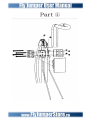
1
FLY JUMPER JUMPING STILTS
OFFICIAL USER MANUAL
Adult M Series
Kids F Series
WARNING
It is the responsibility of users, purchasers and supervisors to read and understand this user
manual fully and completely before ever using, or allowing the use of, Fly Jumper jumping stilts.
Failure to use Fly Jumpers according to this user manual and the instructions within will increase
the risk of serious injuries. Do not allow anyone else to use your Fly Jumpers if they do not meet
the weight and age requirements and have not also read and understood this user manual.
SPECIAL ATTENTION PARENTS
Children should not use jumping stilts without proper adult supervision.
There must be an adult supervising while children learn to use Fly Jumpers and the adult should
make sure that the child is seated at the proper height when putting on their Fly Jumpers. The
adult must assist the child while they learn to keep their balance and move around.
WARNING
All users must read and understand all of the
materials in this manual before using this product
Jumping stilts are considered to be a rebounding device that allows users to jump as
high as seven feet high, run as fast as 40 kilometers per hour fast and perform an
endless amount of other tricks in many different places. Safe use of jumping stilts
requires adequate knowledge of technique, as well as what not to do. Suitable
training is essential before using jumping stilts and all users should wear proper
safety gear at all times, including but not limited to, a helmet, wrist, elbow and knee
pads. Prior to anyone using Fly Jumper jumping stilts, they MUST read and
understand the manual provided with every set of jumping stilts in which it illustrates
and advises the ways in which jumping stilts function. If this manual ever becomes
lost or missing please contact Fly Jumper Canada to have another one mailed to you
free of charge. If any warning labels or stickers become unreadable or missing please
contact Fly Jumper Canada directly for free replacements.
This manual is packed with essential safety information that will make your Fly
Jumping experience a lot easier, safer and ultimately a whole lot of fun. The
instruction manual also contains warnings and caution instructions on playing and
handling this product and these instructions should always be followed to prevent you
or others from any injury. Please read the entire user manual thoroughly before using
your Fly Jumpers and follow the instructions contained therein. After reading this user
manual, be sure to keep it nearby or in a safe place where it can be easily accessed
for future reference by you, the purchaser or anyone else who is interested in using
Fly Jumper jumping stilts.
Misuse and abuse of Fly Jumper jumping stilts is dangerous, and can cause serious
injuries as well as fatalities. Learning to use jumping stilts and any and all safety
measures are the sole responsibility of the users, their parents and or guardians
themselves and the user personally assumes all risks and responsibilities for any
damages, injuries or deaths taking place following the use or misuse of Fly Jumper
jumping stilts in whichever way including damages to property and third party claims.
Fly Jumper Canada Limited is not liable for any accidents, injuries or fatalities relating
to the use of these products. The purchaser/user of this piece of equipment is
assuming a degree of risk for which Fly Jumper Canada Limited cannot be held
responsible.
Fly Jumper jumping stilts are designed according to different levels of weight to
accommodate each user’s unique body weight. Users should only use Fly Jumpers
that were designed to resist their body weight. Recommended weight limitations are
displayed on all boxes and are displayed on the bottoms of all springs. Springs range
in a variety of different sizes and compensate for adult users weighing from 65 Lbs
up to 260 Lbs. Persons at, or near the maximum weight threshold of a particular size
of spring should choose a spring with more resiliency for extensive or extreme use.
Always test the springs for resilience by jumping very lightly. If the resiliency appears
to be weak (springs do not lift the individual when light jumps are made), discontinue
use immediately, take off the stilts and inspect them. If the springs appear to be
damaged or out of shape, the jumping stilts should not be used until the springs have
been replaced. Be sure to check the entire stilts for any other areas that may need
repair as not all problems arise from the springs.
Fly Jumper jumping stilts are designed exclusively for recreational use only. Many
users of our jumping stilts are children, and therefore require close supervision and
rules to follow while playing on Fly Jumper jumping stilts. These rules must be
enforced by whoever is responsible for the care of the child or children. It is strongly
recommended that the buyer of this product go over the rules and recommendations
included in the packet of information supplied with every set of Fly Jumper jumping
stilts, including all of the material in this manual. It is also strongly recommended that
these rules and recommendations be supplemented with those of your own, for
example: the time that jumping is allowed, who users the jumping stilts, and so on.
These rules and recommendations should be reviewed with anyone who is going to
use Fly Jumper jumping stilts. Please read all of the safety and warning messages in
all sections of this manual for more information.
We also urge you to not allow access to these jumping stilts to any children during
times when they may be used without proper adult supervision. This precaution helps
to prevent access to the jumping stilts by children or individuals who are too small or
do not have the training, experience or physical strength necessary to jump on
jumping stilts without having the proper supervision.
Congratulations on purchasing you very own pair of Fly Jumper jumping stilts.
These jumping stilts have been engineered with safety, durability and
performance in mind and we sincerely believe that our products provide
great quality at an unbelievable value.
Box Contents:
One set of Fly Jumper Jumping Stilts
Safety and Instruction Manual
Warranty Registration
Hex key tool for height adjustments
Please remember to mail in your Warranty Registration Card within 10 days
of your original purchase date. This is the only way in which your warranty
will be valid and ensures that you receive any and all product benefits.
This symbol identifies
sections in this manual that
include important health
and safety messages.
This symbol identifies
sections in this manual that
include important health and
safety messages specifically
pertaining to child use of this
product.
TABLE OF CONTENTS
Chapter 1
Introduction
Welcome and Congratulations!
Product Introduction
Product Description
Product Benefits
Chapter 2
Care and Maintenance Instructions
Product Maintenance
Product Modifications
Product Repairs and Parts
Chapter 3
Important Safety Information and
Warnings
Important Safety Warnings
Special Attention Kids and Parents
Chapter 4
Product Use Instructions
Before You Get Started
Safety and Inspection
Choosing a Location
Size Matters
Adjusting Your Fly Jumpers
Putting On Your Fly Jumpers
First Time Use
Warm Up
Standing Up
First Steps
Basic Skills
Jumping
1
Running
Stopping
Getting Up After a Fall
Advanced Skills and Tricks
Chapter 5
Product Warranty
Warranty Information
Product Registration
Submitting a Warranty Claim
Customer Support
Chapter 6
Product Specifications and Diagrams
Specifications
Diagrams
Chapter 7
Appendix
Customer Support
Glossary of Terms
Copyright Notice
IIN
N
ON
TIIO
CT
UC
DU
OD
RO
TR
NT
W
WE
EL
LC
CO
OM
ME
EA
AN
ND
D
C
CO
ON
NG
GR
RA
AT
TU
UL
LA
AT
TIIO
ON
NS
S!!
Congratulations on the purchase of your new Fly Jumper jumping
stilts. We are very confident that you will enjoy your Fly Jumpers for a
very long time and we would like to take this opportunity to sincerely
welcome you to the all new and exciting sport of Powerbocking!
YYoouu aarree nnoow
w rreeaaddyy ttoo eexxppeerriieennccee tthhee
aaw
weerrbboocckkiinngg!!
woorrlldd ooff PPoow
ww
mee nneew
weessoom
Become a member of the Fly Jumper
community online at
www.FlyJumperForum.ca
The forum is the best place to learn
more about powerbocking and will
really help you progress on your Fly
Jumpers.
The forum allows you to:
-
Find other Fly Jumpers in your area!
Receive helpful information on learning your Fly Jumpers!
Share your progress with other bockers all over the world!
Share videos and pictures with Fly Jumper Community!
Share all kinds of new tips and tricks!
Socialize with Fly Jumper friends and enthusiasts!
-
Help yourself and the sport of Powerbocking progress and
develop!
Participate in cool promotions and competitions!
Be first to hear about Fly Jumper events in your area!
It is absolutely free and really easy to join. It only takes 2 minutes and
all you need is a valid email address join.
D
miissss oouutt oonn aallll tthhee ffuunn!!
Doonn’’tt m
J
m!!
Jooiinn tthhee ffoorruum
www.FlyJumperForum.ca
P
PR
RO
OD
DU
UC
CT
T IIN
NT
TR
RO
OD
DU
UC
CT
TIIO
ON
N
Fly Jumpers are the future of entertainment amongst thrill seekers all
over the world. The ability to jump 6 to 7 feet high in the air and run
with incredible speed while leaping and bouncing is a sight never seen
before in the whole world. This product is so fun and so special that it
has developed into an all new extreme sport called Powerbocking.
People all over the world are taking advantage of Fly Jumpers’ ability
to promote an extremely fun and healthy lifestyle. Especially, for kids,
it can be helpful in speeding up the growing process without adding
stress to the joints. You will enjoy incredible heights and speed with
your new Fly Jumpers.
Fly Jumping is an extreme alternative to recreation and exercise that
cultivates a brand new adventurous spirit in young people. Fly Jumpers
create an incredible experience through this exciting sport that has
never been seen before in the sports entertainment world. This is truly
a revolution in sports, a large discovery and a great contribution to the
world.
Fly Jumper jumping stilts are designed according to different body
weights. Beginners should choose the model (spring size) suitable for
their weight range and begin by walking, hopping and jogging. Once
users have developed their skills on Fly Jumpers they may choose to
use springs for the next weight range up to perform some more
difficult movements. Never choose a model designed for people who
weigh less than you. This can cause you to get injured and the product
may fail. For your safety, please remember all the rules of usage in this
manual and keep the product in a good condition.
Where Can You Find Out More?
Many more resources can be found on the Fly Jumper Community
forum at www.FlyJumperForum.ca where you can meet others, share
videos, chat, see pictures, get tips & much more!
P
PR
RO
OD
DU
UC
CT
TD
DE
ES
SC
CR
RIIP
PT
TIIO
ON
N
In general, Fly Jumpers are consisted of a fiberglass or carbon fiber
spring, an aluminum frame, a footplate with bindings, and a knee
support bar. When users compress the springs, the pressure of the
user’s weight creates gravitational energy which is then harnessed by
the springs momentarily. The springs will then release the energy,
providing the user with the ability to jump to incredible heights and
run extremely fast. Fly Jumpers successfully combine good
appearance, protection and an extended product life cycle together
with affordability and price. The quality and amount of technology put
into Fly Jumpers is comparable to other brands of jumping stilts which
can cost over $2500.00 CAD!
Fly Jumper jumping stilts are designed according to different levels of
weight to accommodate each user’s personal body weight. Users
should only use Fly Jumpers that were designed to resist their body
weight. Using Fly Jumpers that are not built for your weight range will
increase the risk of spring failure, injuries and will also weaken the
spring’s resistance. Do not let anyone too heavy for your Fly Jumpers
use your stilts as this will weaken your springs, void their warranty and
increase the risk of serious injury.
General Parts
1.
2.
3.
4.
5.
Knee Support Bar or Calf Cuffs
Aluminum Frames
Springs
Bindings
Interchangeable Rubber Feet
JUNIOR FLY JUMPERS
ADULT FLY JUMPERS
Please refer to the diagrams at the back of this manual for additional
information on all the parts and structure of your Fly Jumpers.
1. Knee Support Bar or Calf Cuffs
It is easy for players to conveniently regulate
the knee bar’s height for their specific needs.
It is suggested that the knee bar should be
4CM down from the bottom of the user’s
knee cap.
2. Aluminum Frame
The frames on Fly Jumper are designed completely out of aircraft
grade aluminum, which is a very strong and very light material that
provides ease of use and adds additional elegance. The exact same
material is used on the tank of the American Shuttle Discovery 2195.
This material is super high strength aluminum lithium which features
high specific strength, high specific modulus, high fracture toughness,
high fatigue value and high corrosion resistance. Tough and high
strength aluminum lithium not only ensures that the product is safe
and steady, but also gives off an appearance and feeling of modern
technology.
3. Springs
The springs are the core part of Fly Jumpers and are made from either
fiberglass or synthesized active carbon fiber. The carbon fiber springs
are lightweight and have a high heat resistance. Both types of springs
are very tough and have a high level of elasticity. Only certain models
come with carbon fiber springs on them. You can tell what kind of
springs simply by their color. Carbon fiber springs are black and
fiberglass springs are more yellow and transparent.
4. Bindings
The bindings are made of cold-resistant
plastics, compression resistant materials and
high-density refined sponge. They are not only
easy to wear but are also safe and comfortable.
These straps include adjustment holes making
these straps fully adjustable so that they can fit
anyone’s foot size comfortably.
5. Interchangeable Rubber Feet
It is constructed of high quality PU mixing
rubber which is more abrasion resistant and its
serviceable lifespan is lengthened. It is very
convenient to dismantle and can be replaced
with new rubber soles very easily and
conveniently.
P
PR
RO
OD
DU
UC
CT
TB
BE
EN
NE
EF
FIIT
TS
S
WARNING
Not all exercise is suitable for everyone. To reduce the risk of
injury, consult your doctor before beginning this or any exercise
program and before this device or any other exercise equipment.
The instructions presented herein are in no way intended as a
substitute for medical counseling. If you suffer from heart disease,
high blood pressure or any other disease or condition, consult your
physician before beginning any exercise program. Always stop and
rest if you feel dizzy or short of breath and only use this product as
intended. You absolutely must make sure that you do not have any
medical or health conditions that could affect the safety and
effectiveness of your exercise program. If at any time during your
exercise you are experiencing discomfort or pain, stop the exercise
immediately and consult your physician.
As a piece of sports training equipment, Fly Jumpers can arouse
people’s entire nervous system effectively, allowing users to increase
speed, strengthen explosive force, improve their body’s compatibility
and dramatically improve their flexibility. A report completed by the
International Jumper Sports Association states that: “players who use
Fly Jumpers as training equipment will maintain a better state of
fitness, run faster and jump higher.”
Fly Jumpers have been widely adopted by some sport amateurs in
Europe and other countries. Sports experts also agree that this is an
excellent piece of physical training equipment for any sports that
require people to run faster and jump higher.
Jumping and running with Fly Jumpers is one of the most effective
total body exercises around and is extremely beneficial to the arms,
waist, hips, back, shoulders and legs. Fly Jumpers also activate a lot of
the tiny muscles or deep muscles that do not get exercised very much.
These muscles are considered to be the “links” to all major muscle
groups in the body and it is normally very difficult to target these
muscles. Use of Fly Jumper jumping stilts will ultimately give you
strength you would never expect because you are only as strong as
your weakest link.
In addition being an effective full body workout for all muscle groups,
Fly Jumpers are also one of the best cardiovascular workouts on the
planet. General use of Fly Jumpers will burn twice as many calories as
normal running, and they also eliminate the impact on your knees and
joints that regular running is notorious for. Studies show that Fly
Jumping for 10 to 15 minutes consumes even more calories than
running on solid ground for a half hour! This means that Fly Jumpers
not only provide one of the most effective workouts in the world, it
does it in far less time while also minimizing the impact on the user’s
knees and other joints. So Fly Jumpers provide over a 50% reduction in
someone’s exercise time and they do not even need to go to a gym.
You can now choose to exercise where ever you like as long as there is
some ground that is hard, dry, clean and free from obstacles.
Jumping and running with Fly Jumpers will regulate your endocrine
systems, burn an enormous amount of calories and will also
strengthen and increase your body’s natural metabolism, allowing
your body to utilize many more calories for energy on a daily basis.
This ultimately assists people in losing weight at accelerated speeds
without the use of any medication or unhealthy commercial
supplements! Use of Fly Jumpers also increases HDL-C (High Density
Lipoprotein Cholesterol) and reduces THR (Total Cholesterol & High
Density Lipoprotein Cholesterol Rate). By mixing Fly Jumpers with a
healthy diet and lifestyle and you will supercharge yourself into an
athletic machine, making you look and feel absolutely wonderful and
full of energy! There’s no denying the fact that Fly Jumping half an
hour every day could easily lose you 5kg of fat a month.
It’s not over yet. Fly Jumpers are also one of the best pieces of
equipment in existence to improve people’s flexibility, balance and
coordination. Many medical institutes across the globe verify that
jumping and running can improve the elasticity of muscle fiber, while
improving the human body’s balance and coordination. Use of our
products exercises the body’s entire nervous system, including the
central nervous system, by increasing motor neuron recruitment. This
will dramatically improve people’s balance, reflexes and coordination
allowing them to react to situations and movements more efficiently,
much quicker and ultimately much more effectively.
Did we mention “stress relief” yet? Fly Jumper related sports and
activities relieves all stress. Normally, to fight stress, you would require
a lot of time consuming training. These days are now gone and the
stress reducing effect of Fly Jumpers begins after only 5 minutes! You
will be enthusiastic and relaxed in no time! Soon your mind will
became clear again and you will have the free capacity you require for
the essential aspects of your life. Exercising with Fly Jumpers regulates
the secretion or cortisol and norepinephrine (the main stress
hormones in the body) into the body. However please be advised that
you should never exercise too much, because too much exercise will
produce more stress. When you use your Fly Jumpers you should relax
when you do your open air leaps and vary the intensity as you like.
Special Health Benefits for Kids!
Fly Jumpers are especially beneficial for kids and teenage users.
Using Fly Jumpers at a young age will help them develop the
physique of a sportsman at an early age, while at the same time
preventing joint problems common in other forms of exercise
during the physical developmental stages. Fly Jumpers have the
unique ability to improve the metabolisms of children while
accelerating the circulation of blood, stimulating the secretion of
growth hormone, and provides benign stimulation to the growth
and development of bones and the skeletal system. During a
child’s growing development period, Fly Jumpers can help them
to become taller without damaging their bones or joints. The
amount and type of exercise people perform as they are children
have a direct impact on the growth of bones, their future height
and their state of health to a large extent. So exercising with Fly
Jumpers during one’s childhood can help aid in the development
of a strong, tall and healthy body!
C
E
CE
NC
AN
NA
EN
TE
NT
AIIN
MA
DM
ND
AN
EA
RE
AR
CA
IIN
S
NS
ON
TIIO
CT
UC
RU
TR
ST
NS
P
PR
RO
OD
DU
UC
CT
TM
MA
AIIN
NT
TE
EN
NA
AN
NC
CE
E
Proper maintenance and care of your Fly Jumpers is essential to
prolonging their life. Fly Jumpers are a high-quality product strictly
designed to be lightweight. To avoid injuries, it is necessary to always
keep the equipment in good condition. All jumping stilts require
maintenance at some point. Springs nay need to be replaced, frames
may become warped or bent, bearings may need lubrication, rubber
feet will need changing etc. Care and maintenance should always be
utilized.
You should do everything you can to protect your springs and always
clean you stilts with a dry cloth. It is also important that you do not use
any sharp edges to scrap dirt off which can damage the spring’s
surface. Please feel free to wrap your springs with protective tape from
time to time to prolong their lifetime. It is also a good idea for all
moving parts such as joints and bearings to be lubricated from time to
time to reduce friction.
Tape can always be removed in the future and re-applied or you can
always just wrap new tape over the old tape. The more tape there is
the more protection you will have. There are virtually endless
possibilities for taping designs as users have managed to come up with
all sorts of unique designs with different colors of tape. Some of you
will choose to create your own color full designs and others may
choose to just go with a standard black tape to make things easier.
Either way, tape is an excellent way to prolong the life of your springs
and it is recommended that all users protect their springs, especially
beginners as your first few hours are when your springs are most likely
to get damaged due to lack of control. It would be wise to tape your
springs before you even use your Fly Jumpers.
Do not store your Fly Jumpers outdoors where they are always
exposed to changes in weather and temperature for long periods of
time. This will cause negative effects on all parts including the
formation of rust and drying of the bearings. Cleaning and maintaining
your Fly Jumpers is essential in preventing injuries. Keeping your Fly
Jumpers in excellent condition will not only ensure that they last
longer it will also ensure that they are safe to use.
FFoorr m
moorree iinnffoorrm
maattiioonn oonn pprrooppeerr m
maaiinntteennaannccee aanndd
pprrootteeccttiioonn iinncclluuddiinngg eexxaam
mpplleess,, vviiddeeooss,, pphhoottooss,, ttiippss aanndd
pprroodduuccttss pplleeaassee vviissiitt w
ww
ww
w..FFllyyJ
Juum
mppeerrFFoorruum
m..ccaa
P
PR
RO
OD
DU
UC
CT
TM
MO
OD
DIIF
FIIC
CA
AT
TIIO
ON
NS
S
There are many different things that users can do to customize their
Fly Jumpers however customizations that require any form of
disassembly will ultimately void the warranty on your Fly Jumpers.
There is only one customization that is recommended and will not void
your warranty. These are any customizations that we classify as
“spring protection customizations” and do not require any form of
disassembling of your Fly Jumpers. Examples of acceptable spring
protection customizations can be but not limited to custom fitted
protectors or layers of protective tape like PVC tape, Duct tape,
Hockey tape, etc. Your custom spring protection must not require
disassembly or interfere with the functions or parts of your Fly
Jumpers.
T
Too ffiinndd m
moorree iinnffoorrm
maattiioonn oonn sspprriinngg pprrootteeccttiioonn iinncclluuddiinngg
eexxaam
mpplleess,, pphhoottooss,, ttiippss aanndd pprroodduuccttss pplleeaassee vviissiitt
w
ww
ww
w..FFllyyJ
Juum
mppeerrFFoorruum
m..ccaa
P
PR
RO
OD
DU
UC
CT
TR
RE
EP
PA
AIIR
RS
S // P
PA
AR
RT
TS
S
In the event of an accident do not attempt to repair or disassemble Fly
Jumpers without professional assistance. If the performance of the
product has changed due to a fall or accident it is recommended that
you contact your nearest service center or distributor for repair. Any
and all damage or malfunctions must be repaired before your Fly
Jumpers are used again. If any warning labels or stickers become
unreadable or missing please contact Fly Jumper Canada directly for
free replacements. Any and all repairs should only be carried out by
an authorized Fly Jumper dealer or service center. Repairs done on
these products by anyone other than a Fly Jumper dealer,
representative, service center or distributor will void any and all
warranties and will avoid any liability on this product.
T
Too ffiinndd aa llooccaall sseerrvviiccee cceenntteerr pplleeaassee vviissiitt
w
ww
ww
w..FFllyyJ
Juum
mppeerr..ccaa oorr ccaallll 11--888888--FFLLYY--J
JU
UM
MPP
IIM
Y
TY
ET
FE
AF
SA
TS
NT
AN
TA
RT
OR
PO
MP
IIN
NG
NIIN
RN
AR
WA
&W
N&
ON
TIIO
AT
MA
RM
OR
FO
NF
S
GS
Fly Jumping or Powerbocking is a very fun activity and an awesome
new sport. However, you must understand that misusing Fly Jumper
jumping stilts can also be very dangerous and it is mandatory that you
take sufficient time to familiarize yourself with Fly Jumper jumping
stilts and how they work. It is absolutely mandatory that you and
anyone else who uses these Fly Jumpers read this instruction manual
and the warnings bellow before attempting to use Fly Jumper jumping
stilts.
IMPORTANT SAFETY WARNINGS
It is the responsibility of the purchaser to become familiar with the
information in this booklet, to convey all the warnings to all users,
and to enforce Fly Jumper Canada’s rules for safe use.
another manufacturer or brand of jumping stilts.
DO NOT use Fly Jumpers without the proper use of protective
equipment. We recommend that users wear as much protection as
possible, including but not limited to, a helmet, gloves, wrist
supports/protectors, elbow pads, kneepads, and any other forms
of protection.
DO NOT carry anything large or heavy in your hands while
wearing Fly Jumpers.
DO NOT attempt any tricks or movements that are beyond
your skill level. Fly Jumpers can be very dangerous if they are not
used within the capability of the user and the boundaries outlined
in this manual. Learn basic and fundamental movements before
trying more advanced skills.
DO NOT attempt to jump high at first. Keep your height low in
the beginning and focus on learning proper bounce control and
landing. Control is more important than height.
DO NOT run or bounce on Fly Jumpers when you are tired or
out of breath. Keep your intervals short and allow sufficient
recovery before you begin another interval. Always end an interval
moments before your body becomes tired or exhausted.
DO NOT use Fly Jumper jumping stilts on or near any of the
prohibited areas outlined in this manual.
DO NOT use Fly Jumper jumping stilts on or in areas of
extreme weather conditions including gusts or severe winds.
DO NOT attempt to jump freely until you have had enough
practicing this with help or support.
DO NOT attempt to jump freely or run until you can walk
freely on your own without losing your balance.
DO NOT use Fly Jumper jumping stilts while under the
influence of drugs or alcohol.
DO NOT use Fly Jumpers without performing sufficient warmup exercises. Warming up by walking or hopping lightly will
stimulate and activate all systems of your body to prepare for
intense exercise. This will improve coordination, performance and
reduce injury.
DO NOT scrap off dirt from any parts of Fly Jumpers. Clean
dirt and dust off of your Fly Jumpers after each use using a dry
cloth to prevent rust.
DO NOT use Fly Jumpers without performing a complete
safety inspection. Perform this safety inspection before and after
every use and check that all screws, connections and straps are
secured firmly and tightly to ensure safety.
DO NOT use Fly Jumpers freely by yourself the first time.
Either find someone who can assist you or find a sturdy obstacle
that you can hold onto for balance and support.
DO NOT use Fly Jumpers if you have any sort of fracture,
bruise, abnormal body conditions or any other physical or mental
medical conditions which limits your athletic ability and that may
interfere with your ability to use Fly Jumpers. Consult your doctor if
you are unsure as you want to be safe and not sorry!
DO NOT let anyone too heavy for your Fly Jumpers use your
stilts as this will weaken your springs, void their warranty and
increase the risk of serious injury.
DO NOT attempt or allow somersaults. Landing on your head
or neck can cause serious injuries, paralysis or even death. These
methods are performed by advanced users who assume all risks.
DO NOT use or allow anyone else to use Fly Jumper jumping
stilts that has not read and fully understood this instruction manual
beforehand. The warnings and instructions for safe usage outlined
in this manual are included to promote safe and enjoyable use of
this equipment.
DO NOT attach anything to your Fly Jumpers that is not a
manufacturer approved part or accessory. Applying tape to your
springs is the only exception.
DO NOT allow children to use this device without proper adult
supervision.
DO NOT children below the age of 6 years old use this device
at any time.
DO NOT leave or store your Fly Jumpers in areas where others
have access to them and are able to use them without reading and
understanding this user manual.
SPECIAL ATTENTION PARENTS
It is mandatory that children learn to use Fly Jumper
jumping stilts with proper adult supervision.
There must be an adult supervising while children learn to use Fly
Jumpers and the adult should make sure that the child is seated at
the proper height when putting on their Fly Jumpers. The adult
must assist the child while they learn to keep their balance and
move around.
Adults will need to help with the initial stand up by holding onto
the child’s hands or forearms with both hands and not let go until
the child is fully capable of moving on their own. Adults need to
make sure that the child finds his/her equilibrium point while
stepping. He/she must also make sure that the child keeps moving
slightly in Fly Jumpers or he/she will not be able to keep their
balance by themselves.
Once the child is ready to learn how to walk on their own the adult
may let go of one arm at a time and will need to stay very close in
case the child looses his/her balance. The adult must also ensure
that the child is learning to move by stepping very slowly.
Children should never use Fly Jumpers by themselves for any
amount of time without an adult to assist them.
P
S
E IIN
NS
SE
ON
US
TIIO
TU
CT
CT
UC
UC
RU
DU
TR
OD
ST
RO
NS
PR
Always use your Fly Jumpers in the correct manner outlined in this
instruction manual and always, always, always carry out safety checks
before, during and after each and every single time you use your Fly
Jumpers. This literally only takes one minute to do and is absolutely
mandatory.
B
BE
EF
FO
OR
RE
EY
YO
OU
UG
GE
ET
TS
ST
TA
AR
RT
TE
ED
D
Before You Get Started
It is necessary that anyone who uses Fly Jumpers understand how
these jumping stilts work and how to properly prepare yourself and
your Fly Jumpers for use. We have outlined the following guidelines
which must be followed before you get started on your Fly Jumpers.
Safety and Inspection
Choosing a Location
Size Matters
Adjusting your Fly Jumpers
Putting on your Fly Jumpers
Safety and Inspection
Safe/Comfortable Use
We recommend that all users wear full protective gear, including but
not limited to wrist guards, elbow pads, knee pads and a helmet.
Understand that no protective gear can fully protect you in every
situation. Inline skating is an inherently dangerous activity which can
result in serious debilitating injuries or even death. You, the user, are
the only one who can reduce these inherent risks by always wearing
full protective gear and, more importantly, maintain control at all
times.
Wear a helmet and don’t even think about using Fly Jumpers without
one. The helmet should fit snugly and if you can easily twist or push it
out of position, the straps are too loose. It should sit squarely atop
your head (versus tilted back) to protect your forehead in case of a fall
forward. Choose a helmet that has been approved by a certified body
and make sure you adjust it correctly.
It is advised that all users wear comfortable clothes and standard
athletic running shoes. We recommend that users wear running shoes
with a flat sole and a good rubber base and make sure that they are
tied tightly and securely. Shoes with little support, raised heels or
awkward shapes should not be worn when using Fly Jumpers. The use
of a helmet, wrist pads and knee and elbow pads is absolutely
mandatory before you attempt to use your Fly Jumper jumping stilts. A
good range of safety gear can be purchased at
www.FlyJumperStore.ca or at your local department store.
Inspect your Fly Jumpers for safety
Fly Jumper jumping stilts are considered a “high-force” transportation
device which means that they will require constant tightening of all
bolts and nuts. It is absolutely mandatory that any and all users of our
products carry out a full safety after each time they use Fly Jumpers.
This safety check should be done before and after each and every
session and it only takes 1 minute to do this. All you have to do is
check all the nut, bolts, and screws and check for any damage to your
springs.
1. Check that all nuts and bolts are tightly fastened especially the
bolts on the plastic collar and all screws securing the foot-straps,
including the ones securing the ratchets. These bolts have a
tendency to loosen up quicker than all the other bolts because
they receive the majority of vibrations while in use. It is vital to
make sure all the nuts and bolts are secure.
2. Also check that the spring has not suffered any damage. During
the first few hours of use it is common for beginners to really bang
up their springs. Springs are composed of fibers which are very
sensitive to scratches and scraps. Tears in the fibers can cause
certain fibers to begin to shred which can weaken the spring. It is
highly recommended that users wrap their springs with a very
strong form of tape. PVC and heavy duty duct tapes are common
types of tapes used to protect your springs. Whenever there is a
tear in the original protective cover, you should wrap this spot
tightly with tape to protect it once again.
3. Check that the rubber feet on your Fly Jumpers are not worn out
and remove anything from them which could cause loss of
traction. If there is any metal, screws or bolts visible through the
rubber then you must replace your rubber feet with new ones
before you use your Fly Jumper jumping stilts again.
4. Check that the frames on your Fly Jumpers are not warped, bent
or corroded in any way. If there is any sign that your frames are
not in proper operating condition contact Fly Jumper Canada and
do not use your Fly Jumpers until the problem has been corrected.
5. Check that there are no broken, cracked or chipped parts or
components. If any of the plastic parts have been cracked or
compromised you must have these parts replaced before you
jumping stilts can be used again.
If any of the above conditions exist, your Fly Jumper jumping stilts
must not be used and must kept away from anyone who wishes to use
them until the condition is remedied.
CAUTION
(1) Wear comfortable clothes, sneakers and all protective
accessories are absolutely mandatory while using Fly Jumpers, such
as gloves, wrist protectors, elbow pads, kneepads, a helmet and
various other forms of protective equipment.
(2) Always perform a light 10 minute warm up before Fly Jumping
vigorously.
(3) Always perform safety inspections before and after every
session. Check that all the screws and bolts are tightened firmly
and check that your springs have not suffered any damage.
(4) Sit at a comfortable height when putting on your Fly Jumpers
and be sure strap in tightly.
(5) Fasten straps and bindings and make sure your feet are in the
correct position.
(6) Hold onto something or depend on another person’s help to
stand up for the first time.
(7) Learn by stepping first and do not attempt to jump or run until
you have enough practice of walking in balance. Walk step by step
and practice steadily. A beginner should not jump up randomly.
(8) Enjoy your Fly Jumpers for the right durations based on your
physical state or exercise experience. Adjust your exercise time
accordingly and do not over do it. Fly Jumpers are extremely
aerobic and too much exercise can cause stress too.
Notice: There should be another person’s assistance when using
this product for the first time.
Choosing a Location
Fly Jumpers are only to be used on a flat, dry and hard surface where
there is plenty of open space. For your own safety and the safety of
others, do not use Fly Jumper jumping stilts in any busy areas and
users should be courteous to others at all times. Review the prohibited
areas bellow and abide by these rules at all times.
Never Fly Jump without making sure that the surface is safe, solid, flat,
clean, well lit, and dry. The best surface outdoors is standard concrete.
Choose areas that are free of hazards and give you plenty of room to
maneuver (you’ll need several meters of clear surface on all sides).
Fly Jumper jumping stilts are designed for year-round outdoor use.
However, in climates of cold weather where snow and ice are common
it is recommended that users find an area of open space that is dry
and clear of ice, snow, salt, dirt and any other forms of loose debris.
PPlleeaassee sseeee w
ww
ww
w..FFllyyJ
Juum
mppeerrFFoorruum
m..ccaa ffoorr m
moorree ttiippss oonn
ssaaffee uussaaggee.. S
Seerriioouuss iinnjjuurryy ccoouulldd bbee ccaauusseedd iiff tthhee aabboovvee
gguuiiddeelliinneess aarree nnoott ffoolllloow
weedd..
PROHIBITED PLACES TO PLAY
The user, owner and supervisors of these Fly Jumper jumping stilts
are responsible to make all users aware of the prohibited locations
Roads: Using Fly Jumpers near roads, streets or paths is not advisable,
especially those which are busy or congested.
Soft grounds: Do not use Fly Jumpers on or near surfaces such as grass or
mud and other soft surfaces such as padded or carpeted areas. Soft
grounds can cause spring malfunctions do to the fact that soft grounds will
absorb some of the impact while landing just like the springs do. The
result of both the spring and ground trying to absorb this impact can
increase the risk of balance loss which increases the risk injuries.
Slippery Surfaces: Do not play on jumping stilts in places where the
ground is too smooth or slippery such as icy surfaces or grounds with
water and or oil.
Uneven Surfaces: Do not use FLY Jumpers on or near surfaces with uneven
grounds such as places with ditches, pot holes and craters.
Sandy Areas: Do not use Fly Jumpers on or near area with sand, salt, dust,
powder or any other loose debris on the ground.
Obstacles: Avoid using Fly Jumpers on or near any place where there are
moving or stationary obstacles including large debris such as garbage or
boxes.
Slopes and stairs: Jumping is not advisable anywhere near stairways, cliffs
and edges or anywhere near slopes or changes in ground level.
Narrow Alleys: Users require a lot of space to use Fly Jumpers in areas
with limited or narrow space such tunnels, paths or walkways are not
advisable.
Rooftops: It is very dangerous to use Fly Jumpers on any kind of roof top
or elevated grounds.
Unsupervised Areas: Users should not use, and parents should not allow
use of, Fly Jumper jumping stilts in areas with no other people or
supervision. If a user was ever to fall or get injured he/she should be in an
area where someone could see that they are injured and be able to assist
them.
.
DO NOT Use in Areas With:
Low Overhead Clearance: Adequate overhead clearance is essential. A
minimum of 24 feet from ground level is recommended. Be sure to
provide clearance for wires, tree limbs, and other possible hazards.
Low Lateral Clearance: Lateral clearance is also essential. Use you Fly
Jumpers away from walls, structures, fences, and other play areas.
Little Lighting: Only use Fly Jumpers in well lighted areas. Artificial
illumination may be required for indoor or shaded areas.
Lots of People: Using your Fly Jumpers too close to other people is
dangerous and rude. There is no way to predict how they will react so stay
away. Respect their safety and their space.
Size Matters
Fly Jumper jumping stilts come in different sizes because people come
in different sizes. Making sure that you are using the correct model for
your weight range is very important. Fly Jumper jumping stilts are
designed according to different levels of weight to accommodate each
user’s unique body weight. Users should only use Fly Jumpers that
were designed to resist their body weight.
Recommended weight limitations are displayed on all boxes and are
displayed on the bottoms of all springs. Springs range in a variety of
different sizes and compensate for adult users weighing from 65 Lbs
up to 260 Lbs. Persons at, or near the maximum weight threshold of a
particular size of spring should choose a spring with more resiliency for
extensive or extreme use. Beginners should always choose the correct
size for their weight as this will make the learning experience much
easier and safer. Once users have become more skilled on Fly Jumpers
they may choose to use a spring size that has more resilience or is
made for someone heavier. This will provide the user with a higher
energy return from the springs however it also makes Fly Jumping
much more difficult.
It is very important that you never use Fly Jumper jumping stilts that
you are too heavy for. If you weigh more than the maximum weight
range for that size or model, do not use them. This is very dangerous
as the springs are not designed to withstand more weight than the
recommended range. Doing this will increase the chances of injury
dramatically and the risk of spring failure is very high. Also, never allow
anyone to use your jumping stilts that weighs above the
recommended weight range for your Fly Jumpers. This will lower the
resilience of your springs making them much weaker. This will lower
the spring’s ability to return energy and propel you into the air. This
also increases the chance of spring failure and will void your warranty.
Always test the springs for resilience by jumping very lightly. If the
resiliency appears to be weak (springs do not lift the individual when
light jumps are made), discontinue use immediately, take off the stilts
and inspect them. If the springs appear to be damaged or out of
shape, the jumping stilts should not be used until the springs have
been replaced. Be sure to check the entire stilts for any other areas
that may need repair as not all problems arise from the springs.
S
Spprriinnggss ccaann aallw
waayyss bbee rreeppllaacceedd oorr uuppggrraaddeedd.. PPlleeaassee vviissiitt
w
ww
ww
w..FFllyyJ
Juum
mppeerrS
Sttoorree..ccaa ffoorr aa w
wiiddee sseelleeccttiioonn ooff sspprriinngg
m
mooddeellss aanndd ssiizzeess aavvaaiillaabbllee ffoorr iim
mm
meeddiiaattee oorrddeerr..
Adjusting Your Fly Jumpers
Each user may need to adjust the height of the knee bar or cuffs for
their own height. Some users may also need to adjust the bindings to
rest properly against their feet.
1.) Adjusting the calf-wraps and knee bars
To adjust the height and positioning of knee bar you will need an Allen
key and a 10mm wrench or ratchet. The allen key is provided with
each new set of Fly Jumpers and is included with this manual. This
adjustment is necessary to give users the best stability and ease of use.
Knee bars and calf cuffs should rest approximately 1.5 to 2 inches
below the bottom of your knee cap (or patella bone). The knee
support bar should rest just below the bottom of the Patellar Tendon
(this is the tendon which connects the knee cap to your shin bone) and
on the upper part of the Tibia bone (this is your shin bone). You will be
able slide the bar up and down your shin to find the most comfortable
spot for you, just don’t rest it too low (like 4 or 5 inches below the
bottom of your knee cap) as this will place more pressure on your shin
and less on the actual knee bar. Users who are using the original knee
bar found on most models should also wear knee pads and place them
just underneath the bar to add comfort and padding to your shins.
Traditional volleyball knee pads are an excellent way to add cushioning
under the knee bar.
To adjust the knee bar’s height, slightly loosen the hex screws located
on the sides of the plastic knee bar support collar that has the knee
bar attached.
Loosen the 4 hex key bolts
located on the side of the plastic
collar supporting the knee bar.
You do not need to completely
remove these 4 bolts as just
loosening these hex key bolts will
allow you to be able to slide the
knee bar up and down.
Now that the knee bar is loose you can now slide the bars up or down
the collar to set it in the correct spot for your body. If the collar moves
or shifts while you do this be sure to put it back into place before
tightening the screws.
After you have found the best resting spot for the knee bar you can
tighten the hex key bolts back up. You want to tighten the screws
firmly but not too tight as this can damage both the screws and the
plastic. The best way to tighten the allen key bolts is to tighten one
and then tighten the one diagonally across from it and then do the
same again for the other 2 bolts. This will ensure that all the plastic
parts of the collar connect together correctly and square.
2.) Adjusting the Bindings
Adjusting the bindings is also very easy and only requires a standard
star head screw driver. There are adjustment holes on the sides of all
the binding straps with the ratchets on them. All that you need to do is
remove the screw supporting the binding in the present adjustment
hole. Once you remove this screw you can select the correct hole for
your foot size and then just screw the star head screw and washer into
this adjustment hole. Be sure to make sure that the screw and bolt is
tight again and is firmly securing the binding strap.
Putting o your Fly Jumpers
Before you begin this stage be sure that you are wearing comfortable
clothes and protective equipment as outlined in this manual. Make
sure that you have performed your safety inspection as described
above and have determined that your Fly Jumpers have been properly
adjusted for your body. It is also recommended that you find a high
seat to sit on while you put on your Fly Jumpers. A barstool or higher
side of a picnic table, are two examples of a good spot to sit. Wherever
you choose to sit should be a little higher than normal and secure
enough to provide enough stability.
You may now sit down and begin to put on your Fly Jumpers. Begin by
first sliding your foot through the knee bar or calf cuff and rest your
foot on the footplate. Some people may be able to slide their feet in
without removing their shoes and others may need to remove their
shoes to fit their legs through the knee bar or calf cuffs.
Once you have slide your foot through the knee support check that the
binding straps with the ratchets or buckles attached to them are
located on the inner sides of your feet prior to strapping up. The straps
with the rivets should always be on the outside. If not, then you must
remove the stilt and place it on the other leg. Repeat this step for the
other leg.
Now align your heels properly against the back of the footplate. Your
heels should be centered in the middle of the footplate and should not
be twisted in any other direction. To ensure a proper fit of your heels,
wear shoes that have flat soles and are rounded around the heel and
not squared off.
You may now begin to secure your foot into the footplate by fastening
your foot with the bindings. To secure your foot with the bindings you
will need to slide the strap with all the rivets into the strap across from
it with the ratchets on the end.
The rivet straps slide into the side of the ratchets and can then be
tightened with the ratchets. The ratchets securing your feet should be
tightened to with a comfortable amount of tension.
To release the strap when you are done you will just need to push
down on the button on the ratchet and pull the straps away from each
other.
Now you will only need to fasten your leg securely to the knee bar or
calf cuffs. Knee bars have a strap and a buckle at the top which must
be wrapped and secured against your leg. To do this, make sure that
the strap is completely undone. Then take the strap and wrap it
around your leg to the others side of the knee bar.
On this side of the knee bar there will be a loop for you to feed the
strap through. Insert the strap through the inner side of the loop so
that it comes out through the outer side. Then wrap the strap back
across your leg making sure that the strap is flat and not twisted in any
way. Once you get to the other side where the buckle is you will just
need to insert it into the buckle and tighten it and lock the strap in
place. Do not over tighten this strap as it can stop blood from traveling
to your legs. This can cause numbness and is very dangerous. Please
be sure to tighten the strap so that it is firm and snug against your leg
and not digging into it.
If you are using our innovative calf cuff wraps as your knee support
and not the traditional knee bar you will need to put these on
differently. Calf cuffs require adjustments to secure your knee
properly. The padded section of the calf cuff is attached to two other
pieces of fabric, by use of Velcro, which then connects it securely to
the knee bar. To adjust the calf cuffs for your leg you will need to
remove the padded side from the other two pieces of fabric by tearing
it off. You can then adjust where the padded side sits against and
other two pieces of Velcro and center it where you please. Once you
have found a comfortable spot for the padded section and have
secured it back against the other two pieces of Velcro you can select
which way you prefer to slide your leg into the straps. If the buckle
which the strap is fed through is in the back you will need to take your
shoes off each time you put on the calf cuffs. Doing this will keep the
Velcro part on the front of your shin and the buckle in the back. Ort
you may choose to have the buckle face the front and the Velcro in the
back. Some prefer this way as you can easily slip your legs in through
the front each time without taking off your shoes. The choice is yours.
Warm Up
It is also wise to warm up before any physical activity, especially
before Fly Jumping. Therefore it is highly recommended that you walk
around on your Fly Jumpers for the first few minutes and perform
small hops and stretches for an additional 10 minutes before you
begin jumping or running.
You should always perform some sort of warm-up before a session on
your Fly Jumpers. First time users should not attempt running, jumping
or any extreme movements immediately and should only perform
some warm-up exercises such as walking or running slowly.
A great way to warm-up is by performs little hops and skips. After a 10
minute warm-up users can then play normally on their jumping stilts.
F
FIIR
RS
ST
TT
TIIM
ME
EU
US
SE
E
It is highly recommended that you have somebody to assist you with
your first steps when you use your Fly Jumpers for the first time. If you
are unable to acquire someone else’s assistance during your initial use,
you should then hold onto a wall, fence or pole so that is sturdy
enough to support you as you learn to balance. The initial few minutes
are usually the hardest and having someone to hold onto will prove to
be extremely helpful.
SPECIAL ATTENTION PARENTS
It is mandatory that children learn to use Fly Jumper
jumping stilts with proper adult supervision.
An adult must help children to walk step by step by holing the child
by both hands. The child should walk slowly and softly keeping
his/her feet spaced out a little bit to avoid entanglement. It is
impossible to stand still while wearing Fly Jumpers. A child will have
to move or walk to keep his/her balance unless they hold onto
something sturdy for support. It can be dangerous for a child to use
Fly Jumpers alone at the beginning so it is mandatory that an adult
be present while children learn to use their Fly Jumpers.
Do not be intimidated by the first few minutes on your Fly Jumpers as
this is usually the most difficult part. It will seem very hard at first but
it only takes a few minutes to really overcome the initial scare. The
change in height and balance will throw off anyone who puts these on
for the first time but this only lasts the first few minutes and goes
away really quick. It is like learning how to ride a bicycle for the first
time. It feels really awkward at first but once you learn to ride you
never forget the skill for the rest of your life.
With experience and skill, you’ll be able to react to pretty much any
situation reflexively. However, skills develop slowly so take your time
and learn. As you put in the hours, you will become instinctively aware
of how much traction you have, how high you are going to bounce,
how to correct for balance, and where you’re going to land.
Standing Up:
When standing up for the first time, have your helper assist you by
placing their feet on top of the rubber feet of your Fly Jumpers. With
the helper’s bodyweight placed on the feet of your stilts have them
hold both your hands and help you pull yourself up off your seat and
onto your feet. Once you are on your feet do not let go of your helper.
It is very difficult to stand up for the first time without any assistance
from a friend or obstacle. This is why we repeatedly recommend that
all first time users receive some form of assistance from someone else
to help provide some balance while beginners learn to move around
and balance by themselves.
If you do not have someone to
assist you then you will want to
make sure that your obstacle that
you will be using as support is
sturdy enough to provide
adequate balance and is long
enough to allow you to try
moving around. The more secure
obstacles surrounding you that
you can hold onto the better.
This way there is always
something to hold onto as you
move around.
First Steps:
Walking is actually very easy and is probably the easiest thing you will
learn to do on your Fly Jumpers. Most people learn how to walk in
approximately 20 minutes but it is very common for beginners to learn
how to walk around in as little as one minute!
Once you are standing up on your Fly Jumpers you can begin to walk
around on your own or with the assistance of someone else. If you do
not have someone to help you and you don’t think you can walk on
your own yet, you can learn to walk by holding onto the side of a fence
or wall. Just make sure that whatever you choose to hold onto is
sturdy enough to support your weight. A long stick or pole has also
proven itself to be a great form of support for beginners.
Now that you have set the
proper environment to begin
walking we can go over some
basic tips to make sure you learn
correctly and do not fall. The
most important tips are to
always lift your feet when you
walk and make sure that your
feet are always pointing straight.
Many people are used to
dragging their feet when they
walk normally but this will get
you hurt if you do this on your Fly
Jumpers. Dragging your feet will
cause you to fall forward so it is
essential that you always lift your
feet when you walk.
You will need to also need to make sure that you are not walking with
your feet pointing outwards like a duck. When your toes are pointing
outwards it caused the springs to get too close to one another. This
will cause the springs to get entangle or clip each other causing you to
really lose your balance and fall. So be sure to always lift your Fly
Jumpers clear off the ground when you are walking to avoid tripping
and keep your feet pointing straight.
In addition to these two points you want to always look forward when
you are walking or running. This will enable you to see where you are
going and not just where you are stepping. You should also pay
attention to where you are stepping but pay more attention to where
you are going and what is in your way. Also, try to stay relaxed as you
move, just like when you walk normally, because if you trip while your
body is stiff it will be much more difficult to regain your balance.
You should learn how to do all
these things with assistance from
another person or obstacle. As
you become more confident
walking around with assistance
you may try to let go and try to
move on your own. Just
remember that you cannot stand
in one spot with Fly Jumpers on
as you will lose your balance. You
must always keep moving a little
bit to stay on your feet.
It is very important that first time users first find their equilibrium
point while taking their first steps. You will need to apply pressure to
the springs by placing your bodyweight onto your heels. When you
walk normally you transfer your bodyweight from your heels onto the
balls of your feet. You cannot do this on Fly Jumpers and must keep
your bodyweight on your heels as you move around. The best way to
do this is to mainly contract your glut and hamstring muscles as you
move. The easiest way to describe this is like walking on your heels
with your butt cheeks squeezed together. Do not focus on pointing
your toes up to keep your weight onto your heels. This will only cause
your shine to burn very quickly and you will feel this immediately if
you are doing it incorrectly. Always keep your body straight and throw
your chest out while pulling your shoulders back. Always look forward,
bend your knees a little bit and keep your body’s center of gravity
vertical to the ground.
Once you are able to do all of the above you may begin stepping
continually. Be sure not to bend too much forward or backward.
Beginners should never try jumping or any advanced tricks until they
are confident with the basics of Fly Jumpers and can keep their
balance while walking around.
T
Too sseeee ppiiccttuurreess,, vviiddeeooss,, ttuuttoorriiaallss aanndd ttoo ggeett ffuurrtthheerr
aaddvviiccee pplleeaassee vviissiitt:: w
ww
ww
w..FFllyyJ
Juum
mppeerrFFoorruum
m..ccaa
B
BA
AS
SIIC
CS
SK
KIIL
LL
LS
S
Jumping
It is absolutely mandatory that users wear protective equipment when
learning how to jump for the first time. Practice jumping holding onto
something like a secure pole or fence for leverage just to get used to
compressing the springs. Always keep your knees bent a little and be
ready to jump. Keep your body straight and look forward. Be sure not
to bend too forward or backward and use your arms to help keep your
balance. Do not try to jump high at first but after some practice you
may gradually utilize the spring’s elasticity to jump higher.
The most important basic skill in Fly Jumping is controlling the height
and landing of your bounce. The basic jump should always be low and
high and reckless bouncing should never be allowed. There are two
basic ways to jump with your Fly Jumpers. You can jump with both legs
at the same time or you can jump with one leg at a time. The most
power comes from jumping with both legs at the same time. This
produces the most amount of energy and allows for jumps several feet
high.
To learn how to jump with one foot at a time you should begin by
trying this while holding onto a secure object. The first few times you
attempt to compress the springs will feel very awkward and having
something to hold onto will prove to be very helpful. Begin by holding
onto something and practice hopping on one keg at a time. Continue
to do this until you can begin to feel yourself really compressing the
spring. Remember to always focus on landing with your heels and let
the spring do all the work. The trick is to use your glut and hamstring
muscles to press the spring down as much as you can each time you
land. The harder you land onto the spring the less energy you will need
to compress them. Once you have gotten the hang of doing this while
holding onto something you can then begin to learn how to do this
with no support. It is important that you know how to compress the
spring before you attempt this freely.
Learning how to jump with both
legs at a time requires a lot more
balancing which makes this jump
style more difficult. You will need to
use more energy to compress the
springs this way because of the
added resistance of compressing
two springs at the same time.
However, this is the king of all
jumps, providing users with the
ability to jump several feet high.
You will also want to first learn how to do this by holding onto
something for support. Find yourself a sturdy pole or fence and begin
to learn how to jump with both legs at the same time. The trick to
learning this style of jump is to always keep your feet really close
together and not spread apart. This ensures that both feet will touch
the ground at the exact same time without throwing you off balance.
Also remember to focus on landing with your heels and contract
primarily from your glue and hamstring muscles.
Start by holding onto your support and start pressing down onto the
springs with both heels at the same time. You may need to just
perform one little jump naturally without the springs assistance just to
get some momentum. You should soon begin to realize that the harder
to smash down on the springs with your heels when you land, the
higher you can go and the easier it is to compress the springs the next
time you land. Once you get the hand of this holding onto something
for support you can try to learn this without holding onto anything.
Remember to wear all of your protective gear when attempting this as
most beginners fall when they first try this method.
Just try to get a few single jumps in just to find your balance. Once you
can do a few single jumps without losing balance you can try to
perform several jumps in a row. Arms are also very important for
proper control and lift. Whenever you go up, you arms should go up as
well. Your arms should be kept extended and go up to about shoulder
height. They should remain in this balanced position until you start to
go down. Then they should fall down slightly behind the hips and
ready to lift up again as you bounce up.
It should only feel difficult the first few times you try this so don’t be
discouraged. It is really easy once you get it. Once you figure this out
you will be on your way to feeling one of the most unique forms of
excitement on earth.
BBeeccoom
mee aa m
meem
mbbeerr ooff tthhee FFllyy J
Juum
mppeerr ccoom
mm
muunniittyy aatt
w
ww
ww
w..FFllyyJ
Juum
mppeerrFFoorruum
m..ccaa ffoorr m
moorree aaddvvaanncceedd ttuuttoorriiaallss..
Running
Learning how to run in Fly Jumpers is a bit harder than my might
expect. Most people think that jumping will be harder to learn but it is
running that requires the most coordination. The best and easiest way
to learn how to run is to naturally progress into it. If you try to learn
how to run before you have fully mastered how to compress the
springs, you will not learn how to run correctly and you will heighten
the risk of falling and getting hurt. By simply learning how to walk
faster, compressing the springs with one leg at a time and slowly
graduating to a slow jog, you will then be able to ease gently into
running without much trouble.
Learning to run requires users to
keep their body straight and use
multi-limb coordination to keep
their balance. It is very
important that you keep your
body straight and coordinate
your arms and feet to keep your
balance. Be sure to keep plumb
when landing and do not
perform any irregular
movements.
The secret to increasing the length of your strides is to relax your legs
as you run and let the springs do the work. Always remember that the
center of gravity on Fly Jumpers is on your heels so you must
concentrate your energy on absorbing all landings on your heels using
primarily glut and hamstring muscles, and not your calves and
quadriceps as you would when you run normally. Don’t forget to keep
your feet pointing straight and remember to always raise your feet off
the ground as you run.
Stopping
This skill is needed to stop immediately
when practicing with Fly Jumper
jumping stilts. Bend your knees while
landing and absorb the landing using
your legs and your abdomen. Keep your
balance by reaching out with your
hands. This skill should be learned right
away and should be employed
whenever you feel out of breath, out of
balance or need to stop for any other
reason. Also, receive assistance if you
ever have to pick up something from the
floor with your stilts on.
Standing Up After a Fall
Please be advised the most common reason for users falling is because
they are tired and out of breathe and are pushing their cardiovascular
systems too much. When your body begins to get tired and out of
breathe you start to lose much of your balance and coordination as a
result. The best advice we can give users to limit the amount of times
they fall is this: Don’t wait until you are exhausted to stop or slow
down. You should always try to begin slowing down and stopping a
few seconds before you feel your body begin to lose its breath. As
soon as you begin to lose your breathe and feel tired your body will
lose coordination tight away.
Normally it is very difficult for a beginner to stand up after a fall
without any help. Therefore you should not try your first steps without
a friend close by. This is one of the most difficult tasks to learn for
most beginners as it requires some flexibility. We suggest that
beginners take off the jumping stilts at the falling place and then find
an appropriate place to put on the jumping stilts again. Once you have
been using Fly Jumpers for a little while you will be much more
capable and should then be able to learn how to get up on your own.
Learning how to get back onto your feet without any help is a very
important thing to learn how to do as there will be many times where
you may need to get back up to your feet without someone else’s
assistance. Until you learn how to do this properly it is recommended
that you have someone help you back to your feet when you fall or
just remove the Fly Jumpers from your feet completely to get back up.
You can then put them back on once you have recovered.
Because this is a difficult skill to learn how to do on your Fly Jumpers it
requires that all users have a good amount of experience with their Fly
Jumpers before attempting to do this. It requires some flexibility which
usually comes naturally with a few hours of using Fly Jumpers.
When you are skilled enough, you can learn to stand up without any
help using the following method.
The easiest and best way to get up on your Fly Jumpers is to use what
is called the Arch style. You will need to begin by just sitting on your
butt with your legs spread out in front of you. If you are out of breath
or feel tired or dizzy it is important that you just take a few seconds to
recover and catch your breath. Once you feel no longer feel out of
breath you can follow the next few steps.
Now you will need to slowly bring your weakest leg behind you
keeping your knee on 6the ground. Then you will need to bring your
strongest leg forward with your knee raised. So you should now have
one knee on the ground and your strongest leg in front ready to push
up. You will now need to place one hand on the knee on your stronger
or pushing leg. Then place your other hand on the ground in front of
you. Once you are in this position you will be ready to try and push
yourself up. You will now need to simultaneously push your height up
with the arm that is on the ground and the one pushing up from your
knee. The initial push will be from your arms providing the initial
momentum and the rest of the push will be from your strongest leg.
So you will be pushing from your arm on the ground, your arm on your
knee and with your strongest leg. Once you push your weight up to a
certain point you will be able to slide your other or weaker leg inwards
to stand on both feet.
This will take quite a few tries
and the first few attempts will
feel hopeless but once you do
learn this you will be very glad
you did. So the next time you hit
the ground you won’t be
screaming “HELP, I’ve fallen and
I can’t get up!
Take off jumping stilts
Choose a seat with the right height to allow you to remove your Fly
Jumpers comfortably. Undue all the straps and then slide you leg out
of the stilts one at a time. Be sure that you calm down and catch your
breath before you jump back to your feet. It is common for your legs
to feel very light for a few moments after you remove your Fly
Jumpers.
A
AD
DV
VA
AN
NC
CE
ED
DS
SK
KIIL
LL
LS
SA
AN
ND
DT
TR
RIIC
CK
KS
S
Tutorial and Pictures done by Swebounce
Remember to always stay within your abilities when attempting any
type of tricks or advanced movements. You need to learn new tricks
gradually by learning slowly and patiently. Just like any other sport out
there, practice makes perfect. The more you practice and teach
yourself the better you will become at Fly Jumping. Here is a list of
cool tricks for advanced users and experts.
Tuck
One of the easier tricks in the
book. Good to learn as your first
trick. On the top of jour jump
bring your knees up. Also bring
your chest forward to meet your
knees. You do this because when
you bring your knees up you
create a rotation, when you
bring your chest forwards you
stop the rotation. When you can
do this just grab hold of you
knees or knee bar. Voila, your
first tuck jump.
Pike
This trick is very similar to the
tuck but far more difficult. First
of all there is a question of
flexibility. The more flexible you
are the better the trick will look.
On the top of your jump bring
your legs forward, keep them
straight. At the same time bring
your chest forward to meet your
legs. Because the legs are
straight they will create much
more rotation than the tuck.
Make sure to bring your chest
far enough forward so that you
don’t end up on your ass.
Star
Spread your legs as far apart as
possible without taking the up in
front of you. Keep your hands
somewhere in between straight
up and to the sides.
Straddle
This trick is something in
between a "star" and a "pike".
Bring your legs up in front of you
like in the "pike". At the same
time split your legs as much as
possible. Remember to bring
your chest so you don’t create a
backwards rotation. The hands
can either touch the toes or put
them as far down as possible.
Most people are more flexible
this way than in the pike or the
star. With a bit of flexibility this
will be one of you nicest position
jumps. Stretch before trying this
trick so that you don’t pull a
muscle on the inside of your
legs.
Giant leap
On the top of your bounce, bring
one foot forward and the other
one backward. Most people are
naturally more flexible on one leg
than the other so make sure you
know what side will look best. If
you bend the back leg you will
look a lot more flexible. It might
be a good idea to stretch a bit
extra before trying this trick.
Back grab
Do the same as you do in the
“Giant leap”. If you have your
right foot forward twist your
body to the right. With your
right hand grab the left spring
behind your back.
The longer you hold it the nicer
the grab.
Back scratcher
Bring your heals up behind you,
twist your body to the right.
Grab your right spring with your
right hand.
If you want to learn it on your
left side you will have to figure
that out on your own.
Double kicker
Bring your heels up behind you
as high as possible. Push your
hips and arch you back. For a bit
of extra style, tip your head
back.
Toe touch
Start as a “Pike” then twist your
body to the right and touch you
toes with your left hand.
OCS
Start as a normal "pike" then
bend your right leg 90 degrees.
Than twist it underneath the
other leg and reach down with
your left hand to grab the right
foot.
O2
Start with crossing your legs,
bend the leg on top 90 degrees
and lift you legs as a "pike". Grab
the strait legs toe with your
opposite hand and you have
done it.
Back flips
If you reckon you can pull off a
back flip then you are already
very confident and we can't give
you too much advice. If you fail a
back- flip with PoweriZers then
you have another half meter to
fall!! The only difference to a
regular backflip is the unsteady
landing and your timing will
have to be spot-on. This is not a
trick we recommend since it's so
dangerous and the risk of
injuries is high. But, if you are
real PoweriZer expert, this is the
ultimate trick!
Tutorial and Pictures done by Swebounce
M
Moorree iinnssttrruuccttiioonnaall vviiddeeooss aanndd w
wrriittee uuppss ccaann bbee ffoouunndd oonn
tthhee FFllyy J
Juum
mppeerr FFoorruum
m aatt w
ww
ww
w..FFllyyJ
Juum
mppeerrFFoorruum
m..ccaa
P
Y
TY
NT
AN
RA
RR
AR
WA
TW
CT
UC
DU
OD
RO
PR
Warranty Information
Fly Jumper Canada Limited warrants all major components excluding
springs and rubber feet to be free from defects in material and
workmanship, under normal use and service, for one year from the
date of purchase. Fly Jumper Canada Limited warrants springs to be
free from defects in material and workmanship, under normal use and
service, for 6 months from date of purchase. Easily damaged parts are
not included in this warranty, such as the spring cover or protector,
binding straps, binding ratchets, rubber feet and sponge.
The obligation of Fly Jumper Canada Limited is limited to the
replacement of defective parts, repair, or exchange of the original
model warranted. This warranty does not cover shipping, handling,
freight charges, duties, or any other charges that are associated with
the repair or replacement of covered components. This warranty is
invalid if purchaser fails to properly operate and/or maintain the
product and this warranty is not transferable to third parties. This
warranty is expressed in lieu of all other warranties and
representations, expressed or implied except as stated above.
This warranty only applies if the Fly Jumpers have been registered,
purchased and used inside Canada, are used for your own recreational
use, and you are the original purchaser and have been sold this
product by an authorized Fly Jumper representative, retailer,
distributor or service center. Please note that proof of purchase is
required for any warranty claim.
There is no warranty for fitness, particular purpose or warranty of
merchantability. Except as otherwise agreed herein, Fly Jumper
Canada is not responsible or liable for indirect, special or
consequential damages, such as but not limited to, economic loss, loss
of revenue or profits, the loss of enjoyment or use of this product, its
cost or its replacement. This warranty does not cover any problem
that is caused by Improper or extreme use, tampering, accident,
abuse, misuse, negligence, commercial or public use, ordinary wear
and tear, weathering, acts of God (such as wind and lightning), failure
to follow directions, improper maintenance or any other causes
unrelated to defective materials or workmanship. This warranty will
become void if the product has ever been given any unauthorized
repairs or modifications. This limited warranty does not cover
deliberate or accidental damage, failure caused by improper assembly,
storage or use. Rust is a natural occurrence with any outdoor metal
product and is likewise not covered by this warranty.
This limited warranty will become void if the product is modified,
rented out, or used by another individual who was too heavy or
individuals who did not read this instruction manual prior to use. This
warranty will also become void if the product is used in any other
manner other than what is illustrated in this manual. Learning to use
Fly Jumper jumping stilts and any safety measures are the sole
responsibility of the user themselves and the user personally assumes
all risks and responsibilities for any damages, injuries or deaths taking
place following the use or misuse of Fly Jumper jumping stilts in
whichever way including damages to property and third party claims.
Fly Jumper Canada Limited does not assume any responsibility for any
accidents, injuries or fatalities relating to the use of these products.
Making a Warranty Claim
All warranty claims must be pre-authorized by Fly Jumper Canada. To
receive a pre-authorization number please contact Fly Jumper Canada
via email, fax, or in writing with the following information:
1.
2.
3.
4.
Your name and contact details.
A detailed description of the problem
A clear photo of the problem
A clear copy of your original receipt
A representative will then contact you with further instructions in
regards to replacement parts or repairs. At your own discretion, we
will repair or replace all or part of this product if your warranty claim is
successful.
Product Registration
Registering your product with Fly Jumper Canada ensures that you will
receive all of the benefits and guarantees you are entitled to. Once
your Fly Jumper product is registered, you’re eligible to receive all of
the privileges or owning a Fly Jumper product. So complete and return
the Warranty Registration Card with your purchase at once, and take
advantage of these important benefits:
Warranty Verification: Registering your product within 10 days
confirms your right to maximum protection under the terms and
conditions of your Fly Jumper warranty.
Owner Confirmation: Your completed Warranty Registration Card
serves as verification of ownership in the event of product theft or
loss.
Model Registration: Returning your Warranty Registration Card right
away guarantees that you will receive any and all information and
special offers which you qualify for as the owner of your model. This is
also the only way in which Fly Jumper Canada can notify you in the
event of a product recall situation.
To register your Fly Jumper jumping stilts fill out the warranty
registration card and mail it in within 10 days of your original purchase
date.
P
ON
TIIO
AT
CA
FIIC
CIIF
EC
PE
SP
TS
CT
UC
DU
OD
RO
S
PR
NS
A
S
MS
AM
RA
GR
AG
DIIA
DD
ND
AN
Fly Jumper Specifications
F501 Series Junior Fly Jumpers
M115 Series Adult Fly Jumpers
Dimensions: 630 (L) x 280 (W) x
320 (H) mm
Gross Weight: 6.5 KG/pair
Net Weight: 4.2 KG/pair
Dimensions: 910 (L) x 290 (W) x
400 (H) mm
Gross Weight: 9.5 KG/pair
Net Weight: 7.2 KG/pair
BINDINGS
C
T
RT
OR
PO
PP
UP
SU
RS
ER
ME
OM
TO
ST
US
CU
Should you require customer service or technical support for your Fly
Jumper products please contact Fly Jumper Canada’s customer
support team by telephone, mail, fax or email at any of the address’s
listed below.
FLY JUMPER CANADA LIMITED
1-271 Jevlan Drive
Vaughan, Ontario
L4L 8A4
Telephone:
Toll Free:
Fax:
Email:
Website:
905-850-1FLY
1-855-FLY-JUMP
1-866-602-7225
[email protected]
www.FlyJumper.ca
FLY JUMPER JUMPING STILTS AND ALL OTHER RELATED PRODUCTS
UNDER THE BRAND NAME FLY JUMPER ARE EXCLUSIVELY IMPORTED
AND DISTRIBUTED IN CANADA BY FLY JUMPER CANADA LIMITED.
Specifications and guarantees are subject to change without notice.
This product includes the technology associated with the original
patented technology made famous by Alexander Bock.
M
Maannyy m
moorree rreessoouurrcceess ccaann bbee ffoouunndd oonn tthhee FFllyy J
Juum
mppeerr
CCoom
mm
muunniittyy ffoorruum
m aatt w
ww
ww
w..FFllyyJ
Juum
mppeerrFFoorruum
m..ccaa w
whheerree yyoouu
ccaann m
meeeett ootthheerrss,, sshhaarree vviiddeeooss,, cchhaatt,, sseeee ppiiccttuurreess,, ggeett
ttiippss && m
muucchh m
moorree!!
Glossary of Terms
Fly Jumping – This refers to someone participating in the activity or
sport of powerbocking
Fly Jumper – This is the brand name given to our brand of powerbocks
or jumping stilts. Fly Jumper also refers to a person who uses jumping
stilts or powerbocks.
Powerbocking / Fly Jumping – This refers to the activity or sport
derived from using these stilts.
Powerbock – This is a common name for these stilts which derived
from the original German inventor Alexander Bock and his original
brand of jumping stilts called Powerskip.
Powerbocker – This is a person who uses Fly Jumpers or othertypes of
jumping stilts or powerbocks.
Copyright Notice: The information in this document is subject to
change without notice. Fly Jumper Canada shall not be liable for any
damages resulting from technical errors or omissions, which may be
present in this document, or from use of this document.
Copyright 2009 by Fly Jumper Canada Ltd. All rights reserved.
Printed: 2009
Version 1.0
Instruction Manual P/N: INS-F501-M115-01
F501 Series Youth Fly Jumper Jumping Stilts
M115 Series Adult Fly Jumper Jumping Stilts
WARNING
All users must read and understand all of the
materials in this manual before using this product
This manual is packed with essential safety information that will make your Fly Jumping
experience a lot easier, safer and ultimately a whole lot of fun. Please read the entire user
manual thoroughly before using your Fly Jumpers and follow the instructions contained
therein. The instruction manual contains warnings and caution instructions on playing and
handling this product and these instructions should always be followed to prevent you or
others from any injury. After reading this user manual, be sure to keep it nearby or in a safe
place where it can be easily accessed for future reference.
WARNING
Fly Jumper jumping stilts allow users to jump as high as seven feet high, run as fast as 40
kilometers per hour fast and perform an endless amount of other tricks in many different
places. Be advised that any activity or sport performed at height is dangerous and can lead
to serious or even fatal injuries. Suitable training is essential before using jumping stilts and
all users should wear proper safety gear at all times, including but not limited to, a helmet,
wrist, elbow and knee pads.. Prior to anyone using Fly Jumper jumping stilts, they MUST
read and understand the manual provided with every set of jumping stilts in which it
illustrates and advises the ways in which jumping stilts function. Learning to use your
jumping stilts and any safety measures are the sole responsibility of the user themselves
and the user personally assumes all risks and responsibilities for any damages, injuries or
deaths taking place following the use or misuse of Fly Jumper jumping stilts in whichever
way including damages to property and third party claims. Fly Jumper Canada Limited is
not liable for any accidents, injuries or fatalities relating to the use of these products.