1
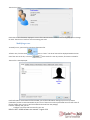
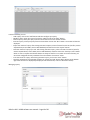
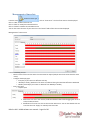
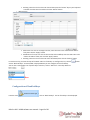
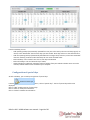
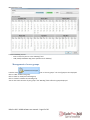
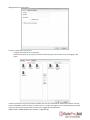
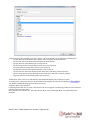
iSafe Pro 360 VISOR software user manual Contents User management ............................................................................................................................................................. 2 Creating users ............................................................................................................................................................... 2 Modifying a user ........................................................................................................................................................... 4 User listing .................................................................................................................................................................... 9 Management of time slots .............................................................................................................................................. 12 Configuration of holidays ................................................................................................................................................ 13 Configuration of special days .......................................................................................................................................... 14 Management of access groups ....................................................................................................................................... 15 Event management ......................................................................................................................................................... 17 Display events ............................................................................................................................................................. 17 Event log ...................................................................................................................................................................... 18 iSafe Pro 360 ‐ VISOR software user manual – Page 1 of 20 Usermanagement Creatingusers The first method used to create users consists of using a wizard. This creates the identifiers (badges, transmitters, application badges, etc.), the users (persons that can access the site) and the access groups (rights and times of access to various site readers). To do this, click on then on the menu “Create users”. The following wizard is displayed: Enter your identifiers in one of three ways: ‐ By manual entry: enter the first identifier number and the amount to be created ‐ Generate random codes: the software will assign codes randomly ‐ By the ‘Self learning’ function: click on “Self learning” and then pass your identifiers one by one through any reader in your installation or use an OMNIKEY reader. Then select the type of identifier to be created (Proximity badge, Application badge, Transmitters or Codes) and the status of these identifiers (In service, Suspended or Stolen). Then click on “Next”. Enter the access rights for the users to be created (authorisations for the various readers on site). iSafe Pro 360 ‐ VISOR software user manual – Page 2 of 20 To do this, you can: ‐ Use an existing access group (note, this option is only available if there are already groups created in your installation) ‐ Authorise the users for all readers ‐ Authorise the users for a selection of readers: The list of readers appears next and you must check the readers the users can access. Then click on “Next”: Enter the access times for your new users. To do this, you can: ‐ Use the times of the selected access group: if you have chosen to use an existing access group, your only option will be to use the times for this group ‐ Do not limit the access times for your users ‐ Define identical access times for all readers: to do this select or create a time slot ‐ Configure different times for each reader: to do this, opposite each reader, select a time slot Then click on “Next”: Enter the options for your users: ‐ Their status (Authorised or Suspended) ‐ The “Alarm Management” option: users authorised to enable/disable an alarm connected to the unit (your installation must be properly configured for this beforehand) ‐ The “Without cycle verification” option: if your installation is configured to use Anti‐Pass‐Back and this box is checked, all of the users created with this option will not be subject to Anti‐Pass‐Back. ‐ The “Relaunching Anti‐PassBack” option: each time these users pass, all Anti‐Pass‐Back cycles for all users will be erased (all users can once again re‐enter or re‐exit) ‐ The dates and times of the start and end of the validity iSafe Pro 360 ‐ VISOR software user manual – Page 3 of 20 Then click on “Next”. Check that all the information displayed is correct. If the wizard needs to create a new access group, you can change its name. Then click on “Confirm” to finish creating your users. Modifyingauser To modify a user, you must first open their information file. To find a user, from the menu one of the users in the list, or click on The user file is then displayed: , click on “Users”. The list of users will be displayed. Double click on then search for a user by surname, first name or identifier. Useful information: At the bottom of the window, you will find information relating to your user’s presence (Unknown if you don’t use Anti‐Pass‐Back at your site or if the user has still not presented him or herself at one of the site readers, entry or exit, as well as the date and time of their last passage). From the “Identity” tab, you can: ‐ Configure a surname and first name for your user iSafe Pro 360 ‐ VISOR software user manual – Page 4 of 20 ‐ Add an image file already saved on your computer or network ‐ Take a photo using a webcam connected to your computer ‐ Delete the user photo If you click on “Take a photo”, the following window is then displayed: Select the webcam to be used from the list at the top left. Click the “Capture” button to take the photo. Finally, if the photo is acceptable, click on “OK”. From the “Identifiers” tab, you can: ‐ Add new identifiers to your user (for example, your user can use a transmitter to access a car park and a badge to access their office). You can add as many identifiers to a user as you want to (15,000 maximum). Note, the same identifier cannot be added to multiple users. Click on the “Add” button. The list of identifiers (only those not yet allocated) is then displayed; double click the identifier to be added to the user. ‐ Modify an identifier already allocated: select an identifier from the list and then click “Edit”. You can then modify the identifier type (Proximity badge, etc.) and the status (In service, Suspended or Stolen). ‐ Delete an identifier from your user: select an identifier from the list and then click “Delete”. iSafe Pro 360 ‐ VISOR software user manual – Page 5 of 20 From the “Allowance” tab, you can: ‐ Select the user status (In service or Suspended) ‐ Configure their access times: o Group time slot (use the times configured for the access group) o Permanent access: no restriction on access times for all readers despite any time slots configured for the access groups o Time slot already created: use of these access times for all readers despite any time slots configured for the access groups ‐ Configure the dates and times of the start and end of the validity ‐ Configure the access groups: o Add a group from those already created: Click on the “Add” button. The list of groups is then displayed. Double click the access group to be added. You can add up to three access groups for the same user o Modify the access group selected in the list o Delete the selected access group o Configure the usage priorities of the access groups by the units: select an access group and then click the arrows and be used first and so on. . The access group at the top of the list (preceded by the number 1) will iSafe Pro 360 ‐ VISOR software user manual – Page 6 of 20 From the “More information” tab, you can add other types of information to your user (e.g. telephone number, parking place, email, etc.). To add new fields, go to the “Tools” menu then “Favourites”, tab “Additional information” and add the desired fields. From the “Motions” tab, you can display the last 50 passages by the user. The first line of the list corresponds to the most recent passage. iSafe Pro 360 ‐ VISOR software user manual – Page 7 of 20 From the “Additional profil” tab, you can: ‐ Configure an additional profile for the user which will be active under the following circumstances: o Never (profile not used) o On a security level (if the software security level is the same as that selected) o On a minimum security level (If the software security level is greater than or equal to that selected) o On a time slot (when the selected time slot is active) o On a period (when the selected period is active) o Always active (this profile will always be used on each passage of the user) ‐ Configure the user authorisations when this profile is active: o Definition of the status (In service or Suspended) o Definition of the access times (use of the time slots for the access group of this profile, permanent access or a selected time slot) o User escorted (if the user is normally escorted, check this box if you still want them to be accompanied when this profile is active) o Access groups (identical to the access groups of the standard profile, you can add up to three access groups). Example of usage of an additional profile: During a period of the year (such as school holidays), you want to restrict the access of the users. To do that, configure a list of days corresponding to the school holidays, select “Active for a period), select the previously created list of days then allocate this more restricted access group to your users. iSafe Pro 360 ‐ VISOR software user manual – Page 8 of 20 From the “Options” tab, you can modify the various options for your user: ‐ The “Alarm Management” option: users authorised to enable/disable an alarm system connected to the unit (your installation must be properly configured for this beforehand) ‐ The “No Anti‐PassBack checking” option: if your installation is configured to use Anti‐PassBack and this box is checked, all of the users created with this option will not be subject to Anti‐PassBack. ‐ The “Relaunching Anti‐PassBack” option: each time these users pass, all Anti‐Pass‐Back cycles for all users will be erased (all users can once again re‐enter or re‐exit) ‐ The number of passages: The user will have a limited number of passes through readers configured to manage this function ‐ The “This user must be escorted” option: On readers configured to manage this option, the user must be accompanied by a specified user or a user belonging to an access group to be authorised. Select this option and then choose the type of person to accompany them: o “User”: click on “Search” then double click the person in the displayed list o “Users group”: click on “Search” then double click on the access group that can accompany them (any user belonging to the selected access group can accompany the user) Userlisting You can output user listings by setting the fields to be displayed and filtering them on various criteria. To output a listing, from the menu, click on “Listing”. The following window will then be displayed: iSafe Pro 360 ‐ VISOR software user manual – Page 9 of 20 From this window, you can: ‐ Add a query: click on the “Add” button and then configure your query ‐ Modify a query: select your query from the list and then click on the “Edit” button. ‐ Delete a query: select your query from the list and then click on the “Delete” button. ‐ Execute a query: select your query from the list and then click on the “Run” button. The results will then be displayed ‐ Export the results of a query: after having executed a request, select a format from the list (text file, comma‐ separated text, Access 2007, Excel or XML database) and then click on the “Export” button ‐ Send the results of a query by e‐mail: after having executed a query, select a format from the list (text file, comma‐separated text, Access 2007, Excel or XML database) and then click on the “Send by e‐mail” button. Select or enter a recipient and choose whether to compress the file or not. Note: to use this function, you must have configured the mail parameters from the software “Favourites” menu. ‐ Print the results of a query: After having executed a query, click on the “Print” button. ‐ Open the selected user file by double clicking it or clicking the “Edit” button which appears at the bottom right if the shortcuts are displayed (to display or hide the shortcuts, click the “Shortcuts” button) Managing a query iSafe Pro 360 ‐ VISOR software user manual – Page 10 of 20 From the “Display” tab, you can: ‐ Give your query a name: enter in the “Wording” field ‐ Select the fields you want displayed in your listing ‐ Select a sort for the results To filter the users to be displayed, click on the “Filters” tab. From this tab, you can define the following filters: ‐ By name: filter the users whose surname starts with / ends with / contains your text ‐ By first name: filter the users whose first name starts with / ends with / contains your text ‐ By group: filter the users whose group is in your list ‐ By time slot: filter the users whose time slot is in your list ‐ By status: filter the users who have the selected status ‐ By the validity start and end dates: filter the users whose validity dates are before / after / between the date(s) entered ‐ By presence: filter the users who have the selected presence ‐ By the options Alarm, Relaunching, Pass (without verification of Anti‐PassBack cycle), Escorted: filter the users with these options selected To add a filter, tick it in the list. A new window is then displayed allowing you to refine your search. To modify a filter, from the list of filters (at the bottom of the window), click the blue link (example: ). A new window is displayed allowing you to refine your search. To delete a filter, simply unselect it. For filtering by surname or first name, check the box “Ask on carrying out” and the program will ask you to enter the text when you execute the query. Once your filters are entered, click “OK” and then click “Run” in the preceding window. The results will then be displayed. iSafe Pro 360 ‐ VISOR software user manual – Page 11 of 20 Managementoftimeslots From the menu , click on “Time zones”. The list of time zones is then displayed. Click on “Add” to add a new time slot. Click on “Edit” to modify the selected time slot. Click on “Delete” to delete the selected time slot. You can also enter the name of your time slot in the “Name” field to filter the time slots displayed. Management of a time zones: From this window, you can: ‐ Edit the name of the time slot. Note: this name must be unique (multiple time slots cannot have the same name). ‐ Configure the display type: o Every day: if your times are different each day o Monday to Friday / weekend: if the times are identical during the week but different at weekends o Monday to Sunday if your times are identical from Monday to Sunday ‐ Enter your times o Graphic input Add a time slot: click in the red area, hold the left button down while dragging the cursor to select the desired times Modification of a time slot: click on the time slot and move it. You can also double click on a time slot then click “Apply” to manually enter the times iSafe Pro 360 ‐ VISOR software user manual – Page 12 of 20 Deleting a time slot: click on the time slot and then press the “Delete” key on your keyboard or double click the time slot and then click the “Delete” button. o Manual entry: Add a time slot: click on an empty time slot, enter the times in the “Selected slot edition” field, then click the “Apply” button Modification of a time slot: click on the time slot to be modified, enter the new times in the “Select slot edition” field, then click the “Apply” button Deleting a time slot: click on the time slot to be deleted, then click the “Delete” button For each time slot, you have the days of the week and a list of holidays. To configure this list, click the next to “Bank Holidays”. A new window is displayed where you can configure the list of holidays. You can also create another list of specific days. To do this, click on “Add a list” in the drop‐down list. button ConfigurationofBankholidays From the menu , click on “Bank holidays”. The list of holidays is then displayed. iSafe Pro 360 ‐ VISOR software user manual – Page 13 of 20 From this window, you can: ‐ Add repeating holidays (automatically repeated from one year to the next by the units and the program). To do this, select “Renewable” then click the days you want to add. These days will turn to the selected colour. ‐ Add non‐repeating holidays (automatically deleted when no longer valid). To do this, select “Not renewable” then click the days you want to add. These days will turn to the selected colour. ‐ Delete holidays: select “Delete” then click on each day to be deleted. ‐ Delete all holidays: click the “Delete all days” button ‐ Import holidays from Outlook: automatic import of holidays from your Outlook calendar. Note: to use this function, Outlook 2007 must be installed on your computer. Configurationofspecialdays As well as holidays, you can add up to eight lists of special days. menu , click on “Special days”. The list of special days will then be From the displayed. Click on “Add” to add a new list of special days. Click on “Edit” to modify the selected list. Click on “Delete” to delete the selected list. iSafe Pro 360 ‐ VISOR software user manual – Page 14 of 20 Management of a list: From this window, you can: ‐ Enter a name for your list in the “Wording” field ‐ Add, modify and delete days (same operation as for holidays) Managementofaccessgroups From the menu , click on “Access groups”. The list of groups is then displayed. Click on “Add” to add a new group. Click on “Edit” to modify the selected group. Click on “Delete” to delete the selected group. You can also enter the name of your group in the “Wording” field to filter the groups displayed. iSafe Pro 360 ‐ VISOR software user manual – Page 15 of 20 Management of an access group: From the “Information” tab, you can: ‐ Configure the name of your access group ‐ Determine the status of your group: check the “Forbid the group” box to block all users belonging to this group. From the “Allowance” tab, you can select the readers the users are authorised for. Double click a reader in the left list (list of forbidden readers) to allow it or double click on a reader in the right list (list of allowed readers) to forbid it. You can also use the arrows between the two lists to toggle the selected readers. iSafe Pro 360 ‐ VISOR software user manual – Page 16 of 20 From the “Schedule” tab, you can define the access time slots for the readers authorised for your group from the following options: ‐ Do not limit the access times for your users ‐ Define identical access times for all readers: to do this, select or create a time slot ‐ Configure different times for each reader: to do this, select a time slot opposite each reader Eventmanagement Displayevents You can display a list of events in real time at the bottom of your screen by clicking on the “View” menu, then on “Events list”. Note: this list only contains events that have occurred since you started Visor. To close this list, click the “Close” button at the top right of the list. To view the last 2000 events, click on the menu The following window will then be displayed: , then on “Show the list”. iSafe Pro 360 ‐ VISOR software user manual – Page 17 of 20 From this window, you can: ‐ View the last 2000 events ‐ Double click an event concerning a user to open their file ‐ Double click an event concerning an identifier to open their file Eventlog You can output an event log by setting the fields to be displayed and filtering them on various criteria. To output a log, from the menu displayed: , click on “Log and reports”. The following window will then be From this window, you can: ‐ Add a query: click on the “Add” button and then configure your query ‐ Modify a query: select your query from the list and then click on the “Edit” button. ‐ Delete a query: select your query from the list and then click on the “Delete” button. ‐ Execute a query: select your query from the list and then click on the “Run” button. The results will then be displayed iSafe Pro 360 ‐ VISOR software user manual – Page 18 of 20 ‐ ‐ ‐ ‐ ‐ Export the results of a query: after having executed a query, select a format from the list (text file, comma‐ separated text, Access 2007, Excel or XML database) and then click on the “Export” button Send the results of a query by e‐mail: after having executed a query, select a format from the list (text file, comma‐separated text, Access 2007, Excel or XML database) and then click on the “Send by e‐mail” button. Select or enter a recipient and choose whether to compress the file or not. Note: to use this function, you must have configured the mail parameters from the software “Favourites” menu. Print the results of a query: After having executed a query, click on the “Print” button. If the selected event concerns a user, open their file by double clicking it or clicking the “Edit” button which appears at the bottom right if the shortcuts are displayed (to display or hide the shortcuts, click the “Shortcuts” button) If the selected event concerns an identifier, open their file by double clicking it or clicking the “Edit” button which appears at the bottom right if the shortcuts are displayed (to display or hide the shortcuts, click the “Shortcuts” button) Managing a request From the “Display” tab, you can: ‐ Give your query a name: enter into the “Wording” field ‐ Select the fields you want displayed in your log ‐ Select a sort for the results iSafe Pro 360 ‐ VISOR software user manual – Page 19 of 20 To filter the evens to be displayed, click on the “Filters” tab. From this tab, you can define the following filters: ‐ By date: filter the events whose date is before / after / between the date(s) entered ‐ By time filter the events whose time is between the entered times ‐ By type: filter the events whose type is part of your list ‐ By central unit: filter the events whose central unit is part of your list ‐ By reader: filter the events whose reader is part of your list ‐ By identifier: filter the events whose identifier is part of your list ‐ By surname: filter the events whose surname starts with / ends with / contains your text ‐ By first name: filter the events whose first name starts with / ends with / contains your text ‐ By group: filter the events whose group is part of your list To add a filter, tick it in the list. A new window is then displayed allowing you to refine your search. To modify a filter, from the list of filters (at the bottom of the window), click the blue link (example: ). A new window is displayed allowing you to refine your search. To delete a filter, simply unselect it. For filtering by Surname or First name, check the box “Ask on carrying out” and the program will ask you to enter the text when you execute the query. Once your filters are entered, click “OK” and then click “Run” in the preceding window. The results will then be displayed. iSafe Pro 360 ‐ VISOR software user manual – Page 20 of 20