1
Title:
Author:
Date:
Version:
SipInput conformity:
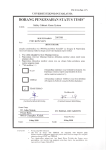
SipInput User Guide
Jan de Kloe
April 1, 2003, updated January 26, 2007
2.0
v4.08
Introduction
SipInput is a primitive two-dimensional music editor for Score engravers. It does away with the
multiple line input and is therefor quicker than the Score input mode. Also, it avoids the inconsistencies
which could occur from line input because it dynamically checks what is input. Input with SipInput is
virtually free from time signature errors. The output of SipInput is a text file which can be read (‘RES’)
immediately into Score.
Input is basically with keys. For some functions, the mouse can be used but this is optional.
This document tells you how to create and edit files.
Programs and files
There are two DOS programs included in SipInput:
(1)
SIPINPUT.EXE creates and updates files with the suffix SIP. The format of such files is private and
they cannot be manipulated by any other program than those of SipInput. There is one such file per
system. A system can have from 1 to 4 voices on a maximum of 4 staves. There can be from 1 to 9 bars
in a system.
(2)
SIPC.EXE converts a file with a SIP suffix to a text file with a SCO suffix. The latter is readable by
Score through the RES command. To facilitate operation, the last created SCO file is replicated to a file
simply called Z. The user never sees the execution of SIPC because it takes place immediately at the
termination of SIPINPUT.EXE. Though not suggested, it is entirely possible to update file Z.
Other files
There is one file in the SipInput suite named SIPINPUT.PAR which keeps the name of the last file
processed. This name is displayed in the SipInput panel as a reminder.
SipInput requires that there is a file SIPINPUT.INI with profile information. This text file is created by
the Windows application.
The user needs not be concerned with its placement or maintenance of these two files.
The help file consulted by SipInput is SIPINPUT.TXT.
The main SIP panel will disable the SipInput button when a required file is not installed.
Starting the editor
Once you have set up the options in the two panels of the SIP Windows application of SipInput, you
push the Run button to get into the edit program SIPINPUT.EXE. This program runs in DOS and
therefor has limited graphical means. However, with the help of arrow keys, PgUp, PgDn etc. as well
as the mouse, it is fast to position input. A simple exercise will demonstrate the basic features of
SipInput.
A simple exercise
Following are the steps to create a simple file.
(1) on the first SipInput panel, check ‘Generate signatures’ and ‘Call Score’. Uncheck ‘Shorten stems’.
(2) select the key of 1 sharp and the time signature 4/4.
(3) set ‘Left barline’ to none.
(4) set ‘Barline stacking’ to 1.
(5) push ‘Object staves’.
(6) push the ‘minus’ buttons on top to assure that you have one voice and one staff.
(7) click the ‘Clef’ button until it is ‘TR’
(8) click the stem direction button until it is ‘Ordinary’ and keep the default staff size. Then return and
Run.
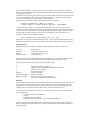
You are now in the editor which gives the following choice:
Filename in Parameterfile = AAA001 (not existing)
Increment (UpArrow), Decrement (DnArrow), Replace (r), Accept(ENTER)
hit ENTER and the following appears:
Create file AAA001.SIP. Enter number of bars (1-9), 0=end
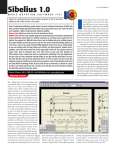
Enter 3 because in this demo we will make a staff with three bars. The next panel comes up and shows
two things which we need for manipulation:
(a) three boxes which tell us that we have a single voice with three bars. The red box is the bar where
we are at – the active bar. We can walk through the bars with the arrow keys or with ‘Home’ and
‘End’. When the mouse pointer is in this area, we are in the positioning mode.
(b) an empty music bar. When we are here we are in edit mode and the mouse pointer is in this area.
You are either in the positioning mode or in the edit mode. The Enter key changes from one to the
other. When terminating a bar, the active bar advances until it cannot go any further.
(9) position to the first bar and hit Enter to get into edit mode. You will see a cursor which is where
notes are placed. Initially it is always at the middle line. You can move this cursor in four directions
with the arrow keys, Home, End, PgUp, PgDn, backspace (back, then two notes down) and comma
(back, then one note down). Note that horizontal space has no influence on the final result.
(10) hit ‘e’. This will position the cursor at the low E. There are three of those vertical cursor
positioning keys: ‘a’ for low A, and ‘c’ for high C are the others.
(11) hit ‘3’ which is a quarter note. You will see the cursor advance to the next position.
(12) hit the up arrow and the cursor will be at the F position. Hit ‘3’ again and continue doing this until
you have four notes E, F, G, A. Notes just look like bullets whatever their duration. On the top of the
white area you see the real duration. Then Enter. This brings you back to the positioning area and you
see the bar advance.
(13) Hit Enter again to edit the next bar. Hit ‘c’ to get to the high C. Enter ‘4’ for an eighth note,
descend with the arrow key and do another eighth note. Then hit ‘b’. This will create a beam. Beams
are always from the last note backwards as far as it can. You will not see stem direction visualized in
this stage but when generated, the ‘ordinary’ will be in effect. If you want a rest in a beam group, enter
the notes and beam first, then the rest.
(14) Hit ‘3’ while keeping the ‘Alt’ key depressed. This is a quarter rest. So now you are able to enter
notes and rests. The vertical position of rests is immaterial since it only depends on the stem direction.
(15) Complete the three bars at will, experimenting with chords, rests, beaming, dots for augmentation.
Test the bar overflow by entering too much duration like five quarter notes. Remember that notes need
to be drawn before they can have dots or accidentals. Accidentals are ‘s’, ‘f’ and ‘n’ before a note.
Faster is to use ‘S’, ‘F’ and ‘N’ when the cursor is after a note but you need to have an empty vertical
space before the note. Because the ‘n’ is far from the left shift key, naturals can also be made with ‘z’
and ‘Z’. If you need a space in between notes, hit ‘Insert’. ‘Delete’ removes all elements vertically on
the cursor position, ‘d’ only removes the symbol where the cursor is at.
(16) Terminate when in the positioning mode by hitting ‘x’. This will convert file AAA001.SIP to
AAA001.SCO and file Z. Then give control to Score. There you do a ‘RES Z’ and you will see the
entered music. When there are input errors, you can go back to the same file and make updates,
otherwise you go to the next file by incrementing the number on the next execution (the next Run) by
hitting the up arrow key. That will create file AAA002.SIP. You can change the name by the Replace
function which prompts for a name.
Filename set-up
When the program is entered, it needs to know with which file it needs to work. One file corresponds to
one unit of input which is a system with from 1 to 4 voices on from 1 to 4 staves as defined in the
‘Object staves’ function. The filename should consist of a meaningful alphabetical part such as ‘HAY’
for Haydn and a numeric part. When you are going to enter less than one hundred systems, two digits
are sufficient. Make it a habit of always defining three letters and three digits. The first file in such
group is hence HAY001. It is imperative that the number sequence of one composition is unbroken.
The suffix cannot be defined since it will automatically be .SIP and .SCO for the two files being output
by one program execution.
A filename can be an existing one in which case you can make updates. It will always tell you if the file
exists. On terminating the program, the .SIP file is then updated (it is a random access file) and the
.SCO file is overwritten by a new version (it is an ASCII text file).
Initially, there is no filename in which case a default is assumed of AAA001.
Filename in Parameterfile = AAA001 (not existing)
Increment (UpArrow), Decrement (DnArrow), Replace (r), Accept(ENTER)
To create ‘HAY001’ push the ‘r’ to replace the name. The effect of the up-arrow and down-arrow
would be to adapt the numeric part. Normally you will bump the number to make HAY002 for the next
system and so on. Once the filename is defined, the number of bars you are going to enter needs to be
provided. Make it a habit of giving as many bars as your manuscript system. Note that once you
defined this number, it can no longer be modified.
Create file HAY001.SIP. Enter number of bars (1-9), 0=end
Hence, from 1 to 9 bars can be entered. When this is done, a grid is displayed with the first bar in red to
indicate the current one. You are now in positioning mode and the mouse pointer will point to the grid.
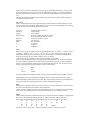
Positioning mode
Positioning from one bar to another (walking through the input) can be done in several ways:
arrow keys
Home key
End key
Left mouse button
to adjacent bar
to the first bar of the top voice
to the last bar of the top voice
to the pointed bar
Each box in the grid gets a value which represents the number of notes in that bar. A blank means that
the bar is all rest(s). Note that full measure rests are assumed if no input was done in a bar.
When in positioning mode, there are some other commands available:.
k
!
w
x
Enter key
Middle mouse button
Right mouse button
?
trigger the generation of signatures
trigger between visual (default) or audible error notification
show the mouse click delay
terminate the program
change to edit mode
change to edit mode
copy the current bar to the bar pointed to
show a list of commands in positioning mode
Edit mode
You get to edit mode by the Enter key or the middle mouse button. In Edit mode you can edit one voice
of one bar only. In order to advance to the next bar you must first go back to positioning mode and
immediately to edit mode again so easiest is to hit the Enter key twice during sequential input. When
inputting a multi voice staff, it is easiest to do the upper voice first, then the lower voice.
The visualized bar is organized in 49 columns. One column can contain only one type of data which is
one of the following:
- any number of notes of equal duration
- one rest
- accidentals when a note follows
- augmentation dot if preceded by a note or a first augmentation dot
There is no relation to horizontal distances so two adjacent notes with or without empty columns in
between cause the same results. There can be no empty columns between notes and their accidentals or
augmentation dots.
When an error is detected, a momentary message is given. By default this message is visual (a purple
block on the bottom) but you can revert this to an audible signal by hitting ‘!’ in either positioning or
edit mode. When there is a duration error, the erroneous bar is still terminated so you can ignore the
error.
Note that when there are duration conflicts between vertical bars, Score will not be able to properly
visualize the generated system.
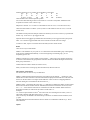
The cursor
Input is at the location of the cursor which can be moved in four directions. When opening a bar, the
cursor is at the first column on the middle staff line. The cursor advances automatically when anything
is input. There are also commands which move the cursor:
arrow keys
Home key
End key
Backspace key
,
Space bar
PgUp key
PgDn
e
a
c
to adjacent pitch or column
to first column
to last column
down two pitches, then left one column
down one pitch, then left one column
to the next note down or right
one octave up
one octave down
to lowest E
to lowest A
to highest C
Notes
Enter a note as a digit. The duration of a note is defined by the value: 0 = double, 1 = whole, 2 = half, 3
= quarter, 4 = eighth, 5 = 16th, 6 = 32nd, 7 = 64th, 8 = 128th, 9 = grace. Notes appear on the screen as
filled bullets with on top the visual duration, always with stems up. The actual stem side depends on
the option for the current voice which is either up, down, or ordinary.
A column can have any number of notes. Notes a second apart are not offset.
Notes can have accidentals and up to two augmentation dots. Accidentals can only be input when the
note exists. Make sure that there is an empty column in front of the note when you enter accidentals.
Fastest is to use capital letters when the cursor is immediately after the note. You can use lower case
letters but the cursor needs to be immediately in front of the note then.
sS
fF
nNzZ
sharp
flat
natural
You cannot make other accidentals so make a sharp if you need a double sharp and replace it in Score.
Augmentation dots can only be defined when there is a note or a chord. The cursor must be in the
column immediately following the note or chord. The vertical position of the cursor is immaterial and
only one dot needs to be specified for all notes to receive the augmentation dot(s).
Rests
Hold the Alt key and push a note key for a rest, so Alt and ‘4’ cause an eighth rest. A column can have
only one rest and the horizontal position is hence immaterial.
Alt and ‘9’ creates a dummy which is used in combination with the ‘b’ command. It is represented by a
cross and serves to indicate the left end of a beam. The dummy rest is not written to the file.
Marks
Marks can only be made on columns with notes, not on columns with rest, accidentals, or augmentation
dot. Put the cursor on the note column, then hit ‘m’. Abbreviations are used for marks. The
abbreviations are standard Score. From the following set, only one can exist per note/chord:
fif
fis
fin
w
a
t
s
ws
as
ts
d
u
h
fe
ar
th
mo
im
hw
tr
trf
trs
trn
pl
f0
f1
f2
f3
f4
f5
(fingers)
The above result in a Code1 Par 11 which is why there can only be one of those at a time.
From the following set, any number can be attached to a note/chord:
ppp
pp
p
mp
mf
f
ff
fff
fp
sf
sfz
cr
di
ri
ac
act
pi (pizz) ao (arco)
tm1
tm2
tm3
tm4
(tremolos)
These translate to the common dynamic symbols.
You can also add a three digit value as a mark such as 112 for the Coda symbol. Additional codes
accepted are lvd and lvu for LV down or up.
Hairpins are coded as <n or >n where n is the number of notes to cover (1-19 in the current voice).
Ottava and ottava bassa are coded as {n and }n where n is the number of notes to cover (1-19 in the
current voice).
The default vertical position for hairpins is below the staff but you can force it above by a special mark
named ‘+hp’. A next use of ‘+hp’ triggers the side.
Dynamic marks such as ppp are per default below the staff but you can trigger the side by the special
mark ‘+ma’. This also triggers default stem side to note side for marks such as the wedge.
To remove a mark, repeat it. An asterisk shows the mark(s) for the current column.
Beams
There are two ways to make beams.
Method 1. The automatic way is to push ‘b’ on or after the last entered beamable group. The beginning
of the group is established automatically. To force the beginning of a beamed group, you can
temporarily put in a rest.
Method 2. Another way to enter a beam group is with the ‘-’ (minus sign). First push the function key
F7 at the first note/chord of the group and F8 on the last note/chord to define the begin and end of the
beam group. Then hit the ‘-’.
Tremolo beams are made as marks (for instance ‘tm2’).
When you need a rest in a beam group, draw the beam first, then insert the rest.
Slurs and ties (and brackets)
For slurs/ties there are also two ways to make them.
Method 1. Define the beginning and end of the group with F7 and F8, then hit ‘_’ (underscore). This
method does not allow control over the slur/tie direction but SipInput assumes the slur on the note side
and a tie on the stem side if it can figure out the difference. There can be no overlapping Method 1
slurs/ties. Hitting F8 a second time has the same effect as ‘_’.
Method 2. Enter ‘[’ and follow the syntax [m] [{+|-}] [Bn] where m defines the number of notes/chords
between the current note and the end note. If omitted, zero (the first note after the current one) is the
end. ‘+’ or ‘-’ is the direction of the slur/tie. If omitted Score will take a default. When a bracket is
desired then enter Bn, for instance B3 will create a bracket with a ‘3’.
Examples:
12+ creates an upward slur/tie to the 14th note in the same voice including the note where you are at.
3-B5 makes a bracket under three notes with a ‘5’ in there.
There can be only one Method 2 slur/tie/bracket per note/chord. To delete such slur/tie/bracket, enter
‘[‘ again.
Note that Method 2 slurs/ties/brackets are shown as marks as a combination of Bn D- D+ [n. The D
means direction.
Tuplets
You can make triplets and 6-tuplets. Following a group of notes enter ‘t’. If the preceding group has six
notes/chords of equal duration it will ask if you want the 6-tuplet, otherwise it will assume a triplet.
There can be no rests in tuplets.
By entering F3 you create a triplet from a quarter note and an eighth note.
Editing commands
The following commands provide the functions one needs during editing:
=
/
Del key
d
Ins key
x
C
repeat the last note and duration
repeat the last column
delete current column
delete current symbol (note, rest, accidental, dot)
insert a blank column (effective in front of a used column)
contract bar (removes empty columns on the left)
duplicate group (F7-F8 range to cursor)
Other commands during the edit mode are:
!
~
V
Enter
Mouse left button
Mouse right button
trigger between visual and audible beep for errors
remove beams. If there are no beams then clear the bar
trigger duration validation
exit edit mode
set left end (same as F7)
set right end (same as F8)
Ending a system
When you terminate a system it is best to immediately give control to Score – which SipInput will do
when you set the appropriate check mark in the control panel.
Then you do the minor fixes in Score of those things SipInput could not do such as changing barlines to
repeats and other matters which would influence pagination. Then you save the system to a .MUS file
using the original SipInput name which is passed as a text in the system to make life easier.
Once you have entered all systems for a piece of music, you do pagination with PAGE (which can be
called immediately from the SipInput control panel), then do final page editing such as titles, fingering,
lyrics, endings, etc.
When PAGE was called from the SipInput panel, it will upon termination immediately show the first
generated page.
Keep all the .SIP files until your project is finished. You may need to revert to them when some major
omission was detected in the correction phase such as a missing system or page. Erase the .SIP files
after completion of the project. The .SCO files are only useful until you make the .MUS file so these
can be deleted after pagination.
(The end)