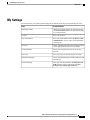
1
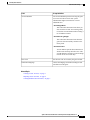
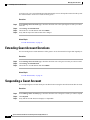
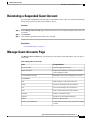
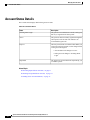
Sponsor Portal User Guide for Cisco Identity Services Engine, Release
1.2
First Published: August 02, 2012
Last Modified: November 11, 2013
Americas Headquarters
Cisco Systems, Inc.
170 West Tasman Drive
San Jose, CA 95134-1706
USA
http://www.cisco.com
Tel: 408 526-4000
800 553-NETS (6387)
Fax: 408 527-0883
THE SPECIFICATIONS AND INFORMATION REGARDING THE PRODUCTS IN THIS MANUAL ARE SUBJECT TO CHANGE WITHOUT NOTICE. ALL STATEMENTS,
INFORMATION, AND RECOMMENDATIONS IN THIS MANUAL ARE BELIEVED TO BE ACCURATE BUT ARE PRESENTED WITHOUT WARRANTY OF ANY KIND,
EXPRESS OR IMPLIED. USERS MUST TAKE FULL RESPONSIBILITY FOR THEIR APPLICATION OF ANY PRODUCTS.
THE SOFTWARE LICENSE AND LIMITED WARRANTY FOR THE ACCOMPANYING PRODUCT ARE SET FORTH IN THE INFORMATION PACKET THAT SHIPPED WITH
THE PRODUCT AND ARE INCORPORATED HEREIN BY THIS REFERENCE. IF YOU ARE UNABLE TO LOCATE THE SOFTWARE LICENSE OR LIMITED WARRANTY,
CONTACT YOUR CISCO REPRESENTATIVE FOR A COPY.
The Cisco implementation of TCP header compression is an adaptation of a program developed by the University of California, Berkeley (UCB) as part of UCB's public domain version
of the UNIX operating system. All rights reserved. Copyright © 1981, Regents of the University of California.
NOTWITHSTANDING ANY OTHER WARRANTY HEREIN, ALL DOCUMENT FILES AND SOFTWARE OF THESE SUPPLIERS ARE PROVIDED “AS IS" WITH ALL FAULTS.
CISCO AND THE ABOVE-NAMED SUPPLIERS DISCLAIM ALL WARRANTIES, EXPRESSED OR IMPLIED, INCLUDING, WITHOUT LIMITATION, THOSE OF
MERCHANTABILITY, FITNESS FOR A PARTICULAR PURPOSE AND NONINFRINGEMENT OR ARISING FROM A COURSE OF DEALING, USAGE, OR TRADE PRACTICE.
IN NO EVENT SHALL CISCO OR ITS SUPPLIERS BE LIABLE FOR ANY INDIRECT, SPECIAL, CONSEQUENTIAL, OR INCIDENTAL DAMAGES, INCLUDING, WITHOUT
LIMITATION, LOST PROFITS OR LOSS OR DAMAGE TO DATA ARISING OUT OF THE USE OR INABILITY TO USE THIS MANUAL, EVEN IF CISCO OR ITS SUPPLIERS
HAVE BEEN ADVISED OF THE POSSIBILITY OF SUCH DAMAGES.
Any Internet Protocol (IP) addresses and phone numbers used in this document are not intended to be actual addresses and phone numbers. Any examples, command display output, network
topology diagrams, and other figures included in the document are shown for illustrative purposes only. Any use of actual IP addresses or phone numbers in illustrative content is unintentional
and coincidental.
Cisco and the Cisco logo are trademarks or registered trademarks of Cisco and/or its affiliates in the U.S. and other countries. To view a list of Cisco trademarks, go to this URL: http://
www.cisco.com/go/trademarks. Third-party trademarks mentioned are the property of their respective owners. The use of the word partner does not imply a partnership
relationship between Cisco and any other company. (1110R)
© 2012-2013
Cisco Systems, Inc. All rights reserved.
CONTENTS
CHAPTER 1
Supporting Guest Users 1
Importance of Network Security 1
Network Access for Guest Users 1
Sponsor Portal 2
Guest Portal 2
Your Role as Sponsor 2
Signing on to the Sponsor Portal 2
Unable to Sign On Because Account is Locked 3
CHAPTER 2
Creating Guest Accounts 5
Creating a Guest Account 5
Importing Guest Accounts 6
Creating Random Guest Accounts 7
Providing Account Details to Guests 7
Lost Guest Password 8
Guest Account Settings 8
CHAPTER 3
Managing Guest Accounts 11
Suspended and Expired Guest Accounts 11
Reactivating Expired Guest Accounts 11
Extending Guest Account Durations 12
Suspending a Guest Account 12
Reinstating a Suspended Guest Account 13
Manage Guest Accounts Page 13
Account Status Details 14
CHAPTER 4
Customizing the Sponsor Portal 15
Choosing the Language Used by the Sponsor Portal 15
Sponsor Portal User Guide for Cisco Identity Services Engine, Release 1.2
iii
Contents
Setting Up Email Confirmations 15
Changing Your Password 16
Assigning Default Values to Guest Accounts 16
My Settings 17
Sponsor Portal User Guide for Cisco Identity Services Engine, Release 1.2
iv
CHAPTER
1
Supporting Guest Users
These topics provide details about your role as a sponsor in ensuring that only authorized users can access
your company's network or Internet:
• Importance of Network Security, page 1
• Network Access for Guest Users, page 1
• Sponsor Portal, page 2
• Guest Portal, page 2
• Your Role as Sponsor, page 2
• Signing on to the Sponsor Portal, page 2
• Unable to Sign On Because Account is Locked , page 3
Importance of Network Security
As you connect to your company's network or access the Internet, many processes work in the background
to securely protect your computer and the network from harm. Network security is critical to maintaining
your company's confidentiality and data integrity. Unauthorized users could negatively impact your company's
network directly by causing it to fail or indirectly by using it to cause harm to others.
Network Access for Guest Users
With the increased use of and dependency on mobile devices, such as laptops, tablets, and mobile phones,
people have become accustomed to being able to access the Internet from anywhere. However, access to
corporate networks requires more security than free Wi-Fi at a local coffee shop. To protect your company's
network and to ensure that only authorized guests can access it, your company uses Cisco Identity Service
Engine (ISE) guest services. Cisco ISE ensures that only authorized guests, such as visitors, contractors,
consultants, and customers, can access the network.
Sponsor Portal User Guide for Cisco Identity Services Engine, Release 1.2
1
Supporting Guest Users
Sponsor Portal
Sponsor Portal
The Sponsor portal is one of the primary components of Cisco ISE guest services. Use the Sponsor portal to
create temporary accounts for authorized visitors to securely access your corporate network or the Internet.
After creating the account, you also can use the Sponsor portal to provide account details to the guest by
printing, e-mailing, or texting.
Guest Portal
When people outside your company attempt to use your company's network to access the Internet, they are
automatically routed to the Guest portal. The Guest portal protects your company's network from unauthorized
users. As a sponsor, you can create temporary usernames and passwords for authorized visitors, and they can
then access the network by entering these credentials in the Guest portal login page.
Your Role as Sponsor
As a sponsor, you are responsible for creating guest accounts for authorized visitors to your organization.
These accounts enable visitors to access your company's network or provide access to the Internet. When
creating these accounts, you should adhere to your company's guidelines for providing network access to
visitors. Cisco Identity Service Engine (ISE) records and stores the entire process for auditing and reporting
purposes, which your company can use to verify that only authorized visitors have been granted network
access.
Your network administrator assigns functionality to your sponsor account base on the guest role to which you
are assigned. So, you might not have access to all features available on the Sponsor portal.
Signing on to the Sponsor Portal
The Sponsor portal is a web-based portal that you use to create guest accounts for authorized visitors. Once
you are signed into the Sponsor portal, you will be automatically disconnected after 20 minutes of inactivity.
Before You Begin
Obtain the Sponsor portal URL and your username and password from your system administrator.
Procedure
Step 1
Open a web browser and enter the Sponsor portal URL provided to you by your system administrator.
Your administrator customizes this URL, but it typically has a format such as:
https://ipaddress:portnumber/sponsorportal.
Step 2
Enter your username and password (provided by your system administrator) and click Sign On.
If you sign on successfully, the Manage Guest Accounts page for the Sponsor portal displays. If not, contact
your system administrator for assistance.
Sponsor Portal User Guide for Cisco Identity Services Engine, Release 1.2
2
Supporting Guest Users
Unable to Sign On Because Account is Locked
Unable to Sign On Because Account is Locked
By default, if you incorrectly enter your password for your sponsor account five times in a row, the Sponsor
portal temporarily locks you out of the system for 30 seconds. You can make additional attempts after that.
Your system administrator can change this default setting to require fewer or more failed attempts before
temporarily locking your account .
Sponsor Portal User Guide for Cisco Identity Services Engine, Release 1.2
3
Supporting Guest Users
Unable to Sign On Because Account is Locked
Sponsor Portal User Guide for Cisco Identity Services Engine, Release 1.2
4
CHAPTER
2
Creating Guest Accounts
These topics provide instructions for creating guest accounts and providing the account details to guests:
• Creating a Guest Account, page 5
• Importing Guest Accounts, page 6
• Creating Random Guest Accounts, page 7
• Providing Account Details to Guests, page 7
• Lost Guest Password, page 8
• Guest Account Settings, page 8
Creating a Guest Account
You can create a single guest account to provide network access for one specific person.
Procedure
Step 1
Click Create Account from the Manage Guest Accounts page.
Step 2
Enter the appropriate information in the First name and Last name fields to create the username.
If you do not enter anything, the portal will create a random username.
Step 3
Choose to send the account details to the guest user:
• Check the Send email notification and enter an Email address
• Check the Send text notification and enter a Phone number
Step 4
Confirm these pre-set required settings:
• Guest role
• Account duration
• Time zone
Sponsor Portal User Guide for Cisco Identity Services Engine, Release 1.2
5
Creating Guest Accounts
Importing Guest Accounts
• Notification language
Step 5
Step 6
Enter other optional fields.
Click Submit to create the account.
Related Topics
Guest Account Settings, on page 8
Importing Guest Accounts
If your company maintains account information for authorized visitors in an external database or file, you can
create guest accounts for these users by importing their information into the Sponsor portal. The file containing
the account information should be a .csv file, which the Sponsor portal then parses and creates new guest user
account for each entry in the file.
Before You Begin
Click Download Template on this page to get a template to use for the import file. Ensure that the file you
are importing conforms to the required structure before importing it. Additionally, if the file includes multi-byte
characters, you must save the file in UTF-8 format.
Procedure
Step 1
Click Import Accounts from the Manage Guest Accounts page.
Step 2
Step 3
Step 4
Click Browse to locate the .csv file.
Click Upload to upload the .csv file.
Confirm these pre-set required settings:
• Guest role
• Account duration
• Time zone
• Notification language
Step 5
Click Submit.
Related Topics
Guest Account Settings, on page 8
Sponsor Portal User Guide for Cisco Identity Services Engine, Release 1.2
6
Creating Guest Accounts
Creating Random Guest Accounts
Creating Random Guest Accounts
You can create up to 10,000 random guest accounts in advance, record the details separately, and store them
in the system for future use. For example, if you are a lobby ambassador who needs to distribute guest accounts,
you could save time by using these generic, randomly created accounts.
Procedure
Step 1
Click Create Random Accounts from the Manage Guest Accounts page.
Step 2
Step 3
Enter the number of accounts to create.
Enter a prefix to add to each account name.
The remainder of the username and the password are generated randomly adhering to the username and
password policies that are set by your system administrator.
Step 4
Confirm these pre-set required settings:
• Guest role
• Account duration
• Time zone
• Notification language
Step 5
Click Submit.
Related Topics
Guest Account Settings, on page 8
Providing Account Details to Guests
You can send guests' their account details by emailing, texting, or printing (depending on how your Cisco
ISE system administrator has configured the Sponsor portal).
Procedure
Step 1
On the Manage Guest Accounts page, check the check box next to the guest accounts you want to notify.
Step 2
Click Email, Text, or Print.
To send an email or text, the guest account must have an email address or phone number associated with it.
Sponsor Portal User Guide for Cisco Identity Services Engine, Release 1.2
7
Creating Guest Accounts
Lost Guest Password
Lost Guest Password
If guests lose their passwords, you can do one of following:
• Send them the account details again—if guests have not changed their passwords, you can just send
them the account details again from the main Manage Guest Accounts page.
• Create a new guest account—if guests have changed their passwords, you cannot just reset the password.
You must create a new account and provide them with those details.
Guest Account Settings
These account settings are required regardless how you create the guest accounts.
Table 1: Guest Account Settings
Field
Usage Guidelines
Guest role
Cisco ISE includes these guest roles to map guest
users to their appropriate network access privileges.
These options are available by default, but your
system administrator might restrict this list or create
additional guest roles:
Guest
When you create an account with this role, the
account is not enabled until the user first signs
on. Status for these guests displays as
"Awaiting Initial Login" until the guest signs
on for the first time.
ActivatedGuest
When you create an account with this role, the
account is enabled automatically. Status for
these guests displays as "Active" even if the
guest has not yet signed on.
Sponsor Portal User Guide for Cisco Identity Services Engine, Release 1.2
8
Creating Guest Accounts
Guest Account Settings
Field
Usage Guidelines
Account duration
The account duration specifies how long the guest
user can access the network. Your system
administrator might restrict this list or create
additional ones:
DefaultEightHours
This 8-hour time limit starts from when you
first create the account. You would typically
not use this account duration when creating a
list of random accounts.
DefaultFirstLoginEight
This 8-hour time limit starts from when the
guest user first successfully connects to the
Guest portal.
DefaultStartEnd
You can indicate specific dates and times on
which to start and stop network access. This
account duration is useful if you need to assign
network access for several days.
Time zone
Set the time zone to be used by the guest account.
Notification language
Choose the language used when sending account
notifications to this guest.
Related Topics
Creating a Guest Account, on page 5
Importing Guest Accounts, on page 6
Creating Random Guest Accounts, on page 7
Sponsor Portal User Guide for Cisco Identity Services Engine, Release 1.2
9
Creating Guest Accounts
Guest Account Settings
Sponsor Portal User Guide for Cisco Identity Services Engine, Release 1.2
10
CHAPTER
3
Managing Guest Accounts
These topics provide details about suspending and extending guests' accounts and sending guests their account
details again.
• Suspended and Expired Guest Accounts, page 11
• Reactivating Expired Guest Accounts, page 11
• Extending Guest Account Durations, page 12
• Suspending a Guest Account, page 12
• Reinstating a Suspended Guest Account, page 13
• Manage Guest Accounts Page, page 13
• Account Status Details, page 14
Suspended and Expired Guest Accounts
When guest accounts are suspended or expired, the affected guest users cannot access the network.
Guest accounts can be suspended in two ways:
• Guest reached the maximum number of login attempts as defined by your system administrator.
• You manually suspended the account.
When an active or suspended account reaches the end of its account duration (which you defined when you
created the account), the account expires.
You can reactivate or reinstate suspended and expired accounts. Expired accounts are automatically purged
based on criteria defined by your system administrator, but the default is 15 days. After an account is purged,
you must create a new account for that guest.
Reactivating Expired Guest Accounts
If guests' accounts have expired, they are no longer able to connect to the network. You can typically reactivate
expired accounts by resetting their account durations. However, an automated process runs periodically (based
Sponsor Portal User Guide for Cisco Identity Services Engine, Release 1.2
11
Managing Guest Accounts
Extending Guest Account Durations
on criteria set by your system administrator) that automatically removes all expired accounts from the system.
You will then need to create new accounts for these guests.
Procedure
Step 1
Step 2
Step 3
Step 4
On the Manage Guest Accounts page, check the check box next to the expired guest accounts you want to
reactivate.
Click Change Account Duration.
Choose the new account duration and click Submit.
Verify that the expired accounts' statuses have changed.
Related Topics
Account Status Details, on page 14
Extending Guest Account Durations
You can extend guests' account durations to allow guests to access the network for longer than originally set.
Procedure
Step 1
On the Manage Guest Accounts page, check the check box next to the guest accounts you want to extend.
Step 2
Step 3
Click Change Account Duration.
Choose the new account duration and click Submit.
Related Topics
Account Status Details, on page 14
Suspending a Guest Account
You can suspend guests' accounts which prevents them from accessing the network but retains their accounts.
Procedure
Step 1
On the Manage Guest Accounts page, check the check box next to the guest accounts you want to suspend.
Step 2
Step 3
Click Suspend.
Verify that the account status now displays as "Suspended."
Sponsor Portal User Guide for Cisco Identity Services Engine, Release 1.2
12
Managing Guest Accounts
Reinstating a Suspended Guest Account
Reinstating a Suspended Guest Account
You can reinstate suspended guest accounts that you suspended previously or that were suspended automatically
because the guest made too many failed attempts to sign on.
Procedure
Step 1
Step 2
Step 3
On the Manage Guest Accounts page, check the check box next to the suspended guest accounts you want
to reinstate.
Click Reinstate.
Verify that the suspended accounts' statuses have changed.
Related Topics
Account Status Details, on page 14
Manage Guest Accounts Page
The Manage Guest Accounts page is the home page for the Sponsor portal that displays after you sign on
to the portal.
Table 2: Manage Guest Accounts Page
Field
Usage Guidelines
Create Account
Create a single guest account.
Import Accounts
Import a file containing a list of guest accounts to
create multiple accounts.
Create Random Accounts
Randomly create a set of multiple guest accounts.
Account List
Edit
Make changes to a the selected account.
Email
Email account details to the selected users.
Text
Text account details to the selected users.
Print
Print account details for the selected users.
Reinstate
Enable a suspended account.
Suspend
Disable an account without deleting it.
Delete
Remove a guest account.
Change Account Duration
Adjust the access time period or reactivate an expired
account.
Sponsor Portal User Guide for Cisco Identity Services Engine, Release 1.2
13
Managing Guest Accounts
Account Status Details
Account Status Details
The account status displays details about guests' accounts.
Table 3: Account Status Details
Status
Description
Awaiting Initial Login
The guest user account has been created, but the guest
has not yet signed into the Guest portal.
Active
The guest user has successfully signed in through the
Guest portal, or the account was defined as an
ActivatedGuest guest role.
Expired
The time period for the account has ended. When you
reactivate an expired account, its state changes based
on the guest role assigned:
• ActivatedGuest role changes to Active.
• Other guest role changes to Awaiting Initial
Login.
Suspended
The guest user's account has been suspended by you
or another sponsor.
Related Topics
Reactivating Expired Guest Accounts, on page 11
Reinstating a Suspended Guest Account, on page 13
Extending Guest Account Durations, on page 12
Sponsor Portal User Guide for Cisco Identity Services Engine, Release 1.2
14
CHAPTER
4
Customizing the Sponsor Portal
These topics provide details about how you can customize your Sponsor portal settings and set defaults
values for guest accounts
• Choosing the Language Used by the Sponsor Portal, page 15
• Setting Up Email Confirmations, page 15
• Changing Your Password, page 16
• Assigning Default Values to Guest Accounts, page 16
• My Settings, page 17
Choosing the Language Used by the Sponsor Portal
You can change the language used by the Sponsor portal to any of the standard language templates or to any
custom language templates added by your system administrator.
Procedure
Step 1
On the Manage Guest Accounts page, click My Settings
Step 2
Choose one of the following:
• Use browser locale to use the same language setting as your web browser.
• Language template to choose a different language template.
Step 3
Click Save.
Setting Up Email Confirmations
When you create a guest account, you can have a copy of the account details automatically emailed to you.
Contact your system administrator if this feature is not available to you.
Sponsor Portal User Guide for Cisco Identity Services Engine, Release 1.2
15
Customizing the Sponsor Portal
Changing Your Password
Procedure
Step 1
On the Manage Guest Accounts page, click My Settings
Step 2
Step 3
Step 4
Enter your email address in the Your email address field.
Check the Receive email confirmation check box.
Click Save.
Changing Your Password
Your system administrator might require you to change your password when signing on to the Sponsor portal,
or you can change it at any time. Your password must adhere to the password policy set by your system
administrator.
Before You Begin
• If you want to change your password, click My Settings on the Manage Guest Accounts page to access
the password fields.
• If you are required to change your password when signing on to the Sponsor portal, the Change Password
screen displays automatically.
Procedure
Step 1
Step 2
Step 3
Step 4
Enter your old password in the Old password field.
Enter your new password in the New password field.
Confirm your new password in the Confirm password field.
Click Save.
Assigning Default Values to Guest Accounts
If you typically create guest accounts that use the same guest role, account duration, time zone, and notification
language, you can set these defaults so you do not have to change them each time you create a guest account.
Procedure
Step 1
On the Manage Guest Accounts page, click My Settings
Step 2
Choose the appropriate options in the Guest role, Account duration Time zone, and Notification language
fields.
Click Save.
Step 3
Sponsor Portal User Guide for Cisco Identity Services Engine, Release 1.2
16
Customizing the Sponsor Portal
My Settings
My Settings
You can customize your Sponsor portal settings and set default values for guest accounts that you create.
Field
Usage Guidelines
Language template
Change the language used by the Sponsor portal or
check Use browser locale to use the same language
as your web browser.
Location
Enter your location.
Your email address
Enter your email address and check Receive email
confirmations to receive copies of account details
sent to guests.
Guest role
Choose a default guest role to use to map guest users
to their appropriate network access privileges.
Account duration
Specify how long the guest user can access the
network.
Time zone
Set a time zone to be used by all guest accounts.
Notification language
Choose a default language used when sending account
notifications.
Password settings
Enter your current password in the Old password
field and enter your new password in the New
password and Confirm password fields.
Sponsor Portal User Guide for Cisco Identity Services Engine, Release 1.2
17
Customizing the Sponsor Portal
My Settings
Sponsor Portal User Guide for Cisco Identity Services Engine, Release 1.2
18