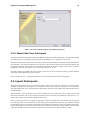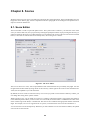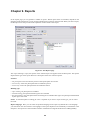
1
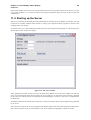
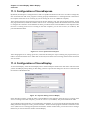
ScoreExpress
Score management
for gymnastics meetings
Version 4.2
User Manual
Axel Hallez
2
ScoreExpress 4.5 User Manual
ScoreExpress 4.5 User Manual
Axel Hallez
This document can be redistributed under condition of source attribution.
3
Table of Contents
1. Introduction .............................................................................................................................. 1
1.1. License Agreement ............................................................................................................. 1
2. Installation ............................................................................................................................... 3
2.1. Computer requirements ........................................................................................................ 3
2.2. Java installation .................................................................................................................. 3
2.3. ScoreExpress installation ...................................................................................................... 5
2.4. Uninstall ScoreExpress ........................................................................................................ 8
3. Get Started with ScoreExpress ..................................................................................................... 9
3.1. Launching ScoreExpress ...................................................................................................... 9
3.2. Opening/Creating a File ....................................................................................................... 9
3.3. Adding a new competition .................................................................................................. 10
4. Sessions ................................................................................................................................. 11
5. Participant Management ............................................................................................................ 12
5.1. Participants list ................................................................................................................. 12
5.2. Adding Participants ........................................................................................................... 12
5.3. Import Participants ............................................................................................................ 15
6. Competition with Finals ............................................................................................................ 17
6.1. Preliminaries and Finals in one Competition .......................................................................... 17
6.2. Preliminaries and Finals in Separate Competitions ................................................................... 17
7. Jury Panels ............................................................................................................................. 18
7.1. Jury Evaluations ............................................................................................................... 18
8. Scores .................................................................................................................................... 20
8.1. Score Editor ..................................................................................................................... 20
8.2. Import Scores ................................................................................................................... 21
9. Reports .................................................................................................................................. 22
10. General Data ......................................................................................................................... 24
10.1. Clubs - Members ............................................................................................................. 24
10.2. Disciplines - Judges ......................................................................................................... 25
11. ScoreDisplay: Public Display of Scores ..................................................................................... 27
11.1. Hardware Setup ............................................................................................................... 27
11.2. Starting up the Server ...................................................................................................... 28
11.3. Configuration of ScoreExpress ........................................................................................... 29
11.4. Configuration of ScoreDisplay ........................................................................................... 29
iv
Chapter 1. Introduction
ScoreExpress is a program developed in cooperation with the Flemisch Gymnastics Federation and the French
speaking Gymnastics Federation of Belgium for the organization of the Belgian competitions. Nevertheless, the
program can be used for the organisation of other competitions. It is distributed free of charge for everybody to use.
Of course you have to respect the license agreement that is listed below (zie Section 1.1, “License Agreement”).
During the development of ScoreExpress, I have used a lot of external libraries, most of them open source. I would
like to expres my gratitude to the people and organisations that develop these libraries:
• NetBeans IDE [http://www.netbeans.org] A Java development platform.
JasperReports [http://jasperreports.sourceforge.net] A report generation framework.
Message Oriented Middleware for Java [http://mom4j.sourceforge.net/] An implementation of the JMS
standard.
JGoodies [http://www.jgoodies.com] Several aids for the development of graphical user interfaces in Java.
Xerces [http://xml.apache.org/] A Java XML parser.
iText [http://www.lowagie.com/iText/] A Java PDF generator.
ANT [http://ant.apache.org/index.html] A software build tool.
Inno Setup [http://www.jrsoftware.org/isinfo.php] An open source compiler for the creation of application
installers.
Batik SVG Toolkit [http://xmlgraphics.apache.org/batik/] A library for using the Scalable Vector Graphics
format.
Launch4j [http://launch4j.sourceforge.net/] For the creation of application launcher for java applications.
SwingLabs Wizard Project [https://wizard.dev.java.net/] A wizard framework.
1.1. License Agreement
This is a translation of the original Dutch license agreement, provided for your convenience only. In case of a
dispute the original version shall be used.
This is an agreement between you, the user, and Axel Hallez, the author.
The agreement concerns the software package ScoreExpress and the documents that are distributed with it,
hereafter called the software.
By installing the software on a computer, you agree with the terms of this agreement. If you do not agree with
these terms, you are not entitled to install the software. The agreement ends when you remove the software from
all of your computers.
1.1.1. LICENSE
With this agreement, the author grants the user a non-exclusive right to install and use the software on one or more
computers and to make copies for back-up and archiving.
The user is not allowed to use the software or parts thereof to create new software, the reverse engineer or decompile
the software or otherwise translate the software, except if he is explicitly allowed to do so by the law. This license
does not grant the user any rights on future versions of the software.
1
Chapter 1. Introduction
2
1.1.2. COPYRIGHT
The copyright and other intellectual property right remain property of the author or any of his license givers.
Information that is produced through the use of the software shall be owned by the user that produces the
information.
1.1.3. LIMITED WARANTY
The software is provided as is, without waranty of any kind. In no case, the author shall be held responsible for
damage that is caused by the use of the software or the inability to do so.
Chapter 2. Installation
In this chapter the installation of ScoreExpress on your computer is explained step by step. The next section
explains the requirements for a computer to be able to use the program comfortably.
The installation itself consists of two parts. Because ScoreExpress is based on the Java platform, you have to make
sure that the Java environment is installed on your computer. This is explained in Section 2.2, “Java installation”.
Afterwards the installation of ScoreExpress itself is explained in Section 2.3, “ScoreExpress installation”. Finally,
Section 2.4, “Uninstall ScoreExpress” explains how you can remove the installation of ScoreExpress.
2.1. Computer requirements
To be able to run ScoreExpress, your computer has to have following specifications:
• CPU speed: 1+ GHz
• RAM: 512+ MB
• Operating system: Windows 2000/XP/2003/Vista/7
ScoreExpress uses about 30 MB of space on the hard disk (apart from the data files).
If you want to use more than one PC at once, either to input scores on several computers or because you want to
use ScoreDisplay, all of the PC's have to meet these requirements. On top of that, they also need to have a network
connection between each other.
2.2. Java installation
Before you can run ScoreExpress, you need to install the Java Runtime Environment (JRE) on the computer.
ScoreExpress 4 uses Java version 1.6.
You can download Java directly from the Java website: http://www.java.com. On this website you will see this
page:
Figure 2.1. Java download page
3
Chapter 2. Installation
4
To check wether your computer has the most recent version of Java installed, you can click on the link 'Do I
hava Java ?'. To download the most recent version you have to click on the button 'Free Java Download'. You
can choose between the online installation program an the offline installation program. Choose the online version
if you want to install Java on your computer immediately. The offline version can be saved for later installation
or copied to other computer that don't have an internet connection. This can be nice if you have to install it in
the competition hall.
After downoloading it, you can run the installation program. First you have to agree with the license agreement.
Figure 2.2. License agreement screen
After clicking accept, you go to the next screen, which actually starts the installation. You see a progress bar of
the installation process.
Figure 2.3. Installation progress
When the installation is finished, you will see this screen:
Chapter 2. Installation
5
Figure 2.4. Finished installation
After clicking finished, Java is installed on your computer and you can proceed to install ScoreExpress itself.
2.3. ScoreExpress installation
The installation program for ScoreExpress can be downloaded from the ScoreExpress website [http://
www.scoreexpress.be]. Updated versions of the software are released on a regular basis. With each new version
you will see a list of changes. If you have a meeting, it is recommended that you check the website for updates
shortly before, to see if there are any changes that apply to your meeting.
Note
If you already have a version of ScoreExpress installed, it is recommended that you uninstall it before
installing a new version (see Section 2.4, “Uninstall ScoreExpress”).
The remainder of this paragraph goes through the setup procedure step by step. The options of each screen in the
setup wizard are explained in detail. The first screen is the Welcome screen, which shows the version number
of the program.
Figure 2.5. Step 1: The welcome screen
Chapter 2. Installation
6
When you click the "Next" button, you see the ScoreExpress license agreement.
Figure 2.6. Step 2: License agreement
Before you can proceed you need to confirm that you agree with the terms of the license agreement.
Figure 2.7. Step 3: Choosing the installation folder
In this screen you can specify the folder where ScoreExpress will be installed. By default this is a ScoreExpress
folder in 'Program Files', but if you want to use a different folder, you can change this. In dit scherm kunt u bepalen
in welke map u ScoreExpress wilt installeren.
Chapter 2. Installation
7
Figure 2.8. Step 4: Choosing Start menu folder
In step 4 you can specify in which folder of the Start Menu the short cuts for starting the ScoreExpress applications
shoudl be placed. Again there is a default setting which you can change if you want to. You can also choose not
to have short cuts in the Start Menu.
Figure 2.9. Step 5: Desktop short cuts
In step 5 you can specify wether you want to have a short cut for launching ScorExpress on the desktop or not.
Chapter 2. Installation
8
Figure 2.10. Step 6: Installation summary
In step 6 the settings you provided in the previous steps are summarized for review. If all options are satisfying,
you can click the 'Install' button to start the installation. After clicking this button, the installation will start. When
the installation is finished you enter the finishing screen. You can select wether ScoreExpress express should be
launched when you click the 'Finish' button.
Figure 2.11. Step 7: End of the installation
2.4. Uninstall ScoreExpress
To remove ScoreExpress from your computer, you can go to the ScoreExpress Start menu folder and select the
item 'Uninstall ScoreExpress'. This will start the uninstall program which will let you confirm that you want to
remove the program. The unistallation removes only th program itself. Data files created with ScoreExpress are
not removed.
Chapter 3. Get Started with ScoreExpress
ScoreExpress consists of several parts. Firstly, there is the program ScoreExpress itself. This is the central program
which lets you administer all the data of a competition. The capabilities and the working of this program is
explained in this and the following chapters.
Next, there is also the program ScoreDisplay. This program is used to display the scores and intermediate rankings
to the public. The details of the program are explained in Chapter 11, ScoreDisplay: Public Display of Scores.
In the remainder of this chapter the general structure of the ScoreExpress program is explained. The following
chapters each deal with a separate aspect of the program in detail.
3.1. Launching ScoreExpress
The ScoreExpress installation program creates several short cuts which allow you to start it: one on the desktop
and one in the Start menu folder. In the start menu folder you will also find short cuts for the other programs and
to the website. Of course you can also browse to the installation folder of ScoreExpress and launch the program
from there.
Figure 3.1. Opening screen of ScoreExpress
If you do not have an apropriate version of Java installed, the program will not start, but it will show a warning
instead, directing you to the Java website.
3.2. Opening/Creating a File
In ScoreExpress, competition data is stored in files that have an MS Access file format. Before you can start, you
need to have a file opened. Through the File menu, you can either create a new file or open an existing file.
After opening a file you can access the several parts in the user interface. At the top of the screen there is the
Competition selection box, where you can choose which competition from de data file you want to work with.
With the button next to the selection box you can add new competition. When you have a competition selected,
you can see and work on the data associated with this competition in the subscreens that are accessible through
the tabs below.
Besides the tabs that give access to the information of the selected competition, there is an other important way
to access information, through the menu General. The items in this menu open dialog windows about data that is
not competition specific, such as clubs and club members (see Chapter 10, General Data).
9
Chapter 3. Get Started with ScoreExpress
10
3.2.1. Opening ScoreExpress with a specified file
When you need two work with several files alternating with each other, it can be inconvenient to have to open a
different file again and again. In this kind of situations it can be useful to create shortcuts that immediately open
the file that you specify. If you copy the ScoreExpress short cut on the desktop, can add the file name (with path)
of the file that you want to open to the target (eg. ScoreExpress c:\files\Competition.mdb). You can make such
a short cut for each of the files you use regularly.
3.3. Adding a new competition
With the button "New" ( ) next to the competition selection box you van add a new competition to the file. When
you add a new competition, the first thing you should do is complete the form in the competition subscreen. Below
is a list of the fields and their explanation. It is also indicated which fields are mandatory.
Discipline (required). When you create a new competition, you need to select the discipline first. The discipline
of a competition can not be changed afterwards. The discipline determines how the competition is organised, such
as which categories there are, how scores are calculated and which reports you can create.
Title (required). The titel of a competition is used in several places such as reports to identify it.
Date From ... To ... The starting and finishing date of the competition. These data are used in the reports. If
it is a one day competition, you can specify twice the same date.
Venue, Address en Zip code. The place where the competition is organized.
Place. City where the competition is organized. This is used in reports.
Chapter 4. Sessions
A competition with a lot of participants is often split into several sessions. Each of the sessions has its part of the
categories and in some cases the participants of one categories are spread over more than one session. It is not
required that you enter the sessions in the database, but sometimes it is easier to work when they are available,
for instance when you need to select categories for a report.
In the Sessions page you can manage the sessions of a competition. On the left site is a list of the sessions that
have been defined and next to that a series of buttons to respectively add a new session, move a session up or
down and to remove a session.
Figure 4.1. Het tabblad sessies
When a session is selected, the properties of the session are visible on the right. Each session has a name that
identifies the session. You can also provide the date and the time of the session.
Session Categories. You can add categories to each session. In the list you see the categories that have been
selected before. With the buttons on the right you can add more categories and remove a category from the list. In
the category list there are two column for "nr from" and "nr to". You only need to use these fields if a category is
spread over several sessions. In this case you can specify which numbers have to compete in each session.
11
Chapter 5. Participant Management
Depending on the discipline, your competition has one of different types of participants. Most disciplines are done
individually, so the particpants are persons. For some individual disciplines, there is the possibility to have a team
ranking, based on the results of the individual participants. In these cases you can also subscribe teams.
Other disciplines are performed in group. In these disciplines the participants are groups of individuals.
5.1. Participants list
The page "Participants" shows a list of all participants of a competition. By default the participants are sorted by
their number. By clicking on the header of a column you change the order of the participants. In the list you can
change the value of the first three columns: Number, Present, Finalist. To change other values, you need to go to
"Clubs - Members" (see Section 10.1, “Clubs - Members”).
Figure 5.1. Participants
5.2. Adding Participants
There are two ways to add new participants. You can either do this in the "Club - Members" window (see
Section 10.1, “Clubs - Members”) or you can use the wizards in the menu "Participants". There is one wizard to
add an individual or group participant (depending on the discipline) and another wizard to add a team participation
(only for individual disciplines).
5.2.1. Wizard Add Participant
Club selection. The wizard consists of several steps. In the first step you need to select the club of new
participant. If the club has already been added to the database, you can select the club from the list. Otherwise,
you can choose to add a new club. If you add a new club, you can see which fields you have to complete at the
bottom of the screen (Figure 5.3, “Wizard Add Participant: add a new club”).
12
Chapter 5. Participant Management
13
Figure 5.2. Wizard Add Participant: club selection
Figure 5.3. Wizard Add Participant: add a new club
Group selection. If you are adding an individual participant, the second step is the member selection. For group
disciplines you first need to specify the group. You can either choose an existing group from the list (showing
the groups from the club you selected before) or add a new group. For a new group, you need to provide a name
and the number of members you want to add to add to the group. If you add a new group, you have to selected
the members of the group in the next steps (one step for each member). If you select an existing groups, you will
go immediately to the last step.
Chapter 5. Participant Management
14
Figure 5.4. Wizard Add Participant: add a new group
Member selection. For individual participations there is only one member selection step. For group
participations, there is one member selection step for eah of the members. You can either select a member from the
club that you selected before, or you can add a new member. A new member will be added to the club you selected.
Figure 5.5. Wizard Add Participant: new member
Participation. In the last step you need to provide the properties of the participation itself. The participant
number that is suggested is one higher than the highest number that is already assigned. You also need to specify
the category of the participant and you can mark the participant as a guest.
Chapter 5. Participant Management
15
Figure 5.6. Wizard Add Participant: participation properties
5.2.2. Wizard Add Team Participant
The wizard Add Team Participant simplifies the addition of team participants significantly. The steps of the wizard
are identical to those for adding a group participation. The difference is in the result of the wizard.
With team participations, the members of the team as well as the team itself have to be subscribed as participant for
the competition. The wizard will do both. You only have to provide the properties for the team participation. The
participation numbers of the members are derived from the team participation number you provide. For instance
the members of a team with number 3 will receive the numbers 31, 32, etc...
The team members are added in the same category as the team. You can change the category of team members
afterwards, without affecting the team category.
See also Section 10.1.4.1, “Team Participations” for more informations about team participations.
5.3. Import Participants
Through the menu 'General' you can launch the 'Import data' wizard. With this wizard you can import clubs,
members, participantions and judges into ScoreExpress. There are tree types of importations: one to load only
club and member data, one to load particpation data together with the corresponding clubs and members and one
to import judges.
The wizard has to steps. In the first step you have to indicate the type of import you want to perform and the file
that contains the data. You can also change the parameters that are used to parse the data file. See Section 5.3.1,
“Import File Format” for more details about the file format.
In the second step you will see a number of target files. These are the fields into which the data will be imported.
For each target field, you can indicate the corresponding source field from the import file. For a number of fields,
the specification of a source field is required. The list of fields that are required is listed at the bottom of the panel.
For the other fields, the specification of a source field is optional. You can also specify a default value for these
fields. This default value will be used if no source field is specified or if the source field has no data.
Chapter 5. Participant Management
16
5.3.1. Import File Format
For the now, only the import of csv (Comma Separated Values) files is supported. These are text files with one
record on each line. The values of the field are separated form each other with a separator (usually , or ;). From
spreadsheet programs such as MS Excel you can easily save data into this file format.
The wizard allows for the configuration of the file format. You can specify the separator and if necessary the text
indicator that is used to surround text fields (usually ").
With the option 'Skip lines' you can indicate the size of the header in the import file. The import wizard assumes
the first line of data contains a list of field names. You have to skip lines only if there are additional lines before
the field names.
5.3.2. Field Specifications
Target Field
Source Field
Content
Member ID
Required
Each member needs to have a unique Member ID within his/her
club. This ID is used to check wether a person is already included
in the database.
Last Name
Required
This field contains the last name or the full name of the member.
First Name
Not required
This field contains the first name of a member. The use of this
field is optional if the field Last Name contains the full name.
Date of Birth
Not required
Data of birth of a member. You can specify the format of the date
in the options.
Gender
Not required
The gender of a member should be indicated by 'M' for males and
'F' or 'V' for female.
Club Number
Required
The unique resgistration number of the club. This field is used to
check if a club is already present in the database.
Club Name
Required
The name of the club.
Country
Nor required
The three character code of the national olympic commitee of the
country.
Region
Not required
The region of a club. The spelling should be identical to the one
used by ScoreExpress.
Table 5.1. Import fields for clubs and members
Target Field
Source Field
Content
Number
Required
The participation number.
Category
Required
The category of the participant. The spelling should correcpond to
the one used by ScoreExpress (Level + Name; eg. 'A Seniors').
Team
Not required
The name of the team. This field can be used to import
participants that are part of a group. All participants with the same
team name are put into one group. If you want to use this, make
sure that all club and participation related fields of team members
are identical.
Table 5.2. Import fields for participations
Chapter 6. Competition with Finals
Many competitions are organized in two stage with a preliminary round and a final round. After the preliminaries,
the participants that qualify are selected into the finals based on their results. In ScoreExpress there are two methods
to accomplish this. The method you use depends on the facilities that are available in the discipline.
6.1. Preliminaries and Finals in one Competition
Some disciplines (such as Trampoline and Tumbling) have facilities for the organization of preliminaries and finals
within one competition. This means that there are events that belong to the preliminaries and other that belong to
the finals. There are also separate reports for the results of the preliminaries and the results of the finals.
In these disciplines, it is the "Finalist" property of the participants that determines who qualified for the finals. At
the end of the preliminaries, you create the results and in the participants screen you can indicate the participants
the are qualified.
6.2. Preliminaries and Finals in Separate Competitions
In disciplines that have no facilities to have the preliminaries and the finals in one competition, you have to create
several competitions, one for the preliminaries and one for each final. After the preliminaries, the participants that
are qualified for a final are added to the corresponding final competition.
To make the selection of participants of a final easier, there is the wizard "Participant Selection" in the menu
"Participants". This wizard allows you to copy participants from one competition to another, based on some criteria.
The wizard consists of three steps. In the first step, you have to choose the competition from which you want to
select participants and the competition to which you want to add the selected participants. In the second step you
can select the categories that are taken into account.
In the third step, you can configure the selection criteria. There are three criteria that can be combined.
Best participants per category. With this criterium, you can put the maximum number of participants you
want to select per category. If the number of participants that meets te other criteria (if you selected any) is higher
than this number, the participants with the best ranking are selected.
Apply minimum score. With this criterium you have to provide the minimal amount of points a participant
has to have to qualify.
Select finalists. With this criterium, you limit the selection of participants to those that have been marked as
finalist in the source competition. This way you can first mark the qualified participants in the preliminaries and
then copy them to the final competition with the wizard.
Ranking. You can indicate which ranking should be used in combination with the first to selection criteria.
You can use the all-around ranking, or the ranking of a single event.
17
Chapter 7. Jury Panels
In the page "Jurypanels" you can manage all of the information about the jury panels. On the left is a list of all panels
in the competition. You can add new panels through the Jury Panels menu. Each panel has to have a unique name.
Figure 7.1. Jury Panels
After creating a new jury panel or selecting an existing panel, you can see the data of the panel on the right side
of the screen. One part shows the list of panel members. This list reflects the composition of the panel according
to the rules of the discipline. For each position you can select a judge from the list of people with a judge license
(see Section 10.2, “Disciplines - Judges”) in the first column. In the second column you can select the club which
delegates the judge.
Note
It is not required that the judge panels are completed in order to enter scores or create result listings.
On the right side of the screen you see the panels tasks roster. It has a row for each category and a column of
checkboxes for each the events in the competition. By selecting a checkbox, you indicate that a category is judged
by the panel for the selected event. It is not possible to assign a task to two different panels.
Through the menu you can not only add new panels, but some other things. You can rename or delete a panel,
create a new panel by copying an existing one (only the members are copied, not the tasks), which i handy when
you have different panels where only one or two members are different. You can also request a number of reports.
One report is a listing of the panels with their members and tasks. There is also a possbility to create evaluation
reports for the judges (zie Section 7.1, “Jury Evaluations”).
7.1. Jury Evaluations
ScoreExpress has the possibility to generate a report that provides insight into the performance of the members in
a panel. To generate such a report you can either select the panel you want to evaluate and then select 'Evaluate
Judges' in the menu, or you can select 'Evaluate all panels' in the menu, to evaluate all panels at once. If you choose
the last option, you only need to say in which order you want the scores to appear in the report.
18
Chapter 7. Jury Panels
19
If you evaluate only one panel, you will see a window with a number of settings (Figure 7.2, “Jury Evaluation
Window”). Besides the order of the scores, you can select the section of the panel that will be evaluated (depending
on the value they assign) and which tasks need to be included in the report.
Figure 7.2. Jury Evaluation Window
Chapter 8. Scores
Working with scores is of course one of the more important parts of the application. The input and update of scores
happens in 'Score Editor' page, which is explained in the next paragraph. In succeeding section explains how to
import scores from another file.
8.1. Score Editor
The Score Editor is used to input and update scores. The system works as follows: you select the event of the
score you want to deal with, next you proceed by entering the participant number. Upon pressing the enter key (or
otherwise changing the focus to an other field) the score is loaded on the screen. If the score has not been entered
before, a new score is created. If the score already exists, the existing score is shown.
Figure 8.1. The Score Editor
The score is shown in a roster, with an input field for each of the marks that are provided by the judges. You can
navigate between these fields by using the tab or the enter key. On the right of this roster are the calculated score
values, that are updated as you enter the marks.
By default, the score values are traversed row by row. In case you prefer to traverse them column by column, you
can change this setting in the options window.
While entering scores, you can either use a point or a comma as a decimal separater. The program will change it
to the default separater. When you move to the next score field, the entered value is validated. If the value is out
of the normal range of the field, it is marked red. The value is also rounded to the appropriate number of decimal
digits. For example, if a score is supposed to be 0.1 precise, an entered value of 8.34 will be rounded to 8.3.
A score never has to be saved explicitely. Whenever you select another score or leave the Score Editor, the opened
score will be saved to the file.
20
Chapter 8. Scores
21
8.2. Import Scores
In the participants menu, you can select the item 'Import Scores'. This wizard is meant to make it easier to work
with several copies of the same database file on a competition. This is especially useful if you want to work with
several computers, but cannot or do not want to install a network. In this case you wil end up with several copies
of the database, each containing a part of the scores. With the Score Import you can import the scores from one
file into another at the end of the competition, thus creating a file containing all of the scores.
Note
When importing scores, a mistake in the settings can cause valid scores to be overwritten by invalid
scores. Therefor it is recommended to make sure that you have a backup copy of the files. You should
also confirm that the import was done correctly by comparing the results before and afterwards.
The import wizard consists of two steps. In the first step, you have to select the file from which you want to import
scores. When you select a file, it will be checked that the selected file has the same competitions as the file you
are using (using the discipline and title of each competition). If not, you cannot import scores. In this step you can
also choose wether you want to copy the "present" property of the participants from the import file and what you
want to do if an imported score conflicts with an existing score.
In the second step you can choose the competition and categories of which you want to import the scores. When
you click the "Finsh" button, the import of score starts.
Chapter 9. Reports
In the reports page you can generate a number of reports. Which reports there are available, depends on the
discipline of the competition. You can see the available reports in the list on the left side. When you select a report,
the desciption area will provide a brief explanation of the contents of the report.
Figure 9.1. The Reports page
Also upon selecting a report, the options of the selected report will appear below the description. The options
depend on the type of the report. Below is a description of the most common options.
Presence:
• All participants: Does not take the presence of the participants into account.
• Present only: selects the participants that are marked as present.
• Absent only: selects the participants that are marked as absent.
Ranking type:
• Open ranking: all participants are included.
• Limited ranking: participants marked as guests are excluded.
• Regional ranking: only participants of the selected region are included. The region of a participant is determined
by the region of its club.
Event: In some disciplines a ranking per event is required. If you select a report of this type, you can select
the event.
Report language: Here you can select the preferred language of the report. By default this is the language
you selected for the user interface. The language of the reports depend on the availability of translations in the
discipline. All reports are at least available in Dutch. Translations to English and French are added gradually.
22
Chapter 9. Reports
23
Categories: You can select the categories you want to include in the report. You need to select at least one
category. If you have defined the session, the categories will be shown by session, which makes it easy to find all
categories of one session. If there are no sessions defined, you get one list of all categories.
After selecting a report and setting the options you can generate the report. You can save the report in HTML
or PDF format, or you can request a print preview, from where you can print it or save it to a file in a format
of your choice.
Chapter 10. General Data
Through menu "General" you can open two screens that allow you to manage data from another point of view than
the compititions. The item 'Clubs - Members' opens a screen for the management of clubs, club members, groups,
teams and participations. With the 'Disciplines - Judges' screen you can manage the judges of each discipline. Both
screen are organized in the same way. The tree on the left side lets you navigate through the objects. When you
select an object, the properties of this object are shown on the right.
To add a new object, select the parent object of the object you want to create and click the 'Add' button. To remove
an object, select it and click the 'Delete' button.
Figure 10.1. the screen 'Clubs - Members'
10.1. Clubs - Members
In this screen you can manage the data clubs, club members, as well as groups, teams and participations. The
objects are ordered hierarchically. On the top level there are the clubs. Through a club, you can access the members,
groups and teams that belong to the club. Through these items, you can also access the participations.
10.1.1. Clubs
When you add a new club, you first have to provide the name of the club. Then the club is created and you can fill
out other properties of the club. The only properties that are required are the name and the number. The number
needs to be unique.
10.1.2. Members
If you select the item members of a club, a list of members will appear on the right. You can double-click a member
to select it and see its properties. You can also add new members with the 'Add' button. Only the name and member
number are required fields, the number needs to be unique within the club. From a member object, you can access
the participations of a member in the competitions.
10.1.3. Groups
When adding a new group you need to enter the name of the group first. Then you can select the members of the
group from the members of the club, by clicking the 'Add' button next to the members list. From a group you can
access the participations of a group in the competitions.
24
Chapter 10. General Data
25
10.1.4. Teams
Working with a group is comparable to working with groups. However, subscribing teams for a competition is
more complicated.
Note
You can create team participations in each individual discipline, but not every discipline has facilities
for calculating and listing team results.
10.1.4.1. Team Participations
When a team participates in a competition, both the team and the team members have to be subscribed. Score
are entered for the individual participants. When you want to generate the team results, the results of the team
members are assembled to calculate those, but you can also generate individual rankings.
To minimize the overhead of adding individual participations, every time you add a new team participation, it
is checked wether the team members have been subscribed already. If not, you will be asked if they have to
subscribed automatically. However, the easiest way to add team participations it the 'Add Team Participation'
wizard (Section 5.2.2, “Wizard Add Team Participant”).
10.1.5. Participations
Members as well as groups and teams can be subscribed for competitions. When you add a new participation, you
first need to select the competition from the competitions in the database that are suitable.
Then you can fill out the properties of the participation. The number uniquely identifies the participation within
the competition. The category of the participant determines who they will compete with.
Below there a number of checkboxes. One is to indicate wether the participant is present or not. When adding
participations this should be checked (normally you don't add participants that are not expected to attend the
competition). With the Finalist checkbox you can indicate that a participant made it to the finals of the competition.
Both fields can also, and easier, be administered in the participants screen of the competition. Finally you can
indicate participants as guests.
Figure 10.2. Competition Participation
10.2. Disciplines - Judges
In the part 'Disciplines - Judges' you can browse the disciplines and manage the judges in the database. When
you receive a participants file from Gymfed, the file will contain the judges from the corresponding disciplines
Chapter 10. General Data
26
that are member of the federation. When you create a file yourself, or if there are judges that do not belong to the
federation, you have to add the judges you want to use in the jury panels.
When you add a new judge, you can choose wether you want to add a person that already is in the database as club
member or a completly new person. Each judge needs to have at least a name and a license level.
Figure 10.3. Judge Properties
Chapter 11. ScoreDisplay: Public Display of Scores
When you organize a competition, you want to make it as attractive as possible for the spectators and the
participants. ScoreExpress includes a program to show the scores to public as they are entered into the database
as well as intermediate rankings.
To establish the display of scores, you need three components. First of all of course you need ScoreExpress
itself to enter the scores. Then you also need the program ScoreDisplay, which is the program that generates the
display image. Finally you need the server program that enables the broadcast of score update messages between
ScoreExpress and ScoreDisplay. The remainder of this of this chapter explains how you should configure each
of these components such that they cooperate correctly. The next section explains what hardware is necessary to
use ScoreDisplay.
Figure 11.1. Schematic overview of the components
11.1. Hardware Setup
The basic idea of ScoreDisplay is that a full screen image is generated, that can be shown to the audience by
means of a beamer or television sets. This means you need an extra screen for the display, next to the screen(s)
you use for ScoreExpress.
This can be accomplished in several ways. One way is to use one computer that has two (or more) displays. For
instance, most laptop computers have a connector for an external display, that can be set up to work as an extra
screen (rather than a duplicate of the laptop screen). Another way is to use an extra computer, that is connected
through a network with the other computer(s). If you use only two computers, you can connect them with a so
called crossed UTP cable. If you want to use more computers, you will need a network hub or switch.
It is important that you check your computer network before the competition in order to ensure that everything
runs spotless. Especially if you plan to use wireless network connections, it is necessary to check the equipment
is working in the competition venue, since there are many factors that can interfere with wireless signal.
All the programs have to work with the same database file. If you work with several computers, this means that
the file is on one of the computers and made available to the other computers through the netwotk, eg. by making
the folder of the file a network share. On the other computers you can then open the file from the network share.
27
Chapter 11. ScoreDisplay: Public Display
of Scores
28
Protection programs such as anti-virus systems and firewalls can prevent proper connections to the server. If you
run into this problem, try to switch of all protection programs (and don't forget to switch it back on after the
competition).
11.2. Starting up the Server
The server is necessary for ScoreExpress and ScoreDisplay to communicate score updates to each other. You can
run the server on either computer in the network, as long as you configure the other programs to connect to the
computer where it is running.
To start the server, go to the ScoreExpress folder in the start menu, and select the item Server. This will open the
ScoreExpress Server window (see figure).
Figure 11.2. The server window
After opening the window, you have to press the 'Start Server Button' to start the server. Before you start the
server you can change the ports that are used by the server. However, in general this is not necessary. Note that
the port that you need to provide in ScoreExpress and ScoreDisplay to connect to the server corresponds with
the JNDI Port.
The Status field shows the current status of the server. The text area below shows any messages that are generated
by the server.
If you want to close down the server, go back the ScoreExpress folder in the start menu and select the Stop Server
item. This will tell the server to close itself down. The server window will disappear in about 10 seconds.
Chapter 11. ScoreDisplay: Public Display
of Scores
29
11.3. Configuration of ScoreExpress
By default, ScoreExpress is configured not to send score update notifications to the server. In order to change this,
first of all make sure that server program is running properly and that there is a working network connection to
the computer where the server is running (if you are running the server on a different computer).
Then start ScoreExpress and in the File menu open the item Options. This will open the Options dialog. On the
first page (Files/Server) enable the checkbox Use server for score display. Below this checkbox there are two field
to configure the connection. In the field Server Name, provide the name or the IP-address of the computer where
the server is running. If the server is running on the same computer, you can use 127.0.0.1 (or localhost). The
port field should be 8001.
Figure 11.3. Server options in ScoreExpress
After changing the server settings, press Save, and restart ScoreExpress. Upon restarting, the program will try to
make a connection with the server. If this does not succeed, it will show an error message, otherwise the connection
was succesfull.
11.4. Configuration of ScoreDisplay
To start ScoreDisplay, select the ScoreDisplay item in the ScoreExpress folder in the Start menu. This will show
you the ScoreDisplay startup dialog. In this dialog you have to provide the settings for the server connection and
the location of the database file.
Figure 11.4. Opstart dialoog van ScoreDisplay
In the field Server Name, provide the name or the IP-address of the computer where the server is running. If the
server is running on the same computer, you can use 127.0.0.1 (or localhost). The port field should be 1099.
To provide the location of the file, you can either fill it out manually, or you can pick the file through a file chooser
dialog. When the settings are correct, press the Continue... button. Now the program will make a connection to the
server (make sure it is running) and open the selected file. If either of these fails, you will see an error message.
Otherwise you will see the main window of ScoreDisplay.
Chapter 11. ScoreDisplay: Public Display
of Scores
30
The main window consists of two parts. On the left you see a the configuration panel, where you can configure
how and when things are displayed. On the right you find the display panel, which has a preview of what is shown
on the full screen display.
Figure 11.5. ScoreDisplay control window
11.4.1. ScoreDisplay Settings Panel
In the congfiguration panel, you can configure what is shown on the display and how this is done. It consists of
several parts that are accessible through tab buttons at the top of the panel. When you change the settings, the
changes are not applied immediately. In order to make the change effective, you have to press the Apply Changes
button at the bottom of the panel. You can use the button Revert Changes to undo any changes that haven't been
applied yet.
11.4.1.1. Categories
The first page of the settingspanel is the category selection. Here you have to select the categories of which you
want to show the scores and/or intermediate rankings. In general you will select the categories that are competing
in the current session.
If the sessions are defined in the database, the catogries will be grouped by session, such that you can easily select
all categories of one session at once. Otherwise, all categories of the competition are in one group.
At the top of the page you can also select Preliminaries or Finals. In disciplines where finals are organized from
the same competition (such as Trampoline and Tumbling), you can indicate which part of the competition is
happening. For other competitions, you should leave it on Preliminaries.
11.4.1.2. Layout
Most of the layout of the display is fixed, however there are some thing you can change. First of all you can select
different main colors. The default colors are chosen in correspondence with the house style of Gymfed and have a
fairly good contrast. In some circumstances this might not be sufficient, so you can change other colors to achieve
better readability of the scores.
Chapter 11. ScoreDisplay: Public Display
of Scores
31
You can also choose wether you want to show national flags next to the participants. Since most of the competitions
are not international, this has been switched of by default. If you want to use this feature, make sure the countries
of the clubs are provided in the database. The countries should be indicated by the IOC three character code (see
http://en.wikipedia.org/wiki/IOC_country_code [http://en.wikipedia.org/wiki/IOC_country_code] for a complete
list).
11.4.1.3. Timings
In the last page of settings, you can select what kind of information is displayed and how long each screen should
be visible. There are three types of screens that can be shown, each of which can be switched of. In decreasing
order of priority:
New/updated scores: whenever a score is saved in ScoreExpress, a score update message is sent to
ScoreDisplay through the server and ScoreDisplay shows it on a separate screen (if this screen type is switched
on). The screen type has two timer settings. The first is the minimal length of time that a score should be visible.
When new scores arrive at a faster pace, the display of the next score is delayed until the current score has been
visible for the minimal amount of seconds. The second is the maximum length of time that a score should be
shown. As long as no new scores arrive, a score is displayed for this amount of seconds. After that the screen
switches to intermediate rankings or a logo screen.
Intermediate rankings: when there are no scores to be shown, the program can show intermediate rankings
of the selected categories. In general, the participants of one category do not fit on one page, so they are split in
a series of pages. You can set the number of seconds that each page is shown.
Logo/Images: in between two rankings, a logo or image can be shown. By default, only the logo is used.
However if you add images to the images list, these are alternated with the logo. You can set for how long an
image remains on the screen.
11.4.2. ScoreDisplay Display Panel
The right part of the screen is the display panel. The main item on this panel is the preview of the display, where
you can see the displayed image. On top of the preview, you can see a fast forward button, witch allows you to
skip to the next screen immediately.
Next to that you find the screen selector. If your computer has more than one screen attached, you can select which
one of those is used for the full screen display.
Finally, there is the Full Screen button. You can push this button to switch the full screen display on and off. You
can also double click on the preview to switch the full screen on/off.