1
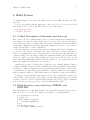
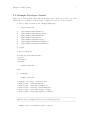
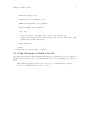
PPW Developer’s Guide
internal documentation
for v3.2
Adam Leko
c 2006-2011 HCS Lab, University of Florida.
Copyright All rights reserved.
Copying and distribution of this file, with or without modification, are permitted in any
medium without royalty provided the copyright notice and this notice are preserved.
i
Table of Contents
Parallel Performance Wizard Developer’s Guide
................................................. 1
1
Introduction . . . . . . . . . . . . . . . . . . . . . . . . . . . . . . . . . . . . . 2
2
Build System . . . . . . . . . . . . . . . . . . . . . . . . . . . . . . . . . . . . 3
2.1
2.2
2.3
2.4
2.5
2.6
3
A Brief Description of Automake and Autoconf . . . . . . . . . . . . . . . . .
Build directory, source directory, PREFIX, and DESTDIR . . . . . .
Getting a ./configure Script From the Subversion Tree . . . . . . . . . .
Java Source Code Distribution . . . . . . . . . . . . . . . . . . . . . . . . . . . . . . . . .
Example Developer Session . . . . . . . . . . . . . . . . . . . . . . . . . . . . . . . . . . . . .
Using Automake to Build a Tarball . . . . . . . . . . . . . . . . . . . . . . . . . . . . .
3
3
4
4
5
6
Instrumentation and Measurement Modules
................................................. 7
3.1
3.2
3.3
3.4
High-Level Overview of Measurement Module. . . . . . . . . . . . . . . . . . .
Language-Dependent Parts of the Measurement Module . . . . . . . .
Measurement Data Model . . . . . . . . . . . . . . . . . . . . . . . . . . . . . . . . . . . . . .
Adding Support for New Languages . . . . . . . . . . . . . . . . . . . . . . . . . . . .
7
8
9
9
4
PAR Data File Notes . . . . . . . . . . . . . . . . . . . . . . . . . 11
5
Analysis and Presentation Modules . . . . . . . . . . 12
5.1
5.2
5.3
5.4
6
High-Level Overview of the PerformanceDataManager . . . . . . . . .
High-Level Overview of Exports . . . . . . . . . . . . . . . . . . . . . . . . . . . . . . .
High-Level Overview of Presentation Module . . . . . . . . . . . . . . . . . .
Command-Line Interfaces of Java Utilities . . . . . . . . . . . . . . . . . . . . .
12
12
12
12
PPW Documentation . . . . . . . . . . . . . . . . . . . . . . . . . 14
6.1
6.2
6.3
Documentation Requirements . . . . . . . . . . . . . . . . . . . . . . . . . . . . . . . . . 14
Format and Organization . . . . . . . . . . . . . . . . . . . . . . . . . . . . . . . . . . . . . 14
Source-Code Documentation . . . . . . . . . . . . . . . . . . . . . . . . . . . . . . . . . . 14
7
Adding New Features . . . . . . . . . . . . . . . . . . . . . . . . . 15
8
Preparing Releases . . . . . . . . . . . . . . . . . . . . . . . . . . . . 16
Parallel Performance Wizard Developer’s Guide
1
Parallel Performance Wizard Developer’s Guide
This document gives a brief overview of the source code structure of the Parallel Performance
Wizard (PPW) source tree, aimed towards developers (not end users).
Chapter 1: Introduction
2
1 Introduction
The PPW source tree lives in a Subversion (svn) tree that lives on the HCS
lab servers.
To check out a copy of the svn tree, point your svn client at
http://svn.hcs.ufl.edu/ppw/trunk. For example:
$ svn co http://svn.hcs.ufl.edu/ppw/trunk ppw
This command brings up the latest version of the code from Subversion to the ‘ppw’
directory.
Chapter 2: Build System
3
2 Build System
To simplify things for end users, the PPW source tree uses GNU automake and GNU
autoconf.
If you’re not familiar with automake and/or autoconf, feel free to read the very brief
introduction below, or refer to the GNU website for more information
• the Automake website
• the Autoconf website
2.1 A Brief Description of Automake and Autoconf
Autoconf is a collection of utilities that produces a portable script named configure that a
user is supposed to run before they compile a piece of software. Autoconf can be thought of
as a proactive approach to portability, where the software examines the current environment
and machine configuration and makes appropriate changes to the source code to make it
compile and run under a certain configuration.
The script that autoconf generates is prepared by examining a file named ‘configure.ac’
(or in some older versions, ‘configure.in’). Autoconf provides a bunch of m4 macros
related to portability that can do certain checks for you, such as find the full path of a
certain executable, find out what C compiler the system has available, and determine if the
current C compiler accepts the inline, volatile, and const keywords. There is also a special
macro named AC_OUTPUT that takes files with an extension of ‘.in’, replaces keywords in
them, and outputs a file without the ‘.in’ extension.
Automake is another tool that provides a high-level way of writing Makefiles. Instead
of writing a Makefile directly, you write a Makefile.am file that gives high-level information
about how to compile your application such as what binaries and libraries to compile, where
to install them, etc. Automake produces Makefiles compatible with most vendor-supplied
make programs, in addition to GNU make which can be installed on just about anything.
Both Autoconf and Automake make it much easier to write and distribute software, but
both are fairly complex and have some, shall we say, interesting syntax aspects and default
behaviors. However, both are worth the initial learning curve and are de-facto standards
used nearly all open source projects as of 2006, including Berkeley UPC.
2.2 Build directory, source directory, PREFIX, and
DESTDIR
One interesting aspect of Automake is that it lets users build in separate directories from
where the source code resides. For example, a user might do something like this:
$
$
$
$
$
$
$
tar xvzf ppw-1.0.tar.gz
cd ppw-1.0
mkdir bldopt; cd bldopt
../configure CFLAGS=-O2
cd ..
mkdir bld; cd bld
../configure CFLAGS=-g -Wall
Chapter 2: Build System
4
This can be really handy for testing different configurations of the tool on a single source
tree.
In addition to separate build directories, Automake also allows you to specify a prefix
on install that might be separate from the one chosen when the configure script was run,
as in:
$ ./configure prefix=/foo/bar
$ make
$ make prefix=/tmp/asdf install
Finally, Automake also allows appending an arbitrary prefix to your installation path,
such as
$ make DESTDIR=/tmp/blah install
This particular option is sometimes used by people packaging software up to be distributed in binary form.
It is very important that any updates to the build system do not break these features,
as advanced users will expect them to “just work.” Luckily, Automake handles most of the
details about this for us, but be sure to run make distcheck every once in a while to make
sure you haven’t inadvertently broken this functionality.
2.3 Getting a ./configure Script From the Subversion Tree
If Autoconf and Automake generate a configure script and a set of Makefiles, then a question
arises: should we store the generated configure scripts and Makefiles inside the svn tree?
Since end users won’t be getting copies of PPW through svn, I decided that it wouldn’t be
worth the hassle of trying to store all of Automake and Autoconf’s files in svn. Instead,
in the toplevel PPW source tree, there is a script called ‘Bootstrap.sh’ that takes care of
calling the appropriate automake and autoconf commands to generate everything needed
to build the PPW source code.
This way, it is easier to experiment with different version of Automake and Autoconf.
The ‘configure.ac’ and ‘Makefile.am’ files should work with any relatively modern version
of Automake (v1.8+) and Autoconf (v2.13+).
2.4 Java Source Code Distribution
Since Java-compiled bytecode is (nearly) platform-independent, I’ve opted to keep the Java
build process separate from the rest of the software. Instead, the ‘Makefile.am’ file in the
‘javasrc’ directory contains references to the jar files that should be distributed when make
dist or make distcheck is run.
For the Java source code, we use Apache Ant to build the source code and resulting JAR
files. We use a pretty standard Java source tree setup, although one notable differences is
that all third-party source code is stored in the ‘javasrc/thirdparty’ directory; all source
in the ‘javasrc/src’ directory has been written by us for PPW.
Note: Make sure to follow any licensing requirements from third-party source
code added to the source tree. For any LGPL-licensed source code, this usually
means keeping a separate JAR file and “dynamically linking” to that via the
main JAR’s Class-Path attribute.
Chapter 2: Build System
5
2.5 Example Developer Session
Listed below is the partial output taken from using svn to check out a clean copy of the
PPW source tree, run the bootstrap script, configure the source tree, and compile it.
$ svn co http://svn.hcs.ufl.edu/ppw/trunk ppw
... output truncated ...
A
A
A
A
A
A
A
ppw/examples/shmem/shtest.c
ppw/examples/shmem/apsp_shmem.c
ppw/examples/shmem/Makefile
ppw/examples/sequential
ppw/examples/sequential/pi.c
ppw/examples/sequential/simple.c
ppw/examples/sequential/Makefile
$ cd ppw
$ sh Bootstrap.sh
Setting up autoconf/automake...
aclocal...
autoheader...
automake...
... output truncated ...
Done.
$ ./configure
... output truncated ...
configure: creating ./config.status
config.status: creating Makefile
config.status: creating src/Makefile
config.status: creating javasrc/Makefile
config.status: creating src/ppw_config.h
config.status: executing depfiles commands
---------------------------------------------------------------------PPW has been configured with the following options:
---------------------------------------------------------------------GASNet tools: use Berkeley UPC’s version
Chapter 2: Build System
6
PThreads support: Yes
Sequential C (via gaspref): Yes
SHMEM (via gaspref): Yes, quadrics
UPC (via GASP): Yes, berkeley
Java: Yes
If you’d like to recompile all of the Java source code,
please install Apache Ant (ant.apache.org) and run ’ant dist’ from
within the javasrc directory.
PAPI support: No
$ make
At this point, the software will be compiled.
2.6 Using Automake to Build a Tarball
Automake automatically builds a make distcheck target to run that produces a compressed
tarball of the program’s source code which should be used when preparing a new release of
PPW.
Note: When preparing a new release, don’t forget to run ant in the ‘javasrc’
directory to rebuild the Java source code tree.
Chapter 3: Instrumentation and Measurement Modules
7
3 Instrumentation and Measurement Modules
For this version of PPW, all instrumentation and measurement code lives in the ‘src’
directory. There is extensive documentation on that source code available by using the
Doxygen tool, or referring to the online version of the documentation.
3.1 High-Level Overview of Measurement Module
The measurement module consists of ANSI C code that deals with the low-level details of
recording performance data efficiently at runtime. The code uses an object-oriented like
method of storing all state information inside opaque handles that need to be passed in on
all subsequent invocations of functions related to that class of operations. For example, the
‘ppw_io.h’ code uses a ppw_file handle that is returned by ppw_open() or ppw_create(),
and has to be passed in to all related file I/O functions like ppw_read_bytes(). This style
of code is very prevalent in the rest of the ANSI C code.
At the lowest level of the measurement module sits the generic I/O routines defined
inside ‘ppw_io.h’ and ‘ppw_io_buffered.h’. These functions provide both buffered an
unbuffered I/O functionality, which also provide endian-aware functions for writing binary
data. There are also a few special routines for easily storing strings and arrays.
Sitting on top of the raw I/O routines are the ‘ppw_io_struct.h’ routines, which provide
a way to serialize and deserialize entire structs to a portable format. These routines rely
on the existing of static “offset” arrays and format strings for all data structs, which are
generated automatically from a Perl script in the ‘codegen’ directory. This Perl script is
driven by the ‘format-1.1.conf’ configuration file, which has definitions of some constants
used by PPW and also has definitions of all structs used by the measurement code. The
Perl code generator script uses this config file to generate ‘ppw_structs.h’, which house
the aforementioned offset arrays and format strings for each struct. The offset arrays are
computed at compile time with the help of the simple macro ppw_offsetof, which is a
version of the standard C99 offsetof macro that should work on most systems (even those
without C99 support).
Sitting on top of the raw structs lies ‘ppw_profile.h’, which simply takes care of grouping together these structs in a certain way to form raw performance data file files.
PPW’s profiling logic is embedded inside a bunch of inline functions located in
‘ppw_profiler.h’, which is used by ‘ppw_meas.h’ to provide PPW’s basic measurement
API. The ‘ppw_meas.h’ interface takes care of most of the drudgery associated with
starting up the measurement interface, and also uses many inline function definitions
embedded in the interface file for efficiency. The ‘ppw_meas.h’ interface also takes care of
handling trace record buffering. See the Doxygen docs for more information on the exact
algorithms used by the profiler and measurement interfaces.
User configuration is controlled by the function set shown in ‘ppw_userconfig.h’,
which simply reads environment variables and sets default configuration options.
The ‘ppw_meas.h’ interface automatically handles getting and validating the user’s
configuration options.
Trace and profile merging code is entirely handled inside the functions defined in
‘ppw_merge.h’. The merge code relies on model-independent “upcalls” (defined in
‘ppw_upcall.h’) to implement the data collection and processing phase. These upcalls
Chapter 3: Instrumentation and Measurement Modules
8
must be written in each new language that PPW is ported to, and include only basic
operations such as a barrier and generic send and receive operations. As with user
configuration, the ‘ppw_meas.h’ interface provides high-level routines for initiating the
merge phase.
3.2 Language-Dependent Parts of the Measurement Module
PPW’s measurement API has been specifically designed to work well with GASP-enabled
languages. To this end, language support for UPC and SHMEM are handled by GASP
wrappers that interface a GASP-enabled language with the standard measurement API
defined in ‘ppw_meas.h’.
While most UPC compilers already have (or will soon have) support for the GASP
interface, we had to retrofit a GASP interface onto library-based languages such as SHMEM
that do not already have a standard performance interface as robust as GASP. Special
“GASP adapters” that add a GASP interface to SHMEM can be found in the ‘gaspref’
subdirectory of the source installation. It is strongly suggested that adding support for
additional non-GASP languages (such as MPI) be handled by creating new GASP adapters
similar to the SHMEM GASP adapter already in place for Quadrics SHMEM. This greatly
simplifies the process of adding support for new languages, or adding support for another
implementation of a language that is already supported (such as other variants of SHMEM).
Each GASP wrapper is contained in a file named ‘gasp_[language]’, and tends to
be rather language-specific. Each wrapper contains implementations for all of the upcalls
defined in ‘ppw_upcall.h’, in a separate header file that is recompiled against the user’s code
when necessary (as with UPC’s static/dynamic threads environment). The overall workflow
of each wrapper is similar, and generally the wrappers do the following at runtime:
• Create a new measurement handle inside their version of gasp_init and do some
rudimentary querying of the execution environment, such as getting the number of
nodes in the run.
• Handle general events in the GASP event notification by making appropriate calls to
the measurement API. In particular, the ppw_meas_srcid function is called for each
GASP event notification to get the generic source identifier for this particular call.
• Handle calls to ppw_gasp_lookupsrc, which is called by the measurement API when
the wrapper calls ppw_meas_srcid with a source ID the measurement API hasn’t seen
yet. It is inside the ppw_gasp_lookupsrc function where the mapping of languagespecific operations to PPW’s general event classes takes place. See the next section for
more information on PPW’s data model.
• Handle special event types (exits, etc) in the GASP event notification callback routine.
The UPC and SHMEM language-depending implementations also include a simple clock
synchronization that is based on F. Cristian’s paper entitled “A Probabilistic Approach to
Distributed Clock Synchronization” which has been modified to use one-sided communications. The global clock synchronization algorithm is essentially remote clock reading and
is very simple, but effective, and is used to adjust timestamps on trace records during the
merge phase.
Chapter 3: Instrumentation and Measurement Modules
9
3.3 Measurement Data Model
In recent versions of PPW, PPW uses a flexible data model to record performance information. See the ‘format-1.1.conf’ configuration file for a full description of all data
structures used by this data model, although a few of the more important concepts will be
discussed here.
The basic item in the PPW data model is a numeric source identifier, which marries a
specific operation with a particular line of code. These operations are further broken down
into generic operation types, such as “Function,” “Get,” or “Barrier.” Each operation type
also has a trace record body associated with it when profiling operations of that type.
For instance, the trace record body associated with “Get” operations contains information
about the get operation, such as the number of bytes read and which thread the data was
read from.
Instead of using a fixed list of operation types, these types are included in the data file
itself. This allows new types to be added to the file format without needing to change
existing data readers. Furthermore, information about trace record body sizes are also
encoded in the file itself (rather than in a header or configuration file) so that when a
reader encounters a trace record type it doesn’t know anything about, it can still safely skip
over the trace record body without knowing anything about what kind of data is inside the
trace record.
This flexible data format simplifies the frontend data browsers significantly. By generating a few simple lookup tables when reading files, code that reads this data format can
efficiently handle data for operation types and languages that were not supported when the
data browser was initially written. (For a good example of this, see the “Operation Types
Pie Chart” visualization of the Java frontend). Additionally, through some simple string
matching, language-dependent analyses can still be performed, although such “hard-coded”
schemes for displaying or analyzing data should be avoided.
Even though the data format is self-defining, care must be taken when modifying the
individual data structures that make of the file format. In particular, if new data is needed
for a particular operation that isn’t covered by an existing operation type or trace record
body type, rather than extending the existing type a new type should be added. This
avoids the problem of breaking compatibility with existing readers that rely on particular
operations being structured in a certain way.
3.4 Adding Support for New Languages
When adding support for new languages to PPW, the first thing to do is to consider any
extensions that have to be made to the existing data model so that operations in the new
language can be sufficiently tracked. If the language uses a SPMD-style execution model,
support for the new language can probably be accomplished by simply adding new operation
types and trace body types where appropriate. If not, then the data model may have to
be extended in other ways. Be sure to follow the guidelines set out in the last section for
keeping compatibility with existing readers. If you absolutely must change the file format
in a way that will break compatibility with existing readers, update the file format’s version
stamp so that the existing readers can at least display a helpful error message to a user.
Once you are satisfied with any extensions to the data model, you’ll need to provide a
wrapper that interfaces the instrumentation technique for this new language with the exist-
Chapter 3: Instrumentation and Measurement Modules
10
ing measurement API. Since the API is GASP-centric, it makes sense to implement GASP
support directly into the language/compiler implementation, or to write an “adapter” in a
similar manner to the GASP SHMEM adapter that currently exists for Quadrics SHMEM.
So far, we have implicitly assumed that you want to measure a program and present data
to the user alongside their original source code. If you are working with a programming
environment in which this doesn’t make much sense (as in reconfigurable computing), you’ll
want to figure out some other way of integrating data collected from these sources to PPW’s
overall display. One possible way of doing this is to link against the measurement API library
and periodically query the current state of the measurement code so you can associate data
from an outside entity with other parts of the application. If you are collecting trace-style
data, then you’ll probably also want to use whatever timers that PPW uses internally so
your performance data will agree with PPW’s timestamps used in its normal trace records.
Chapter 4: PAR Data File Notes
11
4 PAR Data File Notes
As a convenience for end users, we maintain copies of a user’s source code as they are
passed into the compiler wrapper scripts ppwcc and ppwupcc. During the linking phase,
these source code files are concatenated together along with executable and performance
data using the basic Unix tar file format, which is defined on this Wikipedia page:
http://en.wikipedia.org/wiki/Tar_(file_format).
When an application is run, the full path to the executable is determined (by searching
PATH if necessary) and the source archive (extension .sar) is copied over to the performance
data file, which gets the extension .par (Performance ARchive). The java PARFile class in
the PDM package takes care of making sense of the specially-formatted TAR file.
Chapter 5: Analysis and Presentation Modules
12
5 Analysis and Presentation Modules
To simplify coding, all nontrivial analyses have been written in Java.
5.1 High-Level Overview of the PerformanceDataManager
The PerformanceDataManager (PDM) interface forms the basis for interacting with profile
and trace data within Java code. The implementation of the interface (inside the v1 1
package) is actually generated by the Perl script inside the ‘codegen’ directory, to the Java
reader in sync with the C read/write API for PPW’s data file format. At some point in the
future we might have several file formats floating around; in this case the PDM will serve
to insulate the analysis and GUI code from any minor file format details.
The HighLevelPDM gives a higher-level view of working with source code, adding features like aggregation and calltree generation. It implements the generic PDM interface so
can be used in place of a PDM. Additionally, the HighLevelPDM only needs a valid PDM
interface instance to work, so is independent of file format.
For more details on the PDM and the HighLevelPDM, see the Doxygen documentation,
specifically the edu.ufl.hcs.ppw.pdm packages (along with the highlevel and v1 1 packages).
5.2 High-Level Overview of Exports
All exports are in the edu.ufl.hcs.ppw.export package. Most of the exports are pretty
straightforward, although the SLOG2TraceConverter class uses fairly tight integration with
the Java slog2sdk implementation. As an alternative, we could have used the ANSI C-based
TRACE-API provided by the slog2sdk source tree, but it was much easier (although slightly
more painful since documentation of the slog2sdk file is sparse at best) to use the Java API
directly.
See the Doxygen docs for more information.
5.3 High-Level Overview of Presentation Module
All visualizations exist as packages in the edu.ufl.hcs.ppw.vis directory. Each visualization
is implemented as a JPanel so that it can be put just about anywhere in an existing Java
GUI. The visman package houses the Visualization Manager (VisManager), which brings all
the visualizations together. This is used by the GUIController, which is in the gui package.
The GUI controller handles the interaction between the menu options, overall actions such
as loading files, and the visualizations themselves.
See the Doxygen docs for more information.
5.4 Command-Line Interfaces of Java Utilities
Since some of the analysis and conversion utilities are Java only, we felt it was necessary to
keep some of them available from the command-line. Each Java command-line app has a
class definition in the edu.ufl.hcs.ppw.cmdline package, and has a script inside the ‘javasrc’
directory that allows the utility to be used just like any other executable as long as the user
has a Java interpreter installed on their machine.
The installation process even installs the scripts if no Java command is available so that
a user doesn’t have to reinstall in case they move or add a Java interpreter installation.
Chapter 5: Analysis and Presentation Modules
13
Additionally, all the JAR files are compiled at the lowest level of source code and class code
as possible so that other Java implementations such as Kaffe and GIJ will work with the
command-line utilities.
None of the Java command-line utilities are critical (all the same operations should be
available from a workstation with Java installed), so the command-line scripts provided are
for mostly for convenience where it is difficult to transfer data files to a workstation for
analysis.
Chapter 6: PPW Documentation
14
6 PPW Documentation
It is important for both users and developers that PPW include a wide variety of documentation in appropriate formats.
6.1 Documentation Requirements
Here are some basic requirements for PPW documentation:
1. Store/represent user documentation in one primary “canonical” form
2. Provide user documentation in the following formats:
• Single-page and multi-page HTML (nicely formatted via CSS, etc.)
• Printable PDF
• man pages (properly formatted)
• GNU info
• Plaintext (nicely readable; somewhat marked up)
• “Online” docs in the PPW GUI (simplified HTML)
3. Have “reasonable” developer docs (including source-code docs)
6.2 Format and Organization
The “canonical” format chosen for PPW documentation is GNU Texinfo. This choice was
made because we can ultimately generate all of formats we need and achieve high-quality
output.
PPW’s documentation, which resides within the ‘docs’ directory inside the PPW
source tree, has been incorporated into the build system used by PPW. See the
‘docs/Makefile.am’ file and the various Perl scripts within the ‘docs’ directory to
understand how the various documentation is generated.
Where needed, the PPW documentation incorporates screenshots and other images;
these are stored in PNG form within the ‘docs/images’ directory. Any other image formats
(such as PDF) that are needed are generated (automatically) by way of Perl scripts within
‘docs’.
6.3 Source-Code Documentation
The source-code documentation for PPW is maintained as Doxygen markup within both the
C and Java codebases. The Doxygen configuration file for PPW is ‘docs/Doxyfile’, which
is generated from ‘docs/Doxyfile.in’. The Doxyfile specifies what source code Doxygen
processes (essentially everything within ‘src’, ‘javasrc’, and ‘codegen’), along with various
options. Doing a basic Google search for “Doxygen” should unveil sufficient information on
the Doxygen documentation system and related utility.
Chapter 7: Adding New Features
15
7 Adding New Features
Some simple guidelines for adding new, nontrivial features:
1. Add a bugzilla feature enhancement bug for the feature.
2. Before working on the new feature, make sure there aren’t any existing user-suggested
features in Bugzilla that should be worked on first.
3. Always write the user documentation for the new feature before you write the code.
This will allow you to flesh out any user interaction problems before writing a ton of
code.
4. Code up the new feature. If the new feature is going to create a lot of changes spread
across different files, create a feature branch using the standard Subversion branch and
merge commands.
5. Sufficiently test the the new feature.
6. Integrate the new feature and new documentation into the current TRUNK or release
branch of PPW, whichever is appropriate.
Chapter 8: Preparing Releases
16
8 Preparing Releases
There are a number of utilities and software packages that are needed to prepare a PPW
release (these are in addition to the normal requirements to build PPW). For the PPW
backend, the following are needed:
• GNU Autotools
• GNU Texinfo
• ImageMagick (used by scripts for image processing)
• A Latex installation (e.g., TeX Live on Linux)
• Ghostscript (probably...)
• Doxygen
For the PPW frontend GUI:
• For Windows:
• Launch4j, to wrap JARs in Windows executables
• NSIS (nullsoft scriptable install system), for the installer
• NetBeans, recommended for working with the Java code on Windows
• For Linux (and similar platforms), tools to build RPM and DEB archives
• For Mac OS X, tools to build disk image
Steps to release a new version of PPW:
1. Start with a fresh working copy of the PPW source (from trunk). To build a PPW
release, you will need to be able to run configure directly within the working copy
(not in a separate build directory).
2. Bootstrap the source tree (you may need to bootstrap gasnet-tools first).
3. Do configure (probably with appropriate options) and make within the working copy.
4. Double-check version number in ‘configure.ac’, and any other places that include
that version number. Usually just running the ‘update-versions.pl’ script that gets
generated by autoconf will ensure that the version number is updated in the correct
places.
5. Update the docs (especially user manual) to reflect any changes or feature enhancements.
6. Update the NEWS file to show changes and release date.
7. Commit any changes made in the steps above to trunk. Now is a good time for some
final testing that everything still looks good.
8. Make new tag in tags directory (server-side svn cp) of the form RELEASE X Y.
9. Within the ‘docs’ directory, do make gen to generate documentation. You will now
have docs files in ‘docs/site’, along with updated man pages, etc. and files such as
MANUAL within your working copy. The online (HTML) docs (and images) within
‘javasrc’ will also have been updated automatically.
10. Within the ‘javasrc’ directory, do ant dist to update the JAR files to be distributed
with the PPW release.
Chapter 8: Preparing Releases
17
11. Create UNIX source distribution by doing make distcheck. You will now have a ppwX.Y.tar.gz file in your working copy.
Note that typing make release might do some of the above steps for you automatically,
aside from updating the NEWS file and making the svn tags.
12. Create new Java webstart, windows, and OSX versions of GUI (see ‘javasrc/deploy’).
13. Test all source tarballs and binaries above on as many platforms as feasible.
14. Update the PPW website with the following:
• New downloads
• New Java web start version in the ‘site/jws’ directory
• Appropriate files in the ‘site/vX.Y/sampledata’ directory
• New HTML versions of the user manual that you obtained from the make gen
command above
15. Update the PPW Bugzilla (under http://bugzilla.hcs.ufl.edu) to include the latest version of PPW (navigate to the “Products” page, where you should see Parallel
Performance Wizard listed). Also make sure the milestones, default milestone, components, etc. are up to date.
16. Update the ‘docs/ppw-devguide.texi’ file for any new additions to the release process.
17. Send email announcements out, including to ppw AT hcs DOT ufl DOT edu.