1
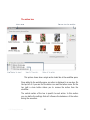
Action(s) User Manual app.jbbres.com Edited and written by Jean-Baptiste Brès. Copyright ©2010 app.jbbres.com. All rights reserved. The owner or authorized user of a valid copy of Action(s) software may reproduce this publication for the purpose of learning to use such software. No part of this publication may be reproduced or transmitted for commercial purposes, such as selling copies of this publication or for providing paid for support services. Every effort has been made to ensure that the information in this manual is accurate. app.jbbres.com is not responsible for printing or clerical errors. Because Action(s) frequently releases new versions and updates to its applications and Internet sites, images shown in this book may be slightly different from what you see on your screen. Information in this document, including URL and other Internet Web site references, is subject to change without notice. Other company and product names mentioned herein are trademarks of their respective companies. Mention of third-party products is for informational purposes only and constitutes neither an endorsement nor a recommendation. app.jbbres.com assumes no responsibility with regard to the performance or use of these products. © 2010 app.jbbres.com 1 ACKNOWLEDGEMENTS ⎟ Action(s) uses portions of the following open-source frameworks and code: Aspirin Copyright ©2009 Kate Rhodes http://github.com/masukomi/aspirin including some part of the James Project Copyright ©2006-2009 The Apache Software Foundation http://james.apache.org/ Datafile Copyright ©2004 Infomata http://datafile.sourceforge.net/ Dnsjava Copyright ©1999-2009, Brian Wellington http://www.dnsjava.org/ Various part of the Jakarta Project Copyright ©1999-2009 The Apache Software Foundation http://jakarta.apache.org/ JavaBeans™ Activation Framework Copyright ©2006-2007 Sun Microsystems Inc. http://java.sun.com/javase/technologies/desktop/javabeans/jaf/index.jsp JavaMail Copyright ©2006-2009 Sun Microsystems Inc. http://java.sun.com/products/javamail/ SwingX Copyright ©2005 Sun Microsystems Inc. and contributors http://swinglabs.org/ © 2010 app.jbbres.com 2 Content Content........................................................................ 3 Introducing Action(s) .................................................. 5 System requirements ............................................................. 6 Installation............................................................................ 8 Resources ............................................................................. 9 Website.............................................................................. 9 Blog................................................................................... 9 Tech Specs ......................................................................... 9 Mailing List ....................................................................... 10 Feedback and Bug Reporting ................................................. 10 Software Update .................................................................. 10 Chapter 1: An overview of Action(s) .......................... 11 Workflow, actions, variables… The concepts behind Action(s) ..... 11 Actions............................................................................. 11 Workflow .......................................................................... 12 Variables .......................................................................... 12 The interface ....................................................................... 12 The toolbar ......................................................................... 13 The library pane .................................................................. 14 Library list ........................................................................ 14 Actions list........................................................................ 14 Information box ................................................................ 14 The workflow pane ............................................................... 15 Chapter 2: Creating workflows .................................. 17 Create a workflow – an example ............................................ 17 Step 1: Ask for a confirmation............................................. 18 Step 3: Copy Files ............................................................. 19 Step 4: Apply Filter to Image File ........................................ 20 Step 5: Display Images ...................................................... 20 © 2010 app.jbbres.com 3 Using actions....................................................................... 20 The action box .................................................................. 21 Input and output ............................................................... 22 Using variables .................................................................... 22 The variable pane .............................................................. 23 Setting and getting variable value in the workflow ................. 24 Running the workflow ........................................................... 25 Chapter 3: Saving and re-opening workflows ............ 26 Saving and re-opening a workflow.......................................... 26 Executable workflows ........................................................... 26 © 2010 app.jbbres.com 4 Introducing Action(s) Action(s) lets you build workflows that accomplish manual chores quickly, efficiently, and effortlessly. You don’t have to know scripting languages or write any code. Instead, you create and execute automation “workflows” simply by dragging and dropping each individual step (“action”) of a process. It’s like creating a kitchen recipe. Action(s) is Simple Action(s) comes with dozens of prebuilt actions that you can use to populate your workflows. For example, say you want to resize dozens of images and send them to your friends by email. By dragging individual actions into a new workflow, you tell Action(s) which files to resize, how big to make them, where to save them and who to send them to. Then you run the workflow, and within minutes, all the images are in your friends' inboxes. There's no limit to what you can do. Add more actions and you can do even more. You can save your workflows to use again, and even share them with friends, regardless of the operating system they are using. Action(s) is Powerful Action(s) can do in seconds and minutes what would take you hours to do manually. It gives you direct access to and control of all the functionalities of your computer: file management, photo editing, Internet, emails... When you have to tackle complex or repetitive tasks, Action(s) is the right tool for the job. © 2010 app.jbbres.com 5 System requirements The system requirements for Action(s) are: Mac OS version • • Mac OS X 10.5 Leopard or later 256 Mo ram Windows version • • • Windows XP, Windows Vista, Windows 7 or later Java SE 6 or later 256 Mo ram Additional notes about system requirements Action(s) is built on a modern foundation that takes advantage of the latest computer technologies. And while you can rest assured that the application will work without any performance glitches on your computer, it is still good to know which systems Action(s) relies on: © 2010 app.jbbres.com • Operating System: Action(s) has been created to be a multiplatform tool; it can run on Mac OS, Windows or any operating system that supports Java SE 6. All Action(s) functionalities are available on all platforms; however, you might encounter some slight cosmetic differences between versions. • Java: Java’s technological versatility, efficiency, platform portability, and security make it the ideal technology for Action(s). This application has been built for Java SE 6. It might work well with Java SE 5, but some features like Click-and-drag tools, and some pre-designed actions do not work or are limited when running the application Java SE 5. In addition, the majority of performance improvements are available only with Java SE 6. For more information about Java, please visit http://www.java.com/. 6 © 2010 app.jbbres.com • Java Web Start: Java Web Start allows you to download and run applications from the web. The Java Web Start software provides an easy, one-click activation of applications and guarantees that you are always running the latest version of the application and eliminates complicated installation or upgrade procedures. If you want to find out more about Java Web Start, visit http://java.com/en/download/faq/java_webstart.xml. • RAM: Nearly all the newest computers come with more than enough RAM, so there is no need to worry about whether it’ll be enough. However, just like any other application out there, Action(s) will use your RAM to its advantage. • Hard Drive: Yet another element that helps Action(s) run smoothly is the available disc space. Please make sure you always have at least a few Gigabytes of free Hard Drive space since Action(s) uses it to store temporary files. Those will disappear when you close the application. 7 Installation Installing Action(s) is quick and easy. All you need to do is visit the Action(s) webpage at http://app.jbbres.com/actions and click on the orange Launch button. The installation will start shortly. A window indicating the progress of the application download and installation will appear. During the installation process, you may be asked to confirm that you allow Action (s) to access your computer. Click on Allow to complete the installation. Now that you have installed Action(s), it’s time to launch in on your computer. You will find the program in your Start menu (Windows) or in your Applications folder (Mac). © 2010 app.jbbres.com 8 Resources Though this manual is a good starting point for learning how to use Action(s), there are many more resources available to you. Website The Action(s)’ website is all about Action(s). It features lots of up-to-date information about the application, including new and updated features, development news, and tutorials. Technical support for new and registered users is also available via the Action(s)’ website at http://app.jbbres.com/actions. Blog One of the most entertaining and fun places on the Action(s)’ website is the blog at http://app.jbbres.com/blog, which is written by the developers. One can find articles about the development process of Action(s), tutorials, tips and tricks, inside information about developers, press releases, descriptions of upcoming features and many interesting happenings in the Action(s) world. Tech Specs An in-depth list of available features and technologies used in Action(s) can be found at http://app.jbbres.com/actions/specs. © 2010 app.jbbres.com 9 Mailing List You can subscribe to the Action(s)’s mailing list at http://app.jbbres.com/subscribe to be the first to hear about new releases and special offers from the Action(s) Team. Feedback and Bug Reporting Though the Action(s) developers invest a lot of time and hard work into making sure Action(s) is a high-quality application, as with any other software, bugs still sometimes find their way into the application. This is why it is very important to keep developers informed about any difficulties you are experiencing or any improvements that you think should be made in order to better the application. And, the sooner developers are informed, the faster they can act to fix or improve a feature. Feedback about the User Manual you are reading now is also very welcome. Use the Report a Bug or Provide Feedback forms at http://app.jbbres.com/feedback to let the Action(s) Team developers know about any bugs or feature requests you have. Software Update Because of the advanced technologies that Action(s) uses, you do not need to manually initiate the update of this software. When a new version is available, it will automatically and transparently be downloaded and installed on your computer. © 2010 app.jbbres.com 10 Chapter 1 | An overview of Action(s) Workflow, actions, behind Action(s) variables… The concepts Before going into details, let’s have a little look at the concepts used in Action(s). Actions Actions are pre-defined tasks, each corresponding to a specific functionality of your computer. Each action does only one simple thing, but it does it very well. There are actions for everything you can imagine: opening a file, printing a document, resizing a picture, sending an email… and even for things that you cannot imagine! Actions can wait for data as an input, and can generate an output. For example, an action that applies a filter on an image will expect to receive images as an input. And, as an output, it will return the new images, processed with the filter. By ordering your actions in the workflow, you can make sure that the result of one action is the input of the next one. Action(s) comes with dozens of actions that correspond to the most common things you might want to do with your computer. And, if this is not enough, the Action(s) website is a gold mine of new actions that you can use in your workflows. Visit http://app.jbbres.com/actions/more to discover and download new actions. If you have some knowledge of software development, you can create your own actions easily and share them with the rest of the world. Visit http://app.jbbres.com/actions/developers for more information. © 2010 app.jbbres.com 11 Workflow With Action(s), you can create workflows. Workflows are sequences of actions that are executed in a defined order. Each action starts when the previous one has finished, so you can picture your workflow as a journey where each step is an action. When you reach the last action, the workflow is complete and ends. Workflows are stored in files with the .wkfl extension. If you double-click on a workflow file, it will automatically open in Action(s) and be ready to be executed or modified. Variables Variables in Action(s) are very powerful components. Variables are memorized info chunks that you can reuse in an Action(s) workflow, exactly as in real programming languages. And, as always, http://app.jbbres.com/actions/more is the perfect place to find even more variables that can answer all of your needs. The interface When you launch Action(s), the interface opens with a Library pane on the left for selecting actions or variables; a workflow pane on the right where you drag the actions to build your workflow; and a toolbar at the top. © 2010 app.jbbres.com 12 The toolbar At the top of the Action(s) window, the toolbar offers six fairly selfexplanatory buttons. From left to right: © 2010 app.jbbres.com 13 Tip: To save screen space, you can hide the library pane by choosing Window > Library. You can bring the toolbar back by choosing Window > Library again • New, Open, Save. These buttons control the creation, opening and saving of workflows. • Run, Step, Stop. These buttons control playback of the workflow you’re building. The library pane The Library pane is the entire left section of the Action(s) window. It includes: the library list, the information box, and the list of actions or variables list. All of these are described below. Library list The library column displays categories of actions and variables that you can use within your workflow: Files, Images, Text… When you choose a category, the action column displays all the actions corresponding to it. Actions list Tip: To see all the actions available on your computer, click on Actions in the library column. This column displays the content of the category you have selected in the library column. For example, if you select “Images” in the library, the actions column will show you all the actions related to image manipulation available on your computer. In order to create your workflow, you can drag and drop the actions from this list into the workflow. Information box The information box displays all the useful information on how to use your actions. When you click on an action in the actions column, this box © 2010 app.jbbres.com 14 displays what the action does, what type of data it expects from the previous action (input) and what it will send to the next action (result). The workflow pane If all the actions in the library are the ingredients for your workflow, the workflow pane is the recipe. This is where you put all your actions in the order that you want them to be executed with the specific settings for each one. But the workflow pane is much more. From this pane, you can also see what information is going to be sent from one action to the next, creating an information flow. © 2010 app.jbbres.com 15 This picture shows what a single action looks like in the workflow pane. Tip: If you double-click on an action in the actions column, this action is automatically added at the end of the workflow pane. When you drag an action from the actions column into the workflow pane, the other actions, already in the workflow, move around to make room for it. When you release the mouse button, the dropped action appears in the workflow pane. © 2010 app.jbbres.com 16 Chapter 2 | Creating workflows Create a workflow – an example In order to show you how to use Action(s) and how powerful the application is, we will now create a very simple workflow. If you like photography, you know how complicated it can be to add a simple effect – such as a black and white filter – to your pictures, and how it can take a very long time to do so if you want to apply it to a lot of pictures. Well, with Action(s), you can do all of this very easily, and in less than a minute. © 2010 app.jbbres.com 17 Step 1: Ask for a confirmation In the Other category, look for the Ask for Confirmation action and add it into the workflow by dragging it into the workflow pane or by doubleclicking on it. This action will be displayed during the execution of the workflow. A dialog box will appear telling the user what the workflow is doing. © 2010 app.jbbres.com 18 Tip: if you want the dialog box to display a more shinny message, click on the icon on the left side of the action settings and choose a more expressive icon. Remember, this action can be edited. You can not only change the title and the text of the dialog box, but also modify the name of the OK and Cancel buttons. It is always a good idea to start your own workflow with a dialog box like this one in order to remind you what is going to happen. Step 2: Get Pictures You can find this action in the Pictures category. Add it to the workflow by dragging it into the workflow pane or by double-clicking on it. This action allows you to select the pictures that you want your workflow to work on. Use the Add and Delete buttons to modify the file list in order to add your own files. You can also drop files from your file explorer directly into the list. In the information box, you might notice that the result of this action is “Image Files”. It is the name give by Action(s) to let you know that once the action is executed, it will send a list of image files to the next action. Step 3: Copy Files You will find this action in the Files and Folders category. This is a very important action: it makes a copy of the specified files and folders – in our case, the one defined during step 2 – in order to make sure that you will not overwrite the originals. To specify in which folder you would like © 2010 app.jbbres.com 19 Tip: The workflow that we are creating will always be executed on the files that you provided in the “Get Pictures” action. But, you can also check the “show when running the workflow” box, and Action(s) will ask you each time you execute the workflow which files you would like to use. This is much more useful than always applying the same filter to the same pictures. the copies to be stored, choose from the combo box or select “other…” and manually choose any folder on your computer. Here again, you can have Action(s) ask you where you want to store the files while running the workflow so that you can choose a different destination each time. Simply check the show when running the workflow option. Now, every time you execute the workflow, a dialog window will appear to ask you where you want the newly duplicated files to be stored. Step 4: Apply Filter to Image File This action – that you can find in the Images category – applies a filter to the pictures saved during step 3. In our example, it will apply a Comic Book effect, but you can choose a different filter from the combo box, for example, you can choose to increase or decrease the contrast. Step 5: Display Images This last action – from the Images category – takes the pictures that we applied the filter to in step 4 and displays them in a special dialog box on your screen. From there, you can have a look at them, rotate them, or save them in a new folder. Using actions At this stage you should already have a pretty good idea how to use actions into your workflow. You can add actions to the workflow either by dragging them from the action list into the workflow pane, either but double-clicking on the action name in the action list. © 2010 app.jbbres.com 20 The action box This picture shows how a single action looks like in the workflow pane. Once added to the workflow pane, an action is displayed in a new box. On the top left of it you can find the action icon and the action name. On the top right a close button allows you to remove the action from the workflow. The central section of the box is specific to each action. In this section you can define the settings that will influence the behaviour of the action during the execution. © 2010 app.jbbres.com 21 Once you have run the action at least once, a new section appears at the bottom of the box: it display the result of the last execution, including the status (success or error) and if any, the result that has been sent to the next action. Input and output As we saw it previously, actions can receive inputs and generate outputs. The output of an action is passed as input to the next one, creating a flow of data that is enriched and updated action after action. When two subsequent actions are compatible, meaning that the output of the first action can be use as input of the next one, Action(s) notify you by creating a link between the two actions: If the result of the first action is not compatible with the input of the second one (for example your first action returns a date, and the second expect a file), or if the first action does not provide any output or the second does not accept any input, no link is created between the two actions. This meant that the flow will stop there and all the data will not be sent to the following actions. A link between two actions No link between the actions Using variables Variables are memorized info chunks that you can reuse in an Action(s) workflow, exactly as in real programming languages. You can see the © 2010 app.jbbres.com 22 available variables by clicking on the Variables category in the library panel. Tip: If you want to store data, but you are not sure what kind it is, use the New Storage variable: it can store any data, whatever it is. Action(s) comes with a lot of useful variables, covering different type of data such as date, files and text but we can distinguish two major types of variables: • Storage variables: The variables with a blue icon are storage variables: they can be used to store data temporarily. Later on in the workflow, you can re-access the data by getting the value of the variable. • System variables: The variables with a purple icon are system variables: their content is defined automatically by Action(s) and might change from one computer to another or from one execution to another. For example, you can find a system variable pointing to the document folder of the user, or the current date and time. The variable pane If you want to use a variable in the workflow, double-click on the variable to select it. You will notice that a new area will appear at the bottom of the workflow pane: this is the variable pane. The variable pane displays all the information you need regarding the variable available in your workflow. Every time you add a new variable to the workflow, it will appear in this pane. For each variable, the variable pane shows: • © 2010 app.jbbres.com The variable name: it is the easiest way to identify the variable. Each variable has a different name. You can change the name by double-clicking on it in the variable pane and entering a new name that will help you remember what this variable is used for. For example: “original file” or “picture description”. 23 • The variable type: each variable can store different types of data. For example: files, text or date. The variable type lets you know what type of data is being stored. • The variable value: this field displays the current information stored in the variable. If you want to remove a variable from the workflow, right click on it in the variable pane and choose Delete variable. Setting and getting variable value in the workflow If you want to use the value stored in a variable during the workflow execution, simply drag the variable from the variable pane into the workflow pane. A new action-like element will appear in your workflow. This element will send the content of the variable to the next action in the workflow. When you add storage variables to the workflow, an option box will appear. Set the result of the previous action as the new value of the variable. If you check this option, the value returned by the previous action will be stored in the variable. If the variable already has a value stored in it, the old value will be erased. The value stored in a system variable cannot be modified. Some actions already have variables built into them. For example, the Copy Files action allows you to choose a file variable as a value for its “copy to” parameter. If you add a New File or Folder variable into your workflow, it will automatically be added to the “copy to” list box of the Copy Files action. For some other actions (for example the Ask for Confirmation action or the Show Message action), you can drag a text variable into the text fields or text panes in order to use the variable content. The variable name will appear between “%” signs, and will be replaced by the variable content during the workflow execution. © 2010 app.jbbres.com 24 Running the workflow Tip: If something goes wrong and the workflow stops before all the actions have been executed, the problematic action will have a red sign in bottom-left corner. Click on it to see what went wrong. Tip: You can also use the keyword shortcuts to run and control the execution of your workflow: click F9 to start the workflow, CTRL+F9 (cmd+F9 on Mac) for running only the next step, F10 to pause and F11 to stop. You can now try to execute the workflow by clicking on the Run button in the top right hand corner of the application window. You can see the actions being performed one after the other. When an action ends, a green sign appears in the bottom-left corner of the action. In the top right section of the window, you can find three buttons: Run, Step and Stop. With these buttons, you can have more control over the execution of the workflow you are currently building: • The Run button starts the workflow. • The Step button also starts the workflow but executes only the first action, and then pauses the workflow. You can then resume the workflow by pressing Run or Step. • The Stop button stops the workflow during its execution. However, a workflow cannot be stopped in the middle of an action execution. If you press the Stop button, the workflow will stop only when the current action is complete. Next time you press the start button, the workflow will commence from the first action. • When a workflow is running, a new button, Pause, replaces the Start button. Pressing this button will pause the workflow after the current action execution is complete. You can then resume the workflow by pressing Resume or Step. © 2010 app.jbbres.com 25 Chapter 3 | Saving and re-opening workflows Saving and re-opening a workflow When you have created a workflow, you can save it in order to be able to re-use it later. Simply click on the Save button in the top left-hand corner of the window and specify the location of your workflow file. Workflow files always end with .wkfl. You can re-open your workflow later by double-clicking on the file – it will automatically start Action(s) – or by launching Action(s) and clicking on the Open button in the top left corner of the window. Executable workflows You will notice that when you open a regular workflow, it automatically opens in the main Action(s) window so that it can be easily modified and/or executed. However, when your workflow is running properly, you might want to execute it without having to go through the main window. This is what the executable workflows are made for - just being able to run the workflow without any intermediary steps. In contrast to regular workflows, when you open an executable workflow by double-clicking on it, it does not open the main Action(s) window: the workflow is automatically executed. This is very useful when you are using a workflow every day. To create an executable workflow: select File > Create an executable workflow and then specify the location of your executable workflow. Executable workflows always carry the ending - .wexe. To start an executable workflow, simply double-click on it. © 2010 app.jbbres.com 26 © 2010 app.jbbres.com 27