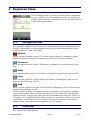
1
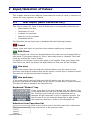
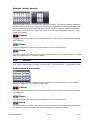
User's Guide
Drivers Log for iPhone
Table of Contents
1
Description.......................................................................................... 3
2
Input/Selection of Values.......................................................................4
2.1
2.2
2.3
2.4
2.5
3
Trips View............................................................................................7
3.1
3.2
3.3
3.4
3.5
3.6
4
Navigation Bar................................................................................7
Start Location (From)...................................................................... 7
Destination (To).............................................................................. 8
Note..............................................................................................8
Status Line.....................................................................................8
Other Options................................................................................. 8
Expenses View................................................................................... 10
4.1
4.2
4.3
4.4
4.5
4.6
5
Text Input (with Favorites list)..........................................................4
Text Input (without Favorites list)...................................................... 5
Date/Time......................................................................................5
Number......................................................................................... 5
Month............................................................................................6
Navigation Bar.............................................................................. 10
Location....................................................................................... 10
Article..........................................................................................11
Note............................................................................................ 11
Status Line................................................................................... 11
Other Options............................................................................... 12
Reports View......................................................................................13
5.1 Navigation Bar.............................................................................. 13
5.2 Selection of Report Period...............................................................13
5.3 Other Options............................................................................... 14
5.4 Web Reports................................................................................. 14
5.4.1 Reports in HTML format............................................................15
5.4.2 Reports in CSV format..............................................................15
5.5 Email Reports............................................................................... 15
5.6 Screen Reports............................................................................. 17
6
Settings View..................................................................................... 18
6.1
6.2
6.3
Trips Preferences........................................................................... 18
Vehicles Preferences...................................................................... 18
General Settings...........................................................................19
© 2009 RandiRundi
2 (19)
ver. 1.1
1 Description
Drivers Log for the iPhone is an application that will help you keep track of all
necessary information for your travels with a car or other vehicles. Some of the
features are,
• Easy to use interface with automatic suggestion of new information and
quick access to most used functions
• New information is automatically suggested based on previous records
•
•
•
•
•
•
For each trip record the purpose can be set to either business or private
and the trip type can be set to single or round trip
Notes can be added to each trip or expense record individually
Reports can be presented on the screen, sent via Email or viewed in a
browser on a computer on the local network
Reports can be presented in different formats and with different
information
Up to 4 vehicles can be handled separately
Favorite locations, articles and notes can be saved and can easily be used
or changed
© 2009 RandiRundi
3 (19)
ver. 1.1
2 Input/Selection of Values
This chapter describes the different views that are shown at input or selection of
values for trips, expenses or reports.
2.1
Text Input (with Favorites list)
This view is shown for input of text at fields with a corresponding Favorites list.
• Start location for trip
•
Destination for trip
•
Location for purchase
•
Note for trip or purchase
•
Purchased article
The Favorites list and text input is handled with the following buttons,
Cancel
Cancel input and return to previous view without making any changes.
Edit/Done
Edit the favorite list. Rows can be deleted and the order can be changed while in
edit mode. This button change to “Done” when edit mode is initiated. Finish edit
mode by clicking the “Done” button.
For deletion of a single row the edit mode is not needed. Draw your finger from
one side to the other on actual row and deletion of that row will be initiated.
Use once
If you enter text in the text field and click this button you will return to the
previous view and the entered text will be used in current trip or expense record.
The text will not be saved to the Favorites list.
Use and save
If you enter text in the text field and click this button you will return to the
previous view and the entered text will be used in current trip or expense record.
The text will also be saved to the Favorites list.
Keyboard ”Return” key
If you enter text in the text field and click the “Return” key
on the keyboard the new text will be saved to the Favorites
list. The text input view will still be displayed and no
changes will be performed in trip or expense records. This
can be used if you for example would like to add several
new locations, articles or notes to the Favorites list.
Selection from Favorites list
Click on any of the rows in the Favorites list to select that
entry and return to the previous view.
© 2009 RandiRundi
4 (19)
ver. 1.1
2.2
Text Input (without Favorites list)
This view is shown for input of text at fields that have no corresponding Favorites
list.
• Email receiver
•
Vehicle names
Email receiver
Use the keyboard to enter the Email address for the Email receiver in the text
field. If more than one receiver address is needed, type all in one row separated
with space. Finish the input by clicking the “Return” key on the keyboard.
Vehicle names
Enter the name of actual vehicle in the text field with the keyboard. Finish the
input by clicking the “Return” key on the keyboard.
2.3
Date/Time
This view is shown for input of date and time values in a trip or expense record.
Date and time picker wheels
With the picker wheels the date, hour and minute of wanted time can be
selected.
Cancel
Click this button to cancel the input and return to previous view without making
any changes.
Reset
Push this button to reset the picker wheels to the initial value.
Done
Click this button to return to previous view and use the date and time from the
picker wheels for actual field in current trip or expense record.
2.4
Number
This view is shown for input of numbers such as,
• Odometer
•
Purchase quantity
•
Purchase amount
•
Number of records in report
© 2009 RandiRundi
5 (19)
ver. 1.1
Number picker wheels
Use the picker wheels to select the wanted number. The picker wheels displayed
during input of quantity or amount has the two rightmost numbers marked with
red to indicate this is the decimal part of the number. During input of odometer
or number of records for report the input is an integer value and hence no red
fields are shown.
Cancel
Click this button to cancel the input and return to previous view without making
any changes.
Reset
Click this button to reset the picker wheels to the initial values.
Done
Click this button to return to previous view and use the selected number in actual
field in current trip or expense record.
2.5
Month
This view is shown during input of month for “Custom Month” in the Report view.
Picker wheels for month
Use the picker wheels to select year and month for custom month. The picker
wheel for date has no function in this case.
Cancel
Click this button to cancel the input and return to previous view without making
any changes.
Reset
Click this button to reset the picker wheels to the initial values.
Done
Click this button to return to previous view and use the selected year and month
for custom month in actual field for current trip or expense record.
© 2009 RandiRundi
6 (19)
ver. 1.1
3 Trips View
The ”Trips View” lets you add, delete and modify your trip
records. For each trip, start and end locations can be saved
together with necessary information about the trip
purpose, trip type and the vehicle used.
3.1
Navigation Bar
The trips navigation bar is used for navigating back and forth between trip
records. Depending on the current trip record, the rightmost button will alter
function between “Last” and “Add”.
Delete
Delete current trip record. If ”Confirm record delete” is enabled in global settings
a popup window will be presented before the record is deleted.
Previous
Go to previous trip record. This button is disabled if current record is the first.
Next
Go to next trip record. This button is disabled if current record is the last.
Last
When current record is not the last one, this button is displayed. Click on this
button to go to the last record.
Add
When current record is the last one this button is displayed. Click on this button
to add a new trip record.
3.2
Start Location (From)
This section has three buttons,
From
Click this button to select start location for the trip. When selected, a new
window is presented where the location can be chosen from the Favorites list, or
a new location can be entered and optionally saved to the Favorites list.
© 2009 RandiRundi
7 (19)
ver. 1.1
Date/Time
Click this button to select date and time for start of the trip. When selected, a
new window is presented where the date and time can be chosen.
Odometer
Click this button to select odometer reading for start of the trip. When selected, a
new window is presented where odometer reading can be chosen.
3.3
Destination (To)
This section has three buttons,
To
Click this button to select destination location for the trip. When selected, a new
window is presented where the location can be chosen from the Favorites list, or
a new location can be entered and optionally saved to the Favorites list.
Date/time
Click this button to select date and time for the end of the trip. When selected, a
new window is presented where the date and time can be chosen.
Odometer
Click this button to select odometer reading for end of the trip. When selected, a
new window is presented where odometer reading can be chosen.
3.4
Note
This section has a single button,
Note
Click this button to input or select a note for the trip. When clicked, a new
window is presented where a note can be chosen from the Favorites list, or a
new note can be entered and optionally saved to the Favorites list.
3.5
Status Line
In the yellow field below the note button, status information can be shown.
Information can be things like vehicle name or trip type.
3.6
Other Options
In the lower part of the window you will find two rows with buttons for other
options.
/
Trip purpose
Click this button to alternate the trip purpose between “Business” and “Private”.
When a new trip record is created the initial trip purpose setting will be set
according to preferences in global settings.
© 2009 RandiRundi
8 (19)
ver. 1.1
Trip type
Click this button to alternate the trip type between “One way” and “Round trip”.
Current setting is shown with arrows on the button and as text in the status line
(below the notes field). When a new trip record is created the initial trip type will
be set according to preferences in global settings.
Vehicle
Depending on the number of vehicles enabled in the global settings this row
contains 0 to 4 buttons. Click one of the buttons to select that vehicle for the
current trip. If no vehicles are enabled in global settings, the last selected vehicle
will be used and instead of buttons, the name of that vehicles will be displayed in
the status line.
© 2009 RandiRundi
9 (19)
ver. 1.1
4 Expenses View
The ”Expenses View” will help you keep track of expenses
for your vehicles. For each expense record, information of
location, date and time, odometer, article, quantity, amount
and a note can be saved.
4.1
Navigation Bar
The expenses navigation bar is used for navigating back and forth between trip
records. Depending on current expense record, the rightmost button will alter
function between “Last” and “Add”.
Delete
Delete current expense record. If ”Confirm record delete” is enabled in global
settings a popup window will be presented before the record is deleted.
Previous
Go to previous expense record. This button is disabled if current record is the
first.
Next
Go to next expense record. This button is disabled if current record is the last.
Last
When current record is not the last one this button is displayed. Click on this
button to go to the last record.
Add
When current record is the last one this button is displayed. Click on this button
to add a new expense record.
If current time is within 30 minutes of the time stamp of the previous expense
record, the location, date, time and odometer will be copied from the previous
expense record. If this is the case, this will be indicated with the text “COPY” to
the right in the “LOCATION” field (text is shown in red and is visible for a couple
of seconds). This function will only work if the previous expense record have
location, time, date and odometer defined (i.e. not empty).
4.2
Location
This section has three buttons,
© 2009 RandiRundi
10 (19)
ver. 1.1
Location
Click this button to select the location for the actual purchase. When selected, a
new window is presented where the location can be chosen from the Favorites
list, or a new location can be entered and optionally saved to the Favorites list.
Date/time
Click this button to select date and time for the purchase. When selected, a new
window is presented where the date and time can be chosen.
Note! If you have an empty expense record and set the time to the same time
as a previous expense record, the location and odometer from that expense
record will be copied to the current. When this is the case there will be an
indication with the text “COPY” shown to the right in the “LOCATION” field (the
text is shown in red and is visible for a couple of seconds).
Odometer
Click this button to select odometer reading for end of the trip. When selected, a
new window is presented where odometer reading can be chosen.
4.3
Article
This section has three buttons,
Article
Select article for current expense record. When selected, a new window is
presented where an article can be chosen from the Favorites list, or a new article
can be entered.
Quantity
Select how many of the articles have been purchased. When selected you will be
presented with a new window where you can specify the quantity.
Amount
Specify the total amount spent for this expense record. When selected you will
be presented with a new window where you can specify the amount spent.
4.4
Note
Click this button to add a note to the expense record. When
selected you will be presented with a new window where you can select a
favorite note from the Favorites list or enter a new note.
4.5
Status Line
In the yellow field below the note button, status information can be shown (such
as vehicle name if no vehicles are enabled in global settings).
© 2009 RandiRundi
11 (19)
ver. 1.1
4.6
Other Options
Vehicle
Depending on the number of vehicles enabled in the global settings this row
contains 0 to 4 buttons. Click one of the buttons to select that vehicle for the
current trip. If no vehicles are enabled in global settings, the last selected vehicle
will be used and instead of buttons, the name of that vehicles will be displayed in
the status line.
© 2009 RandiRundi
12 (19)
ver. 1.1
5 Reports View
The “Reports View” will give you the tools needed to
display your saved records, send them via Email or print
them.
5.1
Navigation Bar
The reports navigation bar contains the buttons for the different ways of
presenting a report.
Web
Push this button to start a web service which will make it possible for you to look
at, print or save reports in HTML or CSV format. The selected report will be
available in your web browser on your desktop computer or similar.
Note! You must be connected by wireless network, Wi-Fi, to the local network for
this to work.
Email
Push this button to open the window with settings for Email reports and to send
the Email report.
Screen
Push this button to show a report of trip or expense records on the screen.
5.2
Selection of Report Period
This section contains the buttons to use to select which
period, a number of records or a specific month, the
created report should cover. With the “Number” and
“Month” button you can change the custom number and
custom month setting.
If the report period is a number, the records are fetched
from the end and in the order in which they have been
saved. Each records date is not used in this case.
A blue arrow indicates which report period is selected.
Number
Push this button to change the number of records for “Custom number”. When
this is done the report period selection is automatically changed to “Custom
© 2009 RandiRundi
13 (19)
ver. 1.1
number”.
Month
Push this button to change the setting for “Custom month”. When this is done
the report period selection is automatically change to “Custom month”.
Latest 10, Latest 25, Custom number (Latest X)
Push any of these buttons to get a report of a number of records. To change the
value for the “Custom number” you should click the “Number” button. Current
setting for “Custom number” is shown on the button (as Latest X).
Current, Previous, Custom month
Push any of these buttons to get a report for current, previous or custom month.
To change the “Custom month” you should click the “Month” button. The current
month for “Custom month” is shown in the button.
5.3
Other Options
Trips or Expenses
Push one of these buttons to select whether the report should cover trips or
expenses records.
Vehicle
Depending on the number of vehicles enabled in the global settings this row
contains 0 to 4 buttons. Click one of the buttons to select that vehicle for the
current trip. If no vehicles are enabled in global settings, the last selected vehicle
will be used and instead of buttons, the name of that vehicles will be displayed in
the status line (the yellow field below the custom month field).
5.4
Web Reports
This window is displayed when Web is selected from the
“Reports” view. Current status for the web service is
displayed in the window.
If the web service is started correctly there will be
information about which IP address and port number to
enter in your web browser for access to the reports (for
example http://192.168.0.10:8080).
The complete address must be entered in the address field in your web browser.
The port number is the number at the end of the web address (i.e. 8080). Before
the port number there must be a colon character “:”.
Note! You must be connected by wireless network, Wi-Fi, to the local network for
the web service to work.
In this window there are two buttons available and the functions for these are,
Port 8080
Click this button to enable the function for the web service to always use port
number 8080. This will make it easier to remember what to enter in the web
browser for access to the reports. If the web service for some reason will not
© 2009 RandiRundi
14 (19)
ver. 1.1
start, it might be due to this port number already used, in which case you can
disable this function and have the web service to start with a dynamically
allocated port number.
Done
Click this button to stop the web service and return to the previous view.
5.4.1
Reports in HTML format
The look of the HTML report has deliberately been made simple to make sure
compatibility with as many web browsers as possible. The actual look will vary
depending on used computer and web browser. The first page displayed in the
web browser is the page where you select what to include in the report. When
selections have been performed you generate the report by clicking the “Submit”
button. One example of a HTML report is,
5.4.2
Reports in CSV format
Reports in CSV format is intended for import to spreadsheets in applications like
Microsoft Excel, StarOffice Calc or OpenOffice Calc. To be able to handle different
characters and character encodings properly all records has been surrounded by
quotation marks (“) at the beginning and the end. One example a CSV report is,
"From","Date/Time","Odometer","Trip type","To","Date/Time","Odometer","Purpose","Distance","Note"
"Office","12/08/08 08.00 AM","3721","Round trip","Customer X","12/08/08 04.30 PM","3783","Business","62",""
"Office","12/09/08 10.00 AM","3793","Round trip","Customer Y","12/09/08 05.20 PM","3862","Business","69","Meeting"
"Office","12/10/08 01.15 PM","3872","Round trip ","Supplier A","12/10/08 04.20 PM","3895","Business","23",""
5.5
Email Reports
This window is displayed when Email is selected in the
“Reports” view.
© 2009 RandiRundi
15 (19)
ver. 1.1
Cancel
Click this button to cancel the report and return to the “Reports” view.
Send
Click this button to send the report via Email. When this is done the Drivers Log
application is closed and the native Email application will be started. The Email
receiver address and Email message content will be preloaded according to the
buttons below.
Report format
Click this button to alter between HTML and CSV format for the report. Due to
the limited support for HTML content in the native Email application the format of
the created HTML reports has deliberately been kept very simple. In most cases
the reports generated will be identical to those generated by the web service
(see previous chapter).
Sort order
Click this button to change the sort order for the records in the report. Arrow
down indicates descending order, i.e. earliest record is shown first.
Include header
Enable this function to get a header section included in the report (valid only for
HTML reports). If the report format has been set to CSV, this button will be
hidden.
Include signature
Enable this function to get a signature section included at the end of the report
(valid only for HTML reports). If the report format has been set to CSV, this
button is hidden.
Include title row
Enable this function to get an initial row with column headings (valid only for CSV
reports). If the report format has been set to HTML, this button is hidden.
Include business trips
Enable this to include trips with business purpose in the report. If the report is
for expenses (i.e. Expenses selected in the “Reports” view), this button will be
hidden.
Include private trips
Enable this to include trips with private purpose in the report. If the report is for
expenses (i.e. Expenses selected in the “Reports” view), this button will be
hidden.
Email receiver
Push this button to define the Email receiver address to be used when the native
Email application starts. If more than one receiver address is entered they should
be separated with space.
© 2009 RandiRundi
16 (19)
ver. 1.1
5.6
Screen Reports
This view is displayed when report on screen is selected from the “Reports” view.
While the report is displayed the sort order can be changed. If report of trip
records has been selected you can also change for which trip purposes records
should be displayed, business and/or private.
Report for trips
For trip reports each record is displayed as,
• The start location, date/time and odometer is displayed to the left
•
The destination location, date/time and odometer is displayed to the right
•
The trip type, one way or round trip, is indicated with a blue icon with
arrows
The trip purpose, business or private, is indicated with a orange icon for
business trips and a green icon for private trips
The line below the odometer readings displays the note for the trip record
if one has been entered
Use the finger to scroll through the records
•
•
•
•
The background color is alternating between white and light gray for the
different records
Report for expenses
For expense reports each record is displayed as,
• The location, date/time and odometer is displayed to the left
•
The article, quantity and amount is displayed to the right
•
The line below the odometer reading displays the note for the expense
record if one has been entered
Use the finger to scroll through the records
•
•
The background color is alternating between white and light gray for the
different records
© 2009 RandiRundi
17 (19)
ver. 1.1
6 Settings View
The ”Settings View” contains the buttons for the definition
of the global settings for the application.
6.1
Trips Preferences
Default trip type
When a new trip record is created the trip type will be set as defined by this
setting. The current choice is shown on the button. Click the button to walk
through the different choices which are,
One way – A new trip record will have trip type “One way” selected.
Round trip – A new trip record will have the trip type “Round trip” selected”.
Latest – A new trip record will have the trip type that was last selected
(independently of for which trip record this was performed).
Default trip purpose
When a new trip record is created the trip purpose will be set as defined by this
setting. The current choice is shown on the button. Click the button to walk
through the different choices which are,
Business – A new trip record will have trip purpose “Business” selected.
Private - A new trip record will have trip purpose “Private” selected.
Latest - A new trip record will have the trip purpose that was last selected
(independently of for which trip record this was performed).
6.2
Vehicles Preferences
Vehicle name
All vehicles can have a name which is shown on reports and buttons for vehicle
selection. To change the name for a vehicle, click the button and enter the new
name in the text field presented.
© 2009 RandiRundi
18 (19)
ver. 1.1
Vehicle enable
For each vehicle you can select whether it should be enabled or disabled.
Disabling of a vehicle will not change any previously created trip or expense
records, but the vehicle button will not be displayed in the different views. If a
vehicle is enabled a button for selection of this vehicle will be displayed in the
views for trips, expenses and reports.
Note! If no vehicle at all is enabled, the latest selected vehicle for the actual
view will be used. In this case no vehicle selection buttons will be displayed and
the name of the selected vehicle will be displayed in the status line for the view.
If you keep track of only one vehicle you can disable all vehicles, (after first have
selected the wanted vehicle in each view), to be certain that all records created
hereafter will have that specific vehicle selected.
6.3
General Settings
Suggest odometer
With this setting enabled you will get a suggested odometer value when you
enter the odometer setting from a previously empty odometer field. The
suggested value is based on previous trip and expense records for the selected
vehicle.
Confirm record delete
Enable this setting to get a confirmation popup window before any trip or
expense record is deleted. If this setting is disabled, the actual record will be
deleted without any warning.
Odometer unit
Click this button to change the unit used for odometer reading. The unit can be
either miles, “mi”, or kilometer, “km”. The currently selected unit is shown on the
button.
© 2009 RandiRundi
19 (19)
ver. 1.1