1
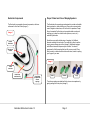
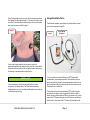
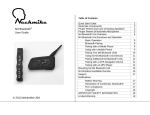
Table of Contents Neckmike Mobile User Guide © 2013 Neckmike USA Quick Start Guide Neckmike Components Proper Fitment and Care of Earplug Speakers Proper Fitment of Neckmike Microphone Using With a Mobile Phone Support Notifications Copyright IMPORTANT SAFETY INFORMATION Limited Warranty 2 3 3 5 6 7 7 7 8 Quick Start Guide Thank you for choosing the Neckmike Mobile communication system! Neckmike enables communication while providing hearing protection in high noise environments with a unique and patented headset design. Please follow the instructions in this User Guide to get the best results from your Neckmike. --Proper fitment is essential to achieve good results-Save this manual for future reference. Neckmike Mobile User Guide v1.3 Fitting the Neckmike headset Place the Neckmike around your neck, with the microphone cabinet 1-2” (3-5cm) to the side of your voice box. It should be placed relatively high on the neck, otherwise your voice may sound muffled. Install the earplugs by reaching over head and gently pull up and back on outer ear to the straighten ear canal. With opposite hand, grasp the earplug stem and insert with a circular motion to form an airtight seal. Lightly wetting the earplugs or ear canal will enable easier insertion into the ear and will provide a better acoustic seal. When fitted correctly, it should be as quiet as when you put your fingers in your ears. Multiple earplug sizes are included so you can find the one that offers the best fit and the most hearing protection. Connect the Neckmike via the extension cable to your smartphone. Connecting your Smartphone You must use the correct cable (iPhone or OMTP style) which corresponds to your smartphone model. If the cable is incorrect or poorly connected, the sound in the earbud speakers may be faint or poor quality when listening to music and/or the microphone may not function when in an active call. The functions of the inline push-to-answer button may vary according to your phone model. In general, this button is used to answer or end an active phone call. On some phone models, this button may be used to play and pause music when not in an active call, and to activate the phone’s voice dialing function. Page 2 Neckmike Components Proper Fitment and Care of Earplug Speakers The Neckmike is comprised of several components, which are referenced in this User Guide (Image 1). The Neckmike silicone earplugs are designed to provide comfortable hearing protection, while enabling you to hear voice communication, music, navigation instructions, etc. via the built-in speakers. Proper fitment is essential for blocking out unwanted outside sounds and enabling you to hear the relevant audio (intercom, music, etc.) enabled by Neckmike. Image 1 Neckmike comes with multiple sizes of earplugs, to fit different diameter and depth of ear canals. The small size is black, medium size is green and large size is blue (Image 2). Additional earplugs with different sizes and shapes may be included. You should experiment to find the earplug that best fits your ear canal. When fitted correctly, outside noises should sound muted, similar to putting your fingers in your ears. Flexible Neck band Microphone Cabinet Image 2 3.5mm connector Hook & loop retention strap High-fidelity speakers with silicone earplugs Neckmike Mobile User Guide v1.3 Small Medium Large The silicone earplugs are attached to the stereo micro-speakers by gently pushing them into place (Image 3). Page 3 Image 4 Image 3 Gently press fit the silicone earplug onto the micro-speakers Install the earplugs by reaching over head with the opposite hand and gently pulling up and back on outer ear to straighten the ear canal. With opposite hand, grasp the earplug and insert with a circular or wiggling motion to form an airtight seal. For the best seal, rub a few drops of water onto the earplugs prior to insertion (make sure to avoid the center speaker hole of the earplug) or put some water droplets on your finger to wet your ear canal prior to insertion. Lightly wetting the earplugs or ear canal will enable easier insertion into the ear and will provide a much better acoustic seal. If you wear a helmet with Neckmike, you should also shorten the earplugs on the end which affixes to the micro-speakers, so that the earplugs are not easily knocked out of position while putting on your helmet and do not protrude uncomfortably inside the helmet (Image 5). Image 5 Cut at molded edge for use with a helmet. The earplug should remain securely in place when there's a good seal. If you've inserted the earplug as far as is comfortable, but cannot achieve a good seal, try a larger size earplug. If your ear canals are shallow and / or you are having trouble achieving a good seal, then the green or blue earplugs may be modified by removing the smallest flange at the end in order to improve the fit. This can be done with sharp scissors or razor blade (Image 4). Neckmike Mobile User Guide v1.3 Earplugs may be washed with soap and water as needed. Page 4 Proper Fitment of the Neckmike Microphone NOTICE Earplugs should be removed from the micro-speakers prior to cleaning and should be completely dry prior to reattaching to the micro-speakers. Otherwise, the micro-speakers may be damaged by the water. NOTICE In some regions or states, the use of headphones or helmet audio is restricted or prohibited. Familiarize yourself with all laws and regulations that apply to your region before using Neckmike and remember that compliance with all laws and regulations is your responsibility. The AMA maintains a helpful resource of motorcycle laws by state: http://www.americanmotorcyclist.com/Rights/State-Laws.aspx WARNING Neckmike is designed for all-day comfort and the neck band is flexible to accommodate different neck sizes. The microphone cabinet should have full contact against the skin for the best microphone performance. Note that a beard or whiskers in the area of the microphone may be heard as a scratching noise in the background. The microphone cabinet is held in place by the built-in tension of the neck band. For active use, you should use the included hook and loop retention strap to hold the Neckmike securely in place. Once comfortably fitted, the extra strap material (if any) should be trimmed with scissors. Using both hands, gently bend the neck band into a 2-3” (6-7cm) diameter prior to wearing. This will help to ensure proper tension in the band (Image 6). This should be done each time you wear the Neckmike. Image 6 Permanent hearing loss may occur if headphones are used at a high volume. Use caution and common sense with the headphone volume level for voice communication and music. Hearing experts suggest that you limit the amount of time you use headphones at high volume, and avoid turning up the volume to further block out noisy surroundings. Your ear can adapt to a higher volume of sound over time, which may sound normal but can be damaging to your hearing. Set your volume to a safe level before that happens. If you experience ringing in your ears, reduce the volume or discontinue use of your audio device. Neckmike Mobile User Guide v1.3 Page 5 Place the Neckmike around your neck, with the microphone cabinet flush against the skin, approximately 1-2” (3-5cm) to the side of your voice box. It should be placed relatively high on the neck; otherwise your voice may sound muffled (Image 7). Using with a Mobile Phone The Neckmike headsets uses a heavy duty coiled cable to connect you’re your smartphone (Image 8). Image 7 Image 8 Push-to-Answer (PTA) Button If your voice is higher pitched, you may want to move the microphone cabinet further away from the voice box for best results. Experiment with the location of the microphone cabinet while using the intercom to see what position is best for you. HELPFUL HINT It is not necessary to shout when using Neckmike in a noisy environment; just speak clearly. The Neckmike microphone is designed to give your voice the best possible quality, even when the surrounding noise is strong. Neckmike Mobile User Guide v1.3 You must use the correct cable (iPhone or OMTP style) which corresponds to your smartphone model. If the cable is incorrect or poorly connected, the sound in the earbud speakers may be faint or poor quality when listening to music and/or the microphone may not function when in an active call. The functions of the inline push-to-answer (PTA) button may vary according to your phone model. In general, this button is used to answer or end an active phone call. When you receive a call, a short press of the PTA button will answer the call. When you are finished with the call, a short press of the PTA button will terminate the call. Page 6 On some phone models, this button may be used to play and pause music when not in an active call, and to activate the phone’s voice dialing function. You should experiment with a short press versus long press of the PTA button to see what functions your phone model supports, or check your mobile phone owner’s manual for more information. Always ensure the cable is firmly connected between the mobile phone and the Neckmike headset for proper function. precautions and remain alert to your surroundings including traffic, weather, road conditions and terrain. It is best to pull over and stop in a safe and legal manner away from traffic prior to activating or deactivating the Product or initiating or receiving any calls. Do not perform any Bluetooth pairing while riding. The User Guide is intended to cover technical capabilities of the Product and should not be interpreted as encouraging the operation of the Product in any manner that is unsafe or prohibited by law. Always exercise due caution when using this Product and obey all relevant traffic laws. Support Do not become distracted by the Product while operating any vehicle. Do not operate the Product if it is unsafe to do so. For additional information please visit our website at www.neckmike.us In some regions or states, the use of headphones or helmet audio is restricted or prohibited. Familiarize yourself with all laws and regulations that apply to your region before using the Product and remember that compliance with all laws and regulations is the user’s responsibility. Use the Product while operating your vehicle only where and how permitted by the applicable law. You can also reach us at: [email protected] Notifications The AMA maintains a helpful resource of motorcycle laws by state: http://www.americanmotorcyclist.com/Rights/State-Laws.aspx Copyright All rights reserved. The content of this User Guide may not be copied, in whole or in part, without the written consent of Neckmike USA and is protected by copyright laws. Use care when installing the Product so that the Product is secure. IMPORTANT SAFETY INFORMATION Neckmike USA (the “Company”) notifies you that your complete and undivided attention is required when using the Neckmike Mobile series communication system (the “Product”). Failure to avoid potentially hazardous situations could result in serious injury or even death. The Company encourages you to take all necessary Neckmike Mobile User Guide v1.3 Page 7 Limited Warranty This Neckmike product is warranted to be free from defects in materials or workmanship for one year from the date of purchase. Within this period, Neckmike USA will, at its sole discretion, repair or replace any components that fail in normal use. Such repairs or replacement will be made at no charge to the customer for parts or labor, provided that the customer shall be responsible for any shipping cost. This warranty does not apply to: (i) cosmetic damage, (ii) consumable parts such as batteries, unless product damage has occurred due to a defect in materials or workmanship; (iii) damage caused by accident, abuse, misuse, water, flood, fire, or other acts of nature or external causes; (iv) damage caused by service performed by anyone who is not an authorized service provider of Neckmike USA; or (v)damage to a product that has been modified or altered without the written permission of Neckmike USA. Neckmike USA retains the exclusive right to repair or replace (with a new or remanufactured replacement product) the device or offer a full refund of the purchase price at its sole discretion. SUCH REMEDY SHALL BE YOUR SOLE AND EXCLUSIVE REMEDY FOR ANY BREACH OF WARRANTY. To obtain warranty service, contact Neckmike USA for shipping instructions and a return authorization number. You must securely package the unit and include a copy of the original sales receipt, which is required as the proof of purchase for warranty repairs. In addition, Neckmike USA reserves the right to refuse warranty claims against products or services that are obtained and/or used in violation of the laws of any country. THE WARRANTIES AND REMEDIES CONTAINED HEREIN ARE EXCLUSIVE AND IN LIEU OF ALL OTHER WARRANTIES EXPRESS, IMPLIED, OR STATUTORY, INCLUDING ANY LIABILITY ARISING UNDER ANY WARRANTY OF MERCHANTABILITY OR FITNESS FOR A PARTICULAR PURPOSE, STATUTORY OR OTHERWISE. THIS WARRANTY GIVES YOU SPECIFIC LEGAL RIGHTS, WHICH MAY VARY FROM STATE TO STATE OR REGION. IN NO EVENT SHALL NECKMIKE USA BE LIABLE FOR ANY INCIDENTAL, SPECIAL, INDIRECT OR CONSEQUENTIAL DAMAGES, INCLUDING, WITHOUT LIMITATION, DAMAGES TO PROPERTY, TRAFFIC FINES OR CITATIONS, WHETHER RESULTING FROM THE USE, MISUSE OR INABILITY TO USE THE PRODUCT OR FROM DEFECTS IN THE PRODUCT. SOME STATES DO NOT ALLOW THE EXCLUSION OF INCIDENTAL OR CONSEQUENTIAL DAMAGES, SO THE ABOVE LIMITATIONS MAY NOT APPLY TO YOU. Neckmike Mobile User Guide v1.3 Page 8 Neckmike USA 18460 S. Ridgeview Road Olathe, KS 66062 USA www.neckmike.us Neckmike Mobile User Guide v1.3 Page 9