1
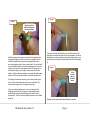
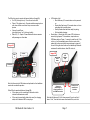
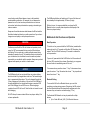
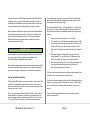
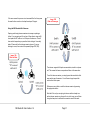
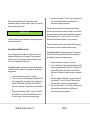
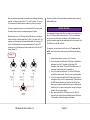
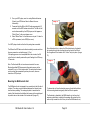
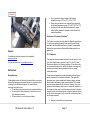
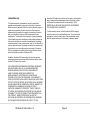
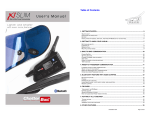
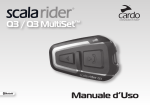
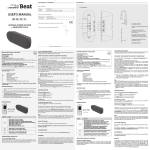
Table of Contents M4 Bluetooth® User Guide © 2013 Neckmike USA Quick Start Guide Neckmike Components Proper Fitment and Care of Earplug Speakers Proper Fitment of Neckmike Microphone M4 Bluetooth Unit Overview M4 Bluetooth Unit Functions and Operation Basic Operation Bluetooth Pairing Pairing with a Mobile Phone Using with a Mobile Phone Pairing Two M4 Bluetooth Units Using the M4 Bluetooth Unit Intercom Pairing Additional M4 Bluetooth Units Pairing with a GPS Navigation Device Pairing with an MP3 Player Mounting the M4 Bluetooth Unit M4 Wireless Handlebar Remote Support Notifications Battery Warning Declaration of Conformity- Bluetooth® FCC Compliance Copyright IMPORTANT SAFETY INFORMATION Limited Warranty 2 3 3 5 6 8 8 9 9 10 11 12 14 14 15 16 17 17 17 17 18 18 19 Quick Start Guide Thank you for choosing the Neckmike M4 Bluetooth communication system! Neckmike enables communication while providing hearing protection in high noise environments with a unique and patented headset design. Because Neckmike is a professional grade, military-derived product, please follow the instructions in this User Guide for best results. --Proper fitment is essential to achieve good results-Save this manual for future reference. Fitting the Neckmike headset Place the Neckmike around your neck, with the microphone cabinet 1-2” (3-5cm) to the side of your voice box. It should be placed relatively high on the neck, otherwise your voice may sound muffled. If it is too close to the voicebox and your voice may sound distorted. Install the earplugs by reaching over head and gently pull up and back on outer ear to the straighten ear canal. With opposite hand, grasp the earplug stem and insert with a circular motion to form an airtight seal. Lightly wetting the earplugs or ear canal will enable easier insertion into the ear and will provide a better acoustic seal. When fitted correctly, it should be as quiet as when you put your fingers in your ears. Multiple earplug sizes are included so you can find the one that offers the best fit and the most hearing protection. Connect the Neckmike via the coiled extension cable to the M4 Bluetooth unit, with the right-angled end plugged into the Bluetooth unit and the straight connector plugged into the headset. Operating the M4 Bluetooth unit You must first charge the M4 unit battery and remote control prior to operation. (Please see detailed instructions). Press and hold the On/Off button (marked with a motorcycle icon) for 5-6 seconds until the blue LED illuminates, then release. The LED will flash approximately every two seconds to indicate the unit is powered on. Pair with your mobile phone for voice calls and music, GPS for guidance, or additional M4 units for rider-to-passenger or bike-to- M4 Bluetooth User Guide v1.4 Page 2 bike communication via Bluetooth. (Please see detailed instructions). Proper Fitment and Care of Earplug Speakers To power off, press and hold the On/Off button for 6-8 seconds until the blue LED is constant, then release. Alternatively, you may press the small gray reset button to immediately power off the unit. Pressing the reset button does not erase Bluetooth pairings made with mobile phones or other M4 units. The Neckmike silicone earplugs are designed to provide comfortable hearing protection, while enabling you to hear voice communication, music, navigation instructions, etc. via the built-in speakers. Proper fitment is essential for blocking out unwanted outside sounds and enabling you to hear the relevant audio (intercom, music, etc.) enabled by Neckmike. Neckmike Components The Neckmike is comprised of several components, which are referenced in this User Guide (Image 1). Neckmike comes with multiple sizes of earplugs, to fit different diameter and depth of ear canals. The small size is black, medium size is green and large size is blue (Image 2). Additional sizes and shapes may be included. You should experiment to find the earplug that best fits your ear canal. When fitted correctly, outside noises should sound muted, similar to putting your fingers in your ears. Image 1 Image 2 Flexible Neck band Microphone Cabinet Small Medium Large The silicone earplugs are attached to the stereo micro-speakers by gently pushing them into place (Image 3). 3.5mm connector Hook & loop retention strap M4 Bluetooth User Guide v1.4 High-fidelity speakers with silicone earplugs Page 3 Image 4 Image 3 Gently press fit the silicone earplug onto the micro-speakers Install the earplugs by reaching over head with the opposite hand and gently pulling up and back on outer ear to straighten the ear canal. With opposite hand, grasp the earplug and insert with a circular or wiggling motion to form an airtight seal. For the best seal, rub a few drops of water onto the silicone earplugs prior to insertion (make sure to avoid the center speaker hole of the earplug) or put some water droplets on your finger to wet your ear canal prior to insertion. Lightly wetting the earplugs or ear canal will enable easier insertion into the ear and will provide a much better acoustic seal. If you wear a helmet with Neckmike, you should also shorten the earplugs on the end which affixes to the micro-speakers, so that the earplugs are not easily knocked out of position while putting on your helmet and do not protrude uncomfortably inside the helmet (Image 5). Image 5 Cut at molded edge for use with a helmet. The earplug should remain securely in place when there's a good seal. If you've inserted the earplug as far as is comfortable, but cannot achieve a good seal, try a larger size earplug. If your ear canals are shallow and / or you are having trouble achieving a good seal, then the green or blue earplugs may be modified by removing the smallest flange at the end in order to improve the fit. This can be done with sharp scissors or razor blade (Image 4). M4 Bluetooth User Guide v1.4 Earplugs may be washed with soap and water as needed. Page 4 Proper Fitment of the Neckmike Microphone NOTICE Earplugs should be removed from the micro-speakers prior to cleaning and should be completely dry prior to reattaching to the micro-speakers. Otherwise, the micro-speakers may be damaged by the water. NOTICE In some regions or states, the use of headphones or helmet audio is restricted or prohibited. Familiarize yourself with all laws and regulations that apply to your region before using Neckmike and remember that compliance with all laws and regulations is your responsibility. The AMA maintains a helpful resource of motorcycle laws by state: http://www.americanmotorcyclist.com/Rights/State-Laws.aspx WARNING Neckmike is designed for all-day comfort and the neck band is flexible to accommodate different neck sizes. The microphone cabinet should have full contact against the skin for the best microphone performance. Note that a beard or whiskers in the area of the microphone may be heard as a scratching noise in the background. The microphone cabinet is held in place by the built-in tension of the neck band. For active use, you should use the included hook and loop retention strap to hold the Neckmike securely in place. Once comfortably fitted, the extra strap material (if any) should be trimmed with scissors. Using both hands, gently bend the neck band into a 2-3” (6-7cm) diameter prior to wearing. This will help to ensure proper tension in the band (Image 6). This should be done each time you wear the Neckmike. Image 6 Permanent hearing loss may occur if headphones are used at a high volume. Use caution and common sense with the headphone volume level for voice communication and music. Hearing experts suggest that you limit the amount of time you use headphones at high volume, and avoid turning up the volume to further block out noisy surroundings. Your ear can adapt to a higher volume of sound over time, which may sound normal but can be damaging to your hearing. Set your volume to a safe level before that happens. If you experience ringing in your ears, reduce the volume or discontinue use of your audio device. M4 Bluetooth User Guide v1.4 Page 5 Place the Neckmike around your neck, with the microphone cabinet flush against the skin, approximately 1-2” (3-5cm) to the side of your voice box (Image 7). It should be placed relatively high on the neck, otherwise your voice may sound muffled. Image 7 M4 Bluetooth Unit Overview The M4 Bluetooth unit is a Class 1 Bluetooth transceiver that is waterproof and includes a glove-friendly handlebar remote. The M4 unit enables one-to-one Bluetooth intercom functionality up to 1,000M between up to four different M4 units (You + 3 others). Note the functional range of the intercom feature will be influenced by terrain such as trees and hills, obstacles such as buildings and weather conditions. The Neckmike M4 Bluetooth unit may also be paired with Bluetoothenabled mobile phones for voice calls and music, MP3 players for music and GPS units for guidance and/or music (Image 8). Image 8 If your voice is higher pitched, you may want to move the microphone cabinet further away from the voice box for best results. Experiment with the location of the microphone cabinet while using the intercom to see what position is best for you . HELPFUL HINT It is not necessary to shout when using Neckmike in a noisy environment; just speak clearly. The Neckmike microphone is designed to give your voice the best possible quality, even when the surrounding noise is strong. M4 Bluetooth User Guide v1.4 Page 6 The M4 unit is easy to operate with several buttons (Image 9A): On / Off (motorcycle icon)- Turns the unit on and off Phone / Play (phone icon)- Connects and disconnects phone calls; also controls music start / stop on some mobile phones. Volume Up and Down (note that volume “up” is the lower button) Rider A, B, C – Opens / Closes Bluetooth intercom session with passenger or other riders Image 9A Rider A LED indicator light o Blue flash every 2-3 seconds when unit is powered on o Steady blue flash every 2-3 seconds when unit is on and paired with a mobile phone o Quickly flashes blue/red when ready for pairing o Solid red while charging Reset button – Resets the unit in case of RF interference caused by high power TV transmitters, airport radars or GSM base stations. Press < 1 second to reset the unit. If the unit is on, it will immediately power off when reset, which makes this button a quick and convenient way to power off the unit. Hitting the reset button will not delete any Bluetooth pairings with mobile phones, other M4 units, etc. Image 9B Volume - LED Indicator light Reset button On/Off Phone/Play Rider B Volume + Rider C Note that the majority of M4 buttons are duplicated on the handlebar remote for convenient operation. Other M4 unit operational features (Image 9B): 3.5mm open port for connecting to Neckmike via the included coiled extension cable 2.5mm port (covered with rubber dust cover) for charging cable, and to hardwire MP3 music player M4 Bluetooth User Guide v1.4 2.5mm port (behind flap) for charging cable or for wired MP3 connection 3.5mm port for connection to Neckmike Note that all buttons will “click” when pressed. If you do not feel / hear a “click”, then the button was not activated. Also, note that Page 7 some functions emit different beeps or tones in the headset to provide audible confirmation. For example, the unit beeps when powered on or off, a two-tone beep is heard at max or minimum volume level, and a beep is heard when opening or terminating an intercom session. Always use the coiled extension cable between the M4 unit and the Neckmike headset and check your cable connections if you notice a change in sound quality or microphone performance. WARNING The M4 Bluetooth battery will enable up to 9 hours of talk time and has a standby life of approximately 120 hours (5 days). While not in use, it is recommended that you charge the M4 Bluetooth unit on a monthly basis to preserve the capacity of the lithium-ion polymer battery. M4 Bluetooth Unit Functions and Operation Basic Operation Familiarize yourself with the M4 unit buttons and operation prior to using. It is NOT recommended that you use the M4 unit buttons while riding. Pull over and stop in a safe and legal manner before attempting to operate the unit. The handlebar remote is included for your convenience, but should also be used in a safe and prudent manner after you are familiar with its operation. Always use your best judgment and operate your vehicle in a safe manner. To turn the unit on, press and hold the On/Off button (marked with a motorcycle icon) for 5-7 seconds until the blue LED illuminates, then release. The blue LED will flash every 2-3 seconds to indicate the unit is powered on. NOTICE To increase volume, press the volume “+” key. To decrease volume, press the volume “-“ key. Remember the volume “-” key is positioned above the volume “+“ key. The M4 Bluetooth unit has an internal lithium-ion polymer battery which should be fully charged before initial use. The normal charge time is approximately three hours. The unit is charged through the 2.5mm charging port at the bottom of the unit, with the USB end of the cable plugged into the included wall charger a computer USB port. While charging, the red LED turns on. When charging is complete, the red LED will turn off. Note that the unit cannot be used while charging. Do NOT attempt to remove internal lithium-ion polymer battery! It is not user-replaceable. M4 Bluetooth User Guide v1.4 To power off, press and hold the On/Off button for 6-8 seconds until the blue LED is constant, then release. Alternatively, you may press the reset button to immediately power off the unit. Bluetooth Pairing To connect the M4 unit to a Bluetooth device, you must first complete a one-time pairing process. After pairing, the M4 unit and the other Bluetooth device will automatically recognize each other whenever they are turned on and within range (~10 m). The Neckmike M4 Bluetooth unit may be paired with multiple devices: Up to 3 other M4 units (A, B, C) for Bluetooth intercom Page 8 Bluetooth Mobile phones / GPS Bluetooth A2DP MP3 player If you are using a Bluetooth mobile phone and GPS, you should first pair the mobile phone to the GPS device, and then pair the M4 unit to the GPS (see further instructions on page 13). Pairing with a Mobile Phone NOTICE You should only pair one M4 unit at a time to your mobile phone. Other M4 units should be turned off and the handlebar remotes should not be touched during the pairing process. 5. When the M4 unit is discovered, select “Motor Phone” in the phone menu to pair. If the mobile phone asks for a PIN or password, enter 0000 (four zeros). 6. Your mobile phone will confirm that the pairing has succeeded. The M4 unit LED will now steadily flash blue every 3-5 seconds to indicate that it is successfully paired. The M4 unit and mobile unit are now paired and should automatically connect each time they are powered on and within range. After pairing, it may be necessary to tap the Phone/Play button once to establish a connection to the mobile phone. If the pairing process is not completed within two minutes, the M4 unit will return to standby mode with a quick flashing blue LED every 2-3 seconds. Pairing Steps Using with a Mobile Phone 1. Turn on your mobile phone and make sure the Bluetooth function is activated (Bluetooth is normally activated in your phone’s wireless settings menu) 2. Press the reset button on the M4 Bluetooth unit (< 1 second). The unit is now powered off. 3. Press and hold the M4 unit On/Off button approximately 10 seconds until the LED flashes red and blue. (Note that the LED will turn blue as you continue to hold the button, prior to flashing red and blue). The M4 unit will now be discoverable by the mobile phone. 4. From your phone, scan for nearby Bluetooth devices. (Consult your phone Owner’s Manual for more information). The M4 will appear as “Motor Phone” in the mobile phone menu. M4 Bluetooth User Guide v1.4 When you receive a call, the M4 unit will answer automatically after 3-5 seconds. To end the call, press the Phone/Play button. To reject an incoming call prior to the automatic answer, press the Phone/Play button immediately when you hear the incoming ring tone and hold for about 2 seconds. To place a call, you should first pull over and stop in a safe and legal manner, and then dial from your mobile phone as usual. The Neckmike M4 Bluetooth system will then pick up the call in the headset. On some phones, the last number called may be redialed by pressing and holding the Phone/Play button for 2-3 seconds. Page 9 If your mobile phone is A2DP (Advanced Audio Distribution Profile) compatible, then your phone music will be transmitted in stereo to the Neckmike M4 headset and the Phone/Play button may be used to play and pause the music (depending on your phone model). Note that phone calls have the highest priority and will automatically interrupt intercom sessions or music. Once a call is complete, the music or intercom session will resume. GPS voice prompts over Bluetooth are the second highest priority and will also interrupt intercom sessions and music. HELPFUL HINT If the connection is ever lost between the M3 unit and mobile phone or you do not hear the phone audio in the headset, tap the Phone/Play button to reestablish the connection. Remember to always use the coiled extension cable between the M4 unit and the Neckmike headset and check your cable connections if you notice a change in sound quality or microphone performance. The initial pairing is a one-time process. Once the units have been paired, they will automatically recognize each other whenever they are powered on and are within range. First label each M4 unit A, B, C or D (as applicable). To pair the first two units (A, B), make sure the other M4 units are powered off and no buttons are pressed on the handlebar remotes during the pairing process. 1. Press the reset button on each unit (< 1 second). 2. Turn on unit A and unit B by pressing and holding the On/Off button (marked with a motorcycle icon) for 5-7 seconds until the blue LED illuminates, then release. The blue LED will flash every 2-3 seconds to indicate that each unit is powered on. 3. Press and hold the button labeled “B” on unit A, and the button labeled “A” on unit B until the LED flashes red and blue, then release. The units are now in pairing mode. 4. Next, short press button “B” on unit A. After several seconds, both units will resume flashing the blue LED every 2-3 seconds once the pairing is complete. You have now completed the one-time pairing process between units A and B, and the intercom function is ready for use. Pairing Two M4 Bluetooth Units The Neckmike M4 Bluetooth unit may be paired up to three other M4 units for the full duplex Bluetooth intercom feature. Note that even with three other M4 units paired, intercom sessions are always made between two units at a time. Note: If you purchased a Neckmike M4 Twin Pack, the two units are already paired from the factory and with the units powered on, the intercom may be activated by pressing button “B” on unit A or button “A” on unit B. Either unit can open or close the intercom session. M4 Bluetooth User Guide v1.4 Note that the intercom session is normally active following the pairing process. You should press the “B” button on unit A or the “B” button on unit A to disconnect the active intercom session if you are not using it. These units will now automatically pair whenever they are within range of each another. Page 10 If for some reason this process is not successful the first time, press the reset button on each unit and perform steps 2-4 again. Image 10B Rider-to-Passenger Using the M4 Bluetooth Unit Intercom Opening and closing intercom sessions is as easy as pushing a button. If you are using unit A, and your fellow rider is using unit B, short press the “B” button on unit A to open the intercom. You will hear a short beep when you press the button to begin. It normally takes 3-5 seconds for the intercom session to open. If you are listening to music, the music will be paused (Image 10A, 10B). Image 10A Rider-to-Rider The intercom supports full duplex communication, similar to a phone call. This means both users can speak and listen at the same time. To end the intercom session, you simply press the same button that was used to open the session. You will hear a longer beep which confirms the button press. Either person can initiate or end the intercom session by pressing the appropriate button. Note that if the unit you are trying to intercom with is already in an active intercom session or phone call or is out of range, you will hear a long low beep tone to indicate the connection cannot be made. M4 Bluetooth User Guide v1.4 Page 11 Also note that phone calls have the highest priority and will automatically interrupt the intercom session. Once a call is complete, the intercom session will resume. HELPFUL HINT The M4 unit battery life can be maximized by closing active intercom sessions when not in use. 4. Next, short press button “C” on unit A. After several seconds, both units will resume flashing the blue LED every 2-3 seconds once the pairing is complete You have now completed the one-time pairing process between these two units, and the intercom function is ready for use. Note that the intercom session is normally active following the pairing process. You should press button “C” on unit A or button ““A” on unit C to disconnect the active intercom session if you are not using it. If for some reason this process is not successful the first time, press the reset button on each unit and perform steps 2-4 again. Pairing Additional M4 Bluetooth Units If you are using more than two M4 units, they will be paired in the same way as the first two units. For example, if you are pairing a third device (unit C), you will first pair units A and B, and then pair unit A to unit C, followed by unit B to unit C. To pair unit A to unit C, make sure the other M4 units are powered off and no buttons are pressed on the handlebar remotes during the pairing process. 1. Press the reset button on each unit (< 1 second). 2. Turn on unit A and unit C by pressing and holding the On/Off button (marked with a motorcycle icon) for 5-7 seconds until the blue LED illuminates, then release. The blue LED will flash every 2-3 seconds to indicate that each unit is powered on. 3. Press and hold the button labeled “C” on the unit A, and the button labeled “A” on unit C until the LED flashes red and blue, then release. The units are now in pairing mode. M4 Bluetooth User Guide v1.4 To pair unit B to unit C, follow the same process. First, make sure the other M4 units are powered off and no buttons are pressed on the handlebar remotes during the pairing process. 1. Press the reset button on each unit (< 1 second). 2. Turn on unit B and unit C by pressing and holding the On/Off button (marked with a motorcycle icon) for 5-7 seconds until the blue LED illuminates, then release. The blue LED will flash every 2-3 seconds to indicate that each unit is powered on. 3. Press and hold the button labeled “C” on the unit B, and the button labeled “B” on unit C until the LED flashes red and blue, then release. The units are now in pairing mode. 4. Next, short press button “C” on unit B. After several seconds, both units will resume flashing the blue LED every 2-3 seconds once the pairing is complete Page 12 Note that the intercom session is normally active following the pairing process. You should press button “C” on unit B or button ““B” on unit C to disconnect the active intercom session if you are not using it. Pair each unit with unit D as indicated in the steps above for pairing additional M4 units. If for some reason this process is not successful the first time, press the reset button on each unit and perform steps 2-4 again. BONUS FEATURE Because there is no unit “D” button on the M4 units, you will use the button with each unit’s assigned letter (A, B or C) to reach unit D. For example, unit A would pair and communicate with unit D using its “A” button, unit B would pair and communicate with unit D with its “B” button and unit C would pair and communicate with unit D with its “C” button (Image 11). Image 11 An unadvertised feature of the M4 is the ability to pair a fourth unit to the On / Off button (with a motorcycle icon). This is not advertised, as there are only three intercom buttons on the handlebar remote, and this connection may only be established with a short press of the On/Off button on the M4 unit itself. For example, you could pair a unit E with unit A. To pair unit A to unit E, make sure all other units are powered off during the pairing process. 1. Press the reset button on each unit (< 1 second). 2. On unit E, press and hold the On / Off button (marked with a motorcycle icon) for 5-7 seconds until the blue LED illuminates, then release. The blue LED will flash every 2-3 seconds to indicate that unit E is powered on. 3. On unit E, press and hold button “A” until the LED flashes red and blue, then release. This unit is now in pairing mode. 4. On unit A, press and hold the On/Off button (marked with a motorcycle icon) on unit A for approximately 10 seconds until the LED flashes red and blue. (Note that the LED will turn blue as you continue to hold the button, prior to flashing red and blue). Unit A is now in pairing mode, similar to when you paired it with your mobile phone. 5. Next, short press the On / Off button on unit A. After 5-9 seconds, both units will resume flashing the blue LED every 2-3 seconds to indicate the pairing is complete. M4 Bluetooth User Guide v1.4 Page 13 5. When the M4 unit is discovered, select “Motor Phone” in the GPS device menu to pair. If the GPS asks for a PIN or password, enter 0000 (four zeros). Note that the intercom session is normally active following the pairing process. You should press button “A” on unit E or short press the On / Off button on unit A to disconnect the active intercom session if you are not using it. Your GPS should confirm that the pairing has succeeded. If for some reason this process is not successful the first time, press the reset button on each unit and perform steps 2-5 again. The M4 and the GPS device should automatically connect each time they are powered on and within range (~10 m). Pairing with a GPS Navigation Device If you are using a Bluetooth-enabled GPS device which supports audio functions, first pair your mobile phone to the GPS, and then pair the GPS to the M4 unit as a headset. This will allow you to hear navigation voice prompts with the Neckmike headset, while using the GPS screen to accept or reject phone calls. The M4 unit should be powered off to begin. 1. Turn on your GPS and make sure the Bluetooth function is activated in the GPS menu settings. 2. From the GPS device menu, scan for nearby Bluetooth devices to pair with your mobile phone. (Consult your GPS Owner’s Manual for more information). 3. After following the GPS device instructions to successfully pair with your mobile phone, follow the GPS device menu instructions to pair with the M4 unit as a headset. 4. Press and hold the M4 unit On/Off button approximately 10 seconds until the LED flashes red and blue. The M4 unit will now be discoverable by the GPS, and will appear as “Motor Phone” in the mobile GPS menu. M4 Bluetooth User Guide v1.4 If the pairing process is not completed within two minutes, the M4 unit will return to standby mode with a quick flashing blue LED every 2-3 seconds. Note that GPS units with built-in music functions (ex. Garmin zumo 660, 665, 550) become the audio source when paired to the M4, and you cannot use a different A2DP music source over Bluetooth while paired to the GPS (i.e. music from your mobile phone or Bluetoothenabled MP3 player). However, you may hardwire a different audio source with the included 2.5 mm to 3.5 mm audio cable if desired. Pairing with an MP3 Player The Neckmike M4 headset may be paired with an MP3 player which supports the A2DP stereo Bluetooth profile. Please consult your MP3 player Owner’s Manual to see if your device supports A2DP. The instructions for pairing the M4 to an MP3 player are similar to a mobile phone or GPS: 1. Turn on your MP3 player and make sure the Bluetooth function is activated in the MP3 player menu settings Page 14 2. From your MP3 player, scan for nearby Bluetooth devices. (Consult your MP3 device Owner’s Manual for more information). 3. Press and hold the M4 unit On/Off button approximately 10 seconds until the LED flashes red and blue. The M4 unit will now be discoverable by the MP3 player, and will appear as “Motor Phone” in the music player menu. 4. Select “Motor Phone” in the device menu to pair. If it asks for a PIN or password, enter 0000 (four zeros). Image 12 Your MP3 player should confirm that the pairing has succeeded. The M4 and the MP3 device should automatically connect each time they are powered on and within range (~10 m). If the pairing process is not completed within two minutes, the M4 unit will return to standby mode with a quick flashing blue LED every 2-3 seconds. Once the helmet clip is in place, the M4 unit attaches to the bracket by inserting lining up the mounting tabs on the back of the M4 unit into the grooves in the bracket until it “clicks” firmly into place. (Image 13). Image 13 Note: The Neckmike M4 unit can also receive audio from nonBluetooth enabled MP3 players and other audio sources via the included 2.5 mm to 3.5 mm audio cable. This audio has the lowest priority and will be superseded by active phone calls, intercom sessions or GPS prompts. Mounting the M4 Bluetooth Unit The M4 Bluetooth unit is designed to be mounted onto the left side of a helmet. The clamp mount is attached between the helmet’s outer shell and inner padding. The rectangular plate is inserted on the inside of the helmet shell and affixed with screws to the oval-shaped clip which rests on the outside of the helmet shell (Image 12). M4 Bluetooth User Guide v1.4 To release the unit from the bracket, press on the tab at the bottom of the mounting bracket and gently slide the M4 unit upwards. The Neckmike is attached to the M4 Bluetooth unit via the coiled extension cable that is included in the package. Be certain that the cable is fully inserted into the 3.5mm port on the M4 Bluetooth unit, Page 15 otherwise the Neckmike will not function properly and the audio may sound distorted. volume. The handlebar remote gives you full control over your communication with your passenger or colleagues while riding. To use the M4 Bluetooth unit without a helmet, an accessory arm band is available to attach the M4 unit to the user’s arm. Go to www.neckmike.us for more information or to purchase. Note there is a 1-5 second delay after a selected button is pushed before activation, depending on the function. Once a button is pushed, there is no need to press it again as the requested function will automatically activate. Pressing the selected button more than once may confuse the main M4 unit. The M4 Bluetooth unit may also be placed in a jacket or vest pocket for use without a helmet. Note that this will reduce the range of the Bluetooth intercom by 50% or more. M4 Wireless Handlebar Remote The Neckmike M4 Bluetooth includes a unique and easy-to-install wireless handlebar remote (Image 14). Image 14 The M4 remote is always ready to use, and does not have a separate on/off switch. It has a built-in rechargeable lithium battery, which should be charged fully before the first use, using the included charging cable. (Note that the M4 unit and handlebar remote use the same USB charging cable). The handlebar remote should be placed in a safe and convenient location where it does not interfere with any other controls (Image 15). To install, simply clip the rear mounting bracket into the top backside of the remote, position the bracket around and behind the handlebar and secure in place with the single fastener at the bottom of the remote. Two flat rubber spacers are included to facilitate a better fit around the handlebar if needed. WARNING The handlebar remote should not be used if it unduly interferes with the motorcycle controls or your ability to fully grip the handlebars and maintain full control over your motorcycle. This remote enables you to easily answer / end phone calls, open / close Bluetooth intercom sessions, start / stop music and to control M4 Bluetooth User Guide v1.4 Page 16 Image 15 Do not operate the device outside of the following temperature range: -20°C to 55°C (-4°F to 131°F) When storing the device for an extended time, keep within the following temperature range: 0°C to 25°C (32°F to 77°F) Contact your local waste disposal department for proper device / battery disposal in accordance with relevant local laws and regulations Declaration of Conformity- Bluetooth ® The Product is compliant with and adopts the Bluetooth specification 2.1 and has successfully passed all interoperability tests that are specified in the Bluetooth® specification. However, interoperability between the device and other Bluetooth®-enabled products is not guaranteed. Support For additional information please visit our website at www.neckmike.us You can also reach us at: [email protected] Notifications Battery Warning If these guidelines are not followed, the internal lithium-ion polymer battery may experience a shortened life span or may present a risk of damage to the M4 Bluetooth device, fire, chemical burn, electrolyte leak, and/or injury. Do not attempt to remove the non-user-replaceable battery. Do not leave the M4 unit exposed to a heat source or in a high temperature location. Do not puncture or burn the device or battery. FCC Compliance This equipment has been tested and found to comply with the limits for a Class B digital device, pursuant to part 15 of the FCC rules. Operation is subject to the following conditions: (1) this device may not cause harmful interference, and (2) this device must accept any interference received, including interference that may cause undesired operation. These limits are designed to provide reasonable protection against harmful interference in a residential installation. This equipment generates, uses, and can radiate radio frequency energy and may cause harmful interference to radio communications if not installed and used in accordance with the instructions. However, there is no guarantee that interference will not occur in a particular installation. If this equipment does cause harmful interference to radio or television reception, which can be determined by turning the equipment off and on, the user is encouraged to try to correct the interference by one of the following measures: M4 Bluetooth User Guide v1.4 Reorient or relocate the receiving antenna Page 17 Increase the separation between the equipment and the receiver. Connect the equipment into an outlet that is on a different circuit from the M4 unit Consult the dealer or an experienced radio/TV technician for help. of the Product in any manner that is unsafe or prohibited by law. Always exercise due caution when using this Product and obey all relevant traffic laws. Do not become distracted by the Product while operating any vehicle. Do not operate the Product if it is unsafe to do so. This product does not contain any user-serviceable parts. Repairs should only be made by Neckmike USA. Unauthorized repairs or modifications could result in permanent damage to the equipment, and void your warranty and your authority to operate this device under Part 15 regulations. In some regions or states, the use of headphones or helmet audio is restricted or prohibited. Familiarize yourself with all laws and regulations that apply to your region before using the Product and remember that compliance with all laws and regulations is the user’s responsibility. Use the Product while operating your vehicle only where and how permitted by the applicable law. Copyright The AMA maintains a helpful resource of motorcycle laws by state: http://www.americanmotorcyclist.com/Rights/State-Laws.aspx All rights reserved. The content of this User Guide may not be copied, in whole or in part, without the written consent of Neckmike USA and is protected by copyright laws. Use care when installing the Product so that the Product is secure. IMPORTANT SAFETY INFORMATION Neckmike USA (the “Company”) notifies you that your complete and undivided attention is required when using the Neckmike M4 Bluetooth series communication system (the “Product”). Failure to avoid potentially hazardous situations could result in serious injury or even death. The Company encourages you to take all necessary precautions and remain alert to your surroundings including traffic, weather, road conditions and terrain. It is best to pull over and stop in a safe and legal manner away from traffic prior to activating or deactivating the Product or initiating or receiving any calls. Do not perform any Bluetooth pairing while riding. The User Guide is intended to cover technical capabilities of the Product and should not be interpreted as encouraging the operation M4 Bluetooth User Guide v1.4 Page 18 Limited Warranty This Neckmike product is warranted to be free from defects in materials or workmanship for one year from the date of purchase. Within this period, Neckmike USA will, at its sole discretion, repair or replace any components that fail in normal use. Such repairs or replacement will be made at no charge to the customer for parts or labor, provided that the customer shall be responsible for any shipping cost. This warranty does not apply to: (i) cosmetic damage, (ii) consumable parts such as batteries, unless product damage has occurred due to a defect in materials or workmanship; (iii) damage caused by accident, abuse, misuse, water, flood, fire, or other acts of nature or external causes; (iv) damage caused by service performed by anyone who is not an authorized service provider of Neckmike USA; or (v)damage to a product that has been modified or altered without the written permission of Neckmike USA. Neckmike USA retains the exclusive right to repair or replace (with a new or remanufactured replacement product) the device or offer a full refund of the purchase price at its sole discretion. SUCH REMEDY SHALL BE YOUR SOLE AND EXCLUSIVE REMEDY FOR ANY BREACH OF WARRANTY. To obtain warranty service, contact Neckmike USA for shipping instructions and a return authorization number. You must securely package the unit and include a copy of the original sales receipt, which is required as the proof of purchase for warranty repairs. In addition, Neckmike USA reserves the right to refuse warranty claims against products or services that are obtained and/or used in violation of the laws of any country. THE WARRANTIES AND REMEDIES CONTAINED HEREIN ARE EXCLUSIVE AND IN LIEU OF ALL OTHER WARRANTIES EXPRESS, IMPLIED, OR STATUTORY, INCLUDING ANY LIABILITY ARISING UNDER ANY WARRANTY OF MERCHANTABILITY OR FITNESS FOR A PARTICULAR PURPOSE, STATUTORY OR OTHERWISE. THIS WARRANTY GIVES YOU SPECIFIC LEGAL RIGHTS, WHICH MAY VARY FROM STATE TO STATE OR REGION. IN NO EVENT SHALL NECKMIKE USA BE LIABLE FOR ANY INCIDENTAL, SPECIAL, INDIRECT OR CONSEQUENTIAL DAMAGES, INCLUDING, WITHOUT LIMITATION, DAMAGES TO PROPERTY, TRAFFIC FINES OR CITATIONS, WHETHER RESULTING FROM THE USE, MISUSE OR INABILITY TO USE THE PRODUCT OR FROM DEFECTS IN THE PRODUCT. SOME STATES DO NOT ALLOW THE EXCLUSION OF INCIDENTAL OR CONSEQUENTIAL DAMAGES, SO THE ABOVE LIMITATIONS MAY NOT APPLY TO YOU. M4 Bluetooth User Guide v1.4 Page 19 Neckmike USA 18460 S. Ridgeview Road Olathe, KS 66062 USA www.neckmike.us M4 Bluetooth User Guide v1.4 Page 20