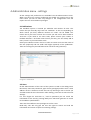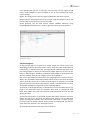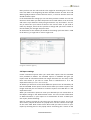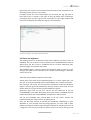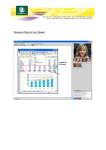
1
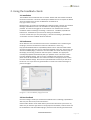
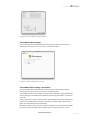
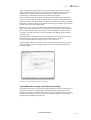
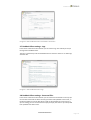
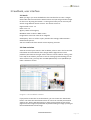
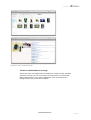
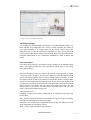
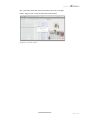
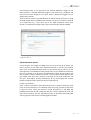
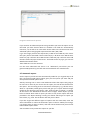
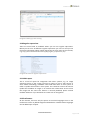
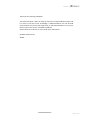
Feedback user guide, version 3.x Feedback user guide For more information see the manual under Help in the Feedback system. 1. Overview This user guide is written for Feedback version 3.0x. Images in the manual are from Safari web browser and Firefox on OSX. There might be slight differences in the interface on Windows compared to the images in this manual. All images may be clicked to be viewed in full size in a separate window, proper for printing. 1.1 What is Feedback Feedback is a system to make it easier reporting images that has been used in a publication. Without the Feedback system this is often made manually and can be a really time consuming task. The Feedback system consists of a client for uploading PDF-‐files or plug-‐in for InDesign alternativally an xtension to QuarkXPress. These clients are used to feed the system with all the metadata from the images, creating thumbnails and previews from the page, collecting other metadata from the page and to export an XML-‐file with all the content to the Feedback Database. There is also a web interface for the user to search, view and create reports of this information. The reports can be exported in different formats to ensure compatibility with different systems. 1.2 Requirements Feedback runs in a web browser on Macintosh OSX or Windows. It requires Flash player on the local machine. The required minimum version of the Flash player is version 9. Windows If you need to install a Flash player, please download it for free at http://get.adobe.com/ Macintosh If you need to install a Flash player, please download it for free at http://get.adobe.com/flashplayer/ Feedback requires a web server, Apache is recommended, and a My SQL database. The Feedback system can be run on Windows or Macintosh, both the server and the client parts. For installation of server, see separate documentation. Don´t have it? Ask your reseller or Laidback Solutions AB. www.laidbacksolutions.se Page 1 of 1 Feedback user guide, version 3.x 2. Using the Feedback clients 2.1 Installation The Feedback client for PDF-‐files has an installer. Double-‐click the installer and follow the online instructions. The client is developed in Adobe Flex and it requires the Adobe Air to be installed. Get it for free for Macintosh or Windows at http://get.adobe.com/air/ InDesign plug-‐in or xtension for QuarkXPress: Install the plugin / xtension in a standard InDesign / QuarkXPress license. The installation is made by using the installer provided. You need to be logged in on the machine as an administrator to do the installation. When installed go to InDesign -‐ Preferences -‐ Feedback / QuarkXPress -‐ Preferences -‐ Feedback and you will see the settings for Feedback. 2.2 and 2.3 shows how you set up the plug-‐in / xtension for InDesign / QuarkXPress. 2.4 and after is for the Feedback client for PDF-‐files. 2.2 Preferences Server Address. This is the address to the server of Feedback. This is needed to give the plugin / xtension the address to where to information is saved. E.g. http://demo.laidbacksolutions.se/feedback/ Folder to Scan. Select the folder where you have the pages you want to scan and add to Feedback. Scan time. Set a time if you want the Feedback plugin / xtension to scan this folder at a certain time every day. If left empty, the scanning is made on manual request. Publisher. This popup will normally be populated automatically with your publisher name. The value is taken from the database settings. Title. If you are a publisher with more than one titles, please select for which title this run is made. The values in this popup menu is taken from the database settings. Generate and upload PDF-‐files. Choose if you like this to be done or not. If you choose to generate PDF´s it will of course take a bit longer to process the pages. Image 2.2.1 The Feedback plugin/xtension 2.3 Run Feedback Once the settings is made you will have the Feedback menu in InDesign / QuarkXPress with only one menu item, Process documents... Choose Add to browse to the folder where you have the documents you want to run, make sure you have the right values in the popup menus Publisher, Title and Issue and hit the OK button and the Feedback plugin / xtension starts executing the documents. www.laidbacksolutions.se Page 2 of 2 Feedback user guide, version 3.x Image 2.3 The Feedback plugin/xtension 2.4 Feedback Client settings To start setting up the Feedback Client you need to log on which requires that an Adminstrator has set up an account to you in the web interface. Image 2.4 The Feedback Client log in 2.5 Feedback Client settings -‐ Hot folders To start setting up the Feedback Client you need to log on which requires that an Adminstrator has set up an account to you in the web interface. The Feedback Client can be run both manually and automatically using hot folders. We start be setting up a hot folder based workflow by selecting "Hot folders" in the menu to the left. "Start processing on startup" will do just that. The Feedback Client starts polling its hot folders once the application is started. If you want to make changes in the settings, please turn this feature off by unactivating it. Starting by setting a "Name" you can now start setting up a hot folder based workflow. Find a name of the hot folders that will make sense for other people too, e.g. the www.laidbacksolutions.se Page 3 of 3 Feedback user guide, version 3.x name of the title you are going to run using this hotfolder. Then choose if this hot folder setting should be "Active" or not. This feature is to give the option to make settings you can switch on and off depending on your workflow. The feature "Autorouting" are described separetely at the bottom of this page. Select an "Input folder". This is where Feedback Client will look for new PDF-‐files to process. You don´t have to set up an "Output folder", the files are being uploaded to the server anyway. The Output folder is only there to help you if you want to pass the PDF-‐files on to another process (or any kind of folder) in your workflow. If you want to do that, please select and Output folder. By setting a "Time" you can set a schedule for when Feedback will check the input folder. You can also make the server to create automatic reports for these files if you have set up Automatic reports on the server. Choose "publisher" and "title" for this hot folder. If the title you want to use isn´t available, press Refresh to get the latest from the server. The page wherethe image where used can be retrieved by using regular expressions. Read more about regular expressions in the table in chapter 4 or go to http://www.webcheatsheet.com/php/regular_expressions.php By pressing Add folder the settings are saved. If you need to edit a setting, select the premade setting, make your changes and then use the "Commit folder settings" to save your changes. Image 2.5 The Feedback Client hot folders 2.6 Feedback Client settings -‐ Hot folders autorouting By activating "Autoroute" you dim the settings for Publisher and Title. Instead you use the names of the files to decide which title the PDF belongs to. More about these setting in the chapter 4, Administration Menu. In order to make this work, you need to have done the settings on the server first, otherwise Feedback will not know which page and title that belongs to each other. www.laidbacksolutions.se Page 4 of 4 Feedback user guide, version 3.x Image 2.6 The Feedback Client hot folders autoroute 2.7 Feedback Client settings -‐ Logs In the menu at the left of the interface you can choose Logs. This will only show you the log of the Feedback Client. The log is created every time the Feedback Client is started so there are no older logs saved on disk. Image 2.7 The Feedback Client logs 2.8 Feedback Client settings -‐ Processed files In the menu at the left of the interface you can choose Processed files. In the top you can see all the files that has been correctly processed and uploaded to the server, in the bottom table you see the files which could not be uploaded for some reason. If you are testing, you can use the buttons Empty to empty the cache so you always will have updated information here. www.laidbacksolutions.se Page 5 of 5 Feedback user guide, version 3.x Image 2.8 The Feedback Client processed files 2.9 Feedback Client settings -‐ PDF Queue PDF Queue is the window for running Feedback Client. If you use the hot folders, you will see the files in the hot folders here when you are running Feedback Client. You can also use this window manually. Use Add documents.... or just drag and drop the files you like to run. Press Start in the lower right corner and you are running. The icon to the left of the Feedback logo shows that the client has got contact with the server and when running, a progress bar shows you file by file that it is uploading files to the server. In the bottom of the client you can see the address to the Feedback server. Image 2.9 The Feedback Client PDF Queue www.laidbacksolutions.se Page 6 of 6 Feedback user guide, version 3.x 3 Feedback, user interface 3.1 Search When you log in you come be default to the interface for List view -‐ Images. Select Title and Issue and hit the Search button and you will get all the images for this issue. By using the button + to the right of Issue you can narrow your search using different search criterias. The search criteras is: Page number: From -‐ To Date: From -‐ To Agency: Name of the agency Metadata: Enter a value in XMP or IPTC Image name: Enter the name of an imagefile Saved query: This is a call for a query saved in the settings, Administration -‐ Saved search queries. You can combine all these search criteras anyway you want. 3.2 View and select View the result of your search in the list below, select a row in the list and the information and a thumbnail of the image and the page where it were published, will show to the right. All the columns can be used for sorting, click in the top of the column you want to use for sorting. By shift-‐clicking you can select several rows, you may also use CMD (Macintosh) or Ctrl (Windows) to make a selection of rows. Image 3.2.1 The Feedback interface If you prefer to view this list as thumbnails, you can choose the Thumbnails button. You have the same features here as in the List view but presented in another way. Hit the Get PDF button in order to open a PDF-‐version of the page where this image was published. By double clicking an image you will get the metadata details of the image. www.laidbacksolutions.se Page 7 of 7 Feedback user guide, version 3.x Image 3.2.2 The Thumbnail view 3.3 Edit or add metadata in an image Sometimes there are images with no metadata or maybe you find metadata you know is wrong. You can correct this by hitting the key command Cmd + Return (Macintosh) or Ctrl + Return (Windows). This command opens a dialogue where you can edit the metadata. www.laidbacksolutions.se Page 8 of 8 Feedback user guide, version 3.x Image 3.3.1 Edit or add metadata 3.4 Delete an image It is possible you will find images that appears in Feedback which shouldn´t be there. Maybe your image filter isn´t correct, maybe someone has made an error with metadata in an image, there can be several reasons why there might be errors. In order to send correct information in your reports you need to delete the images which shouldn´t be included. Hit the key command Cmd + backspace (Macintosh) or Ctrl + backspace (Windows) in order to delete the image. 3.5 Create report If you have done settings in the Report settings dialogue in the Administration menu, the report settings you have created will appear here in the popup menu Report Name. Select the images you want to create a report for by selecting them, or create a report for all the images in the selection. When you click the Report button you will see a dialog where you can choose different types of reports. You can for instance create an XML-‐report which will create the report in a simple XML-‐ format for easy integration with other systems. If you don´t know what kind of a system the receiver of this file has, use a tab separated text file format which almost anyone can handle. You can create any number of reports for the selected files so you can for instance create one Excel report and one html report to be used for different purposes. The report types are: Feedback -‐ creates a full report in XML-‐format, all metadata information will be included XML -‐ creates an XML-‐file with the information you have set up to be included. One XML-‐file including all the selected images. Fotoware -‐ this will generate a single XML-‐file per image. The XML-‐file is made to be importable for a Fotoware system. Excel -‐ creates a file compatible with MS Excel. www.laidbacksolutions.se Page 9 of 9 Feedback user guide, version 3.x PDF -‐ generates a PDF-‐file of the information with low res images HTML -‐ will give you a html-‐file with all the information Image 3.5.1 Create report www.laidbacksolutions.se Page 10 of 10 Feedback user guide, version 3.x 4 Administration menu -‐ settings All the settings and preferences are available from the Administration menu. When you have your system configured you should only need to go to this menu when you like to make any changes in the configuration. This will require the user to have Admin priviligies. 4.1 Publications The Feedback system is licensed per Publisher and number of titles. This means that you normally only have one "Publisher" in this list. Depending on which license you have, different numbers of "Titles" can be added. This means that if you have a license for 10 titles you will not be able to add an 11th title. If you need to use more titles, please contact your reseller or Laidback Solutions. No matter what license you have, you can always add as many "issues" as you need under a title. Select your Publisher name in the list in order to create a Title. Set the name of the title (required) and the width and height (optional) of the publication. These are settings for planned features for the future only (statistics). Image 4.1 Publication 4.2 Users All the administration of the users of the system is made in this dialog. Enter Real name, Username, Password, Type of user (priviligies) and the users´ email address. Hit the + button to create this user. By selecting a user in the list you are able to edit the user information. After editing, press Save to store the new settings. If a user forgets his username or / and his password you can e-‐mail the information to the user by pressing Notify user which will generate an e-‐mail to the address specified here. There are three different user priviligies to set for a user: Read Only: This will only give the user the rights to search and read the information and create a report from existing settings. www.laidbacksolutions.se Page 11 of 11 Feedback user guide, version 3.x User: Besides the right for a read only user, this user has the rights to add issues, make changes in what metadata to see in the interface and create report settings. Admin: This level gives the user the right to administer the whole system. All the titles are presented in the list at the right. Drag and drop the title to the user in order to give the user access to this title. Active Directory can be used. Please contact Laidback Solutions using [email protected] in order to get information on how to do this. Image 4.2 Users 4.3 Extract agency To know which agency to report may sound simple but can be really tricky depending on where the information is and it there are other image agencies involved. E.g, in Sweden there are an image bureau called All Over Press who are selling images for about 35 international image agencies. So how can we know if "Getty images" should be reported to Getty Images or to All Over Press who are reselling some of their images, but not all, in Sweden? You have to get some information from the image agencies in order to do this. Where can you find the information about whom to report to? Since the image agency normally wants you to make as good reports as possible, you should get good answers from them regarding this matter. In Feedback you can then set up advanced queries to get the correct reporting agency. 1) Use part of the image filename to decide that it is from a certain bureau, e.g if aop is the characters which the filename starts with, it is always All Over Press. Enter AOP in the "Filename contains" field and All Over Press in the "Set Agency to" field. 2) Use IPTC information. If "IPTC field" (choose IPTC field) "Contains" (set your value), "Set agency to" And enter the name of the agency. You can add more options by using the + button. The radio button "Use value" is used if you like to use the value in the IPTC field as Agency name. If not activated, you need to enter the name yourself in the "Set agency" field. 3) Use XMP information in the same way as the IPTC. www.laidbacksolutions.se Page 12 of 12 Feedback user guide, version 3.x Now you have set the rules and the rules might be something like "if the file name has AOP in the beginning OR IPTC field 80 contains All Over Press OR XMP Tag Object Name contains All Over Press", it must be All Over Press we should send the report. In the list besides the settings you can see what you have created. You can also choose in which order you want the queries to be made. Select a row in the list and move it up or down the list by using the buttons "up" and "down". This is a way to make sure your search are done in the correct order. If you need to make any changes, select the line you like to change and you see the values to the left. Make your changes and press Save. At the bottom of the window you decide if the settings you have done is valid for all titles (*), a single title or even a single issue. Image 4.3 Extract agency 4.4 Report settings Create customized reports when you need other reports than the standard ones provided as default. The standard reports in Feedback will give you reports with all information about the images selected. You can easily create them and choose if you like to create them in XML-‐format or as a tab separated txt-‐file (see 3.3 in this manual). As default you will have at least three different reports here: All metadata, All IPTC and All XMP. These reports can be chosen when you create a report in the Images view and you can choose to create the reports as an XML-‐file or a Tab separated txt-‐file. When you need other reports to meet your demands you can create them in the Report settings in the Administration menu. You can use IPTC information or XMP information in your reports or a combination of both. To build your own report, do the following: Start by entering a name for the report you are about to create. Try to find short names, they will be shown in a popup menu. Hit the + button to the right of the name field. Now choose which IPTC Fields you want to have in your report by choosing them in the popup menus and hitting the + button to the www.laidbacksolutions.se Page 13 of 13 Feedback user guide, version 3.x right when you have the correct field selected. Do the same procedure for all the fields you like to have in the report. For XMP, choose the correct Namespace first and then the Tag you want to have and hit the + button to the right of the Tag popup menu. Selecting a namespace gives you the Tags for that namespace so you might need to find out which namespace that holds the tags you are looking for. Image 4.4 Report settings and edit reports 4.5 Filters and duplicates The filtering process is to determine what kind of objects you want to have in Feedback. You can set parts of search paths here to exclude different kinds of objects that you don´t want in Feedback, like for instance advertising files, portrait images of journalists and similar. The Feedback plugin / xtension reads this information when it starts up so the settings you make here are actually for the locally installed plugin / xtension, not for the server. There are several different options to filter files: Search path: If you have all your advertising files on a server called "ads", just put :ads: as string and exclude as filter and Feedback won´t handle these files. File extension: The string .eps and the filter exclude will make the Feedback-‐ plugin / xtension ignore all the EPS-‐files, they will simply not be read. You can do the same for any type of files you like Feedback to ignore. Document name: You can set up a rule for the file name too. If you set %YYYYMMDD% in the field "Document name must contain" Feedback will only handle documents with %YYYYMMDD% somewhere in the file name. You can use metadata, IPTC or/and XMP, to set up a filter. Choose the metadata fields you want to use in the popupmenus. Here you also find settings to handle your duplicates. Depending on your workflow or your contract with the image agencies, you may need to have different settings to handle images being used double or maybe even more in a magazine. You can just activate the option you like to use by clicking in the www.laidbacksolutions.se Page 14 of 14 Feedback user guide, version 3.x list of options here. If you choose to use "Exclude duplicate images on the same spread" or "Exclude duplicate images in the same issue", Feedback will only use one of the images in the report and it is always the biggest one (in pixels) that are used. There is also an option to exclude documents with a certain character or string to avoid having data in Feedback that shouldn´t be there. The value is entered as a simple text, e.g. if you enter qxp in the field "Document name must contain" only documents where qxp is part of the filename will be handled. Image 4.5 Filters 4.6 Saved search queries In the interface for Images and Pages you can set up any kind of search you like to perform. If you have more advanced queries or queries you perform often, you can predefined these queries in the Saved search queries. All the saved queries is accessable from the popup menu in the standard interface for the user so please try to find short and descriptive names for the queries you save in order to make it easier for the user. To access these saved queries from the Images view, press the + button to the right of the Issue popup and you will get a new popup. Choose Saved query in this new popup and another popup will appear where you have all your saved queries. Create a saved query: Enter a name in the Query name field and press the + button. Select this new name in the list Name if it isn´t selected. Enter the string you like to search for in the fiels "Find". Then you choose in which IPTC-‐field or / and XMP Tag Feedback will search for this string and click the +-‐button. Repeat this until you have all the searches you like. By selecting a line in the table and clicking Set you can get that value to the Find field again if needed. www.laidbacksolutions.se Page 15 of 15 Feedback user guide, version 3.x Image 4.6 Saved search queries If you need to do advanced queries using variables you have the option to use the fields you have chosen above as variables. The fields are automatically named v1, v2, v3 and so on in the table. These values can now be used in more advanced queries using logical expressions like AND / OR / NOT. E.g In this image you have the expression (v1 OR v2 OR v3 OR v4). This means this query will be executed if IPTC Field 110 (v1) is All Over Press OR the IPTC Field 115 (v2) is All Over Press OR the IPTC Field 120 (v3) is All Over Press OR the IPTC Field 116 (v4) is All Over Press. The fields can be any type, you can mix XMP-‐fields and IPTC-‐fields. These fields are not case sensitive. For the more advanced user there is an "Advanced" part where you can generate SQL-‐queries by yourself. Not recomended for the standard user. 4.7 Automatic reports Set the reports you like to have automatically made for you. A good way to do this is by having saved queries which gives you the reports you want and just call upon these saved queries here. Start by entering one or more e-‐mail addresses where the reports are going to be sent. Set a name of your choice for the report, this will be the filename for the report. The next thing to do is to choose a saved query, e.g. All Over Press, which is a premade (saved) query which will give you a report with all images used from the All Over Press agency. Title, choose a title or choose * to search all the titles in the database for All Over Press images. Under Report you will have to choose which kind of report you want to use, these reports has been premade in the Report Settings. Finally you choose which type of report you like to have, e.g. html. Hit the button Set and you are done. If you like to get two different types of reports with the same data, enter the same information or select the automatic report in the list. Make your change, e.g. change type of report to Excel, and click the Set button and you will now have another report made. You can add as many automatic reports as you like. www.laidbacksolutions.se Page 16 of 16 Feedback user guide, version 3.x In the field email addresses you can enter an email address (or many, use a comma to separate them) to send the file to. E.g. set the email address to the agency you want to send the report and the email address to yourself in order to get a copy of the report. Image 4.7 Automatic reports 4.8 Database administration and Error handling NOTE! Feedback is not developed to be an archive, you should try to keep as little data as possible in the system in order to make it work as fast as possible. If you have entered data in the wrong Title or Issue or just like to get rid of old data for any reason, you can delete this manually. In the top section you find "Title" och "Issue". Select the title or just an issue and hit Clear Title or Clear Issue. This will keep the Title / Issue in the database but the data for the selected title/issue will be deleted. When you need to delete a complete issue for a title, you need to go to the option below, "Delete all data for issues older than a certain date". Choose the title you want to delete and set a date in the calendar. This will delete both the issues and the data and IT CAN NOT BE UNDONE . If you have deleted a Title or Issue and you need to get it back you need to use a backup or run the documents for that Title / Issue once again. When Laidback Solutions releases a new version of Feedback you can normally update this yourself. To update the database you click the Select file button and select the .sql file provided. There are also a field here to set up email addresses to adminstrators of the system. All addresses in this field will get an email whenever the Feedback system gets an error. NOTE! There are just a few more serious errors that are sent this way, you will not get spammed. www.laidbacksolutions.se Page 17 of 17 Feedback user guide, version 3.x Image 4.8 Database administration and error handling 4.9 File routing In order to give you the best workflow we can, we have added the File routing function. This is made to make it possible to just send copies of your PDF-‐files to one single folder and have Feedback creating all the reports fully automatic. But to be able to do so, Feedback must know which files are connected to which titles and this is where you set it up. (You also need to have set up automatic reports, see 4.7). Start by entering a Name for the magazine you are setting up. Then enter the characters of the file name that will match this magazine. In the image here we have found that SDT always is part of the file names for the magazine Svensk Damtidning. You can do more sophisticated matching if needed. The field "Match expression" allows you to use regular expressions in order to match if, in this case, SDT is the first characters in the files or if they are the last ones. Use the regular expressions to set this up if needed. Date is another field for regular expressions, use it if you need to take the date from the filename. In the same manner, use Number if you need to find the number -‐ or issue -‐ from the filename. The same option is available for finding the page number using the field Page exp. At the end, choose for which title these settings are valid. Fields with * must have correct regular expressions. At the bottom you find a few fields where you may test your strings so you can see that you will be given the correct information. www.laidbacksolutions.se Page 18 of 18 Feedback user guide, version 3.x Image 4.9 Setting up File routing 4.10 Regular expressions There are some fields in Feedback where you can use regular expressions. Below you see a list of different regular expressions you can use and you can find more information about regular expressions at many sites on the internet, e.g. http://www.webcheatsheet.com/php/regular_expressions.php Image 4.10 Table of regular expressions 4.11 Web report This is a kind of report for integration with other systems, e.g. an image archiving system. If the system you like to report to uses a web service or some similar technology, Feedback could send data direct to that system in order to update information in that system. This could for instance be used to update the metadata in images in an archive with information such as when the image was last used. This feature is normally disabled, please contact Laidback Solutions if you would like to create such an integration. 4.12 Preferences At the moment, there are only the option to set which language to use in the Preferences menu. By default English and Swedish is included. More languages can be added upon request. www.laidbacksolutions.se Page 19 of 19 Feedback user guide, version 3.x Image 4.12 Preferences 4.13 Schedule cleanup As mentioned earlier, Feedback is not developed to be an archive with millions of assets. In order to keep Feedback up to date and fast you need to keep it tidy and delete old information. The easiest way to do this is is to set up the system to automatically delete old information. Let´s say you want to keep information for the last 5 issues you have published, or maybe you need to keep the information for some months, after that all the reporting should be over and done. By pressing the + sign you can enter a name for a scheduled cleanup and choose which title this is valid for. Go on by choosing the number of issues/days/months/years. Please remember not to keep more than necessary. Choose at which time the cleanup will be done and you are done. Feedback will check once a day at the time you have set if there is a cleanup to be done. The cleanup is done per title. This is because you may have different needs for different titles, a daily newspaper and a monthly magazine may vary a lot for example. Image 4.13 and 4.14 Scheduled cleanup www.laidbacksolutions.se Page 20 of 20 Feedback user guide, version 3.x Thank you for choosing Feedback! This documentation is done in order to help users of the Feedback system and it is done to the best of our knowledge. Laidback Solutions can not be held responsible for any errors that might occur in the documentation or any errors that may be in the reports created by Feedback. Please feel free to contact us if you need more information. Laidback Solutions AB ©2011 www.laidbacksolutions.se Page 21 of 21