1
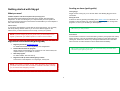
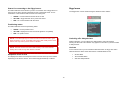
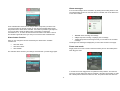
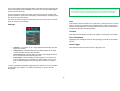
Skygd panic alarm
in your mobile phone
User Guide
Version 1.30
Table of contents
Page
Getting started with Skygd
What is Skygd
ICE - In Case of Emergency
Suggestions for use
Skygd in your mobile phone
Skygd website
“My pages”
Skygd Alarm Page
Skygd message page (S-MMS)
Recommended telephones
2
3
5
6
7
13
14
16
18
20
1
Sending an alarm (quick guide)
Getting started with Skygd
Starting Skygd
What you need
Skygd must be running for you to send an alarm. See Starting Skygd for more
information.
A Mobile telephone with GPS and Symbian s60 operating system
Raising the alarm
Recommended mobile telephones are listed in the chapter “Recommended
telephones”. In case of an emergency it ‘s important that your exact position is
known to the rescue personnel, we therefore recommendthat you use a telephone
with a built-in GPS receiver.
Activate an alarm by pressing and holding in the Alarm button for 2 seconds. It is
possible to raise the alarm even if the keypad lock is on, if you are running other
programs, or even if you are talking on the telephone.
Internet access
To use Skygd, the telephone must be able to access the Internet. You can easily
test this by surfing with the mobile. If you can surf to different pages on the
Internet, then you have Internet access. For help, contact your operator.
TIP: Also try a delayed alarm.
Active alarms
NOTE: If you are using a pay as you go sim card, you will usually have to
register yourself with your mobile operator in order to use the Internet.
An active alarm continues to send information (positions, photographs and videos)
while it is active. It can only be switched off by logging in to the alarm page and
clicking the “deactivation” button or by clicking the deactivation link in the SMS
sent to the ICE. An alarm in Demo mode is deactivated immediately.
Registration and installation (quick guide)
1.
Register yourself at www.skygd.co.uk.
2.
For detailed information about registering view “Registration”.
Download and install the program.
3.
Select between downloading to the computer or over a link in SMS, see
chapters “Direct to your mobile” or “Via PC”.
Start the program.
4.
For further details, see First start-up.
Register an ICE (In Case of Emergency) contact.
TIP: Pressing the alarm button again for 2 seconds during an active alarm
will connect you again to your ICE.
Can be done in the telephone or on My Pages, see My ICE.
NOTE: It isnecessary to register an ICE. This is the person who will receive
your alarm calls, and from the conversation and alarm information, will help
you, or summon the emergency services.
2
Response centre alarm
What is Skygd
Response centre alarm requires a subscription to a response centre. The
response centre receives the alarm and evaluates the situation and requests the
appropriate rescue services. The following functions are included in Skygd
response centre mode:
Skygd is a security alarm for use on mobile telephones. It gives greater security
and safety for people feeling afraid or insecure.
Skygd uses mobile telephones with a GPS function to keep track of your exact
position. The person receiving the alarm – your ICE – can immediately see your
position on a map on his/her computer. Your ICE can also hear what you are
saying, and even see photographs and video from your mobile.
NOTE: Your position is only sent out once you have raised the alarm, and
no one apart from your ICE can see it.
You raise the alarm with your ICE contacts by pressing the alarm button on the
telephone for 2 seconds. The telephone automatically makes a call to your ICE
and sends a message via SMS and e-mail with logging-in details to a web page
where your ICE can get information about your current situation:
•
Makes a telephone call to the response centre
•
Sends an alarm message to the response centre
•
Sends a history of your position, and while the alarm is active, sends your
position continuously
•
Sends the last 60 seconds of recorded sound
•
Sends the 2 most recently taken photographs, plus all the photographs
taken once the alarm is active
•
Sends the most recently taken video, plus all the videos taken while the
alarm is active
•
Sends a recorded audio message. See Alarm message.
Premium alarm (alarms sent to ICE)
•
By seeing on a map exactly where you are.
•
By listening to the audio from the mobile telephone's “hands free”
function
•
By hearing the recorded sound of what was happening for 60 seconds
before you pressed the alarm
•
Makes a telephone call to your ICE
•
Sends an SMS to your ICE
•
By seeing photographs/videos you have taken
•
Sends an e-mail to your ICE
•
Sends a history of your position, and while the alarm is active, sends your
position continuously
•
Sends the last 60 seconds of recorded sound
•
Sends the 2 most recently taken photographs, plus all the photographs
taken once the alarm is active
Skygd functions
•
Here is a summary of the functions available in Skygd. Take a little time to learn
about the various functions, so that you can get the maximum help offered by
Skygd. There is also a Demo mode with limited functionality.
Sends the most recently taken video, plus all the videos taken while the
alarm is active
•
Sends a recorded audio message. See Alarm message.
Premium alarms are sent by SMS an e-mail to the ICE contacts you have
selected. The following functions are included in Skygd premium alarm mode:
By hearing a short message that you can record before you start feeling
worried
If the person you are contacting is an employer or a contact centre, they can see
your user profile so that they know exactly who needs help.
•
3
Free mode
In Demo mode, the functionality is limited to the following:
•
Makes a telephone call to your ICE
•
Sends an SMS to your ICE
•
Sends an e-mail to your ICE
•
Sends only the latest known position
•
Sends 1 photograph
Skygd settings/functions
•
Skygd starts automatically when the telephone is switched on. See
Settings.
•
Standby mode for reduced power consumption (NOTE: no audio
recording will be sent). See Settings.
•
Time-controlled activation from Standby mode. See Settings.
•
Delayed alarm activation. See Delayed alarm and Switch off delayed
alarm.
•
Test alarm. See Testing.
Skygd messaging service (S-MMS)
Along with the alarm function Skygd can be used to quickly send sound and
picture messages to contacts stored in your mobile hone. The last taken picture or
video is sent with the last 30 seconds of recorded sound and the last known
position.
The receiver gets both a SMS and an email with address and password to the SMMS page.
You can choose to activate the S-MMS function using the alarm button or select
activate S-MMS from the Skygd menu.
4
ICE - In Case of Emergency
What is an “ICE”
•
The position of the mobile telephone, updated every 15 seconds
•
All photographs taken after the alarm was activated
•
All videos taken after the alarm was activated
Based on the telephone call, and the information on the alarm web page, you as
an ICE should decide what help should be summoned.
ICE is the person or persons to whom your alarm call is sent. ICE is an
internationally recognised abbreviation for “In Case of Emergency”. It is the ICE in
your mobile phone's list of contacts that the emergency services contact in the
event of an accident. Skygd alarms are sent to the person or people you have
registered as “ICE”, for example “ICE John Smith, Dad”.
Once the danger has passed, you as an ICE will then deactivate the alarm. The
person who raised the alarm cannot deactivate it. That must be done by you as an
ICE. This ensures that a perpetrator cannot force the person raising the alarm to
switch it off.
Selecting your ICE contacts and entering these into your mobile's phonebook is
vital for your security and safety. It is also vital that your ICE contacts know what
to do if they receive an alarm.
Adding an ICE in the mobile
In your mobile’s phone book, enter ICE mum (for example) under the heading
Name. Under the telephone number, enter the number to be contacted, complete
with the plus sign and the international prefix: +44 That way, the number will
work by simply pressing the button, regardless of which country you are in. Leave
out the first zero in the area code.
You can enter your ICE contacts either on “My pages” on the Skygd website or
directly into your telephone. See My ICE and Entering ICE in the mobile.
What do you do as an “ICE”
TIP: If you enter an asterisk after the telephone number, then the telephone
number for your mother is only used as an emergency number. For a mobile
telephone with the area code 070, it will look like this: +4470xxxxxxxx*
As an ICE contact, you will receive a telephone call and/or alarm information from
a friend in trouble. Your friend has activated a Skygd alarm and needs help. Your
friend has nominated one or more ICE as people to be contacted if he/she feels
insecure or frightened. A telephone call will be set up with the first ICE who
answers. All ICE contacts will receive an SMS and/or an e-mail message. The
message will contain an address and password for an alarm page on the Internet.
On the alarm page, there is information from the person who raised the alarm,
such as
•
The position of the telephone raising the alarm
•
60 seconds of audio recorded before the telephone sent the alarm
•
The most recently taken photographs in the telephone before the alarm
•
The most recently taken video in the telephone before the alarm
•
A recorded message from the person using the mobile telephone to raise
the alarm
You can add several persons to be contacted, as ICE1, ICE2 etc.
Make sure to tell the person that you have entered them as an ICE number.
ICE details set up in your mobile phone and in your user profile on Skygd are
synchronised when you start up Skygd in your telephone.
While the alarm is active, the following details are also sent:
5
Suggestions for use
Insecure environments
As soon as you feel insecure, start Skygd. Then you are only a button press away
from being able to contact help.
Threatening person
As soon as you feel that things are getting threatening, start the delayed alarm
and take some photographs.
Hazardous activity
If you are alone, and about to do something that could cause you injury, you can
start the delayed alarm. Set a time to cover your activity and activate the delayed
alarm. If anything happens to you, the alarm will be activated. If not, you can
switch off the delayed alarm once you have completed the activity.
Fun picture
After taken an amazing picture you can easily send the picture including the
recorded sound and the position to some of your contacts stored in your mobile
phone.
6
Via PC to Nokia mobile phones
Skygd in your mobile phone
•
Install the program “Nokia PC Suite” which you can find on the CD that
accompanies the mobile. You can also download the program from
http://www.nokia.com.
•
Save the file you download in a folder or on the PC’s Desktop.
•
Plug the USB lead into the telephone and the computer (or you can use
Bluetooth).
Installing Skygd
There are two ways of installing Skygd in the mobile phone. You can choose
between receiving an SMS containing a link to where the program can be
automatically downloaded and installed. Alternatively, you can download the
program to your PC and then send the program from there to your mobile to be
installed.
•
When the mobile asks “Select data cable mode”, select PC Suite.
•
Start the “Nokia PC Suite” program you have installed.
•
Once the program has started, select to install Java and the Symbian SIS
program, “Install applications”
•
Select the folder or Desktop where you saved the file called skygd.sisx.
Highlight the file and click on the arrow.
•
Answer YES to the question in the mobile “Install Skygd?”
Direct to the mobile
•
Press the button “Download direct to the mobile” in order to send an SMS
to the mobile. The button is displayed after a new registration, and can be
found on “My pages“.
•
Open the SMS and select to open the link in the SMS.
•
The mobile's web browser will open automatically and download the
program. Once the download is complete, you can close the web
browser. The installation will start automatically.
TIP: If you cannot open the link in SMS, this is probably because you are not
getting through to the Internet on your mobile telephone. Internet access is
required in order to download and use Skygd. Contact your operator for help
on Internet access.
7
•
When the mobile displays the text “Information”, answer Continue
•
When the security warning appears in the mobile, answer YES.
•
Install the Skygd program in the mobile's memory by answering YES.
Position of the buttons on Nokia 6110
Starting Skygd
During installation, the Skygd program is put in the PROGRAM folder (in some
cases in a subfolder called EXTRA). To start Skygd:
•
Press the menu button
•
Open the PROGRAM folder (or if necessary the EXTRA folder)
•
Start Skygd by selecting Open after highlighting Skygd
Alarm button
Press and hold down the
button for 2 seconds in
order to send an alarm to
the ICE you have
registered.
TIP: It is a good idea to put Skygd as a shortcut on the front page of the
telephone. This means that you are one click away from activating Skygd.
Selection buttons
These select the
commands and open
Selection.
Skygd will now communicate with the Skygd server to check the user information,
to synchronise your ICE and to check whether Demo mode should be active.
Camera
Is activated when installing
Skygd.
Delayed alarm
(start and reset)
The alarm is sent
automatically unless it is
reset within the time limit
shown on the screen. To
start or reset, press the
button and hold it in for 3
seconds.
Starting for the first time
The first time you start Skygd you will need to enter your telephone number and
your PIN code. The telephone number must be entered in international format, for
example +44701234567. An SMS is sent to the Skygd server to compare the
information you have entered with what you specified during registration.
Position of the buttons on Nokia E75
Once these details have been confirmed, you need to take a photograph of
yourself. In order to take the photograph, Skygd starts the camera. Once you have
taken your photograph, press “Return”. You will then be asked if you want to save
the photograph.
Alarm button
Press and hold down the
button for 2 seconds in
order to send an alarm to
the ICE you have
registered.
TIP: The photograph should give a clear and accurate picture of you, so that
the emergency services can easily recognize you. Keep the photograph of
yourself up-to-date, for example after you have had your hair cut or dyed.
Selection buttons
These select the
commands and open
Selection.
Your photograph is displayed to your ICE when you raise the alarm. Your ICE can
then use the photograph to help the emergency services to recognise you.
8
Camera
Is activated when installing
Skygd.
Delayed alarm
(start and reset)
The alarm is sent
automatically unless it is
reset within the time limit
shown on the screen. To
start or reset, press the
button and hold it in for 3
seconds.
Alarm button
Skygd display
Press this button for 2 seconds to activate the alarm.
The alarm button works even if the mobile's keypad lock has been activated, even
if some other application is running on the mobile, and even if a telephone call is in
progress.
Once Skygd has detected that the alarm button had been pressed for 2 seconds,
the mobile will vibrate briefly to confirm that the alarm will be activated. Once the
alarm has been received by the Skygd server, Skygd confirms this with yet
another vibration. It is essential not to touch any other button while pressing the
alarm button, as the mobile will then not detect that the alarm button has been
pressed.
Mode indicator
NOTE: When charging up the telephone, the vibration is suppressed.
The top row on the Skygd display shows the selected mode. This mode will be
activated by pressing the alarm button for 2 seconds. Possible selections are:
•
Response centre alarm
Selection buttons
•
ICE alarm
These buttons are used to access the menu in Skygd, and to switch off Skygd.
•
Demo alarm
•
S-MMS
Delayed alarms
This button is used to start a delayed alarm. The button must be pressed in for 3
seconds. It works even if the keypad lock is on, even if other programs are running
on the mobile, and even if a telephone call is in progress.
NOTE: In Demo mode the functionality is limited.
The time needed is set in Settings. Under settings you can also switch off this
function.
Switching mode
The button is also used to reset the time. If you have started the delayed alarm,
you can reset the time by pressing in the button for 3 seconds.
The second row in the Skygd display is used to change service. Highlight this row
by pressing on the navigation buttons “Up” or “Down” (the text will turn red) and
then press on the navigation button “Right”. Skygd then switches the setting after
first updating the setting on the Skygd server. It can take a few seconds to
complete the switch.
To switch off a delayed alarm, use “Switch off delayed alarm” in the menu.
It is also possible to change service in the menu “Alarm button function” and via
“My pages”.
TIP: The delayed alarm starts the positioning and sound recording while
Skygd is in standby mode.
9
Status for connecting to the Skygd server
Skygd menu
This status indicator shows whether you have a connection to the Skygd server. In
the event of an alarm, all alarm information is sent to the Skygd server. So it is
vital that the communications with the server are working OK:
The Skygd menu can be reached using the selection button “Select”.
•
GREEN – Communications with the server are OK
•
YELLOW – Skygd has been set to power save mode
•
RED – No communications with the server
Positioning status
This status indicator shows the positioning status.
•
GREEN – Current position found
•
YELLOW – Displayed in Power save mode (position not updated)
•
RED – No position found
NOTE: It can take anything from a few seconds to several minutes to get a
GPS connection. In a car, it can take even longer. GPS usually doesn't work
indoors, but may work if you are close to a window.
Switching off a delayed alarm
NOTE: The GPS receiver uses the mobile's battery. This means that the
battery will not last as long when GPS is activated.
Activate
With this selection, you can switch off a delayed alarm. Doing this requires
entering the PIN code. This selection only appears in the menu if you have started
a delayed alarm.
In the “Activate” menu you can activate a selected function in Skygd. This menu
selection does the same as the alarm button. Possible selections are:
Response centre or ICE
•
Send S-MMS
This displays the name of the response centre or the ICE at the top of the ICE list
depending on the service chosen. This is where Skygd will attempt to call first.
•
Time activated alarm
•
Start time delayed alarm
10
Alarm messages
A 15-second message can be recorded in by starting the recording function. This
recorded message is sent out when the alarm is activated, and can be listened to
on the alarm website.
Time activated alarm works as time delayed alarm except that you set the time
you want the alarm to activate. Unless you stop the time activated alarm before
the preset time the alarm will be activated. This makes it possible to get help even
if you’re not able to press the alarm button yourself due to unforeseen
circumstances. 15, 10 and 5 minutes before the activation of the alarm a sound
and vibration signal will remind you that you have set the time activated alarm.
Alarm button function
•
“Record” starts recording the message
•
“Stop” stops the recording or replaying of the message
“Listen” plays back the message so that you can listen to the recorded
message.
The length of the message is displayed by a red bar at the bottom of the page.
•
Here you can change the function activated by the alarm button. Possible
functions are:
•
Send ICE alarm
•
Send demo alarm
Power save mode
•
Send S-MMS
Skygd power save mode is used to extend the battery time on the mobile phone
when Skygd is used.
The selection will be stored in your settings and used when you start Skygd again.
In “Power save mode” Skygd does not update the GPS positions, and does not
record any sounds before the alarm is activated. If the alarm is activated, no audio
file or GPS positions before the alarm are sent, but positions after the alarm are
11
sent. If from standby mode the delayed alarm is activated, then the positioning and
audio recording both start immediately. In this mode, you receive positions before
the alarm and the audio file.
TIP: The photograph should give a clear and accurate picture of you, so that
the emergency services can easily recognise you. Keep the photograph of
yourself up-to-date, for example after you have had your hair cut or dyed.
The time settings for “Wake” and “Sleep” are used to put Skygd in normal mode
(wake) and back into power save mode (sleep). If both setting are equal Skygd will
stay in power save mode all time.
The times are entered using hours and minutes and use 24 hour mode. The same
times are used for every weekday.
Test
Test sends the same information as in a real alarm, but the ICE person to contact
does not receive any messages, and no telephone call is made. The user gets a
vibration acknowledgement, a message that the alarm has been activated and a
message that the alarm is working properly.
Settings
Position
Menu selection that displays the last known position, with the time of the position.
Price information
Highlighting and selecting this function will open Skygd’s price list in the mobile's
browser.
About Skygd
•
Autostart – If “Autostart” is “On”, Skygd will start automatically when the
telephone is started.
•
Delayed alarm – Specifies whether a time-delayed alarm can be used,
and the time delay until activating the alarm.
•
Connection point – Specifies which connection point Skygd should use
first for communications with the Skygd server.
•
Profile photo - used for updating your photograph in your profile. Your
profile is displayed to your ICE when you raise the alarm. Your ICE can
then use the photograph to help the emergency services to recognise
you.
Menu selection that shows which version of Skygd is in use.
In order to update the photograph, Skygd starts the camera. Once you have taken
a photograph, press “Return”. You will then be asked if you want to save the
photograph.
12
example +44701234567. It is essential to enter the correct telephone
number, otherwise you will not be able to log in to Skygd on the mobile
telephone.
Skygd website
On the Skygd website, http://www.skygd.co.uk there are facilities for registering
yourself, logging in as a user (“My pages”) and as an ICE (log in on the alarm
page).
•
E-mail address – Your e-mail address is used to send you a password.
You need the password to log in to “My pages”.
•
Repeat e-mail address – Repeat your e-mail address. Your passwords
for “My pages” and Skygd program is sent by e-mail. It is important that
the address is correct.
•
Captcha – Enter the letters displayed in the graphic image. If it is difficult
to read the letters, you can reload the page by pressing F5.
•
Skygd’s terms – Confirm that you have read and accepted Skygd’s
terms
•
Information – Check this box if you do not want to receive information
from Skygd.
Registration
To use Skygd, you must first register. This is done by clicking on “New user” on
the Skygd website, http://www.skygd.co.uk. This will take you to a page where you
can enter your details.
Once the details have been entered, click on the button “Create user”. This
completes the registration. An e-mail message containing your password for
logging in to “My pages” and Skygd Program will be sent to you. Next, you will be
taken to a download page where you can download the program for the mobile
telephone in two different ways:
•
Downloading via the computer – This selection means that you
download an installation file to your computer, which you then transfer to
your mobile phone. See Via PC for more information.
•
Downloading direct to the mobile – This selection sends an SMS to
your mobile phone containing a link for downloading the program directly
to your phone. See Direct to mobile for more information.
There is also a facility to download the program or to send an SMS with a link from
“My pages”.
The details that must be entered are:
•
Name – Enter your full name in this field. There is no check of your
name, but it is vital for identifying you in an emergency situation.
•
Phone model – Select the type of phone you are using.
•
Mobile number – Enter your mobile telephone number in international
format. The International format starts with a + sign, followed by a country
code and then the mobile telephone number without the initial zero, for
13
“My pages”
Forgotten password
On “My pages” you can manage your Skygd account. You can, for example,
update your personal details, edit your ICE details, change your password, or
download Skygd to your mobile. To get in to “My pages” you must have the
password you received by e-mail after registering.
If you have forgotten your password, enter your mobile phone number and click on
the button “Forgotten password”. Your password will be sent to you by e-mail.
Logging in
In order to help you when you raise an alarm, some of your personal information
will be displayed to the recipient of the alarm, your ICE. It is vital to fill in the
information correctly. Your personal information is split into two parts:
Updating your personal information
In order to log in to “My pages”, go to http://www.skygd.co.uk and select “My
pages”.
•
Basic information including photograph
•
Extra
Basic info
Here you can amend the details you entered when registering, and also add in
your date of birth. You cannot amend your mobile telephone number, as it is your
user identity.
Photograph
You can also change your photograph. The only format supported is JPEG. Click
on the button “Browse” to select a photo file, and then click on “Save photograph”
in order to store the selected photo.
•
Mobile telephone number – Enter the mobile telephone number in
international format, starting with a + sign, followed by the country code
and then the mobile telephone number without the initial zero, for
example +44701234567.
•
Password – Enter your password. The password was sent to you by email immediately after you registered. If you have forgotten your
password, click on the button “Forgotten password”. The password will
be sent to your e-mail address.
TIP: The photograph should give a clear and accurate picture of you, so that
the emergency services can easily recognise you. Keep the photograph of
yourself up-to-date, for example after you have had your hair cut or dyed.
Extra
Here you can enter more detailed information about yourself. The details are
displayed to the alarm recipients (your ICE contacts), and are used to assist the
emergency services.
Log in by clicking on the button “Log in”.
NOTE: Your personal details, your position and your audio message are
only sent out once you have raised the alarm, and no-one apart from your
ICE can see this.
14
Click on the “Save” button to store your amendments.
My ICE
In order to receive help when you raise the alarm, you must specify at least one
ICE contact person who receives the telephone call and alarm information when
you raise the alarm. You can have up to 10 ICE contacts. You can enter your ICE
contacts either via the ICE tab on My pages, or directly into your mobile's phone
book. When Skygd is started, your ICE in the mobile's phone book and the Skygd
server are synchronised.
NOTE: For your amendments to be used by Skygd on the mobile telephone,
you must restart Skygd.
Changing password
To change the password for logging in to “My pages”, select the “Basic info” tab.
Enter the old password and the new password, and click on “Change password”.
Changing PIN code
The PIN code you use for Skygd on the mobile can be changed in the tab “Basic
info” on “My pages”. Enter the new PIN code and click on “Save”.
Downloading Skygd
In the left-hand column, there are two buttons that can be used to download Skygd
to your mobile telephone:
Downloading via the computer – This selection means that you download an
installation file to your computer, which you then transfer to your mobile telephone.
See Via PC for more information.
Downloading direct to the mobile – This selection sends an SMS to your
telephone number containing a link for downloading the program directly to your
mobile telephone. See Direct to mobile for more information.
In the event of an alarm, Skygd calls each ICE in turn until someone answers. The
order is determined by their place in the list. The topmost ICE is the first to be
contacted.
You can select up to 3 ICE to receive an SMS about the alarm. An e-mail
message is sent to everyone in the list.
To delete an ICE, click on the waste bin to the right of each row.
15
Skygd Alarm Page
The Skygd Alarm Page is used for displaying information that Skygd sends about
an alarm, plus information about the person raising the alarm. All the information is
displayed on a page that you can reach with a unique password. The password
and the link for logging in will be sent to the ICE by SMS or by e-mail.
NOTE: During an active alarm, updated positions are sent continuously, as
well as any photographs or video being taken. When new information
arrives, this is shown by a flashing message to refresh the page higher up
on the page.
Logging in
On the Skygd website http://www.skygd.co.uk there is a login box for accessing
the alarm information. Enter the unique one-time code and click on “OK” to log in.
The link to this page is also in the SMS and the e-mail message that the ICE
contact receives.
16
Photographs
Alarm information
Displayed here are the photographs sent with the alarm. The time markings are
displayed in relation to the alarm time. Only two photographs at a time are
displayed. If there are several, the arrows are used to browse forwards or
backwards.
Up in the top left-hand corner, the time of the alarm is displayed, and whether the
alarm is still active. If the alarm is active, there is also a button “Deactivate the
alarm” which you click in order to deactivate the alarm. If the person raising the
alarm presses the alarm button during an active alarm, this will be displayed under
“Alarm repeated”. For each repeated press on the alarm button, the time in
relation to when the alarm was activated is displayed.
Personal information
TIP: click on the photographs to show them full size.
Personal information is displayed in both the upper left-hand corner and down on
the right. It is the person raising the alarm who has filled in this information.
Audio
Two audio recordings are sent with the alarm:
TIP: click on the photograph to enlarge it.
•
Audio recording – Sounds recorded for 60 seconds before the alarm.
•
Pre-recorded message – Audio message recorded by the person
raising the alarm before the actual alarm. The idea is that the person
raising the alarm should be able to easily describe things of interest
about the alarm.
Position
In the upper right-hand corner, a map is displayed showing the position of the
person raising the alarm. Normally, only the latest known position is displayed, but
the following can also be selected:
•
All available coordinates
•
Coordinators before the alarm
•
Coordinates after the alarm
•
Only the most recent coordinates
Video
Displayed here are videos sent with or after the alarm. The videos are marked with
the time relative to the alarm time.
Using the menu in the lower right corner of the video controller you can change
the size of the video image.
Technical information
Uncertainty about the most recent coordinates is shown by a circle shaded red.
This displays information such as battery strength, signal strengths and base
station.
Holding the mouse pointer above the position symbol will display the time of the
position in relation to the alarm time and the used positioning method.
17
Message
Skygd message page (S-MMS)
Skygds message page shows the information in the S-MMS. You can access the
page by entering a password on the Skygd home page. The password is sent by
SMS or e-mail.
TIP: A message includes either a picture or a video.
Logging in
On the Skygd website http://www.skygd.co.uk there is a login box for accessing
the alarm information. Enter the unique one-time code and click on “OK” to log in.
The link to this page is also in the SMS and the e-mail message that the ICE
contact receives.
Sender
In the upper left corner the name and a picture of the sender is shown and the
time the message was sent.
Position
In the lower left corner a map is shown with the position of the sender at the time
of sending.
Uncertainty about the most recent coordinates is shown by a circle shaded red.
Holding the mouse pointer above the position symbol will display the time of the
position in relation to the alarm time and the used positioning method.
18
Picture or video
The message can be a picture or a video. The time relative the send time of the
message is also shown.
TIP: Click on the picture to see it in full size.
Sound
Here you will hear 60 seconds of recorded sound before the message was sent. If
the Skygd was in “power save” mode when the message was sent then no sound
will be available.
19
Recommended telephones
If you need help, it is vital to know where you are. This is why you should use a
telephone with GPS together with Skygd.
Skygd has been tested on the following telephones:
•
Nokia E52
•
Nokia E75
•
Nokia N79
•
Nokia E66
•
Nokia E71
•
Nokia N78
•
Nokia N85
•
Nokia N95
•
Nokia N95 8GB
•
Nokia N96
•
Nokia N82
•
Nokia 6110
•
Nokia 6210
•
Nokia 6220
•
Nokia 6720
Check whether you need settings for the Internet in your Nokia
phone
1.
2.
3.
4.
5.
6.
Press down the zero button on your Nokia telephone and hold it down for
three seconds.
If the telephone connects to your operator's website, or some other
website, you have the correct settings and do not need to download
them.
If you get an error message, or just get to the bookmarks page, do this:
Go to the menu page on your Nokia phone
Continue to the Tools page
Look for the Inst Guide icon, and follow the instructions on the screen.
20