1
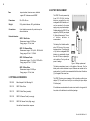
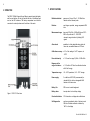
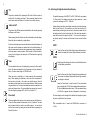
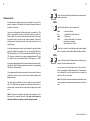
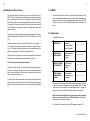
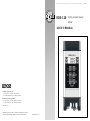
T h e
W o r l d
L e a d e r
R D S -110
I n
P e r s o n a l
USER’S MANUAL
RADOS Technology Oy
P.O.Box 506, FIN- 20101 Turku , Finland
Tel. +358- 2- 468 4600 Fax +358- 2- 468 4601
m
RADOS Technology GmbH
P . O . B o x 5 0 1 2 4 5 , D- 2 2 7 1 2 H a m b u r g , G e r m a n y
Tel. +49- 40- 851 930
Fax +49- 40- 851 932 56
w w w . r a d o s. c o m
All RADOS products are subject to continuous development. The right to
alter technical specifications without prior notice is therefore reserved.
2096 3638 Ver 3.2
S a f e t y
M u l t i-purpose Survey
Meter
m
R a d i a t i o n
FEEDBACK FORM
We are continuously working hard to produce correct and easy-to-read technical
documents. However, complex systems are difficult to explain or understand, and thus
sometimes there may be mistakes or inadequacies in the documentation. To correct
these errors we would like to hear your opinion about this document.
If you have noted mistakes, or if there are parts that are unclear, please let us know.
Take a copy of this page, describe the problem and send the copy to us here in
RADOS.
To:
RADOS Technology Oy/ Technical Documents
P.O. Box 506, FIN-20101 Turku, Finland
Fax: +358-2-468 4601
This way you help us to supply you even better documents. The best feedback will
be rewarded.
Notes on this document
Name of the document:
Issue date:
Description of the mistake or problem:
Correction:
Page no.
Notes on the product
Document No. 2096 3638 Ver 3.2
Copyright © RADOS Technology Oy 1995-2002
Name of the product:
Version:
Description of the mistake or problem:
Correction
This document and the information herewith are copyrighted material as
mentioned in the Copyrights Act. No part of this document may be copied
without written authorisation from the manufacturer.
The manufacturer withholds the right to make changes in the contents of
this document without prior notice.
If you have any comments or suggestions for additions concerning either
the products or this document please send them to the address on the back
cover. There is a feedback form at the end of this document.
General Notes
If you need more room, please use attached pages.
Name:
Company:
Address:
Position:
Telephone:
Fax:
Doc. No 2096 3638 Ver. 3.2
Contents
1. INTRODUCTION ............................................................................... 2
2. BATTERY REPLACEMENT ............................................................ 3
3. OPERATION ...................................................................................... 4
3.1. LED Indicators ............................................................................. 5
3.2. Push Buttons ............................................................................... 5
3.3. Display ......................................................................................... 8
3.4. External Probe ........................................................................... 10
4. ALARMS ........................................................................................... 11
4.1. Audible Alarms ............................................................................11
4.2. Setting the Alarm Threshold Levels .......................................... 12
4.2.1. Setting the Pre-defined Alarm Threshold Levels ............. 12
4.2.2. Setting the Customized Alarm Threshold Levels ............. 14
4.2.3. Setting the CPS Rate Alarm Threshold Levels ................ 17
4.3. Multilevel Internal Dose Alarms ................................................. 18
5. ADVANCED FUNCTIONS ............................................................. 20
5.1. Dose/Counts Integration Mode.................................................. 20
5.2. Activating the High-Resolution Dose Display ............................ 23
6. MAINTENANCE AND DECONTAMINATION ............................. 24
6.1. Periodical check......................................................................... 24
7. SPECIFICATIONS .......................................................................... 25
8. OPTIONAL ACCESSORIES ......................................................... 26
Doc. No 2096 3638 Ver. 3.2
2
27
1. INTRODUCTION
This document contains operating instructions for the Multi-Purpose
Survey Meter RDS-110. It will describe the operation of the software
version 3.010 or newer.
The RDS-110 is a microprocessor based Multi-Purpose Survey Meter
designed for monitoring gamma, X-ray and beta radiation. Because of
its versatile functions and durability it has a wide range of applications,
e.g. in the military, civil defence and rescue or industrial use.
The radiation is detected by one halogen quenched, energy compensated
GM tube, which combined with the microprocessor technology, backed
up by an advanced counting algorithm, gives a reliable response even in
low background radiation fields.
An external beta or gamma probe can be connected to the RDS-110, for
example for contamination or remote control measurements.
One dose rate alarm, one dose alarm or with external beta probe one
CPS rate alarm threshold can be set in the meter. Audible alarms are
given when either the dose rate, accumulated dose or CPS rate exceeds
the corresponding programmed threshold level. CPS rate alarm is active
only when an external beta probe is connected.
The alarm levels can also be disabled. Even in this case the user is not
left totally unprotected as the meter gives an alarm if the dose, dose rate
or CPS rate measurement range has overflowed.
Doc. No 2096 3638 Ver. 3.2
26
3
2. BATTERY REPLACEMENT
Case:
impact resistant, aluminum case, shielded
against RF interferences and NEMP
Dimensions:
90 x 200 x 42 mm
Weight:
530 g without batteries, 600 g with batteries
Connections:
6-pin lockable connector with protective cap for
external detectors
External detectors:
GMP-11 Beta Probe
Measurement range: 0 -9999 cps
Energy range: > 30 keV, beta
GMP- 12L Gamma Probe
Measurement range: 0.05 µSv/h - 99.99 mSv/h
Energy range: 50 keV - 1,25 MeV
GMP- 12H Gamma Probe
Measurement range: 0.1 mSv/h - 3000 mSv/h
Energy range: 80 keV - 1,25 MeV
GMP- 15 Beta Probe
Measurement range: 0 -9999 cps
Energy range: > 30 keV, beta
8. OPTIONAL ACCESSORIES
1233-092
Mains Adapter & Wall Mounting Kit
1233-122
GMP-11 Beta Probe
1233-176
GMP-15 Beta Probe (pancake)
1233-190
GMP-12L Gamma Probe (Low range)
1233-191
GMP-12H Gamma Probe (High range)
The RDS-110 can be powered by
three IEC LR6 (AA) alkaline
batteries, equivalent dry cells,
rechargeable NiCd batteries, or it
can be connected to the mains
supply using an optional adapter.
Suitable adapters for RDS-110 are
supplied by RADOS (see chapter
8. Optional Accessories). The use
of
alkaline
batteries
is
recommended.
The battery life of alkaline cells is
about 200 hours at the normal
background level. The battery life
of dry cells or rechargeable NiCd
batteries is considerably shorter
than the 200 hours, especially in
cold conditions. The dry cells are
prone to leakage.
Figure 1. Battery replacement
The battery compartment cover is at the bottom of the meter. Turn the
battery cover counter-clockwise to open it. Batteries are inserted into the
meter positive (+) pole first. is recommended that the hole set of batteries
(3) is changed at the same time.
The RDS-110 meter gives a message of the low battery condition (see
chapter 3.3).The meter has a facility to run a battery test (see chapter
3.2 battery test).
If the batteries are exhausted or the meter is not used for a long period of
time, take out the batteries to avoid battery leakage.
User defined internal alarm sequence
Doc. No 2096 3638 Ver. 3.2
4
25
3. OPERATION
The RDS-110 Multi-Purpose Survey Meter is operated using the display
and the push buttons. On the right and the left side of the display there
are two red LED indicators. The battery compartment cover and the
connector for external probes are at the bottom of the meter.
7. SPECIFICATIONS
Radiation detected:
gamma- and X-rays, 50 keV - 1.25 MeV beta
radiation with an external probe
Detector:
one halogen quenched, energy compensated GM
tube
Measurement range:
dose rate 0.05 µSv/h - 99.99 mSv/h dose 0.001 999.9 mSv pulse rate 0.1 - 9999 CPS
automatic range indication by flashing LED
signals
Alarm levels:
predefined or freely adjustable alarm levels for
dose rate, accumulated dose and CPS rate.
Calibration accuracy: ± 5 % of the reading in Cs-137 exposure, at
+20ºC
Dose rate linearity:
Response to the
angle of incidence:
Figure 2. RDS-110 Front view
± 15 % over the range 0.1µSv/h - 99.99 mSv/h
± 15 % within ± 90º from the calibration direction
with 65 keV energy
Temperature range:
-25...+55ºC operational , -40...+70ºC storage
Power supply:
3 x alkaline cell IEC LR6 (recommended) or
standard AA dry cells or rechargeable NiCd
batteries of the same size
Battery life:
200 hours at normal background
Battery alarm:
two-step alarm for low battery voltage
Overload indication:
OFL information on display and audible alarm
Self-diagnostics:
continuous operational check of electronics and
GM tube. Possible malfunction indicated by
“dEF” on the display
Doc. No 2096 3638 Ver. 3.2
24
5
6. MAINTENANCE AND DECONTAMINATION
No specific maintenance is required except for a periodic check of
calibration.
The RDS-110 Multi Purpose Survey Meter is dust and water proof
(protection class IP 67) when the protection cap is firmly fastened to the
meter.
In a radioactive fallout situation it is advisable to keep the meter from the
rain in order to protect it from radioactive substances. The meter should
be decontaminated first by wiping it over with a disposable cloth and then
by washing it with an appropriate detergent and rinsing with water. Before
the decontamination, check that the protection cap is firmly fastened to
the meter.
6.1. Periodical check
After a long period of storage, or when in doubt of perfect functioning it is
advisable to check the operation of the meter according the following
periodical checklist.
•
Insert batteries.
•
Switch the meter on.
•
Check the dose by pressing the Dose-button to see if the meter
is functioning properly.
•
Make the battery test by pressing the Scale illum.-button.
•
Let the meter measure background for 30 minutes to detect a
possible detector failure.
3.1. LED Indicators
On the right hand side of the display there are red LED indicators for
indicating the scale of the dose rate or the dose rate alarm threshold
level (µSv/h or mSv/h) shown on the display. The blinking light shows the
active scale of measurement. The blinking rate of the light does not
correspond to the pulse rate of the detector.
On the lower left hand corner of the display there is a red LED indicator
which indicates the unit of the dose or the dose alarm threshold level
(mSv) shown on the display.
On the upper left hand corner of the display there is a red LED indicator
which is blinking when an external beta probe is connected to the meter.
At this time the meter is measuring counts per second (CPS).
3.2. Push Buttons
The meter gives a bleep to confirm the action each time a push button is
pressed.
On
The meter is switched on by pressing the On button.
When the meter is switched on, it runs an automatic operation test,
checking the functions of the meter and all the segments of the display.
During the test, first the number of the software version and then the
digits 8.8.8.8 will be displayed until the first dose rate values are calculated.
The dose rate is displayed as µSv/h (microSievert per hour) or mSv/h
(milliSievert per hour). At the normal background level (0.10 to 0.20 µSv/
h), the first calculated result will be displayed within about 10 - 25 seconds.
If an external probe is connected to the meter, it recognizes the probe
type automatically, and shifts to pre-determined display range and unit.
With the external gamma probe, the first calculated result will be displayed
within about 30 - 40 seconds, except with GMP-12H probe at the normal
background level.
Doc. No 2096 3638 Ver. 3.2
23
6
Off
5.2. Activating the High-Resolution Dose Display
The meter is switched off by pressing the Off button. When the meter is
switched off, the display goes blank. The accumulated dose data and
current alarm levels will remain in the meter’s non-volatile memory.
The default dose range of the RDS-110 is 0.001 - 999.9 mSv (see chapter
3.2. Dose button). The display can be set to a higher resolution in order
to show the dose range of 0.001 - 9.999 µSv.
Buzzer on/off
Activate the high-resolution dose display according to the following steps.
Note that the time-out is 16 seconds and you must take the step in 16
seconds after performing the previous one, otherwise the meter will exit
the setting and return to show the dose rate. If the meter has returned to
show the dose rate, start again from Step 1. You can exit the setting at
any time by waiting 16 seconds until the meter returns to show the dose
rate.
The pulses of the GM tube can be made audible or be muted by pressing
the Buzzer on/off button.
When pressing the button Buzzer on state is indicated by a double bleep.
Buzzer off state is indicated by a single bleep.
At low dose rates the pulses are indicated as slow intermittent bleeps. At
high dose rates the pulses are indicated as fast intermittent bleeps. In
case of measurement overload, when measurement range is exceeded,
the buzzer gives a continuous alarm. With the help of pulse indication it
is easy to note changes in the dose rate or CPS values without glancing
at the display.
STEP 1.
Press the Dose and the Scale Illum. buttons simultaneously to
activate the Advanced Functions Mode. Release the buttons.
STEP 2.
Dose
The accumulated dose can be displayed by pressing the Dose (mSv)
button. The dose is displayed for five (5) seconds or until you release the
button. The dose value range is 0.001-999.9 mSv.
Scroll through the Advanced Functions List with the Dose button
until the display shows Ac d.
STEP 3.
Press the Dose and the Alarm Display buttons simultaneously
until you hear a long bleep. Release the buttons. High-resolution
dose display is activated.
When the meter is switched on, it starts measuring the accumulated
dose. When replacing the batteries or when the meter is switched off,
the dose value is stored in the meter’s non-volatile memory, thus the
dose data is safely stored also in power-down situations. When the meter
is again switched on, the new accumulated dose values are added to the
stored and retrieved dose. The accumulated dose register can be reset.
(See also display messages rOFL and CAL in chapter 3.3.)
Dose reset
The accumulated dose register can be reset by pressing the Buzzer on/
off and the Dose buttons simultaneously for five (5) seconds. The dose
data is cleared from the meter’s non-volatile memory. You can check
that the dose is reset by viewing the accumulated dose by pressing the
Dose (mSv) button.
Press the Dose button to view the dose. If the accumulated
dose is smaller than 0.010 mSv the display alternates between
E -3 and d.ddd (accumulated dose). If the accumulated dose
is 0.010 mSv or greater, the dose is displayed in a normal way.
The dose display can be changed to the default dose display only when
the meter is switched off and on again.
!The
accumulated dose is stored into NVRAM with a resolution of
0.1 µSv.
Doc. No 2096 3638 Ver. 3.2
22
7
STEP 6.
Scale illumination
When the correct time and a question mark is displayed, start
the measurement for the selected period of time by pressing
the Dose and Alarm Display buttons simultaneously until you
hear a short bleep. The previous measurement result is reset
and a new measurement is started.
During the measurement the meter gives short, low bleeps and
the display shows the measurement result.
The integration can be discontinued only by switching off the
meter.
When the specified time has elapsed, the meter gives an alarm
(very fast intermittent sound, 1 series of bleeps every 3
seconds). The measurement discontinues. The last
measurement result is shown on the display.
STEP 7.
The alarm sound can be reset by pressing the Alarm Display
button.
The display shows the measurement result until it is reset by
pressing the Dose button. When the Dose button is pressed
the meter returns to show the default time value (10). When
the time value is displayed you can activate a new measurement
by following the instructions from Step 4. Otherwise the meter
returns to the normal measurement mode in 16 seconds.
Cumulative counts are given on the display as kCP units (counts
x 1000), i.e. 0.500 equals 500 counts.
The display of the meter can be illuminated by pressing the Scale illum.
button.
When the Scale illum. button is pressed shortly, one bleep occurs and
the display is illuminated for 25 seconds, or until you press shortly the
Scale illum. button again.
When the Scale illum. button is pressed and held until a second bleep
occurs, the display is illuminated continuously. The illumination is switched
off by pressing the button shortly again, or by turning the meter off.
Battery test
The RDS-110 meter has a facility to run a battery test. The test is run by
pressing and holding the Scale illum. button for five (5) seconds until the
meter gives a fast intermittent bleep.
When the test is run, the LED indicators will be illuminated and program
version number is shown on the display.
If, after releasing the button, a colon (:) is shown in the middle of the
display, prepare to fit a new battery set.
Alarm display
The RDS-110 will alarm under certain accumulated dose, dose rate and
CPS rate conditions. The current programmed dose, dose rate and CPS
rate alarm threshold levels can be viewed on the display by pressing the
Alarm Display button. The dose alarm level is shown first for two (2)
seconds and then the dose rate alarm level for two (2) seconds. If an
external beta probe is connected to the meter, then only the CPS alarm
level is shown for five (5) seconds. The appropriate LED indicator is
flashing during the viewing. The dose, dose rate and CPS rate alarm
threshold levels can be changed. See Chapter 4. for setting the thresholds.
Doc. No 2096 3638 Ver. 3.2
8
21
3.3. Display
The numeric display is used for displaying the dose rate, dose and CPS
rate values and for setting the alarm thresholds. In addition it shows the
status of the meter (OFL, rOFL, dEF, CAL) and gives messages of the
low battery conditions.
will exit the setting and return to show the dose rate. If the meter has
returned to show the dose rate, start again from Step 1. You can exit the
setting at any time by waiting 16 seconds until the meter returns to show
the dose rate.
STEP 1.
Overload
Dose rate overload. If OFL symbol appears on the display when viewing
the dose rate, the meter is exposed to a radiation field higher than 100
mSv/h. (With the GMP-12H probe the count is 3000 mSv/h, see chapter
8. Optional Accessories.)
Dose overload. If OFL symbol appears on the display when viewing the
dose, the accumulated dose exceeds 999.9. mSv.
Press the Dose and the Scale Illum. buttons simultaneously to
activate the Advanced Functions Mode. Release the buttons.
STEP 2.
Press the Dose button until the display shows Cu d.
(With the external beta probe: Cu c.)
STEP 3.
CPS rate overload. If OFL symbol appears on the display when the beta
probe is in use, the pulse rate exceeds 9999 CPS. (See chapter 3.4
External probe.)
Dose rate overload during the dose display
Press the Dose and Alarm Display buttons simultaneously to
activate the time selection menu.
STEP 4.
If this symbol appears on the display alternately with the dose value after
pressing the Dose button, the dose rate has exceeded the measurement
range during the last dose measurement. This warning can be cleared
only by resetting the dose.
STEP 5.
Meter defect
5 a)
Scroll the time menu by pressing the Alarm Display button. An
integration period of 10, 30, 60 or 120 minutes can be chosen.
The microprocessor of the meter performs continuous checking of the
electronics and components. The dEF-symbol will appear on the display
if the meter is defected or the GM tube does not give any pulses in a
specified time period.
Select the desired time from the selection menu by pressing
the Dose button. The display shows the selected time with a
question mark (e.g. 10?).
5 b)
If the dEF-symbol appears on the display, go through the procedures
described in the Periodical Check in chapter 6.1 with a new set of batteries.
If the symbol reappears, return the meter for servicing. If an external
probe has been in use, read also the following note.
If the value is correct continue to Step 6.
If you want to change the value return to Step 4. by pressing
the Dose button again.
Doc. No 2096 3638 Ver. 3.2
20
9
5. ADVANCED FUNCTIONS
Note! The dEF-symbol will appear after the specified time period also if
an external probe is removed from the meter when the power of the
meter is on. If the dEF-symbol appears, check first if an external probe
has been removed from the meter when power on. If this is the case, the
dEF-message can be cleared by switching the power off and on again. If
the message still appears on display, return the meter for servicing.
In the RDS-110 Multi-purpose survey meter there are advanced functions
for more versatile use of the meter.
You can activate the Advanced Functions Mode by pressing the Dose
and the Scale Illum. buttons simultaneously. You can scroll through the
Advanced Functions List with the Dose button. The number of the
advanced functions available depends on the version of the meter. The
number of the version is displayed when switching on the meter.
For the meter with the version number 3. or newer the Dose/Counts
Integration Mode and High-Resolution Display functions are available. If
you want to use these functions simultaneously, for example when
measuring low dose rate fields (< 60 µSv h-1), activate the High-Resolution
Dose Display (see chapter 5.2.). before the Dose/Counts Integration
Mode function.
It is possible that these functions do not operate properly during low battery
(indicated with : in the middle of the display, see chapter 3.3.).
Unit not calibrated
If this symbol appears on the display alternately with the dose value after
pressing the Dose button, the dose rate and the dose are calculated with
default calibration coefficient. This may indicate that non-volatile memory
is non-operative. Return the meter for servicing.
:
Low battery
This character in the middle of the display indicates that the alkaline
batteries should be replaced within five (5) hours.
Note! If rechargeable NiCd batteries are used, the batteries should be
changed within 20 minutes, because drop in the voltage of rechargeable
batteries is very rapid.
5.1. Dose/Counts Integration Mode
Replace the battery
When the RDS-110 meter is switched on it starts recording accumulated
dose (see chapter 3.2. Dose button). The accumulated dose can be
reset at any time by pressing the Buzzer on/off and the Dose buttons
simultaneously (see chapter 3.2. Dose reset). The RDS-110 can also
integrate accumulated dose for a specified period of time, after which
it gives an alarm and shows the accumulated dose value on the display.
When the integration is started the previously accumulated dose is reset.
This symbol indicates that the battery voltage has dropped to the level
where guaranteed operation of the meter is no longer possible. The dose,
dose rate and CPS rate measurement is discontinued. The last recorded
dose value is stored in the meter’s memory.
Normally the RDS-110 meter does not count cumulative pulses in the
beta measurement mode (i.e. when external beta probe is in use). When
the Dose/Counts Integration Mode is activated in the beta measurement
mode also the number of cumulative pulses can be counted.
Start the accumulated dose integration or the cumulative counts
integration and define the time period according to the following
instructions. Note that the time-out is 16 seconds and you must take the
step in 16 seconds after performing the previous one, otherwise the meter
Doc. No 2096 3638 Ver. 3.2
10
19
STEP 1.
Press the Dose and the Alarm Display buttons simultaneously.
Release the buttons.
3.4. External Probe
An external beta or gamma probe can be connected to the meter. The
probe is connected to the external 6-pin lockable connector interface at
the bottom of the meter.
STEP 2.
Press the Dose button to view the alarm units.
The meter must be switched off before the probe is connected to it. The
probe is recognized by the meter at the start-up when you switch the
meter on again. To connect the external probe to the meter, first remove
the protection cap by turning the cap counter-clockwise. Connect the
external probe by turning the connector of the probe clockwise until it is
firmly fastened.
drAL
Int
doAL
CPS
In the beta measurement mode the meter displays the results as pulses
per second. When the beta probe is in use, the red LED indicator for
CPS will be blinking. If the CPS rate exceeds the 9999 CPS value, then
OFL- alarm is activated and the display alternates between OFL and
xx.x, where the xx.x is the measured value in kCPS range. (k = 1000x)
When the Int - symbol is on the display, press the alarm display
button to choose the Internal Alarm Mode. Release the button.
In the gamma measurement mode the meter displays the results as µSv,
mSv, µSv/h or mSv/h. When the gamma probe is in use, the corresponding
LED indicator will be blinking.
After a gamma probe has been connected to the meter and the meter is
switched on, wait for three (3) minutes to let the display stabilize at the
background level.
The meter must be switched off when the probe is removed from the
meter. The dEF-symbol will appear after a specified time period if an
external probe is removed from the meter when the power of the meter
is on.
= Dose Rate Alarm
= Internal Alarm (See chapter 8.)
= Dose Alarm
= External Probe Alarm, if an external
beta probe is connected.
(See chapters 4.2.3 and 8.)
STEP 3.
Press the Dose and Alarm Display buttons simultaneously to
activate the internal dose alarm levels.
You can view the first internal alarm level, or the one that is
active, by pressing the Alarm Display button. The dose alarm
level is shown first for two (2) seconds and then the dose rate
alarm level for two (2) seconds.
Note! The multilevel internal dose alarms are deactivated when
a new predefined or customized dose alarm level is set by the
user.
Note! If the probe is connected to the meter when the power is on, the
meter does not recognize the probe. The meter must always be
switched off before connecting or disconnecting the probe.
Doc. No 2096 3638 Ver. 3.2
18
11
4.3. Multilevel Internal Dose Alarms
The multilevel internal dose alarm function is a special feature of the
RDS-110 meter. If the internal dose alarm function is activated, the meter
gives an alarm when the dose value reaches the first preset threshold
level. When the alarm is muted by pressing the Dose button for at least
0,5 seconds, the first alarm is reset and the next dose alarm threshold
will be activated in the meter’s memory. The highest dose alarm level
cannot be muted.
The internal dose alarm threshold levels are factory settings. The factory
default dose alarm threshold levels are 15 mSv, 100 mSv, 250 mSv and
1 Sv.
The preset internal alarms must be activated before they are taken in
use. If they are not activated, the alarm levels that are set by the user are
in use. The multilevel internal dose alarms can be deactivated only by
setting new predefined or customized dose alarm level.
When you switch on the meter or reset the accumulated dose, the lowest
alarm level in the multilevel internal dose alarm list is active.
The internal alarms are activated as follows:
Note that you must take the next step in 20 seconds after performing the
previous one, otherwise the meter will exit the internal alarm mode and
return to show the dose rate. If the meter has returned to show the dose
rate, start again from step one.
You can exit the internal alarm mode at any time by waiting 20 seconds,
until the meter returns to show the dose rate. The internal alarm threshold
levels will not be taken into use until you have activated the alarms (Step
3).
4. ALARMS
One dose rate alarm, dose alarm and CPS rate alarm threshold can be
set in the meter. Audible alarms are given if either the accumulated dose,
dose rate or CPS rate exceeds programmable threshold levels. The CPS
rate alarm will be given only if an external beta probe is connected to the
meter.
4.1. Audible Alarms
The audible alarms are
METER DEFECT
Intermittent
(1 series of bleeps
every 30 seconds)
__ _ __
DOSE RATE/ CPS
RATE OVERFLOW
Very fast intermittent
(5 bleeps in a
second)
---------
DOSE RATE ALARM/
CPS RATE ALARM
Fast intermittent
(2 bleeps in a
second)
- - - - - -
DOSE ALARM and
DOSE OVERFLOW
ALARM
Slow intermittent
(1 long bleep every
5 seconds)
_ _ _ _ _
__ _ __
Dose rate and CPS alarms will discontinue automatically when the meter
or the external probe is removed from the high radiation field. The dose
alarm can be reset by zeroing the accumulated dose or by setting the
dose alarm level to a higher value. See Dose Reset in chapter 3.2.
Note! If the alarm threshold levels are set to zero values, the meter
does not give dose rate, dose or CPS rate alarms. This does not
inhibit the overflow alarms to activate.
For information on meter defect, see dEF-message in chapter 3.3.
Doc. No 2096 3638 Ver. 3.2
17
12
4.2. Setting the Alarm Threshold Levels
STEP 6.
You can set one dose rate alarm, dose alarm and CPS rate alarm
threshold value to the meter. The alarm threshold values are saved in
the meter’s memory. The saved values are stored even if the meter is
switched off or the batteries are removed.
Press the Dose and Alarm Display buttons simultaneously until
you hear a long bleep to save the selected alarm threshold
level on the meter’s memory.
You can set the threshold levels by choosing them from pre-defined set
of values or you can set your own values (custom-set values).
If you do not save the changes, the previously set alarm
threshold level will not be changed.
4.2.1. Setting the Pre-defined Alarm Threshold Levels
You can set the dose rate and dose threshold levels by simply choosing
the desired value from the menu according to the following instructions.
You must take the next step within 20 seconds after performing the
previous one, otherwise the meter will exit the alarm threshold setting
and return to show the dose rate. If the meter has returned to show the
dose rate, start again from step one.
You can exit the alarm setting at any time by waiting 20 seconds, until the
meter returns to show the dose rate. The alarm threshold levels will not
be changed until you save the changes (Step 4).
You can check that the new alarm levels are activated by
pressing the Alarm Display button. The dose alarm level is
shown first for two (2) seconds and then the dose rate alarm
level for two (2) seconds.
Note! The customized alarm threshold levels are active until
they are replaced with new values. If you have set customized
values in the meter and you set new values in the normal mode,
the values of the two least significant digits may be shown in
the menu.
4.2.3. Setting the CPS Rate Alarm Threshold Levels
The CPS Rate Alarm Threshold Level is set according to instructions
given in chapter 4.2.1 Pre-defined Alarm Threshold levels and chapter
4.2.2 Customised Alarm Threshold levels.
STEP 1.
Press the Dose and the Alarm Display buttons simultaneously.
Release the buttons.
The external beta probe must be connected into the meter when setting
the CPS threshold. The possible range of alarm threshold level is 0
- 9999 CPS with a resolution of 1 CPS.
STEP 2.
Press the Dose button to view the alarm units.
drAL
= Dose Rate Alarm
Int
= Internal Alarm (See chapters 4.3 and 8.)
doAL
= Dose Alarm
CPS
= External Probe Alarm, if an external beta probe
is connected. (See chapters 4.2.3 and 8.)
Doc. No 2096 3638 Ver. 3.2
16
13
Press the Alarm Display button or wait three (3) seconds to
choose the alarm unit on the display. Release the button.
The decades for dose are
Numeric
LED
Possible range of
alarm level
STEP 3.
I
x.xxx
mSv
0 - 9.999 mSv
Change the threshold value by pressing the Dose or Alarm
Display button until you have the desired value.
II
xx.xx
mSv
0 - 99.99 mSv
Press the Dose button to decrease the value.
III
xxx.x
mSv
0 - 999.9 mSv
Press the Alarm Display button to increase the value.
The values are 1, 1.5, 2, 2.5, 3, 4, ...9. This sequence is repeated
on each decade of the measurement range.
Note! You must always choose the decade before you can set
new values.
It should be noted that the overflow alarm is activated at 100
mSv/h with internal GM-tube, even though the dose rate alarm
level can be set to a value greater than that.
There is only one decade for external beta probe.
Numeric
I
xxxx
LED
CPS
Possible range of
alarm level
When the external probe GMP-12H is used, the overflow alarm
is activated at 3000 mSv/h.
0 - 9999
STEP 4.
STEP 5.
5 a)
Press the Alarm Display button to activate the left most digit on
the display. The selected digit will be blinking. The value is set
by pressing shortly the Alarm Display button until you have the
desired value.
5 b)
Press the Dose button to select the next digit. The activated
digit will be blinking.
Press the Dose and Alarm Display buttons simultaneously until
you hear a long bleep to save the selected alarm threshold
level on the meter’s memory.
If you do not save the changes, the previously set alarm
threshold level will not be changed.
You can check that the new alarm levels are activated by
pressing the Alarm Display button. The dose alarm level is
shown first for two (2) seconds and then the dose rate alarm
level for two (2) seconds.
Set the value by pressing shortly the Alarm Display button until
you have the desired value.
Repeat the step 5 b) until you have set all digits.
You can scroll through the digits by pressing the Dose button.
Doc. No 2096 3638 Ver. 3.2
14
15
4.2.2. Setting the Customized Alarm Threshold Levels
The dose rate and dose alarm threshold levels can be custom set by the
user. To be able to set the customized alarm threshold levels you must
first start the meter in custom mode (Step 1). In the custom mode, the
meter operates in a normal way. However, when setting the alarm
thresholds, the predefined threshold values will not be displayed.
STEP 2.
Press the Dose and the Alarm Display buttons simultaneously.
Release the buttons.
STEP 3.
Press the Dose button to view the alarm units.
You can return the instrument into the normal mode by switching off the
meter and then switching it on as usual (see chapter 3.2 On -push button).
drAL
= Dose Rate Alarm
The customized alarm levels are stored in the NVRAM of the instrument
and are therefore active also when the meter is switched on later in the
normal mode.
Int
= Internal Alarm. (See chapters 4.3 and 8.)
STEP 1.
CPS = External Probe Alarm, if an external beta probe is
connected. (See chapters 4.2.3 and 8.)
doAL = Dose Alarm
First switch on the meter by pressing the On button. Immediately
after or at the same time as pressing the On button
press the Dose and the Alarm Display buttons simultaneously,
until you hear a long bleep. Release the buttons.
Note! The buttons must be pressed when the version number
of the meter is displayed. If you press the buttons later than
this, the instrument will go into the normal mode, where you
can select the alarm threshold levels only from the pre-defined
values list.
Press the Alarm Display button to choose the alarm unit you
want. Release the button.
STEP 4.
Select the decade by shortly pressing the Dose button until
you have the desired decade. The change of the decade is
indicated by the digit value on the display and scaling led.
The decades for dose rate are
Wait until the dose rate or CPS rate is displayed (see chapter
3.2. On -push button).
From step 2. forward you must take the next step in five (5)
seconds after performing the previous one, otherwise the meter
will exit the alarm threshold setting and return to show the dose
rate. If the meter has returned to show the dose rate, start
again from step two.
You can exit the alarm setting at any time by waiting 15 seconds
until the meter returns to show the dose rate. The alarm
threshold levels will not be changed until you save the changes
(Step 6).
Numeric
LED
Possible range of
alarm level
I
xx.x
µSv/h
0 - 99.9 µSv/h
II
xxx
µSv/h
0 - 999 µSv/h
III
x.xx
mSv/h
0 - 9.99 mSv/h
IV
xx.x
mSv/h
0 - 99.9 mSv/h
V
xxx
mSv/h
0 - 999 mSv/h
Doc. No 2096 3638 Ver. 3.2