1
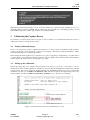
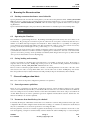
Monocular Outdoor 3D-Reconstruction
LiTH
2012-12-14
User Manual
Editor: Sanna Ringqvist
Version 1.0
Status
Reviewed by
Approved by
TSBB11
User Manual
Morgan Bengtsson (HP)
Group 1
[email protected]
2012-12-14
L IPs
1
Monocular Outdoor 3D-Reconstruction
LiTH
2012-12-14
PROJECT IDENTITY
2012/HT, Group 1
Linköping University, Institute of Technology, ISY
Name
Daniel Rydström
Felix Björkeson
Gustav Jagbrant
Magnus Stigson
Maja Gasslander
Morgan Bengtsson
Sanna Ringqvist
Responsibility
Project Leader (PL)
Evaluation Manager (EM)
Lead Theorist (LT)
Design Manager (DeM)
Quality Manager (QM)
Head Programmer (HP)
Document Manager (DoM)
Phone
0706 10 11 95
0735 50 88 72
0765 75 98 10
0737 15 92 60
0703 30 37 58
0703 26 61 84
0760 43 60 56
E-mail
[email protected]
[email protected]
[email protected]
[email protected]
[email protected]
[email protected]
[email protected]
Group E-mail: [email protected]
Homepage: http://www.isy.liu.se/edu/projekt/bildbehandling/2012/tsbb11_grupp1/
Client: SAAB R3DM
Contact Person: Pelle Carlbom, [email protected]
Course Supervisor: Vasileios Zografos, Building B, room 2A:440, SE-581 83 Linköping Sweden,[email protected]
Project Advisor: Marcus Wallenberg, Building B, Room 2A:435, SE-581 83 Linköping, Sweden, [email protected]
TSBB11
User Manual
Group 1
[email protected]
L IPs
2
Monocular Outdoor 3D-Reconstruction
LiTH
2012-12-14
Contents
1
Manual Overview
5
2
Installing Software
5
2.1
Installing the Android software . . . . . . . . . . . . . . . . . . . . . . . . . . . . . . . . . . . .
5
2.2
Installing the PC software . . . . . . . . . . . . . . . . . . . . . . . . . . . . . . . . . . . . . . .
5
3
4
5
6
7
Calibrating the Capture Device
6
3.1
Getting calibration images . . . . . . . . . . . . . . . . . . . . . . . . . . . . . . . . . . . . . .
6
3.2
Setting up for calibration . . . . . . . . . . . . . . . . . . . . . . . . . . . . . . . . . . . . . . .
6
3.3
Running the calibration application . . . . . . . . . . . . . . . . . . . . . . . . . . . . . . . . . .
7
3.4
Making sure the correct parameters are used . . . . . . . . . . . . . . . . . . . . . . . . . . . . .
7
Capturing Video
7
4.1
General video capture guidelines . . . . . . . . . . . . . . . . . . . . . . . . . . . . . . . . . . .
7
4.2
Interface overview . . . . . . . . . . . . . . . . . . . . . . . . . . . . . . . . . . . . . . . . . .
7
4.3
Initiation . . . . . . . . . . . . . . . . . . . . . . . . . . . . . . . . . . . . . . . . . . . . . . . .
8
4.4
Capturing video . . . . . . . . . . . . . . . . . . . . . . . . . . . . . . . . . . . . . . . . . . . .
9
Transfer Video to PC and Run Reconstruction
9
5.1
Connecting the device to the computer . . . . . . . . . . . . . . . . . . . . . . . . . . . . . . . .
9
5.2
Running PC software with live transfer . . . . . . . . . . . . . . . . . . . . . . . . . . . . . . . .
10
Running the Reconstruction
11
6.1
Starting reconstruction from a stored video file . . . . . . . . . . . . . . . . . . . . . . . . . . .
11
6.2
Operating the Visualiser . . . . . . . . . . . . . . . . . . . . . . . . . . . . . . . . . . . . . . .
11
6.3
Saving, loading and resuming . . . . . . . . . . . . . . . . . . . . . . . . . . . . . . . . . . . . .
11
General configuration hints
11
7.1
General parameter guidelines . . . . . . . . . . . . . . . . . . . . . . . . . . . . . . . . . . . . .
11
7.2
Parameters that should always be checked . . . . . . . . . . . . . . . . . . . . . . . . . . . . . .
11
7.3
Data look very weird - What is the likely culprit . . . . . . . . . . . . . . . . . . . . . . . . . . .
12
7.3.1
Error in initiation . . . . . . . . . . . . . . . . . . . . . . . . . . . . . . . . . . . . . . .
12
7.3.2
Errors at a later stage . . . . . . . . . . . . . . . . . . . . . . . . . . . . . . . . . . . . .
13
8
Keymappings
14
9
Available Parameters
16
TSBB11
User Manual
Group 1
[email protected]
L IPs
3
Monocular Outdoor 3D-Reconstruction
LiTH
2012-12-14
Document history
Version
0.1
0.2
1.0
TSBB11
User Manual
Date
2012-12-10
2012-12-13
2012-12-14
Changes
Document created
Document created
Document created
Group 1
[email protected]
Changed by
DoM, QM, PL
QM
DoM
Reviewed by
DoM,HP
DoM
PL
L IPs
4
Monocular Outdoor 3D-Reconstruction
1
LiTH
2012-12-14
Manual Overview
This user manual guides you through all necessary steps towards using the MO3R application. Here is an overview
over all the parts existing in this document, and further descriptions is given under each section.
Preparing system for first time use
• Installing software
• Calibrating the capture device
Main guide steps
• Capturing video
• Transfer video to PC and run reconstruction
• Running the reconstruction
Parameters and options
• General configuration hints
• Functionality accessible by keyboard presses during reconstruction
• All parameters that can be tweaked for the reconstruction pipeline
2
Installing Software
To install this package the user would normally need rather good knowledge in how to build and compile external
packages under Linux. In this section the easiest way to install the software is explained. It may be necessary
that the host computer runs Ubuntu in order for some of the commands to work. The developers have only tested
this procedure on Ubuntu 12.04 LTS, however the solution will probably work on most Debian based operating
systems.
2.1
Installing the Android software
The Android application will be have to be installed to the capture device. The easiest way to do this is to visit the
download page on the project homepage (http://www.isy.liu.se/edu/projekt/bildbehandling/2012/tsbb11_grupp1/)
from your mobile device and there fetch the latest .apk file. The software is compatible with Android 4.0 and later.
Before reconstruction of the video can start on the computer the camera of the device have to be calibrated. This
is explained in the section Calibrating Camera.
2.2
Installing the PC software
Fetch the software from the download page and extract the archive to a folder of your choice. To compile the
software open a terminal and navigate to the directory with the newly extracted files. From this prompt use the
make command to build the project. Parallellise the build process you may want to use the optional j-flag.
To build this project a number of external libraries have to be built and downloaded. On the project computer
these libraries are already built, but if the software is to be run on another platform you will want to install these
separately. To speed up this process we provide a script that installs all necessary dependencies for ubuntu systems.
For more advanced situations please consult the documentation and compile all external libraries listed. A typical
install under Ubuntu 12.04 would look like this:
TSBB11
User Manual
Group 1
[email protected]
L IPs
5
Monocular Outdoor 3D-Reconstruction
LiTH
2012-12-14
When the Dependencies Install script, row six, is run there will be a lot of questions in the terminal. Choose yes to
install all packages required for MO3R. Among other things this script takes care of installing OpenCV 2.4.2 and
SparseLM that otherwise could be quite cumbersome to install manually.
3
Calibrating the Capture Device
To accurately reconstruct 3D the cameras perception of the world has to be normalised and undistorted. How to
calibrate the camera is described in this section.
3.1
Getting calibration images
There is one external tool needed to calibrate the camera in a good way. That is a checkerboard pattern that the
software can identify. Under downloads on the project homepage a file named ”Checkerboard Pattern” will be
listed. Print this file before continuing any further.
When starting the mobile application provided there is an option of capturing a ”Single Image”. Use this function
to capture images of the checkerboard printed in the previous step. Make sure the checkerboard is flat and that the
camera captures all squares from as varying angles as possible.
3.2
Setting up for calibration
Transfer the image files to the computer and place them in a location of your choice. A description on how to
transfer files from the mobile application is described in section 5. Identify the Parameters.ini file inside of the PC
software folder. The location of this file should be ROOT_OF_PROJECT/CONF/Parameters.ini. Open this file
and find the row that says ”CAMERACALIBRATION_DIR” and enter the path to the captured images here. Also
check and make sure that ”CAMERACALIBRATION_USEFILE” is set to false before continuing.
Figure 1: Check and make sure the two marked lines are correct
TSBB11
User Manual
Group 1
[email protected]
L IPs
6
Monocular Outdoor 3D-Reconstruction
3.3
LiTH
2012-12-14
Running the calibration application
Now start the main application by typing ”./main” from the project root directory and follow these steps:
1. Check the output in the terminal and make sure that filenames of the calibration files could be loaded.
2. At the next message answer no unless you have used another checkerboard pattern than the one provided at
the project homepage.
3. Wait as the detection of the pattern progresses.
4. Manually return to the terminal and save the file if you like. For the purpose of this guide we will type "Y".
5. The results have been saved to a file and and the calibration process is completed.
The rest of the reconstruction will automatically start. To use the calculated calibration at a later time fetch the file
"calibration.txt" from the project root and place it somewhere suitable, for example in ROOT_OF_PROJECT/CONF/.
3.4
Making sure the correct parameters are used
The last part is really simple. Open up the file Parameters.ini and change the line
”CAMERACALIBRATION_USEFILE” to true and the ”CAMERACALIBRATION_FILE” to point to your newly
calculated ”calibration.txt”. For the case when reconstruction is run immediately after calibration the correct
configuration is automatically chosen.
In some cases the estimation of the distortion coefficients tend to not work, in these situations it appears to be
better to not use them at all. If the video is clearly more distorted after calibration compensation than before try
replacing the values of the distortion vector in ”calibration.txt” with zeros.
4
Capturing Video
This section deal with how to obtain a video. Everything on how to operate the mobile application is dealt with
under this section. Apart from camera calibration and network transfer these are the things you will know about
the mobile application.
4.1
General video capture guidelines
When the software is installed you are ready to capture video. There are three crucial things to keep in mind while
operating the capture device.
1. Always keep a steady trajectory and try to move the camera smoothly.
2. Do not move the camera too fast, slow is better. In certain devices distortion effects will present themselves
at hight velocities,
3. Only translate the camera in the view plane during initialisation (this is further explained in section 4.3
below).
4.2
Interface overview
When starting up the application on the mobile device the user is faced with a view similar to this one: From this
menu click the Rec button to start recording and click the same button again to stop recording. The button for
Keyframe is used as a way for the user to indicate the time at which the initiation should finish and continuous
reconstruction and tracking should commence.
The Send button starts sending data to receiving computer. It will send all captured video in the order it was
captured, it is therefore possible to capture more than one sequence before reconstruction. It is also possible to
send video while capturing as the processes operate in separate threads. Before this button is pressed however it is
important that the receiver is ready and awaiting a connection. Otherwise the application may have to be restarted
in order to get at connection to the computer.
TSBB11
User Manual
Group 1
[email protected]
L IPs
7
Monocular Outdoor 3D-Reconstruction
LiTH
2012-12-14
Figure 2: Standard view of the mobile application
4.3
Initiation
To initiate the camera it is important to move the camera very smoothly and only in a panning motion. Rotation
of the camera during this phase may result in irrecoverable errors which makes the video impossible to use. The
easiest way to describe this motion is with an image:
Figure 3: Overview of how the initiation of the camera should be performed
This translation should be somewhere around 10-20 cm depending on the depth of the scene. A deeper scene may
require a longer translation for accurate triangulation.
When the initial panning is done the user should press the button marked keyframe before proceeding to capture
TSBB11
User Manual
Group 1
[email protected]
L IPs
8
Monocular Outdoor 3D-Reconstruction
LiTH
2012-12-14
more data. This allows the computer to automatically find where the initiation of the 3D map should occur.
Otherwise this may be specified later.
4.4
Capturing video
When the map has been initialised the motion of the mobile device is actively tracked in relation to what it sees
and what has been reconstructed. This allows for free movement around and along any axis as long as the motion
is slow enough for the system to be able to accurately identify new points of interest (no major motion blur or
distortion) and by that reconstruct enough points that can be used for effectively computing the ego motion of the
camera. Essentially the two first general capture guidelines is what should be kept in mind.
5
Transfer Video to PC and Run Reconstruction
All videos have to somehow get to the computer before reconstruction. This part explains how to use the wireless
part of our Android application to transfer video files and other data to the PC.
5.1
Connecting the device to the computer
In order to connect the mobile device to the computer the IP adress of the computer has to be known. One of the
easiest ways of finding this adress is by either googling myip or by typing the following in a terminal window:
The IP adress is the number separated by four dots inside the red rectangle in the following image.
Figure 4: Output from ifconfig command.
Fire up the mobile software and press the options button to show a small window asking for IP adress. Enter the
adress exactly as it is shown on computer screen with the port number 8080 added to the end. This port is the
default port used by the pc software. If problems connecting occur, please make sure the two devices uses the
same network (eg. that the mobile device uses a wifi router that also connects to the PC using either wire of wifi).
TSBB11
User Manual
Group 1
[email protected]
L IPs
9
Monocular Outdoor 3D-Reconstruction
LiTH
2012-12-14
Figure 5: View of the mobile application with the correct IP inserted.
5.2
Running PC software with live transfer
Now it is almost time to start the PC software. However in order to get the software to receive it is neccessary to
empty the "images" folder within the project root. This folder is used for storing data that is received and if it is not
empty it will instead load the video file specified by the user in Parameters.ini. When the images folder is empty
the software may be started as usual by running main. This is one example of how to do this.
The terminal will display the following message:
It is now time to press the send button on the mobile device. It would be possible to press this earlier, but it would
only cause the mobile device trying to send without getting an acknowledgement from the PC software. The user
may at any time while this text is displayed press a button on the PC to abort receiving data and instead start the
reconstruction from the file specified in the configuration file.
When the connection is successful the terminal output will look something like this:
The order of received data is not necessarily the same as in this example and misc data is not always sent from the
mobile device.
TSBB11
User Manual
Group 1
[email protected]
L IPs
10
Monocular Outdoor 3D-Reconstruction
6
6.1
LiTH
2012-12-14
Running the Reconstruction
Starting reconstruction from a stored video file
Open up ”Paramaters.ini” and enter the search path for your video file for the parameter called ”VIDEO_FILENAME”.
Make the choice to either use the recorded keyframe index from the mobile device or set one manually for this run
using parameter ”KEYFRAMEINDEX_USEFILE”. More about this setup is explained under section 7, Configuring Parameters.
Open a terminal and navigate to the project directory. Execute the reconstruction process by running main.
6.2
Operating the Visualiser
The visualiser is operated using the mouse. By clicking and holding the left mouse key the user is able to look
around freely. By pressing the scroll the user pans the camera in the view plane. On the keyboard there are a
number of modifiers that helps navigation and analysation. Most notably there is a possibility of resetting the
scene effectively refocusing the data within view. This is useful if the solution or user gets lost and is accessed by
pressing r on the keyboard. Navigation is also possible using w, a, s, d on the keyboard.
Among other options the user have the possibility of fixing the camera to the current keyframe simulating how the
system thinks the camera moved. This is useful for comparing the reconstruction to the video of the world. This
options is accessed by pressing o and is preferably used with keyframe images turned off (press k). These and all
other options are listed under section 8, Keymappings.
6.3
Saving, loading and resuming
As these reconstructions sometimes takes a long time there is a possibility of saving the progress. By pressing y a
snapshot of the scene is saved to ”theMap.map” in the project root. To resume from this point in the reconstruction
set the parameter ”LOAD_AND_RESUME” in Parameters.ini to true.
The rest of the reconstruction pipeline makes no checks to see that all parameters are the same or the video is the
same as before. In order to avoid problems make sure to use the same video as when ”theMap.map” was created.
The other parameters may be adjusted freely but should probably be kept around what they where initially.
7
General configuration hints
Here some of the most important configuration parameters are explained.
7.1
General parameter guidelines
There are a lot of parameters for this kind of application and most of them should be adjusted to fit a general
outdoor environment already in the file you downloaded. However there are cases when the situations are different
and some settings need to be tweaked. Because of this almost all variables in the whole setup is accessible from
one file. Each and everyone of these parameters get a short explanation in the table in section 8, but here the ones
that are most likely to be used are explained.
7.2
Parameters that should always be checked
It is mainly the first part of Parameters.ini that have to be checked for each run. The parameters in this part of the
configuration file are rather straight forward and has almost nothing to do with the reconstruction in itself. Instead
they choose which files to use and some preferences concerning these files.
The first parameter sets if the reconstruction pipeline should attempt to load a reconstruction from a file or start
from the beginning. Using the load functionality assumes that the file called ”theMap.map” is created using the
TSBB11
User Manual
Group 1
[email protected]
L IPs
11
Monocular Outdoor 3D-Reconstruction
LiTH
2012-12-14
same parameters in Parameters.ini as well as using the same video file. Otherwise the reconstruction might behave
erratically.
The second parameter specifies which video file to load. This should be set to the video that the user want to reconstruct check this to make sure. If the parameter here is invalid the program will fail to initialise the reconstruction.
After this there is a group of parameters that concerns camera calibration. The first parameter (”CAMERACALIBRATION_USEFILE”) should be set to false given that the particular capture device used has already been
calibrated. For information on how to obtain the calibration file or other questions concerning these parameters
please read section 3, Calibrating Camera.
In the second group of parameters there are three parameters roughly corresponding to the three used for calibration. These three deal with how to set the second keyframe for the initiation step. The first parameter
(”KEYFRAMEINDEX_USEFILE”) should be set to true if possible. By selecting this option the algorithm will
utilise the keyframe the user specified while capturing the video just make sure the ”KEYFRAMEINDEX_FILE”
points to the file ”keyframe.txt” that came with the video from the capture device. If this instead is set to false the
last row in this group (”KEYFRAMEINDEX_MANUAL”) will be used. The value provided here is the number of
frames before adding the second keyframe. This may require some testing to get right.
Figure 6: Overview of these parameters.
7.3
Data look very weird - What is the likely culprit
Most often when this occurs, particularly when only the first two frames have been added it is a matter of poorly
chosen baseline for the initial keyframes. The baseline is the translation described during Initiation under section
4, Capture Video. Is everything lost if this happens? Hopefully no.
Other errors may be an abundance of outliers, or bad points that does not seem to fit the real data or loss of tracking
after a couple of frames.
7.3.1
Error in initiation
First check the tracking output from the run before anything is drawn in the visualiser.
• Are there many lines connecting the two views when they disappear or are there just a few left? If there
are very few left try setting the manual keyframe ”KEYFRAMEINDEX_MANUAL” to a lower value than
what was observed. Also make sure that ”KEYFRAMEINDEX_USEFILE” is set to false in order for this
to work.
• Are the lines connecting the views particularly short? Try a higher baseline, e.g. select a higher value for
the manual keyframe than was observed.
TSBB11
User Manual
Group 1
[email protected]
L IPs
12
Monocular Outdoor 3D-Reconstruction
LiTH
2012-12-14
• Is there obvious stutter causing many of the lines to disappear or identify incorrect points. Unfortunately
there is little to do. Try recapturing the sequence.
If the above bullets look ok, but there are too few or too many points constructed one simple parameter to adjust is
”ORB_MAX_DETECTION_INITIAL”. Set this to a higher value and the detector will initiate more new points,
set it lower to get higher quality points.
7.3.2
Errors at a later stage
If there are too many outliers present in the 3D point cloud it is likely that some conditions for triangulating points
have been set to generously. Try changing the following parameters to reduce the number of bad points.
• One way to get better and cleaner results is to adjust the removal of outliers by tuning
”REMOVE_OUTLIER_TOLLERANCE”. This tolerance is a factor of the median of the reprojection error.
Hence setting it to a higher value allows more points and a lower less points.
• The second option is to adjust detection to get fewer (more stable points) or more (less stable points) when
attempting to make the map denser using visual features. This is most easily adjusted using
”TRACE_FEATURE_DETECT_THRESHOLD”. If This part of the algorithm produces unnecessary outliers try increasing the detection threshold.
If the tracking is lost check as before if this might be because of glitches in the video. If glitches occur when
the capture device is traversing unexplored areas there is no way for the system to accurately identify itself and
the tracking will fail. This is very hard to compensate for, but might be possible by increasing the number of
triangulated points. Try adjusting any of these parameters to allow for more generous triangulation of new points:
• The simplest parameter to use is ”MIN_NEW_POINTS_FROM_NEW_KEYFRAME”. It sets the minimal
number of new triangulations for each addition of a new keyframe. It is however important to remember that
this might force bad points to be triangulated. Use with care.
It is important to understand that these parameters work in conjunction and that changing one variable dramatically
may force another to be adjusted. These tips and hints are to be regarded as such and are therefore not a recipe for
success. If none of these tips work it is possible to adjust any of the other parameters. Unfortunately the results are
harder to predict and this is in general not recommended. Try first to recapture the video and see if that solves the
problem.
TSBB11
User Manual
Group 1
[email protected]
L IPs
13
Monocular Outdoor 3D-Reconstruction
8
LiTH
2012-12-14
Keymappings
These are keyboard commands currently accessible to the user of the graphical front end.
Key
w
Function
Forward
a
Pan left
s
Backward
d
Pan right
k
keyframe toggle
f
Frustum toggle
n
Neighbour toggle
c
Current camera toggle
m
Marching cubes
e
Draw edges toggle
q
Keyframe selection toggle
y
Save map
t
Save Map to .pcd
+
Enlarge patches
-
Shrink patches
.
Enlarge scene
TSBB11
User Manual
Description
Moves the spectator camera into scene. Compared to the zoom function of
the mouse that zooms to a certain point, this function will continue indefinitely at a rate that scales with how close the focal point of the spectator
camera is to the view plane. This means that it is possible to move slower
using W by first zooming with the mouse.
Moves the spectator camera to the left along the view
Moves the spectator camera backwards. This function is equivalent to ”Forward” but moves the camera in the opposite direction.
Moves the spectator camera to the right along the view plane.
Toggles the display of keyframe images.
Toggles the display of keyframe frustums.
Toggles the display of reference keyframe neighbours.
Toggles the display of where the system currently believes the true camera to be in relation to the reconstructed world. Used for debugging and
progress overview, also possible to track using ”Follow Camera”.
A live algorithm for visualising a surface from all 3D points. Currently
only shaded in a simple way to provide some visual feedback.
Toggle for choosing one of three stages. First display nothing extra, second display lines to all neighbours of the keyframe currently selected by
”Keyframe Selection Toggle” and lastly display all edges to all neighbours
of all keyframes.
Selects which keyframe to use when drawing extra information. The current only use is for ”Draw Edges Toggle”.
Writes all reconstruction information to a file that later may be loaded and
resumed. This allows for reconstruction of large scenes with possibility of
splitting computation to different times.
Writes all reconstruction information to a file that later may be loaded in
the Point Cloud Library (PCL).
Rescales the drawing of 3D point patch representation. Used to visually
improve the viewing experience.
Rescales the drawing of 3D point patch representation. Used to visually
improve the viewing experience.
Rescales the translation for all components in the scene. Used to normalise
scene viewing experience.
Group 1
[email protected]
L IPs
14
Monocular Outdoor 3D-Reconstruction
Key
,
Function
Shrink scene
p
Pause
r
Reset
o
Follow camera
TSBB11
User Manual
LiTH
2012-12-14
Description
Rescales the translation for all components in the scene. Used to normalise scene
viewing experience.
Pauses reconstruction and map refinement allowing for smooth exploration.
Recalculates initiation step for most variables, causes scene and point patches to
rescale.
Locks movement of camera to the path of the reconstruction camera. Hence it gives a
feeling for how the system thinks the true camera moved in the world.
Group 1
[email protected]
L IPs
15
Monocular Outdoor 3D-Reconstruction
9
LiTH
2012-12-14
Available Parameters
The parameters that are most commonly adjusted are listed and explained on the homepage. Some further possibilities for tweaking exists in the configuration file.
The location of the configuration file is specified in the main c file of the project, the one with the main function. Usually however the location of the file is "./CONF/Parameters.ini"
TSBB11
User Manual
Group 1
[email protected]
L IPs
16