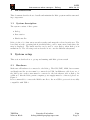
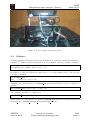
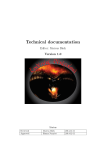
1
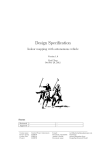
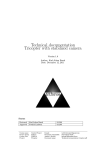
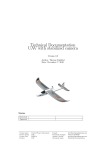
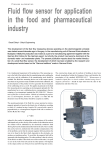
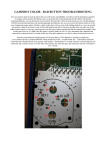
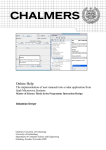
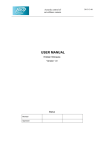
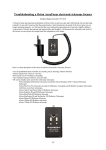
User Manual
Editor: Marcus B¨ack
Version 1.2
Status
Reviewed
Approved
Martin Szilassy
Hanna Nyqvist
2014-12-09
2014-12-11
LiTH
2014–12–11
Autonomous mine sweeper - Balrog
PROJECT IDENTITY
2014/HT, Invenire Periculosa
Link¨
oping University, Dept. of Electrical Engineering (ISY)
Group members
Name
Responsibility
Martin Szilassy (MS)
Marcus B¨ack (MB)
Project manager (PM)
Responsible for documentation (DOC)
Victoria Als´en (VA)
Chief of tests
Johan K¨allstr¨om (JK) Chief of design
Mikael Hammar (MH) Master of SLAM
¨ (DO)
¨
Daniel Orn
Chief of hardware
Olof Zetterlund (OZ) Chief of information
Simon Ollander (SO) Junior Technical Advisor
Phone
070-8840295
070-6924804
Email
(@student.liu.se)
marsz918
marba751
073-9409540
073-0718371
070-2658294
073-6448910
073-7133822
073-8322898
vical845
johka546
mikha087
danor434
oloze183
simol515
Email list for the whole group: [email protected]
Web site: http://www.isy.liu.se/edu/projekt/tsrt10/2014/bandvagn/
Customer: SAAB Bofors Dynamics, Link¨oping
Customer contact: Torbj¨orn Crona, [email protected]
Course leader: Daniel Axehill, +46 13 284042, [email protected]
Client: Hanna Nyqvist, +46 13 281 353, [email protected]
Tutor: Martin Lindfors, +46 13 281365, [email protected]
TSRT10
Marcus B¨
ack
Invenire Periculosa
[email protected]
Lips
Page I
Autonomous mine sweeper - Balrog
LiTH
2014–12–11
Contents
Document history
III
1 Introduction
1.1
1
System description . . . . . . . . . . . . . . . . . . . . . . . . . . . . . . .
2 System setup
1
1
2.1
Hardware . . . . . . . . . . . . . . . . . . . . . . . . . . . . . . . . . . . .
1
2.2
Software . . . . . . . . . . . . . . . . . . . . . . . . . . . . . . . . . . . . .
2
3 Base station
3.1
3
GUI . . . . . . . . . . . . . . . . . . . . . . . . . . . . . . . . . . . . . . .
3
4 Hand Controller
3
5 Balrog
4
5.1
Connecting to Balrog . . . . . . . . . . . . . . . . . . . . . . . . . . . . . .
5
5.2
Starting Balrog’s through the terminal and logging data
. . . . . . . . . .
5
5.3
Shut down Balrog . . . . . . . . . . . . . . . . . . . . . . . . . . . . . . . .
5
5.4
Charging Balrog’s battery . . . . . . . . . . . . . . . . . . . . . . . . . . .
5
5.5
Update software on Balrog . . . . . . . . . . . . . . . . . . . . . . . . . . .
5
TSRT10
Marcus B¨
ack
Invenire Periculosa
[email protected]
Lips
Page II
LiTH
2014–12–11
Autonomous mine sweeper - Balrog
Document history
Version
0.1
0.2
Date
2014-11-21
2014-11-27
0.3
2014-11-28
1.0
1.1
1.2
2014-12-04
2014-12-05
2014-12-09
TSRT10
Marcus B¨
ack
Changes
First draft
Updated base station section and
Balrog section
Updated according to comments
from client
Version 0.3 approved by client
System setup chapter added
System setup reviewed according to
comments
Invenire Periculosa
[email protected]
Sign
MS
MS
Reviewed
MB
¨
DO
MS
MB
MS
¨
DO
¨
DO
MB
MB
MS
Lips
Page III
Autonomous mine sweeper - Balrog
1
LiTH
2014–12–11
Introduction
This document describes how to handle and maintain the Balrog system and its surrounding components.
1.1
System description
The system consists of three parts:
• Balrog
• Base station
• Handcontroller
Balrog is the robot that autonomously searches and maps the selected search area. The
base station is the operating hub from which Balrog can be manoeuvred and where the
map is displayed. The handcontroller can be used to steer Balrog when Balrog is in
manual mode. The following sections describe how to use the different subsystems.
2
System setup
This section desribes how to get up and running with Balrog from scratch
2.1
Hardware
Make sure all hardware is connected to the Balrog. The GPS, IMU, ARM, laser scanner
and handcontroller receiver must be connected via USB. An Ethernet cable from one of
the LAN ports on the router must be connected to the left ethernet jack on Balrog. In
addition to this the Balrog main computer power supply must be connected, please see
Figure 1.
It’s recommended to connect the ARM-controller to the non USB 3 ports as it is not fully
compatible with USB 3.
TSRT10
Marcus B¨
ack
Invenire Periculosa
[email protected]
Lips
Page 1
Autonomous mine sweeper - Balrog
LiTH
2014–12–11
Figure 1: Correct setup of cables and wires
2.2
Software
Both the basestation and Balrog unit runs Ubuntu 14.04.4 with the following dependencies
installed. To install external dependencies from a terminal, run the following command
sudo apt−g e t i n s t a l l g i t b u i l d −e s s e n t i a l a u t o c o n f cmake \
qt4−qmake qt5−qmake qt4−dev−t o o l s
In addition to this all USB-device rules has to be set up, which can be done via the
following commands
cd SOURCE DIR/ os
sudo . / i n s t a l l C o n f i g s . sh
Assuming the current directory is SOURCE DIR the external libraries can be compiled by
running
cd SOURCE DIR/ vendor && . / b u i l d . sh
The software can then be compiled via
cd SOURCE DIR && . / b u i l d a l l . sh
which will produce executables of basestation (SOURCE DIR/basestation/bin/basestation
and app balrog (SOURCE DIR/app balrog/bin/app balrog.
TSRT10
Marcus B¨
ack
Invenire Periculosa
[email protected]
Lips
Page 2
Autonomous mine sweeper - Balrog
3
LiTH
2014–12–11
Base station
The base station is used to control and monitor Balrog. This can be done either through
a terminal or through a GUI. For more information on how to monitor Balrog through
the terminal, see section 5.
3.1
GUI
To start the GUI, run the basestation project on the laptop while being connected to
Balrog’s Wifi. To run the project, use the terminal and run the basestation file located
in basestation/bin or run it through Qt-creator. Once the program has started, it will
ask the user for Balrog’s IP, which is 192.168.1.3 when connecting through Wifi. Enter
the IP and press ’Connect’.
Figure 2: Basestation GUI
Balrog can then be controlled by using the arrow keys for direction and w and s -keys for
speed when in manual mode.
4
Hand Controller
The hand controller, which is an unmodified XBOX controller, is used to manually maneuver Balrog.
TSRT10
Marcus B¨
ack
Invenire Periculosa
[email protected]
Lips
Page 3
Autonomous mine sweeper - Balrog
LiTH
2014–12–11
Figure 3: Hand controller
The button labeled as 1 in figure 3 is used to start the handcontroller and initiate connection to Balrog. This button must be pressed before starting the main program on Balrog
(app_balrog) to ensure connection between hand controller and Balrog.
The joystick labeled as 2 in figure 3 is used to manouver Balrog once connected. It steers
Balrog relative to Balrog’s current position, e.g by pushing to joystick forward Balrog will
keep a straight course and move forward.
The hand controller will turn off automatically after a certain time if it does not find or
looses the connection.
5
Balrog
This section describes how to start and connect to Balrog, how to shut down and how to
power off Balrog.
Figure 4: Balrog
TSRT10
Marcus B¨
ack
Invenire Periculosa
[email protected]
Lips
Page 4
Autonomous mine sweeper - Balrog
5.1
LiTH
2014–12–11
Connecting to Balrog
To start up Balrog, flip the main switch labeled as 1 in figure 4. After a couple of seconds
you will be able to access the WiFi network Balrog using the password bandvagn. Once
connected to the network, open a terminal (Linux or Mac) and run ssh [email protected].
You will then be prompted for Balrog’s password, which is balrog3000.
It is also possible to connect to Balrog using an ethernet cable. This is done by connecting
a cable to the unused network card on your computer and manually changing your IP
address to something in the same subnet as Balrog, i.e change to 192.168.0.1. Balrog
will then be reachable by running ssh [email protected] and writing balrog3000 as
password. 192.168.0.1 is also set to Balrog’s default gateway on that interface thus you
can route Internet traffic from Balrog through your own computer.
5.2
Starting Balrog’s through the terminal and logging data
Once connected to Balrog, the main program is started by navigating to app_balrog/bin
and running ./app_balrog. This will start the main program and allow for example manual control through the base station and hand controller if the hand controller is connected.
To log data from the sensors while the program is running, navigate to app_balrog/bin
and run ./app_balrog -debug. This will log data continuously from all sensors, as well
as states and input signals to the motors, until the application is terminated by pressing
ctrl + c. The log files are stored in the folder where the program is started.
One way to retrieve the log files from Balrog is by mounting Balrog to the laptop (or any
computer). This can be done by navigating to scripts/host and running ./mount.sh on
the laptop while being connected with ethernet cable to Balrog. This will mount Balrog
as a disc on the laptop and allow for file transfers. To unmount Balrog, run the script
./unmount.sh, which is located in the same folder.
5.3
Shut down Balrog
To shut down Balrog you must be connected to Balrog. When connected, running sudo
shutdown -h now in Balrog’s terminal will terminate Balrog’s computer. Thereafter it is
safe to flip the main switch to turn off the power supply. If not done this way there will
appear a prompt next boot that the computer didn’t stop correctly and if you want to
review the BIOS/UEFI settings.
5.4
Charging Balrog’s battery
The charger is inserted into the charge connector next to the main switch. While charging
the battery on Balrog, the main switch must be in off-mode (pointing downwards).
5.5
Update software on Balrog
To access and download new code to Balrog, Balrog must be connected to the Internet.
Connecting Balrog to the Internet can be done by connecting the laptop to Balrog by
TSRT10
Marcus B¨
ack
Invenire Periculosa
[email protected]
Lips
Page 5
Autonomous mine sweeper - Balrog
LiTH
2014–12–11
ethernet cable and running the script sudo ./nat.sh in the os-folder on the laptop. The
nat.sh script shares the Internet connection from the laptop to Balrog. Once connected,
the new code can be downloaded to Balrog (for example by using Git, see github.com for
instructions on how to use Git).
TSRT10
Marcus B¨
ack
Invenire Periculosa
[email protected]
Lips
Page 6