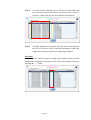
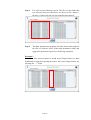
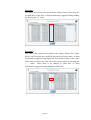
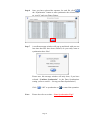
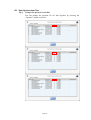
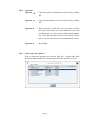
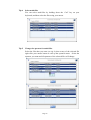
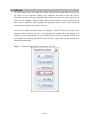
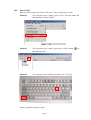
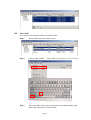
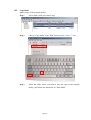
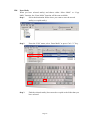
1
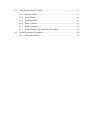
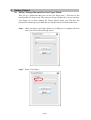
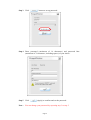
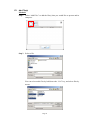
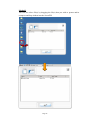
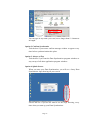
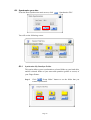
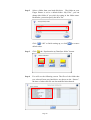
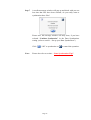
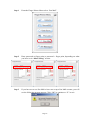
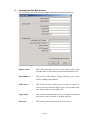
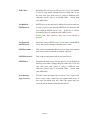
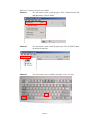
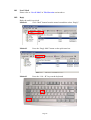
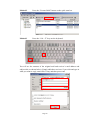
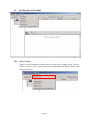
version 1.0
Table of Contents
A. General Description .................................................................................................... 1
A1. About Finger Printer ......................................................................................... 1
A2. Partition Arrangement of Finger Printer ...................................................... 1
A3. Autorun Feature of Finger Printer ................................................................. 2
A4. Password and Finger Prints of Finger Printer............................................. 2
B. How to Swipe Your Finger Print.............................................................................. 3
C. System Requirement ................................................................................................... 4
D. Getting Started .............................................................................................................. 5
D1. Set Up / Change Password for Your Finger Printer .................................. 5
D2. Register Finger Print ......................................................................................... 7
D3. Mode Setting ..................................................................................................... 10
D4. Delete Finger Print .......................................................................................... 11
D5. Delete Password ............................................................................................... 12
E. Unlock .......................................................................................................................... 13
E1. How to Access/Use the Secure Area ........................................................... 13
E2. Lock the Secure Removable Area ............................................................... 16
F. SecretZIP ..................................................................................................................... 18
F1. What is SecretZIP ? ......................................................................................... 18
F2. Why SecretZIP ? .............................................................................................. 18
F3. What is the difference between Unlock and SecretZIP ? ...................... 18
F4. Using SecretZIP ............................................................................................... 19
F5. Add File(s)......................................................................................................... 21
F6. Add Folder(s) .................................................................................................... 23
F7. Removing unwanted file(s) ........................................................................... 25
F8. The Secret function of SecretZIP ................................................................ 26
F9. The ZIP function of SecretZIP ..................................................................... 27
F10. Using both the Secret and ZIP function of SecretZIP ............................ 29
F11. Decrypt File – Restore Encrypted File(s)/Folder(s)................................ 32
F12. Unzip File – Restore Zipped File(s)/Folder(s) ......................................... 33
F13. Restore Encrypted & Zipped File(s)/Folder(s) ........................................ 34
G. Data Synchronizer ..................................................................................................... 35
G1. Set up your Data Synchronizer .................................................................... 35
G2. Synchronize your data .................................................................................... 39
G2.1 Synchronize My DataSync Folder .................................................. 39
G2.2 Synchronize My Favorite Folder ..................................................... 44
G2.3 Synchronize My Document Folder ................................................. 48
G3. Data Synchronizer Tips .................................................................................. 52
G4. Eject Function................................................................................................... 55
H. PCLock ......................................................................................................................... 56
I.
Pen Mail ....................................................................................................................... 62
I1.
Creating New Pen Mail Account ................................................................. 64
I2.
File Function of Pen Mail .............................................................................. 66
I2.1 New E-Mail ........................................................................................... 66
I2.2 Create New Folder .............................................................................. 69
I2.3 Import Address Book .......................................................................... 72
I2.4 Export Address Book .......................................................................... 76
I2.5 Print E-Mail........................................................................................... 77
I2.6 Print Preview ........................................................................................ 78
I2.7 Exit .......................................................................................................... 79
I3.
Edit Function of Pen Mail ............................................................................. 80
I3.1 Select All ................................................................................................ 80
I3.2 Move Mails ........................................................................................... 81
I3.3 Copy Mails ............................................................................................ 82
I3.4 Paste Mails ............................................................................................ 83
I3.5 Delete ...................................................................................................... 84
I3.6 Clean Trash Can ................................................................................... 85
I3.7 Hide Mails Preview ............................................................................. 86
I4.
Mail Function of Pen Mail ............................................................................ 87
I4.1 New E-Mail ........................................................................................... 88
I4.2 Reply ....................................................................................................... 88
I4.3 Forward .................................................................................................. 89
I5.
Tool Function of Pen Mail............................................................................. 91
I5.1 Receive Mails ....................................................................................... 91
I5.2 Send Mails ............................................................................................. 92
I5.3 Address Book ....................................................................................... 93
I5.4 New Contact.......................................................................................... 95
I5.5 Mail Accounts....................................................................................... 96
I5.6 Empty Trash Can when close Pen Mail ......................................... 98
I6.
Help Function of Pen Mail ............................................................................ 98
I6.1 About Pen Mail .................................................................................... 98
A. General Description
A1. About Finger Printer
What is Finger Printer ?! What can it do ?!
The Finger Printer is a USB flash storage device with a finger printer sensor,
which allows you to use your own finger print as a security key instead of a
password. Because everyone’s finger print is unique, therefore, the security level is
much higher then other security function, such as setting a password for example.
Besides raising the security level, there are many uses that you can do with your
own finger print. Come and explore the convenience and privacy, with a slide of
your finger and Finger Printer.
A2. Partition Arrangement of Finger Printer
The total capacity of your Finger Printer is divided into 3 partitions.
Partition 1
CD-Rom Area
Partition 2
HDD Area
Partition 3
Secure Removable Area
Partition 1 CD-Rom Area
This partition can only been seen in Windows 2000 or Windows XP
operating systems. It stores the Finger Printer related application
software, which upon insertion to a USB port of a computer, it will
be automatically executed (autorun). This is a read only area, you
can only read the data in this partition, but you cannot write or delete
this partition.
Partition 2 Hard Disk Drive (HDD) Area
This partition can only been seen in Windows 98 or Windows ME
operating systems. It stores the Finger Printer related application
software, which upon insertion to a USB port of a computer, it will
be automatically executed (autorun). This is a read only area, you
can only read the data in this partition, but you cannot write or delete
this partition.
Partition 3 Secure Removable Area
This is the storage area for user to store their data, but this area is
protected by a password and/or a finger print, you will need to enter
a password or/and finger print before you can access this area.
Page 1
A3. Autorun Feature of Finger Printer
The autorun feature allows you to run the finger printer AP without keyboard or
mouse. When insert your Finger Printer to a USB port of a computer, the Finger
Printer related software will automatically be executed.
Note : If you are in Windows 98 or ME, you will only see the HDD partition
(partition 2) and the Removable partition (partition 3). The finger printer
AP will be running from the HDD partition (partition 2).
If you are in Windows 2000 or XP, you will only see the CD-Rom
partition (partition 1) and the Removable partition (partition 3). The finger
printer AP will be running from the CD-Rom partition (partition 1).
A4. Password and Finger Prints of Finger Printer
You can store up to 10 finger prints in your Finger Printer, but you can only store
ONE password.
Special Notice
All pictures shown in this manual are for reference use only. This manual will not
be updated if there is any version update of any of the Finger Printer software,
unless the method of operation of the software changes.
Page 2
B. How to Swipe Your Finger Print
Step 1
Place your Finger Printer on a flat surface. Make sure the USB connector is on
your left hand side (like shown below).
Step 2
Make sure your finger is DRY before swiping.
Step 3
Place your finger on top and to the right hand side of the sensor.
Step 4
Press gently (do not press too hard) down and swipe down across the sensor.
Do not swipe too fast or too slow, take about 1~2 seconds to swipe your finger
across the sensor.
Note :
You may also rotate the Finger Printer 180o and swipe. Just remember to keep
to the left instead of right. This method is not recommended, because it gives
poor performance when scanning finger print.
Page 3
C. System Requirement
The following is the minimum system requirement for using your Finger Printer.
Pentium II 233MHz Processor or above
256MB or above RAM
Microsoft Windows 98 SE or Windows ME or Windows 2000 SP3 or Windows
2000 SP4 or Windows XP or Windows XP SP1 or Windows XP SP2 operating
system
USB 2.0
8MB free hard disk space
Page 4
D. Getting Started
D1. Set Up / Change Password for Your Finger Printer
Why set up a password when you can use you finger print ? This may be the
question that you want to ask. The reason to set up a password is, in case you hurt
your finger or you have damage the Finger Printer sensor, you still have the
password as a back up to your data that are stored in the Secure Removable Area.
Step 1 When you insert your Finger Printer to a USB port of a computer the first
time, you will see the following screen.
Step 2 Enter “User Name”.
Page 5
Step 3 Click
button to set up password.
Step 4 Enter password (maximum of 16 characters) and password hint
(maximum of 32 characters, including spaces) of your choice.
Step 5 Click
(Apply) to confirm and set the password.
Note : You can change your password by repeating step 3 to step 5.
Page 6
D2. Register Finger Print
Make sure that you have already set up a password (refer to section - “Set Up /
Change Password for Your Finger Printer”), otherwise, you will see the following
message window.
Step 1 Click
to register your finger print.
Page 7
Step 2 Select a un-register finger from the screen. The selected finger will be
highlighted with green surrounding.
Step 3 When a un-register finger is selected, the enroll button
become available. Click the enroll button
your finger print.
Page 8
will
to start enrolling
the two pictures on the
Step 4 When you click the enroll button
right hand side will start moving, which is showing you that you must
swipe your finger across the sensor to register your finger print.
Step 5 You must swipe your finger 3 times to complete the registration of a
finger print. (Do not swipe too fast)
Step 6 After you have successfully registered your finger print, you will see the
finger change to a blue colour, meaning that this finger had been
registered.
Step 7 To register another finger print, repeat step 2 to step 5.
Page 9
D3. Mode Setting
After you have setup a password and finger print(s), you can select the security
level of your choice. There are 3 security level options available.
NB :
Password and finger print(s) is required before you can use any of the
functions that are available from the Finger Printer Menu.
Finger Print
Only finger print is required to be entered.
Password and FP
Must enter both password and finger print.
Password or FP
You have the choice of enter only the password or only the
finger print.
Note : If you had only set up the password and no finger print, you will not be
able to set the mode.
Page 10
D4. Delete Finger Print
You can delete one of the finger prints that had registered or delete all finger prints
that had registered.
Delete One of the Finger Print
Select one of the registered finger (the selected finger will be marked with a RED
dot) and “Delete a Finger Print” button
the “Delete a Finger Print” button
print.
will become available. Click
to delete the selected finger’s finger
Selected finger
marked with red
dot.
Delete All Finger Prints
If there is/are any registered finger print(s), the “Delete All Finger Prints” button
will become available. To delete all finger prints registered, simply
press the “Delete All Finger Prints” button
Page 11
.
D5. Delete Password
You can also remove the password.
Step 1 Press the
button.
Step 2 Leave/Make the “New Password” and “Confirm Password” blank. (You
may also delete the hint or the hint gets deleted with the password
automatically)
Step 3 A message window will shows up and tell you that removing the
password will also remove your finger print(s).
Page 12
E. Unlock
As said in the Partition Arrangement section, the total capacity was divided into 3
partitions, a CD-Rom partition, a Hard Disk Drive partition and a Secure Removable
partition. Both the CD-Rom partition and HDD partition are read only partitions; all data
will be stored in the Secure Removable partition. However, before you can use this
Secure Removable partition, you will need to “Unlock” it first.
E1. How to Access/Use the Secure Area
Make sure that you have already setup a password or password + finger print
before continue.
Step 1 From the Finger Printer Menu select “Unlock”.
Page 13
Step 2 Enter password or finger print or password + finger print, depending on
what you have set in the “Mode Setting” section.
Password or
Finger Print
Password and
Finger Print
Only Finger
Print
Page 14
Step 3 When the correct password or finger print or password + finger print is
entered, the secure removable partitions will become accessible (see
picture below). Otherwise you will see the following error message.
Access to Secure Removable partition fails and error message appear if the correct
password or finger print or password+finger print is not entered
Correct password or finger print or password+finger print is entered, the Secure
Removable partition become accessible.
Page 15
E2. Lock the Secure Removable Area
You can lock the secure removable partition whenever you wish.
Step 1 You will find a little white hand on the bottom right hand side of your
Windows task bar. Double click the white hand to call up the finger
printer menu.
Step 2 From the Finger Printer Menu select “Unlock”.
Page 16
Step 3 Enter password or finger print or password + finger print, depending on
what you have set in section B3.
Step 4 When the correct password or finger print or password + finger print is
entered, the secure removable partitions will be locked and become
inaccessible again.
Page 17
F. SecretZIP
F1. What is SecretZIP ?
Basically we can separate it into two parts – “Secret” and “ZIP”.
Secret – meaning that you want to keep the data or file to yourself and not
sharing it with others, so it is secret to others. The SecretZIP program
allows you to put a password on the file/data that you want to keep
secret, so others cannot access it.
ZIP –
zip file is a well known compressed file format, because the data/file is
compressed, meaning saving of storage spaces, so you can store more
data in the same available capacity.
F2. Why SecretZIP ?
You may ask, WinZIP already provides password function, then why use
SecretZIP ? Well, there are program(s) that can crack the password of ZIP files, so
it is not safe to use the password option in ZIP.
SecretZIP provides you with a higher level of security by using your finger print or
finger print + password or password. The data is 100% save, because the key to
your data is on your finger(s).
You can also use the SecretZIP program to compress the file/data on any Windows
based machine, if it did not previously install WinZIP software. SecretZIP uses a
WinZIP compatible zip file format, so you can use your own WinZIP to unzip the
zip file that was created by SecretZIP.
F3. What is the difference between Unlock and SecretZIP ?
The “Unlock” function is a key to a LOCKED PARTITION, in other words, the
“Unlock” function protects the whole partition (secure removable area).
SecretZIP on the other hand, is protecting the file(s) or folder(s) that was selected.
You can protect any file(s) / folder(s) on your Finger Printer or any file(s) /
folder(s) on your hard disk drive, in other words, you can protect any file or folder
that you choose to protect, no matter where this file or folder is stored.
Page 18
F4. Using SecretZIP
Step 1 You will find a little white hand on the bottom right hand side of your
Windows task bar. Double click the white hand to call up the finger
printer menu.
Step 2 From the Finger Printer Menu select “SecretZIP”.
Page 19
Step 3 Enter password or finger print or password + finger print, depending on
what you have set in section B3.
Step 4 The main menu of SecretZIP will show if the correct password or finger
print or password + finger print is entered. Click “Create Archive” to add
file(s) or folder(s).
Page 20
F5. Add File(s)
Method 1
Step 1 Select “Add Files” to add the file(s) that you would like to protect and/or
compress.
Step 2 Select a file.
You can select multi files by hold down the “Ctrl” key, and select files by
mouse.
Page 21
Method 2
You can also select file(s) by dragging the file(s) that you wish to protect and/or
compress and drop it/them into the SecretZIP.
Page 22
F6. Add Folder(s)
Method 1
Step 1 Select “Add Folders” to add the folder(s) that you would like to protect
and/or compress.
Step 2 Select a folder. (You can only select one folder at a time)
Page 23
Method 2
You can also select folder(s) by dragging the folder(s) that you wish to protect
and/or compress and drop it/them to the SecretZIP.
All files in the folder will show in SecretZIP
Note : You can drag more than one folder at the same time.
Page 24
F7. Removing unwanted file(s)
You can remove the file(s) that you have added at any time. Simply select the
file(s) that you no longer need and press the “Delete” key on your keyboard.
Page 25
F8. The Secret function of SecretZIP
After you have finish selecting file(s) or folder(s), you can protect the data with
SecretZIP.
Step 1 Click the
“Create Archive” button.
Step 2 Tick “Encrypt file” and click “OK” to continue.
Step 3 Select where you want to save your data and enter the file name, then
click “Save”.
Page 26
Step 4 If all goes well, you will see the following message tell you that your
selected file(s) or folder(s) had been encrypted (protected) successfully.
Step 5 You can see the encrypted (protected) file appear in the directory that you
have selected in step 3 with the extension file name of .ezc.
Step 6 Once you have created the encrypted file successfully, you can delete
your original file(s)/folder(s) and leaving only the .ezc file.
F9. The ZIP function of SecretZIP
After you have finish selecting file(s) or folder(s), you can compress the data with
SecretZIP.
Step 1 Click the
“Create Archive” button.
Page 27
Step 2 Tick “Zip file” and click “OK” to continue.
Step 3 Select where you want to save your data and enter the file name, then
click “Save”.
Step 4 If all goes well, you will see the following message tell you that your
selected file(s) or folder(s) had been compressed (zipped) successfully.
Step 5 You can see the compressed (zipped) file appear in the directory that you
have selected in step 3 with the extension file name of .zip.
Step 6 Once you have created the compressed file successfully, you can delete
your original file(s)/folder(s) and leaving only the .zip file.
Page 28
F10. Using both the Secret and ZIP function of SecretZIP
After you have finish selecting file(s) or folder(s), you can compress and encrypt
the data with SecretZIP.
Step 1 Click the
“Create Archive” button.
Step 2 Tick both “Encrypt file” and “Zip file” and click “OK” to continue.
Step 3 When you tick both boxes, you will see the extra “Operation Order” menu.
It allows you to select what you want to do first. You can select to encrypt
(protect) the data first then zip (compress) the file or you can zip
(compress) the file first and then encrypt (protect). Select one of the
options from the “Operation Order” menu and click “OK” to continue.
Page 29
F10.1 Operation Order – Encrypt then Zip
If you have selected “Encrypt then Zip” in the operation order menu in
step 3 above, you will be prompted with the following screen, asking you
the location and file name that you want to save.
Note :
Once you have selected “Encrypt then Zip” in the operation
order menu, the file(s) or folder(s) that you have selected will
get(s) encrypted (protected) first, then the encrypted (protected)
file gets compressed (zipped) and saved with the file extension
of .zip.
You can unzip this compress file by other program such as WinZIP.
However, because it was encrypted (protected) before zipping
(compressing), so after unzip, you will get an encrypted (protected) .ezc
file. Therefore, you do not have to worry about the data gets stolen and
unzipped by others, because it was still protected.
Encrypt then
Zip with
SecretZIP
Unzip with WinZIP
and gets the
protected .ezc file
Page 30
F10.2 Operation Order –Zip then Encrypt
If you have selected “Zip then Encrypt” in the operation order menu in
step 3 above, you will be prompted to with the following screen, asking
you the location and file name that you want to save.
Note :
Once you have selected “Zip then Encrypt” in the operation
order menu, the file(s) or folder(s) that you have selected will
get(s) zipped (compressed) first, then the zipped (compressed)
file gets encrypted (protected) and save with the file extension
of .ezc.
Page 31
F11. Decrypt File – Restore Encrypted File(s)/Folder(s)
Step 1 To decrypt (un-protect) the encrypted (protected) file/data, select
“Decrypt File” from the main menu of SecretZIP.
Step 2 Find and select the encrypted (protected) .ezc file that you want to decrypt
(un-protect) and then click “Open”.
Step 3 The encrypted (protected) file will get decrypted (un-protected) and then
store in the same directory as the encrypted (protected) .ezc file.
Page 32
F12. Unzip File – Restore Zipped File(s)/Folder(s)
Step 1 To unzip (decompress) the zipped (compressed) file/data, select “Unzip
File” from the main menu of SecretZIP.
Step 2 Find and select the zipped (compressed) .zip file that you want to unzip
(decompress) and then click “Open”.
Step 3 Select where you want to save the unzipped (decompressed) data and
click “OK”.
Step 4 The zipped (compressed) file will get unzipped (decompressed) and store
in the directory that you have selected in step 3.
Page 33
F13. Restore Encrypted & Zipped File(s)/Folder(s)
F13.1 Restore “Encrypt then Zip” File
Step 1 Follow the “Unzip File – Restore Zipped File(s)/Folder(s)”
instruction in section G12 and you will get the .ezc file.
Step 2
Follow the “Decrypt File – Restore Encrypted
File(s)/Folder(s)” instruction in section G11 and you will
restore your original file.
F13.2 Restore “Zip then Encrypt” File
Step 1 Follow the “Decrypt File – Restore Encrypted
File(s)/Folder(s)” instruction in section G11 and you will get
the .zip file.
Step 2
Follow the “Unzip File – Restore Zipped File(s)/Folder(s)”
instruction in section G12 and you will restore your original
file.
Page 34
G. Data Synchronizer
You may have organized your data by folders, or saving it on different locations in your
computer; you may also have a copy of some of the data on your Finger Printer. If you
make changes to these data, it will take some time to copy the updated version and
overwrites the old version, either on the PC or on your Finger Printer. Data
Synchronizer provides an easy way to let you synchronize the files/data on your PC and
on your Finger Printer.
G1. Set up your Data Synchronizer
Step 1 From the Finger Printer Menu select “Data Sync.”.
Step 2 Enter password or finger print or password + finger print, depending on
what you have set in section B3.
Page 35
Step 3
You will see the main screen of the Data Synchronizer. Click
“Setting”.
Step 4 You can see the following main setting screen with 5 options.
1
2
4
3
5
Option 1 Label of my DataSync
This function allows you to label your removable partition of your
Finger Printer, it applies to both the public removable partition and
secure removable partition, depending on which removable partition
are you in when you do the labeling. What ever is entered here,
you can see it when you right click on the removable drive of your
Finger Printer and select property.
Page 36
You can type in any name you want, but no longer than 11 characters
in length.
Option 2 Confirm Synchronize
Tick the box if you want a confirm message window to appear every
time before synchronization take place.
Option 3 Always on Top
Tick the box if you want the Data Synchronizer program windows to
stay on top of all other application program windows.
Option 4 Splash Screen
When you start your Data Synchronizer, you will see a fancy Data
Synchronizer logo showing on your screen.
Un-tick the box if you do not want to see this logo showing, every
time when you start up your Data Synchronizer.
Page 37
Option 5 Language
Select and change the display language.
Page 38
G2. Synchronize your data
From the Data Synchronizer main screen, click
“Synchronize File”.
You will see the following screen.
G2.1
Synchronize My DataSync Folder
This option allows you to synchronize a selected folder on your hard drive
and the selected folder on your removable partition (public or secure) of
your Finger Printer.
Step 1
Click
“Setup folder” button to set the folder that you
want to synchronize.
Page 39
Step 2
Select a folder from your hard disk drive. The folder on your
Finger Printer is set to a default folder “My Files”, you can
change this folder (if you wish) by typing in the folder name.
Remember, you must specify the drive too.
Click
“OK” to finish setting up, or click
default value.
to restore
the “Synchronize my DataSync folder” button.
Step 3
Click
Step 4
You will see the following screen. The files of the folder that
you selected from your hard drive are shown as the “Source”,
the time of when each file was last modified also showed.
Page 40
Step 5
The Data Synchronizer program will auto detects and compares
the files of both the source folder and destination folder and
suggest the operation required (see following examples).
Example 1
The source files selected cannot be found on the Finger Printer, so Data
Synchronizer suggested copying the source files to the Finger Printer, by
showing the “→” mark.
Example 2
The source files selected was found on the Finger Printer. Since there are
no differences of the files, so Data Synchronizer suggested doing nothing
by showing the “X” mark.
Page 41
Example 3
The source files selected was found on the Finger Printer, also found,
there is one file which was modified (because it had a later date), so Data
Synchronizer suggested copying the file from Finger Printer to the source
folder and overwrites the same file in the source folder by showing the
“ ← ” mark. Since there is no changes to other files, so Data
Synchronizer suggested doing nothing for other files.
Step 6
Once you have selected the operator for each file, click
the “Synchronize” button to start synchronize the selected files
on your PC and your Finger Printer.
Page 42
Step 7
A confirm message window will pop up and check with you one
last time that files have been selected, do you really want to
synchronize these files ?
Please note, this message window will only show, if you have
selected “Confirm Synchronize” in the Data Synchronizer
setting. (refer to section - “Set up your Data Synchronizer”)
Click
Note :
“OK” to synchronize or
to cancel the operation.
Please also refer to section – “Data Synchronizer Tips”.
Page 43
G2.2
Synchronize My Favorite Folder
Step 1
Click
“Setup folder” button to set the folder that you
want to synchronize.
Step 2
Select the “My Favorites” folder from your hard disk drive.
The folder on your Finger Printer is set to a default folder “My
Favorites”, you can change this folder (if you wish) by typing in
the folder name. Remember, you must specify the drive too.
Click
“OK” to finish setting up, or click
default value.
Step 3
Click
“Synchronize my favorite folder” button.
Page 44
to restore
Step 4
You will see the following screen. The files of the folder that
you selected from your hard drive are shown as the “Source”,
the time of when each file was last modified also showed.
Step 5
The Data Synchronizer program will auto detects and compares
the files of both the source folder and destination folder and
suggest the operation required (see following examples).
Example 1
The source files selected cannot be found on the Finger Printer, so Data
Synchronizer suggested copying the source files to the Finger Printer, by
showing the “→” mark.
Page 45
Example 2
The source files selected was found on the Finger Printer. Since there are
no differences of the files, so Data Synchronizer suggested doing nothing
by showing the “X” mark.
Example 3
The source files selected was found on the Finger Printer, also found,
there is one file which was modified (because it had a later date), so Data
Synchronizer suggested copying the file from Finger Printer to the source
folder and overwrites the same file in the source folder by showing the
“ ← ” mark. Since there is no changes to other files, so Data
Synchronizer suggested doing nothing for other files.
Page 46
Step 6
Once you have selected the operator for each file, click
the “Synchronize” button to start synchronize the selected files
on your PC and your Finger Printer.
Step 7
A confirm message window will pop up and check with you one
last time that files have been selected, do you really want to
synchronize these files ?
Please note, this message window will only show, if you have
selected “Confirm Synchronize” in the Data Synchronizer
setting. (refer to section – “Set up your Data Synchronizer”)
Click
Note :
“OK” to synchronize or
to cancel the operation.
Please also refer to section – “Data Synchronizer Tips”.
Page 47
G2.3
Synchronize My Document Folder
Step 1
Click
“Setup folder” button to set the folder that you
want to synchronize.
Step 2
Select the “My Documents” folder from your hard disk drive.
The folder on your Finger Printer is set to a default folder “My
Documents”, you can change this folder (if you wish) by typing
in the folder name. Remember, you must specify the drive too.
Click
“OK” to finish setting up, or click
default value.
Step 3
Click
to restore
“Synchronize my documents folder” button.
Page 48
Step 4
You will see the following screen. The files of the folder that
you selected from your hard drive are shown as the “Source”,
the time of when each file was last modified also showed.
Step 5
The Data Synchronizer program will auto detects and compares
the files of both the source folder and destination folder and
suggest the operation required (see following examples).
Example 1
The source files selected cannot be found on the Finger Printer, so Data
Synchronizer suggested copying the source files to the Finger Printer, by
showing the “→” mark.
Page 49
Example 2
The source files selected was found on the Finger Printer. Since there are
no differences of the files, so Data Synchronizer suggested doing nothing
by showing the “X” mark.
Example 3
The source files selected was found on the Finger Printer, also found,
there is one file which was modified (because it had a later date), so Data
Synchronizer suggested copying the file from Finger Printer to the source
folder and overwrites the same file in the source folder by showing the
“ ← ” mark. Since there is no changes to other files, so Data
Synchronizer suggested doing nothing for other files.
Page 50
Step 6
Once you have selected the operator for each file, click
the “Synchronize” button to start synchronize the selected files
on your PC and your Finger Printer.
Step 7
A confirm message window will pop up and check with you one
last time that files have been selected, do you really want to
synchronize these files ?
Please note, this message window will only show, if you have
selected “Confirm Synchronize” in the Data Synchronizer
setting. (refer to section – “Set up your Data Synchronizer”)
Click
Note :
“OK” to synchronize or
to cancel the operation.
Please also refer to section – “Data Synchronizer Tips”.
Page 51
G3. Data Synchronizer Tips
Tip 1 Change the operator for all files
You can change the operator for all files together by pressing the
“Operator” button on the bar.
Page 52
Tip 2
Operators
Operator →
: Copy from source to destination and overwrite existing
file.
Operator ←
: Copy from destination to source and overwrite existing
file.
Tip 3
Operator D
: Delete function. It will ask you if you want to delete
the source files one by one. If you delete the source file,
it will then ask you if you want to delete the destination
file. If you did not delete the source file, then it will not
ask you if you want to delete the destination file or not.
Operator X
: Do nothing.
Select your own operator
You can select the operator you want for each file. Simply right click
the mouse button at the file’s operator and select the operator you want.
Page 53
Tip 4
Select multi-files
You can select multi-files by holding down the “Ctrl” key on your
keyboard, and then select the files using your mouse.
Tip 5
Change the operator for multi-files
Select the files that you want (see tip 4), then at any of the selected file
right click your mouse button to call up the operator menu. Select the
operator you want and all operators of the selected files will change.
Page 54
G4. Eject Function
The eject button acts like the Window’s “Eject” function. Clicking the eject button
it will safe remove your Finger Printer just like you are doing a safe remove from
Windows operating system. This step will ensure you that all the changes had been
made to your Finger Printer.
Please note, if you do not safe remove your Finger Printer, you may loss your
data.
Remarks – Windows Safe Remove
(Unplug or Eject Hardware) in the system tray in the lower right
Double-click
hand corner of your screen. A message window will appear, select the name of
the device that you want to remove, and then click the “Stop” button.
Confirm the device that you want to remove by click “OK”, wait till the LED light
dimmed, then remove from USB port.
If you cannot safe remove the device, please try again later.
Page 55
H. PCLock
You may want to leave your desk for a while, and you do not want others to use or see
the data on your computer; locking your computer will then be the only choice.
Normally you may lock your computer with screen saver, however, screen saver has no
protect on the computer, if others simply restarts your machine; as some people may not
have setup a password when logging into operating system, screen saver protection
means almost no protection if this is the case.
Now, here is another solution to lock your computer – PCLock. PCLock is an easy to use
program which will lock your PC, even restarting the machine does not unlock. You
simply use your Finger Printer as a key, when the key is removed from the USB port of
the machine, the machine gets locked; when the key is plug back in, the machine gets
unlocked automatically.
Step 1
From the Finger Printer Menu select “PCLock”.
Page 56
Step 2
Enter password or finger print or password + finger print, depending on what
you have set in section B3.
Step 3
You will see the following main screen. To active the PCLock function, tick
the “Active PCLock” box on the top left hand corner.
Step 3
You can select your own background picture, otherwise, default background
will be used. Click “Browse” button
and select your own background
picture. NB : The picture file must be in BMP format.
Page 57
Step 4
You can also enter a message that you want to display on the screen.
(maximum of 32 English characters including spaces)
Step 5
Set up a time that you want to lock your machine. The time setting is just, in
case that you break or lost your Finger Printer while the machine is locked, the
machine will automatically gets unlocked after the set time expired. You can
set to lock the machine up to 255 hours and 59 minutes.
Step 6
Click “Setting”
to confirm the settings made. You will see a LOCK
icon appear on your task bar on the bottom right hand side of your screen.
Page 58
Now, when you remove your Finger Printer from the USB port of your machine, your
machine will be locked automatically.
Did not select own
background, so
default background
picture is used.
Display message set
in step 4.
Own background
selected in step 3.
Display message set
in step 4.
UNLOCK
To unlock the machine, simply plug your Finger Printer back in to the USB port, and
your machine will be unlocked within few seconds.
Page 59
EXIT
To quite the PCLock program, at the LOCK icon in the task bar, right click your mouse
button and select “Exit”.
If you did not see the LOCK icon in the task bar, then follow the steps below.
Step 1
From the Finger Printer Menu select “PCLock”.
Step 2
Enter password or finger print or password + finger print, depending on what
you have set in section B3.
Page 60
Step 3
Untick the “Active PCLock” box on the top left hand corner and press
“Setting”
.
Page 61
I.
Pen Mail
Receiving and sending mails wherever you go with Pen Mail. Using Pen Mail, you no
long have to carry a notebook to reply mails; and you will not miss out any important
mails while you are away.
Please note, Pen Mail will only receive the mails which is less than 100KB and store the
mails in your Finger Printer, if the mail is over 100KB in size, Pen Mail will only receive
the subject title of the mail and store it, if you want to see the contents of the mail, you
have to download it.
Example 1 : Mail < 100KB, can see the contents directly.
Example 2 : Mail > 100KB, can only see the contents by press “Download” button.
Page 62
Step 1
From the Finger Printer Menu select “Pen Mail”.
Step 2
Enter password or finger print or password + finger print, depending on what
you have set in “Mode Setting” section.
Step 3
If you have never use Pen Mail or have not set up a Pen Mail account, you will
see the following message appear. Click “OK” to continue or “X” to exit.
Page 63
I1.
Creating New Pen Mail Account
The following is the main account window. Enter the information required.
Display Name
:
This is the name that receiver of your e-mail will see and
also this name will be shown in the main Pen Mail screen.
Email Address
:
This is your e-mail address. People who reply your e-mail
will be sending to this address.
POP3 Server
:
This is the mail server which you use to receive e-mails. If
you are not sure about this POP3 server, please check with
your mail provider or your MIS staff.
Login Name
:
This is the account name that you use to login your normal
mail server (such as outlook or outlook express).
Password
:
This is the account password of your mail server.
Page 64
POP3 Port
:
Normally the mail server will use port 110 (as set default)
to receive your mails. Change this port value only if you
are sure, that your mail server is using a different port,
otherwise, please leave it as default value. (check with
your MIS staff)
Use Built-in
SMTP Server
:
SMTP server is the mail server which was used to send out
e-mails. If you are not sure the SMTP server, then tick this
“Use Built-in SMTP Server” box. If the box is ticked,
Pen Mail will try to auto detect the SMTP server.
Please note, this function may not work behind a
firewall.
Use External
SMTP Server
:
Enter the correct SMTP server if you know which SMTP
server that you are using to send out your e-mail.
SMTP Account
:
This is the account name that you use to login your normal
mail server (such as outlook or outlook express).
SMTP Password :
This is the account password of your mail server.
SMTP Port
:
Normally the mail server will use port 25 (as set default) to
send out your mails. Change this port value only if you are
sure, that your mail server is using a different port,
otherwise, please leave it as default value. (check with
your MIS staff)
Save message
:
Tick this “Save message copy on server” box, if you want
leave a copy of the e-mail on your original mail server. If
you have un-ticked this box, then the mails that you
received will be deleted from the mail server.
copy on server
Page 65
I2.
File Function of Pen Mail
I2.1
New E-Mail
Send mail to people who you want to contact. Enter e-mail address(es) of
receiver(s), subject of this mail, contents, and then press “Send”.
Note :
Cc =
Bcc =
Carbon Copy
Blind Carbon Copy (the email addresses and receiver’s
names will not be shown on the email)
Page 66
There are 3 ways to create a new e-mail.
Method 1
You can create a new e-mail by press “File” from the menu bar
and then select “New E-Mail”.
Method 2
You can create a new e-mail by press the “New E-Mail” button
on the quick start bar.
Method 3
You can create a new e-mail by press the “Ctrl + N” keys.
Page 67
You can also attach files to the mail that you want to send. Click the attach file
button
, and then select the file(s) that you want to attach.
Click “Attach File”
Select “Attach File”
File Attached
Page 68
You can select multi-files and attached to the mail. You can see the files that you
have attached by press
.
Files Attached
I2.2
Create New Folder
You can create folders to manage the mails that you received.
Step 1
From the menu bar select “File” and then “Create New Folder”.
Step 2
Enter the name of the folder and click “OK”.
Page 69
Step 3
You will see the new folder created under your account.
Step 4
Now, you can organize your mail by “Drag and Drop”.
Select the mail and hold down the left mouse button.
Drag to the folder where you want the mail to be stored and release the mouse button.
Selected mail moved to the new folder.
Page 70
You can also move multi-mails at the same time. Simply hold down the “Ctrl”
key on the keyboard and select the mails that you want to move by your left
mouse button, then drag and drop to the new folder.
You can also create “Sub-Folders”. Please note, you can only create sub folder
within the new folder that you have created, you cannot create sub folder within
the default folders (Inbox / Outbox / Sent Item / Trash Can).
Select a main folder and then follow the “Create New Folder” steps.
You can also select a main folder and then right click the mouse button (a quick
menu will show up), select “Create New Folder” from the menu.
Page 71
Once you have successfully created, you should see the sub folder appear in the
main folder that you have selected.
I2.3
Import Address Book
Note : Do not import address book from different language operating system.
Step 1
Export your address book from Outlook or Outlook Express.
Step 2
Select the out put format to be CSV – Text File format.
Page 72
Step 3
Browse and select where you want to save the out put, as well as
given it a file name. Click “Next >” to continue.
Step 4
Select “Name” and “E-mail Address” fields, and click “Finish”.
Page 73
Step 5
From “File” menu, select “Import Address Book”.
Step 6
Select a CSV file.
Step 7
Make sure the field is mapped to the correct data.
Page 74
Step 8
Select the correct mapping field, if it is not correct.
Step 9
When the correct field was mapped, you should see the following
message telling you that you have successfully imported the address
book.
Step 10
You will find the data of the imported address book in your PenMail
address book.
Page 75
I2.4
Export Address Book
Step 1
Select “Export Address Book” from “File” menu.
Step 2
Enter the out put file name and where you want to save it.
Step 3
You will see the following message if exporting is successful.
You can then import this exported CSV file using your Outlook or Outlook
Express.
Page 76
I2.5
Print E-Mail
Print out e-mail using your printer. There are 3 ways to print your e-mail.
Method 1
You can print your e-mail by press “File” from the menu bar
and then select “Print E-Mail”.
Method 2
You can print your e-mail by press the “Print” button
the quick start bar.
Method 3
You can print your e-mail by press the “Ctrl + P” keys.
Select your printer and press print.
Page 77
on
I2.6
Print Preview
Check the print out of the mail on screen. Press “File” from the menu bar and
then select “Print Preview”.
You will see what the print out looks like on screen.
Page 78
I2.7
Exit
Exit the Pen Mail program.
Page 79
I3.
I3.1
Edit Function of Pen Mail
Select All
You can select all the mails in a folder by choosing the “Select All” function from
the “Edit” menu or press “Ctrl + A” key on the keyboard.
Page 80
I3.2
Move Mails
You can move the selected mail(s) to another folder.
Step 1
Select mail(s) that you want to move.
Step 2
Choose “Move Mails…” from “Edit” menu or press “Ctrl + X” key.
Step 3
Select the folder where you want to move the original mail(s), and
follow the instruction in “Paste Mails”.
Page 81
I3.3
Copy Mails
Make a copy of the selected mail(s).
Step 1
Select mail(s) that you want to copy.
Step 2
Choose “Copy Mails” from “Edit” menu or press “Ctrl + C” key.
Step 3
Select the folder where you want to store the copy of the original
mail(s), and follow the instruction in “Paste Mails”.
Page 82
I3.4
Paste Mails
When you have selected mail(s) and choose either “Move Mails” or “Copy
Mails” function, the “Paste Mails” function will become available.
Step 1
Select the destination folder where you want to store the moved
mail(s) or copied mail(s).
Step 2
From the “Edit” menu, select “Paste Mails” or press “Ctrl + V” key.
Step 3
Find the selected mail(s) been moved or copied to the folder that you
have selected.
Page 83
I3.5
Delete
Step 1
Step 2
Select the mail(s) which you want to delete.
You may choose one of the following methods to delete the mail(s).
Method 1
Select “Delete” from the “Edit” menu.
Method 2
Press the “Delete” key on your keyboard.
Page 84
Method 3
Drag the selected mail(s) and drop it/them in the
“Trash Can”.
You will find the mail(s) which you want to delete in the “Trash
Can” folder.
I3.6
Clean Trash Can
When you delete any mail, the mails that you wish to delete will be put into the
“Trash Can”, you can still restore these mails, unless you clean the trash can.
From the “Edit” menu, select “Clean Trash Can” to empty the mails that are in
the Trash Can.
Please note :
When you use the “Clean Trash Can” function, the mails that
are in the trash can is irrecoverable.
Page 85
I3.7
Hide Mails Preview
If the mail is less than 100KB, it will gets received and store in your Finger
Printer. When you click on these type of mails (<100KB), you can see the
contents of the mail in the preview window below.
Select “Hide Mails Preview” or press “Ctrl + L” key to hide the preview window.
Page 86
I4.
Mail Function of Pen Mail
Page 87
I4.1
New E-Mail
Please refer to “New E-Mail” of File Function section above.
I4.2
Reply
Reply the mail(s) received.
Method 1
Click “Mail” button from the menu bar and then select “Reply”.
Method 2
Press the “Reply Mail” button on the quick start bar.
Method 3
Press the “Ctrl + R” keys on the keyboard.
Page 88
You will see the contents of the original mail and receiver’s mail address and
subject title (as shown below). Simply add other receivers if you wish and type in
what you want to reply, attach files if any, and then press send.
I4.3
Forward
Forward the mail(s) received to others.
Method 1
Click “Mail” button from the menu bar and then select
“Forward”.
Page 89
Method 2
Press the “Forward Mail” button on the quick start bar.
Method 3
Press the “Ctrl + F” keys on the keyboard.
You will see the contents of the original mail and receiver’s mail address and
subject title (as shown below). Simply add other receivers if you wish and type in
what you want to reply, attach files if any, and then press send.
Page 90
I5.
I5.1
Tool Function of Pen Mail
Receive Mails
Receive e-mails from the account(s) that you have set up. Simply select “Receive
Mails” from the “Tool” menu or press the “Send & Receive Email” button from
the quick start bar.
Page 91
Please Note :
I5.2
If you press the “Send & Receive Email” button from the quick
start bar, you will be sending mails that are in the “Outbox” as
well as receiving mails from the account that you have set up.
Send Mails
Sending e-mails that are in the “Outbox”. Simply select “Send Mails” from the
“Tool” menu or press the “Send & Receive Email” button from the quick start
bar.
Please Note :
If you press the “Send & Receive Email” button from the quick
start bar, you will be sending mails that are in the “Outbox” as
well as receiving mails from the account that you have set up.
Page 92
I5.3
Address Book
Check out your address book. You can select “Address Book” from the “Tool”
menu or press the “Address Book” button
from the quick start bar.
You will see the following main “Address Book” window.
Add :
Add new contact information to your address book.
When you press this “Add” button, you will see the following screen,
simply enter the nickname and the e-mail address of the contact
person.
Page 93
Remove : Delete any unwanted contact information.
Select the contact name that you want to remove and click the
“Remove” button.
A warning message window will pop up and telling you that once
you deleted the contact information, it cannot be recovered, unless
you re-enter the contact detail again.
Page 94
Property : Check out/modify the information of an existing contact information.
Select a contact person and click property, then modify either the
Nickname or Email Address, or both.
Close :
I5.4
Close the contacts window.
New Contact
Add a new contact information to your address book. Select “New Contact” from
the “Tool” menu and follow the “Add” instruction from the Address Book section
above.
Page 95
I5.5
Mail Accounts
You can check, modify or delete the mail account. Select “Mail Accounts” from
the Tool menu.
You will see the main Email Account.
Add :
Add new email account. Click the “Add” button, and follow the
instruction in the “Creating New Pen Mail Account” section above.
Remove : Remove existing account.
Select a email account that you want to remove and click the
“Remove” button.
Page 96
A warning message window will pop up and telling you that once
you deleted this email account, all mails in this account will also gets
deleted. Press “Yes” to continue or “No” to cancel.
You will need at least one e-mail account to operate the PenMail
function, therefore, if you try to delete the last e-mail account, the
following message will show.
Property : Check out/modify the information of an existing mail account.
Select a mail account and click property, then modify the information
or property.
Close :
Close the mail account window.
Page 97
I5.6
Empty Trash Can when close Pen Mail
When you tick this function, every time you close the PenMail program, the
Trash Can will be empty automatically.
If you do not want to empty the Trash Can when closing the PenMail program,
simply un-tick the box and click “OK”.
I6.
I6.1
Help Function of Pen Mail
About Pen Mail
Shows you the version of Pen Mail that you are using.
Page 98