1
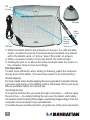
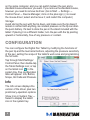
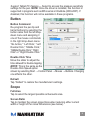
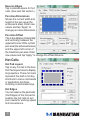
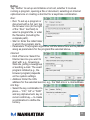
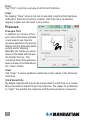
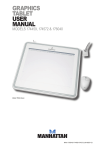
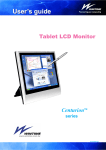
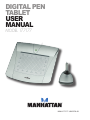
digital pen
tablet
user
manual
Model 177177
MAN-177177-UM-0708-01
introduction
Thank you for purchasing the MANHATTAN® Digital Pen Tablet, Model
177177.
An ideal complement to newer computers equipped with Microsoft Vista
and Microsoft Office, the Digital Pen Tablet is designed to support digital
ink, handwriting recognition and document annotation capabilities, giving
users a new level of interaction with their computers. It supports Adobe
PhotoShop, Illustrator and Flash, Corel Painter, Autodesk Maya and 3D
Studio Max, Pro/E and other popular software applications.
The lightweight RF wireless pen with 512 pressure sensitivity levels and
15° tilt enable the creation and edit of photos, drawings and other digital
documents in a way that’s more natural and instinctive. The tablet’s three
programmable buttons are easily customized to suit user preferences;
automatic power-save reduces battery drain, keeping the pen ready for use.
An integrated menu strip contains 16 built-in hot keys for on-tablet control
of frequently used menu commands and application functions. A pair of
programmable keys can be set to perform keystroke combinations or
launch a menu item without using the mouse and interrupting workflow.
A low profile and generous cable combine to provide natural, relaxed
working positions, and the compact size makes it a good addition and
fit with most stationary and mobile workspaces.
The easy-to-follow instructions in this user manual make installation
and operation a breeze, so you’ll soon be enjoying the benefits of these
additional features:
• Compatible with Windows and Mac systems; includes trial-version of
Corel Painter X, Adobe PhotoShop CS3 Extended and UC-Logic PenSuite Pro software
• Lifetime Warranty
System Requirements
• Windows 2000/XP/Vista and Mac OS 9.x or above
• Pentium III equivalent or higher; 256 MB hard disk space and 128 MB
RAM recommended
FCC Compliance Statement
This equipment has been tested and found to comply with the limits for a
Class B digital device, pursuant to Part 15 of FCC Rules. These limits are
designed to provide reasonable protection against harmful interference
when the equipment is operated in a residential installation. This equipment
generates, uses and can radiate radio frequency energy and if not installed
and used in accordance with the instruction manual may cause harmful
interference to radio communications. However, there is no guarantee
that interference will not occur in a particular installation.
If this equipment causes harmful interference to radio or television
reception, which can be determined by turning the equipment off and on,
the user is encouraged to try to correct the interference by one or more
of the following measures:
• Reorient the receiving antenna.
• Increase the separation between the equipment and receiver.
• Connect the equipment into an outlet on a circuit different from that to
which the receiver is connected.
Changes or modifications not expressly approved by the party responsible
for compliance can void the user’s authority to operate the equipment.
This product is equipped with a shielded cable. Extension cable, if used,
must be shielded in order to comply with the emission limits. Operation
of this device is subject to the following conditions: 1) This device may
not cause harmful interference, and 2) This device must accept any
interference received, including interference that may cause undesired
operation.
CE Compliance Statement
This product complies with all the requirements of the EMC Directive
89/336/EEC. This product has been tested and found to comply with:
• lEN55022 (CISPR 22) — Electromagnetic interference
• lEN50082-1 (IEC801-2, IEC801-3, IEC801-4) — Electromagnetic immunity
• lEN60950 (IEC60950) — Product safety
installation
Software
CAUTION: Do not connect the Digital Pen Tablet to the computer before
installing the driver, as this could prevent a proper installation.
1.Insert the driver CD into the CD-ROM drive, and wait for the main menu
to appear on screen. NOTE: On most systems, the setup program will
start automatically. If it doesn’t, you can start the program manually
by going to Start, then Run, entering E:\setup (where “E:” represents
the CD-ROM drive), then pressing the Enter key.
2.Select Driver Setup, then press the “Enter” key for all subsequent
prompts/questions.
3.Returning to the main menu, select PenSuite Setup, highlight the
modules you want to install, then click “OK” to install the PenSuite
software.
4.After completing the driver installation, restart the computer. A small
graphics tablet icon
will appear in the system tray, normally at the
lower-right corner of the screen, indicating that the driver has been
properly installed and the tablet is operational.
Hardware
Insert the USB connector into an available USB port on your desktop or
notebook computer. After detecting the tablet, Windows will search for
and then install the device driver for it.
Installation Verification
The green LED above the pen area is the primary indicator of operation.
It normally remains off, turning on and off only in response to various
operations and conditions. Check the LED’s status as you proceed
through the following test steps.
1.Tap on any surface with the pen’s tip to “wake it up” if the automatic
power-saving function has placed it in standby mode.
2. Whenever the tablet itself is activated, the LED will light briefly, then
shut off again.
LED
Hot cells
Pen stand
Barrel
buttons
USB cable
Active/
Pen area
(working
surface)
Pen tip
3. When the tablet detects the presence of the pen, the LED will blink
slowly, as when the pen tip is held just above the tablet or is placed
within the tablet’s work, or “active,” area (“Pen area” on screen).
4. When you press a button on the pen barrel, the LED will light.
5. Holding the pen on or above the active area will make the cursor on
the computer screen move accordingly.
Pen Operation
To work more efficiently when writing or drawing, watch the computer
screen and not the tablet. (This becomes easier to do with practice.)
Double-tapping:
For best results when double-tapping the pen (equivalent to double-clicking
a mouse), keep the tip on the tablet’s surface. Otherwise, lift the pen tip as
little as possible before the second tap.
Scrolling/panning:
This special function lets you scroll through a document — without using
the scroll bar — by simply holding the pen over the tablet, particularly
convenient when browsing Web pages, examining images larger than the
computer screen and panning a spreadsheet.
To enable the pen scrolling function, program one of the pen’s two barrel
buttons to operate as a mouse’s “middle (button) click.” (Refer to Button/
Button Command in the Configuration section below.) This re-programmed
barrel button on the pen will now function as a scroll button.
To use the pen scrolling function, press and hold the designated barrel
button while moving the pen just above the surface of the pen area (see
the image on Page 6). As soon as you press the barrel/scroll button,
scroll marks will
appear (shown
at right) and the
cursor will change
to a scroll cursor.
When you move
this scroll cursor
away from the
scroll mark, the
document window
will scroll in that
direction and the
scroll cursor will
point to the direction it’s moving in. To scroll faster, increase the distance
between the scroll cursor and scroll mark; to scroll at a lower speed,
decrease this distance. When you release the barrel/scroll button, the
scroll mark will disappear and pen scrolling will stop.
To continuously scroll in the direction indicated by the scroll mark, press
the barrel/scroll button and release it immediately. Pressing the barrel/
scroll button again removes the scroll mark and stops pen scrolling.
Pen scrolling works with most Microsoft applications (including Internet
Explorer, Word, Excel, PowerPoint and Access) and with many others,
though the function’s “behavior” varies somewhat from one application
to another. Some applications, for example, will allow scrolling in all
directions while others will only scroll up and down; some will scroll
smoothly while others tend to be “jumpy.”
Working with or without a Standard Mouse:
You can have both a Digital Pen Tablet and a standard mouse installed
on the same computer, and you can switch betwen the pen and a
standard mouse whenever you want. If you remove the standard mouse,
however, you need to remove its driver. (Go to Start → Settings →
Control Panel → Device Manager; click on the plus sign (+) to reveal
the mouse driver; select and remove it; and restart the computer.)
Storage:
Avoid storing the pen with the tip down, and make sure the tip doesn’t
remain in contact with anything, as constant pressure on the tip can drain
the pen’s battery. It’s best to store the pen in the stand included with the
tablet: If placing it in a different holder, turn the pen with the tip pointing
upward or horizontally, free of any pressure or contact.
configuration
You can configure the Digital Pen Tablet by modifying the functions of
the pen tip and the two barrel buttons, adjusting the pressure sensitivity
of the pen, setting the scope of the tablet’s work area and programming
the hot cells.
Tap through Start/Settings/
Control Panel, then double-tap
the Tablet Settings icon; or tap
on the tablet icon
in the
system tray. Five configuration
tabs will appear: Info, Button,
Scope, Hot Cells and Pressure.
Info
The Info screen displays the
version of the driver, plus two
preliminary-operation options.
Show Icon in System Tray —
Select to display the tablet
icon in the system tray.
Support Tablet PC Feature — Select to access the pressure sensitivity
settings for the pen. NOTE: Once the driver is installed, this function is
supported in programs such as MS Journal or OneNote (2003-2007). If
disabled, this function will not be available in these programs.
Button
Button Command
Re-program the pen tip and
barrel buttons by selecting the
button name from the left dropdown menu and assigning it
one of the mouse commands
in the right drop-down menu:
“No Action,” “Left Click,” “Left
Double Click,” “Middle Click,”
“Middle Double Click,” “Right
Click” or “Right Double Click.”
Double Click Time
Move the slider to adjust the
time allowed for double-tapping.
NOTE: This is the same as the
Double-Click Speed option
shown by selecting Start → Control Panel → Mouse → Buttons. Changing
one affects the other.
Default
Tap “Default” to restore the manufacturer’s settings.
Scope
Full Area
Tap to select the largest possible active/work area.
Screen Ratio
Tap to maintain the screen proportions when reducing either current
width or height of Pen Area Dimensions (see below).
Reserve Edges
Tap to allocate space for hot
cells. (See next tab section.)
Pen Area Dimensions
Shows the current width and
height of the pen area (the
active/work area). Enter new
values and tap “Apply” to
change pen area dimensions.
Pen Area Offset
This is the distance (horizontally
and vertically) between the
upper-left corner of the current
pen area (the active/work area)
and the upper-left corner of
the maximum pen area. Enter
new values and tap “Apply” to change the offset distance.
Hot Cells
Hot Pad Layout
Tap on any hot cell in the blue
Hot Pad Layout area to display
its properties. These hot cells
represent the built-in hot key
shortcuts to menu commands
or application functions,
including customizable keys.
Hot Edges
You can reserve the perimeter
(Hot Edges) of the hot pad to
position the hot cells to suit
your needs for working speed
and convenience.
10
Define
Tap “Define” to set up and intialize a hot cell, whether it involves
running a program, opening a file or document, selecting an Internet
option/service or creating a shortcut for a keystroke combination.
Run:
• Run: To set up a program or
document with a hot cell, tap
the browser icon (to the right
of the “Run:” text field) to
select a program/file, or enter
the filename (including the
complete path).
• Start in: Enter the initial folder
in which the program starts.
• Parameters: The program arguments that are added here will be passed
along as parameters for the program/file selected above.
Internet:
• Kind of Service: Select the
Internet service you want to
start with; e.g., browsing a
Web site, joining a newsgroup
or sending e-mail. The exact
program initiated (e.g., the
browser program) depends
on the system settings.
• Address: Enter the URL
address for the selected service; e.g., the Web site or e-mail address.
Hot Key:
• Select the key combination to
press — “Ctrl,” “Alt” or “Shift”
and any alphanumeric key or
cursor control key — to create
a combination to define the
hot key.
11
Print
Tap “Print” to print an overview of all hot cell functions.
Clear
By tapping “Clear” when a hot cell is selected, anything that had been
defined for that hot cell will be cleared. Until that cell is re-defined,
tapping it again will not result in any action.
Pressure
Pressure Test
In addition to a choice of four
pen colors, this screen provides
a test area to see how the
pressure applied to the pen tip
affects the line thickness while
writing and/or drawing.
Basically, the harder you press
down on the tablet with the pen,
the thicker the line. The
numerical value of the pressure
level is shown in the field above
the “Clear” button.
Clear
Tap “Clear” to erase whatever marks have been made in the Pressure
Test area.
Click Sensitivity
By default, tapping with the pen tip is equivalent to a left click on a mouse.
Move the slider to adjust the pen tip response. The closer it’s positioned
to “Light,” the quicker the response and the less pressure is required.
12
troubleshooting
Problem: The LED doesn’t light.
Solution: Make sure all connections are made properly so that power
is supplied and data signals can be transmitted. With the digital pen,
lightly tap the tip on any surface and try again.
Problem: The cursor doesn’t move with pen movement.
Solution: Verify that the hardware functions properly, and check for the
presence of the tablet icon in the system tray to verify that the tablet
driver has been loaded. If the tablet icon doesn’t appear, remove and
re-install the driver.
Problem: The line doesn’t become thicker regardless of how much pressure is placed on the pen tip.
Solution: Test the pressure sensitivity as described on Page 12.
Problem: The cursor moves erratically or jiggles when the pen is held still.
Solution: Keep the tablet at least 5 inches (12 cm) away from any
monitors, modems or other electronic devices, as they may emit
electromagnetic interference.
Problem: The pen stops functioning after intermittent operation.
Solution: This occurs when the batteries run low and need replacing.
Remove the top of the pen and replace the batteries with fresh ones,
negative pole first (as shown). Replace the pen top.
Problem: The pen tip appears to have lost its sharp point.
Solution: A worn tip won’t affect the performance of the pen, but a new
tip can be installed simply by pulling the old tip out and pressing a
new tip securely in place.
13
specifications
Standards and Certifications
• USB 1.1; CE; FCC
General
• Technology: electromagnetic induction
• Active area: 7.6 x 10.2 cm, 77.5 sq. cm (3 x 4 in., 12 sq. in.)
• Coordinate resolution: 79 lpmm (2,000 lpi); absolute report mode
• Origin position: upper left
• Data report rate: at least 100 rps
• Reading height: up to 9 mm (0.02 in.)
• Power supply: 5 V DC, less than 50 mA (maximum; ±5%)
• Input current: 70 mA (maximum)
• Compatible with 2000/XP/Vista and Mac OS 9.x or above
• LED indicator: Activity
• Cable: USB type A, 140 cm (55 in.)
• Dimensions: 166 x 178 x 9.3 mm (6.5 x 7 x 0.36 in.); 238 g (7.5 oz.)
RF Wireless Pen with Power Save
• Three buttons, programmable; (2) pen barrel, (1) pen tip
• Pen pressure sensitivity: 512 levels
• Pen tilt range: ±15° from vertical (detectable)
• Accuracy: ±0.25 mm (0.01 in.)
• Power: (1) AAA battery, included
• 23 g (0.8 oz.); with holder, 54 g (1.9 oz.)
Software
• UC-Logic PenSuite Pro & WinTab driver with PenMail, PenSigner, Annotate
for Word, Annotate All, PenCommander & PenPresenter (full version)
• Adobe PhotoShop CS3 Extended, Corel Painter X (30-day trial versions
for Windows XP & Vista)
Package Contents
• Digital Pen Tablet, 3” x 4” / A7; RF wireless pen with holder
• UC-Logic PenSuite Pro software (full version); Adobe PhotoShop CS3
Extended & Corel Painter X (30-day trial versions)
• (2) AAA batteries
• User manual with driver and software CDs
14
MANHATTAN offers a complete line
of PC Components, Peripherals, Cables and Accessories.
Ask your local computer dealer for more information
or visit us online at
®
www.manhattan-products.com
Copyright © MANHATTAN
All products mentioned are trademarks or registered trademarks of their respective owners.