1
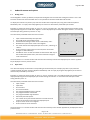
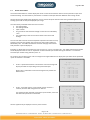
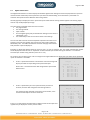
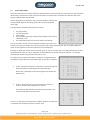
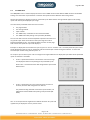
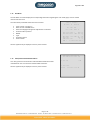
2014‐11‐25 V 1.2 User Manual Earth Leakage Monitoring system IsoBox 16 / IsoIn / IsoOut Due to our policy of continual improvement, specifications may change without prior notice Megacon AB Ranhammarsvägen 20 S-168 67 Bromma Sweden Tel: 08-402 42 50 [email protected] www.megacon.se Page 2 av 18 Content 1 IsoBox 16 menues and options ...................................................................................................................... 3 1.1 Analogue menu .................................................................................................................................... 3 1.2 Input menu ........................................................................................................................................... 3 1.3 Instant States Menu ............................................................................................................................. 4 1.4 Alarm Memory Menu ........................................................................................................................... 5 1.5 Instant Values Menu ............................................................................................................................ 6 1.6 Highest Values Menu ........................................................................................................................... 7 1.7 Lowest Values Menu ............................................................................................................................ 8 1.8 True RMS Menu ................................................................................................................................... 9 1.9 THD/TRMS Values Menu .................................................................................................................... 10 1.10 Event Memory ‐ Main Menu .............................................................................................................. 11 1.10.1 Event Memory ‐ Sub Menu ........................................................................................................... 12 1.11 Power‐up Memory ‐ Main Menu ....................................................................................................... 13 1.11.1 Power‐up Memory ‐ Sub Menu ..................................................................................................... 13 1.12 Info Menu........................................................................................................................................... 14 1.13 IsoIn/IsoOut Communikation Menu .................................................................................................. 14 2 Basic Settings Menu ...................................................................................................................................... 15 2.1 Set‐up Menu ...................................................................................................................................... 15 2.2 Settings Menu .................................................................................................................................... 15 2.3 Language Menu .................................................................................................................................. 16 2.4 Date & Time Menu ............................................................................................................................. 16 2.5 RS485‐PC‐Communikation Menu ....................................................................................................... 17 2.6 Option Menu ...................................................................................................................................... 17 3 Technical data ............................................................................................................................................... 18 Installation guide: separate sheet Megacon AB Ranhammarsvägen 20 S-168 67 Bromma Sweden Tel: 08-402 42 50 [email protected] www.megacon.se 2(18) Page 3 av 18 1 IsoBox 16 menues and options 1.1 Analog menu The Analog Menu shows, by default, the input with the highest current value both analog and numeric. This is also the menu to which the instrument will return if no operations have been made within 30 seconds. To display the value for any other input, enter the number of the required input, using the numerical keyboard followed by “OK” or simply use the left/right keys to increase or decrease the presented input number. Example: To present the value of input 12 , press “1” and “2” and then “Ok”. The newly entered input number will be displayed replacing the current & active “Highest” or other displayed input number during the selection. To cancel the entered input during selection press the “C” key. I n : 1 2 A B - C D - E H The information presented within this menu contains: V a l u e : 5 0 0 m A F 1 0 0 m A Input number followed by the input label. H i g h e s t Current & active earth leakage values. 5 0 A filtered earth leakage current value is indicated by “mAF“. Whether the input current value is the “Highest”. The active state for the displayed input such as “Ok”, “Warning” or “Alarm”. If alarm memory active status has occurred, then active state 0 changes to “Alarm Memory”. A l a r m M e m o r y If IsoBox 16 unit is not able to stabilise communication with any of the installed IsoIn/IsoOut units, then active state will change to “IsoIn‐Com Alarm”. The clear button “C” is used to confirm and clear the alarm memory state for the displayed input. Use the up/down key to display the next or previous menu. 1.2 Input menu This menu will display all information corresponding to the selected input. To display any other input, enter the number required using the numerical keyboard followed by “OK” or simply by using the left/right key to increase or decrease the presented input number. Example: To present the value of input 12, press “1” and “2” and then “Ok”. The newly entered input number will be displayed replacing the active displayed input number during the selection. To cancel the entered input number during selection press “C”. The information presented within this menu contains: Input number. I n p u t : 1 2 L a b e l : A B - C D - E H Input label. Current value. V a l u e : 5 0 0 m A Current active State. S t a t e : O K The programmed delay time in seconds. D e l a y : 5 s The programmed alarm threshold. A l a r m : 2 0 0 0 m A W a r n i n g : 1 0 0 0 m A The programmed warning threshold. F i l t e r : A c t i v e Active low pass filter option. N e w E v e n t s : 9 The number of any new events that have occurred since last control of the events occurred for the displayed input. H i g h e s t I n p u t If input current value is the “Highest”. A l a r m M e m o r y If alarm state has occurred earlier. The clear button “C” is used to confirm and clear the alarm memory state. Use the up/down key to display the next or previous menu. Megacon AB Ranhammarsvägen 20 S-168 67 Bromma Sweden Tel: 08-402 42 50 [email protected] www.megacon.se 3(18) Page 4 av 18 1.3 Instant States Menu The Instant States Menu is used to display the current active state. This information is presented as a collection of 8 inputs based on different data sorting modes. Use the left/right key to display the next or previous 8 inputs. Note that the data sorting method applies to all existing inputs and not only the displayed input range. The information presented within this menu contains: The page number. I n s t a n t S t a t e s The sorting method. Input number. P a g e 1 Current active state. I n p u t S o r t e d You are also able to use the numeric keyboard to provide a fast search of a I n S t a t e 1 O k specific input. Enter the number of the input using the numeric keyboard 2 O k followed by “OK”. The IsoBox 16 will then search for the page that contains 3 W a r n i n g 4 O k that particular input and display it. 5 O k 6 A l a r m Example: To display the state of input 12, press “1” and “2” and then “Ok”. 7 O k 8 O k The newly entered input number will be displayed on the last row as “keyboard:” and the entered input number during the selection. To cancel the entered input number during selection press “C”. As an option you are able to press “OK” to change the arranged method or to display the input labels of the presented inputs. Its function is as follows: I n s t a n t S t a t e s If “OK” is pressed and held for 3 seconds the menu will change and P a g e 1 present the labels corresponding to the displayed inputs. I n p u t S o r t e d When “OK” is released the menu will change back to present the I n L a b e l default menu. 1 A B - C D - E 1 2 A B - C D - E 2 3 A B - C D - E 3 4 A B - C D - E 4 5 A B - C D - E 5 6 A B - C D - E 6 7 A B - C D - E 7 8 A B - C D - E 8 If “OK” is pressed only for a short period of time, less then 3 I n s t a n t S t a t e s seconds, the menu will change the data sorting method. P a g e 1 The possible sorting methods are based on input number and S t a t e S o r t e d highest priority states. I n S t a t e 6 A l a r m 3 W a r n i n g 1 O k 2 O k 4 O k 5 O k 7 O k 8 O k Use the up/down key to display the next or previous menu. Megacon AB Ranhammarsvägen 20 S-168 67 Bromma Sweden Tel: 08-402 42 50 [email protected] www.megacon.se 4(18) Page 5 av 18 1.4 Alarm Memory Menu The Alarm Memory Menu is used to display if an alarm state has occurred earlier. This information is presented as a collection of 8 inputs based on different data sorting modes. Use the left/right key to display the next or previous 8 inputs. Note that the sorting method applies to all existing inputs and not only the displayed input range. The information presented within this menu contains: The page number. The sorting method. Input number. Alarm Memory State. You are also able to use the numeric keyboard to provide a fast search of any specific input. Enter the number of the input using the numeric keyboard followed by “OK”. The IsoBox 16 will then search for the page that contains that particular input and displays it. Example: To display the state of input 12, press “1” and “2” and then “Ok”. The newly entered input number will be displayed on the last row as “keyboard:” and the entered input number during the selection. To cancel the entered input number during selection press “C”. A l a r m M e m o r y P a g e I n p u t I n 1 2 3 4 5 6 7 8 S O O O A O A O O 1 S o r t e d t a t e k k k l a r m k l a r m k k A l a r m As an option you are able to press “OK” to change the arranged method or to display the input labels of the displayed inputs. Its function is as follows: If “OK” is pressed and held for 3 seconds the menu will change and display the labels corresponding to the presented inputs. When “OK” is released the menu will change back to present the default menu. If “OK” is pressed only for a short period of time, less then 3 seconds, the menu will change the data sorting method. The possible sorting methods are based on input number and highest priority alarm state memory. Use keys up/down for showing next or previous menu. M e m o r y M e m o r y M e m o r y P a g e I n p u t I n 1 2 3 4 5 6 7 8 L A A A A A A A A a B B B B B B B B 1 S o r t e d b - A l a r m e C C C C C C C C I n 4 6 1 2 3 5 7 8 S A A O O O O O O - E E E E E E E E 1 2 3 4 5 6 7 8 M e m o r y P a g e S t a t e l D D D D D D D D 1 S o r t e d t a t e l a r m l a r m k k k k k k M e m o r y M e m o r y Megacon AB Ranhammarsvägen 20 S-168 67 Bromma Sweden Tel: 08-402 42 50 [email protected] www.megacon.se 5(18) Page 6 av 18 1.5 Instant Values Menu The Instant Values Menu is used to display the active current values and their relation to each particular input alarm threshold setting. This information is presented as a collection of 8 inputs based on different data sorting modes. Use the left and right keyboard to display the next or previous 8 inputs. Note that the sorting method applies to all existing inputs and not only the displayed input range. I n s t a n t V a l u e s The information presented within this menu contains: P a g e 1 The page number. The sorting method. I n p u t S o r t e d Input number. I n V a l u e R e l . Current values. Filtered earth leakage current value is indicated by 1 2 0 m A 2 3 % 2 3 0 m A F 4 0 % “mAF“. 3 0 m A 0 % The relationship of the current active values to the alarm level 4 0 m A 0 % settings. 5 0 m A 0 % 6 0 m A 0 % 7 0 m A 0 % You are also able to use the numeric keyboard to provide a fast search of any F 8 1 0 0 m A 4 5 % specific input. Enter the number of the input using the numeric keyboard followed by “OK”. The IsoBox 16 will then search for the page that contains that particular input and displays it. Example: To display the instant values for input 12, press “1” and “2” and then “Ok”. The newly entered input number will be displayed on the last row as “keyboard:” and the entered input number during the selection. To cancel the entered input number during selection press “C”. As an option you are able to press “OK” to change the arranged method or to display the input labels of the presented inputs. Its function is as follows: I n s t a n t V a l u e s P a g e 1 If “OK” is pressed and held for 3 seconds the menu will change and I n p u t S o r t e d display the labels corresponding to the presented inputs. I n L a b e l 1 A B - C D - E 1 When “OK” is released the menu will change back to present the 2 A B - C D - E 2 3 A B - C D - E 3 default menu. 4 A B - C D - E 4 5 A B - C D - E 5 6 A B - C D - E 6 7 8 A B - C D - E 7 A B - C D - E 8 If “OK” is pressed only for a short period of time, less then 3 seconds, the menu will change the sort method. I n s t a n t P a g e The possible sorting methods are based on input number, value and the relationship to the alarm threshold. Use the up/down key to display the next or previous menu. V a l u e s V a l u e I n 8 2 1 3 4 5 6 7 V a l 1 0 0 3 0 2 0 0 0 0 0 0 1 S o r t e d u m m m m m m m m e A A A A A A A A F F R e 4 4 2 l 5 0 3 0 0 0 0 0 . % % % % % % % % Megacon AB Ranhammarsvägen 20 S-168 67 Bromma Sweden Tel: 08-402 42 50 [email protected] www.megacon.se 6(18) Page 7 av 18 1.6 Highest Values Menu The Highest Values Menu is used to display the absolute highest earth leakage current level (mA) that each input has reached and the relationship to that particular input alarm threshold setting. This information is presented as a collection of 8 inputs based on different data sorting modes. Use left/right key to display the next or previous 8 inputs. Note that the sorting method applies to all existing inputs and not only the displayed input range. H i g h e s t V a l u e s The information presented within this menu contains: P a g e 1 The page number. The sorting method. I n p u t S o r t e d Input number. I n V a l u e R e l . Current highest value (mA). A filtered earth leakage current value is 1 2 0 m A 2 3 % F indicated by “mA “. 2 3 0 m A 4 0 % 3 2 0 m A 0 % The relationship of the current active values to the settings. 4 5 0 0 m A 0 % 5 3 0 0 m A 0 % You are also able to use the numeric keyboard to provide a fast search of a 6 1 0 m A 0 % 7 3 m A 0 % specific input. Enter the number of the input using the numeric keyboard F 8 1 0 0 m A 4 5 % followed by “OK”. The IsoBox 16 will then search for the page that contains that particular input and displays it. Example: To display the highest values for input 12, press “1” and “2” and then “Ok”. The newly entered input number will be displayed on the last row as “keyboard:” and the entered input number during the selection. To cancel the entered input number during selection press the “C” key. As an option you are able to press “OK” to change the arranged method or to display the input labels of the presented inputs. Its function is as follows: H i g h e s t V a l u e s If “OK” is pressed and held for 3 seconds the menu will change and P a g e 1 display the labels corresponding to the presented inputs. I n p u t S o r t e d When “OK” is released the menu will change back to present the I n L a b e l 1 A B - C D - E 1 default menu. 2 A B - C D - E 2 3 A B - C D - E 3 4 A B - C D - E 4 5 A B - C D - E 5 6 A B - C D - E 6 7 A B - C D - E 7 8 A B - C D - E 8 If “OK” is pressed only for a short period of time, less then 3 H i g h e s t V a l u e s seconds, the menu will change the data sorting method. P a g e 1 V a l u e S o r t e d The possible sorting methods are based on input number, value and the relationship to the alarm threshold. I n V a l u e R e l . 8 1 0 0 m A F 4 5 % 2 3 0 m A 4 0 % 1 2 0 m A 2 3 % 3 0 m A 0 % 4 0 m A 0 % 5 0 m A 0 % 6 0 m A 0 % Press “C” to reset/restart the registration of highest values for all inputs and 7 0 m A 0 % up/down key to display the next or previous menu. Megacon AB Ranhammarsvägen 20 S-168 67 Bromma Sweden Tel: 08-402 42 50 [email protected] www.megacon.se 7(18) Page 8 av 18 1.7 Lowest Values Menu The Lowest Values Menu is used to display the absolute lowest current level (mA) that each input has reached and the relationship to that particular input alarm level threshold. This information is presented as a collection of 8 inputs based on different data sorting modes. Use the left/right key to display the next or previous 8 inputs. Note that the L o w e s t V a l u e s sorting method applies to all existing inputs and not only the displayed input range. P a g e 1 I n p u t S o r t e d The information presented within this menu contains: I n V a l u e R e l . The page number. 1 2 0 m A 2 3 % 2 3 0 m A 4 0 % The sorting method. 3 2 0 m A 0 % Input number. 4 5 0 0 m A 0 % 5 3 0 0 m A 0 % Current lowest value (mA). A filtered earth leakage current value is 6 1 0 m A 0 % indicated by “mAF“. 7 3 m A 0 % The relationship of the current active values to the settings. 8 1 0 0 m A F 4 5 % You are also able to use the numeric keyboard to provide a fast search of a specific input. Enter the number of the input using the numeric keyboard followed by “OK”. The IsoBox 16 will then search for the page that contains that particular input and displays it. Example: To display the lowest values for input 12, press “1” and “2” and then “Ok”. The newly entered input number will be displayed on the last row as “keyboard:” and the entered input number during the selection. To cancel the entered input number during selection press the “C” key. L o w e s t V a l u e s As an option you are able to press“OK” to change the arranged method or to display the input labels of the presented inputs. Its function is as follows: P a g e 1 I n p u t S o r t e d I n L a b e l If “OK” is pressed and held for 3 seconds the menu will change and 1 A B - C D - E 1 2 A B - C D - E 2 display the labels corresponding to the presented inputs. 3 A B - C D - E 3 4 A B - C D - E 4 When “OK” is released the menu will change back to present the 5 A B - C D - E 5 6 A B - C D - E 6 default menu. 7 A B - C D - E 7 8 A B - C D - E 8 L o w e s t V a l u e s If “OK” is pressed only for a short period of time, less then 3 seconds, the menu will change the sort method. P a g e 1 V a l u e S o r t e d The possible sorting methods are based on input number, value and the relationship to the alarm level. I n V a l u e R e l . 8 1 0 0 m A F 4 5 % 2 3 0 m A 4 0 % 1 2 0 m A 2 3 % 3 0 m A 0 % 4 0 m A 0 % 5 0 m A 0 % 6 0 m A 0 % Press “C” to reset/restart the registration of lowest values for all inputs and 7 0 m A 0 % up and down key to display the next or previous menu. Megacon AB Ranhammarsvägen 20 S-168 67 Bromma Sweden Tel: 08-402 42 50 [email protected] www.megacon.se 8(18) Page 9 av 18 1.8 True RMS Menu The TRMS/50Hz menu is used to display the active current TRMS values and the filtered TRMS value for the 50‐60Hz setting. This information is presented as a collection of 8 inputs based on different data sorting modes. Use the left /right key to display the next or previous 8 inputs. Note that the sorting method applies to all existing inputs and not only the displayed input range. T R M S / 5 0 H z V a l u e s The information presented within this menu contains: P a g e 1 The page number. I n p u t S o r t e d The sorting method. Input number. I n T R M S 5 0 H z 1 1 0 2 0 1 0 0 0 m A The TRMS value, if available on the connected IsoHub. 2 3 0 4 0 m A The TRMS value after passing a low‐pass filter (60‐50HZ). 3 0 0 m A 4 0 0 m A 5 0 0 m A You are also able to use the numeric keyboard to provide a fast search of 6 0 0 m A any specific input. Enter the number of the input using the numeric 7 0 0 m A 8 1 0 0 5 0 m A keyboard followed by “OK”. The IsoBox 16 will then search for the page that contains that particular input and displays it. Example: To display the instant values for input 12, press “1”and “2” and then “Ok”. The newly entered input number will be displayed on the last row as “keyboard:”and the entered input number during the selection. To cancel the entered input number during selection press “C”. As an option you are able to press “OK” to change the arranged method or to display the input labels of the presented inputs. Its function is as follows: T R M S / 5 0 H z V a l u e s If “OK” is pressed and held for 3 seconds the menu will change and display the labels corresponding to the presented inputs. P a g e 1 I n p u t S o r t e d When “OK” is released the menu will change back to present the default menu. I n L a b e l 1 A B - C D - E 1 2 A B - C D - E 2 3 A B - C D - E 3 4 A B - C D - E 4 5 A B - C D - E 5 6 A B - C D - E 6 7 A B - C D - E 7 8 A B - C D - E 8 If “OK” is pressed only for a short period of time, less then 3 seconds, the menu will change the sort method. T R M S / 5 0 H z V a l u e s The possible sorting methods are based on input number, the P a g e 1 TRMS value and the TRMS value passing a low‐pass filter (60‐ T R M S S o r t e d 50HZ). I n T R M S 5 0 H z 1 1 0 2 0 1 0 0 0 m A 8 1 0 0 5 0 m A 2 3 0 4 0 m A 3 0 0 m A 4 0 0 m A Use “C” to reset/restart the registration of lowest values for all inputs and 5 0 0 m A up/down key to display the next or previous menu. 6 0 0 m A 7 0 0 m A Megacon AB Ranhammarsvägen 20 S-168 67 Bromma Sweden Tel: 08-402 42 50 [email protected] www.megacon.se 9(18) Page 10 av 18 1.9 THD/TRMS Values Menu The THD/TRMS Menu is used to display the calculated total harmonic distortion and the TRMS value that the THD calculation is based on. This information is presented as a collection of 8 inputs based on different data sorting modes. Use the left/right key to display the next or previous 8 inputs. Note that the sorting method applies to all existing inputs and not only the displayed input range. T H D / T R M S V a l u e s The information presented within this menu contains: P a g e 1 I n p u t S o r t e d The page number. The sorting method. I n T H D T R M S 1 2 0 % 1 0 0 m A Input number. 2 3 0 % 3 0 0 m A The THD value. 3 2 0 % 1 2 5 m A The TRMS value. 4 7 0 % 7 5 m A 5 6 5 % 2 3 m A 6 3 3 % 9 9 m A You are also able to use the numeric keyboard to provide a fast search of 7 4 5 % 1 0 5 m A 8 6 7 % 7 8 m A any specific input. Enter the number of the input using the numeric keyboard followed by “OK”. The IsoBox 16 will then search for the page that contains that particular input and displays it. Example: To display the instant values for input 12, press “1” and “2” and then “Ok”. The newly entered input number will be displayed on the last row as “keyboard:” and the entered input number during the selection. To cancel the entered input number during selection press “C”. As an option you are able to press “OK” to change the arranged method or to display the input labels of the presented inputs. Its function is as follows: T H D / T R M S V a l u e s If “OK” is pressed and held for 3 seconds the menu will change and P a g e 1 display the labels corresponding to the presented inputs. I n p u t S o r t e d When “OK” is released the menu will change back to present the I n L a b e l 1 A B - C D - E 1 default menu. 2 A B - C D - E 2 3 A B - C D - E 3 4 A B - C D - E 4 5 A B - C D - E 5 6 A B - C D - E 6 7 A B - C D - E 7 8 A B - C D - E 8 If “OK” is pressed only for a short period of time, less then 3 seconds, the menu will change the sort method. The possible sorting methods are based on input number, the THD T H D / T R M S V a l u e s value and the TRMS value. P a g e 1 I n p u t S o r t e d I n T H D T R M S 4 7 0 % 7 5 m A 8 6 7 % 7 8 m A Press “C” to reset/restart the registration of lowest values for all inputs and 5 6 5 % 2 3 m A 7 4 5 % 1 0 5 m A up/down key to display the next or previous menu. 6 3 3 % 9 9 m A 2 3 0 % 3 0 0 m A 1 2 0 % 1 0 0 m A 3 2 0 % 1 2 5 m A Megacon AB Ranhammarsvägen 20 S-168 67 Bromma Sweden Tel: 08-402 42 50 [email protected] www.megacon.se 10(18) Page 11 av 18 1.10 Event Memory ‐ Main Menu The Event Memory ‐ Main Menu is used to display the number of stored events within the IsoBox 16 unit for each existing input. This information is E v e n t M e m o r y presented as a collection of 8 inputs based on different data sorting modes. P a g e 1 The maximum number of stored events for each input is limited to 63 events. I n p u t S o r t e d I n T o t a l N e w Use the left and right keyboard to display the next or previous 8 inputs. 1 9 2 Note that the data sorting method applies to all existing inputs and not only 2 0 0 3 2 0 0 the displayed input range. 4 0 0 5 0 0 The information presented within this menu contains: 6 1 0 0 7 3 0 8 0 5 The page number The sorting method. Input number. Total number of existing events. The number of new events. The numeric keyboard is used to provide a fast search of a specific input and display of the event memory contents for a particular input. Enter the number of the the input using the numeric keyboard followed by “OK”. The IsoBox 16 will then search for the page that contains that particular input and display it. If the current & active page contains that particular input the IsoBox 16 will then display the contents of event memory for that particular input, refer to next section 1.10.1 Event Memory ‐ Sub Menu. Example: To display the event information for input 12, press “1” and “2” and then “Ok”. The newly entered input number will be displayed on the last row as “keyboard:”and the entered input number during the selection. To cancel the entered input number during selection press the “C” key. E v e n t M e m o r y As an option you are able to press “OK” to change the arranged method or P a g e 1 to display the input labels of the presented inputs. Its function is as follows: I n p u t S o r t e d If “OK” is pressed and held for 3 seconds the menu will change I n L a b e l and display the labels corresponding to the presented inputs. 1 A B - C D - E 1 2 A B - C D - E 2 3 A B - C D - E 3 When “OK” is released the menu will change back to present the 4 A B - C D - E 4 default menu. 5 A B - C D - E 5 6 A B - C D - E 6 7 A B - C D - E 7 8 A B - C D - E 8 E v e n t M e m o r y P a g e 1 If “OK” is pressed only for a short period of time, less then 3 seconds, the menu will change the sort method. T o t a l S o r t e d I n T o t a l N e w The possible sorting methods are based on input number, total 3 2 0 0 number of events and the number of new events. 6 1 0 0 1 9 2 7 3 0 2 0 0 4 0 0 Press up/down key to display the next or previous menu. 5 0 0 8 0 5 Megacon AB Ranhammarsvägen 20 S-168 67 Bromma Sweden Tel: 08-402 42 50 [email protected] www.megacon.se 11(18) Page 12 av 18 1.10.1 Event Memory ‐ Sub Menu The Event Memory – Sub Menu is used to display the stored events within the IsoBox 16 unit for particular selected inputs. The maximum number of stored events for each input is limited to 63 events. Press left/right key to display the event memory sub menu for the next or previous input. The information presented within this menu contains: E v e n t M e m o r y Input number Input label. I n : 3 A B - C D - E 3 The occurred state. O k The start date and time for that state. 2 7 . 0 8 . 2 0 1 3 4 : 1 5 The maximum current value (mA) during the alarm state. A l a r m 7 2 8 m A 2 7 . 0 8 . 2 0 1 3 4 : 1 0 W a r n i n g 2 7 . 0 8 . 2 0 1 3 4 : 0 5 O k 2 7 . 0 8 . 2 0 1 3 4 : 0 0 Example: The displayed sample to the right should be interpreted as: The input state from 27.08.2013 at 04:15 until now was/is “OK”. The input state from 27.08.2013 at 04:10 until 27.08.2013 at 04:15 was “Alarm”, and the maximum value that input current reached during this period was 728mA. The input state from 27.08.2013 at 04:05 until 27.08.2013 at 04:10 was “Warning”. The input state from 27.08.2013 at 04:00 until 27.08.2013 at 04:05 was “Ok”. And so on…. If there is an arrow shown on the display, use the up/down key to display the next or previous event. The numeric keyboard can be used to provide a fast display of event memory for another input. Enter the number of the required input using the numeric keyboard followed by “OK”. The IsoBox 16 will then display the event memory for the selected input. Example: To display the event information for input 12, press “1”and “2” and then “OK”. The newly entered input number will be displayed instead of the active displayed input number during the selection. To cancel the entered input number during selection press “C”. Each time an Event Memory ‐ Sub Menu for a particular input is displayed, the number of new events for that particular input within the main menu will be set to zero. To clear the entire event memory for the displayed input press and hold “C” for 3 seconds. Press “OK” to leave the event memory sub menu. Megacon AB Ranhammarsvägen 20 S-168 67 Bromma Sweden Tel: 08-402 42 50 [email protected] www.megacon.se 12(18) Page 13 av 18 1.11 Power‐up Memory ‐ Main Menu The power failure memory menu is used to display the last 63 power‐up and power‐off cycles of the system. The information presented within this menu contains: Total number of power failures. To display the stored memory for power failure press “OK” to enter the Power‐up Memory ‐ Sub Menu. 1.11.1 Power‐up Memory ‐ Sub Menu The information presented within this sub menu is: The power state. The date and time for occurred state. If there is an arrow shown on the display, use the up/down key to display the next or previous event. To clear the entire power‐up memory, press and hold “C” for 3 seconds. Press “OK” to leave the Power‐up Memory ‐ Sub Menu. P o w e r - u p E v e n t M e m o r y C o u n t : 8 P r e s s O K t o e n t e r P o w e r - u p M e m o r y P o w e r O n 2 7 . 0 8 . 2 0 1 3 2 3 : 2 2 P o w e r O f f 2 7 . 0 8 . 2 0 1 3 2 3 : 1 0 P o w e r O n 2 7 . 0 8 . 2 0 1 3 2 3 : 0 9 P o w e r O f f 2 7 . 0 8 . 2 0 1 3 2 3 : 2 2 Megacon AB Ranhammarsvägen 20 S-168 67 Bromma Sweden Tel: 08-402 42 50 [email protected] www.megacon.se 13(18) Page 14 av 18 1.12 Info Menu The Info Menu is used to display the corresponding information regarding the unit model, type, version and the internal real time clock. I n f o M e n u The information presented within this menu contains: D a t e & T i m e Time. Format: “hh:mm:ss”. 0 : 1 4 : 5 4 Date. Format: “DD.MM.YYYY”. 2 7 . 0 8 . 2 0 1 3 If the auto daylight savings time adjustment is activated. Communication protocol. D a y l i g h t : A u t o Model. P r o t o c o l : B i n a r y Type. M o d e l : I s o B o x 1 6 Firmware version. T y p e : 2 0 1 1 V e r s i o n : 1 . 1 Serial number S N : 5 1 5 0 0 0 0 0 0 0 Use the up/down key to display the next or previous menu. I s o I n / I s o O u t C o m m u n i c a t i o n 1.13 IsoIn/IsoOut Communikation Menu I s o I n O K This meny presents communication status between IsoBox 16 and the installed IsoIn unit. If an IsoOut is installed it will show here. I s o O u t Use the up/down key to display the next or previous menu. N o t i n s t a l l e d Megacon AB Ranhammarsvägen 20 S-168 67 Bromma Sweden Tel: 08-402 42 50 [email protected] www.megacon.se 14(18) Page 15 av 18 2 Basic Settings Menu To display the Basic Settings Menu press and hold the left, right and the OK key at the same time for 3 seconds. . 2.1 Set‐up Menu Use this menu to set some of the basic properties of the system. Use the keypad to select the following sub‐menus. The presented information within this menu is: Settings, used to change the active input settings such as: S e t - u p m e n u Input label. Delay time. Alarm level. > S e t t i n g s L a n g u a g e Warning level. D a t e & T i m e Languages, used to change the active used languages such as: R S 4 8 5 - P C - C o m English. O p t i o n s Swedish. R e t u r n Norwegian. German Configuration of connected IsoIn units. Configuration of connected IsoOut units. Adjust the active date and time of the internal real time clock. Configuration of RS485‐communikation to PC. Options, to configure backlight and start‐menu. Leave the set‐up menu. Use key up/down and ”OK” to choose sub‐menu. 2.2 Settings Menu S e t t i n g s M e n u Use this menu to customise some of the input properties. The editable > I n p u t 1 properties are: L a b e l A B - C D - E 1 Input number and label. D e l a y 0 s Delay time. A l a r m 3 0 0 m A Alarm level. W a r n i n g 1 5 0 m A F i l t e r O F F Warning Level. Active low pass filter, ON or OFF R e l a y C o n t o l Relay S a v e 1 S a v e A l l I n p u t s Selection of properties is carried out by using the up and down keys and R e t u r n press “OK” to change/adjust. Use the numerical keypad to enter the new value and to finish press “OK”. Use up/down key to change sign and left/right to move sideways. Note that after each input you must save values individually, do not use “Save all inputs”. Filter is activated and de‐activated by pressing “OK” when Filter is marked. Relay output only applicable when IsoOut is installed. On delivery IsoBox 16 is programmed so alarm on input 1 will activate relay output 1. Megacon AB Ranhammarsvägen 20 S-168 67 Bromma Sweden Tel: 08-402 42 50 [email protected] www.megacon.se 15(18) Page 16 av 18 Language Menu 2.3 Use this menu to change language on all manues. Use the up and down key to select the desired language, and press “OK” to confirm your selection. 2.4 Date & Time Menu Use this menu to adjust the date and time of the internal Real Time Clock. You are also able to define the required daylight savings time function. Use the up/down key to select an option, and press ”OK” to select the edit mode. An arrow to the right hand side of the display indicates this. Use the numerical keypad to enter the new value for the selected option, and confirm it by pressing the “OK” key. To change the daylight savings time function, select this option and press “OK” to activate or deactivate. L a n g u a g e s > E n g l i s h S w e d i s h N o r w e g i a n G e r m a n R e t u r n D a t e & > H o u r M i n u t e S e c o n d Y e a r M o n t h D a y D a y l i g h t T i m e 0 4 2 4 1 6 2 0 1 3 0 8 2 7 A u t o R e t u r n Megacon AB Ranhammarsvägen 20 S-168 67 Bromma Sweden Tel: 08-402 42 50 [email protected] www.megacon.se 16(18) Page 17 av 18 2.5 RS485‐PC‐Communikation Menu Use this menu to adjust neccessary communication parameters and protocol between IsoBox 16 and a PC. Selectable options within this menu are: R S 4 8 5 - P C - C o m Protocol: Binary, ModBus. > P r o t o c o l B i n a Baud rate: 9600, 19200. Address: 1‐255. B a u d r a t e 1 9 2 Parity and format: A d d r e s s Binary: None 8, N, 1 P a r i t y n o ModBus: Even 8, E, 1 F o r m a t 8 , N Odd 8, O, 1 None 8, N, 2 R e t u r n Choose option with up/down key and press ”OK” to verify. Use numeric keypad to enter new logical numbers and save by pressing “OK”. Separate manuals for Modbus‐ och Binary‐communikation are available. 2.6 Option Menu This menu is used to define the backlight function and the start page for the IIsoBox 16 unit. The selectable options within this menu are: O p t i o n M e n u Backlight, used to specify the backlight function, selectable options are: Automatically: The instrument will light up the LCD as soon as > B a c k l i g h t : A u t o m a t i c a l l any key is pressed. Manually: The instrument will light up the LCD only when the D e f a u l t P a g e : key backlight is pressed. A n a l o g P a g e Default Page, used to define the start page for the instrument, I s o O u t R e l a y : N o I s o O u t selectable options are: Analog Page. R e t u r n Input Details. Instant States. Alarm Memory. Instant Values. Highest Values. Lowest Values. Event Memory. Power Memory. IsoOut relay, defines the method used for activation of the relay outputs state, selectable options are: Alarm, the relay output follows the current state of the assigned input. Alarm memory, the relay output follows the alarm memory state of the assigned input. Use the up/down key to select an option. Press “Ok” to change the alternative for the selected option. r y 0 0 1 n e , 1 y Megacon AB Ranhammarsvägen 20 S-168 67 Bromma Sweden Tel: 08-402 42 50 [email protected] www.megacon.se 17(18) Page 18 av 18 3 Technical data Language: Supply voltage: IsoBox 16: IsoIn: IsoOut: Accuracy : English/Swedish/Norwegian/German Max. input current 50‐60Hz: Active low pass filter: Communication protokoll: Update interval: Storage kapacity: Event memory: Power down memory: Relay output (IsoBox och IsoOut): Fuse data: 110‐250 VAC/DC, 50‐60Hz, 1,8W (150mA) 12 VDC, 1,56W (130mA) 12 VDC, 2,64W (220mA) With ct G45 Range 0‐100mA Trms ± 5% Range 0,1‐1A Trms ± 2% Range 1‐10A Trms ± 2% <200A Unlimited 200‐500A 40 seconds 500‐1000A 5 seconds 60Hz, individual filter option/input RS485‐network (Binary och ModBus protocol) 2,5 seconds to update all 16 inputs Dimensions: IsoIn, IsoOut: 63 events/input 63 events Max 1A, 230VAC/DC Max 10A, automatic fuse 4A slow 250V is recommended. Fuse must be close to the unit and clearly marked for the IsoBox‐ system. Main/network switch must be marked ON/OFF W x H x D: 144 x 144 x 110 mm Weight: 750 g For panel mounting. Fixing screws are included W x H x D: 135 x 90 x 60 mm (inclusive rail) Weight: 250 gr. For rail mounting. 0‐70 C Air must be able to circulate around the instrument IP 30 Max. 2000m 80% for temperaturs up to 30° C, linear drop to 50% at 40° C. Pollution degree 2 in accordance with IEC 664. Earth Leakage Monitoring System IsoBox 16 is suitable for installation in electrical swithboards. Indoors FKAR‐PG 2 0,5 mm2 FKAR‐PG 2 x 2 0,5 mm2 FKAR‐PG 2 0,5 mm2 IsoBox: Ambient temperatur range: Ventilation requirements: Terminal protection: Max altitud: Relative humidity: Air pollution: Installation environment: Working environment: Rekommended cable types: IsoBox PC RS485: IsoIn / IsoOut RS485 12VDC: IsoIn current transformer: Installation guide: separate sheet Megacon AB Ranhammarsvägen 20 S-168 67 Bromma Sweden Tel: 08-402 42 50 [email protected] www.megacon.se 18(18)