1
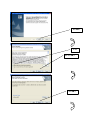
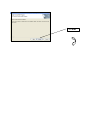
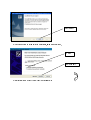
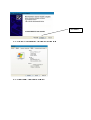
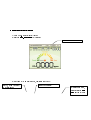
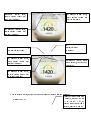
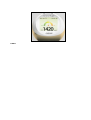
SenseLife Cam
Indoor Airquality Monitor
User manual
1. USB driver installation
2. Monitoring program installation
3. Time setting
Black
White
*Above image could be slightly different from actual product
*The user manual is subject to change without prior notice to increase user’s convenience or
add advanced functions
1.USB driver installation
1)
Click
“program
download
(Data
logging)”
on
our
website
&
save
the
program
at
an
appropriate folder on your desktop.
2) After opening the folder, execute the file,
CP210x_VCP_Win2K_XP_S2K3.exe
CP210x_VCP_Win2K_XP_S2K3.exe, then you can
find the following pop-up.
Click “Next”
Click “Next”
1. Click
2. Click “Next”
Click “Next”
Click “Install”
Click “Finish”
3) Connecting Cam to a computer by USB cable, below pop-up follows,
1. Click
2.Click ”Next”
It may take a few minutes till the wizard finishes searching.
Click “Finish”
4) Click “Start”
“Control panel” “System” on your computer
5) Click “Hardware”
“Device administration”
6) Click port (COM & LPT)
7) You can see USB Serial Port at 6), once the driver is successfully installed
If you fail to see USB Serial port at 6), you are asked to go to “Control panel” again and
execute “Add new hardware” function.
8) COM port may vary according to each PC’s USB Port,
You will be required to select the Port number,
when you install “Monitoring Program” at 3)Setting-[1]
2.Monitoring program installation
1) Copy CO2_Monitor folder at your PC
2) Execute “
CO2_Monitor.exe” in the folder
[1]Click SETTING
3) SETTING (At “Comport Setting”, designate “Port” only)
[2]Click,
when
you
CO2 data logging
want
[3]Logging Interval
[1]Select USB Port,
Please refer to
LPT
COM
section at USB
Driver Installation 6)
[4]Terms for data
logging(start)
[7]Click OK
[5]Terms for data
logging(finish)
[6]Select the folder that you want to save the
logging data
The data logging will be made at the selected folder in excel format.
4) Click “CONNECT”
[1]Click
”CONNET”
5) CO2 concentration being displayed on CAM can be monitored
6) Click “Exit”, when you want to finish the program
Click “EXIT”
3.Time
3.Time Setting
1)Time setting
[1]Pressing “Mode” at least 2
seconds,
“Year”
section
[2]Set “Year” by “Up/Down”
[3]Pressing
“Month”
“Mode”
section
once,
flickers.
[5]
Set
“Day”
“Month” by “UP/Down”
[4]
Pressing
“Date”
“Mode”
section
Pressing
“Mode”
section
once,
flickers.
Set
“Day” by “UP/Down”
once,
flickers.
Set
“Date” by “UP/Down”
[7]
[6]
Pressing
“Mode”
Secect AM/PM by
once,
“Up/Down”
“AM/PM” section flickers.
[8]
Pressing
“Mode”
once,
[10]Pressing
“Hour”
section
flickers.
“Mode”
more
Set
than 2 seconds, you can finish
“Hour” by “UP/Down”
time setting
[9]
Pressing
“Minute”
“Mode”
section
once,
flickers.
Set
“Minute” by “UP/Down”
While time setting mode, you can finish setting by pressing “Mode” more than 2 seconds
[1]Pressing “Down” more than
2)Backlight On/Off
2
seconds,
Off.
In
the
backlight
light
if
will
be
Off,
by
pressing “Down” more than 2
seconds, backlight will be on
The end.