1
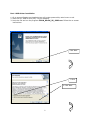
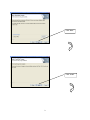
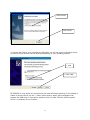
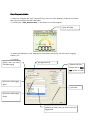
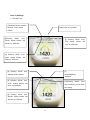
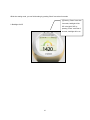
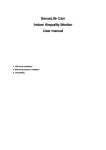
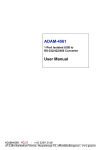
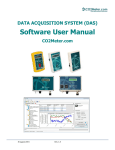
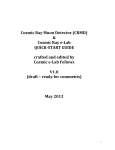
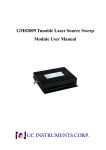
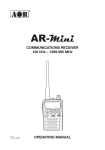
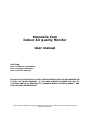
SenseLife Cam
Indoor Air quality Monitor
User manual
SECTIONS:
Part 1. USB driver installation
Part 2. Program installation
Part 3. Set time and date
DO NOT PLUG THE CAM INTO YOUR PC BEFORE INSTALLING THE USB DRIVERS OR
IT WILL NOT WORK PROPERLY. IF YOU HAVE ALREADY PLUGGED THE CAM IN,
YOU MUST UNPLUG IT, REMOVE ANY ”UNKNOWN DEVICE” DRIVERS, REBOOT, AND
FOLLOW THESE INSTRUCTIONS.
[This manual is subject to change without prior notice to increase user’s convenience or to add
advanced functions]
Part 1.USB driver installation
1. Go to www.co2meter.com/products/cam-co2-meter-powered-by-auto-home-or-usb
2. Save the file “USB Drivers (ZIP)” to your desktop.
3. Unzip the file and run the program CP210_Win2K_XP_S2K3.exe. Follow the on-screen
instructions:
Click “Next”
1. Click
2. Click “Next”
2
Click “Next”
Click “Install”
3
Click “Launch”
Click “Finish”
4. Connect the CAM to your computer by USB cable. You will see a pop-up Window similar
to the one below (window can be different depending on your operating system).
1. Click
2. Click ”Next”
BE PATIENT! It may take a few minutes until the wizard finishes searching. If the Wizard is
unable to find the driver, hit the “<-back” button and try again. Most installations fail
because the USB driver is improperly installed. Until you read “CO210x USB Composite
Device” is installed, do not continue.
4
Click “Finish”
5. To test for proper installation, Click “Start” Æ “Control panel” Æ “System” on your computer
5
6. Click “Hardware” Æ “Device Manager”
7. Click port (COM & LPT)
8. If you can see USB to UART COMXX the driver is successfully installed. If you cannot see
it, go to the “Control panel” again and execute “Add new hardware” function.
9. The COMXX port will vary according to each PC’s USB Port. Write down this number, as
you will need it when you install the CO2_monitor.exe program.
6
Part 2. Program installation
1. Save the “Program file (zip)” named CP210_run.zip to your desktop. Create a new folder,
and unzip all the files into the new folder.
2. Double-click “CO2_Monitor.exe” in the folder to run the program.
[1]Click SETTING
3. Select the COM port to the setting you wrote down previously. Do not check “Logging
Enable” yet.
4. Click OK
[2]Click, when you want
[3]Logging Interval
CO2 data logging
[1]Select USB Port,
Please refer to COM
LPT section at USB
[4]Terms for data logging
(start)
[7]Click OK
[5]Terms for data logging
(finish)
[6]Select the folder that you want to save the
logging data
7
5. Click CONNECT button
[1]Click
”CONNECT”
6. CO2 concentration being displayed on CAM can be monitored. If the CO2 level in ppm
does not respond, it is either because the wrong COM port number was selected in
“Settings” or the USB driver was not properly installed. Try selecting each of the different
COM ports under settings. If none of them work, you should unplug the CAM, uninstall the
USB drivers, and repeat Part 1 again.
7. To enable data logging, click “Setting”, then check “Enable data logging” and select a path
to save the log file. It will be in an ASCII text format LOG***.CSV suitable for easily
importing into a database or spreadsheet.
NOTE: The LOG file will not be created until you set the Year/Month/Date on the
CAM and give a valid date range under “terms” under Settings.
8. Click “Exit”, when you want to finish the program
Click “EXIT”
8
Part 3. Settings
1. Set the Time
[1]Pressing “Mode” at least 2
[2]Set “Year” by “Up/Down”
seconds, “Year” section
flickers
[3]Pressing
“Mode”
once,
[5] Pressing “Mode” once,
“Month” section flickers. Set
“Day”
“Month” by “UP/Down”
section
flickers.
Set
“Day” by “UP/Down”
[4] Pressing “Mode” once,
“Date” section flickers. Set
“Date” by “UP/Down”
[6] Pressing “Mode” once,
[7]
“AM/PM” section flickers.
Select AM/PM by
“Up/Down”
[8] Pressing “Mode” once,
[10]Pressing
“Hour” section flickers. Set
“Mode”
more
than 2 seconds, you can finish
“Hour” by “UP/Down”
time setting
[9] Pressing “Mode” once,
“Minute” section flickers. Set
“Minute” by “UP/Down”
9
While time setting mode, you can finish setting by pressing “Mode” more than 2 seconds
[1]Pressing “Down” more than
2 seconds, backlight will be
2. Backlight On/Off
Off. In the light if Off, by
pressing “Down” more than 2
seconds, backlight will be on
10