1
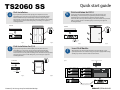
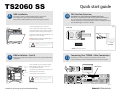
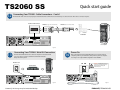
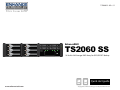
TS2060 SS -UG v.1.1
OPEN
OPEN
OPEN
HDD1
I S 210
ENHANCE
HDD2
OPEN
HDD3
HDD4
POWER
TS2060 SS
EnhanceRAID
2U 6-disk SAS Storage RAID Array for D2D/D2D2T Backup
Quick start guide
www.enhance-tech.com
© Copyright 2009. Enhance Technology, Inc. Proudly Assembled in the U.S.A.
TS2060 SS
1
Quick start guide
Understanding your TS2060
4
Welcome
Thank you for choosing Enhance Technology
Thank you for buying Enhance Technology TS2060 Series, the ultimate
D2D/D2D2T All-in-One backup storage solution designed for high-impact and
high-volume real-time data backup and offline archive storage needs.
1
Learn and identify each component of TS2060
3
2
5
OPEN
OPEN
OPEN
HDD1
2
6
OPEN
HDD2
HDD3
HDD4
POWER
I S 210
What is in the box?
ENHANCE
Carefully unpack your TS2060 storage system, and inventory the
accessories according to your model type.
10 11
8
4
12
13
+
+
OPEN
+
+
+
+
OPEN
+
+
OPEN
+
OPEN
+
HDD1
HDD2
HDD3
HDD4
POWER
+
IS 210
ENHANCE
7
9
15
14
Qty 1 - TS2060 Array with IS210 5.2” HDD Enclosure (optional) & Q14 4x2.5” HDD Enclosure (optional) Installed
Hot-swap Disk Trays - Qty 6
Rack-ear Mounting Kit - Qty 2
ioStor
Slide Rail Set - Qty 2
Front:
1. Security Key Lock
2. Hot-swap HDDs Tray
3. Q14 4x2.5” Removable HDDs Enclosure (optional)
4. IS210 5.2” Removable HDDs Enclosure (optional)
5. Power LED
6. Alarm Mute Button
TM
TS2060 IP -UG v.1.2
Store Simple & Secure
OPEN
OPEN
OPEN
HDD1
IS210
ENHANCE
HDD2
OPEN
HDD3
HDD4
POWER
TS2060 IP
GbE iSCSI Storage RAID Array for D2D/D2D2T Backup
ioStor
TM
User Guide
www.iostor.com
HDD Mounting Hardware - Qty 16
3
© Copyright 2009. ioStor, Inc. Proudly Assembled in the U.S.A.
User Guide and CD- Qty 1
Standard IEC Power Cable - Qty 2
Unpack your TS2060
Unpack all components including the HDD mounting screws, key sets and
cables. If you are missing any of the items mentioned above, please contact
your dealer or contact Enhance Technology at www.enhance-tech.com.
TS2060 SS | SAS Storage Array for D2D/D2D2T Backup
Rear:
7. ATX PS2 Power Supply
8. Auto Power Switch
9. RS232 VT100 ANSI Terminal Emulation
10. Web GUI Management Console
11. Power Switch
12. SFF8470 SAS Port
13. eSATA Ports for IS210 and Q14
14. RAID Controller
15. RAID Controller LED
ENHANCE|TECHNOLOGY
TS2060 SS
Quick start guide
Disk Installation
4
6
If your system was purchased with capacity, please skip this section and
immediately go to next section. If your system was purchased without disks,
install each disk into the provided disk trays and fasten using the supplied
hdd screws. Do not use any other mounting screws other than the ones provided
with your system. System or disk damage may occur if using non-approved
mounting hardware.
Hard Disk
Disk Installation for IS210
If your system was purchased without IS210, please skip this section and
immediately go to next section. If your system was purchased with IS210,
install disk into the provided disk trays and fasten using the supplied
hdd screws. Do not use any other mounting screws other than the ones provided
with your system. System or disk damage may occur if using non-approved
mounting hardware.
Hard Disk
Disk Tray
+
+
+
+
+
+
IS210
ENHANCE
+
+
NOTE:
Unlock the tray
and pull the handle.
Figure 1.
Figure 2.
Figure 5.
Disk tray - Bottom view
5
Disk Installation for Q14
If your system was purchased without Q14, please skip this section and
immediately go to next section. If your system was purchased with Q14,
install each disk into the provided disk trays and fasten using the supplied
hdd screws. Do not use any other mounting screws other than the ones provided
with your system. System or disk damage may occur if using non-approved
mounting hardware.
2.5” Hard Disk
7
+
+
+
+
+
+
Figure 6.
Insert Disk Module
After fastening each disk, insert the disk trays in the open disk bay on your
system, Q14 and IS210. For added security, your system is equipped with locking
disk bays to prevent accidental or malicious disk removal.
Gently “press” tray handle to insert HDD
Figure 7.
+
+
Disk tray - Bottom view
OPEN
Q14 Disk Tray
OPEN
OPEN
NOTE: Push
OPEN
OPEN
HDD1
down to unlock
HDD2
OPEN
HDD3
HDD4
POWER
Q14 Disk tray - Bottom view
Figure 3.
Figure 4.
IS210
ENHANCE
Gently “press” tray handle to insert HDD
Lock the tray by turning the key lock
TS2060 SS | SAS Storage Array for D2D/D2D2T Backup
ENHANCE|TECHNOLOGY
TS2060 SS
84
Disk Installation
If your system
was purchased with capacity, please skip this section and
HBA
Installation
immediately
gofeatures
to next section.
If your
system
was purchased
without disks,
Your
TS2060 SS
a Hardware
RAID
architecture.
This provides
install
each
disk into
provided
disk
trays
fasten(HBAs).
using the supplied
the
best
support
for athe
wide
range of
host
busand
adapters
hdd screws.
Doyour
notHBA
use any
other mounting
screws
otherproper
than the
ones provided
Always
follow
installation
procedure
to ensure
operation.
with your system. System or disk damage may occur if using non-approved
mounting hardware.
Quick start guide
10
SAS Interface Overview
Introduction to SAS SFF8470 to SFF8088 Cable Types
Your TS2060 SS is equipped with industry standard SFF8470 SAS interface port.
The correct cable type is detirmined by the HBA or RAID controller you have
seleceted. Usually, on the storage-end the type of connector is SFF8470 and on the
host-end HBA, the type of connector is SFF8088.
Figure 8.
1. Touch the metal PCI slot covers on the back
of your computer to discharge any static electricity.
SFF8470 [SAS]
2. Unplug ALL cables from your computer, and remove
the side access panel according to your system type.
+
3. Apple G5 users must first remove the deflector cover
and place it on a clean, safe surface.
SFF8088 [Host-end Connector View]
+
+
+
NOTE: Remember to replace the air deflector after you
have finished installing your HBA.
WARNING: Allow a few minutes for the internal
computer compenents to cool down before
opening your computer system.
PCI SAS HBA
SFF8470 [Recieving Connector View]
9
HBA Installation - Cont’d
Please follow your HBA driver installation notes to ensure operation & hassle free
configuration.
Reinstall the screw
to secure the card
in place.
11
1. Remove the PCI slot cover plate from an available
PCI slot. Consult your HBA or video capture card
for recommended slot postions.
Ensure that the connector is properly secured & fastned. Most commom
issues are related to poor cable connection. Do not force connector into place.
SFF8470 SAS Port
+
+
2. Install & secure your PCI controller card into the slot
and firmly press the card into place.
Port access opening
Connecting Your TS2060 - Cable Connections
3. Close and replace the system panel.
+
PCI slot
+
+
+
WARNING: To minimize the chance of electrical
shock, always follow proper saftey rules when
working with electrical components.
+
+
+
+
+
+
+
Figure 9.
TS2060 SS | SAS Storage Array for D2D/D2D2T Backup
ENHANCE|TECHNOLOGY
TS2060 SS
12
Quick start guide
Connecting Your TS2060 - Cable Connections - Cont’d
Ensure that all of the connectors are properly secured & fastned. Most commom issues are related to poor cable connection. Do not force connector into place.
Thumb Screw SAS Connector
SFF8470 [Storage-end Connector View]
SFF8088 [Host-end Connector View]
+
+
+
+
PCI SAS HBA
+
+
+
+
+
+
+
+
+
+
+
Host Computer
Figure 10.
13
Connecting Your TS2060 - Web GUI Connection
Connect TS2060 Web GUI console to the host computer on the network with
cross over cable or connect to the Ethernet switch with LAN cable
then power on the system.
14
Power On
After connecting both data and Web GUI cables to your system and host
computer, power-on your TS2060 first, then power-on your host computer.
Your array is now ready for RAID configuration in the Web GUI.
Web GUI Console
On Off
Ethernet Switch
WARNING: To minimize the chance of
electrical shock, always follow proper
safety rules when working with
electrical materials.
Host Computer
+
+
+
+
+
+
+
+
+
+
+
+
+
+
+
+
+
+
+
+
+
+
TS2060 SS | SAS Storage Array for D2D/D2D2T Backup
Figure 11.
Figure 12.
ENHANCE|TECHNOLOGY
TS2060 SS
15
Preparing TS2060 for Configuration
After power-on, the power LED and hard disks LEDs will light up and your TS2060
will display a message showing the system is booting then change to Initializing
mode for few seconds to check the system.
1. System is booting up when turn on the power.
System Booting
Initializing
................................
192.168.0.200
Enhance Technology
Quick start guide
17
Create a RAID Array
You will be using the Quick Install function in the Web GUI to create a RAID and
User Data Volume for your TS2060.
NOTE: The Quick Install function is designed for set up a single RAID level with a single User Data Volume. If you
want to configurate your system with multiple RAID levels with multiple User Data Volumes please learn from
system User Manual CD for complete instructions.
Step 1: Select Quick Install then choose the RAID Level desired. After
choosing the RAID level, click NEXT.
2. RAID controller is initializing the system to check
the hardware connection and memory. This is NOT
initializing for the hard disks.
Step 2: In this step, the volume can be customized as needed. Volume
size, Bus ID, SCSI ID, and LUN can be assigned specified numbers to be
attributed to the volume. The maximum volume size is shown as default.
The volume can only be less or equal to the number shown. By default,
the Bus ID, SCSI ID, and LUN are set at 0. Click NEXT after desired volume
size and IDs are set.
3. The system has booted up successfully and showing
the system IP address on the LCD screen.
Now you can login Web GUI to create a RAID Array for
your TS2060
Figure 13.
16
Login Web GUI
Step 3: Confirm if all the setting are correct then click Confirm to
finish the setup.
To access Web GUI utility, lanuch the web browser on your computer and enter the
TS2060’s IP address in the address field.
Login Name: admin Password: 1234
Web GUI Sreen View
NOTE: By default, the Web GUI’s network connection
type is set to Automatic configuration - DHCP, which
should be kept only if your network supports DHCP or
you are connecting through a dynamic IP address.
Done: A summary page with the User data volume will be shown:
A RAID 0 user data volume with the UDV name “QUICK86975”, named
by the system itself, with the total available volume size 222GB.
The TS2060’s IP address should be seen on the screen of
the controller. By default the IP address is 192.168.0.200
Figure 15.
192.168.0.200
Enhance Technology
Figure 14.
NOTE: Depending on the capacity of your system. The RAID array initialization process may take several minutes.
Please allow plenty of time for this process. Never turn off your TS2060 while initializing the array.
If you are required to use a permanent IP address, you
need to set a static IP address for the system.
(Please refer to User Manual CD for detail infomation)
TS2060 SS | SAS Storage Array for D2D/D2D2T Backup
ENHANCE|TECHNOLOGY
TS2060 SS
18
Format Volume for Windows OS
Please refer to your computer’s documentation for detailed information on
formatting and preparing volumes for use
To format the drive for Windows OS
1. Click on Control Panel, Performance and Maintenance, Administrative Tools.
2. Click on the Computer Management icon.
3. Click on the Disk Management Icon.
4. Right click on the new drive’s icon in the right hand window
5. Select the Format option, click yes in warning window.
6. Type a name for the drive under volume label.
7. Select perform quick format option.
8. Click OK in format warning box.
9. The drive will be formatted and available in My Computer and Windows Explorer.
Quick start guide
20
Troubleshooting
This section covers some common support questions.
If you are experiencing an urgent issue, please contact
your dealer or call 1-562-777-3488 ex 119.
Connection Problems:
Always double check for loose cable connections or improperly seated disks
if you experience problems where a disk or volume does not appear in your
computer, or you recieve an error message stating a disk missing
when you have the drives configured as a RAID set.
1. Disconnect the data cables and reconnect each cable one at a time,
ensuring each connector is screwed in securely on your system.
2. Make sure the connector is properly secured on your HBA.
3. Check your TS2060 IP’s drive presence LEDs, located on the front
panel of the system. If the LEDs are not lit, remove the disk and
reinsert the disk module.
If the problem persists, please contact your dealer or contact Enhance’s support department
at [email protected]
19
Format Volume for Mac OS
Please refer to your computer’s documentation for detailed information on
formatting and preparing volumes for use
To format the drive for Mac OS
1. Go to the Applications folder on your system hard drive.
2. Open the Utilities folder.
3. Double click on the Disk Utility Program.
4. Find the drive in the left hand window and select the drive.
5. Click on the Partition tab.
6. Under Volume Scheme select 1 Partition
7. Type a name for the drive in the box provided.
8. Select Mac OS extended under the format options.
9. Click on Partition in the Partition dialog box.
10. The drive will be formatted and mounted on the desktop.
TS2060 SS | SAS Storage Array for D2D/D2D2T Backup
ENHANCE|TECHNOLOGY
Two (2) Year Limited Warranty
WARRANTY COVERAGE
Enhance Technology’s warranty obligations are limited to the terms set forth below:
Enhance Technology, as defined below, warrants this Enhance Technology-branded hardware product against defects in materials and
workmanship under normal use for a period of TWO (2) YEARS from the date of retail purchase by the original end-user purchaser
('Warranty Period"). If a hardware defect arises and a valid claim is received within the Warranty Period, at its option, Enhance Technology
will either (1) repair the hardware defect at no charge, using new or refurbished replacement parts, or (2) exchange the product with a
product that is new or w hich has been manufactured from new or serviceable used parts and is at least functionally equivalent to the
original product. Enhance Technology may request that you replace defective parts with new or refurbished user-installable parts that
Enhance Technology provides in fulfillment of its warranty obligation. A replacement product or part, including a user ¬installable part that
has been installed in accordance with instructions provided by Enhance Technology, assumes the remaining warranty of the original
product or ninety (90) days from the date of replacement or repair, whichever provides longer coverage for you. When a product or part is
exchanged, any replacement item becomes your property and the replaced item becomes Enhance Technology's property. Parts provided
by Enhance Technology in fulfillment of its warranty obligation must be used in products for which warranty service is claimed. When a
refund is given, the product for which the refund is provided must be returned to Enhance Technology and becomes Enhance Technology’s
properly.
EXCLUSIONS AND LIMITATIONS
This Limited Warranty applies only to hardware products manufactured by or for Enhance Technology that can be identified by the
"Enhance Technology" trademark, trade name, or logo affixed to them. The Limited Warranty does not apply to any non-Enhance
Technology hardware products or any software, even if packaged or sold with Enhance Technology hardware. Manufacturers, suppliers, or
publishers, other than Enhance Technology, may provide their own warranties to the end user purchaser, but Enhance Technology, in so far
as permitted by law, provides their products "as is". Software distributed by Enhance Technology with or without the Enhance Technology
brand name (including, but not limited to system software) is not covered under this Limited Warranty. Refer to the licensing agreement
accompanying the software for details of your rights with respect to its use.
Enhance Technology does not warrant that the operation of the product will be uninterrupted or error-free. Enhance Technology is not
responsible for damage arising from failure to follow instructions relating to the product's use.
This warranty does not apply: (a) to damage caused by use with non-Enhance Technology products: (b) to damage caused by accident,
abuse, misuse, flood, fire, earthquake or other external causes; (d to damage caused by operating the product outside the permitted or
intended uses described by Enhance Technology; (d) to damage caused by service (including upgrades and expansions) performed by
anyone who is not a representative of Enhance Technology or an Enhance Technology Authorized Service Provider; (e) to a product or part
that has been modified to significantly alter functionality or capability without the written permission of Enhance Technology; (fl to
consumable parts, such as batteries, unless damage has occurred due to a defect in materials or workmanship; or {g} if any Enhance
Technology serial number has been removed or defaced.
TO THE EXTENT PERMITTED BY LAW, THIS WARRANTY AND REMEDIES SET FORTH ABOVE ARE EXCLUSIVE AND IN LIEU OF ALL OTHER
WARRANTIES, REMEDIES AND CONDITIONS, WHETHER ORAL OR WRITTEN, STATUTORY, EXPRESS OR IMPLIED. AS PERMITTED BY APPLICABLE
LAW, ENHANCE TECHNOLOGY SPECIFICALLY DISCLAIMS ANY AND ALL STATUTORY OR IMPLIED WARRANTIES, INCLUDING, WITHOUT
LIMITATION, WARRANTIES OF MERCHANTABILITY. FITNESS FOR A PARTICULAR PURPOSE AND WARRANTIES AGAINST HIDDEN OR LATENT
DEFECTS. IF ENHANCE TECHNOLOGY CANNOT LAWFULLY DISCLAIM STATUTORY OR IMPLIED WARRANTIES THEN TO THE EXTENT
PERMITTED BY LAW, ALL SUCH WARRANTIES SHALL BE LIMITED IN DURATION TO THE DURATION OF THIS EXPRESS WARRANTY AND TO
REPAIR OR REPLACEMENT SERVICE AS DETERMINED BY ENHANCE TECHNOLOGY IN ITS SOLE DISCRETION. No Enhance Technology reseller,
agent. or employee is authorized to make any modification, extension, or addition to this warranty.
EXCEPT AS PROVIDED IN THIS WARRANTY AND TO THE EXTENT PERMITTED BY LAW, ENHANCE TECHNOLOGY IS NOT RESPONSIBLE FOR
DIRECT, SPECIAL, INCIDENTAL OR CONSEQUENTIAL DAMAGES RESULTING FROM ANY BREACH OF WARRANTY OR CONDITION, OR UNDER
ANY OTHER LEGAL THEORY, INCLUDING BUT NOT LIMITED TO LOSS OF USE; LOSS OF REVENUE; LOSS OF ACTUAL OR ANTICIPATED PROFITS
(INCLUDING LOSS OF PROFITS ON CONTRACTS); LOSS OF THE USE OF MONEY; LOSS OF ANTICIPAT 222222ED SAVINGS; LOSS OF BUSINESS;
LOSS OF OPPORTUNITY: LOSS OF GOODWILL: LOSS OF REPUTATION; LOSS OF, DAMAGE TO OR CORRUPTION OF DATA; OR ANY INDIRECT OR
CONSEQUENTIAL LOSS OR DAMAGE HOWSOEVER CAUSED INCLUDING THE REPLACEMENT OF EQUIPMENT AND PROPERTY, ANY COSTS OF
RECOVERING, PROGRAMMING, OR REPRODUCING ANY PROGRAM OR DATA STORED OR USED WITH ENHANCE TECHNOLOGY PRODUCTS
AND ANY FAILURE TO MAINTAIN THE CONFIDENTIALITY OF DATA STORED ON THE PRODUCT. THE FOREGOING LIMITATION SHALL NOT
APPLY TO DEATH OR PERSONAL INJURY CLAIMS. ENHANCE TECHNOLOGY DISCLAIMS ANY REPRESENTATION THAT IT WILL BE ABLE TO
REPAIR ANY PRODUCT UNDER THIS WARRANTY OR MAKE A PRODUCT EXCHANGE WITHOUT RISK TO OR LOSS OF THE PROGRAMS OR DATA.
CONSUMER PROTECTION LAWS
FOR CONSUMERS WHO ARE COVERED BY CONSUMER PROTECTION LAWS OR REGULATIONS IN THEIR COUNTRY OF PURCHASE OR, IF
DIFFERENT, THEIR COUNTRY OF RESIDENCE. THE BENEFITS CONFERRED BY THIS WARRANTY ARE IN ADDITION TO ALL RIGHTS AND
REMEDIES CONVEYED BY SUCH CONSUMER PROTECTION LAWS AND REGULATIONS. Some countries, states and provinces do not allow the
exclusion or limitation of incidental or consequential damages or exclusions or limitations on the duration of implied warranties or
conditions, so the above limitations or exclusions may not apply to you. This warranty gives you specific legal rights, and you may also have
other rights that vary by country, state or province.
This Limited Warranty is governed by and construed under the laws of the country in which the product purchase took place. Enhance
Technology, the warrantor under this Limited Warranty, is identified at the end of this document according to the country or region in
which the product purchase took place.
ENHANCE TECHNOLOGY, iNC
© 2009 Enhance Technology, Inc. All rights reserved.
Under the copyright laws, this manual may not be
copied, in whole or in part, without the written consent
of Enhance Technology, Inc.
Every effort has been made to ensure that the
information in this manual is accurate. Enhance
Technology is not responsible for printing or
clerical errors.
Enhance Technology, Inc.
12221 Florence Ave.
Santa Fe Springs, CA 90670
(562) 777-3488
www.enhance-tech.com