1
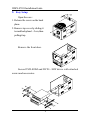
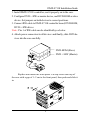
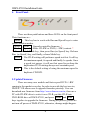
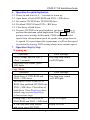
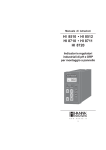
DMX-8711E Installation Guide Hi-Copy DMX- 8711E User’s Guide Revision 2.0 DMX-8711E Installation Guide This device complies with Part 15 of the FCC Rules. Operation is subject to the following two conditions: (1) This device may not cause harmful interference, and (2) This device must accept any interference received, including interference that may cause undesired operation. Federal Communications Commission (FCC) Statement This equipment has been tested and found to comply with the limits for a Class B digital device, pursuant to part 15 of the FCC Rules. These limits are designed to provide reasonable protection against harmful interference in a residential installation. This equipment generates, uses and can radiate radio frequency energy and, if not installed and used in accordance with the instructions, may cause harmful interference to radio communications. However, there is no guarantee that interference will not occur in a particular installation. If this equipment does cause harmful interference to radio or television reception, which can be determined by turning the equipment off and on, the user is encouraged to try to correct the interference by one or more of the following measures: z z z Reorient or relocate the receiving antenna. Increase the separation between the equipment and the receiver. Connect the equipment to an outlet on a circuit different from that to which the receiver is connected. z Consult the dealer or an experienced radio/TV technician for help. Warning: To meet FCC requirements, a shielded power cord is required in order to prevent interference. It is essential that only the supplied power cord is to be used. Use only shielded cables to connect I/O devices to this equipment. You are cautioned that changes or modifications not approved by the party responsible for compliance could void your authority to operate the equipment. DMX-8711E Installation Guide Welcome to the DMX-8711E User’s Guide Thank you for your purchasing of DMX-8711E CD/DVD duplicator controller. DMX-8711E features very easy operation with three LED’s on front panel to inform you the operating result. DMX-8711E uses IDE interface, one DVD-ROM and one DVD +/-RW drive are needed for proper operation. 1. Features : Fully stand-alone CD/DVD duplicator device. Auto format detection. It supports CD-R, CD-RW, DVD-R, DVD (-RW), DVD (+RW) writings. When select DVD-RW drive (Pioneer) as writer, please use DVD-R or DVD-RW medium. When select DVD+RW drive (Ricoh) as writer, please use DVD+RW medium. Normal backup takes 50 minutes. IDE bus interface. Only for normal backup purpose. Protected CD/DVD backup is not supported. If source DVD has a particular area code inside, please purchase DVD-ROM for that area to read. Firmware upgradeable by a DVD-ROM drive . A blank DVD+RW medium must be “Erased” first before using. DVD-RW (Pioneer), DVD+RW (Ricoh) drives all support CDR, CD-RW writings. If source medium is a DVD, then the destination must also be a blank DVD medium. If source medium is a CD, then the destination must be a blank CD-R or CD-RW. 2. Before You Start : Please make sure your source CD/DVD is clean and does not have any scratch on its surface. Configure DVD +/-RW drive as master device, and DVD-ROM as slave device. Set jumpers on them to correct positions. 1 DMX-8711E Installation Guide 3. Easy Setup Open the case : 1. Release the screw on the back plane. 2. Remove top cover by sliding it toward backplane 1~2 cm, then pulling it up. Remove the front door. Secure DVD-ROM and DVD +/-RW drives with attached screws and accessories. 2 DMX-8711E Installation Guide 1. Install DMX-8711E controller, seat it properly on to the case. 2. Configure DVD +/-RW as master device, and DVD-ROM as slave device. Set jumpers on both devices to correct positions. 3. Connect IDE cable to DMX-8711E controller board, DVD-ROM, DVD +/-RW drives. Note : Pin-1 of IDE cable can be identified by red color. 4. Attach power connectors to all devices and finally, slide DVD devices into the case carefully. DVD-ROM (Slave) DVD +/-RW (Master) Replace and fasten the front panel. Put top cover onto top of the case with a gap of 1~2 cm to the front panel, then push and slide it in. 3 DMX-8711E Installation Guide 4. Front Panel : There are three push buttons and three LED’s on the front panel. Their functions are : Mode : This key has to work with Run and Speed keys to enter special function modes. Mode + Run : Upgrade controller firmware. * Mode + Speed : Erase CD-RW or DVD (+/-RW) content. * * : Press and halt Mode key, then press Run (or Speed) key. Release Run (or Speed ) key, and finally, release Mode key. Speed : The CD-R writing will perform a speed test first. It will try the maximum speed, 4x speeds and finally 1x speeds. Once a speed test passes, it will use that speed to perform the duplication. DVD writing always uses constant speed. Run : This is the default setting of using the maximun speed to duplicate CD/DVD. 5. Update Firmware There are many new models and faster speed DVD +/-RW coming to the market everyday. In order to provide the best service, DMX-8711E allows user to upgrade firmware privately. User can download new firmware from http://www.domex.com.tw, then use a PC with CD-RW drive to write it on a CD-R, put this CD-R into DVD-ROM drive of DMX-8711E, and press Mode and Run keys together to upgrade the firmware. During the process, please do not turn off power of DMX-8711E, otherwise, damage might happen. 4 DMX-8711E Installation Guide 6. Operation for quick duplication 5-1. Power on and wait for 4 ~ 5 seconds to warm up . 5-2. Open doors of both DVD-ROM and DVD +/-RW drives. 5-3. Put source CD/DVD into DVD-ROM drive. 5-4. Put blank CD/DVD into DVD +/-RW drive. 5-5. Close doors of both drives. 5-6. If source CD/DVD is in good condition, just press Run key to perform the maximun speed duplication. Press Speed key will get into secure writing. In this mode, CD-R writing will select speed from the maximum speed, 4x speeds, then going down to 1x speeds. If a speed meets the requirement, it will use that speed to perform the writing. DVD writing always uses constant speed. 7. Operation Step by Step Warming up: Operation Green, orange and red LED’s flash 5 seconds. One short beep sounds, green LED lights. Error Message One long beep sounds, red LED lights. Copy Mode : Operation Open doors of DVD-ROM and DVD +/-RW drives. Put source CD/DVD into DVDROM, then put blank CD/DVD into DVD +/-RW drive. Close doors of both drives. Press Run key to have default copy or press Speed key to have secure copy. During copy, LED on panels of DVD-ROM and DVD +/-RW flash. If OK, one short beep sounds and ejects target CD/DVD. 5 Error Message One long beep sounds, red LED lights. Yellow LED lights. Yellow LED off. DMX-8711E Installation Guide Update firmware Mode: Operation Error Message Put update CD-R into DVD-ROM. One long beep sounds, Press Mode and Run keys red LED lights. together, then release them. Finish update, all LED’s will be turned off. Please turn off the power then power on again. 8. Specifications : Humidity Operating temperature Connector Regulation 20%-80% 5°C~35°C IDE FCC,CE 9. Technical Support : Welcome to our web site http://www.domex.com.tw E-mail address: [email protected] 6