1
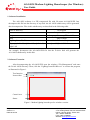
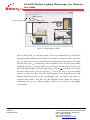
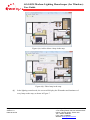
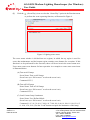
APAC Opto Electronics Inc. AO-1403S Modern Lighting Housekeeper for Windows User Guide 2012/7/23 AO-1403S Modern Lighting Housekeeper (for Windows) User Guide 1. Software Installation The AO-1403S software is a ZIP compressed file with file name AO-1403S.ZIP. Just decompress this file into the directory of any disk. An AO-1403S subdirectory will be generated after decompression. Files in this subdirectory are described in the following table: Files or Directory Description icons Lamp Icon Directory lang Language Directory (TW and CN) map Map Example LightingControlForWin.exe Main Execution Program libgcc_s_dw2-1.dll, QtCore4.dll, QtGui4.dll, sqlite3.dll Qt and SQLite3 DLL libraries For example, decompress the AO-1403S.ZIP file into the D drive disk will generate the AO-1403S subdirectory in this disk. 2. Software Execution After decompressing the AO-1403S.ZIP, open the windows “File Management” and enter the D:\AO-1403S directory. Then, click the “LightingControlForWin.exe” to execute the program, as illustrated in Figure 1. Text function Icon toolbar Control area Status Figure 1: Modern lighting housekeeper for windows version. Page 1 of 9 Version 1.0 Date:2012/7/23 APAC Opto Electronics Inc. 3 Tzu Chiang Road, Hsinchu Industrial Park Hukow, Hsinchu Hsien, Taiwan 303 TEL: +886-3-5986799 FAX: +886-3-5986655 Website: www.apacoe.com.tw AO-1403S Modern Lighting Housekeeper (for Windows) User Guide The meanings of the icon in the toolbar shown in Figure 1 are: Lighting Control, Scene Play, Lamp Location Setting, and Connection Interface. The procedures to execute the software are described below: (1) A user who executes the software for the first time must set up the map. To do this, please use the “Map Selector” in the Setting menu as shown the following Figure. Then, a window as shown in Figure 2 (left) will be generated. Figure 2: The map selector (left) and the setting example (right). Just enter the floor number, the loop number, the plane map, the networking IP address, and the port number into the appropriate box. An example to set up the map is illustrated below: Floor: 1 Loop: 1 Map: map/map.png IP Address: 192.168.1.3 Port: 400 After completing the above, press the “New” button to create a new map record. Hereafter, only “Load” and “Update” function buttons can be used, as shown in Figure 2 (right). While the “Load” button is used to load an existent map record on the display window, the “Update” button is used to modify an existent map record and store the new map into database. Page 2 of 9 Version 1.0 Date:2012/7/23 APAC Opto Electronics Inc. 3 Tzu Chiang Road, Hsinchu Industrial Park Hukow, Hsinchu Hsien, Taiwan 303 TEL: +886-3-5986799 FAX: +886-3-5986655 Website: www.apacoe.com.tw AO-1403S Modern Lighting Housekeeper (for Windows) User Guide (2) Use the “Connection Interface” option in the Setting menu to open the device connection setting window as shown in Figure 3(left). Figure 3: Connection setting (left) and connection successful (right) Note that the demo version only offers the method of network connection. Press the “Connect” button to connect target address. When the “” icon appears, as shown in Figure 3(right), the connection is successful. Then the control area shown in Figure 1 will display the selected map, as depicted in Figure 4. Figure 4: Show the map when connected. (3) Next we need to add lamp icons into the map. For this purpose, use the “Lamp Location” option in the Setting menu to open the window as shown in Figure 5. Page 3 of 9 Version 1.0 Date:2012/7/23 APAC Opto Electronics Inc. 3 Tzu Chiang Road, Hsinchu Industrial Park Hukow, Hsinchu Hsien, Taiwan 303 TEL: +886-3-5986799 FAX: +886-3-5986655 Website: www.apacoe.com.tw AO-1403S Modern Lighting Housekeeper (for Windows) User Guide Edit lamp Return lighting control Add lamp Delete lamp Figure 5: Lamp setting window. You can add, delete, or edit lamp status in the map continuously by pressing the appropriate function button in the tool bar. For instance, as shown in Figure 6(a), press the (Add lamp) icon and click the points continuously in the map for the lamps will add lamp icon continuously in the designated place with the lamp number displayed, press the (Delete lamp) icon and click the existent lamp in the map will delete the selected lamp. To edit the lamp status, press the (Edit lamp) icon to start the lamp editing mode. You can click the icon in the map to open the editing window as shown in Figure 6(b). The digits appeared in the map indicate the loop number and the ID number of the corresponding lamp. For instance, the digits 1-2 represent that LOOP=1 and ID=2 for the designated lamp. When the setting is completed, press the (Return lighting control) icon to return to the lighting control mode. Page 4 of 9 Version 1.0 Date:2012/7/23 APAC Opto Electronics Inc. 3 Tzu Chiang Road, Hsinchu Industrial Park Hukow, Hsinchu Hsien, Taiwan 303 TEL: +886-3-5986799 FAX: +886-3-5986655 Website: www.apacoe.com.tw AO-1403S Modern Lighting Housekeeper (for Windows) User Guide Figure 6(a): Add or delete a lamp in the map. Figure 6(b): Edit a lamp in the map. (4) In the lighting control mode, the screen will display the ID number and luminance of every lamp on the map, as shown in Figure 7. Page 5 of 9 Version 1.0 Date:2012/7/23 APAC Opto Electronics Inc. 3 Tzu Chiang Road, Hsinchu Industrial Park Hukow, Hsinchu Hsien, Taiwan 303 TEL: +886-3-5986799 FAX: +886-3-5986655 Website: www.apacoe.com.tw AO-1403S Modern Lighting Housekeeper (for Windows) User Guide Figure 7: lamps already set on the map. In the control area, users can switch on/off and adjust luminance of every lamp by using the mouse as described below. Place the mouse on the icon which is the lamp you want to control. Then, you can switch on/off the lamp by clicking left key of the mouse, and can perform dimming of the lamp by clicking right key of the mouse. The screen which shows switching on/off and dimming of lamps is depicted in Figure 8. The luminance (0 ~ 100%) of a lamp can be adjusted by using the slider. In addition, if the lamp has a built-in PIR sensor, users can employ the “PIR Enable” option to activate or deactivate the auto smart dimming function. Figure 8: Screen showing switching on/off and dimming of lamps. Page 6 of 9 Version 1.0 Date:2012/7/23 APAC Opto Electronics Inc. 3 Tzu Chiang Road, Hsinchu Industrial Park Hukow, Hsinchu Hsien, Taiwan 303 TEL: +886-3-5986799 FAX: +886-3-5986655 Website: www.apacoe.com.tw AO-1403S Modern Lighting Housekeeper (for Windows) User Guide (5) Click the (Scene Play) icon or select the “Scene Play” option in the Function menu to perform the scene operating function, as illustrated in Figure 9. Maintenance area Scene button area Figure 9: Lighting scene menu. The scene menu window is divided into two regions, in which the top region is used for scene data maintenance and the bottom region contains scene buttons for execution. If this function is to be performed for the first time, there will be no item in the scene button area. Users must create scene buttons for later operation. An example to create some scene items is illustrated below. (A) Turn on All Lamps Scene Name: Turn on All Lamps Scene Icon: (use “file browser” to select the scene icon) Command: 255 5; (B) Turn off All Lamps Scene Name: Turn off All Lamps Scene Icon: (use “file browser” to select the scene icon) Command: 255 0; (C) Load Current Lamp Luminance Scene Name: User Defined Mode Scene Icon: (use “file browser” to select the scene icon) Command: 1 0; 2 0; 3 0; 4 0; 5 100; 6 0; 7 100; 8 0; 9 46; 10 100; 11 100; 12 0; 13 0; 14 0; 15 0; 16 0; (Use the “Load” button to acquire the luminance of the lamp) Page 7 of 9 Version 1.0 Date:2012/7/23 APAC Opto Electronics Inc. 3 Tzu Chiang Road, Hsinchu Industrial Park Hukow, Hsinchu Hsien, Taiwan 303 TEL: +886-3-5986799 FAX: +886-3-5986655 Website: www.apacoe.com.tw AO-1403S Modern Lighting Housekeeper (for Windows) User Guide After completing each of the above items, by pressing the “New” button, a new corresponding scene button will be generated and the information will be stored, as shown in Figure 10. Turn on All Lamps User Defined Mode Turn off All Lamps Figure 10: Generation of new scene icons. A user who wants to maintain a scene button can use the “Update” button to update scene data. On the other hand, a user who wants to delete a scene button must input the correct “Scene Name” first. Then, pressing the “Delete” button will result in deletion of the scene. (6) Completing the scene button setting shown in Figure 10, a user can execute the “Scene Play” by pressing the corresponding scene icon. For instance, press the “Turn on All Lamps” button will light all lamps. At the same time, “Scene Name,” “Scene Icon,” and “Command” will be shown in the edited dialog box. (7) The product supports two different output coding. One is the DALI Standard (2 bytes) and the other is the APAC Protocol (10 bytes). A user can select the appropriate coding length via the “Output Coding Length” option. This operation does not require restart of the program. (8) The product supports three language interfaces including English, Traditional Chinese, and Simplified Chinese. Users can select appropriate language via the “Language” option. Note that when the language type is changed, the program must be restarted to make the new language effective. Page 8 of 9 Version 1.0 Date:2012/7/23 APAC Opto Electronics Inc. 3 Tzu Chiang Road, Hsinchu Industrial Park Hukow, Hsinchu Hsien, Taiwan 303 TEL: +886-3-5986799 FAX: +886-3-5986655 Website: www.apacoe.com.tw