1
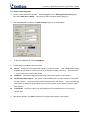
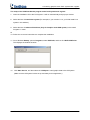
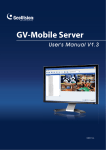
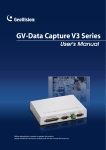
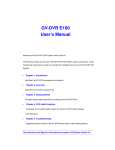
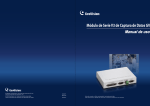
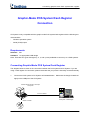
Connecting graphic-mode POS system/cash register Graphic-Mode POS System/Cash Register Connection GV-System is only compatible with the graphic-mode POS system/cash register with the following two characteristics. - Windows operation system - Serial (COM) output Requirements Software: V6.1 Hardware: An appropriate USB dongle Note: There are four types of dongles (1, 2, 3, and 4 ports) available to connect up to 4 POS systems. Connecting Graphic-Mode POS System/Cash Register The diagram below focuses on the connection between the POS system and GV-System. If you are using a cash register for connection, please remember that your printer is internally connected already. 1. Connect the POS system to GV-System as illustrated below. Make sure the dongle is attached tightly to the USB port of the GV-System. Windows-based and built-in serial-port POS system Cross-over RS232 GV-System + USB dongle RS232 or Parallel Printer GeoVision Inc. 1 Revision Date: 2005/7/21 Connecting graphic-mode POS system/cash register The setup at the GV-System: 2. Go to the main panel in GV-System. Click Configure, point to POS Application Setting, and then select POS Device Setup. This brings up the POS Server Setup dialog box. 3. Click the New button to display the COM setting dialog box as shown below. 4. In the POS Module field, select GraphMode. 5. Configure other available options as below: Device: Assign the POS system/cash register to a camera screen. POS 1 displays the images and data on the Camera 1 screen; POS 2 on the Camera 2 screen, and so on. Click the button […] next to the item to rename the device. COM Port: Select the COM port that the POS system/cash register is connected to. Cash Drawer Open Signal: This option is only available when an input module is configured in the main system. Assign the input module connected to the cash drawer. Every time when the cash drawer is opened, a signal will be sent to the main system and recorded in System Log for later retrieval. Trace Mode: Check this option only after getting the recommendation from our technical support staff. 6. After above settings, click Add to add the POS system/cash register to GV-System. GeoVision Inc. 2 Revision Date: 2005/7/21 Connecting graphic-mode POS system/cash register The setup of the POS Data Sender program at the POS system/cash register: 7. Insert the Installation CD to the POS system. It will run automatically and pop up a window. 8. Select the item of Install Vxxx system (For example, if your version is 7.0, you’ll find Install V7.0 system in this window). 9. Select the item of Software POS Driver (Only for Graphic mode POS system) in the Install Program 2nd menu. ss 10. Follow the on-screen instructions to complete the installation. 11. Go to Windows Startup, point to Programs, select DVR-POS, and then click DVR POS Driver. This displays the window as below. 12. Click Start Service, and then select the COM port to send graphic data to the GV-System. (Make sure the GV-System is also set up and ready for this application.) GeoVision Inc. 3 Revision Date: 2005/7/21