1
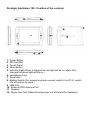
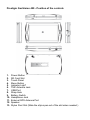
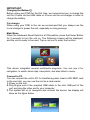
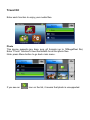
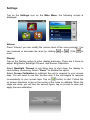
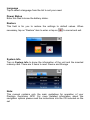
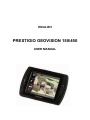
ENGLISH
PRESTIGIO GEOVISION 150/450
USER MANUAL
Prestigio GeoVision 150 - Position of the controls
1.
2.
3.
4.
5.
Power Button
SD Card Slot
Touch Panel
Menu Button
Indicator Light (When it charges the red light will be on; when fully
charged the green light will be on.)
6. Headphone Jack
7. Strap Hole
8. Battery Switch (For leaving long term unused, switch it to off. Or, switch
it to off and on for reset.)
9. USB Port
10. External GPS Antenna Port
11. Speaker
12. Stylus Pen/ Slot (Slides the stylus pen out of the slot for operation.)
Prestigio GeoVision 450 - Position of the controls
1.
2.
3.
4.
5.
6.
7.
8.
9.
10.
11.
12.
13.
Power Button
SD Card Slot
Touch Panel
Menu Button
Indicator Light*
TMC Antenna Jack
USB Port
Strap Hole
Battery Switch
Headphone Jack
External GPS Antenna Port
Speaker
Stylus Pen/ Slot (Slide the stylus pen out of the slot when needed.)
IMPORTANT:
Charging the Battery
Before using your PND for the first time, we recommend you to charge the
unit for 5 hours via the USB cable or 2 hours via the car charger in order to
charge the battery.
Car charger
When using your PND in the car we recommend that you always use the
in-car charger to power the unit, especially on long journeys.
Main Menu
When the Hardware Reset Switch is at ON position, press the Power Button
for 3 seconds to turn the unit on. The following screens will be displayed,
and the unit is ready to be used. Tap on an icon to enter the function.
This device integrates several multimedia programs. You can use it for
navigation, to watch video clips, view photo, and also listen to music.
Connect to PC
You can connect the unit to PC for transferring data. Insert a SD/ MMC card
to the card slot, you can use the unit as a card reader.
1. Power on the unit.
2. Plug B-type end of the supplied USB cable to the mini USB port of the
unit, and plug the other end to your computer.
3. The system will try to recognize and connect the device; the display will
show as the figure below.
Travel Kit
Enter each function to enjoy your media files.
Photo
This device supports jpg, bmp, png, gif formats (up to 12MegaPixel file).
Enter "Photo" function to see thumbnails for all the photo files.
Note: press Menu button to go back main menu.
If you see an
icon on the list, it means that photo is unsupported.
Settings
Tap on the Settings icon on the Main Menu, the following screen is
displayed.
Volume
Press 'Volume' you can modify the volume level of the voice prompts. You
can increase or decrease the level by clicking
mute.
or
. Click
to
Display
Tap on the Display option to enter display submenu. There are 3 items to
adjust: Brightness, Backlight Timeout, and Screen Calibration.
Select Backlight Timeout to set idling time to shut down the display to
save battery consuming. Select “Never” to disable this option.
Select Screen Calibration to calibrate the unit to respond to your screen
taps. You will need to use this function only if the unit begins to respond
inconsistently to your screen taps. Tap on
button to start. Follow the
on screen directions to tap on the center of the cross to calibrate. When the
steps are done, you will see the second figure, tap on screen to save and
apply the new calibration.
Language
Tap to select a language from the list to suit your need.
Power Status
Enter this filed to know the battery status.
Restore
This field is for you to restore the settings to default values. When
necessary, tap on “Restore” item to enter or tap on
to cancel and exit.
System Info
Tap on System Info to know the information of the unit and the inserted
memory card. There are 2 items to read: Device and Storage
Note:
This manual contains only the main guidelines for operation of your
Prestigio GeoVision GPS. For more detailed information about the
navigation options please read the instructions into the CD included on the
set