1
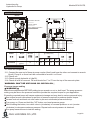
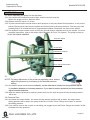
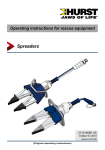
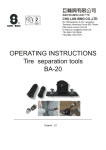
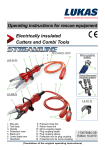
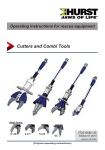
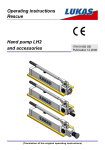
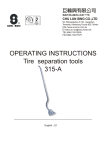
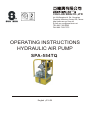
199
CHU LUN SING CO.,LTD
No.199,Gangshan N. Rd., Gangshan
Township, Kaohsiung County 820, Taiwan
http://www.sunrun.com.tw
E-mail:[email protected]
TEL:886-7-6210505
FAX:886-7-6217575
R
OPERATING INSTRUCTIONS
HYDRAULIC AIR PUMP
SPA-554TQ
English
E1~E5
Instructions for:
Hydraulic Air Pump
Models:SPA-554TQ
1. SAFETY PRECAUTIONS
Fail to comply with the following cautions
and warnings could cause equipment
damage and personal injury.
IMPORTANT :Minimum age of the
operator must be 18 years The operator
must have read and understood all
instructions, safety issues, cautions and
warnings before starting to operate the
SUN RUN equipment. The operator is
responsible for this activity towards other
persons.
CAUTION: Avoid sharp bends and kinks
that will cause severe back-up pressure in
hoses. Bends and kinks lead to premature
hose failure.
DO NOT drop heavy objects on hose. A
sharp impact may cause internal damage to
hose wire strands. Applying pressure to a
damaged hose may cause it to rupture.
IMPORTANT: Do not lift hydraulic
equipment by the hoses or couplers. Use
the carrying handle or other means of safe
transport.
WARNING : To avoid personal injury and
possible equipment damage, make sure all
hydraulic components withstand the
maximum pressure of 700 bar(10,000psi).
!
DANGER: Do not handle pressurized
hoses. Escaping oil under pressure can
penetrate the skin causing serious injury. If
oil is injected under the skin, see a doctor
immediately.
WARNING: Always wear safety glasses.
The operator must take precaution against
injury due to failure the tool or workpiece.
WARNING : The system operating pressure
must not exceed the pressure rating of the
lowest rated component in the system. Install
pressure gauges in the system to monitor
operating pressure. It is your window to what
is happening in the system.
WARNING: Never pressurize uncoupled
couplers. Only use hydraulic equipment in
a coupled system.
WARNING: Immediately replace worn or
damaged parts with genuine SUN RUN
parts. SUN RUN parts are designed to fit
properly and withstand rated loads.
IMPORTANT: Hydraulic equipment must
only be serviced by a qualified hydraulic
technician. For repair service, contact the
SUN RUN Service Center in your area. To
protect your warranty, use only SUN RUN oil.
R
CHU LUN SING CO.,LTD
!
WARNING: To avoid personal injuries and
equipment damage, do not remove the
shroud of the wrench. Do not modify any
component of the wrench. Do not change the
relief valve which is inside the swivel
couplings.
!
CAUTION: The incorrect system connection
will cause failure and danger. Before
connection, make sure the swivel couplings
being clean. After application, the swivel
couplings must be put on the dust caps.
!
CAUTION: Do not use worn socket and
square drive.
!
CAUTION: Please use the socket of good
performance.
Page:E1
Instructions for:
Hydraulic Air Pump
Models:SPA-554TQ
2.SPECIFICATION
300mm
Lubrication oil knob
Air Press. Adjust
550mm
Press. Gauge Zero button
Oil/vent port
Press. Adjust
Model
Number
SPA-554TQ
Air Supply
Req'd
1.4M3/min
@6 bar
DBa at
Idle and
700bar
Flow rate
Hp
75
320mm
Oil tank
4
Weight
(with oil)
@115VAC(L/min)
0
(bar)
70
(bar)
350
(bar)
700
(bar)
(L)
(kg)
7.4
1.3
1.1
0.9
8
44
3.OPERATION
3.1 Hose and coupler install
3.11 Connect the one end of hose at pump coupler (HorA) and hose the other end connect to wrench
(HorA). Pump H or A end can't be connected to wrench L or B end.
3.12 Check volt.
3.13 Check enough hydraulic oil (Aw32).
3.14 Check oil level in reservoir. Oil level should be 1" to 2" from the top of the reservoir plate.
WARNING: CAN'T BE USE IN NO OIL OR FAIL OIL
Pressure torque setting
WARNING
Make these adjustments BEFORE putting torque wrench on nut or bolt head. The pump pressure
setting may be above the pressure needed to provide the required torque for your application.
Exceeding required torque will cause equipment damage and may lead to serious personal injury.
See torque wrench instructions for amount of pressure required to produce desired torque.
Loosen lock unit and back out relief valve to prevent unintended pressure build-up.
Turn pump on. Press and hold the "UP" button, and read pressure gauge.
While holding the button, turn relief valve in (clockwise) to increase pressure or out (counterclockwise) to decrease maximum pressure. Repeat unit correct pressure is obtained.
Run pump several times to test this setting.
R
CHU LUN SING CO.,LTD
Page:E2
Instructions for:
Hydraulic Air Pump
Models:SPA-554TQ
3.OPERATION
3.2 When operating the pump for the first time:
3.21 Valve and hose connections must be tight, and the reservoir must be
filled to the proper oil level. Start the motor.
3.22 Release Vent/ Fill cap to 1.5 circles.
3.23 To press remote button several times to build pressure. If the pump doesn't build pressure, it may not be
primed. Disconnect a hose from the system and route it back to the pump reservoir. Run the pump until
a steady flow of oil is observed free of suspended air bubbles. Reconnect the hose to the system.
3.24 Run hydraulic torque wrench out to its full travel several times to eliminate air from the system. For more
complete instructions, refer to the section titled "Bleeding Air From The System." The pump is ready to
be put into regular operation.
Air press. Adjust
oil/ vent port
Lubrication oil knob
Press. Adjust
Press. Gauge Zero button
3.3 Adjusting The Pressure Regulating Valve
NOTE: For easy adjustment of the pressure regulating valve, always
adjust the pressure by increasing to the desired pressure
Remote button
setting.
3.31 One hand to press remote button continuity, on the other hand, slowly turn the pressure adjust
in clockwise direction to increase pressure. If you want to reduce pressure just turn pressure
adjust counterclockwise.
3.32 When the desired pressure is reached, please don't turn the knob anymore and the directed pressure
will be set.
3.4 Pressure Zero
3.41 As release the remote button , the motor will stop and the pressure will go down, but maybe some
ending pressure will be hold in the pump at this time. Pull the "Press. Gauge zero button" to release
the ending pressure.
3.42 If you need to remove the coupler or something, we suggest to pull the"Press. Gauge zero button" at first
to release all of the pressure.
R
CHU LUN SING CO.,LTD
Page:E3
Instructions for:
Hydraulic Air Pump
Models:SPA-554TQ
4. Maintain oil level
4.1 Bleeding Air From The System
Air can accumulate in the hydraulic system if the reservoir level is too low. This air cause the torque wrench
to respond in an unstable or slow manner. Just put torque wrench on the smooth ground that is no load
condition and operates it in full stroke for several times that will bleed air from torque wench system.
4.2 Hydraulic Fluid Level
4.21 Check the oil level in the reservoir after each 10 hours of use. Proper oil level is 1/2" (15mm) from the
top of the fill hole when all wrench plungers are retraced.
4.2.2 Drain, flush, and refill the reservoir with an approved, high-grade hydraulic oil (Aw32) after
approximately every 300 hours of use. The frequence of oil changes will depend upon the general
working conditions, severity of use, and overall cleanliness and care given the pump.
4.3 Lubrication and Air pressure adjust
4.3.1If the pump is operated on a continuous duty cycle, 100 hours
or a maximum speeds for extended periods, an automatic air
line oiler should be installed in the air inlet line as close to the Lubricant
Air pressure adjust
pumping unit as possible. Set the unit to feed 1-3 drops of oil
per minute. Turn clockwise is addition, counterclockwise is
reduction.
4.3.2 Air pressure adjust operation is also clockwise to addition and counterclockwise is reduction.
R
CHU LUN SING CO.,LTD
Page:E4
Instructions for:
Hydraulic Air Pump
Models:SPA-554TQ
PROBLEM
Pump is not delivering oil or
delivers only enough oil to
advance torque wrench(s)
partially or erratically (continued)
CAUSE
1.Oil level too low.
2.Loose-fitting coupler to cylinder.
3.Air in system.
4.Air leak in suction line.
5.Dirt in pump or filter plugged.
SOLUTION
1.Fill reservoir to 1/2"(15mm) from
top of filler hole with all wrench
plungers retracted.
2.Check quick-disconnectcouplings
to wrenches. Inspect couplers to
ensure that they are completely
coupled. Occasionally couplers
have to be replaced because the
ball check doesn't stay open due
to wear.
3.Bleed the system.
4.Check and tighten suction line.
5.Pump filter should be cleaned
and, if necessary, pump should be
dismantled and all parts inspected
and cleaned.
6.Change to lighter oil.
7.Adjust as needed.
6.Cold oil or oil too heavy.
7.Relief valve or low pressure
unloading calve out of adjustment.
8.Reservoir capacity is too small.
8.Use smaller object or larger
reservoir.
9.Inspect all parts carefully and
9.Defective directional valve.
replace if necessary.
10.Motor rotating in wrong direction. 10.Air motor Air line connected
into wrong port.
11.Check
for plugged vent in filler
11.Vacuum in reservoir.
plug.
12.Remove end cap from low
12.Low pressure pump wrong.
pressure gear pump. Clean
pump, and replace worn gears,
shifting spool, body or end cap.
Pump can't build full pressure.
(Continued)
Pump will not build full pressure
R
1.Check to see if there are any
external leaks. If no oil leakage is
visible, the problem is internal.
2.To test for a leaking control valve,
lift the pump from the reservoir
but keep the filter in the oil.
Remove the drain line to see if the
oil is leaking from the valve. If the
valve is not leaking, the internal
check valve could be leaking.
Refer to the note concerning
checking for oil leaks at the
beginning of this troubleshooting
Guide.
3.Leaking pressure switch seal.
1.Faulty pressure gauge.
2.Check for external leakage.
CHU LUN SING CO.,LTD
1.Seal leaking pipe fittings with pipe
sealant.
2.Clean, reseat or replace flow
control valve parts. If the intenal
check valve(s) are leaking, the
pump must be dismantled and the
seat areas repaired, poppets
replaced, etc.
3.repair or replace seal.
1.Calibrate gauge.
2.Seal faulty pipe fitting with pipe
sealant.
Page:E5