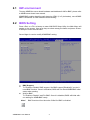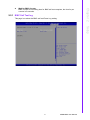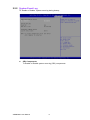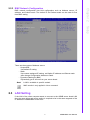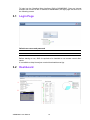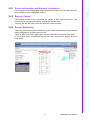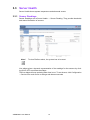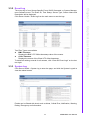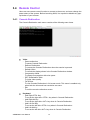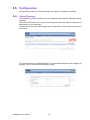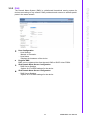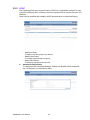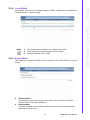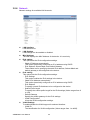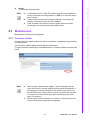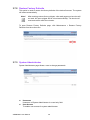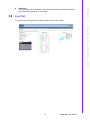
1
User Manual ASMB-BMC ASMB Server Board BMC Function Application for Single Unit Copyright The documentation and the software included with this product are copyrighted 2013 by Advantech Co., Ltd. All rights are reserved. Advantech Co., Ltd. reserves the right to make improvements in the products described in this manual at any time without notice. No part of this manual may be reproduced, copied, translated or transmitted in any form or by any means without the prior written permission of Advantech Co., Ltd. Information provided in this manual is intended to be accurate and reliable. However, Advantech Co., Ltd. assumes no responsibility for its use, nor for any infringements of the rights of third parties, which may result from its use. Acknowledgements Intel and Pentium are trademarks of Intel Corporation. Microsoft Windows and MS-DOS are registered trademarks of Microsoft Corp. All other product names or trademarks are properties of their respective owners. Product Warranty (2 years) Advantech warrants to you, the original purchaser, that each of its products will be free from defects in materials and workmanship for two years from the date of purchase. This warranty does not apply to any products which have been repaired or altered by persons other than repair personnel authorized by Advantech, or which have been subject to misuse, abuse, accident or improper installation. Advantech assumes no liability under the terms of this warranty as a consequence of such events. Because of Advantech’s high quality-control standards and rigorous testing, most of our customers never need to use our repair service. If an Advantech product is defective, it will be repaired or replaced at no charge during the warranty period. For outof-warranty repairs, you will be billed according to the cost of replacement materials, service time and freight. Please consult your dealer for more details. If you think you have a defective product, follow these steps: 1. Collect all the information about the problem encountered. (For example, CPU speed, Advantech products used, other hardware and software used, etc.) Note anything abnormal and list any onscreen messages you get when the problem occurs. 2. Call your dealer and describe the problem. Please have your manual, product, and any helpful information readily available. 3. If your product is diagnosed as defective, obtain an RMA (return merchandize authorization) number from your dealer. This allows us to process your return more quickly. 4. Carefully pack the defective product, a fully-completed Repair and Replacement Order Card and a photocopy proof of purchase date (such as your sales receipt) in a shippable container. A product returned without proof of the purchase date is not eligible for warranty service. 5. Write the RMA number visibly on the outside of the package and ship it prepaid to your dealer. ASMB-BMC User Manual Part No. 20060BMC10 Edition 1 Printed in Taiwan July 2013 ii Technical Support and Assistance 1. 2. Visit the Advantech website at http://support.advantech.com where you can find the latest information about the product. Contact your distributor, sales representative, or Advantech's customer service center for technical support if you need additional assistance. Please have the following information ready before you call: – Product name and serial number – Description of your peripheral attachments – Description of your software (operating system, version, application software, etc.) – A complete description of the problem – The exact wording of any error messages Warnings, Cautions and Notes Warning! Warnings indicate conditions, which if not observed, can cause personal injury! Caution! Cautions are included to help you avoid damaging hardware or losing data. e.g. There is a danger of a new battery exploding if it is incorrectly installed. Do not attempt to recharge, force open, or heat the battery. Replace the battery only with the same or equivalent type recommended by the manufacturer. Discard used batteries according to the manufacturer's instructions. Note! Notes provide optional additional information. Document Feedback To assist us in making improvements to this manual, we would welcome comments and constructive criticism. Please send all such - in writing to: [email protected] iii ASMB-BMC User Manual Safety Instructions 1. 2. 3. Read these safety instructions carefully. Keep this User Manual for later reference. Disconnect this equipment from any AC outlet before cleaning. Use a damp cloth. Do not use liquid or spray detergents for cleaning. 4. For plug-in equipment, the power outlet socket must be located near the equipment and must be easily accessible. 5. Keep this equipment away from humidity. 6. Put this equipment on a reliable surface during installation. Dropping it or letting it fall may cause damage. 7. The openings on the enclosure are for air convection. Protect the equipment from overheating. DO NOT COVER THE OPENINGS. 8. Make sure the voltage of the power source is correct before connecting the equipment to the power outlet. 9. Position the power cord so that people cannot step on it. Do not place anything over the power cord. 10. All cautions and warnings on the equipment should be noted. 11. If the equipment is not used for a long time, disconnect it from the power source to avoid damage by transient overvoltage. 12. Never pour any liquid into an opening. This may cause fire or electrical shock. 13. Never open the equipment. For safety reasons, the equipment should be opened only by qualified service personnel. 14. If one of the following situations arises, get the equipment checked by service personnel: The power cord or plug is damaged. Liquid has penetrated into the equipment. The equipment has been exposed to moisture. The equipment does not work well, or you cannot get it to work according to the user's manual. The equipment has been dropped and damaged. The equipment has obvious signs of breakage. 15. DO NOT LEAVE THIS EQUIPMENT IN AN ENVIRONMENT WHERE THE STORAGE TEMPERATURE MAY GO BELOW -20° C (-4° F) OR ABOVE 60° C (140° F). THIS COULD DAMAGE THE EQUIPMENT. THE EQUIPMENT SHOULD BE IN A CONTROLLED ENVIRONMENT. 16. CAUTION: DANGER OF EXPLOSION IF BATTERY IS INCORRECTLY REPLACED. REPLACE ONLY WITH THE SAME OR EQUIVALENT TYPE RECOMMENDED BY THE MANUFACTURER, DISCARD USED BATTERIES ACCORDING TO THE MANUFACTURER'S INSTRUCTIONS. The sound pressure level at the operator's position according to IEC 704-1:1982 is no more than 70 dB (A). DISCLAIMER: This set of instructions is given according to IEC 704-1. Advantech disclaims all responsibility for the accuracy of any statements contained herein. ASMB-BMC User Manual iv Safety Precaution - Static Electricity Follow these simple precautions to protect yourself from harm and the products from damage. To avoid electrical shock, always disconnect the power from your PC chassis before you work on it. Don't touch any components on the CPU card or other cards while the PC is on. Disconnect power before making any configuration changes. The sudden rush of power as you connect a jumper or install a card may damage sensitive electronic components. v ASMB-BMC User Manual ASMB-BMC User Manual vi Contents Chapter Chapter Chapter 1 System Requirements .........................1 1.1 1.2 1.3 Hardware Requirement ............................................................................. 2 Software Requirement .............................................................................. 2 IPMITool and Other Open Source Software ............................................. 2 2 Setup.....................................................3 2.1 2.2 2.3 HW environment ....................................................................................... 4 BIOS Setting ............................................................................................. 4 2.2.1 BMC Self Test log ......................................................................... 5 2.2.2 System Event Log......................................................................... 6 2.2.3 BMC Network Configuration ......................................................... 7 LAN Setting ............................................................................................... 7 3 Graphics User Interface (GUI) ............9 3.1 3.2 Login Page .............................................................................................. 10 Dashboard............................................................................................... 10 3.2.1 Device Information and Network Information.............................. 11 3.2.2 Remote Control........................................................................... 11 3.2.3 Sensor Monitoring....................................................................... 11 Server Health .......................................................................................... 12 3.3.1 Sensor Readings ........................................................................ 12 3.3.2 Event Log.................................................................................... 13 3.3.3 System Log ................................................................................. 13 Remote Control ....................................................................................... 14 3.4.1 Console Redirection.................................................................... 14 3.4.2 Server Power Control.................................................................. 17 Configuration........................................................................................... 18 3.5.1 Active Directory........................................................................... 18 3.5.2 DNS ............................................................................................ 19 3.5.3 LDAP........................................................................................... 20 3.5.4 Local Media................................................................................. 21 3.5.5 Mouse Mode ............................................................................... 21 3.5.6 Network....................................................................................... 22 3.5.7 NTP............................................................................................. 23 3.5.8 PAM Order .................................................................................. 24 3.5.9 PEF ............................................................................................. 24 3.5.10 RADIUS ...................................................................................... 27 3.5.11 Remote Session.......................................................................... 28 3.5.12 Services ...................................................................................... 29 3.5.13 SMTP .......................................................................................... 30 3.5.14 System and Audit log .................................................................. 31 3.5.15 Users........................................................................................... 32 3.5.16 Virtual Media ............................................................................... 33 Auto Video Recording ............................................................................. 34 Maintenance............................................................................................ 35 3.7.1 Firmware update ......................................................................... 35 3.7.2 Restore Factory Defaults ............................................................ 36 3.7.3 System Administrator.................................................................. 36 Log Out ................................................................................................... 37 3.3 3.4 3.5 3.6 3.7 3.8 vii ASMB-BMC User Manual Appendix A ASMB-BMC User Manual Ports Usage ....................................... 39 viii Chapter 1 1 System Requirements ASMB-BMC functions and specifications mentioned in this document are fully compliant with IPMI 2.0 specification. To set ASMB-BMC on ASMB server boards, the following are required: 1.1 Hardware Requirement ASMB server board An ASMB-BMC module Power Supply Keyboard LAN cable A client computer 1.2 Software Requirement IE or other web browsers IPMI driver is not required neither on windows nor Linux while ASMB-BMC is with ASMB server board. 1.3 IPMITool and Other Open Source Software ASMB-BMC supports open source software IPMITool as long as it is compliant to IPMI2.0 ASMB-BMC User Manual 2 Chapter 2 Setup 2 2.1 HW environment To setup ASMB the server board hardware and dedicated LAN for BMC, please refer to ASMB server board user manual. ASMB-BMC module should be well placed on IPMI1 (2 x 5 pin header), once ASMBBMC is initialized, an LED indicator will be blinking. 2.2 BIOS Setting Press <Del> or <F2> at bootup to enter AMI BIOS Setup Utility, the Main Menu will appear on the screen. Use arrow keys to select among the items and press <Enter> to accept or enter the sub-menu. Server Mgmt is used to modify ASMB-BMC setting. BMC Support To "Enable or Disable" BMC support. Set BMC support [Disabled] if you don't need BMC function. Once it is disabled, BIOS will not check ASMB-BMC initial status when starting. Wait for BMC To “Enable or Disable” wait For BMC. Once it is disabled, BIOS will initial without waiting for ASMB-BMC ready. Note! BMC function will not be active if Wait for BMC is disabled. ASMB-BMC User Manual 4 Wait for BMC Counter BMC counter to set waiting time for BMC self test complete, the time for per counter is 5 seconds. 2.2.1 BMC Self Test log This page is to about the BMC self test Erase Log setting. Chapter 2 Setup 5 ASMB-BMC User Manual 2.2.2 System Event Log To “Enable or Disable” system event log during bootup. SEL Components To Enable or Disable system event log (SEL) components. ASMB-BMC User Manual 6 BMC network configuration lists LAN configuration such as Address source, IP address, and Subnet mask. The default IP and Subnet mask can be used for first time BMC setting. Chapter 2 2.2.3 BMC Network Configuration Setup There are three types of Address source. – Unspecified Use default IP setting. – Static Use custom assigned IP setting, set Station IP address and Subnet mask after change Configuration Address to Static. – Dynamic-Obtained by BMC Dynamically get IP source from your server board. Note! LAN2 is available in specific models. MAC rewrite is only applied in Linux command. 2.3 LAN Setting If the LAN of the client computer wants to connect to the ASMB server board LAN then the same client and server setting is required to be in the same segment of the IP address of ASMB-BMC on the host. 7 ASMB-BMC User Manual ASMB-BMC User Manual 8 Chapter 3 Graphical User Interface (GUI) 3 To login into the Graphical User Interface (GUI) of ASMB-BMC. Open an Internet browser and connect to the IP address of ASMB-BMC, the login page will show as in the following screen. 3.1 Login Page Default user name and password Username admin Password admin Before starting to use, JAVA is required to be installed to use remote control afterwards. It is available at http://www.java.com/en/download/manual.jsp 3.2 Dashboard 1 3 2 ASMB-BMC User Manual 10 The left upper area in Dashboard shows general information of the firmware and network settings of your ASMB-BMC module. 3.2.2 Remote Control The Remote Control screen will show the screen of your monitored server. The screen can be updated manually by clicking the “Refresh” tab. “Launch” tab will direct the user to the Remote Control function. There are green and red status indicators, green means the monitored sensor normal status; otherwise, it is critical when it is red. There is “HELP” tab on the right upper corner to describe the function of the page. If new events occur, a notification will pop up, users can click the pop up and see new events. 11 ASMB-BMC User Manual Graphical User Interface (GUI) 3.2.3 Sensor Monitoring Chapter 3 3.2.1 Device Information and Network Information 3.3 Server Health Server Health shows system temperature and abnormal events. 3.3.1 Sensor Readings Sensor Readings are at Server Health > Sensor Reading. They provide thresholds and status information of sensors. Note! To clear Platform alerts, the system has to be reset. Live widget gives a dynamic representation of the readings for the sensors by clicking ON or OFF to activate the widget. The live widget will stop updating when time is out. To set timeout, click Configuration > Service from main menu to change web timeout seconds ASMB-BMC User Manual 12 The event log is from Sensor-Specific Event, BIOS Generated, or System Management Software event. The Event ID, Time Stamp, Sensor Type, Sensor Name and Description will be displayed. Click Server Health > Event log from the main menu to see the logs. 3.3.3 System Log Click Server Health > System log to enter the page, and click the System Log tab to view the related events. Entries can be filtered with levels such as Alerts, Critical Error, Notification, Warning, Debug, Emergency and information. 13 ASMB-BMC User Manual Graphical User Interface (GUI) Two Filter Types are available. BMC Timezone Displays the BMC UTC Offset timestamp value of the events. Client Timezone Displays the events of the Client UTC offset timestamp. To delete all existing records for all sensors, click “Clear All Event Logs” on the bottom-right. Chapter 3 3.3.2 Event Log 3.4 Remote Control Users can use remote control function to connect to the server, and even change the power status of the system. Before launching KVM, it is required to disable any popup blocker of your browser. 3.4.1 Console Redirection The Console Redirection main menu consists of the following menu items. Video – Pause redirection To pause Console Redirection. – Resume Redirection To resume the Console Redirection when the session is paused. – Refresh Video To refresh the display shown in the Console Redirection window. – Compression Mode To change Compression with color space. – DCT Quantization Table To judge video quality. – Full Screen To view Console Redirection in full screen mode. This menu is enabled only when both the client and host resolution are same. – Exit To exit the console redirection screen. Keyboard – Hold Right CTRL Key To act as the right-side <CTRL> key when in Console Redirection. – Hold Right Alt Key To act as the right-side <ALT> key when in Console Redirection. – Hold Left Ctrl Key To act as the left-side <CTRL> key when in Console Redirection. – Hold Left Alt Key To act as the left-side <ALT> key when in Console Redirection. ASMB-BMC User Manual 14 Mouse – Show Cursor To show or hide the local mouse cursor on the remote client system. – Mouse Calibration When the mouse mode is disabled. In this step, the mouse threshold setting on the remote server will be discovered. Options – Bandwidth To adjust the bandwidth with option “Auto Detect” or alternative bandwidths. – Keyboard/Mouse Encryption To encrypt keyboard inputs and mouse movements sent between the connections. – Zoom To zoom-in or zoom-out the screen when launching the Java Console. Media – Virtual Media Wizard To add or modify a media, select and click “Virtual Media Wizard” button. 15 ASMB-BMC User Manual Graphical User Interface (GUI) Chapter 3 – Right Windows Key To act as the right-side <WIN> key when in Console Redirection. You can also decide how the key should be pressed: Hold Down or Press and Release. – Left Windows Key To act as the left-side <WIN> key when in Console Redirection. You can also decide how the key should be pressed: Hold Down or Press and Release. – Alt+Ctrl+Del To act as if you depressed the <CTRL>, <ALT> and <DEL> keys down simultaneously on the server that you are redirecting. – Context menu To act as the context menu key in Console Redirection. – Floppy Key Media1 To start or stop the redirection of a physical floppy drive and the floppy type as img. – CD/DVD Media1 To start or stop the redirection of an iso file. – Hard Disc/USB key Media1 To start or stop the redirection of a Hard Disk/USB key image and USB key image such as img. Note! Keyboard Layout – Auto Detect To detect keyboard layout automatically. The languages supported automatically are English - US, French - France, Spanish - Spain, German - Germany, Japanese - Japan. – Soft Keyboard To select the keyboard layout. Note! For windows clients, if the logical drive of the physical drive is dismount then the logical device is redirected with Read/Write Permission else it is redirected with Read permission only. For MAC client, external USB Hard disk redirection is only supported For Linux client, fixed Hard drive is redirected only as Read mode. Write mode is not supported. For USB key image redirection, FAT16, FAT32, NTFS are supported. Soft keyboard is applicable only for JViewer Application. Video Record This option is available only when Java Console is launched. To view this menu option you must download the Java Media FrameWork (JMF). It can be downloaded from the link http://www.oracle.com/technetwork/java/javase/download142937.html – Start Recording To start recording the screen. – Stop Recording To stop the recording. – Settings To set the settings for video recording. ASMB-BMC User Manual 16 This page allows users to view and control the power of the server. To open Power Control and Status page, click Remote Control > Server Power Control from the main menu. Graphical User Interface (GUI) Reset Server To reboot the system without powering off (warm boot). Power Off Server - Immediate To power off the server immediately. Power Off Server - Orderly Shutdown To power off the server immediately. Power On Server To power on the server. Power Cycle Server To power off first, then reboot the system (cold boot). 17 Chapter 3 3.4.2 Server Power Control ASMB-BMC User Manual 3.5 Configuration Configuration group is for users accessing with various configuration settings. 3.5.1 Active Directory Active Directory (AD) is a directory service created by Microsoft for Windows domain networks. Once Active Directory is set, users in the same group will have same privilege as an administrator or a normal user. To open Active Directory Setting page, click Configuration > Active Directory from the main menu. The 'Active Directory' is default disabled. To enable Active Directory and configure its settings. Click on the 'Advanced Settings' button. ASMB-BMC User Manual 18 The Domain Name System (DNS) is a distributed hierarchical naming system for devices connecting to any network. DNS provides domain names to address participants in the same network. Host Configuration – Host Settings Manual or Automatic. – Host Name Displays the hostname of the device. Register BMC BMC can be registered via direct dynamic DNS or DHCP client FQDN. IPv4 Domain Name Server Configuration – DNS Server Settings Options for IPv4 DNS settings for the device. IPv6 Domain Name Server Configuration – DNS Server Settings Options for IPv6 DNS settings for the device. 19 ASMB-BMC User Manual Graphical User Interface (GUI) Chapter 3 3.5.2 DNS 3.5.3 LDAP The Lightweight Directory Access Protocol (LDAP) is an application protocol for querying and modifying data of directory services implemented in internet Protocol (IP) networks Group can be modified after enabling LDAP Authentication in Advanced Setting – Add Role Group To add a new role group to the device. – Modify Role Group To modify the particular role group. – Delete Role Group To delete a role group from the list. Advanced LDAP setting To configure LDAP Advanced Settings. Options are Enable LDAP Authentication, IP Address, Port and Search base. ASMB-BMC User Manual 20 Local Media shows lists of available images on BMC. Images can be replaced by “Replace Image” or “Delete Image”. Only administrator privileges can change local media. Each image type can be uploaded for one image. Maximum upload size is 8 MB. 3.5.5 Mouse Mode The Redirection Console handles mouse emulation from local window to remote screen. Absolute Mode The absolute position of the local mouse will be sent to the server (Recommended when server OS is Windows). Relative Mode Calculated relative mouse position will be sent to the server (Recommended when server OS is Linux). 21 ASMB-BMC User Manual Graphical User Interface (GUI) Note! Chapter 3 3.5.4 Local Media 3.5.6 Network Network settings for available LAN channels. LAN Interface LAN interface list. LAN Settings LAN settings can be enabled or disabled. MAC Address The field displays the MAC Address of the device. It is read only. IPv4 setting This option lists the IPv4 configuration settings. – Obtain IP Address automatically This option dynamically configures an IPv4 address using DHCP. – IPv4 Address, Subnet Mask, and Default Gateway These fields are for specifying the static IPv4 address, Subnet Mask and default gateway to be configured to the device. IPv6 setting This option lists the IPv6 configuration settings. – IPv6 Settings This option enables the IPv6 settings in the device. – Obtain IPv6 Address automatically This option dynamically configures an IPv6 address using DHCP. – IPv6 Address To specify a static IPv6 address to be configured to the device. – Subnet Prefix length To specify the subnet prefix length for the IPv6 settings (Value ranges from 0 to 128). – Default Gateway Specify the default gateway for the IPv6 settings. – VLAN Configuration It lists the VLAN configuration settings. VLAN Settings To enable/disable the VLAN support for selected interface. – VLAN ID The identification for VLAN configuration (Value ranges from 1 to 4095). ASMB-BMC User Manual 22 3.5.7 NTP The Network Time Protocol (NTP) is protocol for synchronizing the clocks of computer systems over packet-switched, variable-latency data networks. NTP is default disabled. NTP Setting pages at Configuration > NTP from the main menu. Date The current date for the device specifically. Time The current time for the device specifically. UTC Timezone To display the local time, choose the UTC timezone values in the listed box. NTP Server The NTP server for the device specifically. Automatically synchronize The date and time will be automatically synchronized with the NTP server if checking the box. 23 ASMB-BMC User Manual Graphical User Interface (GUI) Chapter 3 – VLAN Priority The priority for VLAN configuration (Value range from 1 to 7, 7 is the highest priority for VLAN). 3.5.8 PAM Order Pluggable Authentication Module (PAM) Ordering provides the priority list of available PAM module for user authentication to the BMC. The authentication will be verified in order. To disable one of the authentication, go to the dedicate page to disable it. PAM Ordering at Configuration > PAM Order from the main menu. 3.5.9 PEF Platform Event Filtering (PEF) provides a regular mechanism for configuring the BMC to take selected actions on event messages that it receives or has internally generated. These actions include operations such as system power-off, system reset, as well as triggering the generation of an alert. To open PEF Management Settings page, click Configuration > PEF from the main menu Event Filter Tab Choose the Event Filter, double click or click Modify tab to modify Event Filter, or click the blank Event Filter to add new setting. – PEF ID This field displays the ID for the newly configured read-only PEF entry. ASMB-BMC User Manual 24 25 ASMB-BMC User Manual Graphical User Interface (GUI) – Policy Entry # Displays Policy entry number for the newly read-only configured entry. – Policy Number Displays the Policy number of the configuration. – Policy Configuration To enable or disable the policy settings. Chapter 3 – Filter configuration Check box to modify the PEF settings. – Event Filter Action Check box to modify PEF Alert action. – Event Severity To choose any one of the Event severity from the list. – Sensor Name To choose the particular sensor from the sensor list. Alert Policy Tab This page is used to configure the Alert Policy and LAN destination. Entries can be added, deleted or modified in this page. Choose the Policy Entry, double click or click Modify tab to modify Alert Policy Entry, or click the blank Policy Entry to add new setting. – Policy Set To choose any one of the Policy set values from the list. 0. Always send alert to this destination 1. If alert to previous destination was successful, do not send alert to this destination. Proceed to next entry in this policy set. 2. If alert to previous destination was successful, do not send alert to this destination. Do not process any more entries in this policy set. 3. If alert to previous destination was successful, do not send alert to this destination. Proceed to next entry in this policy set that is to a different channel. 4. If alert to previous destination was successful, do not send alert to this destination. Proceed to next entry in this policy set that is to a different destination type. – Channel Number To choose a particular channel from the available channel list. – Destination Selector To choose a particular destination from the configured destination list. LAN Destination To add, delete or modify LAN destination. Choose the LAN Destination, double click or click Modify tab to modify LAN Destination, or click the blank LAN Destination to add new setting. ASMB-BMC User Manual 26 Chapter 3 3.5.10 RADIUS To “enable or disable” RADIUS, check or uncheck the "RADIUS Authentication" Enable checkbox. 27 ASMB-BMC User Manual Graphical User Interface (GUI) – LAN Destination Display Destination number for the newly configured read-only entry. – Destination Type To select SNMP Trap or an Email alert. The SMTP server information also has to be added-under Configuration > SMTP. – Destination Address Destination address supports IPv4 address format and IPv6 address format. – Subject & Message These fields must be configured if email alert is chosen as destination type. RADIUS Authentication Option to enable RADIUS authentication. User can click “HELP” to see the detail setting for each column. Port The RADIUS Port number. Time Out The Time out value in seconds, the range is from 3 to 300. Server Address The IP address of RADIUS server. Secret The Authentication Secret for DADIUS server. 3.5.11 Remote Session This page is for users to configure virtual media configuration settings for the redirection session. The default is encryption disabled. KVM Encryption Enable or Disable encryption on KVM data for the next redirection session. Media Encryption Enable or Disable encryption on Media data for the next redirection session. Virtual Media Attach Mode Two types of VM attach mode are available. – Attach Immediately attached Virtual Media to the server upon boot-up. – Auto Attaches Virtual Media to the server only when a virtual media session is started. ASMB-BMC User Manual 28 This page is used to display the services running in the BMC. To modify a service, the user must be an Administrator. Chapter 3 3.5.12 Services Graphical User Interface (GUI) Service Name Displays service name of the selected slot (read-only). Current State Display the current status of the service, either active or inactive. Interfaces Shows in the interface which service is running. Nonsecure Port This port is used to configure the non secure default port number for the service. Click “HELP” to see port occupation for application. Secure Port Used to configure secure default port number for the service. Click “HELP” to see port occupation for application. Timeout Display the session timeout value of the service. Web timeout value range Web timeout value range: 300 to 1800 seconds. 29 ASMB-BMC User Manual Maximum Sessions Displays the maximum number of allowed sessions for the service. 3.5.13 SMTP Email notification alerts will be sent while SMTP (Simple Mail Transfer Protocol) is set. This function helps the administrator to be notified when the status of the server changes. LAN Channel Number Display the list of LAN channels available. Sender Address The “Sender Address” valid on the SMTP Service. Machine Name The “Machine Name” of the SMTP Service. Naming criterion please see “HELP”. Primary SMTP Service Lists the Primary SMTP Server configuration. – Server Address The “IP address” of the SMTP Server. – SMTP Service requires Authentication To enable/disable SMTP Authentication, supports CRAM-MD5, LOGIN, and PLAIN. – Username The username to access SMTP Accounts. Username criterion is listed in “HELP”. – Password The password for the SMTP User Account. Username criterion is listed in “HELP”. Secondary SMTP Server Lists the Secondary SMTP Server configuration. It is an optional field. If the Primary SMTP server is not working fine, then it tries with Secondary SMTP Server configuration. ASMB-BMC User Manual 30 System and Audit log page displays a list of system logs and audit logs occurred in this monitored server. To open System and Audit log page, click Configuration > System and Audit Log from the main menu. System Log This field is to enable or disable the system logs. Log Type Specifies the Log type for system logs, whether it should be preserved in a local file or on a remote server. Note! Local file resides at/var/log/. File Size To specify the size of the file in bytes if the selected log type is local. Size ranges from 3 to 65536. Rotate Count When logged information exceeds the specified file size, the old log information automatically gets moved to back up files based on the rotate count value. If the rotate count is zero, the old log information gets cleared permanently each time. Value ranges from 0 to 255. Server Address To specify the remote server address to the log system events. Server Address supports IPv4 and FQDN format. Audit Log To enable or disable the audit log. 31 ASMB-BMC User Manual Graphical User Interface (GUI) Chapter 3 3.5.14 System and Audit log 3.5.15 Users The user management page allows users to view the current list of user slots for the server. User can be added, modified, or deleted. To open User Management, click Configuration > Users from the main menu. User ID Displays the ID number of the user (maximum of ten users). User Name Displays the name of the user. User Access To enable or disable the access privilege of the user. Network Privilege Displays the network access privilege of the user. SNMP Status Displays email address of the user. To modify or add users by selecting a configured slot or a free slot. Click “HELP” to see the criterion for each column about user privilege and setting. ASMB-BMC User Manual 32 This page is to configure Virtual Media device settings. To open Virtual Media page, click Configuration > Virtual Media from the main menu. Floppy devices Selects the number of floppy devices that support for Virtual Media redirection. CD/DVD devices Selects the number of CD/DVD devices that support for Virtual Media redirection. Harddisk devices Selects the number of hard disk devices that support for Virtual Media redirection. Local Media Support To enable or disable the local media support for Virtual Media redirection. 33 ASMB-BMC User Manual Graphical User Interface (GUI) Chapter 3 3.5.16 Virtual Media 3.6 Auto Video Recording The Auto Video Recording consists of Triggers Configuration and Recorded Video. To set configure triggers for various events, click Auto Recording > Triggers Configuration from the main menu. To open Video recording page, click Auto Video Recording > Recorded Video from the main menu. # The serial number. File Name The video filename. File Information Day, date and time of video upload. Play Video To play the selected video. Download To download the elected video. ASMB-BMC User Manual 34 Delete To delete the selected video. Note! 3.7 Maintenance Maintenance for back end management. 3.7.1 Firmware update An easy firmware update method for users, cancelation is available during the stepby-step process. Click the Enter Update Mode tab and follow the instruction. To open Firmware Update page, click Maintenance > Firmware Update from the main menu Note! After entering “update mode widgets”, other web pages and services will not work. All open widgets will be closed automatically. If the upgrade process is cancelled in the middle of the wizard, the device will be reset. The browser has to be closed and the user has to log back onto the Internet again before performing any other types of operations. Please make sure the chances of a power or connectivity loss are minimal when performing firmware upgrades. 35 ASMB-BMC User Manual Graphical User Interface (GUI) A maximum of only 2 video files can be recorded and available for access, with each recording limited to 5.5MB or 20 seconds whichever is earlier. Further event occurrences will be ignored and no recording will happen, until at least one video file is deleted. If the recorded video files are stored in RAM, then those video recordings will not be persistent upon BMC reboot. Chapter 3 3.7.2 Restore Factory Defaults This option is used to restore the factory defaults of the device firmware. The system will reboot automatically. Note! After entering restore factory widgets, other web pages and services will not work. All open widgets will be closed automatically. The device will reset and reboot within few minutes. To open Restore Factory Defaults page, click Maintenance > Restore Factory Defaults from the main menu. 3.7.3 System Administrator System Administrator page allows a user to change passwords. Username Username of System Administrator is a read only field. User Access To enable user access for system administrator. ASMB-BMC User Manual 36 Password To change the user’s password. The password must be at least 8 characters long, and white spaces are not allowed. 3.8 Log Out To log out, click the logout link on the top right corner of the screen. Chapter 3 Graphical User Interface (GUI) 37 ASMB-BMC User Manual ASMB-BMC User Manual 38 Appendix A Ports Usage A Port # Owner Module Usage 80 Web server Listening for network connections on HTTP:// 443 Web server Listening for secured network connections on HTTP:// 5120 CD media server To accept regular CD media redirection connections 5123 Floppy media server To accept regular HD media redirection connections 5122 HD media server To accept regular FD media redirection connections 7578 KVM server (adviser) To accept regular KVM redirection connections 623 IPMI LAN interface 1900 uPnP discovery Used for uPnP based BMC discovery 50000 uPnP discovery Used for uPnP based BMC discovery 555 WSMAN Eventing daemon's listening port (Implemented, not enabled) 5988 SFCB(WSMAN) WSMAN related 427 SLPD Service Loater ASMB-BMC User Manual 40 Appendix A Ports Usage 41 ASMB-BMC User Manual www.advantech.com Please verify specifications before quoting. This guide is intended for reference purposes only. All product specifications are subject to change without notice. No part of this publication may be reproduced in any form or by any means, electronic, photocopying, recording or otherwise, without prior written permission of the publisher. All brand and product names are trademarks or registered trademarks of their respective companies. © Advantech Co., Ltd. 2013