1
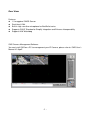
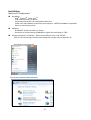
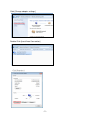
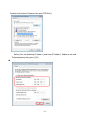
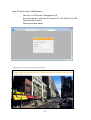
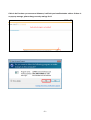
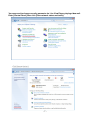
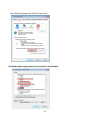
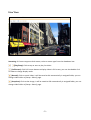
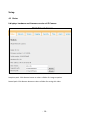
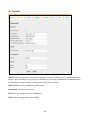
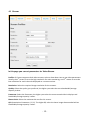
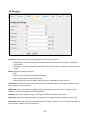
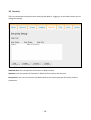
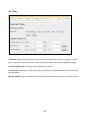
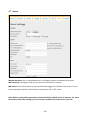
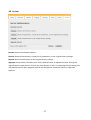
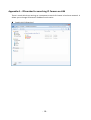
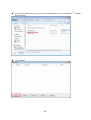
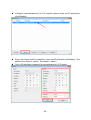
IP Camera
IP Survlliance
User’s Manual
-1-
V_1.0
Contents Table
Over View ........................................................................................................................................................ 1
Installation....................................................................................................................................................... 2
Live View ........................................................................................................................................................ 9
Setup ............................................................................................................................................................. 10
4.1 Status ........................................................................................................................ 10
4.2 Network ..................................................................................................................... 11
4.3 Stream ....................................................................................................................... 12
4.4 Imaging ..................................................................................................................... 13
4.5 Security ..................................................................................................................... 14
4.6 Time .......................................................................................................................... 15
4.7 Alarm ......................................................................................................................... 16
4.8 System ...................................................................................................................... 17
Appendix A – IPSearcher for searching IP Camera on LAN .................................................................. 18
-2-
Over View
Features
1.3 megapixel CMOS Sensor
Real-time H.264
Built-in high sensitive microphone for Box/Bullet series
Supports ONVIF Standard to Simplify Integration and Enhance Interoperability
Supports H/W Watchdog
CMS Camera Management Software
You can install CMS on a PC to management your IP Camera, please refer to “CMS User’s
Manual-V1.0.pdf”.
-1-
Installation
Minimum PC Requirement
Hardware:
Intel○R Pentium○R DUAL CoreTM
2 GB system memory or above
Sound Card: DirectX○R 9.0c compatible sound card
Video Card: 3D hardware accelerator card required – 100% DirectX○R 9.0c compatible
Ethernet network port/card
Software:
Windows○R XP Service Pack 2 or above
Resolution of screen setting: 1280x960 or higher for the display of 720P
Change computer’s IP address – Please set IP address to be “192.168.0.3”.
(You can also searching IP Camera with IPSearcher, please refer to appendix A)
Click [Start-> Control Panel]
Click [View network status and tasks]
-2-
Click [Change adapter settings]
Double Click [Local Area Connection]
Click [Properties]
-3-
Double click [Internet Protocol Version4(TCP/IPv4)]
Select [Use the following IP address] and enter IP Address, Subnet mask and
Default gateway then press [OK].
-4-
Login IP Camera with a WEB browser
You may visit IPCamera’s homepage by IE.
Running a browser and enter IP Camera’s IP- 192.168.0.118 in URI.
Default account: admin
Default password: admin
It displays Live Video after you login IP Camera.
-5-
If this is the first time you connect to IPCamera, it will ask you install ActiveX○R add-on. If there is
no pop-up message, please change security settings for IE.
-6-
You may need to change security parameter for Live View Player playing video well.
Enter [Control Panel] then click [View network status and tasks].
Click [Internet Options].
-7-
Enter [Security] page then click [Custom level].
Set [Download unsigned ActiveX controls] to be [Prompt].
-8-
Live View
Streaming: IP Camera supports dual stream, select a stream type from the drawdown box.
/
(Play/Stop): Click to stop or start to play live video.
(Full Screen): Click Full Screen button to display video in full screen, you can also double click
on video to change display mode.
(Record): Click to record video, it will be saved as AVI automatically in assigned folder, you can
change video folder at [Setup-> Status] page.
(Snapshot): Click to shot image, it will be saved as JPG automatically in assigned folder, you can
change video folder at [Setup-> Status] page.
-9-
Setup
4.1 Status
It displays hardware and firmware version of IP Camera.
Snapshot path: Click Browse button to select a folder for image snapshot.
Record path: Click Browse button to select a folder for saving AVI video.
- 10 -
4.2 Network
TCP/IP: There are two types of IP network settings, if there is a DHCP server or broad band router
setup in your IP network, you may set it to be DHCP. If you set up a NVR(Network Video Recorder)
to recording IP Camera’s video, it is better set IP type to be “Static IP”.
SNTP Server: Enter IP or FQDN of an SNTP server.
Host Name: Type the camera title.
HTTP: You can change listen port of WEB GUI.
RTSP: You can change listen port of RTSP.
- 11 -
4.3 Stream
In this page you can set parameters for Video Stream.
Profiles: IP Camera supports dual video streams, select a draw down item to set video parameters.
Usually, the 1st stream is set to be high resolution for main monitoring, and 2nd stream is set to be
low resolution for multi channels displayed on a screen monitor.
Resolution: Select the required image resolution for the streams.
Quality: Select the quality you preferred, the higher you select the more bandwidth/storage
capacity it takes.
Framerate: Select the framerate, the higher you select the more smooth video it displays and
bandwidth/storage capacity it takes.
Bitrate Limit: Select the maximum bit rate for this stream.
QP: Quantization Parameter ( 0- 51). The higher QP value the lower image data encoded ad less
bandwidth/storage capacity it takes.
- 12 -
4.4 Imaging
Frequency: Select one of the following options of the Flicker device:
◎ NTSC/60Hz : This will compensate for 60Hz flicker and will put the display if selected to
NTSC mode.
◎ PAL/50Hz : This will compensate for 50Hz flicker and will put the display if selected to PAL
mode.
Mirror: Select the required option
◎ OFF
◎ Mirror: Flips the data in horizontal direction.
◎ Flip: Flips the data in vertical direction.
◎ Mirror and Flip: Flips the data in both directions, equivalent to 180 rotation.
Color Auto: IP Camera will turn to be mono (black and white) mode in low light condition when
this parameter is set to be On.
Brightness: Select the required brightness level that ranges from 16 to 112. A brighter scene
appears, if you choose higher level of brightness.
Contrast: Select the required range. The range available is between 32 to 128.
Sharpness: Select the required range of sharpness. The range available is between 48 to 144.
Saturation: Select the required saturation level that ranges from 32 to 112. A vivid scene appears,
if you choose a higher level of saturation.
- 13 -
4.5 Security
There are three operating levels when entering the Web UI. Logging-in as the admin allows you to
change all settings.
Administrator: You can operate all functions in Web interface.
Operator: You can operate all functions in Web interface except User Account.
Anonymous: You can only monitor the Web interface, but cannot operate all function and set
parameters.
- 14 -
4.6 Time
Timezone: Select the required time zone from the drop-down list. If this is not done, the time
given by the unit may be incorrect. Please set a connectable Time Server at [Network] page.
Current System Time: It displays current time on IP Camera.
Sync with PC: It displays current time on your computer, click Update button to sync time with
your computer.
Manual Update: Enter date and time manually then click Update button sync IP Camera’s time.
- 15 -
4.7 Alarm
Motion Detection: Set it to make MD active, click [Region] button to edit detecting areas.
MD Sensitivity: the higher value you set the more sensitivity for camera.
MD Action: Select which action to execute when MD triggered. IP Camera may send an e-mail
which attached snapshot in JPEG format or upload this file to FTP server.
Note: Before setting all the parameters, please build FTP or SMTP server in advance. For more
information about the settings, you can consult a qualified IT professional or your ISP.
- 16 -
4.8 System
Restart: Restart the Network Camera.
Restore: Resets all parameters, except the IP parameters, to the original factory settings.
Default: Resets all parameters to the original factory settings.
Upgrade: Please select a firmware then click [Update] button to upload firmware. During the
upgrade process please don’t click on any other button or don’t try changing camera setting, this
may lead camera to abort upgrade process and subsequent reboot will result in undesired
behavior.
- 17 -
Appendix A – IPSearcher for searching IP Camera on LAN
There is a tool which can running on a computer to search IP Camera in local area network. It
allows you to change IP Camera’s IP address much easier.
Double click [IPSearcher].
- 18 -
R displays
Running [IPCamSearcher] (It may show “IPCamSearcher.exe” if your Windows○
full file name.)
Click [Search]
- 19 -
It displays searched device(s) in 5-10 seconds, please select an IP Camera then
click [Update].
Enter User Name and Password then enter new IP, Netmask and Gateway. (The
default User Name is “admin”, Password is “admin”)
Press OK then open a browser for connecting to this IP Camera.
- 20 -