1
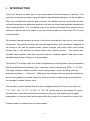
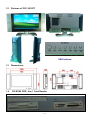
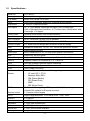
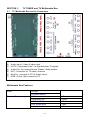
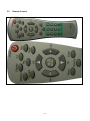
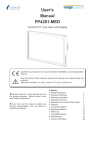
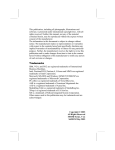
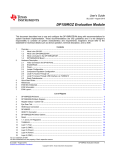
PPC-3012PT
30” Touch Panel PC with TV Tuner
User’s Manual
-1 -
©
COPYRIGHT
All rights reserved. The information contained in this guide has been validated
and reviewed for accuracy. No patent liability is assumed with respect to the use
of the information contained herein. While every precaution has been taken in
the preparation of this guide, the Manufacturer assumes no responsibility for
errors or omissions.
No part of this publication may be reproduced, stored in a retrieval system, or
transmitted in any form or by any means, electronic, mechanical, photocopying,
recording, or otherwise, without the prior written permission of the Manufacturer.
Manufacturer reserves the right to modify or improve the specifications without
prior notice.
TRADEMARK™
®
NAGASAKI
®
is a registered trademark of Nagasaki IPC Technology Corporation.
®
®
Intel , Pentium and MMX are registered trademarks of Intel
®
®
Corporation.
®
Microsoft and Windows are registered trademarks of Microsoft Corporation.
All products and company names are trademarks or registered trademarks of their
respective holders.
These specifications are subject to change without notice.
-2 -
CONTENTS
SECTION 1 INTRODUCTION
1.1 INTRODUCTION
… … … … … … … … … … … … … … … … … .
1.2 Pictures of PPC-3012P T … … … … ....… … … … … … … .… … … ..
1.3 Dimensions … … … … … … … … … … … … … … … … … … … … … ..
1.4 I/O Ports … … … … … … … … … … … … … … … … … … … … … … … ..
1.5 Power Adapter and Optional Accessories … … … … … … … … … .
1.6 Main board used in PPC-3012PT … … … ..… .… … … … … ..… .
1.7 Specifications … … … … … … … … … … … … … … … … … … … … … ...
4
5
5
5
6
6
7
SECTION 2 TOUCH SCREEN
2.1 How To Load Windows O.S. … … … … … … … … … … … … … … …
7
SECTION
3.1
3.2
3.3
3.4
3 TV BOX
TV Multimedia Box … … .… … … … … … ..… … … … … … … … … ..... 8
Remote Controller … … ..… … … … … … … … … … … … … … … .… ... 8
Remote Control Precaution & Usage … … … … … … … … … … … . . 9
Power On / Off … … … … … … … … … … … … … … … … … … … … … . 10
SECTION 4 BASIC OPERATION
4.1 During Normal Operation .… … … … … … … … … … … … … … ...... 10
4.2 In Menu Mode … … … … … … … … … … … … … … … … … … … … …
11
4.3 Select Display / Audio Source … … … … … … … … … … … … … … . 11
4.4 OSD Set Up
SECTION 5 TROUBLE SHOOTING
5.1 Trouble Shooting … … … … … .… … … … … … … … .… … … … … ..
5.2 Specifications of TV Tuner … … … … … … … … … … … … … … … …
-3 -
12
12
I. INTRODUCTION
First of all, we wish to thank you for your patronage and for purchasing our product. Our
products incorporate a variety of special features and advanced designs, yet we are able to
offer very cost-effective products and solutions. We believe that we can provide not only
the best technology and advanced products, but also the lowest cost products compared to
other similar products. For a complete view of our products and solutions, please visit our
website or discuss with our dealer or see the various models on this driver CD or User’s
manual booklet.
This product manual contains a variety of technical information to help you to use or install
the product. The manual contains the technical specification, port connectors, diagrams of
the board or unit and its various areas, jumper settings, and many other useful areas.
Please refer to the manual for details about each specific product. The manual also
includes some general idea about special features, software options, and some basic
troubleshooting ideas to help you in these areas.
This Panel PC is widely used in all kinds of applications including Kiosk, factory automation,
HMI (Human-Machine-Interface), hotel, restaurant, home, banking (e.g. ATM) , 7-11, POS,
POI, super markets, medical, military, food, mining, airport, school, building, vehicles,
telecommunications , … and so on. Whenever the customer has any special requirement,
we are very pleased to custom design for them at a much competitive pricing and within
the average 4 weeks delivery time.
We are able to custom design the all-in-one or separate Panel PC from a very small 6.4”,
7”, 8”, 10.4”, 12.1”, 15”, 17”, 19”, 20”, 21”, 23”, 30”, all the way up to the largest 40” as per
the customer’s required specifications including in the very cold weather and a higher
temperature or in a very harsh environment with dirty, humid, full of particles in the air, etc.
Please contact our distributors for further details.
-4 -
1.2
Pictures of PPC-3012PT
OSD buttons
1.3
1.4
Dimensions :
CD-ROM, FDD, 6-in-1 Card Reader
-5 -
1.5
Specifications :
Model No.
Housing
PPC-3012PT
Made by 2.0mm rugged steel construction
IP & NEMA
Meets IP-56, NEMA -12 on front
Color
Wall-mount
Silver color is standard. Black color is optional at your request
4 x VESA-75 wall mount holes
LCD specs.
30” TFT LCD display, high bright 400 cd/m2, 500:1 contrast ratio
1280 x 768 wide screen resolution, 16.77 million colors, 50,000 hours Wide
View Angle : 170 degree
Touch screen
Speaker
Resistive touch screen, 2048 x 2048 resolution
Built in 2 high output 10 watts speaker on each side
CPU Processor
INTEL CELERON 2.4 GHz CPU as standard
System RAM
System Chipset
Support maximum 2GB DDR RAM. Standard is 512MB.
HDD
Standard is 40GB HDD. 60, 80, 120, 160GB are optional for request.
VGA
Video RAM
Support second monitor
Built in 64MB RAM for 3D / 2D high speed graphics acceleration
AGP
Support 4X, 8X AGP speed
Video Memory
Direct X
Support 16M, 32M, 64M share memory. Default is 32 or 64M.
LAN
One 100/10 Mbps Ethernets support networking
CD- ROM
FDD
One CD-ROM , 52x Speed
One 1.44MB FDD built in
6-iin-1
Reader
Card
TV Tuner
ATI 9200 as north bridge and SiS962L as south bridge.
Support DirectX on versions 8.0, 8.1, and 9.0.
One 6-in-1 Flash Card Reader built in supporting :
CF card (CF-I, CF-II),
Memory Stick (MS),
SM (Smart Media),
SD (Smart Disk),
MMC
MD (Micro Drive)
Remote control
TV Tuner built in supporting NTSC system for U.S., Taiwan, Japan
Optional PAL systems for European countries
1 x Remote control keypad
HDTV
Support high definition TV on 480p, 480i, 720p, 1080i
USB 2.0
2 x USB 2.0
Serial port
Keyboard
2 x RS232 serial ports
1 x PS2 type keyboard port
Mouse
1 x PS2 type mouse port
Printer port
Game port
1 x LPT port for printer interface
1 x game port
-6 -
PCI
slot
expansion
1 x PCI slot for future expansion purpose
PCI ver. 2.2
Support PCI version 2.2
PCI IDE port
Audio jack
Support ATA-100 x 2 up to 4 devices
Support external speaker or microphone function
Vibration resistant
Meet strict vibration test from 5 – 500 Hz at 1.5G RMS under Windows XP
Pro.
Shock resistant
Passed strict shock test from 10G for 11ms duration under Windows XP
Pro.
Dual power supplies supporting PC system and TV system
Standard AC 100-240V power adapter.
Power supply
Dimensions
See the above drawing
Operating
temperature
From 0 to 40 degree C at an air ventilation area
SECTION 2
TOUCH PANEL
4 Wire analog Resistive Touch screen.
-7 -
SECTION 3
3.1
1)
2)
3)
4)
5)
6)
7)
TV TUNER and TV Multimedia Box
TV Multimedia Box and Its Connectors
Audio input 1, Video S-video input
Audio input 2, Video S-video input
HDTV / Component Input : for high definition TV signals
Audio Out : For external Home Theater / Audio system
ANT : Connector for TV cable / Antenna
Audio In : connects to PC for Audio output
RGB : D-Sub 15pin connect to PC
Multimedia Box Features
Audio
External Connector
NICAM
Surround Sound
S-Video
Composite / AV
YPbPr / YCbCr
VGA Audio Input
Audio Output
-8 -
2 Sets
2 Sets
1 Set
1 Set
1 Set
3.5
Remote Control
-9 -
1)
2)
3)
4)
5)
6)
7)
8)
9)
10)
11)
12)
13)
14)
15)
16)
17)
18)
3.3
3.4
1)
Power
Menu : To show all the functions except in AV or PC mode.
Source : Switch to TV/PC/Video mode.
Volume : Volume up (+), Volume down (-).
Channel : ? for higher frequencies, ? for lower frequencies
Adjustment keys : Using Up, Down, Left and Right to adjust functions.
Recall : Back to previous channel or last selected function from menu page.
Enter : Confirm your selections
Favorite : press 8 to memorise your favorite channels, then use 9 to select
memorized favorite channels.
Sleep Timer : Setup sleep mode for auto switch off.
Main/Sub Audio : Switch to Normal sound, Surround sound or NICAM.
Mute : Press once to turn off sound, and press again to turn it back on.
Number keys : To select favorite channels instantly.
Display : To Show the current channel number and audio mode.
Memory : can set 8 favorite channels of yours.
Swap : Swap the main picture and the PIP picture
PIP : switch on / off PIP (Picture in picture) functions and 3 different PIP modes.
Mode : switch between 4:3 and 16:9 display mode
Remote Control Precaution and Usage
♦
Control distance would be shorter as the TV receiver facing a strong light.
♦
Any impact should be avoided.
♦
Humidity and high temperature should be avoided.
♦
Remove battery from Remote Control when it is not in use for a longer time.
♦
Transmitter should point directly to the TV receiver.
Power On/Off
Red light on after power cable has plugged in.
- 10 -
2)
3)
Press Power button, red light turns green. Display appears in 3 seconds.
Press Power 1
? button again to switch off TV. Green light turns red and display off.
Warning: Electrical currents may still remain in the TV after power off. Unplug the
power cord if you intend not using TV for a long period.
SECTION
4.1
4
BASIC OPERATION
During Normal Operation
Press Channel 5? ? button to select TV channels
Press Volume 4 + or - button to adjust the Audio volume
4.2
In Menu Mode
1.
Press Menu 2 button as ENTER / EXIT
2.
Press Channel 5 ? ? button to select specific function for adjustment
3.
Press Enter 8 button on the Remote Control (or Source 3 button on Control Pad)
as SELECT.
Note: You will be using these buttons all the time to make any adjustment.
4.3
Select Display/Audio Source
1) Press Source 3 button to switching among input sources.
2) Displays orders: PCbCr/YPbPr ? S-Video 2 ? S-Video 1 ? Video 2 ?
Video 1 ? TV ? RGB(PC mode)
3) Press Menu 2 button to set up TV displays, Languages and other
settings … etc
Note: The system can not display TV signal and Video1/S-Video1 signal at
- 11 -
the same time.
4.4
OSD Setup
Main Video Adjustment
1.
2.
3.
Press Menu 2 button to enter menu page
Press Channel 5? ? button to select specific function for adjustment
Press Enter 8 button on the Remote Control (or Source 3 button on
Control Pad) to confirm to enter menu page. Then Select Contrast,
Brightness, Saturation, Hue, Sharpness for further adjustments.
Example: Contrast Adjustment:
Press Channel 5? ? button to select Contrast, then press 8 button on
the Remote Control (or Source 3 button on Control Pad), then Press
Channel 5? ? button to adjust. Press Menu 2 button to return to the
menu.
SECTION 5
5.1
TROUBLE SHOOTING
Trouble Shooting Checklist
No Picture & No Sound
♦
♦
♦
Picture OK but No Sound
♦
♦
♦
The remote control doesn’t
work
No/Poor color or Poor Picture
Quality
♦
♦
♦
♦
Check whether the monitor is turned on
Power cord inserted into wall outlet?
Plug another product’s power cord into the wall
outlet where the monitor’s power cord was
plugged in.
Press Volume
button
Sound muted? Press Mute button
Check if there is any obstruction between monitor
and remote control
Check if the batteries are installed correctly
Check if the batteries still have power
Adjust the color balance in menu
Increase the distance between monitor and other
- 12 -
♦
Horizontal/Vertical Bars or
picture shaking
Strange sound from inside
the monitor
5.2
♦
♦
interference
Activate any function to restore the brightness of
the picture
Check for local interference such as an electrical
appliance or power tool
A change in ambient humidity or temperature
may result in an unusual noise at the time of
switching off or on of the monitor and does not
indicate a fault with the monitor.
Specifications of TV Tuner
Model No.
Power Supply
Remote Control Model
Power Consumption
LCD View Area
Speaker Output Power
VGA Input
PPC-3012PT
AC 90 – 250V / 60 Hz
R3001
170 W
Approximate 30 inch diagonal
10 watts + 10 watts
1
Note: Manufacturer reserves the right to change / upgrade product features without
prior notice.
- 13 -