1
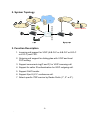
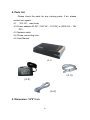
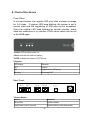
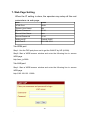
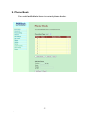
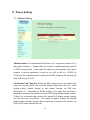
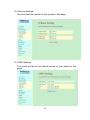
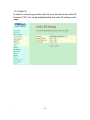
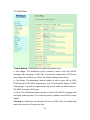
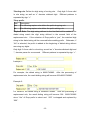
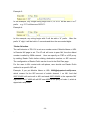
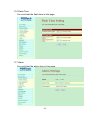
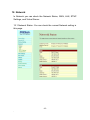
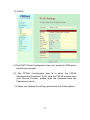
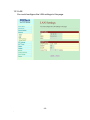
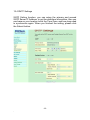
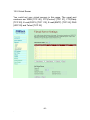
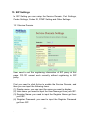
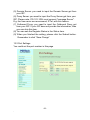
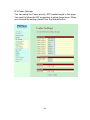
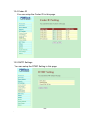
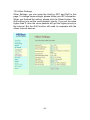
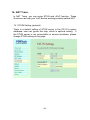
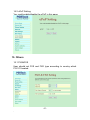
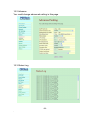
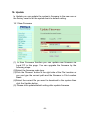
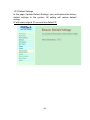
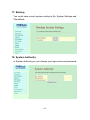
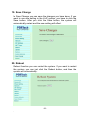
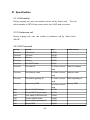
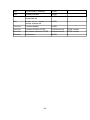
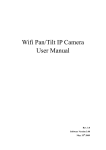
PG-101
Personal Gateway
User Manual
PG-101
PORTech Communications Inc.
【Content】
1. Introduction ........................................................................................................... 1
2. System Topology .................................................................................................. 2
3. Function Description ............................................................................................ 2
4. Parts list................................................................................................................. 3
5. Dimension: 14*9*3 cm .......................................................................................... 3
6. Chart of the device................................................................................................ 4
6.1 Front Panel....................................................................................................... 4
6.2 Back Panel ....................................................................................................... 4
7. Web Page Setting.................................................................................................. 5
7.1 Via WAN port ................................................................................................... 5
7.2 Via LAN port ..................................................................................................... 5
8. System Information .............................................................................................. 6
9. Phone Book ........................................................................................................... 7
10. Remote MV .......................................................................................................... 9
11. Phone Setting ...................................................................................................... 9
11.1 Master Setting ................................................................................................. 9
11.2 Volume Settings ............................................................................................ 10
11.3 DND Settings................................................................................................. 10
11.4 Caller ID ........................................................................................................ 11
11.5 Dial Plan ........................................................................................................ 12
11.6 Flash Time..................................................................................................... 15
11.7 Alarm ............................................................................................................. 15
12. Network .............................................................................................................. 16
12.1 Network Status: You can check the current Network setting in this page...... 16
12.2 WAN .............................................................................................................. 17
12.3 LAN ............................................................................................................... 18
12.4 SNTP Settings ............................................................................................... 19
12.5 Virtual Server................................................................................................. 20
13. SIP Settings ....................................................................................................... 21
13.1 Service Domain ............................................................................................. 21
13.2 Port Settings .................................................................................................. 22
13.3 Codec Settings .............................................................................................. 23
13.4 Codec ID ....................................................................................................... 24
13.5 DMTF Settings .............................................................................................. 24
13.6 Other Settings ............................................................................................... 25
14. NAT Trans. ......................................................................................................... 26
14.1 STUN Setting (optional) ................................................................................ 26
14.2 uPnP Setting ................................................................................................. 27
15. Others ................................................................................................................ 27
15.1 FXO&FXS...................................................................................................... 27
15.2 Advance ........................................................................................................ 28
15.3 Status Log ..................................................................................................... 28
16. Update................................................................................................................ 29
16.1 New Firmware ............................................................................................... 29
16.2 Default Settings ............................................................................................. 30
17. Backup ............................................................................................................... 31
18. System Authority .............................................................................................. 31
19. Save Change ..................................................................................................... 32
20. Reboot ............................................................................................................... 32
21. Specification...................................................................................................... 33
21.1 Call transfer ................................................................................................... 33
21.2 Conference call ............................................................................................. 33
22.3 IVR Command ............................................................................................... 33
1. Introduction
PG-101 can be used with soft-phone support SIP, residential VOIP
gateway and connect to MV-37X VoIP GSM Gateway.
The
setting of soft-phone and residential gateway is beyond the scope
of this document and user should refer to the user manual of
original manufacturer.
also included.
The related configuration of peer MV is
For the detail configuration of MV product, user
should refer to MV user manual.
-1-
2. System Topology
H
PSTN
G
PSTN
ITSP
K
GSM
F
2*
3*
GSM
Master Number
Softphone
A
FXO
C
D
B
FXS
Internet
FXS
PG-101
PG-101
MV-370
Home or Office
Office
3. Function Description
1. Incoming call support for VOIP (A-B-D-C or A-B-D-F or K-D-C
or K-D-F) and FXO.
2. Outgoing call support for dialing plan with VOIP and local
FXO routing.
3. Support concurrent ring(C and F) for VOIP incoming call.
4. Support for caller ID authentication for VOIP outgoing call.
5. Support Call-Transfer.
6. Support A(or K)-C-F conference call.
7. Select specific ITSP service by Realm Prefix (1*, 2* or 3*).
-2-
4. Parts list
Please check the parts for any missing parts. If do, please
contact our agents:
4.1 「PG-101」main body
4.2 Power adaptor AC-DC (110V AC – 12V DC) or (220V AC – 12V
DC)
4.3 Network cable
4.4 Phone connecting Line
4.5 User Manual
(4.1)
(4.3)
(4.2)
(4.4)
5. Dimension: 14*9*3 cm
-3-
6. Chart of the device
Front Panel
In normal situation, the register LED only blink at power-on stage
for 3~6 times. If register LED keep blinking, the system is not in
normal state and the registering of SIM may not be completed.
Once the register LED keep blinking for several minutes, check
ether-net connection or try another STUN server which can be set
in the WEB page.
*Power: LED on after power on.
*Hook: Indicate the status of phone
*PSTN: Indicate the status of PSTN Line
*Register:
LED status
Behavior
OFF
Default
ON
Registered to SIP proxy
Blinking
Checking NAT
Back Panel
FX O
FX S
LAN
A ct
Core Select/
R estart
WAN
L ink A ct
Pow er
Link
*Restart button
Action
Behavior
Short Click
System restart
Long Press (over 5 second)
System factory reset and restart
-4-
-
7. Web Page Setting
When the IP setting is done, the operator may setup all the rest
parameters via web page.
Item
Value
HTML Port
9999
System User Name
ata
System Password
1234
Normal User Name
user
Normal Password
1234
WAN port IP
Default DHCP
LAN Port IP
192.168.123.1
Via WAN port
Step1: Use the FXS port phone set to get the WAN IP by IVR (#126#).
Step2: Start a WEB browser window and enter the following line to access
WEB page.
http://wan_ip:9999
Via LAN port
Step1: Start a WEB browser window and enter the following line to access
WEB page.
http://192.168.123.1:9999
-5-
8. System Information.
8.1 When you login the web page, you can see the demo system
current system information like firmware version, company…
etc in this page.
8.2 Also you can see the function lists in the left side. You can use
mouse to click the function you want to set up.
-6-
9. Phone Book
You could add/delete items in current phone books.
-7-
10. Remote MV
PG-101 can register to MV as optional. The setting is for one-stage
or two-stage outgoing call in case of MV environment. As for the
case of soft-phone environment, please leave this part blank
*Module Name or URL: The peer SIP account used when dialing VOIP
outgoing call(i.e. The SIP account of B used to register in the system
topology).
-8-
11. Phone Setting
11.1 Master Setting
*Master Number: The number that FXO dial out (i.e. the phone number of F in
the system topology).
of PSTN incoming call.
System uses this number to authenticate the caller ID
If the caller ID matches to the setting in the master
number, it has the permission to dial out via VoIP in MV (i.e. F-D-B-G or
F-D-B-H).If the matching result is failed, the PSTN incoming call will ring the
local FXS directly (F-D-C).
*No Answer Fwd Time Out: Setup the FXS ringing period. For setting 2~8
rings, the incoming VOIP call from MV always rings local FXS first. After
ringing period, system change to dial master number via FXO port.
(Parameter “0”: forwarding to PSTN directly.) The caller side will hear a
greeting at first then a ring back tone from PSTN while dialing master number.
To Set 0 for concurrent ring, which is for ringing FXS, dialing master number
via FXO port are concurrence.
The empty of master number will disable
dialing master number function which means the incoming VoIP call will ring
FXS only till caller side end the call.
-9-
11.2 Volume Settings
You could set the volume of your phone in this page.
11.3 DND Settings
You could set the do not disturb period of your phone in this
page
-10-
11.4 Caller ID
In order to correctly generate caller ID, user should set the caller ID
format of FXS. You could enable/disable the caller ID setting in this
page.
-11-
11.5 Dial Plan
*Transit Method: Three types of methods provided to user.
a. One Stage: The destination phone number is sent in the SIP INVITE
message with transiting a VOIP Call. It should be supported by SIP Server
while dialing via a SIP proxy. This is the default setting of the system.
b. Two Stage: The destination phone number is sent to peer MV by 2833
DTMT packet or SIP INFO depending on PG-101 setting SIP Setting→DTMF
Setting page. It should be supported by SIP server while the 2833 packet or
SIP INFO is ready by SIP proxy.
c. Proxy: The destination phone number is sent in SIP INVITE message and
routed by outbound proxy. For outbound service, please consult ISP for more
details.
*Routing to: Define the call direction (IP call or PSTN call) if the dialed digit
match the rule set in Routing rule field.
-12-
*Routing rule: Define the digit string of routing rule.
Only digit 0~9 are valid
in rule string, as well as “x” denotes wildcard digit.
Different patterns is
separated by sign “+”.
*Drop prefix:
Item
Description
Yes
The following replace rule define the prefix dropping rule
No
The following replace rule define the prefix adding rule
*Replace Rule: The digit string defined in the first field will be added if the
dialed string match the digit string defined in the second field of the
replacement rule.
If the selection of Drop prefix is “yes”, the matched digit
string in the dialed string will be removed before adding prefix.
Otherwise, if
“No” is selected, the prefix is added at the beginning of dialed string without
removing any digits.
Only digit 0~9 are valid in rule string, as well as “x” denotes wildcard digit and
“,” denotes pause for one second.
Different patterns is separated by sign “+”.
Example 1:
For example, the dialed string is 86621742885.
After the processing of
replacement rule, the result dialing string will become 002+86621742885.
Example 2:
For instance, the dialed string is 00286621742885.
After the processing of
replacement rule, the result dialing string will become 006
since “Yes” of Drop prefix is select and
“006”.
-13-
86621742885
“002” is dropped and replaced by
Example 3:
In this example, any 4-digits string begin with 5, 35 or 21 will be add a “007”
prefix.
e.g. 5171 will become 0075171.
Example 4:
In this example, any string begin with 5 will be add a “9” prefix.
After the
prefix “9” digit, it will be hold in 3 seconds and then the succeeded digits.
*Realm Selection:
The call behavior of PG-101 is act as a number router if Module Name or URL
in Remote MV page is set. The IP call will route to peer MV, thus the dialed
number is called by GSM network.
User can specify an ITSP or a SIP proxy
by adding Realm Prefix before dialing destination number or SIP account.
The configuration of Realm Prefix can be found in the Dial Plan page.
For the case in MV coexist with soft-phone, user should use Realm Prefix
method to a specific SIP call.
Example: If you put Module Name or URL: [email protected],
which means it’s the SIP account of mobile channel 1 on MV. And dial
0937123456 will route call to MV and send 0937123456 to the operator MV
registered. Dial 1*4002 will call SIP user 4002 at SIP proxy of realm 1, which is
sipportech.selfip.com.
-14-
11.6 Flash Time
You could set the flash time in this page
11.7 Alarm
You could set the alarm time in this page.
-15-
12. Network
In Network you can check the Network Status, WAN, LAN, STNP
Settings, and Virtual Server.
12.1 Network Status: You can check the current Network setting in
this page.
-16-
12.2 WAN
(1) The DHCP Client Configuration item is to setup the WAN port’s
network environment.
(2) The PPPoE Configuration item is to setup the PPPoE
Username and Password. If you have the PPPoE account from
your Service Provider, please input the Username and the
Password correctly.
(3) When you finished the setting, please click the Submit button.
-17-
12.3 LAN
You could configure the LAN settings in this page.
-18-
12.4 SNTP Settings
SNTP Setting function: you can setup the primary and second
SNTP Server IP Address, to get the date/time information. Also you
can base on your location to set the Time Zone, and how long need
to synchronize again. When you finished the setting, please click
the Submit button.
-19-
12.5 Virtual Server
You could set your virtual servers in this page. The usual port
numbers are WEB [TCP 80], FTP(Control) [TCP 21], FTP(Data)
[TCP 20], E-mail(POP3) [TCP 110], E-mail(SMTP) [TCP 25], DNS
[UDP 53] and Telent [TCP 23].
-20-
13. SIP Settings
In SIP Setting you can setup the Service Domain, Port Settings,
Codec Settings, Codec ID, DTMF Setting and Other Settings.
13.1 Service Domain
User need to set the registering information of SIP proxy at this
page. PG-101 cannot work correctly without registering to SIP
proxy.
First you need to click Active to enable the Service Domain, and
then you can input the following items.
(1) Display name: you can input the name you want to display.
(2) User name: you need to input the User Name get from your ISP.
(3) Register Name: you need to input the Register Name get from
your ISP.
(4) Register Password: you need to input the Register Password
get from ISP.
-21-
(5) Domain Server: you need to input the Domain Server get from
your ISP.
(6) Proxy Server: you need to input the Proxy Server get from your
ISP. Please note, PG-101-102L must connect "message Server".
E.g. the free server we recommend, IPTel, with this feature.
(7) Outbound Proxy: you need to input the Outbound Proxy get
from your ISP. If your ISP does not provide the information, then
you can skip this item.
(8) You can see the Register Status in the Status item.
(9) When you finished the setting, please click the Submit button.
Remember to click “Save Charge”
13.2 Port Settings
You could set the port number in this page
-22-
13.3 Codec Settings
You can setup the Codec priority, RTP packet length in this page.
You need to follow the ISP suggestion to setup these items. When
you finished the setting, please click the Submit button.
-23-
13.4 Codec ID
You can setup the Codec ID in this page.
13.5 DMTF Settings
You can setup the DTMF Setting in this page
-24-
13.6 Other Settings
Other Settings: you can setup the Hold by RFC and QoS in this
page. To change these settings, please follow your ISP information.
When you finished the setting, please click the Submit button. The
QoS setting is to set the voice packets’ priority. If you set the value
higher than 0, then the voice packets will get the higher priority to
the Internet. But the QoS function still need to cooperate with the
others Internet devices.
-25-
14. NAT Trans.
In NAT Trans. you can setup STUN and uPnP function. These
functions can help your VoIP device working properly behind NAT.
14.1 STUN Setting (optional)
There is a default setting of STUN server in the PG-101 system
database; user can ignore this step, which is optional setting. If
the STUN server is not connectable or service shutdown, please
change STUN setting at this page.
-26-
14.2 uPnP Setting
You could enable/disable the uPnP in this page
15. Others
15.1 FXO&FXS
User should set FXS and FXO type according to country which
PG-101 located.
-27-
15.2 Advance
You could change advanced setting in this page
15.3 Status Log
-28-
16. Update
In Update you can update the system’s firmware to the new one or
the factory reset to let the system back to default setting.
16.1 New Firmware
(1) In New Firmware function you can update new firmware via
Local PC in this page. You can upgrade the firmware by the
following steps:
(2)Select the firmware code type.
(3)Click the “Browse” button in the right side of the File Location or
you can type the correct path and the filename in File Location
blank.
(4)Select the correct file you want to download to the system then
click the Update button.
(5) Please click update/default setting after update firmware
-29-
16.2 Default Settings
In this page: Update/ Default Settings, you could restore the factory
default settings to the system. All setting will restore default
setting.
IP will retain original IP as usual not default IP.
-30-
17. Backup
You could save current system setting to file: System Settings and
PhoneBook.
18. System Authority
In System Authority you can change your login name and password
-31-
19. Save Change
In Save Change you can save the changes you have done. If you
want to use new setting in the VoIP system, you have to click the
Save button. After you click the Save button, the system will
automatically restart and the new setting will effect.
20. Reboot
Reboot function you can restart the system. If you want to restart
the system, you can just click the Reboot button, and then the
system will automatically.
-32-
21. Specification
21.1 Call transfer
During ongoing call, user can transfer current call by “flash hook”.
The call
will be transfer to PSTN if the current call is from VOIP, and vice versa.
21.2 Conference call
During ongoing call, user can initiate a conference call by “flash hook”+
“#512#”.
22.3 IVR Command
Group
Action
key
parameter(s)
Function
IVR unlock
#190#
Function
IVR lock
#191#
Function
Reboot
#195#
Function
Factory
#198#
Function
Set DHCP client
#111#
Function
Set static IP
#112xxx*xxx*xxx* Static IP address
xxx#
Function
Set network mask
#113xxx*xxx*xxx* network mask
xxx#
Function
Set default gateway IP
#114xxx*xxx*xxx* default gateway IP
xxx#
Function
Set primary DNS
#115xxx*xxx*xxx* primary DNS
xxx#
Info
Check LAN IP Address
#120#
Info
Check DHCP client status
#121#
Info
User name of SIP account
#122#
Info
Check network mask
#123#
Info
Check default gateway IP
#124#
Info
Check DNS
#125#
-33-
-
Info
Check WAN IP Address
#126#
Info
Software version
#128#
Info
Check PSTN
forward all call
Info
Check PSTN number of no #149#
answer forward call
Function
Forward disable
#145#
Function
Forward all call to PSTN
#147xxxxxxxx#
PSTN number
Function
No answer forward to PSTN
#149xxxxxxxx#
PSTN number
Function
conference
#512#
number
-34-
of #147#