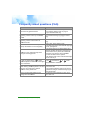
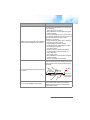
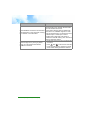
1
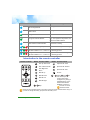
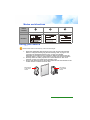
Window Auto-Cleaning Robot
WINBOT 68
User Manual
Hobot Technology Inc.
www.hobot.com.tw
Copyright
Copyright © 2012 by HOBOT Technology Inc. All rights reserved. No part of this
publication may be reproduced, transmitted, transcribed, stored in a retrieval
system or translated into any language or computer language, in any form or by
any means, electronic, mechanical, magnetic, optical, chemical, manual or
otherwise, without the prior written permission of this company.
Trademarks
All other logos, products, or company names mentioned in this manual may be
the registered trademarks or copyrights of their respective companies, and are
used for informational purposes only.
Disclaimer
HOBOT Technology Inc. makes no representations or warranties, either
expressed or implied, with respect to the contents hereof and specifically
disclaims any warranties, merchantability, or fitness for any particular purpose.
Further, HOBOT Technology Inc. reserves the right to revise this publication and
to make changes from time to time in the contents hereof without obligation of
this company to notify any person of such revision or changes.
The place and safety of this glass cleaning tool usage must be judged and
responsible by the user. But also need to follow the instructions in this user
manual.
Safety information
• Fasten the safety rope before use and tie to indoor fixture.
• Check out whether the safety rope is broken or the knot is loose.
• Set danger warning area downstairs for no-balcony window and door.
• Powerful magnets! Be careful of hand-caught, and keep the device away from
the magnetic card or magnetic recording device.
• Prohibit the usage by children.
• No water spray onto the main terminal.
• Do not use on frameless window while the sunlight is very strong.
• Remove anything on the glass. Do not use on cracked glass. Reflective or
coating glass might be slighted scratched due to dirt on the window.
Technical support
If any problems occur and the manual cannot provide the solution you need,
please contact the local retailers or the local authorized dealers.
Table of Contents
Copyright ........................................................................... i
Trademarks ....................................................................... i
Disclaimer ......................................................................... i
Safety information ............................................................. i
Technical support .............................................................. i
Product introduction ......................................................... 1
Products and accessories ................................................ 1
Product features ............................................................... 1
Getting to know the device ............................................... 2
Main terminal ............................................................................... 2
Sub terminal ................................................................................. 2
LED indicators on the main terminal ............................................ 2
Introduction to the remote controller ............................................ 3
Modes and directions ................................................................... 4
Using your device ............................................................. 4
Using the cleaning ring and the cleaning cloth ............................ 5
Choosing the appropriate cleaning ring ....................................... 6
WINBOT’s working area ................................................... 7
Defining working area .................................................................. 7
Detecting working area ................................................................ 7
Removing obstacles .................................................................... 7
Ways to clean window ...................................................... 8
Frequently asked questions (FAQ) .................................. 9
Safety information about power adapter ........................ 12
General safety information ............................................. 12
Product introduction
First of all, thank you for choosing WINBOT 68, the revolutionary window autocleaning robot with Artificial Intelligence technology! Please read this user manual
carefully before the usage of WINBOT. It has two terminals: the main terminal and
the sub terminal. With the use of magnet on both terminals, WINBOT can stay on
the window securely even with no power. WINBOT has two cleaning wheels to
move freely on the window to clean both sides of the window at the time. With the
use of auto cleaning mode, WINBOT can automatically sense the edges on the
window and create a map of tracks to clean the whole window. The easy
replaceable lint-free cloth is used on both cleaning wheels. The water dispenser
on the sub terminal can clean the dirt. The robot can operate in either AUTO
Cleaning or Manual Cleaning Mode according to the instructions from the remote
controller.
Products and accessories
• Main Terminal x 1
• Sub terminal x 1 (including safety rope x 1, safety hook x 1)
• Remote controller x 1 (batteries included)
• Adapter x 1 (including AC power cord x 1)
• Cleaning cloth x 18
• DC Power extension cable (3.5 m) x 1
• Cleaning ring (including 3G purple ring x 2, 2G green ring x 2,1G blue ring x 4)
• User manual x 1
• Quick start guide x 1
• Optional: Water cleaning set (Small water pipe x 1, water pipe adapter x 1, water
pump adapter x 1)
Product features
• For cleaning glass with 3~10mm thickness
• Permanent magnet, provide strong magnetic field for WINBOT to stay securely
on the window, even with no power
• Infrared (IR) sensor to detect edges of windows automatically
• Anti-dropping control algorithm
• Voice safety prompt
• Clean double sides of window simultaneously. Water washing capability for
outside windows
• 3 automatic cleaning modes for clean whole window
• Manual cleaning mode
• 3 different cleaning speeds
1
Product introduction
Getting to know the device
Main terminal
1.
2.
3.
4.
5.
6.
7.
8.
9.
10.
11.
4
1
2
5
6
7
3
8
9
10
Hanging hole
Blue LED indicator #3
Blue LED indicator #6
Blue LED indicator #2
Blue LED indicator #1
Green LED indicator
Red LED indicator
Blue LED indicator #4
Power switch
DC power jack
Blue LED indicator #5
11
Sub terminal
12
13
12. Hanging Hole
13. Small hole for connecting
water pipe provided
14. Safety hook
15. Safety rope
14
15
LED indicators on the main terminal
Indicators
Meaning
All the six blue indicators flash, and
The device works properly.
the green indicator is on.
Getting to know the device
2
Indicators
Meaning
The blue indicator that is close to
the blockage flashes.
Blockage is detected.
The blue indicators no. 1, 3, 4, and 6
5mm glass is detected.
flash 3 times.
The green indicator is on.
Self-test is failed.
The green indicator flashes.
The temperature of the motor is too
high. The higher the temperature, the
faster the indicator flashes.
All of the blue indicators flash one
after another counterclockwise.
The device is cooling.
All of the indicators light up.
The device is having a risk of falling.
The green and red indicators are on,
the blue indicators no. 4, 5, 6 are on.
The green and red indicators are on,
the blue indicators no. 1, 2, 3 are on.
Magnetic attraction is too weak during
the cleaning process.
Magnetic attraction is too strong during
the cleaning process.
Introduction to the remote controller
Remote controller
Button Function / Mode
Auto Up then Down
Speed mode: Slow
Auto Left then Down
Speed mode: Normal
Auto Right then
Down
Speed mode: Fast
Manual Up
No use
Manual Down
Manual Left
Manual Right
,
Button Function / Mode
Stop
-
Press
then
to
turn off/on 6pcs IR
sensors (Turn Off if
sunlight is very strong or
pastes/sticker is on the
window that interfere
WINBOT movement.)
DO NOT turn off for
frameless window.
Please remove insulation spacer in the bottom of back of remote controller before using it. If
you want to change the battery, just pull down the battery cover.
3
Getting to know the device
Modes and directions
Button on
remote
controller
Mode
Auto up then down
Auto left then down
Auto right then down
Direction
Using your device
Please handle with care to avoid any chance of hand-caught.
1.
2.
3.
Select the appropriate cleaning rings for the main and the sub terminals.
Refer to "Using the cleaning ring and the cleaning cloth" on page 5 and
"Choosing the appropriate cleaning ring" on page 6 for details.
Depending on the selected way of cleaning, different procedures may be
required. Refer to "Ways to clean window" on page 8 for more information.
Securely fasten the safety rope and tie to the indoor fixture. See "Sub
terminal" on page 2 for safety hook and safety rope.
Put the main terminal puts on the inside window and the sub terminal on the
outside window to attract with each other.
Main terminal
on the inside
window
Sub terminal
on the outside
window
Getting to know the device
4
4.
Connect the DC extension cable with the power adapter then plug the Lshape connector into the main terminal.
Power adapter
DC plug
L-shape connector
DC extension cable
5.
6.
7.
Connect the power adapter with the power cord.
Plug into the power.
Turn on the power on the main terminal.
8.
Choose
"Auto go up then down" mode from
the remote controller. WINBOT will start
automatically.
Voice message will prompt if any issue during
cleaning process.
9. Please turn off once the cleaning process is done
and take off both terminals simultaneously from
the window.
Power switch
Using the cleaning ring and the cleaning cloth
1.
Use appropriate cleaning ring based on glass thickness to optimize attraction
between the main and the sub terminals. Refer to "Choosing the appropriate
cleaning ring" on page 6 for more information.
1G
3G
2G
3G
Cover cleaning ring with cleaning cloth.
1G
1G
1G
5
Getting to know the device
3G
2G Green
Cleaning Ring
(2mm)
3G
2.
2G
1G Blue
Cleaning Ring
(0mm)
2G
2G
3G Purple
Cleaning Ring
(5mm)
3.
Put cleaning ring on wheels of the main and the sub terminals.
The purpose of using different cleaning ring is to ensure Glass thickness + cleaning ring
thickness = 10mm.
Choosing the appropriate cleaning ring
Always make sure the thickness of the glass and the cleaning ring is 10mm in
total. Refer to the following table to choose the appropriate cleaning ring.
Glass
thickness
3mm
5mm
8mm
10mm
Main terminal
2G green cleaning ring
(2mm)
1G blue cleaning ring
(0mm)
1G blue cleaning ring
(0mm)
1G blue cleaning ring
(0mm)
Sub terminal
Glass type
3G purple cleaning ring
(5mm)
3G purple cleaning ring
(5mm)
2G green cleaning ring
(2mm)
1G blue cleaning ring
(0mm)
• Mosaic glass
• Matte surface glass
• Small window
• French window
• Large French windows
• French window for
new building
• If you do not know your glass thickness, please use the 5mm configuration for your first
trial.
• While starting up, 4 lights will be twinkling 3 seconds if detected 5mm glass.
• For thinner glass with smaller number cleaning ring, magnetic field will be stronger and
device might overheat easily. (Voice prompt).
• For thicker glass with larger number cleaning ring, magnetic field will be weaker and device
might slip. (Voice prompt).
• Please do not use for glass thicker than 10mm. (Voice prompt).
Getting to know the device
6
WINBOT’s working area
Defining working area
Use silver reflective tape to define
WINBOT’s working area and use black
tape for reflective glass.
The silver reflective tape on the indoor
window should be aligned with the outer
frame.
Outdoor
window
frame
silver
reflective
tape
Indoor
window
frame
Detecting working area
The IR sensors on WINBOT can detect
• Window frame
• Frame-less window
• Silver reflective tape
Notice:
• Please do NOT use on frameless window with strong sunlight.
• Please do NOT use on frameless matte surface glass.
• Use silver reflective tape for normal and black tape for reflective window.
Removing obstacles
Below situation will be recognized as running into obstacle.
Situation
Partially opened window, the sub terminal
will run into another window.
Outdoor window frame is smaller than the
indoor one, the sub terminal will hit onto
outdoor frame than indoor one.
Windows with pastes will affect the
movement smoothness.
7
WINBOT’s working area
Possible solution
Please make sure all windows are closed.
Tape silver reflective tape on indoor window
side to align the tape with outer frame to
restrict the terminal clean area. Please use
black tape for reflective window.
• The sub terminal switches smaller number
cleaning ring while slipping.
• The sub terminal switches larger number
cleaning ring while overheat.
Ways to clean window
Method
Circumstances
Dry clean
For window with small
amount of sand/dust.
Wet clean
with water
cleaning set
(optional
accessory)
If it's rainy or humid outside
or window is with large
amount of sand/dust, water
cleaning leads better
performance than dry
cleaning.
Procedures
1. Use a clean cleaning cloth to polish.
2. You may spray some water or cleaning
product on to the window when cleaning.
1. Hook the small water pipe on to the sub
terminal for water spraying.
2. You may use the water pump adapter to
connect the small water pipe to the water
pump.
WINBOT’s working area
8
Frequently asked questions (FAQ)
Question
I don’t know my glass thickness.
In the self-test WINBOT does at the
beginning, 3 LEDs on the top of WINBOT
are ON.
In the self-test WINBOT does at the
beginning, 3 LEDs on the bottom of
WINBOT are ON.
WINBOT does not move smoothly, cannot
climb up the window or move irregularly.
WINBOT moves upward and slip down
during the cleaning process.
Possible solution
• Please check the section "Using the cleaning
ring and the cleaning cloth" on page 5.
• Try to start with 5mm ring.
Use a thicker cleaning ring (bigger number
ring).
Use a thinner cleaning ring (small number
ring).
• Use a new, clean cleaning cloth.
• The side screw of the main terminal might get
loose, just tighten it.
• The suction may be too weak; please use a
thinner (smaller number ring) cleaning ring.
• If the window is very clean, the surface will
becomes very slippery and so WINBOT
couldn't be able to move upward.
• The cleaning cloth on the main terminal might
be too wet. Dry it.
In “Auto go up then down” (
) mode,
Press
and switch to
or
mode
WINBOT slips and couldn't detect the upper
using the remote controller.
frame of windows.
• The cleaning cloth might be too dirty. Use a
new, clean one.
While cleaning, WINBOT pauses a lot, and
• The magnetic attraction might be too strong;
there is a voice instruction: "Wait for
please use a larger number cleaning ring for
WINBOT cooler, please wait."
the sub terminal.
There is an abnormal shaking sound
The cleaning cloth might be too dirty. Use a
coming out from WINBOT.
new, clean one.
9
Frequently asked questions (FAQ)
Question
Possible solution
If the cleaning wheels on the main and the sub
terminals have not detached, you can do one
of the following:
1. Switch the power off and on.
2. Move WINBOT to a safe location using the
remote controller.
3. Remove blockages (if any) from the window.
If the cleaning wheels on the main and the sub
terminals have detached, this is quite
dangerous. You should
1. Check whether the safety rope is fastened
WINBOT stops in the middle of the cleaning
and tied to the indoor fixture.
process due to blockages on the window.
2. Get the safety rope to the shortest.
3. Please check if the downstairs floor within
the cleaning area is safe.
4. Turn off the power.
5. Slowly move the main terminal until the
cleaning wheels on both terminals are
facing each other.
6. Turn on the power.
7. Move WINBOT to a safe location using the
remote controller.
8. Remove blockages on the window.
Hold main terminals to the edge of table and
press one wheel of the sub terminal down then
press another wheel, the terminals should be
separated.
The main and the sub terminals are sucked
by accident.
Table
Press one of
sub terminal’s
wheels down
How to confine WINBOT moving area?
Use silver reflective tape or white tape on
indoor window side and use black tape for
reflective window; IR sensor will detect the
tape and turn around.
Frequently asked questions (FAQ)
10
Question
Possible solution
• If the window is partially opened, the sub
terminal will run into another window. Make
sure all windows are closed.
• If the outdoor window frame is smaller than
What if WINBOT touches the window frame
the indoor one, WINBOT might hit or stuck
and makes alert or even stops with “running
into the window frame. You should use silver
into obstacle” voice instruction?
reflective tape or white tape on indoor
window side to align with outer frame to
restrict the terminal cleaning area. Use black
tape for reflective window.
1. Put the main terminal on the non-sticker side
of window.
What if sunlight is very strong or pastes/
sticker is on the window that interfere
2. Press
then
on the remote controller
WINBOT movement?
to turn off 6 IR sensors; do NOT turn off IR
sensor while cleaning frameless windows.
11
Frequently asked questions (FAQ)
Safety information about power adapter
• Use only the power adapter supplied with device. Use of another type of power
adapter will result in malfunction and/or danger.
• Please use the proper electric outlet and make sure no heavy objects are placed
on the power adapter or power cord.
• Allow adequate ventilation around the adapter when using it to operate the
device. Do not cover the power adapter with paper or other objects that will
reduce cooling.
• Do not use the adapter in a high moisture environment. Never touch the adapter
when your hands are wet.
• Connect the adapter to a proper power source. The voltage requirements are
found on the adapter.
• Do not use the adapter if it becomes damaged.
• Do not attempt to service the adapter. There are no service parts inside. Replace
the unit if it is damaged or exposed to excess moisture. Consult your HOBOT
dealer for help and maintenance.
General safety information
When setting up or operating your WINBOT, please pay special attention to the
following:
• This manual is saved in the gift box for easy reference when needed.
• Make sure you follow all instructions and warnings related to the system.
• Do not use on glass thicker than 10mm.
• Do not expose your device to rain or excess humidity, and keep it away from
liquids (such as beverages, faucets, and so on).
• Avoid exposing your device to direct sunlight, or intense light source, and keep it
away from sources of heat (such as radiators, space heaters, stoves, and so
on).
• Do not place the device in the vicinity of strong magnetic fields.
• Keep the device accessories away from children.
Safety information about power adapter
12