1
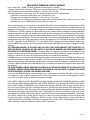
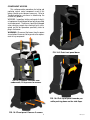
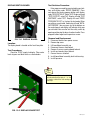
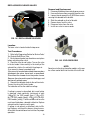
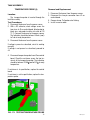
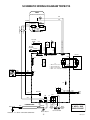
®
SERVICE & REPAIR MANUAL
BUNN-O-MATIC CORPORATION
POST OFFICE BOX 3227
SPRINGFIELD, ILLINOIS 62708-3227
PHONE: (217) 529-6601 FAX: (217) 529-6644
42824.0000B 05/12 ©2011 Bunn-O-Matic Corporation
BUNN-O-MATIC COMMERCIAL PRODUCT WARRANTY
Bunn-O-Matic Corp. (“BUNN”) warrants equipment manufactured by it as follows:
1) Airpots, thermal carafes, decanters, GPR servers, iced tea/coffee dispensers, MCP/MCA pod brewers thermal servers
and Thermofresh servers (mechanical and digital)- 1 year parts and 1 year labor.
2) All other equipment - 2 years parts and 1 year labor plus added warranties as specified below:
a) Electronic circuit and/or control boards - parts and labor for 3 years.
b) Compressors on refrigeration equipment - 5 years parts and 1 year labor.
c) Grinding burrs on coffee grinding equipment to grind coffee to meet original factory screen sieve analysis - parts
and labor for 4 years or 40,000 pounds of coffee, whichever comes first.
These warranty periods run from the date of installation BUNN warrants that the equipment manufactured by it will be
commercially free of defects in material and workmanship existing at the time of manufacture and appearing within the
applicable warranty period. This warranty does not apply to any equipment, component or part that was not manufactured
by BUNN or that, in BUNN’s judgment, has been affected by misuse, neglect, alteration, improper installation or operation,
improper maintenance or repair, non periodic cleaning and descaling, equipment failures related to poor water quality,
damage or casualty. In addition, the warranty does not apply to replacement of items subject to normal use including but
not limited to user replaceable parts such as seals and gaskets. This warranty is conditioned on the Buyer 1) giving BUNN
prompt notice of any claim to be made under this warranty by telephone at (217) 529-6601 or by writing to Post Office
Box 3227, Springfield, Illinois 62708-3227; 2) if requested by BUNN, shipping the defective equipment prepaid to an
authorized BUNN service location; and 3) receiving prior authorization from BUNN that the defective equipment is under
warranty.
THE FOREGOING WARRANTY IS EXCLUSIVE AND IS IN LIEU OF ANY OTHER WARRANTY, WRITTEN OR ORAL, EXPRESS OR IMPLIED, INCLUDING, BUT NOT LIMITED TO, ANY IMPLIED WARRANTY OF EITHER MERCHANTABILITY
OR FITNESS FOR A PARTICULAR PURPOSE. The agents, dealers or employees of BUNN are not authorized to make
modifications to this warranty or to make additional warranties that are binding on BUNN. Accordingly, statements by such
individuals, whether oral or written, do not constitute warranties and should not be relied upon.
If BUNN determines in its sole discretion that the equipment does not conform to the warranty, BUNN, at its exclusive option while the equipment is under warranty, shall either 1) provide at no charge replacement parts and/or labor (during the
applicable parts and labor warranty periods specified above) to repair the defective components, provided that this repair
is done by a BUNN Authorized Service Representative; or 2) shall replace the equipment or refund the purchase price for
the equipment.
THE BUYER’S REMEDY AGAINST BUNN FOR THE BREACH OF ANY OBLIGATION ARISING OUT OF THE SALE OF THIS
EQUIPMENT, WHETHER DERIVED FROM WARRANTY OR OTHERWISE, SHALL BE LIMITED, AT BUNN’S SOLE OPTION
AS SPECIFIED HEREIN, TO REPAIR, REPLACEMENT OR REFUND.
In no event shall BUNN be liable for any other damage or loss, including, but not limited to, lost profits, lost sales, loss of
use of equipment, claims of Buyer’s customers, cost of capital, cost of down time, cost of substitute equipment, facilities
or services, or any other special, incidental or consequential damages.
392, AutoPOD, AXIOM, BrewLOGIC, BrewMETER, Brew Better Not Bitter, BrewWISE, BrewWIZARD, BUNN Espress, BUNN
Family Gourmet, BUNN Gourmet, BUNN Pour-O-Matic, BUNN, BUNN with the stylized red line, BUNNlink, Bunn-OMatic,
Bunn-O-Matic, BUNNserve, BUNNSERVE with the stylized wrench design, Cool Froth, DBC, Dr. Brew stylized Dr. design,
Dual, Easy Pour, EasyClear, EasyGard, FlavorGard, Gourmet Ice, Gourmet Juice, High Intensity, iMIX, Infusion Series, Intellisteam, My Café, Phase Brew, PowerLogic, Quality Beverage Equipment Worldwide, Respect Earth, Respect Earth with
the stylized leaf and coffee cherry design, Safety-Fresh, savemycoffee.com, Scale-Pro, Silver Series, Single, Smart Funnel,
Smart Hopper, SmartWAVE, Soft Heat, SplashGard, The Mark of Quality in Beverage Equipment Worldwide, ThermoFresh,
Titan, trifecta, Velocity Brew, A Partner You Can Count On, Air Brew, Air Infusion, Beverage Bar Creator, Beverage Profit
Calculator, Brew better, not bitter., BUNNSource, Coffee At Its Best, Cyclonic Heating System, Daypart, Digital Brewer
Control, Nothing Brews Like a BUNN, Pouring Profits, Signature Series, Tea At Its Best, The Horizontal Red Line, Ultra are
either trademarks or registered trademarks of Bunn-O-Matic Corporation.
2
42824 030912
INTRODUCTION
This equipment will brew a half-gallon batch of coffee into an awaiting dispenser. It can be easily
configured for 120V 15 amp, 120/208V 20 amp or 120/240V 20 amp. The brewer may have a hot water
faucet for allied beverage use. It is only for indoor use on a sturdy counter or shelf.
CONTENTS
Warranty..............................................................................................................2
Contents...............................................................................................................3
Component Access..............................................................................................4
Upper Clamp Assembly Removal.........................................................................5
Upper Clamp Assembly Disassembly...................................................................6
Control Board.......................................................................................................7
CBA Triac Map.....................................................................................................8
Refill/Rinse Valves.............................................................................................10
Air Pump Motors...............................................................................................11
Tank Assembly...................................................................................................12
Limit Thermostat................................................................................................12
Temperature Probe............................................................................................13
Schematic Wiring Diagrams...............................................................................14
3
42824 060611
COMPONENT ACCESS
This section provides procedures for testing and
replacing various major components used in this
brewer should service become necessary. Refer to
Troubleshooting for assistance in determining the
cause of any problem.
WARNING - Inspection, testing, and repair of electrical equipment should be performed only by qualified
service personnel. The brewer should be unplugged
when servicing, except when electrical tests are required and the test procedure specifically states to
plug in the brewer.
WARNING - Disconnect the brewer from the power
source before the removal of any panel or the replacement of any component.
FIG. 10-3 Push front panel down.
FIG. 10-1 Remove 2 screws from
underneath, lift top cover to remove.
FIG. 10-4 Pull top of panel towards you
while pushing down on the side flaps.
FIG. 10-2 Front panel. Remove 2 screws.
4
42824 060611
UPPER CLAMP ASSEMBLY REMOVAL
4. Remove front panel.
WARNING - Disconnect the brewer from the power
source before the removal of any panel or the replacement of any component.
5. Disconnect silicon hose from vent valve. Disconnect 2 pin white/violet harness from Control Board
J-11. FIG 5-3
1. Remove top cover.
2. Using 5/32˝ Allen wrench, remove 4 socket head
screws. FIG 5-1
FIG. 5-3
FIG. 5-1
3. Disconnect braided hose from Tee fitting. FIG 5-2
6. Lift sprayhead assembly from brewer chassis.
FIG. 5-2
5
42824 060611
UPPER CLAMP ASSEMBLY DISASSEMBLY
WARNING - Disconnect the brewer from the power
source before the removal of any panel or the replacement of any component.
3. Lift the sprayhead plug assembly out of the cap.
1. Remove c-clip, pivot shaft and brew chamber lifter.
FIG. 6-3
SAFETY SWITCH REPLACEMENT
FIG. 6-1
2. Using 5/32˝ Allen wrench, remove one or both
socket head screws from handle. Split the slide
mount brackets from sprayhead assembly as
shown. FIG 6-2
NOTE: Testing the switch should be done in
Program mode "TEST SWITCHES"
4. Place the assembly as shown (so the switch actuator pin does not fall out). Remove the 2 phillips
screws securing the switch bracket. NOTE: If replacing the switch harness, secure it to the unused
hose barb to prevent damage to wires.
FIG. 6-2
FIG. 6-4
REASSEMBLY
5. During reassembly, be sure to lubricate o-rings,
bushings and guides as required.
6
42824 060611
CONTROL BOARD
Removal and Replacement:
1. Disconnect brewer from power source.
2. Disconnect the wires and harnesses from the
control board.
3. Remove the six screws securing the control board
to the bracket.
4. Secure the new control board to the bracket with
six screws.
5. Re-connect wires and harnesses.
FIG. 11-1 CONTROL BOARD
Location:
The Control Board is located behind the front
cover.
Test Procedures:
The test procedures for the control board will vary
depending upon the problems experienced by the
brewer. Refer to the Troubleshooting section which
is divided into three sections, Refill Circuit, Heating
Circuit, and Brewing Circuit.
Check for Power to board:
1. Place one meter lead at L1 terminal and the other
lead at L2 terminal on the Control Board.
2. With the power connected to brewer, the voltage
reading to the board should be the line voltage
rated for that model.
If no voltage is present, check power cord to
the board. If voltage is present, and brewer
does not power on replace Control Board
7
42824 060611
CONTROL BOARD TRIAC MAP
Triac: Load Component:
Connector:
TH1
TH2
TH3
Heater Terminal/L2 Terminal
Red wire/White wire
Brown wire/White wire
Tank Heaters Refill solenoid
Rinse solenoid FIG. 12-1 TRIAC MAP
8
42824 060611
DISPLAY/SWITCH BOARD
Test Switches Procedure:
Enter program mode by pressing both arrow buttons until display reads "RECIPE CHANGES". Press
and release the center program button until display
reads "SERVICE TOOLS". Select "YES". Display will read
"TEST OUTPUTS", select "NO". Display will read "TEST
SWITCHES", select "YES". Display will read "PRESS
PROGRAM TO EXIT" as it enters the test mode. When
no switches are activated, the display will read "NOTHING PRESSED". You can press any of the buttons on
the control panel and display will indicate which one
you activated. You can also test the safety switch by
opening and closing the brew chamber handle. Press
program button to go back to previous screen.
FIG. 13-1 DISPLAY BOARD
Location:
The display board is located on the front face plate.
Test Procedures:
Check for 12VDC supply to display. Place meter
leads at green and black wires as shown below.
Removal and Replacement:
1. Disconnect brewer from power source.
2. Remove top cover.
3. Lift board/bezel assembly up.
4. Disconnect harness from board.
5. Remove 4 screws securing board to bezel.
6. Install new board w/keys to bezel.
7. Connect harness to board.
8. Install board/bezel assembly back into housing.
9. Install top cover.
Helpful
Hint
Wrap a thin paper clip around each meter
lead and extend past the tip by ¼" - ½". You
may need to sand off the clear coating on
some clips!
FIG. 13-2 DISPLAY BOARD TEST
9
42824 060611
REFILL/RINSE SOLENOID VALVES
REFILL
Removal and Replacement:
1. Disconnect the brewer from water & power sources.
2. Unscrew the brass elbow assembly from the valve.
3. Loosen (do not remove) the (2) M4 X 6mm screws
securing the solenoid to the bracket.
4. Slide the solenoid up & out of bracket.
5. Remove hoses from the valve.
6. Disconnect wires from the valve.
7. Install new valve in reverse order.
RINSE
FIG. 14-1 REFILL/RINSE SOLENOID
Location:
The brew valve is located inside the top cover.
Test Procedures:
1. Refer to the Programing Section for Service Tools/
Test Outputs/Refill/Rinse Valve.
2. Be sure brew chamber/cup & container are in place
before activating either valve.
3. Check the valve for coil action. Turn on the valve
in the test mode. Listen carefully in the vicinity of the
solenoid for a click as the coil pulls the plunger in.
If no sound is heard, proceed to #4.
If the sound is heard as described, there may be a
blockage in the valve , hose, tank, or sprayhead.
Disconnect the brewer from the power source.
Remove the valve and inspect for blockage, and
de-lime all related areas.
4. Connect the voltmeter leads to the coil terminals.
Turn on the valve with the test mode.
The indication will be the rated line voltage.
If voltage is present as described, but no coil action
is observed, check continuity (resistance) of coils
(.96k ±10% for 100V models [gray], 1.2k ±10%
for 110-120V models [black], 4.23k ±10% for 220240V models [white]). If either coil does not have the
resistance listed above, solenoid is defective. Replace
solenoid and test again to verify repair.
If voltage is not present as described, refer to Wiring Diagrams and check the brewer wiring harness.
Also check the control board and switches for proper
operation.
10
FIG. 14-2 EXPLODED VIEW
NOTE:
Do not use similar valves from other models, as this one
has a flow control built into the inlet of the refill side.
42824 060611
AIR PUMP MOTORS
PRESS OUT
PUMP
TURBULENCE
PUMP
Removal and Replacement:
1. Disconnect the brewer from the power source.
2. Remove nut and clamp.
3. Disconnect harness and hose from the pump.
4. Install new pump in reverse order.
FIG. 15-1 PUMP MOTORS
Location:
The pump motors are located inside the top cover.
Test Procedures:
1. Refer to the Programing Section for Service Tools/
Test Outputs/Turbulence/Press Out Pumps.
2. Be sure brew chamber/cup & container are in place
before activating either motor.
3. Turn on the motor with the test mode. Listen carefully in the vicinity of the motor to hear if it's running.
If no sound is heard as described, proceed to #4.
If the sound is heard as described, there may be a
blockage in the hoses. Disconnect the brewer from
the power source. Remove the hoses and inspect for
blockage.
4. Connect the voltmeter leads to the coil terminals.
Turn on the valve with the test mode.
The indication will be 0VDC off, 12-18VDC on.
FIG. 15-2 PUMP MOTOR
If voltage is present as described, but no coil action
is observed, valve is defective. Replace valve and test
again to verify repair. If voltage is present as described,
but no action is observed, check continuity (resistance)
of coils 20-30 . If coil does not have the resistance
listed above, pump is defective. Replace pump and
test again to verify repair.
If voltage is not present as described, refer to Wiring Diagrams and check the brewer wiring harness.
Also check the control board and switches for proper
operation.
11
42824 060611
TANK ASSEMBLY
HEATER
RESISTANCE
1450W-100V
8.9-10.9
1450W-120V32.8-40.1
1450W-230V
6.2- 7.6
TERMINAL TO SHEATH - INFINITE (OPEN)
TEMPERATURE
PROBE (3)
3. Disconnect the wires from the tank heater terminals.
4. Check resistance value across tank heater terminals
and compare to chart.
If resistance is present as described, reconnect the
wires, the tank heater is ok.
If resistance is not present as described, replace the
tank assembly.
Removal and Replacement:
1. Remove the front access panel.
2. Drain water from the tank.
3. Disconnect all the hoses from the tank.
4. Disconnect all the wires from the tank.
5. Remove the 2 screws and strap securing the tank.
6. Install new tank assembly in reverse order.
1
VIDEO CLIP: Tank removal Click - >
FIG. 21-1 LIMIT THERMOSTAT (2)
2
NOTE: One additional limit thermostat used
on 230V models.
FIG. 16-1 TANK HEATER (1)
Location:
The tank heaters are located inside the tank and secured
to the tank bottom.
Test Procedures:
1. With a voltmeter, check voltage across the white
wire (120V Models) or red wire (120/208-240V
Models) from the terminal block and black wire
from the control board. Connect brewer to the
power source. The indication will be the rated line
voltage (during a heating cycle).
2. Disconnect the brewer from the power source.
If voltage is present as described, proceed to #3.
If voltage is not present as described, refer to the Wiring Diagrams and check wiring harness.
12
Test Procedures:
1. Disconnect the brewer from the power source.
2. Disconnect the wires from the limit thermostat.
3. With an ohmmeter, check for continuity across
the limit thermostat terminals.
If continuity is present as described, the limit thermostat
is operating properly.
If continuity is not present as described, replace the
limit thermostat.
Removal and Replacement:
1. Remove the wires from limit thermostat.
2. Carefully slide the limit thermostat out from under
the retaining clip and remove limit thermostat.
3. Carefully slide the new limit thermostat into the
retaining clip. Ensure the metal face has good contact
with tank.
42824 060611
TANK ASSEMBLY
TEMPERATURE PROBE (3)
Removal and Replacement:
Location:
The temperature probe is inserted through the
tank lid assembly.
Test Procedures:
1. Disconnect the brewer from the power source.
2. With a DC voltmeter, check voltage across the
two wires at J2 on control board (black probe to
black wire, red probe to white wire refer to FIG
17-1). Connect the brewer to the power source.
The indication should be between 4.5vdc (cool)
to 1vdc at ready temperature.
3. Disconnect the brewer from the power source.
1. Disconnect the brewer from the power source.
2. Disconnect the two pin connector from J2 on
control board.
3. Remove clamp. Pull probe out of tubing.
4. Install in reverse order.
If voltage is present as described, circuit is working
correctly.
If voltage is not present as described, proceed to
#4.
4. Disconnect temperature probe from J2 on control
board. Check the resistance across the two terminals of the temperature probe. The indication
should be between 10.5K cool to 870 at ready
temperature.
If resistance is to specification, replace the control
board.
If resistance is not to specification, replace the temperature probe.
FIG. 17-1 TESTING TEMPERATURE PROBE
13
42824 060611
SCHEMATIC WIRING DIAGRAM TRIFECTA
TANK
WHI
t°
BLK
LIMIT
THERMOSTAT
TANK HEATER
AIR PUMP
MOTOR
BRN
ORN
AIR VENT
SOLENOID
SOL
WHI/BLU
WHI/BLU
BREW
INTLK
SWITCH
LED
WHI/VIO
WHI/VIO
M
(+12V)
(GND)
WHI
(-)
(+ .5V HOT-4.5V COLD)
B
L
K
BLK RED +
BLU/BLK
1
1
1
J3
J5
1
J4
6
5
FLOW METER
(SIG)
(GND)
(+12V)
YEL
BLK
RED
1
DISPLAY
J2
J1
J11
GRN
RED
3
4
10
1
2
3
4
2
1
J6
J6
WHI
WHI - Rx: 0 to +5vdc
BLK
BLK - Board Ground
RED - Tx: 0 to +3.4vdc
GRN - +12 to +18vdc (non reg supply)
4
3
2
1
J7
1
J12
BLU/BLK
HEATER
J9
1
WHI
BLK
POWER CORD
42830.0000C 11/10 ©2010 BUNN-O-MATIC CORPORATION
3
4
J8
BRN (GND)
VIO (+12V)
BRN
Chassis Ground
14
BRN
ORN
M
PRESS
OUT
PUMP
3
6
WHI
WHI
BLK
GRN
WHI
WHI
2
RED
4
Earth Ground
1
BREW
CHAMBER
FILL
SOL
SOL
BREW
CHAMBER
RINSE
100-120V AC
2 WIRE + GND
SINGLE PHASE
120VAC SOLENOIDS
42824 060611
SCHEMATIC WIRING DIAGRAM TRIFECTA
TANK
WHI
t°
BLK
BLU/BLK
LIMIT
THERMOSTAT
LIMIT
THERMOSTAT
THERMAL FUSE
B
L
K
TANK HEATER
AIR VENT
SOLENOID
SOL
WHI/BLU
WHI/BLU
BRN
ORN
BREW
INTLK
SWITCH
LED
BLK RED +
M
WHI/VIO
WHI/VIO
AIR PUMP
MOTOR
(-)
(+ .5V HOT-4.5V COLD)
230VAC
(+12V)
(GND)
THERMAL FUSE
WHI
1
1
FLOW METER
(SIG)
(GND)
(+12V)
YEL
BLK
RED
1
1
J3
J4
J11
J5
1
6
5
10
DISPLAY
J2
J1
GRN
RED
3
4
1
2
3
4
2
1
J6
J6 WHI
WHI - Rx: 0 to +5vdc
BLK
BLK - Board Ground
RED - Tx: 0 to +3.4vdc
GRN - +12 to +18vdc (non reg supply)
4
3
2
1
J7
1
J12
BLU/BLK
HEATER
J9
1
WHI
Earth Ground
GRN/YEL
BLU
BRN
BRN
GRN/YEL
BLU
42830.0001B 11/10 ©2010 BUNN-O-MATIC CORPORATION
Chassis Ground
15
2
3
4
RED
J8
BRN (GND)
VIO (+12V)
BRN
BRN
ORN
M
PRESS
OUT
PUMP
3
6
4
POWER CORD
1
WHI
WHI
BREW
CHAMBER
FILL
SOL
SOL
BREW
CHAMBER
RINSE
230V AC CE
2 WIRE + GND
SINGLE PHASE
230VAC SOLENOIDS
42824 060611