1
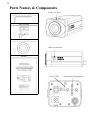
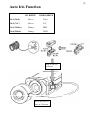
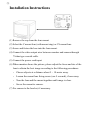
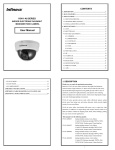
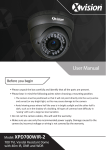
SERVICE MANUAL 1/3” SONY DSP COLOR CCD CAMERA TRUE DAY & NIGHT (IR-CUT REMOVABLE) & O.S.D. (ON SCREEN DISPLAY) SERIES The serial number of this product may be found on the bottom of the unit. You should note the serial number of this unit in the space provided and retain this instruction as a permanent record of your purchase to aid identification in the event of theft. Model No. Serial No. ① CAUTION RISK OF ELECTRIC SHOCK DO NOT OPEN CAUTION: TO REDUCE THE RISK OF ELECTRIC SHOCK, DO NOT REMOVE COVER (OR BACK), NO USER SERVICEABLE PARTS INSIDE. REFER SERVICING TO QUALIFIED SERVICE PERSONNEL. The lightning flash with arrowhead symbol, within an equilateral triangle, is interned to alert the user to the presence of uninsulated “dangerous voltage” within the product’s enclosure that may be of sufficient magnitude to constitute a risk of electric shock to persons. The exclamation point within an equilateral triangle is intended to alert the user to the presence of important operating and maintenance (servicing) instructions in the literature accompanying the appliance. ▲ Before attempting to connect this product, please read and keep this manual for future use. Safety Warning 1. Do not open the cover, it may cause electric shock. Ask a qualified service person for maintenance when you encounter any problems. 2. Install the camera away from TV, radio transmitter, magnet, electric motor, transformer, audio speakers because the magnetic fields generated from above devices will distort the video image. 3. Place this camera on a solid base. Install the camera away from stoves or other heat generating devices as the high temperature could cause deformation, discoloration or other damages to the camera. ② Install the camera at where the temperature range does not exceed 0°C to 50°C (32°F to 122°F) 4. Do not expose and operate the camera in the rain and humid areas. 5. Use only soft dry cloth to clean the camera. Also use lens tissue or cotton tipped applicator and ethanol to clean the CCD sensor and camera lens. 6. When the camera is not in use, put the cover cap on the lens mount. Please do not touch the surface of CCD by bare hand. Introduction This OSD series CCD camera introduces a new level of high picture quality through the digital signal processing LSI’s technology for advanced video surveillance. It provides the most reliable and accurate color picture in security industries. Main Features z Color camera with SONY 1/3” Super HAD CCD sensor in metal case. z Employs Digital Signal Processor (DSP) chip-set for image control. z Controlled by OSD Menu. z Additional Functions, motion detection, mirror, sharpness. z OLPF auto switching (IR-Cut Removable). z High sensitivity, CCD enables a clear image at 0.3Lux (0.1Lux B/W). z Video drive lens or DC drive lens can be selected. Supports both C and CS mount lens z The PRIVACY function enables you to select areas that will be masked during monitoring. ③ Parts Names & Components Hex Screwdriver Hole to fix lens Auto Iris Plug C-Mount Ring Auto iris connector Manual Power LED Selection & setting buttons ④ Auto Iris Function DC DRIVE VIDEO DRIVE Pin 1 (Red) Drive - Volt + Pin 2 (N.C) Drive + N.C Pin 3 (White) Damp + IRIS Pin 4 (Black) Damp - GND Plug in auto iris connector Screw the auto iris lens on CS mount ⑤ Installation Instructions (1) Remove the cap from the lens mount. (2) Select the C mount lens (with mount ring) or CS mount lens. (3) Screw and fasten the lens into the lens mount. (4) Connect the video output wire between monitor and camera through 75ohm type coaxial cable. (5) Connect the power cord input. (6) When monitor shows the picture, please adjust the focus and iris of the lens to obtain the best image according to the following procedures: ‧ Choose objects at a distance about 5 ~ 10 meter away. ‧ Loosen the mount lens fixing screw (use L wrench), if necessary. ‧ Turn the lens and the mount together until image is clear. ‧ Screw the mount to camera. (7) Fix camera to the bracket, if necessary. ⑥ Switch Definition UP button LEFT button SET button RIGHT button DOWN button SET button Press to display the menu. In the menu, this button functions as “ENTER”. UP & DOWN buttons Press to select the item of menu. LEFT & RIGHT buttons Press to change the item value. MAIN MENU ⑦ Menu Operation ‧ Press the SET button to display the menu on screen. ‧ ‧ ‧ ‧ Press the UP or DOWN button to select the item. The selected item will be displayed in yellow text. Press the LEFT or RIGHT button to change mode. The ENTER symbol means there is a sub-menu. Press the SET button to enter to the sub-menu. ‧ Select the EXIT item and press the SET button to finish setting. LENS To select the lens mode depending on the lens used: ‧ MANUAL When manual iris lens is used. ‧ DC When auto iris lens that requires a DC drive signal is used. ‧ VIDEO When auto iris lens that requires a video drive signal is used. SHUTTER To change the shutter setting and speed based on the environment. ‧ FLK Select when flickering occurs on the screen due to an imbalance between illumination and frequency. Under this mode, the shutter speed is NTSC: 1/100; PAL: 1/120 ‧ FIXED Immobile control of the shutter speed can be achieved. ‧ MANUAL The shutter speed can be controlled manually. ‧ AUTO After an immobile brightness value is set, the shutter speed will adjust automatically to achieve the value. BLC (Backlight Compensation) When there is strong backlight behind the object, enable this function to achieve a clear image of the background as well as the object. ‧ ON To enable this function. -- BLC Area: User defines which zone to enable. -- BLC Ratio: Set between 0 and 63. When the value is bigger, the compensation to the BLC area will be more. ‧ OFF To disable this function. ⑧ AGC (Auto Gain Control) Enable this function to heighten the brightness signal automatically. The effective value is between 0 and 255 (0dB ~ 40dB). (Bigger value, more noise). <<ATTENTION>> Disable this function for IR-Cut Removable. WHITE BAL. To change the white balance mode: ‧ ATW Auto Tracking White Balance. The white balance will adjust continually according to the color temperature of the object. The rage of color temperature is 1,800°K~10,500°K. ‧ AWB Auto White Balance Control. The white is correct in any condition. (To adjust the white balance, focus the camera to white paper and press SET button to obtain the optimum state under current illumination. If the environment including the light source is changed, the white balance has to be adjusted again). ‧ FIXED Four modes are available for selection by user. ‧ MANUAL The manual adjustment mode enables finer adjustment of ATW and AWB. Please select ATW mode or AWB mode first and change to MANUAL mode. Set the appropriate color temperature and then increase or decrease the red and blue color values while monitoring the color changes on the object. FUNCTION ‧ RETURN To save the option and return to the SETUP menu. ‧ CAMERA ID 1. Please move the cursor to the letter you wish to choose by using the UP and DOWN buttons. ⑨ 2. Select an ID from A~Z, a~ z, 0, 1~9 by using the UP, DOWN, LEFT and RIGHT buttons. 3. Move the cursor to “C” to clear the letter. 4. Please lock in the letter by using the SET button. 5. Please repeat the above to input the ID, up to 15 letters. 6. When a name has been chosen, select a position on the screen for the name to display. Move the cursor to and press the SET button. 7. Select “RETURN” and press the SET button to complete ID input. ‧ MIRROR Select “ON” for mirror image or “OFF” for normal image. ‧ DAY NIGHT -- COLOR: Common mode. -- AUTO: The default setting. Automatically changes between color mode under bright light environment and B/W mode under low light environment. Set the value of “DELAY”, “START LEVEL” and “END LEVEL” to define the changing time. -- B/W: Stay in B/W mode for clearer image and better visibility under low light environment. <<ATTENTION>> Select AUTO for IR-Cut Removable. ‧ MOTION When the object on screen is moving, the camera will detect the changes and display a warning on screen. -- OFF: -- ON : Not active. Any motion in the selected areas is observed. 1. AREA: There are 64 areas. Adjust the size of zone by pressing UP, DOWN, LEFT, RIGHT and SET buttons. 2. MOTION TH.: Higher sensitivity when the value is bigger 3. MOTION TRACE: Shows the location where the motion was detected. ⑩ ‧ PRIVACY Cover the areas you do not wish to appear on screen. -- ON : Enable the PRIVACY mode. Using the UP, DOWN, LEFT, RIGHT buttons to adjust the size and color of the four zones or clean the selected zones. -- OFF: Disable the PRIVACY mode. ‧ GAMMA Adjustable value between 0.05 and 1.00. ‧ LANGUAGE ‧ RESET Supports English, T.Chinese, S.Chinese, Japanese, Korean Return to the default settings. ADJUST Depending on the environment, adjust CONTRAST, SHAPRNESS, CB_GAIN and CR_GAIN for clearer and more colorful image. Specification PICK-UP DEVICE Sony 1/3" Super HAD Normal Resolution CCD Sony 1/3" Super HAD High Resolution CCD SIGNAL PROCESSOR D.S.P. (Digital Signal Processor) RESOLUTION 420 TV Lines 520 TV Lines MIN. ILLUMINATION 0.05Lux / F1.2 0.1Lux / F1.2 S/N RATIO POWER SUPPLY More than 50 dB DC12V; AC24V; AC110V; AC230V; AC90~260V Switching; DC12V/AC24V Dual Power GAMMA CORRECTION 0.45 (0.05~1.0 Adjustable) CONTROL O.S.D. (On Screen Display) LANGUAGE WHITE BALANCE LENS MOUNT English, T.Chinese, S.Chinese, Japanese, Korean ATW (1,800°K~10,500°K) C / CS Mount AUTO IRIS CONTROL Video Drive Auto Iris Lens & DC Drive Auto Iris Lens AUTO ELECTRONIC SHUTTER 1/60; 1/100; 1/250; 1/500; 1/2,000; 1/5,000; 1/10,000; 1/100,000 (Fixed) Auto / Manual 0 ~ 255 Sections / AES / FLK Mode Lens Selection (DC / VD / Manual) Shutter Selection (Auto / Fixed / Manual / FLK) ATW / AWB / Manual Selection BLC (Area / Ratio Adjustable) Selection AGC (0~40dB Adjustable) Selection Adjust Contrast / Sharpness / CB_Gain / CR_Gain Camera ID ON / OFF Motion Detection ON / OFF (64 Area, Position / Size / Sensitivity) Privacy Zone ON / OFF (4 Zone, Position / Size / Tone) Day & Night (Electronic Conversion) Mirror ON / OFF Reset to Default BASIC FUNCTION EXTEND FUNCTION VIDEO OUTPUT POWER CONSUMPTION 1 Vp-p Composite Video / 75 ohm Load 3.5W (Max.) OPERATING TEMP. -10°C~50°C (14°F~122°F) OLPF SWITCHING Automatically (1. Select DAY NIGHT: AUTO; 2. Select AGC: OFF)