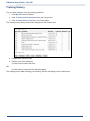
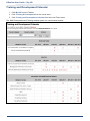
1
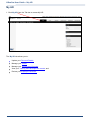
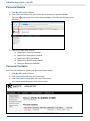
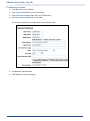
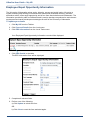
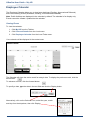
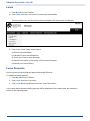
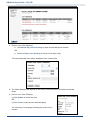
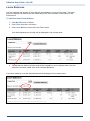
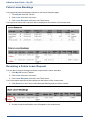
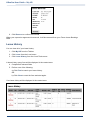
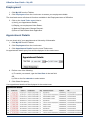
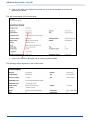
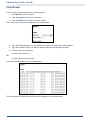
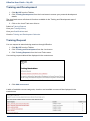
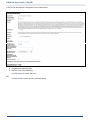
HRonline
User Guide
My HR
HRonline User Guide – My HR
Table of Contents
My HR .............................................................................................................................................................. 2
Personal Details ............................................................................................................................................... 3
Personal Contacts ........................................................................................................................................ 3
Emergency Contacts .................................................................................................................................... 5
Employee Equal Opportunity Information .................................................................................................. 6
Staff Directory Details.................................................................................................................................. 7
Employee Calendar ...................................................................................................................................... 8
My View ........................................................................................................................................................... 9
Leave .............................................................................................................................................................. 10
Leave Requests .......................................................................................................................................... 10
Leave Balances........................................................................................................................................... 12
Future Leave Bookings............................................................................................................................... 13
Reversing a Future Leave Request............................................................................................................. 13
Leave History ............................................................................................................................................. 14
Employment .................................................................................................................................................. 15
Appointment Details.................................................................................................................................. 15
View Roster................................................................................................................................................ 17
Paid Outside Work ..................................................................................................................................... 18
Training and Development ............................................................................................................................ 19
Training Request ........................................................................................................................................ 19
Training History ......................................................................................................................................... 22
Training and Development Calendar ......................................................................................................... 23
1
HRonline User Guide – My HR
My HR
1. Click My HR from the Tab bar to access My HR.
The My HR tab allows you to:
Update your Personal Details
Manage your Leave;
Manage your Employment Records;
View your Training and Development records; and
Review your Employee Calendar.
2
HRonline User Guide – My HR
Personal Details
1. Click My HR from the Tab bar.
2. Click Personal Details from the Local menu to access your personal details.
The local tasks menu will show all functions available in the Personal Details area of
HRonline.
3. Click on the task menu links to:
a) Update your Personal Contacts
b) Update your Emergency Contacts
c) Update your EEO Information
d) Update your Staff Directory Details
e) View your Employee Calendar
Personal Contacts
Use Personal Contacts to update your personal contact details.
1. Click My HR from the Tab bar.
2. Click Personal Details from the Local menu.
3. Click Personal Contacts from the Local Tasks menu.
Your details will be displayed in the content area.
3
HRonline User Guide – My HR
To update your details:
1. Click My HR from the Tab bar.
2. Click Personal Details from the Local menu.
3. Click Personal Contacts from the Local Tasks menu.
4. Click the Contact Details link in the table.
A Personal Contacts form will be shown in the content area.
5. Complete all relevant fields.
6. Click Update to record changes.
4
HRonline User Guide – My HR
Emergency Contacts
Use Emergency Contacts to update your emergency contact details.
1. Click My HR from the Tab bar.
2. Click Personal Details from the Local menu.
3. Click Emergency Contacts from the Local Tasks menu.
Your emergency contacts will be displayed in the content area.
4. Perform one of the following:
a) Click the Contact Name link to update an existing emergency contact.
b) Complete relevant fields, and then click Update.
OR
c) Click Add new Emergency Contact record to add a new emergency contact.
d) Complete relevant fields, then click Insert.
5
HRonline User Guide – My HR
Employee Equal Opportunity Information
The University of Newcastle values equity, diversity, access and social justice. We strive to
create a learning and working environment that reflects and celebrates diversity, practises
affirmative action, offers equal opportunity and is free from discrimination and harassment. The
information provided by staff is confidential and is used to develop comprehensive and relevant
employment and career development strategies for staff of the University of Newcastle.
To update your details
1. Click My HR from the Tab bar.
2. Click Personal Details from the Local menu.
3. Click EEO Information from the Local Tasks menu.
Your Employee Equal Opportunity Information record will be displayed.
4. Click EEO Details in the table.
The EEO Information form will be displayed.
5. Complete all relevant fields.
6. Perform one of the following:
a) Click Update to submit the form.
OR
b) Click Clear to reset the form and start again.
6
HRonline User Guide – My HR
Staff Directory Details
To update your details
1. Click My HR from the Tab bar.
2. Click Personal Details from the Local menu.
3. Click My Staff Directory Details from the Local Tasks menu.
The following screen will be displayed:
To update current details click on the link under ‘Attribute Type’.
To add a new employee attribute, click in the link ‘Add new Employee Attribute record’.
The following screen will be displayed:
For more information regarding entering Staff Directory Information, see the link within HRonline,
Help for Personal Details, on the Personal Details menu.
7
HRonline User Guide – My HR
Employee Calendar
The Employee Calendar allows you to view leave bookings (Pending, Approved and Deferred)
and course training events (Waitlisted, Pending, Confirmed and Attended).
Note: Public Holidays are displayed in the calendar by default. The calendar is for display only.
Events cannot be created / updated via the calendar.
Viewing Events
To view the calendar:
1. Click My HR from the Tab bar.
2. Click Personal Details from the Local menu.
3. Click Employee Calendar from the Local Tasks menu.
Your calendar will be displayed in the content area:
The Calendar will show the entire month for today’s date. To display the previous month, click the
back button.
To advance a month, click the forward button.
To specify a date, type the date in the text field and click the Display button.
Alternatively, click on the Calendar icon, select the year, month
and day from the dropdown, then click Display.
8
HRonline User Guide – My HR
My View
The information viewed through HRonline relates to a particular job. If you have more than one
job in the organisation you will need to select the job number relevant to the information you wish
to display, or request you wish to make. Once the job is selected, this will remain ‘Active’ until
another job is selected or you leave HRonline.
To change the active job:
Click on the maximise/minimise icon under the ‘My View’ section of the right panel. This will
display all current jobs.
Click on the radio button for the job that you wish to select and then Set the View by clicking on
the ‘Set My View’ icon.
The active job will now be displayed at the top of the panel under ‘My Details.
9
HRonline User Guide – My HR
Leave
1. Click My HR from the Tab bar.
2. Click Leave from the Local menu to access your leave details.
The local tasks menu will show all functions available in the Leave area of HRonline:
3. Click on the Local Tasks menu links to:
a) Submit Leave Requests
b) Calculate Future Leave Balances
c) Check your Future Leave Bookings
d) Cancel future leave by Reversing a Future Leave Request
d) Review your Leave History.
Leave Requests
Leave requests are submitted and approved through HRonline.
To submit a leave request
1. Click My HR from the Tab bar.
2. Click Leave from the Local menu.
3. Click Leave Bookings Request from the Local Tasks menu.
Your current leave requests waiting approval will be displayed in the content area. An example is
shown on the following page:
10
HRonline User Guide – My HR
4. Perform one of the following:
a. Click Whole Day Leave Booking to make a whole day leave request.
OR
b. Click Part Day Leave Booking for leave of less than a day.
The Leave Request form will be displayed in the content area:
5. The fields displayed will depend on the Leave Code you select. Complete all relevant
fields
6. Perform one of the following:
a) Click Submit to submit the form.
OR
b) Click Clear to reset the form and start again.
You will receive a message indicating the result of your
request.
11
HRonline User Guide – My HR
Leave Balances
You can calculate the amount of leave that will be available to you at a future date. The leave
balances displayed by default are calculated daily at the time and date on the bottom of the
content area.
To calculate future leave balance:
1. Click My HR from the Tab bar.
2. Click Leave from the Local menu.
3. Click Leave Balances from the Local Tasks menu.
Your leave balances as at today will be displayed in the content area:
4. To calculate the amount of leave that will be available to you for another date, click the
calendar and select a date, then click Calculate Balances.
Your leave balances as at the selected date will be displayed in the content area:
12
HRonline User Guide – My HR
Future Leave Bookings
Your approved leave bookings are shown on the Leave Requests page.
1.
Click My HR from the Tab bar.
2. Click Leave from the Local menu.
3. Click Leave Requests from the Local Tasks menu.
Your approved future leave requests will be displayed at the bottom of the content area.
Reversing a Future Leave Request
You are able to reverse an approved leave request with a future start date.
1. Click My HR from the Tab bar.
2. Click Leave from the Local menu.
3. Click Leave Requests from the Local Tasks menu.
Your future leave requests will be displayed at the bottom of the content area.
4. Click Reverse on the Future Leave Request Booking that you wish to cancel.
5. A leave reversal confirmation form will appear in the content area:
13
HRonline User Guide – My HR
6. Click Reverse to confirm the reversal.
When your supervisor approves the reversal, it will be removed from your Future Leave Bookings
table.
Leave History
You can view all of your leave history.
1. Click My HR from the Tab bar.
2. Click Leave from the Local menu.
3. Click Leave History from the Local Tasks menu.
A leave history query form will be displayed in the content area.
4. Complete all relevant fields.
5. Perform one of the following:
a) Click Find to search your leave history.
OR
b) Click Clear to reset the form and start again.
Your leave history will be displayed in the content area.
14
HRonline User Guide – My HR
Employment
1. Click My HR from the Tab bar.
2. Click Employment from the Local menu to access your employment details.
The local tasks menu will show all functions available in the Employment area of HRonline.
3. Click on the Local Tasks menu links to:
a) Verify your Appointment Details;
b) Display your employment View Roster;
c) Make an Employment Change Request;
d) Enter a Paid Outside Work Application.
Appointment Details
You can check all of your appointments at University of Newcastle.
1. Click My HR from the Tab bar.
2. Click Employment from the Local menu.
3. Click Appointment Details from the Local Tasks menu.
An appointment details query form will be displayed in the content area.
4. Perform one of the following:
a) To restrict your search, type the Start Date in the text field.
OR
b) Click on the first calendar to select a date.
5. Click Show Occupancy.
Your appointment details will be displayed in the content area.
15
HRonline User Guide – My HR
6. Click on the date in the Active From field of any record in the table to view the full
appointment details.
This will be displayed in the content area:
7. Click on the Position Number link to view the position details.
The following will be displayed in the content area:
16
HRonline User Guide – My HR
View Roster
You can view your work patterns for specific periods.
1. Click My HR from the Tab bar.
2. Click Employment from the Local menu.
3. Click View Roster from the Local Tasks menu.
The roster query form will be displayed in the content area.
4. Type the Enquiry Date in the text field box or click on the calendar to select a date.
5. Type the number of days you wish to see into the Period of Enquiry text box.
6. Perform one of the following:
a) Click Find to search.
OR
b) Click Clear to reset the form.
Your roster will be displayed in the content area.
The Employment Change Request form will be displayed in the content area.
17
HRonline User Guide – My HR
Paid Outside Work
The University of Newcastle recognises that it is in its interest for members of staff to participate
in appropriate Paid Outside Work activities which bring benefits to the institution whilst promoting
or maintaining the professional standing of staff.
It is also recognised that Paid Outside Work must be undertaken in a way that appropriately
addresses risks associated with such arrangements. For further information on Paid Outside
Work see http://www.newcastle.edu.au/policy/000835.html.
1. Click My HR from the Tab bar.
2. Click Employment from the Local menu.
3. Click Paid Outside Work from the Local Tasks menu.
The Paid Outside Work form will be displayed in the content area.
4. Click Add new record.
The Paid Outside Work form will be displayed in the content area:
5. Complete all relevant fields.
6. Perform one of the following:
a) Click Insert to submit the form.
OR
b) Click Clear to reset the form and start again.
18
HRonline User Guide – My HR
Training and Development
1. Click My HR from the Tab bar.
2. Click Training Development from the Local menu to access your personal development
details.
The local tasks menu will show all functions available in the Training and Development area of
HRonline.
3. Click on the Local Task menu links to:
Submit a Training Request
View your Training History
View your Qualifications and
View the Training and Development Calendar.
Training Request
You can request to attend training sessions through HRonline.
1. Click My HR from the Tab bar.
2. Click Training and Development from the Local menu.
3. Click Training Requests from the Local Tasks menu.
Your training request table will be displayed in the content area.
4. Click Add new record.
A table of available courses categories, locations and available courses will be displayed in the
content area.
19
HRonline User Guide – My HR
5. Click on the appropriate training Course Category, ensuring you have selected the right
location.
A table of available courses will be displayed in the content area.
6. Click on the Course you wish to attend.
A table of course dates will be displayed in the content area.
7. Choose the course instance you wish to attend by checking the date and time, and click
the corresponding link in the Nominate column (see Course Lists for the difference
between Nominate and Waiting List).
20
HRonline User Guide – My HR
A full course description is displayed in the content area.
8. Complete all relevant fields.
9. Perform one of the following:
a) Click Insert to submit the form.
OR
b) Click Clear to reset the form and start again.
21
HRonline User Guide – My HR
Training History
You can view a history of all your training sessions.
1. Click My HR from the Tab bar.
2. Click Training and Development from the Local menu.
3. Click Training History from the Local Tasks menu.
The training history query form will be displayed in the content area.
4. Complete all relevant fields.
5. Perform one of the following:
a) Click Find to submit the form.
OR
b) Click Clear to reset the form and start again.
The training history table showing your training courses will display in the content area.
22
HRonline User Guide – My HR
Training and Development Calendar
1. Click My HR from the Tab bar.
2. Click Training & Development from the Local menu.
3. Click Training and Development Calendar from the Local Tasks menu.
The Staff Development and Training website opens in a new browser window.
23