1
Oracle® Hospitality Suite8
Conference and Catering Management User Manual
Release 8.9
July 2015
Copyright © 1987, 2015, Oracle and/or its affiliates. All rights reserved.
This software and related documentation are provided under a license agreement containing
restrictions on use and disclosure and are protected by intellectual property laws. Except as
expressly permitted in your license agreement or allowed by law, you may not use, copy,
reproduce, translate, broadcast, modify, license, transmit, distribute, exhibit, perform, publish, or
display any part, in any form, or by any means. Reverse engineering, disassembly, or
decompilation of this software, unless required by law for interoperability, is prohibited.
The information contained herein is subject to change without notice and is not warranted to be
error-free. If you find any errors, please report them to us in writing.
If this software or related documentation is delivered to the U.S. Government or anyone licensing it
on behalf of the U.S. Government, then the following notice is applicable:
U.S. GOVERNMENT END USERS: Oracle programs, including any operating system, integrated
software, any programs installed on the hardware, and/or documentation, delivered to U.S.
Government end users are "commercial computer software" pursuant to the applicable Federal
Acquisition Regulation and agency-specific supplemental regulations. As such, use, duplication,
disclosure, modification, and adaptation of the programs, including any operating system,
integrated software, any programs installed on the hardware, and/or documentation, shall be
subject to license terms and license restrictions applicable to the programs. No other rights are
granted to the U.S. Government.
This software or hardware is developed for general use in a variety of information management
applications. It is not developed or intended for use in any inherently dangerous applications,
including applications that may create a risk of personal injury. If you use this software or
hardware in dangerous applications, then you shall be responsible to take all appropriate fail-safe,
backup, redundancy, and other measures to ensure its safe use. Oracle Corporation and its
affiliates disclaim any liability for any damages caused by use of this software or hardware in
dangerous applications.
Oracle and Java are registered trademarks of Oracle and/or its affiliates. Other names may be
trademarks of their respective owners.
Intel and Intel Xeon are trademarks or registered trademarks of Intel Corporation. All SPARC
trademarks are used under license and are trademarks or registered trademarks of SPARC
International, Inc. AMD, Opteron, the AMD logo, and the AMD Opteron logo are trademarks or
registered trademarks of Advanced Micro Devices. UNIX is a registered trademark of The Open
Group.
This software or hardware and documentation may provide access to or information on content,
products, and services from third parties. Oracle Corporation and its affiliates are not responsible
for and expressly disclaim all warranties of any kind with respect to third-party content, products,
and services. Oracle Corporation and its affiliates will not be responsible for any loss, costs, or
damages incurred due to your access to or use of third-party content, products, or services.
Contents
Preface ........................................................................................................................... 7
Audience ............................................................................................................................ 7
Customer Support ............................................................................................................. 7
Documentation .................................................................................................................. 7
Revision History ................................................................................................................ 7
1 Introduction ............................................................................................................. 9
About Suite8 Meeting Planner .......................................................................................... 9
Logging In ........................................................................................................................ 10
Meeting Planner Shortcut bar ......................................................................................... 11
Navigation Keys .............................................................................................................. 12
Using the blue drill down arrow .................................................................................... 13
HTML View ..................................................................................................................... 14
The Quick Keys ................................................................................................................ 17
The Date Box .................................................................................................................... 19
Changing the date............................................................................................................ 19
Customising the HTML display ..................................................................................... 20
Customising Suite8 Grids................................................................................................ 21
Favourites ......................................................................................................................... 24
2 Conference Diary ................................................................................................... 27
Viewing the Conference Diary........................................................................................ 27
Creating a New Booking or Event .................................................................................. 32
Accessing the Booking Master Search screen .......................................................... 32
Quick Book ................................................................................................................ 33
New Booking on the Booking Master Search .......................................................... 37
Moving an event to another function space ................................................................... 37
Change the Event Start/End Time ................................................................................. 39
Shareable Function Space ................................................................................................ 39
Function Space – Closed Periods .................................................................................... 48
Printing the Conference Diary ........................................................................................ 49
3 Conference Booking ............................................................................................... 51
Conference Booking Search............................................................................................. 51
New Booking Master ....................................................................................................... 54
Booking Information................................................................................................. 55
Deposit & Cancellation ............................................................................................. 62
General Information ................................................................................................. 63
Linked Profiles .......................................................................................................... 64
Linked Documents .................................................................................................... 64
Forecast / Revenue ................................................................................................... 67
Editing a Booking Master ................................................................................................ 69
Copying a Booking Master.............................................................................................. 69
Deleting a Booking Master .............................................................................................. 72
Cancelling a Booking Master .......................................................................................... 73
3
Printing a Function Sheet or other Correspondence ..................................................... 74
Events ............................................................................................................................... 86
New Event ................................................................................................................. 87
Editing Events ........................................................................................................... 92
Table Res.................................................................................................................... 93
Copying Events ......................................................................................................... 97
Deleting Events ....................................................................................................... 100
Moving Events ........................................................................................................ 100
Waitlist Events ........................................................................................................ 101
Conference Packages .............................................................................................. 108
Event Groups .......................................................................................................... 116
Notes ........................................................................................................................ 119
Sub Events ............................................................................................................... 126
Manual Postings...................................................................................................... 132
User Log .................................................................................................................. 135
Events Participants List .......................................................................................... 136
Financial Accounts .................................................................................................. 137
Printing a Function Sheet or other Correspondence............................................. 145
Forecast/Revenue ................................................................................................... 146
Resources........................................................................................................................ 146
Function Spaces....................................................................................................... 148
Miscellaneous Items................................................................................................ 151
Standard Menus ...................................................................................................... 158
Menu Items.............................................................................................................. 167
Activities & Tasks linked to a Booking Master ............................................................ 175
Options ........................................................................................................................... 175
Billing Instructions .................................................................................................. 175
Event Manual Postings ........................................................................................... 180
Financial Accounts .................................................................................................. 180
Guest Comments..................................................................................................... 180
Linked Documents .................................................................................................. 183
Notes ........................................................................................................................ 185
User Log .................................................................................................................. 185
Participant List ........................................................................................................ 186
Postings.................................................................................................................... 187
Show Attached Table Reservations ....................................................................... 187
4 Event Management............................................................................................... 193
Event Management Search ............................................................................................ 193
Event Management Options ......................................................................................... 195
Sub Events via Event Management .............................................................................. 196
Edit Event ....................................................................................................................... 201
5 Maintenance ......................................................................................................... 205
Entering a new maintenance task ................................................................................. 206
Resolving a maintenance task ....................................................................................... 208
Setting a room status to OOO or OOS .......................................................................... 209
4
Marking a resolved maintenance task as unresolved.................................................. 209
Deleting a maintenance task ......................................................................................... 210
Print, Email, SMS or Fax a maintenance task ............................................................... 210
SMS Log.......................................................................................................................... 218
Email Log ....................................................................................................................... 220
6 Index .................................................................................................................... 223
5
6
Preface
Audience
This user manual is intended for system users and system administrators.
Customer Support
To contact Oracle Customer Support, access My Oracle Support at the following URL:
https://support.oracle.com/
When contacting Customer Support, please provide the following:
Product version and program/module name
Functional and technical description of the problem (include business impact)
Detailed step-by-step instructions to re-create
Exact error message received
Screen shots of each step you take
Documentation
Oracle Hospitality product documentation is available on the Oracle Help Center at
http://docs.oracle.com
Revision History
Date
Preface
Description of Change
July, 2005
8.5.0.0 - First Issue Small Business
Edition
May, 2008
8.7 - Updated for Version 8.7
June, 2008
8.7.3.1 - Updated for Version 8.7.3.1
May, 2009
8.8 - Updates for Version 8.8
Sept, 2010
8.8 - Updates for Oracle 11gR1
Jan, 2012
8.9 - Updated for Version 8.9
Nov, 2012
8.9 - New cover page
July, 2015
8.9 – Oracle template applied
7
1
Introduction
About Suite8 Meeting Planner
The Suite8 Meeting Planner module automates sales and catering top to bottom. It consists of the
Conference Diary, which is used to check availability and to work on existing bookings and Event
Management, which allows the users to quickly enter events and to manage them in an effective
manner.
The system consists of the following options:
Booking Master
Conference and Meeting Event Management
Resource Management
Direct access to financial accounts and postings
Overview of Booking Structure & Terminology
Introduction
9
Logging In
To use Suite8 you must first log into the system. You must have a valid user identification and
password.
Logging into Suite8
1. From the desktop, click the Fidelio Suite8 icon.
The Suite8 Splash screen is displayed for several seconds with the Payment
Application Data Security Standard (PA-DSS) disclaimer
The Fidelio V8 Login screen is then displayed.
2. Type your user identification (case sensitive) in the Login name box.
3. Tab to the Password box.
4. Type your secret password (case sensitive) in the Password box.
5. Click LOGIN, the Suite8 main menu screen appears.
You are now logged into the system.
10
Introduction
Note: If one of the following tables: WMLG, WLOG, ZPOS, WDAT,
SHIS, SRPD, WRPD has no indices or a missing index, an alert is
displayed when starting Suite8 with a message to contact support. It
could happen that a table has no indices in the event that a table was
renamed for support purpose. Renaming a table carries the indices to
the renamed table. If an index is missing of one of the above
mentioned tables, the alert is displayed when starting Suite8.
Meeting Planner Shortcut bar
The Suite8 main menu screen has nine coloured tabs located on the left of the screen. Each
coloured tab represents one of the main user modules.
To open the Meeting Planner Shortcut Bar
1. Click MEETING PLANNER from the coloured shortcut bar.
The Meeting Planner shortcut bar opens.
2. Alternatively you can click MEETING PLANNER on the menu bar.
The Meeting Planner menu screen appears.
Introduction
11
Navigation Keys
Accelerator keys
Accelerator keys are used for fast access to a box on a screen or dialog box. When a letter is
underlined you can press the Alt + letter keys and the cursor moves into the appropriate box. For
example, on the Profile Search screen the letter “A” is underlined in the Name box. By pressing the
Alt + A keys, the cursor moves into the Name box.
To use the accelerator keys:
From the screen or dialog box, press Alt + letter to move the cursor into the appropriate box.
Shortcut keys
Suite8 has shortcut keys that allow you to perform actions directly from the keyboard without
having to use the mouse. Using these keys saves you time.
12
Introduction
Suite8 Shortcut keys
Shortcut Key
Description
F1
Displays the help.
Alt + F4
Closes the active window.
F10
Closes all active windows.
F12
Moves the cursor from a data box to the first record on the
grid.
Alt + Down arrow
Displays a combo box.
Tab
Moves forward through the boxes/options.
Moves to the next box and confirms the entry.
Shift + Tab
Moves backward through the boxes/options.
Ctrl + Tab
Moves forward through tabs.
Ctrl + Shift +
Tab
Moves backward through tabs.
Escape
Cancels the current action.
Removes a Combo box before a selection has been made.
Home
Moves the cursor to the beginning of a box.
End
Moves the cursor to the end of a box.
Using the blue drill down arrow
Many boxes have a blue drill down arrow
information that can be displayed.
next them indicating that there is additional
For example, on the House Status screen clicking the blue drill down arrow on the Out of Order
line displays the Out of Order Rooms screen.
Introduction
13
HTML View
Suite8 offers the possibility to view information in HTML format. HTML is the abbreviation for
"Hypertext Markup Language." This is the system of marking a document so it can be published
on the World Wide Web and viewed with a browser. The main areas where information can be
viewed in HTML format are as follows:
Reservation Navigator
Blocks
Profiles
Cashiering
Tasks and Activities
Events
Conference Reservation
The HTML display on the reservation navigator can be hidden so that the reservation grid is
expanded. Double-click in the blue reservation header bar or right-click and select/deselect
LOWER PART OF THE SCREEN from the short-cut menu to view or hide the HTML display. This
setting is stored per user and remains until the next time it is changed.
14
Introduction
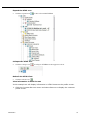
Expand the HTML tree
Click the expand icon
to show all available folders.
Collapse the HTML tree
Click the collapse icon
to collapse all folders to the uppermost level.
Refresh the HTML View
Click the refresh icon
View information in HTML format
In this example we will display information in HTML format on the profile screen.
1. Click the CUSTOMER RELATION menu and select PROFILES to display the customer
profile screen.
Introduction
15
This main customer profile screen is called the Navigator and is divided into 3
distinct areas:
Query - basic and advance profile search criteria
Query Results - the results of the query shown in a grid format
Tree Listing and HTML Page
A tree listing of all the details associated with this profile including address,
communications, links, reservations or history
A freely definable HTML display which by default has a 'big' format where
the details are displayed in a non-grid style format or a list format. The
HTML display can be printed by using the right mouse click.
2. Enter the name to search for in the NAME box and click SEARCH.
3. The query results are shown in grid format in the middle section of the screen and
the tree and HTML formats are shown in the lower section of the screen.
4. In this instance the HTML view displays a summary of the profile details. The tree
listing is displayed by default expanded by one level. A plus sign next to a folder
indicates that it can be expanded to show more folders; a minus sign indicates
that it can be collapsed.
16
Introduction
Change the display of the HTML
Two additional buttons on the html display allow you to change whether certain details
are displayed in a non-grid style or in a list format. By default the 'big' view is
displayed.
1. To view in list format click the
2. To view in a non-grid style, click the
button.
button.
Copy to clipboard
It is possible to copy information from the HTML files to clipboard by selecting items
from HTML, using right mouse short cut menu and selecting COPY TO CLIPBOARD or short
cut key CTRL + C. This information can then be pasted to any open file by using right
mouse menu option PASTE or short cut key CTRL + V.
The menu option COPY TO CLIPBOARD is controlled by the user right COPY TO CLIPBOARD
FROM HTML under Users → User Definition → Rights → Miscellaneous
The Quick Keys
Suite8 allows you to select the Quick Keys main menu from any screen. The quick keys are
shortcuts to screens, searches, and desktop tools. Using these keys allows rapid access to
information without having to leave the section that you are currently working on. For example, a
customer is making a new reservation while at the same time asking questions about restaurants in
the area. You can use the Telephone Book quick key for restaurant information instead of aborting
the new reservation screen, looking up the restaurant information, closing the Telephone Book,
and reopening the new reservation screen.
Introduction
17
To access the Quick Keys main menu
Click the QUICK KEYS menu option.
The Quick Keys menu is displayed.
18
Introduction
The Date Box
The format of the dates and the separators between the dates may vary from one hotel to another.
The date format is defined in the Control Panel Windows Regional Settings/Options.
Typical date formats include the following:
dd/yy
MM/dd/yyyy
yy/MM/dd
yyyy-MM-dd
dd-MMM-YY
You can type the date directly in the date box; however it must be typed exactly as per the predefined format.
There are many date boxes in the system, for example, Arrival Date or From Date. The date can be
either a specific date or an as of date.
A specific date is when you need to see what happened on that day. For example, you need to see
which guests have departed 01/01/03.
An 'as of date' is when you need to find out information starting from that date. For example, you
need to read the room rack starting from 09/09/03 through 12/09/03.
Changing the date
The date can be changed by typing a new date or with the use of the calendar.
To type a new date
1. Place the cursor in the Date box.
2. Type the new date in the Date box, in the defined format including separators.
3. Press the Tab key, the date is changed.
To change a date using the calendar
1. Click the drop down arrow
next to the Date box.
The calendar appears.
2. Change the month to a previous month or future month by clicking the horizontal
arrows located on the top of the calendar or by pressing the Ctrl + Page Up or
Ctrl + Page Down key.
3. Place the cursor on the date and click the left mouse button or move the keyboard
arrow keys to locate the date and press Enter, the date is changed.
Introduction
19
Customising the HTML display
The HTML display may be customised according to the requirements of the property.
The customization options available when placing the cursor on the HTML display and rightclicking are:
PRINT - prints an exact copy of the HTML display. The print page margins and the actions to
take if the HTML printout is too large for the defined paper size can be defined in the
configuration.
PRINT WITH SETUP - displays the printer options and then print the HTML display.
VIEW SOURCE - displays the HTML code; no changes can be made.
EDIT TEMPLATE WITH NOTEPAD - opens the relevant *.htm and *.qry in notepad. Users with
HTML programming knowledge can edit these files to meet the requirements of the property.
EDIT TEMPLATE WITH ASSOCIATED APPLICATION - opens the relevant *.htm and *.qry with the
program associated with these file types. Users with HTML programming knowledge can edit
these files to meet the requirements of the property.
How to use HTML Expressions to customize the HTML display
Properties can configure and store customised html files in the Version 8 directory for
htm files. The files are displayed in Suite8 either by logged in user, user language,
customised htm files for all users or language specific htm files for all users.
The priority Suite8 uses to determine which file to use is in the sequence as listed:
Customised htm file by user initials
To display a customised htm file by user initials, the htm file has to be called
USR_USERINTIALS_HTMFILENAME.HTM.
Example: For a user with the initials DS the file has to be called
usr_ds_quickinfo.htm.
Customised htm file by user language
To display a customised htm file by user language, the htm file has to be called
CUST_LANG_LANGUAGE SHORT DESCRIPTION_QUICKINFO .HTM.
Example: If the language short description is F for French, the user has to select
this language under User Settings → Startup → Language and the file, such as
quickinfo.htm has to be called cust_lang_f_quickinfo.htm.
Customised version for all users
To display a customised version of htm files for all users, the html files have to be
called CUST_HTMLFILENAME.HTM.
Example: cust_quickinfo.htm.
Customised version by language
To display a customised version by language, the html files have to be called
LANG_SHORT DESCRIPTION OF THE LANGUAGE_HTMLFILE .HTM.
Example: lang_f_quickinfo.htm, where f stands for the short description of the
language.
If none of these files can be found then the standard htm file is displayed
How to hide or show expressions depending on activated features or license
The following expression can be used to hide for example, Conference Information on
the HTM file when working with the small business edition:
if ({const isBnB})=(1)}{/if}{else} {if {feature Meeting Planner}} Conference
{runquery 2}
20
Introduction
Customization functionality is controlled by the user right HTML source view and
edit under Setup → Configuration → Users → User Definition → Rights →
Miscellaneous.
The print page margins and the actions to take if the HTML printout is too large for
the defined paper size are defined via the option HTML PRINTOUT under Setup →
Configuration → Global Settings → Miscellaneous → Visual Appearance 4.
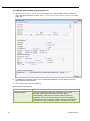
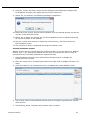
Customising Suite8 Grids
Many of the grids in Suite8 may be customised according to the needs of the property.
The customization options available are:
CUSTOMIZE - opens the customize dialog box so that columns on the grid can be added,
changed or removed.
RESTORE DEFAULTS - applies the default settings for this grid.
SHOW DEFAULTS - applies the default settings to the current grid view, however, any
customised settings are used the next time the grid is displayed.
Select PRINT to print or export the existing grid layout, the possible export formats are ASCII
File, CSV Format, HTML Document or an Excel Document.
Note: The print or export function should be used before changes to
the grid will be saved.
How to customize a grid
1. Place the cursor in the grid and right-click to display the short-cut menu.
2. Select CUSTOMIZE to open the customize screen.
The fields already used are marked with a green check mark.
Introduction
21
3. Click the PENCIL button to view or change the column properties.
4. To move a field to the grid, select the field and drag it to the required position.
5. Click the
in the top right-hand corner to close the customize screen.
6. A message is displayed asking if you want to store the grid layout.
7. Select YES to save the changes or NO not to save any changes.
How to remove a column from a customized grid
1. Place the cursor in the grid and right-click to display the short-cut menu.
2. Select CUSTOMIZE to open the customize screen.
The fields already used are marked with a green check mark.
3. On the grid point to the column to be removed and drag it to the customize
screen; yellow arrows are displayed at each end of the column name.
Once the column has been removed the green check mark is removed from the
field name on the customize screen.
4. Click the
in the top right-hand corner to close the customize screen.
5. A message is displayed asking if you want to store the grid layout.
6. Select YES to save the changes or NO not to save any changes.
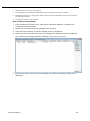
Column Properties
22
Field
Description
Field name
The field name as it is defined in the database table.
Caption
The field caption.
Fixed
Defines if the column will be fixed to the left side, when
scrolling to the right to view additional fields of the grid.
Columns marked as fixed are highlighted grey.
Introduction
How to create a customised grid view for profile search
Users familiar with the Fidelio Suite8 table structure and fields can create a
customised grid view for the profile search.
This functionality is controlled by the parameter CUSTOM VIEW IN PROFILE SEARCH
under Setup → Configuration → Global Settings → Miscellaneous → Search
Screens 2 tab.
To add fields to the Grid Customization dialog box, the view
V8_SYS_CUSTOMXCMSSEARCH has to be amended.
Example: "Adding the financial account long description to the profile navigator"
The view has to be changed as follows:
CREATE OR REPLACE FORCE VIEW v8_sys_customxcmssearch
(customxcmssearch_xcms_id, zfac_longdesc)
AS SELECT xcms_id customxcmssearch_xcms_id,
(select zfac_longdesc from zfac where zfac_actvalidfrom is not null and
zfac_actvaliduntil is null and xcms.xcms_id=zfac.zfac_xcms_id and rownum=1)
zfac_longdesc
from xcms;
The fields from the custom view are automatically added to the grid.
How to create a customised grid view for reservation search
Users familiar with the Fidelio Suite8 table structure and fields can create a
customised grid view for the reservation navigator.
This functionality is controlled by the parameter CUSTOM VIEW IN RES. NAVIGATOR
under Setup → Configuration → Global Settings → Miscellaneous → Search
Screens 2 tab.
To add fields to the Grid Customization dialog box, the view
V8_SYS_CUSTOMXCMSSEARCH has to be amended.
Example: "Adding the housekeeping status to the reservation navigator"
How to create a customised grid view for booking search
Users familiar with the Fidelio Suite8 table structure and fields can create a
customised grid view for the event booking search.
This functionality is controlled by the parameter CUSTOM VIEW IN BOOKING SEARCH
under Setup → Configuration → Global Settings → Miscellaneous → Search
Screens 2 tab.
To add fields to the Grid Customization dialog box, the view
V8_SYS_CUSTOMYBOMSEARCH has to be amended, however it must contain the field
customybomsearch_ybom_id.
Example: "How to display the function type description"
The view has to be changed as follows:
CREATE OR REPLACE FORCE VIEW V8_SYS_CUSTOMYBOMSEARCH
AS
SELECT
ybom_id customybomsearch_ybom_id,
Introduction
23
yfty_longdesc
from
ybom, yfty
where
ybom_yfty_id=yfty_id(+);
Customization functionality is controlled by the user right EDIT under Setup →
Configuration → Users → User Definition → Rights → Miscellaneous → Grid layout
Customization.
Print functionality is controlled by the user right PRINT GRID under Setup →
Configuration → Users → User Definition → Rights → Miscellaneous.
Favourites
The Favourites shortcut toolbar allows you to keep your most frequently used options right where
you can find them. Your most used options can be added to the Favourites shortcut toolbar where
they are more noticeable and more easily organized to suit your purposes.
To make the most of the Favourites shortcut toolbar, you need to organize the options in it; this can
be done using drag and drop.
In user settings the Favourites shortcut toolbar can be set to be listed first and will then be the
default shortcut toolbar opened when logging on to Fidelio.
Note: The Favourites shortcut toolbar cannot be removed from the
toolbar.
How to add an option to the Favourites shortcut bar
1. Click one of the coloured shortcut toolbars on the left to list the options on that
toolbar.
2. Right-click the option that you want to add, and then click ADD TO FAVOURITES on
the shortcut menu.
The option is now listed on the Favourites shortcut toolbar.
3. Repeat Steps 1 and 2 for each option that you want to add.
Note: Options from Web Services cannot be added to the Favourites
shortcut toolbar.
How to delete an option from the Favourites shortcut bar
1. Click the FAVOURITES shortcut toolbar on the left to list the options.
2. Right-click the option that you want to remove, and then click DELETE BUTTON on
the shortcut menu.
The option is removed from the Favourites shortcut toolbar.
3. Repeat Steps 1 and 2 for each option that you want to remove.
How to reorganise the options on the Favourites shortcut bar
1. Click the FAVOURITES shortcut toolbar on the left to list the options.
2. Select the option to be moved and then left-click and hold the mouse button while
you drag the option to its new location on the toolbar.
3. Repeat Steps 1 and 2 for each option that you want to move.
24
Introduction
On the toolbar the Favourites shortcut bar can be listed first by selecting the
option FAVOURITE BUTTONS ON TOP under Miscellaneous → User Settings →
Appearance Tab.
Introduction
25
2
Conference Diary
Viewing the Conference Diary
The conference diary is a graphical display of all the function spaces. It enables users to easily view
the availability of function spaces and to start the booking process. In addition to creating new
bookings, details of existing bookings and events can be viewed and changed, and calendar events
and PMS availability are displayed.
Note: Calendar events with the type conference bookings are not
displayed in the conference diary.
How to view the conference diary
Click the MEETING PLANNER menu and select CONFERENCE DIARY or press F3.
The Conference Diary is displayed.
The user can scroll up and down within the conference diary by rotating the wheel of
the mouse.
The layout of the diary can be changed by activating the parameter DISPLAY FUNCTION
SPACE FOR EACH BOOKING. Bookings entered in the same function space are then listed on
a separate line; however events of the same booking are displayed in a single line.
Bookings entered into shareable function spaces are also displayed on individual lines.
Conference Diary
27
Note: Placing the cursor on a booking displays a hint box with the
following details if available:
The Company Name, Contact, Booking Dates, Decision Date, Follow
Up Date, Cutoff Date, Event Type, Dates, Time, Status, Number of
Persons, Seating arrangement and the Rate.
Note: Opening the diary via F3 from the Booking Master edit screen
opens the diary on the arrival date of the booking. Pressing F3 on the
event details or event edit screen the diary will be opened on the
selected day; otherwise the default is to open the diary on the current
date.
The default start time for the conference diary is defined via the option CONFERENCE
DIARY START TIME under Setup → Configuration → Global Settings → CCM →
Conference 1 tab.
The default number of days to be displayed on the conference diary is defined via
the option DEFAULT LOADED DAYS FOR DIARY under Setup → Configuration → Global
Settings → CCM → Conference 1 tab. It is recommended to set the default number
of days to two.
The type of availability displayed in the Date column is defined via the option
DISPLAY AVAILABILITY IN ROOM RACK under Miscellaneous → User Settings →
Appearance Tab. Types of availability available are Maximum Availability, Minimum
Availability, Def. Occupied and Def. + Tent. Occupied.
Linking a view type to a login so that the preferred view is automatically used
when the user calls the conference diary is defined via the option FUNCTION SPACE
VIEW TYPE IN DIARY under Miscellaneous → User Settings → Appearance Tab.
Linking a custom order to a login so that the preferred custom order is
automatically used when the user calls the conference diary is defined via the
option FUNCTION SPACE ORDER IN DIARY under Miscellaneous → User Settings →
Appearance Tab.
Bookings entered in the same function space can be listed in a separate line by
activating the parameter DISPLAY FUNCTION SPACE FOR EACH BOOKING under Setup →
Configuration → Global Settings → CCM → Conference 1 tab.
The event type can be displayed before the name by activating the parameter
DISPLAY EVENT TYPE FIRST IN CONFERENCE DIARY under Setup → Configuration → Global
Settings → CCM → Conference 1 tab.
Events with the status non-deduct inventory using combined rooms are displayed
with an indicator on the conference diary by activating the parameter DISPLAY
DOUBLE OCCUPANCY IN CONFERENCE DIARY under Setup → Configuration → Global
Settings → CCM → Conference 1 tab. If the parameter is not activated then no
indicator is shown on these events.
28
Conference Diary
Understanding the Conference Diary
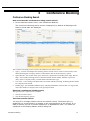
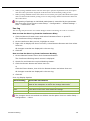
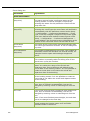
Conference Diary search criteria
Fill in this field
With this information
Start Time
The start time is used as the start time for showing the
availability and occupancy of function spaces. A default start
time can be defined in the configuration.
Order By
Can be used to change the order in which the function spaces
are displayed on the left hand side, the default is by Name.
Standard orders are: by Name, Area, Min. Capacity and Max.
Capacity. In addition to the standard orders, an unlimited
number of custom orders can be defined. A custom order can
also be linked to a login so that the preferred custom order is
automatically used when the user calls the conference diary.
View Types
Day View: Allows viewing one or multiple days depending on
the zoom settings and the default days in global settings. The
columns are displayed in time slots.
Week View: Allows viewing one or multiple weeks depending
on the zoom settings. The columns are displayed in date slots.
Monthly View: Allows viewing a single day or a full month
depending on the zoom settings. The columns are displayed in
date slots.
View By
Used to change the view time slots, i.e. 30 minutes, 1 hour or
4 hour slots. This can be used in connection with the Day
View.
Zoom Horizontal
Used to change the zoom settings horizontally of the
time/date slots, to expand the view for example. The zoom
settings are stored per user. After an upgrade or if using them
for the first time, the zoom settings can be by default set to
the minimum, but once changed they will be the same every
time the user logs on.
Zoom Vertical
Used to change the zoom settings vertically, i.e. enlarge the
function space names on the left hand side.
Space Type
One of the pre-defined space types can be selected for
filtering. Once a space type has been selected, click SEARCH to
display only function spaces of the selected space type.
Space Name
From the drop down list select one of the function space
names and click SEARCH to display only the selected function
space.
Seating
Select one of the seating arrangements from the list and click
SEARCH to display only those function spaces that are defined
with the selected seating arrangement. This option can be
used in connection with minimum capacity in order to find a
suitable room.
Min. Capacity
May be used to search for function spaces that have the
minimum capacity entered. Only those function spaces that
are defined with the minimum capacity, for example 10 or
larger will be displayed. The minimum capacity is taken from
the function space configuration screen and does not consider
seating arrangement.
Conference Diary
29
Min. Area
May be used to search for function spaces that have the
minimum area defined. Only those function spaces that equal
or have more than the entered area will be displayed. The
area is taken from the function space configuration screen.
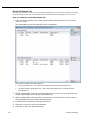
All/Availability
Determines whether all function spaces or just the available
ones should be displayed. If the ‘Availability’ option is
selected, a time from/to screen will be displayed. Enter the
time (from/to) an available function space should be searched
for. This option can be used in connection with any other
filter.
Individual
If selected, only individual rooms will be shown, for example
room A.
Combination
If selected, only combination rooms will be shown, for
example rooms A/B.
Shareable
If selected, shareable function spaces will be shown
Seldom
Seldom - only function spaces that have been defined as not
to SHOW IN DIARY will be displayed.
By default individual, combination and shareable are selected
and are displayed unless defined otherwise
Caption
This option is displayed on the lower left-hand corner of the
screen. The two options currently available are BOOKING NAME
and COMPANY/CONTACt. The caption is applied to the event bar
so that it either shows the booking name or the
company/contact name.
Hide HTML
In order to hide the HTML panel, select the check box HIDE
HTML in the lower left-hand corner of the screen.
Note: The selection is stored per user and is automatically
selected each time the screen is opened
Hide Search
In order to hide the search criteria panel and display more
function spaces, select the check box HIDE SEARCH in the lower
left-hand corner of the screen.
In addition to the standard orders, an unlimited number of custom orders can be
defined via the option CUSTOM ORDERS under Setup → Configuration → Conference
Management → Function Spaces.
When selecting the function space type SELDOM only function spaces that have
been defined as not to SHOW IN DIARY under Setup → Configuration → Conference
Management → Function Spaces → Function Space Definition will be displayed.
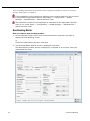
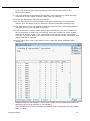
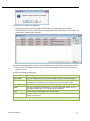
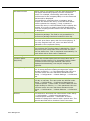
Conference Diary screen icons
Icon
30
Legend Term
What it represents
Noisy
Indicates that this event is a noisy one,
such as a dinner party with live music.
Do not move
Indicates that this event should not be
moved from this function space.
M
Master Event
Indicates that this event is a masterevent.
S
Sub-Event
Indicates that this event is a sub-event.
Conference Diary
Shared Function
Space
The black triangle indicates that this event
is in a shared function space.
Note: Only displayed if the parameter
DISPLAY FUNCTION SPACE FOR EACH BOOKING is
active.
Set up time
Indicates the set up time for this event.
Set down time
Indicates the set down time for this event.
Shareable
Indicates that this function space is
shareable.
Combination
Indicates that this function space is a
combination of two or more individual
function spaces. Combination rooms are
automatically blocked as soon as one of
the combination rooms is booked. The
name of the company, contact or booking
name is shown on the main function
space and again within brackets on the
combination rooms.
Shared Function
Indicates that this event is booked as
shareable.
Event Status
Each event status has a defined colour.
Events are displayed in the colour
according to their event status.
Events are displayed in different colours depending on the event status. However,
each booked event displays the Company, contact or booking name, number of
persons and the type of event on the coloured bar. Additional icons are displayed
as described above and for combination rooms the combination description is also
displayed.
How to search for a function space
1. Click the MEETING PLANNER menu and select CONFERENCE DIARY or press F3.
The Conference Diary is displayed.
2. Complete the search criteria.
3. Click SEARCH.
The function spaces available according to the entered criteria are displayed.
Note: In order to hide the search criteria panel and display more
function spaces, select the check box HIDE SEARCH in the lower lefthand corner of the screen.
Conference Diary
31
How to display function space details
Function space information includes the function space measurements, possible
seating arrangements and rates. This information may be displayed from the
conference diary in a view only format.
1. Click the MEETING PLANNER menu and select CONFERENCE DIARY or press F3.
2. Point to the function space name and right-click to display the short-cut menu.
3. Select VIEW DETAILS.
The function space detail screen is displayed in view only format.
Creating a New Booking or Event
Accessing the Booking Master Search screen
How to access the booking master search screen
1. Click the MEETING PLANNER menu and select CONFERENCE DIARY or press F3.
The Conference Diary is displayed.
2. Place the cursor on the grid box for the function space name, date and time on
which the event should start.
3. Left-click and hold down the left-mouse button.
4. Drag the mouse to the right until the required date and time are selected, release
the left-mouse button, the short-cut menu is displayed.
5. Select CONFERENCE BOOKING, the booking master search screen is displayed;
displayed by default are all bookings within the date range with the same
arrival/departure date as the booking/event you are about to create.
32
Conference Diary
6. If a new event should be added to an existing booking, select the booking and
click the EVENT button on the Booking Master search screen.
7. If this new event belongs to a new booking, the new booking can be created via:
The Quick Book option (See page 33)
The New Booking Option (See page 36)
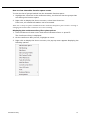
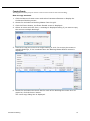
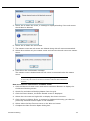
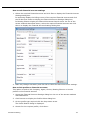
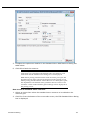
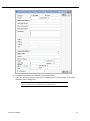
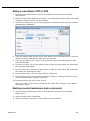
Quick Book
The QUICK BOOK option can be used to create both the booking and the event at the same time. The
quick booking screen is split into two parts; the upper part contains the booking information and
lower part the event information. Only the main fields are displayed for the booking, however
once the quick booking screen is completed, additional booking information can be entered by
editing the booking.
Conference Diary
33
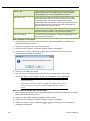
To create a new booking using quick book
1. On the booking master search screen (See page 32) click the QUICK BOOK button to
open the Quick Booking screen. See: Accessing the Booking Master Search screen (See
page 32)
2. Complete the booking screen, for a detailed explanation of the options see the
Quick Booking table below.
3. Click OK to save the new booking.
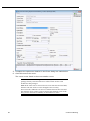
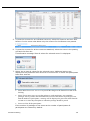
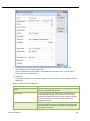
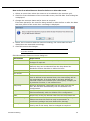
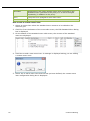
Quick Booking dialog box
34
Fill in this field
With this information
Company Name
Enter the company name and press tab; if only one
company exists with that name it will be filled
automatically, otherwise the profile search screen is
displayed. Click on the three dots next to the company
name field to open customer profile search screen directly
and search for the company profile or create a new one.
Conference Diary
Contact Name
Enter the contacts last name and press tab; if only one
individual exists with that name it will be filled
automatically, otherwise the profile search screen is
displayed. Click on the three dots next to the contact
name field to open the customer profile search screen
directly and search for the contact profile or create a new
one. Either the company or the contact name has to be
filled in for the booking master.
Contact on site
Enter the name of the contact on site if known.
Booking Name
Enter the booking name.
Market Segment
Select the market segment applicable to the booking.
Source
Select a source code that best defines on how the
booking was received.
Credit Status
The credit status option is view only and depends on the
company/contact profile that was selected.
C - for cash-listed.
R - for credit status restricted.
A - if city ledger status has been approved.
Note: Depending on the companies/contacts credit
status, a warning message may be displayed, with the
option to continue.
Decision Date
Select a date from the calendar, if the customer has to
decide by a certain date. This will be completed
automatically if a default has been defined in global
settings.
Follow up Date
Select a date from the calendar, if the property would like
to follow up with the customer, for example the date
when the signed contract has to be returned. This will be
completed automatically if a default has been defined in
global settings.
Event Information
Event Status
Select the event status.
Event Type
Select the event type.
Event Name
Will be filled in automatically depending on the event type
selected, but can be changed.
No of Attendees
Enter the number of attendees for this event.
Min Guarantee
If agreed with the customer, enter the minimum number
of guaranteed attendees for this event.
Start Date
The start date of the event is completed as it was already
selected via the conference diary.
End Date
The end date of the event is completed as it was already
selected via the conference diary.
Start Time
The start time of the event is completed as it was already
selected via the conference diary.
End Time
The end time of the event is completed as it was already
selected via the conference diary.
Conference Diary
35
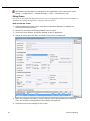
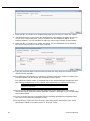
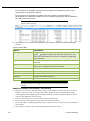
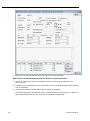
Info Board
Enter the information that should be placed on the info
board outside the function space such as Fidelio Software
Dealer Conference.
Info Board Profile
This option allows the property to enter a different name
to be displayed on the info board. For example, the
booking was made by Star Conferences for the company
IBM; so on the info board IBM should be displayed.
The handling is such that when a company and a contact
are entered, the entry in the field Info Board Profile
replaces the company, if only a contact is entered, the
entry in the Info Board Profile replaces the contact. If no
entry is made in the Info Board Profile then the
company/contact name from the booking will be
displayed.
Noisy
If this event is going to be a noisy one, select this option.
Other users can then see in the conference diary that the
event is going to be noisy.
Block
This is a view only field and shows the start time and the
end time of the event or when a function space is booked
the setup time plus event start time and event end time
plus set down time. This is completed automatically.
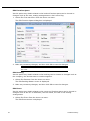
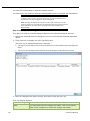
Function Space Information
36
Function Space
Filled with the function space selected in the conference
diary.
Seating Arr.
Select the seating arrangement. The seating arrangement
defined as default will be filled in.
Rate
Select a pre-defined rate or enter a special rate. The rate
defined as default will be filled in.
Amount
The rate amount will be completed depending on the
selected rate but can be changed.
Dept Code
The department code for room rental.
Special Rate
The check box will be selected automatically as soon as a
different amount than that defined for the rate code is
entered in the amount field.
Shareable
This option is displayed and selected automatically only if
a shareable function space has been selected, but can be
changed as required.
Hourly Rate
This option is displayed only if the selected rate is defined
as an hourly rate, but can be changed as required.
Setup Time
Filled with the setup time defined for the selected seating
arrangement, but can be changed.
Setdown Time
Filled with the set down time defined for the selected
seating arrangement, but can be changed.
Don't move
Select this box if the function space should not be moved.
Conference Diary
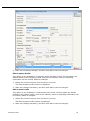
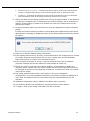
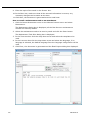
New Booking on the Booking Master Search
When creating a booking via the NEW booking option, first the booking needs to be created and
then the booking needs to be selected in order to enter the event, therefore, the times and function
space selected on the conference diary are not automatically completed via this option.
To create a new booking using the booking master search
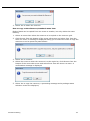
1. On the booking master search screen (See page 32) click the NEW button.
2. Complete the booking screen; see the Suite8 Conference & Catering Management
manual for a detailed explanation of the fields and tabs.
3. Select OPTIONS and then EVENTS to enter a new event, click OK to save the new
booking.
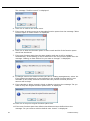
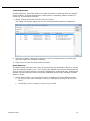
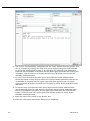
Moving an event to another function space
The easiest way to move an existing event from one function space to another is to drag and drop
it via the conference diary. Various messages may be displayed depending on where the event is
being moved to.
How to move an event
1. Click the MEETING PLANNER menu and select CONFERENCE DIARY to display the
Conference Diary screen.
2. On the Conference Diary screen, select the event to be moved.
3. Left-click and hold the mouse button while you drag the event to the new function
space.
Conference Diary
37
The message "Confirm move?" is displayed.
4. Click YES to confirm the event move.
5. If the event is being moved to a shareable function space then the message "Allow
function space in share mode?" is displayed.
6. Click YES to allow the function space in share mode and NO if the function space
should not be shared.
7. If the new function space has the same seating and rate it will be updated
automatically. If the seating or rate is different in the new function space then the
message "Seating or Rate differs! Do you want to change?" is displayed.
8. If changes need to be made to either the rate or seating arrangements, select YES.
If the seating arrangement or rate defined on the original function space is not
available on the newly selected function then they will be removed, but the
amount will be kept.
9. If the calendar is being viewed in Week or Month view then the message "Do you
want to keep the original function space time?" is displayed.
10. Click YES to keep the original function space time.
11. If the new function space has default miscellaneous items defined then the
message "Do you want to add the default misc. items?" is displayed.
38
Conference Diary
12. Click YES to add the default misc. items.
13. If the number of pax on the event is not within the minimum and maximum
defined for the selected seating arrangement. Then the message "Seating capacity
Min. =XX and Max. =XX. Continue?" is displayed.
14. Selecting YES will move the event.
The event is moved on the Conference Diary screen.
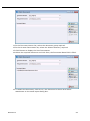
Change the Event Start/End Time
You may change an event's start and/or end time, by doing one of the following:
Change the start/end time by moving the event time on the grid.
Change the start/end time via the Edit Event screen.
How to change an event start/end time
1. Click the MEETING PLANNER menu and select CONFERENCE DIARY to display the
Conference Diary screen.
2. On the Conference Diary screen, select the event.
3. Right-click to display the short-cut menu, select EDIT EVENT and change the start
and/or end time on the Edit Event dialog box.
or
4. Left-click on either the start or end of the event, when the cursor appearance
changes hold the mouse button down while you drag the mouse to the left or right
or left-click on the event and hold the mouse button while you drag the entire
event to the new time spot.
The message "Confirm move?" is displayed.
5. Click YES to confirm the event time change.
Shareable Function Space
Certain function spaces such as the main lobby and restaurant may be configured as SHAREABLE,
this allows users to book these function spaces either in share mode or exclusively. Booking a
function space in share mode allows multiple groups to be booked into the same function space
without double booking or waitlisting events. Booking in exclusive mode only allows one event to
be booked into the function space, any others will be waitlisted.
Conference Diary
39
Function Spaces that are defined as SHAREABLE are displayed in green with <S> for shareable on
the left hand side of the conference diary. Events which are booked as sharing a function space are
displayed with a green trellis.
Shareable Function Space - how does it work?
When only one event is booked into a shareable function space the event status will not be
changed to waitlist when the entered no. of attendees exceeds the max. capacity of the function
space.
When more than one event is booked then event status will not be changed to waitlist as long
as the total no. of attendees is within the max. capacity of the function space.
When more than one event is booked the event status of the last event entered will be set to
waitlist if the total no. of attendees is more then the max. capacity of the function space.
If the no. of attendees from other events is reduced so that the total no. of attendees is within
the max. capacity then the user will be prompted to change the status of any waitlisted events.
Example:
If we have a shareable function space such as a restaurant with a maximum capacity of 200 pax
Booking an event with 100 pax - this is within the 200 limit so there is no need to waitlist the
event.
Booking a second event with 20 pax - with both events the total number of pax (120) is within
the 200 pax limit so there is no need to waitlist this event.
Booking a third event with 90 pax - this now takes the total number of pax to 210 which is over
the 200 pax limit therefore this event will be waitlisted as the total no. of attendees exceeds the
max. capacity of the function space.
However:
If the no. of attendees of the 1st event is now reduced to 80, the 3rd event will no longer be
waitlisted.
If the no. of attendees of the 2nd event is now increased to 110, then this event will be
waitlisted and the 3rd event no longer waitlisted.
How to create an event into a shareable function space
1. Click the MEETING PLANNER menu and select CONFERENCE DIARY to display the
Conference Diary screen or press F3.
2. Point to the function space name, date and time to be booked.
3. Left-click and hold down the left-mouse button.
4. Drag the mouse to the right until the required date and time are selected, release
the left-mouse button, the short-cut menu is displayed.
5. Select CONFERENCE BOOKING, the share mode message is displayed.
6. Select YES to book the function space as shareable, this allows other groups to be
booked into the same function space. Selecting NO will book the function space in
exclusive mode which will not allow other groups to be booked into the same
function space without waitlisting them.
7. Select QUICK BOOK or NEW to create a new booking or select an existing booking
and then the EVENTS button to add a new event to an existing booking.
40
Conference Diary
How to view shareable function space events
To view the list of groups booked into the shareable function space:
1. Highlight the event bar in the conference diary, the hint bar lists the groups that
are sharing the function space.
2. Right-click to display the short-cut menu, select VIEW SHARE LIST.
From here, all related information can be accessed.
There are a variety of options available from the conference diary/floor plan screen for viewing or
changing information that is related to an event or booking.
Displaying the conference diary/floor plan options
1. Click the MEETING PLANNER menu and select CONFERENCE DIARY or press F3.
The Conference Diary is displayed.
2. On the conference diary screen, highlight an event.
3. Right-click to display the short-cut menu, the pop-up menu appears displaying the
following options:
Conference Diary
41
Edit Function Space
Via this option any details related to the booked function space can be viewed or
changed such as the rate, seating arrangement or don't move flag.
1. Select EDIT FUNCTION SPACE from the short-cut menu.
The Edit Function Space dialog box is displayed.
2. Make any necessary changes, and then click OK to save the changes.
Note: The start and end time must be within the start and end time of
the event.
Edit Booking
Via this option any details related to the booking can be viewed or changed such as
the company, the decision date or market segment.
1. Select EDIT BOOKING from the short-cut menu.
The Edit Booking Master screen is displayed.
2. Make any necessary changes, and then click OK to save the changes.
Edit Event
Via this option any details related to the event and function space can be viewed or
changed such as the no. of attendees, the info board, the rate or the seating
arrangement.
1. Select EDIT EVENT from the short-cut menu.
The Edit Event screen is displayed.
42
Conference Diary
2. Make any necessary changes, and then click OK to save the changes.
Edit Company Profile
This option is only available if a company profile has been linked. Via this option any
details related to the company profile, such as the address, notes or marketing
information can be viewed, added or changed.
1. Select EDIT COMPANY PROFILE from the short-cut menu.
The Edit Company Profile screen is displayed.
2. Make any changes necessary, and then click OK to save the changes.
Edit Contact Profile
This option is only available if a contact has been linked. Via this option any details
related to the contact profile, such as the address, notes or marketing information can
be viewed, added or changed.
1. Select EDIT COMPANY PROFILE from the short-cut menu.
The Edit Company Profile screen is displayed.
2. Make any changes necessary, and then click OK to save the changes.
Conference Diary
43
Show Resources
Via this option all resources are displayed, resources such as menu details, notes and
miscellaneous items can be viewed, changed or new ones added.
1. Select SHOW RESOURCES from the short-cut menu.
The Event Details screen is displayed.
Everything that gets booked to an event is known as a resource.
Typical resources are:
Function Spaces
Miscellaneous Items such as decoration, technical equipment etc.
Standard Menus - food and beverage items
Resources are displayed in the order in which they are booked. They are grouped
according to item type - all miscellaneous items together and all standard menu items
together, it is not possible to group different item types together, but the order can be
changed within a group by moving the items up and down on the resources grid.
The FORECAST/REVENUE tab displays information about the expected, forecasted and
posted revenue of the event; the tab is split into two parts:
44
Package items
Non package items
Conference Diary
Tasks & Activities
Use this option to view, edit, delete or create new tasks or activities that are specific
to the booking. A typical example for a task linked to a booking master would be a
'follow up' on the signed contract.
1. Select TASKS & ACTIVITIES from the short-cut menu.
The Tasks & Activities dialog box for the selected booking master is displayed.
2. Click NEW to add a new task or activity or select an existing entry and click EDIT
and then make any changes necessary.
3. Click CLOSE to close the task & activity screen.
Show Wait List
If waitlist events exist then they may be viewed from the Conference Diary or via the
quick key Waitlist Priority (Ctrl + W). Viewing the waitlist via the quick key allows the
user to view all events which are currently waitlisted for a particular day. Viewing the
waitlist via the conference diary shows the waitlisted events of the selected function
space or event.
1. Select SHOW WAITLIST on the shortcut menu to display the Event Waitlist screen.
The priority order of the waitlisted events may be changed by pressing the up and down
arrows.
The Booking, Event, Company or Contact may be edited.
Conference Diary
45
Add Sub Event
This option allows the creation of a sub event linked to the selected master event.
1. On the Conference Diary select the required event.
2. Select ADD SUB EVENT from the short-cut menu.
The New Event screen is displayed with a comment indicating that this is a Sub
Event of 'Event Name'.
3. The Event Status, No. of Attendees and Function Space Information is taken from
the master event, complete the remaining options - the start and end times must
be within or overlap with the start and end times of the master event.
4. Click OK to save the sub event.
Convert as Sub Event
This option prompts the user to convert the selected event into a sub event. The
option is only available for events which are not sub events and if other events exist in
the same time period.
1. On the Conference Diary select the event to be converted to a sub event.
2. Select CONVERT AS SUB EVENT from the short-cut menu.
A list of all events within the time period is displayed.
3. Select the required event and click OK.
The event is now converted to be a sub event.
View Sub Events
If an event has sub events then this option displays all the sub events linked to the
selected master event with the possibility to edit or change; the event, the function
space, the company and/or contact as well as displaying or adding new resources,
tasks or activities.
1. On the Conference Diary select a master event.
2. Select VIEW SUB EVENTS from the short-cut menu.
A list of all sub events for the selected event is displayed.
46
Conference Diary
Convert as Master Event
This option prompts the user to convert the selected sub event into a master event.
This option is only available for sub events.
1. On the Conference Diary select the event to be converted to a master event.
2. Select CONVERT AS MASTER EVENT from the short-cut menu.
3. Select either NEW FUNCTION SPACE to select a new function space or select WAITLIST
to keep the existing function space but set the status to Waitlist.
4. If NEW FUNCTION SPACE is selected then the New Function Space dialog box is
displayed and another function space can be booked.
5. If WAITLIST is selected then the event status is changed to waitlist. If waitlisted
events already exist, then a message is displayed asking if you want to adjust the
priority list.
6. Select YES to view the priority waitlist
View Master Event
If a master event exists then this option displays the master event linked to the
selected sub event with the possibility to edit or change; the event, the function
space, the company and/or contact as well as displaying or adding new resources,
tasks or activities.
1. On the Conference Diary select a sub event.
2. Select VIEW MASTER EVENT from the short-cut menu.
The Master Event Details dialog box is displayed.
Note: Sub events are displayed with a green S and green triangle
and master events with a pink M and pink triangle
Sub Event functionality is controlled by the parameter USE MASTER-SUB EVENTS
under Setup → Configuration → Global Settings → CCM → Conference 1 tab.
Conference Diary
47
View all events
This option is used to view all events for a particular booking. Events and resources
can be added, edited or deleted; in addition all other options can be accessed.
Print
This option is used to print correspondence related to the booking.
Roomplanner
This option opens the Roomplanner module; see the Suite8 Roomplanner manual.
Booking Options
Notes
Billing Instructions
User Log
Financial Accounts
Postings
Participants List
Function Space – Closed Periods
Occasionally a function space or combination of function spaces needs to be closed off for a period
of time for reasons such as maintenance or refurbishment. A function space which already contains
an event cannot be closed off.
You may close a function space via:
The conference diary
Function Space Definition under Setup → Configuration → Conference Management →
Function Spaces
The colour to display closed periods in the conference diary is defined via the
option COLOUR FOR CLOSED PERIOD under Setup → Configuration → Global Settings →
CCM → Conference 1 tab.
How to create a closed period
1. Click the MEETING PLANNER menu and select CONFERENCE DIARY to display the
Conference Diary screen or press F3.
2. Point to the function space, date and time to be closed.
3. Left-click and hold down the left-mouse button.
4. Drag the mouse to the right until the required time is selected and release the leftmouse button, the short-cut menu is displayed.
Note: To close more than one day drag the mouse to the right in order
to access the short cut menu and then define the dates and times on
the Closed Periods dialog box.
5. Select CLOSE OFF FUNCTION SPACE, the closed periods dialog box appears.
6. Complete the dates, times and reason for closing the function space.
7. Click OK.
The closed period is displayed in the conference diary in the colour defined for
closed periods.
48
Conference Diary
How to edit a closed period
1. Click the MEETING PLANNER menu and select CONFERENCE DIARY to display the
Conference Diary screen or press F3.
2. Point to the closed period to be edited and right-click to display the short-cut
menu.
3. Select EDIT CLOSE PERIOD.
4. Make the changes on the closed period dialog box.
5. Click OK.
The closed period is updated on the conference diary.
Note: Closed periods for the past can not be updated.
How to delete a closed period
1. Click the MEETING PLANNER menu and select CONFERENCE DIARY to display the
Conference Diary screen or press F3.
2. Point to the closed period to be deleted and right-click to display the short-cut
menu.
3. Select DELETE CLOSE PERIOD, a confirmation message is displayed.
4. Click YES.
The closed period is removed on the conference diary.
Printing the Conference Diary
You can print the Conference Diary either for a single day, for a week, for a month or for a selected
date range. In order to print the conference diary the required VIEW TYPE must be selected before
pressing the PRINT button.
On the monthly view calendar weeks are displayed on both the preview and the print out.
On all views a legend of the booking statuses is displayed on both the preview and the print
outs.
To print the Conference Diary
1. Click the MEETING PLANNER menu and select CONFERENCE DIARY to display the
Conference Diary screen.
2. From the Conference Diary screen, select DAY, WEEK or MONTH in the VIEW TYPE box.
3. Click PRINT, the display print dialog box is displayed.
4. Select the print settings. For details on the print settings see the Conference Diary
Print Options table below.
5. Click PRINT to print the conference diary.
If the view type MONTH is selected then the conference dairy can also be exported
to Excel by pressing the EXCEL button.
Conference Diary
49
Conference Diary Print Options
Field
Definition
Display horizontal
lines
If selected, horizontal lines will be shown in the printout of
the diary.
Horizontal lines type
Select the type of horizontal lines that should be
displayed.
Display vertical line
If selected, vertical lines will be shown in the printout of
the diary.
Vertical lines type
Select the type of vertical lines that should be displayed.
Font
Select the font that should be used for the print out.
Display status
colour
If selected the diary will be displayed and printed in the
original colours. In other words, it will print in the colours
that have been defined in the status definition.
Default colour
Select the default colour in which the diary should be
printed.
Default Colour
If selected the diary will be displayed and printed in the
default colour defined.
Row Height
Select the height for each row on the printout.
Print 2 weeks layout
Select this option to print the monthly view with two
weeks on one page. If not selected then all days will be
printed on one page.
Note: This option is only displayed if the VIEW TYPE Month
is selected.
Print Range
The defined range (date/time) will be printed. If the FULL
DIARY check box is selected then the default number of
days defined in configuration will be printed.
Note: The Full Diary check box is only displayed if the
VIEW TYPE Day is selected.
The number of days to be printed in the conference diary when FULL DIARY is
selected is defined by the parameter DEFAULT LOADED DAYS FOR DIARY under Setup →
Configuration → Global Settings → CCM → Conference 1 tab.
50
Conference Diary
3
Conference Booking
Conference Booking Search
How to access the conference booking search screen
1. On the MEETING PLANNER menu, click CONFERENCE BOOKING.
The Conference Booking search screen is displayed; by default all bookings with
today's arrival date are displayed.
The conference booking search screen is divided into four distinct areas:
Query - consists of multiple basic booking master search criteria, such as Arrival Date, Conf.
Status, Booking ID, Company Name, Contact Name and an advanced query option.
Query Results - the results of the query shown in a grid format, including Conf. Mgr., Rooms
Mgr., Arrival Date, Booking Name, Conference Status, Rooms Status, Number of persons
(Pax), Notes, Company Name, Contact Name and Function Type.
Tree View - a tree listing of all the details associated with this booking, including Profile details
for company and contact.
HTML page - free definable HTML display which by default has a list format or a 'big' format
where the details are displayed in a non-grid style format.
Entering a conference booking query
The query screen is split into two sections:
The basic search criteria
The advanced query options
The basic search criteria
You may fill in multiple fields to narrow the search criteria. The actual query is
displayed in a script format in a window on the right hand side of the screen. If no
data is entered, the list of events displayed is in alphabetical order. The fields are
explained in the Booking Master Search dialog box.
Conference Booking
51
Fill in this Field
With this information
Arrival Date
Search for bookings based on the arrival date. By
default, all bookings for today’s date will be
shown. Select a date from the calendar list box.
Include In house
If this box is checked, all bookings (with or
without events) that match the entered date range
and will be in house will be displayed.
To
Search for bookings based on a date range, if an
arrival date is entered this will indicate the end of
the date range. Select a date from the calendar
list box.
Conf. Status
Select the booking (conference) statuses from the
drop down list. If no status is entered, bookings
with all booking statuses will be shown.
Rms. Status
Select the room status from the drop down list. If
no status is entered all bookings will be shown.
Booking ID
Every booking master has a unique ID that will be
assigned by the system. If a specific booking id is
searched, then it can be entered in this field.
Conf. Manager
Select a conference manager from the drop down
list of available managers.
Company Name
Click on the three dots next to the company name,
if you would like to search for existing company
profiles
Contact Name
Click on the three dots next to the contact name,
if you would like to search for existing contact
profiles.
incl. Participants
If a name is entered in the Contact Name search
box then selecting this check-box will search for
all bookings where this contact has been entered
as a booking contact as well as a participant.
Participants only
If a name is entered in the Contact Name search
box then selecting this check-box will search for
all bookings where this contact has been entered
as a participant.
The advanced query options
The advanced query consists of three selection fields:
The first allows you to select from a drop-down list of query possibilities.
The second limits the query to a second level or gives a choice of conditions.
The third field requires either a free-format value or for the user to select a possible value from
a drop-down list.
The fields are explained in the Advanced Query dialog box.
52
Field
Definition
Booking Group
The name of the booking group template. The following
options are available while searching on booking group:
Is equal to - will only display booking masters for the entered
booking group name.
Conference Booking
Is not equal to - will display all booking masters except for
those of the entered booking group name.
Note: This option is only available if the parameter USE GROUP
TEMPLATES is active.
Booking Name
The name of the booking. The following options are available
while searching on booking name:
Is equal to - will only display booking masters for the entered
name.
Is not equal to - will display all booking masters except for
those of the entered name.
Rooms Manager
The room manager. The following options are available while
searching on rooms manager:
Is equal to - will only display booking masters for the selected
manager.
Is not equal to - will display all booking masters except for
those where the selected manager is the conference manager.
Departure Date
Advanced query on the departure date. The following options
are available while searching on departure date:
Is equal to - will show all booking masters where the
departure date is an exact match.
Is not equal to - will show all bookings where the departure
date is not equal to the entered one.
Is greater than - will show all booking masters where the
departure date is greater than the one entered.
Is less than - will show all booking masters where the
departure date is less than the entered one.
Creation Date
Each booking master is assigned to a creation date. The
following options are available while searching on creation
date:
Is equal to - will show all booking masters where the creation
date is an exact match.
Is not equal to - will show all bookings where the creation
date is not equal to the entered one.
Is greater than - will show all booking masters where the
creation date is greater than the one entered.
Is less than - will show all booking masters where the creation
date is less than the entered one.
Note: The actual query is displayed in script format in a window on
the right hand side of the screen and as long as the filter is not cleared
by pressing the CLEAR button, each additional query will be added to
the actual query list.
Wildcards
The search criteria can also be entered using wildcards (%). This is helpful in the company and
contact name fields. For example, M%ller will return Miller, Muller, %Bank will return Investment
Bank, American Bank and Fidelio% will return Fidelio Gmbh or Fidelio Inc.
Activating the search:
To activate the search the user must click the SEARCH button. Clicking the SEARCH button will
return the maximum number of bookings defined in the configuration, with the question to
display more if there are more to be displayed.
Conference Booking
53
A list of bookings that match the specified criteria is displayed. The query criteria can be easily
reset by clicking the CLEAR button.
A full explanation of the conference booking screen search behaviour can be found
in the Suite8 Configuration Manual under Setup → Configuration → Global
Settings → Miscellaneous → Search Screens 2 tab.
The maximum number of lines displayed is controlled by the parameter MAXIMUM
LINES IN LIST under Setup → Configuration → Global Settings → Miscellaneous →
Search Screens 2 tab.
New Booking Master
How to create a new booking master
1. On the MEETING PLANNER menu click CONFERENCE BOOKING and then click NEW to
display the New Booking screen.
or
Click EVENT MANAGEMENT and then click NEW.
2. The Booking Master Search screen is displayed; click NEW.
The New Booking master screen is displayed; it consists of six screens, each one
represented by a tab.
54
Conference Booking
Booking Master Screen Tabs
Tab
Option
Booking Information
Information about the booking, such as arrival,
departure, number of persons and be entered.
Deposit/Cancellation
Information about deposit and cancellation policies.
General Information
Information about changes to the status or
deposit/cancellation.
Linked Profiles
Linked profiles.
Linked Documents
Linked Documents.
Forecast / Revenue
Information about the expected, forecast and posted
amounts of the total booking including room reservations
linked to the booking and additional posted amounts on
the linked financial account.
The changing of the account manager on a conference booking is controlled by the
user right CHANGE ACCOUNT MANAGER under Setup → Configuration → Users → User
Definition → Rights → Booking Master.
The entering of bookings and events in the past is controlled by the user right
ENTER BOOKINGS IN THE PAST under Setup → Configuration → Users → User Definition
→ Rights → Booking Master.
Booking Information
The Booking Information screen is open by default when selecting either NEW or EDIT. To create a
new booking master either a company or contact profile has to be selected.
Booking Master – Booking Information tab
Field Name
Definition
Company Name
If applicable, select the company via the three dots
next to the company name. Use the search criteria
provided by the profile search screen to find the
company name or create a new company profile.
If the selected company name has a rebate code
linked then at the arrival date field a question will
be displayed asking if the rebate from the profile
should be linked to the booking.
Contact Name
If applicable, select the contact via the three dots
next to the contact name. Use the search criteria
provided by the profile search screen to find the
contact or create a new contact profile
Contact on site
Enter the name of the contact on site if it differs
from the contact name
Linked Company
If a company profile has been linked via the LINKED
PROFILES tab it will be displayed under this option
Linked Contact
If an individual profile has been linked via the
LINKED PROFILES tab, it will be displayed under this
option
Conference Booking
55
Group Template
Defines which, if any, group template is linked to
this group. Group templates may be used to link
specific groups together. Click the
button to
select an existing template or to create a new
template.
From the Group Templates screen the following
options are available:
SEARCH - enter search criteria and press search to
activate.
FULL SEARCH - press the Full Search button to return
all group template names matching the search
criteria.
CLEAR - press clear to clear the search criteria.
NEW - to enter a new group template.
EDIT - to edit an exiting group template.
FIND IN GRID - to further narrow the group template
search.
SELECT - to select the highlighted group template
and link it to the booking master.
Booking Name
Enter the booking name such as Birthday Party,
Annual Sales Conference or wedding.
If the parameter COPY PROFILE NAME INTO BOOKING
NAME is active then the booking name is
automatically completed with the profile name. If
there is both a company name and a contact name
then the company name is used, otherwise the
contact name is used.
Arrival Date
(Mandatory)
Enter the arrival date or the date of the function.
If the selected company name has a rebate code
linked then a question will be displayed asking if
the rebate from the profile should be linked to the
booking.
Note: The entering of an arrival date in the past is
controlled by the user right ENTERING BOOKINGS IN THE
PAST.
Departure Date
(Mandatory)
Enter the departure date of the end date of the
function
Category
56
Conference
Rooms
Both
Select either option. The conference will be selected
automatically if the arrival date is the same as the
departure date. If the arrival date is not the same
as the departure date and no rooms are booked,
this option should be selected as otherwise the
application forces the user to enter room booking
information.
Note: The Rooms option will not be accessible if
the arrival date is the same as the departure date.
Credit Status:
Displays the credit status from the selected profile
of the booking. It will be filled in automatically
depending on the company/contact that gets linked
to the booking master. If a company/contact has
one of the three credit statuses:
Conference Booking
C - Cash
R – Restricted
A – Accounts receivable
A message indicating which credit status has been
applied to the profile will be displayed. The credit
status of a booking can only be changed on profile
level, not on this screen.
ID
Booking Id number, automatically assigned by the
system.
Account Manager
Indicates the initials of the sales manager defined
on the company/contact level. If no account
manager has been filled in, a selection can be made
but existing (filled in) account managers can not be
changed on the booking level.
Market Segm.
Select the market segment from the drop down list.
The market segment entered here at booking
master level is transferred to any attached group or
individual reservation.
Source
Select the source segment from the drop down list.
The source defines how the property got the
booking, such as airline, travel agent, central
system. The source code entered here at booking
master level is transferred to any attached group or
individual reservation.
Channel
Select the channel from the drop down list. Channel
codes are attached to a conference booking in
order to track how the reservation or booking was
made at the property, for example, via the internet,
via email or via the telephone.
The channel code entered here at booking master
level is transferred to any attached block, group or
individual reservation.
Booking Master – Conference Details
Field Name
Definition
Conference Status
(Mandatory)
From the drop down list select the status for the conference
part of the Booking, such as definite, tentative or waitlist
Conference Mgr.
From the drop down list select the manager that is
responsible for the conference part of the booking
No. of Attendees
Mandatory
Enter the number of attendees. If the booking has several
events with a different number of people, enter here the
highest amount of attendees
Decision Date
Select a date from the calendar, if the customer has to
decide by a certain date
The date field will be completed automatically if certain
conditions are met. The default number of days and the
statuses for which it is valid are defined in the
configuration.
Follow Up Date
Select a date from the calendar, if the property would like
to follow up with the customer, for example the date when
the signed contract has to be returned.
Conference Booking
57
The date field will be completed automatically if certain
conditions are met. The default number of days and the
statuses for which it is valid are defined in the
configuration.
Cutoff Date
This date indicates when the function space should be
released. Currently no function space is released
automatically. Select a date from the calendar
Info board
Enter the text that should be used for the information board
Function Type
The type of the function, such as conference or meeting.
Select the function type from the drop down list.
Currency
Select a currency from list box. By default the currency
defined under GLOBAL SETTINGS → CURRENCIES, tab will be
entered
Details Confirmed?
Check this box to indicate that all details for this booking
have been confirmed
FS distributed?
Indicates whether the function sheet has already been
issued to the respective departments
Contract Number
Same as booking ID.
Create booking as
calendar event
This option is only visible when the global setting
CONFERENCE BOOKINGS AS CALENDAR EVENTS on the CCM tab is
active and the status definition of the selected conference
status is DEF.
If the parameter for manual creation is active the option is
displayed and can be selected manually. If the parameter
for automatic creation is active the option is selected by
default but may be de-selected if not required.
Saving the booking with the option selected will create the
calendar event.
In the calendar the booking name is displayed in the
calendar event description and the company, contact and
booking ID are displayed in the notes. The calendar event
will be updated when changing any of these fields or the
arrival and departure dates in the booking.
When changing the conf. status to a non-definite status or
deleting a booking the calendar event will be removed
automatically.
Calendar events will be created when copying bookings, if
the option was selected in the original booking the status
definition of the selected conference status is DEF.
Rebate
Defines if a pre-defined rebate should be applied to the
booking.
If events exist then a message to check the booked
resources is displayed when a rebate is added, changed or
removed.
Booking Master - Rooms Details
58
Field Name
Definition
Rooms Status
Mandatory
Select the status from the drop down list select that applies
to the room bookings. It is not uncommon that the
conference and rooms status are different during the course
of the booking life cycle
Conference Booking
Rooms Mgr.
Select the responsible manager/ user for the room bookings
Decision Date
Select a date from the calendar. Used to define a date by
which the customer has to decide to book or not.
The date field will be completed automatically if certain
conditions are met. The default number of days and the
statuses for which it is valid are defined in the
configuration.
Follow Up Date
Select a date from the calendar the property would like to
follow up with the customer.
The date field will be completed automatically if certain
conditions are met. The default number of days and the
statuses for which it is valid are defined in the
configuration.
Individual Reservations
No of reservations:
Displays the number of individual reservations that have
been attached to the booking. An unlimited number of
individual reservations can be linked to a block
Attached
Press the ATTACHED button to view the reservations that
have been attached to a booking master including any
cancelled reservations.
Select
Press the SELECT button to open the reservation navigator,
select an existing reservation and link it to the booking
master.
Note: It is possible to link reservations which are not within
the date range of the booking, however only reservations
which are not linked to another booking are displayed
New
Press the NEW button to enter a new reservation and link it
to the booking.
Note: The default rate code used in the reservation is the
default rate code which is defined under Configuration →
Global Settings → Reservation. The default market, source
codes and channel codes are taken from the booking
master and not from any defaults defined in configuration.
Groups
Group name
Displays the group name of the attached group. Only one
group can be attached.
Rooming List
Press ROOMING LIST to view or change the rooming list of
attached groups
Select
Press the SELECT button to open group navigator, select an
existing group and link it to the booking master. If a
financial account is linked to the booking master then a
question is displayed asking if the financial account should
be linked to the group.
New
Press the NEW button to enter a new group reservation.
Note: The default rate code used in the reservation is the
default rate code which is defined under Configuration →
Global Settings → Reservation. The default market, source
codes and channel codes are taken from the booking
master and not from any defaults defined in configuration.
Conference Booking
59
If a financial account is linked to the booking master then a
question is displayed asking if the financial account should
be linked to the group.
Blocks
Block Name
Displays the block name of the attached block. Only one
block can be attached to a booking master.
Room Grid
Press the ROOM GRID button to view the room grid of the
attached block
Select
Press the SELECT button to open block navigator, select an
existing block and link it to the booking master
New
Press the NEW button to enter a new block reservation.
Note: The default market, source codes and channel codes
are taken from the booking master and not from any
defaults defined in configuration.
If a block code format has been pre-defined then the block
code is automatically created based on the defined setup.
For example, the format CCCDDMMYY is the first 3 letters
of the company name and the starting day, month, year.
When creating a new block with a starting date of the 17th
July 2009 and the company profile BBC linked, then the
block code field is automatically completed with
BBC170709.
Conference booking rebates
Rebates can be applied globally via a rebate code on the booking master or can be
applied per resource as a percentage or as a flat rate.
Applied rebate codes on the booking can be changed on resource level per attached
resource, for example, you can apply a rebate code for 10 % rebate on room rental
and apply for one specific resource apply a 20% rebate.
How do rebates work?
60
When selecting a rebate code when editing a booking master, rebates are applied according to
the defined rebate configuration under Configuration → Cashiering → Rebate Configuration
of the linked rebate code.
If the rebate code is changed when editing a booking the message 'Recalculate rebates?' is
displayed.
Selecting YES recalculates the rebates according to the linked rebate codes.
Selecting NO leaves the existing rebate calculation; the message 'Rebate has changed. Please
review booked resources' is displayed.
Conference Booking
If a rebate code is removed the message 'Detach all previously calculated rebates?' is
displayed.
Selecting YES removes the rebate codes; all manually entered rebates on the booked resources
are also removed.
Selecting NO leaves the existing rebate calculation; the message 'Rebate has changed. Please
review booked resources' is displayed.
The possibility to link a group template to a conference booking is controlled by
the parameter USE GROUP TEMPLATES under Setup → Configuration → Global Settings
→ CCM → Conference 1 tab.
The entering of bookings and events in the past is controlled by the user right
ENTER BOOKINGS IN THE PAST under Setup → Configuration → Users → User Definition
→ Rights → Booking Master.
Rebate functionality is controlled by the parameter ENABLE CARDLESS REBATE HANDLING
under Setup → Configuration → Global Settings → CCM → Conference 1 tab.
The adding, editing or removal of rebate codes on the booking master is controlled
by the user right REBATE LINKING under Setup → Configuration → Users → User
Definition → Rights → Booking Master.
The adding, editing or removal of a rebate percentage or flat rate on a resource is
controlled by the user right CHANGE REBATE FOR RESOURCES under Setup →
Configuration → Users → User Definition → Rights → Booking Master.
Note: Block Reservation functionality requires an additional license
code.
Conference Booking
61
Deposit & Cancellation
This option allows users to enter any deposits the customer has to pay and/or any cancellation
procedures that may apply if the customer decides to cancel the booking.
Cancellations
Cancellations are defined separately for rooms and conference. There are no limitations as to the
number of cancellation penalties that can be entered.
Cancellation policies (i.e. 50% 14 days prior to arrival and 100% 5 days prior to arrival) can be predefined under Setup → Configuration → Global Settings → Conference tab. If pre-defined
cancellations exist, they will be applied to every new booking that will be created. If they can not
be applied to the booking because the due date has already passed, the user will be prompted with
a confirm message.
62
Click NEW to enter a new cancellation penalty.
Click EDIT to edit existing cancellation penalties.
Click DELETE to delete existing cancellation penalties.
Conference Booking
Booking Master - Deposit Cancellation tab - Cancellation
Field Name
Explanation
Cutoff Date
Entered on the booking information tab. Displayed here as
view only.
Cancelled by
Defines the date by when the booking can be cancelled.
Percentage
Enter the percentage that is due (depending on the
cancellation date).
Amount Due
Calculated automatically depending on the percentage
entered. Also works vice versa. Enter the amount and the
percentage will be calculated.
Deposits
Deposits are also defined separately for rooms and conference. There are no limitations as to the
number of deposit payments that can be entered.
Click NEW to enter a new deposit payment.
Click EDIT to edit an existing deposit payment.
Click DELETE to delete an existing deposit payment.
Booking Master - Deposit/Cancellation tab - Deposit
Field Name
Definition
Booked To Date
Filled automatically with the room revenue. For future
reservations the amount will be taken from the forecast
tables.
Total Deposit
Required
By default contains the same as booked to date, but in
case a different deposit amount is requested it can be
defined here.
SNo
Sequence number will be generated by the system.
Due Date
Enter the due date of the deposit payment.
Percentage
Enter the deposit percentage.
Amount Due
If the percentage has been filled, the amount due gets
filled in automatically, based on the total deposit amount
entered.
Paid
Select this option if the deposit has been received.
General Information
This option tracks the status changes and changes to cancellations and reinstatements separately
for rooms and conference.
Select the INFORMATION TYPE from the drop-down list:
Status change detail
Cancellation/Reinstatement detail
Conference Booking
63
Status change details
Field Name
Definition
Rooms/Conference
Status Old
Tracks the old or original status for the rooms and/or the
conference.
Status New
Tracks the new status for the rooms and/or the
conference.
Date Changed
Tracks the date the status was changed for the rooms
and/or the conference.
Changed by
Tracks the user that entered the changes for the rooms
and/or the conference.
Cancellation/Reinstatement detail
Field Name
Definition
Rooms/Conference
Reason
Select a cancellation reason from the drop down list
Rooms/Conference Lost
To
If known, a competitor can be selected from the drop
down list
Rooms/Conference
History
Shows any cancellation and/or reinstate
Information
Rooms/Conference
Description
Additional notes can be entered
Linked Profiles
Linking profiles to the booking master
On the booking master edit screen, a company and/or a contact can be linked to the booking. In
some cases, however additional profiles such as a travel agent and/or a source also need to be
linked. To link additional profiles, use the LINKED PROFILES tab. In addition to linking new profiles,
existing links can be viewed and profile information such as address, telephone numbers can be
changed.
Press NEW LINK to link additional profiles, the profile search screen will appear and an existing
profile can be selected or a new one can be created.
Select a profile and press EDIT PROFILE to edit a linked profile. Profile information such as address,
telephone numbers can be changed.
Select a profile and press DELETE LINK to remove the link between the profile and the booking.
Any additional linked profiles will be visible on the booking master edit screen on the fields:
LINKED COMPANY and LINKED CONTACT.
Note: That via the booking master edit screen it is not possible to edit
or delete the additionally linked profiles. These options are only
available via the tab LINKED PROFILE.
Linked Documents
This option enables the user to view, edit or add different types of documents to a booking master.
It is recommended to place these documents on a shared network path to which all users have
access. If a scanner is connected to the workstation you can also scan and attach documents such as
contracts, letters or pictures. The scanner needs to be ‘Twain’ compatible.
64
Conference Booking
Document groups and path are defined under Setup → Configuration → Miscellaneous →
Document Types.
Note: Linked documents can be viewed, edited or added via the
linked documents tab on the booking master edit screen or via the
options button on the conference booking grid.
How to link a document
1. Select the LINKED DOCUMENTS tab.
2. Click ADD, the Attach documents dialog box is displayed.
Conference Booking
65
3. In the DOCUMENT GROUPS list, click the document group you want.
4. In the ALLOWED DIRECTORIES list, click the allowed directory you want.
5. Click BROWSE to display the list of documents.
6. Select the required document and click OPEN, the Document Name field is filled.
66
Conference Booking
7. To attach the document, click ATTACH, the document is shown as linked on the
linked documents tab.
Note: Pictures or images may be attached in JPG or BMP format. The
default setting is JPG, but this may be changed via the SCAN OPT.
button. The selected settings will be saved for that user.
How to view/edit a linked document
1. Select the LINKED DOCUMENTS tab.
2. Select the document and click VIEW.
Suite8 opens the relevant application, for example, Word if the document is a
Word document or Crystal Reports if the document is a Crystal Report.
Note: The document may be edited directly from within the opened
application.
How to scan and link a document
1. Select the LINKED DOCUMENTS tab.
2. CLICK ADD, the attach documents dialog box is displayed.
3. In the DOCUMENT GROUPS list, click the document group you want.
4. In the ALLOWED DIRECTORIES list, click the allowed directory you want.
5. Click SCAN, the select source dialog box is displayed.
6. Select the source and click SELECT to open the scanner application.
7. Scan the document.
8. Click ATTACH to link the scanned document.
Note: The scanner needs to be 'Twain' compatible.
Forecast / Revenue
The Forecast / Revenue tab displays information about the expected, forecast and posted amounts
of the total booking including room reservations linked to the booking and additional posted
amounts on the linked financial account. The forecasted and posted figures are displayed both as a
gross figure and a net figure with the tax displayed separately.
Conference Booking
67
How to print or export forecast/revenue information
1. Select the FORECAST/REVENUE tab.
2. Expand or collapse the grid by clicking on the
or
buttons or by right-clicking
and selecting EXPAND or COLLAPSE from the short-cut menu.
3. Once the grid is displayed as required, right-click and select PRINT to display the
Print dialog box.
4. To print the report make any required adjustments to the print parameters and
click PRINT.
5. To export the report select the export type from the EXPORT TO box; the available
export types are:
68
Conference Booking
ASCII File
CSV File
Excel Document
HTML Document
6. Click EXPORT, the document is generated and exported.
Editing a Booking Master
How to edit an existing booking master
1. On the MEETING PLANNER menu, click CONFERENCE BOOKING.
The Conference Booking search screen is displayed.
or
2. Click EVENT MANAGEMENT and then click NEW.
The Booking Master Screen is displayed.
3. Search for and locate the required booking master, then click the EDIT button.
The edit booking master screen is displayed, it consists of six screens, each one
represented by a tab.
Booking Information
Deposit & Cancellation
General Information
Linked Profiles
Linked Documents
Forecast/Revenue
See: New Booking Master (See page 54)
Copying a Booking Master
The copy option may be used to duplicate a booking master for reoccurring bookings. Two types
of series may be entered:
Custom - this option is used when details such as the arrival date do not follow a set
frequency.
Series - this option should be used if the arrival date and interval of each booking is known.
For example, if each booking is for every second week of the month or if between each arrival
date there is an interval of 5 days.
Enter a custom series
1. Click the MEETING PLANNER menu and select CONFERENCE BOOKING to display the
Conference Booking search screen.
2. Select a booking master in the grid and click COPY, the Copy dialog box is
displayed.
3. Select CUSTOM to display the Booking Copy dialog box.
4. Enter the NO. OF COPIES required. A row of details to be completed for each copy is
displayed on the Booking Copy dialog box.
Conference Booking
69
5. Type the arrival date for the booking in the DATE box or click the drop down arrow
and select a date from the calendar.
6. In the OPTIONS box click the drop-down arrow, and select the type of booking.
7. Select the CONFERENCE STATUS from the drop-down list.
8. Select the ROOMS STATUS from the drop-down list, this status will be applied to all
the bookings. This option is only displayed if rooms have been entered on the
original booking.
9. Select the BLOCK STATUS from the drop-down list, this status will be applied to all
the bookings. This option is only displayed if a block was entered on the original
booking.
10. Enter the BLOCK CODE; his code will be valid for all copies. This option is only
displayed if a block was entered on the original booking.
11. Click OK to confirm the copy process, a processing message is displayed.
The required number of bookings are created. All are exact copies of the original
booking with the exception of the criteria entered in the booking copy dialog box,
the contract number and the block code, which is the entered block code plus a
sequence number. The suffix (COPY) is added to the booking name.
Note: Checks on availability of rooms, functions space and capacity
are performed and will be returned by Suite8 with the relevant
messages.
Note: If individual reservations have been entered in the original
booking then they will be copied with the linked reservation status for
the selected room status.
Enter a fixed series
1. Click the MEETING PLANNER menu and select CONFERENCE BOOKING to display the
Conference Booking search screen.
2. Select a booking master in the grid and click COPY, the Copy dialog box is
displayed.
3. Select SERIES to display the Booking Copy dialog box.
70
Conference Booking
4. In the NO. OF SERIES box enter the number of copies required. Leave this field blank
if the number of tour series will be determined by the FREQUENCY, NEXT ARRIVAL and
LAST ARRIVAL dates.
5. Select the CONFERENCE STATUS from the drop-down list, this status will be applied to
all the bookings.
6. Select the ROOMS STATUS from the drop-down list, this status will be applied to all
the bookings. This option is only displayed if rooms have been entered on the
original booking.
7. Select the BLOCK STATUS from the drop-down list, this status will be applied to all
the bookings. This option is only displayed if a block was entered on the original
booking.
8. Enter the BLOCK CODE; his code will be valid for all copies. This option is only
displayed if a block was entered on the original booking.
9. Enter the FREQUENCY, this is the interval of the series, click either DAYS, WEEKS or
MONTHS, for example:
If the series is every 10 days then enter 10 and select the DAY option, the booking
will be copied to every 10th day.
If the series is every 5 weeks then enter 5 and select the WEEK option, the booking
will be copied to every 5th week.
If the booking occurs every month then a day may be defined. If the series takes
place every 2nd month on a Monday then enter 2, select the MONTH option and
select MONDAY, the booking will be copied to every 2nd month on a Monday; the
day takes priority which means that the interval may not be exactly two months
but maybe 2 months and 2 days.
If the booking should be copied to every 2nd month exactly then select the day
NOT DEFINED, this way the booking will exactly one month apart regardless of the
day on which it falls.
10. Type the arrival date of the next booking in the NEXT ARRIVAL box or click the drop
down arrow and select a date from the calendar.
11. If the NO. OF SERIES option is not used then type the arrival date of the last event
in the LAST ARRIVAL box or click the drop down arrow and select a date from the
calendar.
12. Type the decision date in the DECISION DATE box or click the drop down arrow and
select a date from the calendar. The entered decision date is applied to all the
booking copies.
13. Type the follow up date in the FOLLOW UP DATE box or click the drop down arrow
and select a date from the calendar. The entered follow up date is applied to all
the booking copies.
14. Click OK to confirm the copy process, a processing message is displayed.
Conference Booking
71
The required number of bookings are created. All are exact copies of the original
booking with the exception of the criteria entered in the booking copy dialog box,
the contract number and the block code, which is the entered block code plus a
sequence number. The suffix (COPY) is added to the booking name.
Note: Checks on availability of rooms, functions space and capacity
are performed and will be returned by Suite8 with the relevant
messages.
Note: If individual reservations were entered on the original booking
then they will be copied with the linked reservation status for the
selected room status.
Deleting a Booking Master
How to delete a booking master
1. Click the MEETING PLANNER menu and select CONFERENCE BOOKING to display the
Conference Booking search screen.
2. Select a booking master and click DELETE, a confirmation message is displayed.
3. Select YES to delete the booking master.
4. The booking master is deleted along with all other details such as events and room
block, deposit & cancellations are also deleted.
Note: Deleting a booking master is user right dependent. Deletion of a
booking master is not allowed if the CCM Info Board Interface is
active.
72
Conference Booking
Cancelling a Booking Master
If a booking is to be cancelled then the status of either or both the conference and the rooms must
be changed to a cancel status.
How to cancel a booking
1. Display the Booking Master - Booking Information tab.
2. Change either or both the CONFERENCE STATUS and the ROOMS STATUS to a cancel
status, the Cancellation dialog box is displayed.
3. In the Conference panel select a REASON for the cancellation.
4. Select a LOST TO location if known.
5. Enter a DESCRIPTION if required.
6. Repeat steps 3-5 for the Rooms panel.
7. If the booking has uncompleted activities or tasks then a message is displayed
asking if they should be deleted.
8. Click YES to delete the records automatically.
9. If only one status was cancelled then when clicking YES to delete the activities and
tasks the Activities & Tasks dialog for this particular booking is displayed and the
user can choose which tasks & activities to delete.
10. Click CLOSE.
Note: Completed activities are always kept.
Conference Booking
73
Printing a Function Sheet or other Correspondence
Correspondence can be printed and sent via regular mail or sent via email, as an email attachment
or by fax from within the Meeting Planner module.
The PRINT option opens the print dialog window. The screen is split into three sections.
Printing functionality is controlled by the first section is to choose a template from a list of
predefined Templates, to select a language for the correspondence and to select if the
correspondence should be saved. Letter and form templates can be created in Miscellaneous →
Reports with the section role Conference.
The second section is the PROFILES section and contains information about the profiles linked
to the booking. The DETAILS section displays all the addresses from all the profiles linked to the
booking. The primary address of the selected profile and the preferred communication type
are selected. If there are several profiles attached, you can select which profile the
correspondence should be sent to. You also have the option to select another profile, if for
some reason you need to send the correspondence to a different address other than the
reservation profile or linked profiles, click the PROFILE SEARCH button to activate profile search.
Any profiles linked to the booking can be edited by pressing the EDIT PROFILES button.
The third section gives information about the History of sent correspondence for this booking.
The template name and the print date are displayed. If a letter was edited and saved but not
printed then the template name will be displayed with (Saved) after the name and the date and
time it was saved.
Default email subjects can be defined via the option DEFAULT EMAIL SUBJECTS under
Setup → Configuration → Miscellaneous → Simple Custom Text.
Default email body text can be defined via the option EMAIL BODY DEFAULT under
Setup → Configuration → Miscellaneous → Simple Custom Text.
The maximum size for email attachments is defined via the option MAX. EMAIL
ATTACHMENT SIZE (MB) under Setup → Configuration → Global Settings → Reports →
Reports tab.
Family functionality is controlled by the parameter ENABLE FAMILY WIZARD under
Setup → Configuration → Global Settings → Profile → Profile 1 tab.
Print functionality is controlled by the user right PRINT under Setup → Configuration
→ Users → User Definition → Rights → Booking Master.
How to print correspondence
1. Select the appropriate booking in the grid; click the PRINT button to display the
Print dialog box.
2. In the TEMPLATES box click the drop-down arrow and select the template to be
used.
3. In the LANGUAGE box click the drop-down arrow and select the language, if no
language is selected, the default language from the language configuration will be
used.
4. In the PREF. DISTRIBUTION box the preferred method of distribution for this profile is
displayed. If a company profile is attached then the contact profiles preferred
method of distribution takes priority over the company's.
5. Select the SAVE REPORT check box if the document should be saved in history.
6. Select the FAMILY GREETINGS check box if the family letter greetings should be used.
7. Select the CONTACT and ADDRESS information to be used in the document.
74
Conference Booking
8. Click EDIT, the document is generated and displayed on the screen. Depending on
the setup of your system either MS Word or the Fidelio Internal editor application
will be used to display the document.
9. Make sure that all the entered information is correct; any necessary changes can
be made at this time.
10. At this point the letter can be printed or saved to be printed at a later time.
11. To print the letter, click the PRINT icon or select PRINT from the file menu.
12. Close the edit screen, if changes were made you will be prompted to save the
changes.
13. If using MS Word as the editor, click EXIT to close the application.
14. If the document was edited and saved but not yet printed then the template name
will be displayed with (Saved) after the name and the date and time it was saved
in the history section of the Print dialog box.
15. If the document was printed then the template name will be displayed and the
date and time it was printed in the history section of the Print dialog box.
How to print saved correspondence
1. Select the appropriate booking in the grid; click the PRINT button to display the
Print dialog box.
2. Select the document to be printed from the list of templates in the HISTORY section
of the screen.
3. Click EDIT HISTORY, the letter is displayed on the screen. Depending on the setup of
your system either MS Word or the Fidelio Internal editor application will be used
to display the document.
4. Make sure that all the entered information is correct; any necessary changes can
be made at this time.
5. Click the PRINT icon or select PRINT from the file menu to print the letter.
6. Close the edit screen.
7. If using MS Word as the editor, click EXIT to close the application.
8. The document template name will be displayed and the date and time it was
printed in the HISTORY section of the Print dialog box.
How to preview a document
1. Select the appropriate booking in the grid; click the PRINT button to display the
Print dialog box.
2. In the TEMPLATES box click the drop-down arrow and select the template to be
used.
3. In the LANGUAGE box click the drop-down arrow and select the language, if no
language is selected, the default language from the language configuration will be
used.
4. In the PREF. DISTRIBUTION box the preferred method of distribution for this profile is
displayed. If a company profile is attached then the contact profiles preferred
method of distribution takes priority over the company's.
5. Select the SAVE REPORT check box if the document should be saved in history.
6. Select the FAMILY GREETINGS check box if the family letter greetings should be used.
7. Select the CONTACT and ADDRESS information to be used in the document.
8. Click PREVIEW, the document is generated and displayed on the screen.
Conference Booking
75
9. At this point the document can be printed or saved to be printed at a later time.
10. To print the document, click the PRINT icon.
11. To save the document, click the SAVE icon, enter a file name to save the
document.
12. Click SAVE.
13. Close the preview screen.
How to email correspondence
1. Select the appropriate booking or event in the grid; click the PRINT button to
display the Print dialog box.
2. In the TEMPLATES box click the drop-down arrow and select the template to be
used.
3. In the LANGUAGE box click the drop-down arrow and select the language, if no
language is selected, the default language from the language configuration will be
used.
4. In the PREF. DISTRIBUTION box the preferred method of distribution for this profile is
displayed. If a company profile is attached then the contact profiles preferred
method of distribution takes priority over the company's.
5. Select the SAVE REPORT check box if the document should be saved in history.
6. Select the FAMILY GREETINGS check box if the family letter greetings should be used.
7. Select the CONTACT and ADDRESS information to be used in the document.
8. Click EMAIL, the document is generated and the email dialog box displayed.
76
Conference Booking
9. The TO box is automatically completed with the email address from the profile, this
can be changed by clicking the drop-down arrow and selecting the email address
to which this email should be sent or by selecting the required email addresses
from the list of available in the panel on the upper right-hand side and clicking the
TO button. Click the SELECT ALL button and then the TO button to select all the
available email addresses.
10. In the CC box click the drop-down arrow and select the email address which
should be copied on this email or select the required email addresses from the list
of available in the panel on the upper right-hand side and click the CC button.
Click the SELECT ALL button and then the CC button to select all the available email
addresses.
11. In the BCC box click the drop-down arrow and select the email address which
should be blind copied on this email or select the required email addresses from
the list of available in the panel on the upper right-hand side and click the BCC
button. Click the SELECT ALL button and then the BCC button to select all the
available email addresses.
12. Enter the topic of the email in the SUBJECT box. If a default email subject has been
defined, then this will be displayed.
13. In the BODY box make sure that all the entered information is correct, any
necessary changes can be made at this time.
14. If the email should be saved and sent later then click SAVE DRAFT, the email is
saved and the template name is displayed with (E-Mail)(Saved) after the name
and the date and time it was saved in the history section of the Correspondence
dialog box.
15. If the email should be sent now click SEND, the document is generated and the
email sent.
A confirmation message is displayed confirming that the message was sent.
How to email correspondence as an attachment
1. Select the appropriate booking or event in the grid; click the PRINT button to
display the Print dialog box.
2. In the TEMPLATES box click the drop-down arrow and select the template to be
used.
3. In the LANGUAGE box click the drop-down arrow and select the language, if no
language is selected, the default language from the language configuration will be
used.
4. In the PREF. DISTRIBUTION box the preferred method of distribution for this profile is
displayed. If a company profile is attached then the contact profiles preferred
method of distribution takes priority over the company's.
5. Select the SAVE REPORT check box if the document should be saved in history.
6. Select the FAMILY GREETINGS check box if the family letter greetings should be used.
7. Select the CONTACT and ADDRESS information to be used in the document.
8. Click EMAIL, the document is generated and the email dialog box displayed.
Conference Booking
77
9. The TO box is automatically completed with the email address from the profile, this
can be changed by clicking the drop-down arrow and selecting the email address
to which this email should be sent or by selecting the required email addresses
from the list of available in the panel on the upper right-hand side and clicking the
TO button. Click the SELECT ALL button and then the TO button to select all the
available email addresses.
10. In the CC box click the drop-down arrow and select the email address which
should be copied on this email or select the required email addresses from the list
of available in the panel on the upper right-hand side and click the CC button.
Click the SELECT ALL button and then the CC button to select all the available email
addresses.
11. In the BCC box click the drop-down arrow and select the email address which
should be blind copied on this email or select the required email addresses from
the list of available in the panel on the upper right-hand side and click the BCC
button. Click the SELECT ALL button and then the BCC button to select all the
available email addresses.
12. Enter the topic of the email in the SUBJECT box. If a default email subject has been
defined, then this will be displayed.
13. Select the SEND AS ATTACHMENT check box if the document should be sent as an
attachment rather than in the body of the email.
14. To edit the document click the EDIT ATTACH. button, the document is generated and
displayed on the screen. Depending on the setup of your system either MS Word
or the Fidelio Internal editor application will be used to display the document.
15. In the FORMAT box select the format for the attachment.
16. In the BODY box enter the text which should be included in the body of the email.
78
Conference Booking
17. If the email should be saved and sent later then click SAVE DRAFT, the email is
saved and the template name is displayed with (E-Mail)(Saved) after the name
and the date and time it was saved in the history section of the Correspondence
dialog box.
18. If the email should be sent now click SEND, the document is generated and the
email sent.
A confirmation message is displayed confirming that the message was sent.
Note: Attachments sent in PDF format are automatically password
protected so that no changes can be made to the original PDF.
Note: When sending correspondence as a PDF attachment, the PDF
files are stored both in the database and in the Mailing Documents
directory defined in the configuration. After the correspondence has
been successfully sent the PDF files are removed from the database.
How to email correspondence with an attachment
1. Select the appropriate booking or event in the grid; click the PRINT button to
display the Print dialog box.
2. In the TEMPLATES box click the drop-down arrow and select the template to be
used.
3. In the LANGUAGE box click the drop-down arrow and select the language, if no
language is selected, the default language from the language configuration will be
used.
4. In the PREF. DISTRIBUTION box the preferred method of distribution for this profile is
displayed. If a company profile is selected then the contact profiles preferred
method of distribution takes priority over the company's.
5. Select the SAVE REPORT check box if the document should be saved in history.
6. Select the FAMILY GREETINGS check box if the family letter greetings should be used.
7. Creating correspondence for an individual profile requires that only the ADDRESS be
selected as the profile is selected by default. When creating correspondence for a
company profile, the primary CONTACT and primary ADDRESS of the company is
selected by default, but can be changed as required.
8. Click EMAIL, the document is generated and the email dialog box displayed.
Conference Booking
79
9. The TO box is automatically completed with the email address from the profile, this
can be changed by clicking the drop-down arrow and selecting the email address
to which this email should be sent or by selecting the required email addresses
from the list of available in the panel on the upper right-hand side and clicking the
TO button. Click the SELECT ALL button and then the TO button to select all the
available email addresses.
10. In the CC box click the drop-down arrow and select the email address which
should be copied on this email or select the required email addresses from the list
of available in the panel on the upper right-hand side and click the CC button.
Click the SELECT ALL button and then the CC button to select all the available email
addresses.
11. In the BCC box click the drop-down arrow and select the email address which
should be blind copied on this email or select the required email addresses from
the list of available in the panel on the upper right-hand side and click the BCC
button. Click the SELECT ALL button and then the BCC button to select all the
available email addresses.
12. Enter the topic of the email in the SUBJECT box. If a default email subject has been
defined, then this will be displayed.
13. Click ADD, the Attach documents dialog box is displayed.
80
Conference Booking
14. In the DOCUMENT GROUPS list, select the document group required.
15. In the ALLOWED DIRECTORIES list, select the allowed directory required.
16. Click BROWSE to display the list of documents.
17. Select the required document and click OPEN, the Document Name field is filled.
Conference Booking
81
18. To attach the document, click ATTACH, the document is shown as a linked
attachment on the email report dialog box.
19. In the BODY box, make sure that all the entered information is correct; any
necessary changes can be made at this time.
20. If the email should be saved and sent later then click SAVE DRAFT, the email is
saved and the template name is displayed with (E-Mail)(Saved) after the name
and the date and time it was saved in the history section of the Correspondence
dialog box.
21. If the email should be sent now click SEND, the document is generated and the
email sent.
A confirmation message is displayed confirming that the message was sent.
How to email saved correspondence
1. Select the appropriate booking or event in the grid; click the PRINT button to
display the Print dialog box.
2. Select the email to be sent from the list of templates in the HISTORY section of the
screen.
3. Click E-MAIL HISTORY, the email is displayed on the screen. Depending on the setup
of your system either MS Word or the Fidelio Internal editor application will be
used to display the email.
4. Make sure that all the entered information is correct; any necessary changes can
be made at this time.
5. Click SEND, the document is generated and the email sent.
6. The document template name is displayed and the date and time it was sent in the
HISTORY section of the Correspondence dialog box.
82
Conference Booking
How to fax correspondence
1. Select the appropriate booking or event in the grid; click the PRINT button to
display the Print dialog box.
2. In the TEMPLATES box click the drop-down arrow and select the template to be
used.
3. In the LANGUAGE box click the drop-down arrow and select the language, if no
language is selected, the default language from the language configuration will be
used.
4. In the PREF. DISTRIBUTION box the preferred method of distribution for this profile is
displayed. If a company profile is attached then the contact profiles preferred
method of distribution takes priority over the company's.
5. Select the SAVE REPORT check box if the document should be saved in history.
6. Select the FAMILY GREETINGS check box if the family letter greetings should be used.
7. Select the CONTACT and ADDRESS information to be used in the document.
8. Click FAX, the document is generated and the fax dialog box displayed.
9. The TO box is automatically completed with the fax number from the profile.
10. To edit the fax click EDIT, the document is generated and displayed on the screen.
Depending on the setup of your system either MS Word or the Fidelio Internal
editor application will be used to display the document.
11. Make sure that all the entered information is correct; any necessary changes can
be made at this time.
12. To schedule the time the fax should be sent, click ADVANCED, the Fax Scheduler
dialog box is displayed.
13. Select when to SEND THE FAX, the default is NOW, to specify a specific date and time
select a SPECIFIC TIME IN THE DAY and enter the date and time to send the fax.
14. Select the FAX PRIORITY, the default is Normal.
15. Click OK.
16. Click Send, the document is generated and the fax sent.
How to export correspondence
1. Select the appropriate booking or event in the grid; click the PRINT button to
display the Print dialog box.
2. In the TEMPLATES box click the drop-down arrow and select the template to be
used.
Conference Booking
83
3. In the LANGUAGE box click the drop-down arrow and select the language, if no
language is selected, the default language from the language configuration will be
used.
4. In the PREF. DISTRIBUTION box the preferred method of distribution for this profile is
displayed. If a company profile is attached then the contact profiles preferred
method of distribution takes priority over the company's.
5. Select the SAVE REPORT check box if the document should be saved in history.
6. Select the FAMILY GREETINGS check box if the family letter greetings should be used.
7. Select the CONTACT and ADDRESS information to be used in the document.
8. Click EXPORT, the document is generated and the export dialog box displayed.
9. In the DESTINATION box, click the drop-down arrow and select if the document is
being exported to a file or to an application, such as MS Word or MS Excel.
10. In the FILE TYPE box, click the drop-down arrow and select the file type to be used
for the export. One of the most commonly file types is Rich Text Format as it
allows editing of the document whilst keeping the correct formatting.
11. This option is only available if TOAPPLICATION was selected as the Destination type.
Click the drop-down arrow and select the application type.
12. The FILE box is automatically completed with a file name taken from the reports
section, but can be changed as required. To select a different file, click the folders
button.
13. Click EXPORT, the document is generated and exported.
How to create an easy letter
1. Select the appropriate booking in the grid; click the PRINT button to display the
Print dialog box then click EASY LETTER.
The Compose Easy Letter screen is split into 3 sections:
84
Departments - lists the available departments; ALL DEPARTMENTS lists all available
templates.
Templates - lists the available templates; templates are displayed according to the selected
department.
Resulting Document - lists the templates which are selected by default.
Conference Booking
2. Select the required department from the DEPARTMENTS list; the templates belonging
to the selected department are displayed in the TEMPLATES list.
3. Select the required template from the list of available TEMPLATES; click the arrow
button to move the template to the RESULTING DOCUMENT window on the right.
4. Repeat step 3 for all the required templates. The order of the templates may be
changed using the UP and DOWN arrows.
5. Click the COMPOSE button to display the Internal Editor screen.
6. Make any additions or changes to the letter as required.
7. To print the letter, click FILE then PRINT.
8. To email the letter click FILE then E-MAIL.
9. To save the letter click FILE then SAVE AS.
10. Allocate a FILE NAME, choose the location to save the letter and click SAVE.
The letter is saved in RTF format.
Conference Booking
85
12. Click FILE then CLOSE to exit the Internal Editor.
Events
This option is used to add new events to a booking master; typical examples of events are meeting,
conference, lunch, dinner or coffee breaks. Everything that gets booked to an event is known as a
resource, for example, the actual function space, miscellaneous items such as decoration and
technical equipment, and the food and beverage items.
When a new event is entered the function space is selected and this is automatically added to the
event resources. All other items such as decoration, and food and beverage items must be added
separately.
If Alternative functionality is active then alternative events can be defined; this enables the
customer to reserve alternatives and make a final decision at a later date, for example, Dinner may
be booked and Lunch reserved as an alternative.
The first booked event cannot be set as an alternative as there are no other events for it to be an
alternative to. When at least one event exists then the ALTERNATIVE option and the alternative
selection box are displayed. The Alternative option can be selected without selecting a specific
alternative or a specific alternative can be selected from the list of already booked events.
How to access the event details
1. Click the MEETING PLANNER menu and select CONFERENCE BOOKING to display the
Conference Booking screen.
2. Search for and select a Booking Master from the grid.
3. Click the EVENTS button, the Event Details screen is displayed.
The screen is divided into 3 distinct areas:
The upper section displays information from the booking master.
As soon as a package and/or event group has been booked the option GROUP BY
PACKAGE/EVENT GROUP is displayed. Selecting this option groups the events by
package or by event group, individual events are still sorted in date order.
86
Conference Booking
If a conference package has been booked then the PACKAGE search field is
displayed and can be used to display a list of the events belonging to the package.
If an event group has been booked then the EV. GROUP search field is displayed and
can be used to display a list of the events belonging to the package.
The middle section displays information about the event, such as start and end times, event
type and seating arrangement.
An event which is part of a conference package is indicated by a green tick mark in
the PKG/GRP column and the package name is listed in the PKG column.
An event which is part of an event group is indicated by a blue tick mark in the
PKG/GRP column and the event group name is listed in the Ev. Grp column.
In order to easily see the events which belong to a specific day; events are
grouped by day and the days are coloured alternately yellow and white.
The lower section displays information about Resources and Forecast/Revenue details, each
represented by a separate tab.
Note: The order of events within the same day can be changed by
selecting the event and moving up or down on the grid as required.
Note: The event order cannot be changed if the option GROUP BY
PACKAGE/EVENT GROUP is activated.
Event groups functionality is controlled by the parameter USE EVENT GROUPS under
Setup → Configuration → Global Settings → CCM → Conference 1 tab.
Alternative functionality is controlled by the parameter USE ALTERNATIVES under
Setup → Configuration → Global Settings → CCM → Conference 1 tab.
New Event
How to enter a new event
1. Click the MEETING PLANNER menu and select CONFERENCE BOOKING to display the
Conference Booking screen.
2. Search for and select a Booking Master from the grid.
3. Click the EVENTS button, the Event Details screen is displayed.
4. Click NEW, the New Event screen is displayed.
Conference Booking
87
5. Complete the options as detailed in the Event dialog box table below.
6. Click OK to save the event.
The event is now listed in the event details screen.
Note: If a new event is being entered on a day where an event with a
package already exists then the user will be asked "Is this event
included in the package?"
Note: If the same time is entered for an event start time and end time,
then the end date of the event is changed to the next day.
There must be a difference of at least 1 minute between the start and
the end time of an event in order to display the function space in the
diary and to check the availability of miscellaneous items.
88
Conference Booking
Event dialog box
Field Name
Explanation
Event Information
Event Status
(Required)
The event status field will be filled automatically with the
status entered under conference status on the booking
master. It can be changed if required by selecting the
status for this particular event from the drop down list.
Event Type
(Required)
Select the event type from the drop down list. When
selecting the event type the event name will be filled in
automatically with the definition entered under Setup →
Configuration → Conference Management → Event Type. It
can be changed if required. If the event types have been
defined with default forecast figures under Setup →
Configuration → Conference Management → Event Defaults,
the forecast/revenue information at the bottom of the event
edit screen will be filled as well.
Event Name
(Required)
The name of the event will be filled automatically after the
event type has been selected. It can be changed at any
time.
No of Attendees
(Required)
The number of attendees for the event. The number of
attendees entered will be taken for several checks, for
example function space and seating arrangement check.
Min Guarantee
Enter the minimum number of guaranteed persons. This
number is normally taken for billing even if less should turn
up for the function.
Start Date
The start date is filled automatically with the system date if
it is within the range of the arrival and departure dates.
Future bookings will default to the arrival date of the
booking master. It is not possible to create an event that is
not within the arrival and departure date of the booking.
Note: The entering of an arrival date in the past is
controlled by the user right ENTERING BOOKINGS IN THE PAST.
End Date
The end date is filled automatically with the end date of the
booking master. It is not possible to create an event that is
not within the arrival and departure date of the booking.
Start Time
If the event type has been configured with default start
time, then it is filled in automatically, but can be changed
by entering a time or selecting one from list box. If the
event was booked through the conference diary then the
start time is taken from the diary.
End Time
If the event type has been configured with default end
time, then it is filled in automatically, but can be changed
by entering a time or selecting one from list box. If the
event was booked through the conference diary then the
end time is taken from the diary.
Note: If an event finished past midnight, the end date has
to be changed to the next day.
Alternative
Select this option to reserve an alternative event; select a
specific alternative event from the list of reserved events.
NOTE: This option is only displayed when at least one other
event has been reserved.
Conference Booking
89
Info Board
Enter the information that should be placed on the info
board outside the function space such as “Fidelio Software
– Dealer Conference”.
Info Board Profile
Mainly used in conjunction with the doorcard interface, this
option allows the property to enter a different name. For
example, the booking was made by Star Conferences for
the company IBM; so on the doorcard IBM should be
displayed.
The handling is such that when a company and a contact
are entered the entry in the field Info Board Profile replaces
the company, if only a contact is entered the entry in the
Info Board Profile replaces the contact. If no entry is made
in the Info Board Profile then the company/contact name
from the booking will be displayed.
Incl. in Package
Check this box to define if the event is included in a
conference package. The field is only accessible if a
conference package has been booked for this day.
Noisy
Select this box to indicate that the event will be a ‘noisy’
one such as a dinner party with live music playing. If the
noisy flag has been set, users can also see the indication in
the conference diary.
Block
This is a view only field and shows the start time and the
end time the function space is blocked for. This is setup
time plus event start time and event end time plus set
down time. This is completed automatically if a room block
with a block code is attached.
Event Group
If this event is part of an event group then the event group
name is displayed.
Function Space Information
90
Function Space
(Required)
Select the function space from the list of defined function
spaces. If a shareable function space is linked to the event
type selected, this will be displayed automatically, but may
be changed as required.
Shareable
This option is displayed on function spaces which are
defined as shareable.
Seating
Arrangement
Select the seating arrangement from the drop-down list. In
some cases the seating arrangement might already be filled
in, i.e. if the parameter flag: MULTIPLE FUNCTION SPACES PER
EVENT has been activated under Setup → Configuration →
Global Settings → Conference tab.
Rate
Select the rate from list box of defined rates, such as full
day or half day. The rate codes are defined under Setup →
Configuration → Conference Management → Function
Spaces → Rate Codes. In some cases the rate might
already be filled in, i.e. if the parameter MULTIPLE FUNCTION
SPACES PER EVENT has been activated under Setup →
Configuration → Global Settings → Conference tab.
Amount
The amount is filled with the rate entered under Setup →
Configuration → Conference Management → Function Space
Definition → Rates tab. It is also possible to change this
amount with a special rate. The special rate field will be
checked if this is the case.
Conference Booking
The amount displayed here is the amount being charged
after the discount has been applied.
Dept Code
(Required)
The department code. In order to use the posting
functionality, every resource item has to have a department
code assigned. This can be done via the configuration part.
The field is filled automatically with the department code
entered on the function space definition.
Special Rate
If a different rate has been entered in the amount field, this
field will indicate the change with a tick mark.
Rebate % Flat
Defines whether the rebate calculation is by percentage or
by flat rate and the percentage or flat rate amount to be
used.
Orig. Amount
Displays the amount being charged according to the
selected rate code. It is also possible to change this amount
with a special rate. The special rate field will be checked if
this is the case.
Setup Time
If the seating arrangements have been defined with default
setup time, the default values will be filled in automatically,
but can be changed at any time.
Set down Time
If the seating arrangements have been defined with default
set down time, the default values will be filled in
automatically, but can be changed at any time.
Please note that the function space will be booked from the
event start until the event end time including the defined
setup and set down time.
Don’t Move
This field should be marked if a customer insists on a
particular function space. If this field is selected users will
also see the indicator in the conference diary.
Incl. in Package
The field is only accessible if a conference package has
been booked for this day.
Cost Price
Displays the cost price for the function space.
Function Space Selection List
Field Name
Explanation
Function Space name
Enter the name of the function space if known.
Available
Select this radio button to show only those function spaces
that are available on the booked date during the entered
start/end times.
All
Select this radio button to show all function spaces. Function
spaces that are not available will be highlighted in red.
Select
Click this button to select the highlighted function space.
Details
Click this button to view the configuration information such
as measurements, rates or seating arrangements. If a
picture of the function space is available then this can be
viewed by selecting the EXTRA INFO tab.
The entering of bookings and events in the past is controlled by the user right
ENTER BOOKINGS IN THE PAST under Setup → Configuration → Users → User Definition
→ Rights → Booking Master.
Conference Booking
91
Alternatives functionality is controlled by the parameter USE ALTERNATIVES under
Setup → Configuration → Global Settings → CCM → Conference 1 tab.
Editing Events
An event can be edited and adjustments made, such as changing the start/end time, the number of
attendees, the seating arrangement or changes to the info board.
How to edit an event
1. Click the MEETING PLANNER menu and select
Conference Booking screen.
CONFERENCE
BOOKING to display the
2. Search for and select a Booking Master from the grid.
3. Click the EVENTS button, the Event Details screen is displayed.
4. Select an event and click EDIT, the Edit Event screen is displayed.
5. Make any changes necessary, typical changes would be amending the start/end
time, the number of attendees or the seating arrangement.
6. Click OK to save the changes to the event.
92
Conference Booking
Table Res
This option is used to enter a table reservation or list the table reservations which are attached to
an event in a function space that is linked to a restaurant.
How to display attached table reservations
1. Click the MEETING PLANNER menu and select CONFERENCE BOOKING to display the
Conference Booking screen.
2. Search for and select a Booking Master from the grid.
3. Click the EVENTS button, the Event Details screen is displayed.
4. Select an event and click EDIT, the Edit Event screen is displayed.
5. Click TABLE RES. and then select SHOW LINKED.
The Table Reservation Search screen is displayed; the table reservations attached
to the selected booking are listed.
6. Several search criteria such as the dates, the booking name and the booking # are
completed with details from the booking.
7. Complete any other required search criteria by typing information or selecting
information from the available lists.
For an explanation of the search criteria, see the Table Reservation Search Criteria
table below.
8. Click SEARCH to list the table reservations according to the entered search criteria.
9. Click CLOSE to close the table reservation search screen.
How to enter a new table reservation
1. Click the MEETING PLANNER menu and select
Conference Booking screen.
CONFERENCE
BOOKING to display the
2. Search for and select a Booking Master from the grid.
3. Click the EVENTS button, the Event Details screen is displayed.
Conference Booking
93
4. Select an event and click EDIT, the Edit Event screen is displayed.
5. Click TABLE RES. and then select CREATE NEW.
The Table Reservation Edit screen is displayed.
6. The COMPANY and CONTACT profile names from the booking are automatically linked
in the PROFILES panel.
7. If the selected profile has a reservation then a message is displayed asking if the
reservation should be attached.
8. Click YES to attach the reservation to the table reservation.
94
Conference Booking
If YES was selected then the reservation is now marked as selected in the
RESERVATIONS panel.
9. The DATE defaults to the booking arrival date; enter the date for which the table
reservation is to be made or select a date from the calendar.
10. Select the RESTAURANT required from the list.
11. In the TEMPLATE box the first available reservation booking time is selected by
default. Click the down arrow to select the required reservation booking time.
12. The TIME FROM and TO are completed with the times from the reservation booking
template, but may be adjusted as required.
13. If the reservation is being made using a guest profile the # OF ADULTS defaults to
NO. OF ATTENDEES as defined in the booking, minus the number for which a table
reservation already exists; if the reservation is being made using a reservation
then the # OF ADULTS, BABY, CHILD and TEENAGER are taken from the reservation, but
maybe changed if required.
14. In the TABLES box, click on the down arrow to open the Select Available Table
dialog box.
Multiple tables can be selected if required and tables can be displayed according to
attribute type such as smoking or non-smoking.
The standard and maximum number of available seats is displayed for the selected
table or tables.
Conference Booking
95
A table number must be selected if the parameter TABLE NUMBER IS MANDATORY is
active.
15. Select the required table and then click SELECT.
16. Select the COLOUR in which the table reservation should be displayed in the Table
Reservation Availability grid.
17. Enter any additional information in the DESCRIPTION box.
18. Enter information in the TABLE CARD box.
19. Click OK to save the table reservation.
Table Reservation Search Criteria
Fill in this field
With this information
Restaurant
Select a restaurant from the list.
Date to
The dates are completed automatically with the booking
arrival and departure dates.
Start time from to
Enter from and to times to limit the search to a specific time
period.
Include history
Select this check box to include historical table reservation
bookings.
Not Assigned tables
only
Select this check box to display only tables which have not
been assigned.
Room #
Enter the room number to limit the search to a specific room
number.
Booking
Completed automatically with the booking name.
Event
Select an event from the list; all events within the selected
dates are displayed.
Last Name
The last name of the guest.
First Name
The first name of the guest.
Description
Enter the text to search for a table reservation with a specific
description. The text can be entered using wildcards (%) in
order to search anywhere within the description, e.g.
%highchair will return reservations with the text 'Highchair
required' and also 'Requires a highchair'.
Status
Select a table reservation status from the list, the status
DEFINITE is selected by default.
Reservation #
Enter the reservation number to limit the search to a specific
reservation.
Booking #
Completed automatically with the booking number.
Note: The table reservation linked to an event can also be listed via the
option SHOW ATTACHED TABLE RESERVATIONS on the OPTIONS menu
on the event details screen.
Restaurants are linked to a function space via the option RESTAURANTS under Setup
→ Configuration → Table Reservations.
96
Conference Booking
Copying Events
The copy functionality may be used to create several events for the same booking.
How to copy an event
1. Click the MEETING PLANNER menu and select CONFERENCE BOOKING to display the
Conference Booking screen.
2. Search for and select a Booking Master from the grid.
3. Click the EVENTS button, the Event Details screen is displayed.
4. Select an event and click COPY, a message is displayed asking if you want to copy
the event to multiple bookings.
5. Click NO to copy the event to a single booking or click YES to copy the event to
multiple bookings, if YES is selected then the Booking Master Search screen is
displayed.
6. Search for and select the check box for each of the bookings the event is to be
copied to, click the SELECT button.
The event copy dialog box is displayed.
Conference Booking
97
7. Enter the NO. OF COPIES to be created and press the TAB key to create the copies.
8. The BOOKING DATES of the event are displayed for information purposes at the top
of the event copy dialog box. They are the arrival and departure dates of the
booking master; it is not possible to make an event copy outside of these dates.
9. Enter the NO. OF COPIES to be made and press TAB, an additional line is added to
the event copy screen for each copy required.
10. Type the required date in the DATE box or click the drop down arrow and select a
date from the calendar.
11. If a different FUNCTION SPACE is required, click the THREE DOTS button to display the
Function Space List and select the required function space.
If a different function space is selected but as the same seating arrangement then
the seating arrangement is also copied; this applies also to rates and amounts.
Note: The FUNCTION SPACE cannot be changed if the event being
copied is a sub-event.
12. In the PACKAGE OPTIONS box click the drop-down arrow and select if the event
should be copied with the existing package, without a package or if a new package
should be created.
13. If COPY EXISTING PACKAGE is selected then the existing packages are displayed and
the user must select the package to copy.
14. In the MASTER / SUB EVENT box click the drop-down arrow and select if the event
should be created as a master event or as a sub event.
98
Conference Booking
15. Under the MASTER /SUB EVENT box an additional box is displayed where users can
select under which event the sub event should be copied. Original event defines
the master event and the New event defines the newly created master event if
master and sub event were selected to be copied together.
16. If CREATE AS A SUB EVENT is selected then the original events are listed for selection
and the user must select the event for which the copied event will be a sub-event.
17. Select the ALTERNATIVE option to reserve an alternative event; select a specific
alternative event from the list of booked events.
18. In the EVENT GROUP OPTIONS box click the drop-down arrow and select if the event
should be copied without the event group or if a new event group should be
created.
19. Click OK to confirm the copy process, a processing message is displayed.
The required number of events are created.
Note: Checks on the availability of functions space and capacity are
performed and will be returned by Suite8 with the relevant messages.
If the event being copied was waitlisted and there is now space for the
copied event, then a message is displayed asking if you want to
change the event status. Answering this message with YES will display
the Event Status Change dialog box and the required event status for
the copied event can be selected.
Event Copy dialog box
Option
Explanation
Booking Dates
On top of the event copy screen, the arrival and departure
date of the booking master is shown. Copies outside those
dates are not allowed.
No of Copies
Enter the number of copies that should be made, if the
booking runs over several days, the dates for the copied
events can be entered into the date box. To exclude a date
that has been entered, remove the check mark before the
date.
Date
Enter the date required for the event copy.
Function Space
Select the function space required for the event copy.
Package Options
Depending on whether the event should be part of a package
or not, the appropriate option can be selected.
Master/Sub Events
This option is only available if the parameter USE MASTER-SUB
EVENTS under Setup → Configuration → Global Settings →
Conference tab is switched on. If it is turned on, select
whether the event should be created as a master- or sub
event. In case of a sub event the appropriate master event
also has to be selected.
Alternative
Defines if an alternative event should be created. If selected
then an alternative event can be selected from the booked
events.
Event Group
Options
Defines if the event is copied without an event group or if a
new event group should be created.
Conference Booking
99
The entering of bookings and events in the past is controlled by the user right
ENTER BOOKINGS IN THE PAST under Setup → Configuration → Users → User Definition
→ Rights → Booking Master.
Deleting Events
How to delete an event
1. Click the MEETING PLANNER menu and select
Conference Booking screen.
CONFERENCE
BOOKING to display the
2. Search for and select a Booking Master from the grid.
3. Click the EVENTS button, the Event Details screen is displayed.
4. Select an event and click DELETE, a confirmation message is displayed.
5. Select YES to delete the event.
6. The event is deleted along with all resources attached to the event.
Note: Multiple events can be selected for deletion using the shift and
down arrow keys.
Deleting an event is user right dependent. Deletion of an event is not
allowed if the CCM Info Board Interface is active.
All packages attached to the event will also be deleted.
Moving Events
How to move an event
1. Click the MEETING PLANNER menu and select
Conference Booking screen.
CONFERENCE
BOOKING to display the
2. Search for and select a Booking Master from the grid.
3. Click the EVENTS button, the Event Details screen is displayed.
4. Select an event and click EDIT, the Edit Event screen is displayed.
5. In the NAME field click the three dots button to open the Function Space List dialog
box.
6. Select the new Function Space and click SELECT.
The Edit Function Space dialog box is re-displayed.
100
If the new function space has the same seating arrangement and rate then the seating
arrangement and rate are updated automatically, however, the amount is not changed.
If the original function space had no seating arrangement and rate defined, then no seating
arrangement and rate are defined for the new function space and the amount is not
changed.
Conference Booking
If the new function space does not have the same seating arrangement and rate defined
then the message "Seating or Rate differs! Do you want to change?" is displayed.
Confirming this with 'Yes' will fill the default seating arrangement and rate. Confirming
with 'No' will leave the seating arrangement and rate blank. The amount is not changed in
either case.
If the new function space has a different seating arrangement the message "Seating or Rate
differs! Do you want to change?" is displayed. Confirming this with 'Yes' will fill the
default seating arrangement but keep the original rate. Confirming with 'No' will leave the
seating arrangement blank and the rate as it was. The amount is not changed in either case.
If the new function space has a different rate the message "Seating or Rate differs! Do you
want to change?" is displayed. Confirming this with 'Yes' will fill the default rate but keep
the original seating arrangement. Confirming with 'No' will leave the rate blank and the
seating arrangement as it was. The amount is not changed in either case.
7. Click OK to save the changes to the event.
Waitlist Events
If no space is available then events may be added to the waitlist. Events are placed on the waitlist
in order of entered events and, as and when space becomes available the events are moved from
the waitlist.
The waitlist priorities can be adjusted automatically be selecting the parameter CHANGE WAITLIST
PRIORITY AUTOMATICALLY under Configuration → Setup → Global Settings → Conference tab.
If this parameter is selected users will not be prompted with the message to adjust the waitlist
priority, the priority will be set in order of the entered events. As function spaces become available
the waitlist priority is adjusted automatically.
Priorities may be adjusted manually however users will be prompted with a warning if they want
to change the status of an event with a lower priority.
Note: A waitlisted sub-event which is linked to a master event will
take the status of the master event
Waitlisting an event in an exclusive function space
1. Click the MEETING PLANNER menu and select
CONFERENCE
BOOKING
2. From the Conference Diary screen, place the cursor on the function space, date
and time that you want to book.
3. Click and drag the mouse by holding down the left mouse button while dragging
the mouse to the right until the required date and time, the command pop-up
menu appears.
4. Select CONFERENCE BOOKING, if the function space is already occupied then a
message is displayed indicating this with the option to continue or not.
5. Select YES to continue to book the function space, a message is displayed
confirming that the Event Status will be changed to waitlist.
Conference Booking
101
6. Click OK, the Booking Master Search screen is displayed.
7. Search for the required booking and select it in the grid.
8. Click the EVENTS button to book the event, the New Event screen is displayed.
9. Complete the Event Information.
10. Click OK; a message may be displayed asking if the default misc. items should be
added.
11. Select YES to add the items and NO not to add the items.
12. If there is already an event on the waitlist then the following message is
displayed:
13. Select NO if the priority should not be adjusted, then the waitlist priority will be set
in order of the entered events.
14. Select YES to adjust the priority list, the Event Waitlist screen is displayed showing
all events currently on the waitlist.
15. Use the up and down arrows to adjust the event priority, click OK to close the
Event Waitlist screen.
16. The Conference Diary is displayed showing the booked event.
Waitlisting an event in a shareable function space
1. Click the MEETING PLANNER menu and select CONFERENCE DIARY.
2. From the Conference Diary screen, place the cursor on the function space, date
and time that you want to book.
3. Click and drag the mouse by holding down the left mouse button while dragging
the mouse to the right until the required date and time, the command pop-up
menu appears.
102
Conference Booking
4. Select CONFERENCE BOOKING, the share mode message is displayed.
5. Select YES to book the function space as shareable, this allows other groups to be
booked into the same function space. Selecting NO will book the function space in
exclusive mode which will not allow other groups to be booked into the same
function space without waitlisting them.
6. If the function space is booked to capacity then a message is displayed indicating
this with the option to overbook or not.
7. A further message is displayed indicating that the function space is not available at
this time, with the option to continue or not.
8. Select YES to continue to book the function space, a message is displayed
confirming that the Event Status will be changed to waitlist.
9. Click OK, the Booking Master Search screen is displayed.
10. Search for the required booking and select it in the grid.
11. Click the EVENTS button to book the event, the New Event screen is displayed.
12. Complete the Event Information.
Conference Booking
103
13. Click OK; a message may be displayed asking if the default misc. items should be
added.
14. Select YES to add the items and NO not to add the items.
15. If there is already an event on the waitlist then the following message is
displayed:
16. Select NO if the priority should not be adjusted, then the waitlist priority will be set
in order of the entered events.
17. Select YES to adjust the priority list, the Event Waitlist screen is displayed showing
all events currently on the waitlist.
18. Use the up and down arrows to adjust the event priority, click OK to close the
Event Waitlist screen.
19. The Conference Diary is displayed showing the booked event.
Moving an event from the waitlist when an existing event is cancelled
1. Click the MEETING PLANNER menu and select
Conference Booking screen.
CONFERENCE
BOOKING to display the
2. Search for and select the required booking.
3. Click the EVENTS button, the Event Details screen is displayed.
4. Point to the event to be deleted and click the DELETE button, a confirmation
message is displayed.
5. Click YES to delete the event and all attached resources.
6. If events exist on the waitlist for this function space then a message is displayed.
104
Conference Booking
7. Select YES to change event status, the change event status screen is displayed.
8. Point to the event to have its status changed.
9. Select a new status from EVENT STATUS list box.
10. Click CHANGE to change the status.
11. Click CLOSE to close the change event status screen.
Moving an event from the waitlist when an existing event is reduced in
numbers
1. Click the MEETING PLANNER menu and select
Conference Booking screen.
CONFERENCE
BOOKING to display the
2. Search for and select the required booking.
3. Click the EVENTS button, the Event Details screen is displayed.
4. Point to the event to be adjusted and click the EDIT button.
5. Reduce the NO. OF ATTENDEES.
6. If enough space has now become available and if events exist on the waitlist for
this function space then a message is displayed.
Conference Booking
105
7. Select YES to change event status, the change event status screen is displayed.
8. Point to the event to have its status changed.
9. Select a new status from EVENT STATUS list box.
10. Click CHANGE to change the status.
11. Click CLOSE to close the change event status screen.
Moving an event from the waitlist when the waitlisted event is reduced in
numbers
1. Click the MEETING PLANNER menu and select
Conference Booking screen.
CONFERENCE
BOOKING to display the
2. Search for and select the required booking.
3. Click the EVENTS button, the Event Details screen is displayed.
4. Point to the event to be adjusted and click the EDIT button.
5. Reduce the NO. OF ATTENDEES, if by reducing the numbers the function space has
now become available then a message is displayed.
6. Select YES, the Event Status change screen is displayed.
7. Select the EVENT NEW STATUS from the list box.
106
Conference Booking
8. Click OK, if there are other events on the waiting list the following message may
be displayed “Event(s) with higher priority exists! Continue?”.
9. Select YES, to continue, the following message is displayed:
10. Select NO if the priority should not be adjusted, then the waitlist priority will be set
in order of the entered events.
11. Select YES to adjust the priority list, the Event Waitlist screen is displayed showing
all events currently on the waitlist.
12. Use the up and down arrows to adjust the event priority, click OK to close the
Event Waitlist screen.
13. The Conference Diary is displayed showing the booked event.
Viewing waitlisted events
Waitlist events may be viewed from the Conference Diary or via the quick key Waitlist
Priority (Ctrl + W). Viewing the waitlist via the quick key allows the user to view all
events which are currently waitlisted for a particular day.
1. Click the MEETING PLANNER menu and select CONFERENCE DIARY to display the
Conference Diary screen.
2. Place the cursor on an occupied grid square and right-click to display the short-cut
menu.
3. Click SHOW WAITLIST on the shortcut menu to display the Event Waitlist screen.
4. The priority order of the waitlisted events may be changed by pressing the up and
down arrows.
5. The Booking, Event, Company and Contact may be edited.
Conference Booking
107
Note: The Event Waitlist screen may be displayed by selecting
WAITLIST PRIORITY (CTRL+W) from the QUICK KEYS menu.
The following options are available from the event waitlist screen:
Edit Booking
Edit Event (See page 86)
Edit Company Profile
This option is only available if a company profile has been linked. Via this option
any details related to the company profile can be viewed or changed, such as:
Change/add/delete address
Change/add/delete communication
Enter/view/delete notes
View/change the marketing information
View/delete linked profiles
Create new links between profiles
Edit Contact
Note: When deleting a function space from a waitlisted event a
message will be displayed to change the event status to the booking
status as the event is not waitlisted anymore.
Conference Packages
Conference packages can be set up to include a conference room, coffee breaks, meals and
technical equipment and are usually offered at a fixed price. This option allows the user too
quickly and easily, select and book a conference package which means that all the necessary events
required are booked in one step and do not have to be entered one by one.
If a conference package has been booked then the PACKAGE search field displayed on the Event
Details screen can be used to display a list of the events belonging to the package. The display
order of the conference packages can be defined by moving the packages up or down on the grid
as required. The display order can only be defined within the same day.
If Alternative functionality is active then alternative packages can be defined; this enables the
customer to reserve alternatives and make a final decision at a later date, for example, Package I
may be booked and Package II reserved as an alternative.
The first package added to an event cannot be set as an alternative as there are no other packages
for it to be an alternative to. When at least one package exists then the ALTERNATIVE option and the
alternative selection box are displayed. The Alternative option can be selected without selecting a
specific alternative or a specific alternative can be selected from the list of already booked
packages.
Packages can be merged. Already booked packages can be merged and merged packages can be
unmerged. If unmerged is selected all originally booked events and resources will displayed. In
addition a new column is displayed to show if package is merged. All events which are the same
are merged and those which are different are kept.
Package events will only be merged under the following conditions:
108
Events are the same event type and have overlapping day and time.
Resources have the same function space, miscellaneous items, standard menu and menu items.
Miscellaneous items, same items are merged and different items are added; for example,
Package I has a flip chart and a beamer, Package II has a flip chart and an overhead projector,
after merging there will be 1 flip chart, 1 beamer and 1 overhead projector.
Conference Booking
Same function spaces are not merged.
Catering items are summarized if defined per person otherwise they are added.
Miscellaneous items we merge only when booked resource and added resource have the per
person flag activated.
To merge resources we use the ID.
How to add a new package
1. Click the MEETING PLANNER menu and select
Conference Booking screen.
CONFERENCE
BOOKING to display the
2. Search for and select a Booking Master from the grid.
3. Click the EVENTS button, the Event Details screen is displayed.
4. Select an event and click PACKAGES, the Packages for booking screen is displayed.
Any conference packages already attached to the event are listed.
5. Click NEW to add a new conference package, the Add new package dialog box is
displayed.
Conference Booking
109
6. The START DATE is completed automatically with the start date of the booking
master.
7. The END DATE is completed automatically with the end date of the booking master.
8. In the PACKAGE box, click on the down arrow to open the drop-down list, and select
a conference package.
9. When the package is selected the NAME and PRICE options are automatically
completed, they can be changed as required.
10. The PAX option is also automatically completed with the number of attendees as
defined on the event; this can be changed as required.
11. Select the ALTERNATIVE option to book an alternative conference package; select a
specific alternative package from the list of booked packages.
NOTE: This option is only displayed when at least one other package
has been defined.
12. The grid in the lower half of the package dialog box is completed with the
conference package breakdown, the event name and the start and end times for
each event included in the package are detailed.
13. Click OK to close the Add new package dialog box.
14. If there are already booked packages and merge package functionality is active
then a message is displayed asking if to merge the package. If there are multiple
packages already booked then a selection screen is displayed.
110
Conference Booking
15. Click YES to merge the package.
Depending on the merge package configuration the packages are merged
automatically or a list of the conference package events is displayed; all events are
selected by default to be merged.
16. Make any adjustments required to the selection and click OK to merge the events.
17. Click CLOSE, all events defined in the conference package are listed on the Event
Details screen.
Conference Package dialog box
Field Name
Description
Start Date
Will be completed with the arrival date from the booking master
End Date
Will be completed with the To date from the booking master.
Currently no packages can be defined for more than one day
Package
Select from list box the defined conference packages
Name
Will be completed automatically using the package name of the
pre-defined package. The name can be changed
Price
The configured package price will be filled
Pax
The number of attendees will be filled with the defined attendees
on the event level
All package items of the conference package are displayed.
Conference Booking
111
How to delete a package
1. Click the MEETING PLANNER menu and select
Conference Booking screen.
CONFERENCE
BOOKING to display the
2. Search for and select a Booking Master from the grid.
3. Click the EVENTS button, the Event Details screen is displayed.
4. Select an event and click PACKAGES, the Packages for Booking screen is displayed.
Any conference packages already attached to the event are listed.
5. Select the conference packages to be deleted and click DELETE, a confirmation
message is displayed.
6. Click YES to delete all events and resources included in this package.
7. Click CLOSE, all events included in the conference package are deleted from the
event edit screen.
How to update the package price
1. Click the MEETING PLANNER menu and select
Conference Booking screen.
CONFERENCE
BOOKING to display the
2. Search for and select a Booking Master from the grid.
3. Click the EVENTS button, the Event Details screen is displayed.
4. Select an event and click PACKAGES, the Packages for Booking screen is displayed.
Any conference packages already attached to the event are listed.
5. Select the conference package to be edited and click EDIT, the Update Package
dialog box is displayed.
112
Conference Booking
6. Select the package detail to be edited, click EDIT, the Update package event dialog
box is displayed.
7. Update the price in the EXPECTED PER PERSON AND FORECAST PER PERSON boxes.
8. Click OK to close the Update package event dialog box.
9. Click OK then click CLOSE to return to the Event Details screen.
Note: The package price is calculated based on the package split,
taking into consideration the revenue entered for each event by
department code.
How to copy a package
1. Click the MEETING PLANNER menu and select
Conference Booking screen.
CONFERENCE
BOOKING to display the
2. Search for and select a Booking Master from the grid.
3. Click the EVENTS button, the Event Details screen is displayed.
Conference Booking
113
4. Select an event and click PACKAGES, the Packages for Booking screen is displayed.
Any conference packages already attached to the event are listed.
5. Select the conference package to be copied and click COPY, the Package Copy
dialog box is displayed.
6. The BOOKING DATES of the event are displayed for information purposes at the top
of the package copy dialog box.
7. Enter the NO. OF COPIES to be made, package copies are made by day; an
additional line is added to the package copy screen for each copy required.
8. Type the required date in the DATE box or click the drop down arrow and select a
date from the calendar.
9. The PACKAGE NAME and ATTENDEES are completed by default.
10. Select the ALTERNATIVE option to reserve an alternative conference package; select
a specific alternative package from the list of booked packages.
11. Click OK to save the package copy.
How to merge a package
1. Click the MEETING PLANNER menu and select
Conference Booking screen.
CONFERENCE
BOOKING to display the
2. Search for and select a Booking Master from the grid.
3. Click the EVENTS button, the Event Details screen is displayed.
4. Select an event and click PACKAGES, the Packages for Booking screen is displayed.
Any conference packages already attached to the event are listed.
5. Select the conference package to be merged and click MERGE, a confirmation
message is displayed.
114
Conference Booking
6. Click YES to merge the package.
Depending on the merge package configuration the packages are merged
automatically or a list of the conference package events is displayed; all events are
selected by default to be merged.
7. Make any adjustments required to the selection and click OK to merge the events.
How to unmerge a package
1. Click the MEETING PLANNER menu and select
Conference Booking screen.
CONFERENCE
BOOKING to display the
2. Search for and select a Booking Master from the grid.
3. Click the EVENTS button, the Event Details screen is displayed.
4. Select an event and click PACKAGES, the Packages for Booking screen is displayed.
Any conference packages already attached to the event are listed.
5. Select the conference package to be unmerged and click UNMERGE, a confirmation
message is displayed.
6. Click YES to unmerge the package.
Conference Booking
115
A list of the conference package events is displayed; all events are selected by
default to be unmerged.
7. Select the events to be unmerged and click OK.
Merge package event functionality is controlled by the parameter MERGE PACKAGES
under Setup → Configuration → Global Settings → CCM → Conference 1 tab.
Packages can be merged automatically or the user can choose which package
events to merge. With both the MERGE AUTOMATIC and ASK FOR MERGING options the
user is prompted before merging the package events, however, with the option
ASK FOR MERGING the user can select which events to merge.
Alternatives functionality is controlled by the parameter USE ALTERNATIVES under
Setup → Configuration → Global Settings → CCM → Conference 1 tab.
Note: If a package is required for 2 days, the package should not be
booked as start date: Day 1 and end date: Day 2 as this would block
the function spaces for the individual events for the entire time and
not just from 09.00-18.00 on both days.
Note: Packages set as ALTERNATIVE cannot be merged and packages
already merged cannot be set as ALTERNATIVE.
Event Groups
Event groups can be set up to include all the necessary events and resources for a particular type of
event, for example, a wedding. This option allows the user too quickly and easily, select and book
an event group which means that all the necessary events required are booked in one step and do
not have to be entered one by one.
If an event group has been booked then the EV. GROUP search field displayed on the Event Details
screen can be used to display a list of the events belonging to the event group.
If more than one event group has been booked then selecting the option GROUP BY PACKAGE/EVENT
GROUP will group the resources per event group. The display order of the event groups can be
defined by moving the event groups up or down on the grid as required. The display order can
only be defined within the same day.
If Alternative functionality is active then alternative event groups can be defined; this enables the
customer to reserve alternatives and make a final decision at a later date, for example, Wedding
Party Style I may be booked and Wedding Party Style II reserved as an alternative.
116
Conference Booking
The first event group reserved cannot be set as an alternative as there are no other event groups for
it to be an alternative to. When at least one event group exists then the ALTERNATIVE option and
the alternative selection box are displayed. The alternative option can be selected without selecting
a specific alternative or a specific alternative can be selected from the list of already reserved event
groups.
How to add a new event group
1. Click the MEETING PLANNER menu and select CONFERENCE BOOKING to display the
Conference Booking screen.
2. Search for and select a Booking Master from the grid.
3. Click the EVENTS button, the Event Details screen is displayed.
4. Select an event and click EV. GROUPS, the Event Groups screen is displayed.
Any event groups already attached are listed.
5. Click NEW to add a new event group; the Event Groups dialog box is displayed.
Conference Booking
117
6. The START DATE is completed automatically with the start date of the booking
master.
7. The END DATE is completed automatically with the end date of the booking master.
8. In the GROUP box, click on the down arrow to open the drop-down list, and select
an event group.
When the group is selected the GROUP NAME is automatically completed but can be
changed as required.
9. The PAX option is also automatically completed with the number of attendees as
defined on the event.
10. Select the ALTERNATIVE option to reserve an alternative event group; select a
specific alternative event group from the list of reserved event groups.
NOTE: This option is only displayed when at least one other event
group has been reserved.
11. The grid in the lower half of the event groups dialog box is completed with the
event breakdown, the event name and the start and end times for each event
included in the event group are detailed.
12. Click OK to close the Event Groups dialog box.
13. Click CLOSE, all events defined in the event group are listed on the Event Details
screen; a blue tick mark indicates that the event is part of an event group.
Event Groups dialog box
118
Field Name
Description
Start Date
Completed with the arrival date from the booking master
End Date
Completed with the start date from the booking master.
Group
Select from list box the defined event groups.
Group Name
Completed automatically using the event name of the predefined group. The name can be changed
Conference Booking
Pax
The number of attendees will be filled with the defined attendees
on the event level
Alternative
Select this option to reserve an alternative event group; select a
specific alternative event group from the list of reserved event
groups.
NOTE: This option is only displayed when at least one other event
group has been reserved.
All items of the event group are displayed.
Event groups functionality is controlled by the parameter USE EVENT GROUPS under
Setup → Configuration → Global Settings → CCM → Conference 1 tab.
Alternatives functionality is controlled by the parameter USE ALTERNATIVES under
Setup → Configuration → Global Settings → CCM → Conference 1 tab.
Notes
An unlimited number of notes can be added to each booking master, event or resource.
To add, view or delete booking master notes, select the booking master, click the OPTIONS
button and select NOTES from the options menu.
To add, view or delete booking master notes from the conference diary, select the event on the
conference diary, right-click to display the short cut menu, select BOOKING OPTIONS and then
select NOTES.
To add, view or delete event or resource notes from the conference diary, select the event on
the conference diary, right-click to display the short cut menu and select VIEW ALL EVENTS to
display the Event Details screen. Select the event or resource to which a note is to be added.
Click the NOTES button on the right-hand side of the screen to add a note to an event. Click the
NOTES button on the bottom of the screen to add a note to a resource.
To add, view or delete event or resource notes on the Event Details screen, select the event or
resource to which a note is to be added. Click the NOTES button on the right-hand side of the
screen to add a note to an event. Click the NOTES button on the bottom of the screen to add a
note to a resource.
How to add a new booking master note
1. Click the NOTES button to display the notes dialog.
2. Any existing notes are listed in the upper part of the dialog box.
Conference Booking
119
3. Click the NEW button to display the Add Note dialog.
120
Conference Booking
4. The DATE/TIME and USER are automatically completed.
5. Select a NOTE CATEGORY from the drop-down list.
6. Select the option GUEST VIEWABLE if the guest is allowed to view the note.
Depending on the definition and setup of any customer correspondence, this
option is used to control which notes should appear on contracts, offers or letters.
Leave it empty if you do not want the guest to be aware of this note.
7. In the NOTE box enter the text for the note.
8. The day, date, time and name of the logged in user can be added to the text of
the note by pressing F7.
9. Click OK to save the note.
Conference Booking
121
How to edit a booking master note
1. Click the NOTES button to display the notes dialog.
2. All the existing notes are listed in the upper part of the dialog box. The text of
each note is listed in the lower part of the dialog box. Click on the DETAILS button
to view details such as the category, when the note was entered and the time it
was entered.
3. Select the note to be edited and click the EDIT button to display the Edit Note
dialog box.
4. Make any changes required and click OK to save the note.
How to delete a booking master note
1. Click the NOTES button to display the notes dialog.
2. All the existing notes are listed in the upper part of the dialog box. The text of
each note is listed in the lower part of the dialog box. Click on the DETAILS button
to view details such as the category, when the note was entered and the time it
was entered.
3. Select the note to be deleted.
4. Click the DELETE button, a confirmation message is displayed.
5. Click YES, the note is deleted.
How to add a new note to an event or resource
1. On the Event Details screen, select the event or resource to which a note is to be
added.
Click the NOTES button on the right-hand side of the screen to add a note to an
event.
Click the NOTES button on the bottom of the screen to add a note to a resource.
The notes dialog box is displayed; any existing notes are listed in the upper part of
the dialog box.
2. Click the NEW button to display the Add Note dialog.
122
Conference Booking
3. The DATE/TIME and USER are automatically completed.
4. Select a NOTE CATEGORY from the drop-down list.
5. Select the option GUEST VIEWABLE if the guest is allowed to view the note.
Depending on the definition and setup of any customer correspondence, this
option is used to control which notes should appear on contracts, offers or letters.
Leave it empty if you do not want the guest to be aware of this note.
6. In the NOTE box enter the text for the note.
7. The day, date, time and name of the logged in user can be added to the text of
the note by pressing F7.
8. Click OK to save the note.
How to edit an event or resource note
1. On the Event Details screen, select the event or resource for which a note is to be
edited.
Click the NOTES button on the right-hand side of the screen to edit an event note.
Click the NOTES button on the bottom of the screen to edit a resource note.
2. All the existing notes are listed in the upper part of the dialog box. The text of
each note is listed in the lower part of the dialog box. Click on the DETAILS button
to view details such as the category, when the note was entered and the time it
was entered.
3. Select the note to be edited and click the EDIT button to display the Edit Note
dialog box.
4. Make any changes required and click OK to save the note.
How to delete an event or resource note
1. On the Event Details screen, select the event or resource for which a note is to be
deleted.
Click the NOTES button on the right-hand side of the screen to delete an event
note.
Click the NOTES button on the bottom of the screen to delete a resource note.
2. All the existing notes are listed in the upper part of the dialog box. The text of
each note is listed in the lower part of the dialog box. Click on the DETAILS button
to view details such as the category, when the note was entered and the time it
was entered.
3. Select the note to be deleted.
Conference Booking
123
4. Click the DELETE button, a confirmation message is displayed.
5. Click YES, the note is deleted.
Note Categories are defined via the option NOTES CATEGORIES under Setup →
Configuration → Conference Management. Note Categories can be defined to be
restricted and then only users with the appropriate user rights can view, edit,
insert or delete a restricted note. Note categories can also be defined to pop-up
when editing the booking master, event or resource.
Restricted notes functionality is controlled by the rights under the user right
RESTRICTED NOTES under Setup → Configuration → Users → User Definition → Rights
→ Miscellaneous.
Text Templates
Text templates may be created and used where the same text is required very often or where the
same basic text can be used and minor adjustments made.
How to create a template
1. Open any NOTES screen.
2. Click NEW to open the Add Note dialog box.
3. Enter the text required for the template.
4. Press ALT + E to export the text, the Text Template dialog is displayed.
5. Allocate a FILE NAME for the template.
6. Click OK to save the template.
7. The Add Note dialog is re-displayed; click OK to save the text as a note or CANCEL
to exit from the Add Note dialog screen.
8. Click CLOSE to close the Notes dialog.
124
Conference Booking
How to import a template
1. Open the NOTES screen.
2. Click NEW to open the Add Note dialog screen.
3. Place the cursor in the note box and press ALT + I to import a text template.
4. The Text Template dialog is displayed listing all available templates.
Conference Booking
125
To search for a template, enter a template NAME, click SEARCH.
To edit an existing template, click the EDIT button.
To create a new template, click the NEW Button.
5. Double-click the required template or highlight the required template from the list
and click OK.
6. The Add Note dialog is displayed with the template in the NOTE box.
7. Make any adjustments necessary and click OK to save the note.
8. Click CLOSE to close the Notes dialog.
Note: Text template can also be imported in to the body part of the
print screen when sending emails.
Text templates can also be created via the option TEXT TEMPLATES under Setup →
Configuration → Miscellaneous.
Sub Events
The sub event option allows users to create events as sub-events into the same function space as
the master event without double booking.
Special features of the master and sub event relationship
A sub event must be in the same function space as the master event, but can have a different
seating arrangement or rate.
The start and end time of a sub-event, also taking into consideration any setup and set down
time must overlap with the start and end time of the master event. For example: A conference
from 09:00-18:00 will be created as the master event and morning coffee from 08:30-09:00 could
be created as a sub event.
The Block box in the event edit screen will always be updated with the earliest time of either
the sub or master event and with the latest time of either the sub or master event. This option
always indicates the start and end times the function space is blocked.
In the event grid indicates the master event and will indicates the sub events. In addition
master/sub-events are displayed in a tree format and can be expanded and collapsed.
Easy conversion from a master event to a sub-event by vice versa.
Changing the number of attendees in the master event will prompt the user to change the
number of attendees in the sub events. The user will be given the option to change all sub
events or only the ones with the same number of attendees.
How to create a sub event
1. Click the MEETING PLANNER menu and select CONFERENCE BOOKING to display the
Conference Booking screen.
2. Search for and select a Booking Master from the grid.
3. Click the EVENTS button, the Event Details screen is displayed.
2. Click SUB EVENT or right-click and select ADD SUB EVENT from the short-cut menu.
The New Event screen is displayed with a comment indicating that this is a Sub
Event of 'Event Name'.
126
Conference Booking
5. Complete the options as detailed in the table below:
6. Click OK to save the sub event.
A master event is indicated by
in the first column. Clicking the plus sign lists
all the sub events which are then indicated by
in the first column.
The BLOCK option on the Master Event will be updated where applicable.
Event dialog box
Field Name
Explanation
Event Information
Event Status
(Required)
Conference Booking
The event status field will be filled automatically with
the status entered under conference status on the
booking master. It can be changed if required by
selecting the status for this particular event from the
drop down list.
127
128
Event Type
(Required)
Select the event type from the drop down list. When
selecting the event type the event name will be filled in
automatically with the definition entered under Setup
→ Configuration → Conference Management → Event
Type. It can be changed if required. If the event types
have been defined with default forecast figures under
Setup → Configuration → Conference Management →
Event Defaults, the forecast/revenue information at the
bottom of the event edit screen will be filled as well.
Event Name
(Required)
The name of the event will be filled automatically after
the event type has been selected. It can be changed at
any time.
No of Attendees
(Required)
The number of attendees for the event. The number of
attendees entered will be taken for several checks, for
example function space and seating arrangement
check.
Min Guarantee
Enter the minimum number of guaranteed persons.
This number is normally taken for billing even if less
should turn up for the function.
Start Date
The start date is filled automatically with the system
date if it is within the range of the arrival and
departure date. Future bookings will default to the
arrival date of the booking master. It is not possible to
create an event that is not within the arrival and
departure date of the booking.
End Date
The end date is filled automatically with the end date
of the booking master. It is not possible to create an
event that is not within the arrival and departure date
of the booking.
Start Time
If the event type has been configured with default start
time, then it is filled in automatically, but can be
changed by entering a time or selecting one from list
box. If the event was booked through the conference
diary then the start time is taken from the diary.
End Time
If the event type has been configured with default end
time, then it is filled in automatically, but can be
changed by entering a time or selecting one from list
box. If the event was booked through the conference
diary then the end time is taken from the diary.
Note: If an event finished past midnight, the end date
has to be changed to the next day.
Info Board
Enter the information that should be placed on the info
board outside the function space such as “Fidelio
Software – Dealer Conference”.
Info Board Profile
Mainly used in conjunction with the doorcard interface,
this option allows the property to enter a different
name. For example, the booking was made by Star
Conferences for the company IBM; so on the doorcard
IBM should be displayed.
Conference Booking
The handling is such that when a company and a
contact are entered the entry in the field Info Board
Profile replaces the company, if only a contact is
entered the entry in the Info Board Profile replaces the
contact. If no entry is made in the Info Board Profile
then the company/contact name from the booking will
be displayed.
Incl. in Package
Check this box to define if the event is included in a
conference package. The field is only accessible if a
conference package has been booked for this day.
Noisy
Select this box to indicate that the event will be a
‘noisy’ one such as a dinner party with live music
playing. If the noisy flag has been set, users can also
see the indication in the conference diary.
Block
This is a view only field and shows the start time and
the end time the function space is blocked for. This is
setup time plus event start time and event end time
plus set down time. This is completed automatically if a
room block with a block code is attached.
Function Space Information
Function Space
(Required)
Select the function space from the drop-down list of
defined function spaces. If a shareable function space
is linked to the event type selected, this will be
displayed automatically, but may be changed as
required.
Seating Arrangement
Select the seating arrangement from the drop-down
list. In some cases the seating arrangement might
already be filled in, i.e. if the parameter flag: MULTIPLE
FUNCTION SPACES PER EVENT has been activated under
Setup → Configuration → Global Settings → Conference
tab.
Rate
Select the rate from list box of defined rates, such as
full day or half day. The rate codes are defined under
Setup → Configuration → Conference Management →
Function Spaces → Rate Codes. In some cases the rate
might already be filled in, i.e. if the parameter MULTIPLE
FUNCTION SPACES PER EVENT has been activated under
Setup → Configuration → Global Settings → Conference
tab.
Amount
The amount is filled with the rate entered under Setup
→ Configuration → Conference Management →
Function Space Definition → Rates tab. It is also
possible to change this amount with a special rate. The
special rate field will be checked if this is the case.
Dept Code
(Required)
The department code. In order to use the posting
functionality, every resource item has to have a
department code assigned. This can be done via the
configuration part. The field is filled automatically with
the department code entered on the function space
definition.
Special rate
If a different rate has been entered in the amount field,
this field will indicate the change with a tick mark.
Conference Booking
129
Setup Time
If the seating arrangements have been defined with
default setup time, the default values will be filled in
automatically, but can be changed at any time.
Set down Time
If the seating arrangements have been defined with
default set down time, the default values will be filled
in automatically, but can be changed at any time.
Please note that the function space will be booked from
the event start until the event end time including the
defined setup and set down time.
Don’t Move
This field should be marked if a customer insists on a
particular function space. If this field is selected users
will also see the indicator in the conference diary.
Incl. in Package
The field is only accessible if a conference package has
been booked for this day.
How to delete a sub event
1. Click the MEETING PLANNER menu and select
Conference Booking screen.
CONFERENCE
BOOKING to display the
2. Search for and select an event from the grid.
3. Click the EVENTS button, the Event Details screen is displayed.
4. Select the sub event, indicated by
confirmation message is displayed.
in the first column and click DELETE, a
5. Select YES to delete the event.
6. The sub event is deleted along with all resources attached to the event.
The BLOCK option on the Master Event will be updated where applicable.
Note: Multiple sub events can selected for deletion using the shift and
down arrow keys.
Deleting an event/sub event is user right dependent. Deletion of an
event/sub event is not allowed if the CCM Info Board Interface is
active.
How to delete a master and a sub event
1. Click the MEETING PLANNER menu and select Booking CONFERENCE BOOKING to display
the Conference Booking screen.
2. Search for and select a Booking Master from the grid.
3. Click the EVENTS button, the Event Details screen is displayed.
4. Select the master event, indicated by
message is displayed.
130
or
and click DELETE, a confirmation
Conference Booking
5. Select YES to delete the event, a message is displayed asking if the sub events
should also be deleted.
6. Select YES to delete the sub events.
7. The master event and sub event are deleted along with all resources attached.
8. Select NO to delete only the master event and convert the sub event to a master
event.
9. Click OK on the confirmation message.
The master event is deleted and the sub event is converted to be the master
event.
Note: Deleting an event/sub event is user right dependent. Deletion
of an event/sub event is not allowed if the CCM Info Board Interface
is active.
How to convert a sub event to a master event
1. Click the MEETING PLANNER menu and select
Conference Booking screen.
CONFERENCE
BOOKING to display the
2. Search for and select a Booking Master from the grid.
3. Click the EVENTS button, the Event Details screen is displayed.
4. Select the sub event and right-click to display the short-cut menu.
5. Click CONVERT TO MASTER EVENT, a message is displayed informing you that the
previously selected function space is not available.
6. Select either the NEW FUNCTION SPACE or the WAITLIST button.
7. Complete the New Function Space dialog box.
Conference Booking
131
8. Click OK, you are asked if you want to add default miscellaneous items.
9. Select YES to add the default miscellaneous items.
The event is converted and displayed in the grid as a master event.
How to convert a master event to a sub event
1. Click the MEETING PLANNER menu and select
Conference Booking screen.
CONFERENCE
BOOKING to display the
2. Search for and select a Booking Master from the grid.
3. Click the EVENTS button, the Event Details screen is displayed.
4. Select the master event and right-click to display the short-cut menu.
5. Click CONVERT TO SUB EVENT, the Event list of possible master events is displayed.
6. Select the required master event and click OK.
The event is converted and displayed in the grid as a sub-event. Any default items
are automatically removed.
Note: If the master event has existing sub events it can not be
converted unless the sub events have been removed or re-linked.
Note: Master/sub event functionality requires that the parameter USE
MASTER-SUB EVENTS is active, under Setup → Configuration → Global
settings → Conference tab.
Manual Postings
To view posted revenue and to post revenue, select the booking and click EVENTS.
How to post a manual posting
1. Click the MEETING PLANNER menu and select CONFERENCE BOOKING to display the
Conference Booking screen.
2. Search for and select a Booking Master from the grid.
3. Click the OPTIONS button and select EVENT MANUAL POSTINGS.
or
Click the EVENTS button and then click the MANUAL POST button.
The cashier Login dialog box is displayed.
4. Enter a valid Cashier No. and Password and then click LOGIN.
The Manual postings dialog box is displayed.
132
Conference Booking
5. To post the revenue for an individual resource, select the resource and click POST
REVENUE. In the screen shot below only the revenue for the Beamer was posted.
6. To post the revenue for all the resources attached, select the event in the posting
grid and click POST ALL.
A confirmation message 'Post all values for selected event?' is displayed.
7. Select YES to post all values for the selected event. Additional options are
displayed if the parameter POST PACKAGES TO PARTICIPANTS is active and participants
have been entered.
Select MAIN FINANCIAL ACCOUNT to post all the charges to the financial account of the
booking.
Select EACH PARTICIPANT to post the package to each participant. Any remaining
packages will be posted to the main financial account. If the number of packages is less
than the number of participants, a message will be displayed to post to the main financial
account or to select the participants to whom the package should be posted.
SELECTED lists all the participants:
If the number of packages is the same as the number of participants all
participants are selected by default.
Conference Booking
133
If the number of packages is less than the number of participants none of the
participants is selected by default.
If the number of packages is greater than the number of participants all
participants are selected by default and the remaining packages will be posted to
the main financial account.
Note: Non-package items will always be posted to the financial
account of the booking.
8. All resources for the event are posted, click CLOSE to close the manual postings
screen.
Posting Dialog Box
Option
Explanation
Posting
This column shows all booked items per event. Use the
and
buttons to open and close the event tree. If a
menu price split exists this can be viewed by expanding
the event tree.
Period
Shows the date and time of the event and the booked
resource.
Dept. Code
Shows the configured department code. Department
code can be changed via the EDIT button.
Description
Description of the selected department code.
Quantity
The quantity of the booked item.
Unit Price
The price per booked item.
Amount
Amount of booked resource.
Posted
Shows posted amount.
Note: Event manual posting is not possible when no default
department codes for packages or menus have been defined in global
settings.
Additional posting functionality/ information
If the price of a resource that has already been posted changes, it should also be corrected in
CCM in order to have the up-to-date information. When the rate is changed, the message
'Catering Item rate changed! Update Posting Information' will be displayed and if answered
with YES, the difference will be posted.
134
Posted revenue can also be viewed on the revenue/forecast tab.
Resources and events that have posted revenue can not be deleted.
It is not possible to change the quantity and/or rate as soon as a resource and/or package have
been posted.
POS systems can post to the corresponding CCM Financial Account.
Conference Booking
When posting standard menus with one menu price split, the department code, description
and rate of the split will be displayed in the main line on the manual posting screen.
When posting standard menus where there are two menu price splits, then Menu Price Split 1
and 2 are listed in the manual posting screen as sub-postings and the total listed in the main
line of the menu.
This posting of package to individual participants is controlled by the parameter
POST PACKAGES TO PARTICIPANTS under Setup → Configuration → Global Settings →
CCM → Conference 1 tab.
User Log
The user logs may be used to view all the changes made to a booking, an event or a resource.
How to view the User Log from the Conference Diary
1. Click the MEETING PLANNER menu and select CONFERENCE DIARY or press F3.
The Conference Diary is displayed.
2. On the conference diary screen, highlight an event.
3. Right-click to display the short-cut menu, select BOOKING OPTIONS and then select
USER LOG.
All changes recorded are displayed in the user log.
4. Click OK.
How to view the User Log from Conference Booking
1. On the MEETING PLANNER menu click CONFERENCE BOOKING.
The Conference Booking search screen is displayed.
2. Search for and locate the required booking master.
3. Click the OPTIONS button and select USER LOG.
or
Click the EVENTS button, then click the OPTIONS button and select USER LOG.
All changes recorded are displayed in the user log.
4. Click OK.
User Log Display Options
Field Heading
Gives this information
Date
The date and time the change was made. This is the system
date of the computer on which the change was made.
Text
A short description about the changes that were made.
User
The name of the user who made the change
Workstation
The Computer Name on which the change was made.
The changes which are tracked are defined via the option USER LOG under Setup →
Configuration → Users.
Conference Booking
135
Events Participants List
This option is used to view the list of participants attending an event. The participants are entered
on the booking master, and are automatically transferred from the booking level to each event.
How to create an event participant list
1. From the Event Details screen click OPTIONS and select PARTICIPANT LIST from the
short-cut menu.
The Participant List for the selected event is displayed.
The screen is split into two sections:
Event participants list - lists all the participants included on the participants list.
Available booking participants list - lists booked participants not yet included on the
participants list
2. Select a participant from the AVAILABLE BOOKING PARTICIPANTS LIST and click INCLUDE
to add a participant to the Event participants list.
3. Select a participant from the EVENT PARTICIPANTS LIST and click EXCLUDE to remove
the participant from the Events participants list.
4. A profile can be edited by clicking PROFILE EDIT.
5. Click PRINT to print a list of all attendees.
6. Click OK. to save the participants list.
136
Conference Booking
Note: It is not possible to have more participants than the number of
attendees on the event level or the booking level, a warning message
is displayed and the participant list has to be adjusted.
Financial Accounts
Financial Accounts are accounts that do not affect the properties availability and are used to post
charges to non-guest accounts. For example, permanent accounts such as staff accounts, POS
Accounts or other internal accounts used to post no-show and cancellation fees, corrections or
charges for non staying guests. Financial Accounts are also used for conference bookings and
conference telephone charges and internal lost postings such as interface late charges.
Note: In the Meeting Planner module the financial accounts option
and postings functionality are available if the PMS license and/or the
CCM Billing Component license are activated.
Financial accounts may be accessed via several options in Suite8:
Reservations
Front Desk
Meeting Planner
Cashiering
How to access via Reservations
The financial account option in reservations may be used to open, edit or create a
financial account.
1. Click the RESERVATIONS menu and select FINANCIAL ACCOUNTS.
The Reservation Navigator screen is displayed defaulted to the Financial Accounts
tab.
2. Click NEW to display the New Financial Account dialog box.
How to access via Front Desk
The financial account menu option in front desk may be used to open a new financial
account.
1. Click the FRONT DESK drop down menu and select NEW FINANCIAL ACCOUNT.
The financial account dialog box is displayed.
An existing account may be edited by selecting the financial account page on the
reservation navigator via the Arrivals or Inhouse Guests menu options.
How to access via Meeting Planner
There are several ways to access Financial Accounts from with the Meeting Planner
module:
1. On the Conference Diary, right-click on a booking, select BOOKING OPTIONS to
display the short-cut menu.
or
From Conference Booking, click EVENTS and select OPTIONS to display the short-cut
menu.
or
From Event Management, select BOOKING MASTER and then select OPTIONS to display
the short-cut menu.
Conference Booking
137
2. Click FINANCIAL ACCOUNTS on the short-cut menu to display the Financial Accounts
Search screen.
3. Click NEW FA to create a new financial account.
The financial account dialog box is displayed.
The search criteria, financial account Name, Description and Account Number allow
the user to locate the required financial account easily. In addition selecting the option
Show on pop-up will display all available financial accounts. This setting is saved for
future use until changed by the user.
Note: The financial account can also be displayed via Event
Management when selecting Postings. However, as this option allows
postings you must enter a cashier number.
How to access via Cashiering
1. Click the CASHIER menu and select BILLING.
The Cashier Login screen is displayed.
2. Enter your CASHIER NUMBER and PASSWORD, click LOGIN.
The Billing Search screen is displayed.
3. Click NEW FA to display the New Financial Account dialog box.
How to create a new financial account
1. Access the New Financial Account dialog box via one of the access methods
described above.
138
Conference Booking
2. Complete the financial account details by typing information or selecting
information from the drop-down lists.
For an explanation of the fields on the financial account screen, see the New
Financial Account table below.
3. Click OK.
If the new financial account was created via cashiering then the posting screen is
displayed.
New Financial Account dialog box
Fill in this field
With this information
Group
Select the type of financial account required from
the list of predefined groups.
Date Range
If required select the date range check box and
enter the date range (from/to) you would like to
keep the Financial Account in your system. Usually
it is not necessary to enter a date range on a
financial account.
Profile
Each financial account must be linked to a profile;
click the button next to the profile box to open the
profile search screen and select an existing profile
or create a new one.
Conference Booking
139
Account Number
Each financial account must have an account
number before it can be checked into the system.
Click the drop-down arrow and select an account
number; if the account number was defined with a
description then this is updated in the NUMBER
DESC. box.
Number Desc.
The description defined for this account number is
displayed.
Market
If no default market code has been defined, click
the drop-down arrow and select a market code. If
this field is defined as mandatory then a market
code has to be attached.
When setting up a financial account in meeting
planner the market is filled by default with the
market segment from the booking master.
Description
Displays the financial account group and financial
account number.
Credit Limit
Select a credit limit from the list box.
Limit Value
The credit value associated with the selected
credit limit is displayed. This may be changed as
required.
Transponder
The transponder card number is displayed if the
financial account was created upon swiping or
entering a transponder card.
Note: This option only displayed if TRANSPONDER
functionality is active.
Source Code
Select from a list of predefined source codes.
Channel Code
Select from a list of predefined channel codes.
Tax Exemption
Defines if the financial account is tax exempt.
Contracted Curr
Select the contracted currency for the financial
account.
Billing Info
Enter any billing information, such as 'Room and
Tax to Company'. The billing information is
displayed in the billing screen on the standard
HTML file.
Remarks
Enter any additional information. Remarks are
displayed in the billing screen on the standard
HTML file.
Note: If the start date selected equals the system date and the OK
button is clicked, the financial account will be checked in. If the start
date does not match the system date the financial account status will
be ‘Expected’.
140
Conference Booking
How to edit financial account settings
1. Select the required financial account and click EDIT to display the Financial Account
Settings dialog box.
In cashiering display the billing screen of the required financial account and click
the FA SETTINGS button to display the Financial Account Settings dialog box.
In Meeting Planner display the Financial Accounts Search screen via one of the
access methods described above, select the required financial account and click
SELECT to display the Financial Account Settings dialog box.
2. Make any changes necessary and click OK to close the financial account settings.
How to link profiles to financial accounts
This option is used to link Company, Agent, Source, Meeting Planner or Vendor
profiles to the financial account.
1. Access the Financial Account Settings dialog box via one of the access methods
described above.
2. Click PROFILES to display the Profile Select dialog box.
3. On the profile type required click the drop-down arrow.
The Profile Search dialog is displayed.
4. Search for the required profile, click SELECT.
Conference Booking
141
The Profile Select dialog box is displayed with the profile selected.
5. Click OK to return to the Financial Account Settings dialog box.
How to unlink profiles to financial accounts
This option is used to unlink Company, Agent, Source, Meeting Planner or Vendor
profiles to the financial account.
1. Access the Financial Account Settings dialog box via one of the access methods
described above.
2. Click PROFILES to display the Profile Select dialog box.
3. Select the profile to be unlinked.
4. Click DELETE LINK.
5. Click OK to return to the Financial Account Settings dialog box.
How to enter notes for financial accounts
This option is used to add, edit, delete and view notes related to the selected financial
account.
1. Access the Financial Account dialog box via one of the access methods described
above.
2. Click NOTES to display the Notes (See page 119) dialog box.
See: Suite 8 Reservations manual for more details.
How to link billing instructions to financial accounts
This option is used to link billing instructions to the Financial Account.
1. Access the Financial Account Settings dialog box via one of the access methods
described above.
2. Click BILLING INSTR. to display the Billing Instructions (See page 175) dialog box.
See: Suite 8 Reservations manual for more details.
How to link credit cards to financial accounts
This option is used to add, edit, delete, guarantee or get approval for credit cards. For
example the charges of conference bookings or group members might be routed to a
financial account and paid by a company credit card.
1. Access the Financial Account Settings dialog box via one of the access methods
described above.
2. Click CREDIT CARDS to display the financial account credit cards dialog box.
See: Suite 8 Reservations manual for more details.
This option is only available if the status of the financial account is expected, checked
in or closed.
How to enter fixed charges for financial accounts
This option is used to enter fixed charges on the Financial Account. Fixed charges are
used to post daily charges other than room, tax or packages, for example conference
equipment rental from external locations. Suite 8 posts fixed charges automatically
during night audit or when choosing the option post daily charges in the cashiering
module.
1. Access the Financial Account Settings dialog box via one of the access methods
described above.
2. Click FIXED CHARGES to display the Fixed Charges dialog box.
142
Conference Booking
See: Suite 8 Reservations manual for more details.
How to unlink a CCM financial account
1. Locate the required booking.
2. Click the OPTIONS button to display the short-cut menu.
3. Click FINANCIAL ACCOUNTS on the short-cut menu to display the Financial Accounts
Settings dialog box.
4. Click UNLINK, the message "Unlink CCM Booking?" is displayed to confirm the
unlinking, select YES.
5. If no postings have been made the Financial Account will be unlinked. If postings
have been made then a message is displayed to "Transfer postings of the selected
booking?" select YES.
6. The cashier folio is displayed; click the TRANSFERS button to display the Transfer
Posting dialog box.
7. In the TO ROOM field select the account to transfer the postings to or create and
then select a new financial account.
8. The charges may be transferred in the normal manner or transferred by checking
the TRANSFER POSTINGS OF SELECTED CCM BOOKING check box. This option transfers all
postings that have been made via the MANUAL POST option under the EVENTS menu.
9. Click OK to transfer the charges.
Conference Booking
143
10. Click the CLOSE button to close the cashier screen.
11. Click OK on the Financial Account Settings dialog box to complete the transaction.
Note: Financial Accounts will be unlinked only when the OK button
on the FA edit screen is pressed. If CANCEL is pressed then the FA is
still linked even if postings have been transferred.
Note: Postings that have been made via the option POSTINGS on the
OPTIONS menu are not linked to the CCM booking and posted directly
to the Financial Account. These postings have to be transferred
individually.
How to display the user log
This option is used to view the changes related to the selected financial account.
1. Access the Financial Account dialog box via one of the access methods described
above.
2. Click USER LOG to display the User Log dialog box.
The User Log is displayed split into 2 sections:
The upper section displays the name of the financial account and the arrival and departure
dates.
The lower section displayed information about the changes to this financial account.
3. Once all changes have been viewed, click OK to close the user log.
User Log Display Options
144
Field Heading
Gives this information
Date
The date and time the change was made. This is the system
date of the computer on which the change was made.
Conference Booking
Text
A short description about the changes that were made.
User
The name of the user who made the change.
Workstation
The computer name on which the change was made.
The financial account groups and numbers are defined via the options FINANCIAL
ACCOUNT GROUPS and FINANCIAL ACCOUNT NUMBERS under Setup → Configuration →
Cashiering.
Financial account functionality is controlled by the user rights VIEW, EDIT, INSERT
and DELETE under Setup → Configuration → Users → User Definition → Rights →
Cashiering → Financial Accounts.
Printing a Function Sheet or other Correspondence
See Printing a Function Sheet or other Correspondence (See page 74)
Conference Booking
145
Forecast/Revenue
The FORECAST/REVENUE tab displays information about the posted, expected and forecasted
revenue of each resource and is split as follows:
Package items
Non package items
Merged packages
New entries are allowed for non package expected forecast.
The forecasted and posted figures are displayed both as a gross figure and a net figure with the tax
displayed separately.
Resources
Everything that gets booked to an event is known as a resource.
Typical resources are:
Function Spaces (See page 147)
Miscellaneous Items (See page 151) - such as decoration, technical equipment etc.
Standard Menus (See page 158) - food and beverage items
Resources are displayed in the order in which they are booked and by default are grouped
according to item type - all miscellaneous items together and all standard menu items together. A
red arrow indicates that there are menu items linked to the resource.
The order of the resources can be changed by moving the items up and down on the resources grid
or by clicking the column header. The order can be stored by selecting the option ALLOW USER
SORTING from the right mouse short cut menu on the resource grid. The option RESTORE ORIGINAL
SORTING from the right short cut menu on the resource grid, removes all customized sorting.
A resource can be attached to an event with a different date/time range then the event itself as
resources are often required before an event starts and after the event has finished.
The following tasks are available on the RESOURCE tab:
146
Add a new resource.
Edit a resource.
Delete a resource.
Add notes to a resource.
Access the Roomplanner module.
Copy and paste resource information.
Translate resource information.
Printing menu cards
Conference Booking
The FORECAST/REVENUE tab displays information about the posted, expected and forecasted
revenue of each resource and is split into two parts:
Package items
Non package items
Note: Multiple resources can be selected and booked at the same time
from different resource sections and categories. If several items are
selected then the default values are taken for each resource. On the
resources grid the QUANTITY and the PRICE can be adjusted directly.
The PRICE cannot be adjusted if the resource is included in a package
or if the selected standard menus are defined as on consumption base
or where no or two menu splits have been defined.
Note: Rebates can be applied globally via a rebate code on the
booking master or can be applied per resource as a percentage or as a
flat rate.
If Alternative functionality is active then alternative resources can be defined; this enables the
customer to reserve alternatives and make a final decision at a later date, for example, Resource I
may be booked and Resource II reserved as an alternative.
The first booked resource cannot be set as an alternative as there are no other resources for it to be
an alternative to. When at least one resource exists then the ALTERNATIVE option and the
alternative selection box are displayed. The Alternative option can be selected without selecting a
specific alternative or a specific alternative can be selected from the list of already booked
resources.
Alternatives functionality is controlled by the parameter USE ALTERNATIVES under
Setup → Configuration → Global Settings → CCM → Conference 1 tab.
Additional attributes to collect non-standard information about the resource can be
added via the option ATTRIBUTE CATEGORIES under Setup → Configuration → CRM. To
display the attribute category list box on the resource edit screen the option
RESOURCE has to be selected.
For each attribute category defined a marketing info category is created. The
elements for each new list box are defined via the option MARKETING INFO under
Setup → Configuration → CRM.
Rebate functionality is controlled by the parameter ENABLE CARDLESS REBATE HANDLING
under Setup → Configuration → Users → User Definition → Rights → Booking
Master.
The adding, editing or removal of a rebate percentage or flat rate on a resource is
controlled by the user right CHANGE REBATE FOR RESOURCES under Setup →
Configuration → Users → User Definition → Rights → Booking Master.
Conference Booking
147
Function Spaces
The function space details may need to be amended or an additional function space added to an
event. These types of changes may be made in one of the following ways:
Select an event and press EDIT. Changes such as seating arrangement or rate can be made on
the function space information section on the lower part of the event screen.
Select an event and select the function space from the resource grid and press EDIT.
On the Conference Diary select the event, right-click to display the short-cut menu and select
EDIT FUNCTION SPACE.
How to add a new function space
1. Select an event and click NEW FUNCTION SPACE from the bottom of the event edit
screen.
If a Conference Package has been reserved then a message is displayed asking if
the function space is included in the package.
2. Click YES if the function space is included in the package, otherwise click NO.
The New Function Space dialog box is displayed.
3. Complete the options as detailed in the Function Space dialog box table below:
4. Click OK to add the function space to the event.
If the time period for the function space being booked is either before or after the
dates and time period of the event then a message is displayed.
148
Conference Booking
5. Select YES to continue with the resource booking; the event start and end
dates/times are extended accordingly.
The function space is listed in the resource list and the Function Space column on
the events grid now shows 'Multiple' to indicate that multiple function spaces are
booked for this event.
Note: Resources are often required before an event starts and after the
event has finished.
How to edit a function space
1. Select an event then select the function space to be edited on the resource grid.
2. Click EDIT from the bottom of the event edit screen, the Edit Function Space dialog
box is displayed.
3. Make any necessary changes and click OK to save the changes.
Conference Booking
149
Function Space dialog box
150
Field Name
Explanation
Name
Select the function space from the drop-down list of
defined function spaces.
Seating Arrangement
Select the seating arrangement from the drop-down
list. In some cases the seating arrangement might
already be filled in, i.e. if the parameter flag: MULTIPLE
FUNCTION SPACES PER EVENT has been activated under
Setup → Configuration → Global Settings → Conference
tab.
Start Date
The start date is filled automatically with the start date
as defined in the event.
End Date
The end date is filled automatically with the end date
as defined in the event.
Start Time
The start time from the event. The function space can
not be booked outside the event start/end date and
time.
End Time
The end time from the event. The function space can
not be booked outside the event start/end date and
time.
Setup Time
If the seating arrangements have been defined with
default setup time, the default values will be filled in
automatically, but can be changed at any time.
Set down Time
If the seating arrangements have been defined with
default set down time, the default values will be filled
in automatically, but can be changed at any time.
Note: The function space will be booked from the
event start until the event end time including the
defined setup and set down time.
Rate
Select the rate from list box of defined rates, such as
full day or half day. The rate codes are defined under
Setup → Configuration → Conference Management →
Function Spaces → Rate Codes. In some cases the rate
might already be filled in, i.e. if the parameter MULTIPLE
FUNCTION SPACES PER EVENT has been activated under
Setup → Configuration → Global Settings → Conference
tab.
Don't Move
This option should be marked if a customer insists on a
particular function space. If this option is selected
users will also see the indicator in the conference diary.
Dept Code
The department code is automatically completed with
the department code entered on the function space
definition.
Special rate
If a different rate has been entered in the amount box,
this option will be selected.
Incl. in Package
Defines if the function space is included in a package.
The option is only accessible if a conference package
has been booked for this day.
Conference Booking
Orig. Amount
Displays the amount being charged according to the
selected rate code. It is also possible to change this
amount with a special rate. The special rate field will
be checked if this is the case.
Shareable
This option is displayed on function spaces which are
defined as shareable.
Hourly Rate
Automatically selected if the rate selected is defined as
an hourly rate in the setup. Can be changed as
required.
Rebate % Flat
Defines whether the rebate calculation is by percentage
or by flat rate and the percentage or flat rate amount
to be used.
Cost Price
Displays the cost price for the function space.
Amount
Displays the amount being charged after the discount
has been applied.
Alternative
Select this option to reserve an alternative function
space; select a specific alternative space from the list
of reserved function spaces.
NOTE: This option is only displayed when at least one
other function space has been reserved.
Function Space Selection List
Field Name
Explanation
Function Space name
Enter the name of the function space if known.
Available
Select this option to show only those function spaces that
are available on the booked date during the entered
start/end times.
All
Select this option to show all function spaces. Function
spaces that are not available will be highlighted in red.
Select
Click this button to select the highlighted function space.
Details
Click this button to view the configuration information
such as measurements, rates or seating arrangements. If
a picture of the function space is available then this can
be viewed by selecting the EXTRA INFO tab.
Miscellaneous Items
Everything that gets booked to an event is known as a resource. Most events require specific items
other than food and beverage, be it decoration for a wedding or technical equipment for a
presentation. Any item which is not a food and beverage item or a function space is known as a
miscellaneous resource.
How to add a miscellaneous item
1. Select an event and click NEW RESOURCE from the bottom of the event edit screen.
2. The Function Spaces, Miscellaneous Items and Standard Menus categories are
displayed on the left-hand side of the event edit screen.
Conference Booking
151
3. Click on the
to list the Miscellaneous Items categories, select the required
category and click on the
to list the details.
The width of the resource tree can be changed in order to see the full resource
description; the last setting is saved per user.
4. Select the item by double-clicking or dragging the item to the resources grid, the
Add Resource dialog box is displayed.
152
Conference Booking
5. The NAME of the item is completed by default, but can be changed if required.
6. The QUANTITY completed by default depends on the setup of the item. If the item is
configured on a PER PERSON basis then the QUANTITY is automatically completed with
the number of event attendees; this can be changed be clearing the Per Person
option and adjusting the quantity as required.
Note: Depending on the setup of the item, Suite8 will check if
sufficient items are available (inventory control).
7. SELECT A RATE or enter a special PRICE. If the rate selected is defined as an hourly
rate in the setup then the HOURLY RATE check box is automatically selected, but can
be changed as required.
8. The ORIG. PRICE is completed with the amount being charged according to the
selected rate code.
9. If a discount is to be applied, select % or FLAT and enter the discount percentage
or flat rate amount.
10. The PRICE is completed with the amount being charged after the discount has been
applied.
11. Select any ATTRIBUTES if applicable.
12. The DEPT. CODE is filled by default, select a different department code if required.
13. Select the ALTERNATIVE option to reserve an alternative item; select a specific
alternative item from the list of booked miscellaneous items.
NOTE: This option is only displayed when at least one other
miscellaneous item from the same category has been defined.
14. The additional description box is only displayed if the parameter DISPLAY STD. MENU
& MISC. ITEM DESCRIPTION ON RESOURCES is active; the description may be changed as
required.
Conference Booking
153
15. Click OK to book the resource.
16. If there is not enough of the requested item in stock, an availability message is
displayed.
16. Select YES to book the item regardless of the number available. On the resource
grid in the column UNAVAILABLE, the number of unavailable items is displayed. If
the message is answered with NO, the item will not be booked.
Note: The booked number of items will be shown in function sheets
and contracts as the customer does not need to know whether or not
certain items are in house or if they need to be ordered from an
external company.
How to edit a miscellaneous item
1. Select an event then select the resource to be edited on the resource grid.
2. Click EDIT from the bottom of the event edit screen, the Edit Misc. Item dialog box
is displayed.
3. Make any necessary changes and click OK to save the changes.
154
Conference Booking
How to book a miscellaneous item for before or after the event
1. Select an event then select the resource to be edited on the resource grid.
2. Click EDIT from the bottom of the event edit screen, the Edit Misc. Item dialog box
is displayed.
3. Change the resource dates and/or times as required.
If the time period for the resource being booked is either before or after the dates
and time period of the event then a message is displayed.
4. Select Yes to continue with the resource booking; the event start and end
dates/times are extended accordingly.
5. Click OK to save the changes.
Note: Resources are often required before an event starts and after the
event has finished.
Edit Miscellaneous Resource Items dialog box
Field Name
Explanation
Item Name
The name of the item is completed by default, but can be
changed if required.
Attribute
If for the miscellaneous item additional attributes have been
defined, they can be selected from the drop down list.
Attributes further describe or define the item.
Quantity
Enter the required quantity of the item.
Per Person
External
Defines whether or not the item is an external one. If the
item is defined as an external item, the external flag will be
set automatically. If an item that is not been defined as
external needs to be ordered from a third party company for
a particular function, it can defined here.
Resp Dep.
Select a department responsible for the item from the list
box. Will be filled automatically with the defaults from
configuration.
Dept. Code
Select a department code from the drop-down list. Will be
filled automatically with the defaults from configuration.
Rate
Select one of the pre-defined rates from the drop down list.
Incl. In Package
Defines if the miscellaneous item is included in a package.
Please note that this field can only be accessed if a
conference package has been booked for that day.
Hourly Rate
Automatically selected if the rate selected is defined as an
hourly rate in the setup. Can be changed as required.
Conference Booking
155
Orig. Price
Displays the amount being charged according to the selected
rate code. It is also possible to change this amount with a
special rate. The special rate field will be checked if this is
the case.
Special Price
This box is selected as soon as an amount is entered in the
price field.
Cost Price
Rebate % Flat
Defines whether the rebate calculation is by percentage or by
flat rate and the percentage or flat rate amount to be used.
Price
Displays the amount being charged after the discount has
been applied.
Total
Displays the total amount being charged for the selected
quantity.
Start Date
The start date from the event. View only field.
End Date
The end date from the event. View only field.
Start Time
The start time from the event. View only field.
Please note that a resource can not be booked outside the
event start/end date and time.
End Time
The end time from the event. View only field.
Please note that a resource can not be booked outside the
event start/end date and time.
Setup Time
The setup time entered on the configuration of the
miscellaneous items. If an item with pre-defined setup time
is booked, this field is filled automatically with the defaults,
but can be changed or added at any time.
Set down Time
The set down time entered on the configuration of the
miscellaneous items. If an item with pre-defined set down
time is booked, this field is filled automatically with the
defaults, but can be changed or added at any time.
Alternative
Select this option to reserve an alternative resource; select a
specific alternative resource from the list of reserved
resources.
NOTE: This option is only displayed when at least one other
resource from the same category has been reserved.
The description is taken from the configuration but may be
changed as required.
Note: The additional description box is only displayed if the
parameter DISPLAY STD. MENU & MISC. ITEM DESCRIPTION ON
RESOURCES is active.
How to delete a miscellaneous/standard menu item
1. Select an event then select the resource to be deleted on the resource grid.
2. Click DELETE from the bottom of the event edit screen, a confirmation message is
displayed.
156
Conference Booking
3. Select YES to delete the resource.
How to copy a miscellaneous/standard menu item
Booked items can be copied from one event to another, but only within the same
booking.
1. Select an event then select the resource to be copied on the resource grid.
2. Click OPTIONS from the bottom of the event edit screen and select COPY from the
short-cut menu. A message is displayed asking you to select the event to copy the
resource to and to press the paste button.
3. Select YES to continue.
4. Select the event to which the resource is to be copied to, click OPTIONS from the
bottom of the event edit screen and select PASTE from the short-cut menu. A
confirmation message is displayed.
5. Select YES to copy the resource; a processing message and a package status
selection screen are displayed,
Conference Booking
157
6. Select the required package status and if the resource copy should be applied to
all events, click OK.
The resource is listed in the resource grid of the selected event.
Note: Multiple miscellaneous items can be selected at the same time
from different categories. If several items are selected then the default
values are taken for each miscellaneous item. On the resources grid
the QUANTITY and the PRICE can be adjusted directly.
The display of the description of standard menu and miscellaneous menu items in
booked resources is controlled by the parameter DISPLAY STD. MENU & MISC. ITEM
DESCRIPTION ON RESOURCES under Setup → Configuration → Global Settings → CCM
→ Conference 1 tab.
Standard Menus
Most properties sell a number of standard or set menus which usually consist of several courses
and have a single price.
How to add a standard menu resource
1. Select an event and click NEW RESOURCE from the bottom of the event edit screen.
2. The Function Spaces, Miscellaneous Items and Standard Menus categories are
displayed on the left-hand side of the event edit screen.
158
Conference Booking
3. Click on the
to list the Standard Menu categories; all the configured menu
categories such as Receptions, Buffets, Coffee Breaks, Lunch and Dinner Menus
will be displayed. Select the required category and click on the
to list the menus
and the default price.
The width of the resource tree can be changed in order to see the full resource
description: the last setting is saved per user.
Conference Booking
159
Note: Menus consist of menu items, select a menu and click on the
to list the menu items attached to the menu. A hint box displays the
full description for menu items with a long description. The price
displayed in the resource tree is the default price. The price for an
outlet is displayed when selecting the menu and the specific outlet.
4. Select the item by double-clicking or dragging the item to the resources grid, the
Add Resource dialog box is displayed.
160
Conference Booking
5. Complete the options as detailed in the Standard Menu Add Resource dialog box
table below:
6. Click OK to book the resource.
Note: Multiple menu items can be selected at the same time. If several
menu items are selected then the default values are taken for each
menu item and the Add Resource dialog box is not displayed.
Note: When posting standard menus with one menu price split, the
department code of the split will be displayed in the posting screen.
When posting standard menus where there are two menu price splits,
the department code defined in the parameter DEFAULT DEPT. CODE
FOR MENU on the CCM tab under global settings will be displayed in
the posting screen.
How to edit a standard menu resource
1. Select an event then select the standard menu resource to be edited on the
resource grid.
2. Click EDIT from the bottom of the event edit screen, the Edit Standard Menu dialog
box is displayed.
Conference Booking
161
3. Make any necessary changes and click OK to save the changes.
How to book a standard menu item for before or after the event
1. Select an event then select the standard menu resource to be edited on the
resource grid.
2. Click EDIT from the bottom of the event edit screen, the Edit Standard Menu dialog
box is displayed.
3. Change the standard menu dates and/or times as required.
If the time period for the standard menu being booked is either before or after the
dates and time period of the event then a message is displayed.
162
Conference Booking
4. Select YES to continue with the standard menu booking; the event start and end
dates/times are extended accordingly.
5. Click OK to save the changes.
Note: Resources are often required before an event starts and after the
event has finished.
Standard Menu Add Resource dialog box
Field
Definition
Name
The name of the standard menu is completed by default,
but may be changed as required.
Quantity
The quantity of the standard menu is taken from the
number of attendees defined on the event, but can be
changed if required.
Price
The price of the standard menu; if a discount is applied
then the discounted price is displayed.
Charged on
Consumption
Defines if the standard menu is charged on a
consumption basis such as cocktail receptions or open
bars.
Note: If a standard menu is defined and booked as
CHARGED ON CONSUMPTION, no menu price will be booked as
it will be charged according to consumption based on the
prices of the individual menu items.
Outlet
Defines if the menu price is for a specific outlet, e.g. bar,
restaurant or banqueting.
Cost Price
The cost price of the menu item.
Alternative
Select this option if an alternative menu is required;
select the menu from the list of reserved menus.
NOTE: This option is only displayed when at least one
other standard menu from the same category menu
category has been defined.
Menu Price Split
Defines how much of the standard menu price should be
charged to each department code. The price may be split
between a food department code and a beverage
department code; the setup is the same for both codes.
For example, a standard menu may include a glass of
wine; so 95% of the menu price may be allocated to a
food department code and the remaining 5% allocated
to a beverage department code.
When posting standard menus with one menu price split, the
department code of the split will be displayed in the posting
screen.
Conference Booking
163
When posting standard menus where there are two menu
price splits, the department code defined via the parameter
DEFAULT DEPT. CODE FOR MENU is displayed in the posting
screen.
Note: The entered menu price split must equal the total
menu price.
(Department Code Food)
(Department Code Beverage)
The first department code for the menu price split is
usually a food department code and the second one a
beverage department code.
Orig. Price
Displays the original price of the menu item before any
discounts are applied.
Rebate
Defines whether a rebate is to be applied and if the
rebate calculation is by % or a FLAT rate.
The percentage or flat rate amount to be applied.
Price
Displays the price of the menu item after the discount
has been applied.
Total Rebate
Food/Bev.
If a FLAT amount rebate is applied then the total amount
of the rebate is displayed.
Total Food/Beverage
Displays the total price to be charged for food/beverage
for the quantity booked.
(Description)
Displays a description of the standard menu as defined
in the configuration; this may be changed as required.
Note: The additional description box is only displayed if
the parameter DISPLAY STD. MENU & MISC. ITEM DESCRIPTION
ON RESOURCES is active.
Standard Menu Edit dialog box
164
Option
Explanation
Name
The name of the standard menu.
Cons. Base
Defines if the standard menu is charged on a consumption basis
such as cocktail receptions or open bars.
Note: If a standard menu is defined and booked as CHARGED ON
CONSUMPTION, no menu price will be booked as it will be charged
according to consumption based on the prices of the individual
menu items.
Incl. in
Package
Defines if the standard menu is included in a package
Note: This option is only available if a conference package has
been booked for that day.
Gratuity Incl?
Defines if the gratuity is included in the price.
Menu Price
The price of the standard menu; if a discount is applied then the
discounted price is displayed.
Outlet
Defines if the menu price is for a specific outlet, e.g. bar,
restaurant or banqueting.
Menu Item
Price
This option is view only and shows the sum of all menu items.
Conference Booking
This can be used to compare the sum of the menu items and the
actual menu price; especially useful if menu items are exchanged
for more expensive ones. The menu item price field will always
show the revenue margin.
Quantity
Booked quantity of the standard menu; the number of attendees
defined on the booking master.
Compl. Menus
Defines the number of complimentary menus if applicable.
Cost Price
The cost price of the menu item.
Menu Price
Split
Defines how much of the standard menu price should be charged
to each department code. The price may be split between a food
department code and a beverage department code; the setup is
the same for both codes.
For example, a standard menu may include a glass of wine; so
95% of the menu price may be allocated to a food department
code and the remaining 5% allocated to a beverage department
code.
When posting standard menus with one menu price split, the department
code of the split will be displayed in the posting screen.
When posting standard menus where there are two menu price splits, the
department code defined via the parameter DEFAULT D EPT. CODE FOR
MENU is displayed in the posting screen.
Note: The entered menu price split must equal the total menu
price.
(Dept. Code Food)
(Dept. Code Beverage)
The first department code for the menu price split is usually a food
department code and the second one a beverage department
code.
Orig. Price
Displays the original price of the menu item before any discounts
are applied.
Rebate % Flat
Defines whether a rebate is to be applied and if the rebate
calculation is by % or a FLAT rate.
The percentage or flat rate amount to be applied.
Price
Displays the price of the menu item after the discount has been
applied.
Total Rebate
Food/Bev.
If a FLAT amount rebate is applied then the total amount of the
rebate is displayed.
Total
Food/Total
Bev.
Displays the total price to be charged for food/beverage for the
quantity booked.
Exp
The expected number of people, if more than booked the kitchen
can prepare.
Gtd
Guaranteed number of people. Normally the number of attendees
that will be charged even if less will attend.
Post Gtd.
Defines if the guaranteed number of persons will be posted. The
guaranteed number will be posted only if the guaranteed number
is greater than quantity. If nothing is entered or the guaranteed is
less than quantity the value from field QUANTITY will be taken.
The option can be selected by default through the configuration or
set manually as required.
Conference Booking
165
Set
Set number of people – if more than expected or guaranteed
should be set for.
Act
Displays the actual number of people that attended the event.
Start/End Date
View only fields. The start/end date is taken from the event.
Start/End Time
View only fields. The start/end time is taken from the event.
Serve
Start/End
Defines at what time the menu should be served and/or until
which time.
Alternative
Select this option if an alternative menu is required; select the
menu from the list of reserved menus.
NOTE: This option is only displayed when at least one other
standard menu from the same category menu category has been
defined.
(Description)
Displays a description of the standard menu as defined in the
configuration; this may be changed as required.
Note: The additional description box is only displayed if the
parameter DISPLAY STD. MENU & MISC. ITEM DESCRIPTION ON RESOURCES
is active.
Course Display
Display of the course order, quantity, menu item name and price.
The display of the description of standard menu and miscellaneous menu items in
booked resources is controlled by the parameter DISPLAY STD. MENU & MISC. ITEM
DESCRIPTION ON RESOURCES under Setup → Configuration → Global Settings → CCM
→ Conference 1 tab.
Alternatives functionality is controlled by the parameter USE ALTERNATIVES under
Setup → Configuration → Global Settings → CCM → Conference 1 tab.
When posting standard menus where there are two menu price splits, the posting's
are displayed on the posting screen with the department code defined via the
parameter DEFAULT DEPT. CODE FOR MENU under Setup → Configuration → Global
Settings → CCM → Conference 1 tab.
The display of the Post Gtd. option by default is controlled by the parameter POST
STD MENU GUARANTEED VALUE under Setup → Configuration → Global Settings → CCM
→ Conference 1 tab.
166
Conference Booking
Menu Items
Most properties sell a number of standard or set menus which consist of several courses and have
a single price. When a customer is selecting a menu for a function they may choose one of the
standard menus available and then make changes or add additional menu items. For example, a
customer may choose Menu I but want to include Chocolate Mouse which is part of Menu II.
An additional menu item would normally be selected from the pre-defined list of menu items,
however is some cases a custom menu item needs to be added, this is a menu item that has not
been pre-configured. Custom menu items are defined as special or one-off menu items.
How to add a pre-defined menu item
1. Select an event then select the standard menu resource to be edited on the
resource grid.
2. Click EDIT from the bottom of the event edit screen, the Edit Standard Menu dialog
box is displayed.
3. On the bottom of the standard menu edit screen, the courses of the standard
menu are displayed.
4. Click NEW to add a new menu item. A message is displayed asking you are adding
a custom menu item.
5. Select YES to add a menu item that has not yet been defined.
6. Click NO to select from the list of already defined menu items. The menu
categories are displayed grouped by food and beverage, on the right-hand side of
the edit standard menu screen.
Conference Booking
167
7. Click on the
next to a menu category to list all the items belonging to that
category. The price displayed in the resource tree is the default price. The price for
an outlet is displayed when selecting the item and the specific outlet.
8. Select the menu item by dragging the item to the course listing grid on the edit
standard menu dialog box, double-clicking or clicking SELECT. The Add Resource
dialog box is displayed.
168
Conference Booking
9. Enter the COURSE number.
10. Enter the COURSE ORDER, for example, if there are two starters; define the first one
with course order 0 and the second one with course order 1.
11. The NAME of the item is completed by default, but can be changed if required.
12. The QUANTITY of the item is taken from the number of attendees on the event, but
can be changed if required.
13. Prices may vary per outlet so select an OUTLET if applicable, e.g. bar, restaurant or
banqueting.
14. Select the INCLUDED option if the item is to be included in the standard menu. If
not selected then the item will be charged separately.
15. Enter the PRICE if applicable.
16. Enter the COST PRICE if applicable.
17. The DEPT. CODE is filled by default, select a different department code if required.
18. Click OK, the new menu item is added to the course listing on the edit standard
menu dialog box.
19. Click CLOSE to close the pre-defined menu items listing.
Add Resource dialog box - Pre-Defined Menu Items
Field
Definition
Course
Defines the menu course of this newly booked menu item.
Course Order
Used to further define the order. For example if there are two
starters: Define the first one with course order 0, the second
with 1.
Name
The name of the menu item.
Quantity
The quantity, default is number of attendees entered on the
booking master.
Spl Price?
The special price field is checked if an amount is entered in the
price field.
Outlet
Defines if the item price is per a specific outlet, e.g. bar,
restaurant or banqueting
Conference Booking
169
Included?
Determines if the newly booked menu item is included in the
standard menu (included in the price) or if it will be charged
separately (in addition to the price).
Price
The price to be charged for this menu item.
Cost Price
The cost price of the menu item.
How to add a custom menu item
1. Select an event then select the standard menu resource to be edited on the
resource grid.
2. Click EDIT from the bottom of the event edit screen, the Edit Standard Menu dialog
box is displayed.
3. On the bottom of the standard menu edit screen, the courses of the standard
menu are displayed.
4. Click NEW to add a new menu item. A message is displayed asking you are adding
a custom menu item.
5. Select YES to add a menu item that has not yet been defined, the custom menu
item configuration dialog box is displayed.
170
Conference Booking
6. Complete the options as detailed in the table below:
7. Click OK, the new custom menu item is added to the course listing on the edit
standard menu dialog box.
Note: This item has only been created for this event (standard menu)
and is not part of the pre-defined list of menu items.
Conference Booking
171
Custom Menu Item dialog box
Field
Definition
Category –
Beverage/Food
Defines if the item is either a food or a beverage item.
Course
Defines the menu course of this customised menu item.
Course order
Used to further define the order. For example if there are two
starters: Define the first one with course order 0, the second
with one.
Menu Item
Name 1-4
Defines the appearance of the item on the function sheet.
Description
Used to add additional information about the item.
Origin 1 - 3
Only used for beverages, mostly wines to further define the
origin of the wine or vinery.
Year
Only used for beverages, mostly wines to define the year.
Resp.
Department
(Required)
Defines the responsible department such as the kitchen.
Dept. Code
(Required)
Defines the department code which should be used for postings,
for example, room rental or a food or beverage department
code.
Portion
Defines how the item is portioned. Most useful for beverage
items to define whether it is by glass or bottle.
Incl. in Menu?
Defines if the price of the menu item is included in the menu.
Generally used for food items and mainly used in properties that
sell set menus, where the food item is always included in a menu
and is not priced individually. When selecting the menu from the
booking, it is still possible to change this item to exclude.
Outlet
Defines if the item price is per a specific outlet, e.g. bar,
restaurant or banqueting
Cost Price
The cost price of the menu item.
Price
The sales price for this item.
Quantity
The quantity, this is filled automatically with the number of
attendees, but may be changed as required. A number including
decimals may be entered.
How to edit a menu item
1. Select an event then select the standard menu resource to be edited on the
resource grid.
2. Click EDIT from the bottom of the event edit screen, the Edit Standard Menu dialog
box is displayed.
3. On the bottom of the standard menu edit screen, the courses of the standard
menu are displayed.
4. Select the standard menu item to be edited, click EDIT, the resource item edit
dialog box is displayed.
172
Conference Booking
5. Make any necessary changes and click OK to save the changes.
Resource Item dialog box
Field
Definition
Category - Beverage/
Food
Defines if the item is either a food or a beverage item.
Course
Defines the menu course of this customised menu item.
Course order
Used to further define the order. For example if there are
two starters: Define the first one with course order 0, the
second with one.
Menu Item Name 1-4
Defines the appearance of the item on the function sheet.
Description
Used to add additional information about the item.
Origin 1 - 3
Only used for beverages, mostly wines to further define
the origin of the wine or vinery.
Year
Only used for beverages, mostly wines to define the year.
Resp. Department
Defines the responsible department such as the kitchen.
Conference Booking
173
(Required)
Dept. Code
(Required)
Defines the department code which should be used for
postings, for example, room rental or a food or beverage
department code.
Portion
Defines how the item is portioned. Most useful for
beverage items to define whether it is by glass or bottle.
Incl. in Menu?
Defines if the price of the menu item is included in the
menu. Generally used for food items and mainly used in
properties that sell set menus, where the food item is
always included in a menu and is not priced individually.
When selecting the menu from the booking, it is still
possible to change this item to exclude.
Price
The sales price for this item.
Quantity
The quantity, this is filled automatically with the number
of attendees, but may be changed as required. A number
including decimals may be entered.
How to delete a menu item
1. Select an event then select the standard menu resource to be edited on the
resource grid.
2. Click EDIT from the bottom of the event edit screen, the Edit Standard Menu dialog
box is displayed.
3. On the bottom of the standard menu edit screen, the courses of the standard
menu are displayed.
4. Select the menu item to be deleted, click DELETE, a confirmation message is
displayed.
5. Select YES to delete the menu item.
How to print menu cards
1. Select an event, the resources are listed in the resources grid.
2. Select one or more standard menu items to be included in the menu card.
3. Click MENU CARDS from the bottom of the event edit screen, the Print dialog box is
displayed.
4. In the TEMPLATES box click the drop-down arrow and select the template to be
used.
5. In the LANGUAGE box click the drop-down arrow and select the language, if no
language is selected, the default language from the language configuration will be
used.
6. Click PRINT to print the menu card or click PREVIEW to display the menu card on the
screen.
7. Click CLOSE to close the Print dialog box.
174
Conference Booking
Available Menu Cards
The difference between SGL and MPL is the layout - MPL reports can be used for
buffets, long menus or multiple menus.
Report Name
Menu Card
Left Side
Right Side
FCR_CCM_9970_MENU
CARD_BEV_FOOD_SGL.rpt
Beverage
Food
FCR_CCM_9971_MENU
CARD_BEV_FOOD_MPL.rpt
Beverage
Food
FCR_CCM_9972_MENU
CARD_EV_FOOD_SGL.rpt
Event Info
Food
FCR_CCM_9973_MENU
CARD_EV_FOOD_MPL.rpt
Event Info
Food
FCR_CCM_9974_MENU
CARD_NOTES_FOOD_SGL.rpt
Menu Notes
Food
FCR_CCM_9975_MENU
CARD_NOTES_FOOD_MPL.rpt
Menu Notes
Food
FCR_CCM_9976_MENU
CARD_EV_BEV_MPL.rpt
Event Info
Beverage
FCR_CCM_9977_MENU
CARD_NOTES_BEV_MPL.rpt
Menu Notes
Beverage
Activities & Tasks linked to a Booking Master
Use this option to view, edit, delete or create new activities and/or tasks that are specific to the
booking. A typical example for an activity linked to a booking master would be a ‘follow up’
activity on the signed contract.
Click the ACTIVITY/TASKS button on the right hand side of the booking grid to view, edit, delete or
create a new activity or task.
Note: Changing the company/contact on a booking will change the
company/contact on any linked tasks or activities.
Options
Billing Instructions
When a financial account is linked then billing instructions can be used to enter instructions to
automatically route specific department codes to a different billing window, room or financial
account. For example if the company will pay for the room rental and charges attached to the
booking, such as lunch and equipment rental, then you would enter billing instructions to
automatically route these charges to a different billing window. If no financial account is linked
then the billing instructions are used as general information.
Conference Booking
175
How to enter a new billing instruction
1. On the conference diary screen, highlight an event.
2. Right-click to display the short-cut menu, select BOOKING OPTIONS and then select
BILLING INSTRUCTIONS.
Any existing billing instructions are listed.
3. Click the NEW button to display the New/Edit Billing Instruction dialog box.
4. Select the WINDOW the charges should be routed to.
The default for the new instruction is in sequential order. Window 1 is always
reserved for all postings which are not routed to another window. When entering
billing instructions for the first time, the default window is 2.
5. Enter the FROM DATE and TO DATE the billing instruction is valid for, the default
dates are the arrival and departure dates.
6. Select the DEPARTMENT CODES to be routed from the drop down list of available
department codes. The * will select all department codes. Use the EXCLUDE button
to exclude department codes and the INCLUDE button to add department codes.
7. Select any or all of the following options:
176
Conference Booking
SAME FINANCIAL ACCOUNT - if checked, the charge will be routed to the same financial
account; if unchecked the charge can be routed to another name or financial account.
CASHFLAG - if checked, the financial account will be paid after the event in cash and the
name and address fields on the billing instructions are then not accessible.
8. Select the NAME for the billing window from the list of linked profiles. If the booking
is made for a company and a contact then the linked company will be selected by
default. If the booking is made for a contact only then the contact name will be
selected by default.
9. In the OTHER NAME option you can select to route the department codes to another
profile.
If either the profile selected via NAME or OTHER NAME has default billing instructions
defined then a message is displayed asking if the default billing instructions should
be added.
10. Click YES to add the default billing instructions.
11. If the option SAME FINANCIAL ACCOUNT is not selected then the charges can be routed
to another financial account OTHER FIN. ACCOUNT. Select from a list of available
financial accounts or create a new Financial Account.
12. If the method of PAYMENT is known, it can be selected from a list of available
payment methods and will be default for that window at check out.
13. Select the CONTACT from the list of linked profiles. If the booking is made for a
company and a contact then the linked contact will be selected by default but can
be changed as required. If the booking is made for a contact only then the contact
name will be empty.
14. The billing address of the name, other name or account is displayed
automatically. If no billing address exists then the primary address is displayed. If
more than one address exits for the profile then the required address can be
selected.
15. Additional information may be added in the NOTES box if required.
16. The attached profile may be edited by pressing the EDIT PROFILE button.
17. To apply a limit to the billing instruction click the LIMIT tab.
Conference Booking
177
18. Enter the LIMIT for the selected billing instruction code.
19. Click OK to save the billing instructions.
178
Conference Booking
How to set a billing instruction limit
1. Display the Billing Instructions dialog box.
2. Select the billing instruction to which a limit is to be applied and click the LIMIT tab.
Conference Booking
179
3. Enter the LIMIT for the selected billing instruction.
4. Click OK to save the billing instructions.
5. Click OK to close the billing instructions screen.
Billing Instruction functionality is controlled by the user right BILLING INSTRUCTIONS
under Setup → Configuration → Users → User Definition → Rights → Routing
Instructions.
The start date of the billing instructions defaults to the system date if the
parameter DEFAULT START DATE OF BILLING INSTRUCTIONS TO SYSTEM DATE is activated
under Setup → Configuration → Global Settings → Billing → Billing 1 tab. This
defines if the billing instructions are independent of the booking dates and allows
billing instructions to be applied to postings made on pre-arrival bookings. If not
activated then the start date of the billing instructions will default to the start date
of the booking.
Note: When a financial account is linked and a billing instruction has
been entered then it is linked automatically to the financial account.
However, if a billing instruction was entered before the financial
account was created or linked to the booking then the billing
instruction is not linked automatically to the financial account.
Event Manual Postings
See Manual Postings (See page 132)
Financial Accounts
See Financial Accounts (See page 137)
Guest Comments
This option may be used to enter guest comments for the duration of the event and is accessible via
the OPTIONS menu of Conference Booking screen.
There is no limit as to the number of guest comments that can be entered, the guest comments are
displayed in descending date order and the PREVIOUS and NEXT buttons can be used to easily move
between the different comments. Indicators on the guest comment grid category grid differentiate
between profile, reservation and meeting planner comments. Guest comments are also viewable
from room history.
How to enter a new guest comment
1. Click the MEETING PLANNER menu and select CONFERENCE BOOKING to display the
Conference Booking screen.
2. Search for and select a Booking Master from the grid.
3. Click the OPTIONS button and select GUEST COMMENTS.
The Guest Comments dialog box is displayed.
180
Conference Booking
4. Click the NEW button to display the Guest Comments dialog box.
5. The DATE defaults to today's date, but may be changed if required.
6. The USER defaults to the signed on user.
7. In the CATEGORY box select the category to which this type of comment belongs.
8. In the GUEST COMMENTS box enter the guest comment.
9. Click OK, the new comment is displayed on the Guest Comments list.
Conference Booking
181
10. Click CLOSE to close the Guest Comments screen.
How to edit a guest comment
1. Search for and select the required booking master, then select GUEST COMMENTS
from the OPTIONS menu of the conference booking screen.
The Guest Comments screen is displayed.
2. Select the guest comment to be edited and click the EDIT button to display the
Guest Comments dialog box.
3. Make any changes necessary.
4. Click OK to save the changes.
How to delete a guest comment
1. Search for and select the required booking master, then select GUEST COMMENTS
from the OPTIONS menu of the conference booking screen.
The Guest Comments screen is displayed.
2. Select the guest comment to be deleted and click the DELETE button, a
confirmation message is displayed.
3. Click YES to delete the guest comment.
Guest Comments categories are defined via the option GUEST COMMENTS under
Setup → Configuration → CRM.
182
Conference Booking
Linked Documents
This option enables the user to view, edit or add different types of documents to a booking master.
It is recommended to place these documents on a shared network path to which all users have
access. If a scanner is connected to the workstation you can also scan and attach documents such as
contracts, letters or pictures. The scanner needs to be ‘Twain’ compatible.
Document groups and path are defined under Setup → Configuration → Miscellaneous →
Document Types.
Note: Linked documents can be viewed, edited or added via the
linked documents tab on the booking master edit screen or via the
options button on the conference booking grid.
How to link a document
1. Select the LINKED DOCUMENTS tab.
2. Click ADD, the Attach documents dialog box is displayed.
Conference Booking
183
3. In the DOCUMENT GROUPS list, click the document group you want.
4. In the ALLOWED DIRECTORIES list, click the allowed directory you want.
5. Click BROWSE to display the list of documents.
6. Select the required document and click OPEN, the Document Name field is filled.
184
Conference Booking
7. To attach the document, click ATTACH, the document is shown as linked on the
linked documents tab.
Note: Pictures or images may be attached in JPG or BMP format. The
default setting is JPG, but this may be changed via the SCAN OPT.
button. The selected settings will be saved for that user.
How to view/edit a linked document
1. Select the LINKED DOCUMENTS tab.
2. Select the document and click VIEW.
Suite8 opens the relevant application, for example, Word if the document is a
Word document or Crystal Reports if the document is a Crystal Report.
Note: The document may be edited directly from within the opened
application.
How to scan and link a document
1. Select the LINKED DOCUMENTS tab.
2. CLICK ADD, the attach documents dialog box is displayed.
3. In the DOCUMENT GROUPS list, click the document group you want.
4. In the ALLOWED DIRECTORIES list, click the allowed directory you want.
5. Click SCAN, the select source dialog box is displayed.
6. Select the source and click SELECT to open the scanner application.
7. Scan the document.
8. Click ATTACH to link the scanned document.
Note: The scanner needs to be 'Twain' compatible.
Notes
See Notes (See page 119)
User Log
See User Log (See page 135)
Conference Booking
185
Participant List
This option is used to list the participants attending a booking.
How to enter a participant list
1. From the Conference Booking screen click OPTIONS and select PARTICIPANT LIST from
the short-cut menu.
or
From the Conference Diary select the event, right-click to display the short cut
menu, select BOOKING OPTIONS and then select PARTICIPANTS LIST.
2. Enter the participants name in the NAME box, if the CHECK PROFILE check box is
selected (default) then the system checks if the profile already exists. The profile
search dialog box is displayed and the profile may be selected or a new profile
created if it does not exist.
3. When all the participants names have been entered click SAVE.
The participants list is updated and the financial accounts created if the
functionality to create financial accounts automatically is activated.
Available options
186
SAVE - saves the participants list, but also updates any profile information that was changed or
creates new profiles if necessary.
PROFILE EDIT - used to edit the selected profile.
FIN ACCOUNT - if the system is configured to create the financial accounts automatically the
participants list must be saved first, then selecting the option FIN ACCOUNT opens the NEW
FINANCIAL ACCOUNT dialog box with all the details completed for the selected profile. If the
financial accounts are to be created manually then selecting the option FIN ACCOUNT opens the
FINANCIAL ACCOUNT SEARCH dialog box opens, from which an existing financial account may
be selected or a new account created for the selected profile.
CHECK PROFILE - If selected and users enter a new profile, the profile search screen opens and
the profile can be selected if it exists. If this option is not activated and users enter a new
profile, the entered profile gets created regardless of whether it exists or not.
UNLINK - this option is available only via Conference Booking where it can be used to unlink
the financial account from the profile.
PROFILE SEARCH - opens the profile search dialog box, entered profiles can be changed by
selecting the profile search button and selecting a different profile but only if no financial
account for the already entered profile exists.
Conference Booking
POSTINGS - this option allows users to directly access the participant's financial account in the
cashiering module. After entering a valid cashier number and password, the financial account
of the participant is displayed. The user can then carry out all cashiering transactions for which
they have user rights.
IMPORT ROOMINGLIST - this option is only available if there are reservations linked to the
booking. It can be used to import both individual reservations linked to the booking and the
rooming list of linked blocks or groups. If a reservation from the rooming list has already been
imported to the participant list then it is no longer displayed on the import list. Reservations
with the same profile are only displayed once on the rooming import list.
PRINT - prints a list of all attendees.
REMOVE - removes profiles from the participants list. However if a financial account has been
created for a participant then the participant cannot be removed from the list unless the
financial account has been unlinked.
Note: If the PMS license or the sublicense CCM Billing Component is
activated it is possible to create a financial account for the participant.
Functionality to create financial accounts automatically is controlled by the
parameter CREATE FINANCIAL ACCOUNT FOR PARTICIPANT LIST AUTOMATICALLY under Setup
→ Configuration → Global Settings → CCM → Conference 1 tab. If this option has
not been activated then financial accounts may be created manually.
Postings
The posting option allows users to directly access the booking master financial account in the
cashiering module. After entering a valid cashier number and password, the financial account of
the booking is displayed. The user can then carry out all cashiering transactions for which they
have user rights.
Show Attached Table Reservations
This option is used to list the table reservations which are attached to an event in a function space
that is linked to a restaurant. If there are no table reservations currently attached then the Table
Reservation Search dialog box is displayed and a new table reservation can be entered.
How to display attached table reservations
1. From the Conference Booking screen click OPTIONS and select SHOW ATTACHED TABLE
RESERVATIONS from the short-cut menu.
The Table Reservation Search screen is displayed; any existing table reservations
attached to the selected booking are listed.
Conference Booking
187
2. Several search criteria such as the dates, the booking name and the booking # are
completed with details from the booking.
3. Complete any other required search criteria by typing information or selecting
information from the available lists.
For an explanation of the search criteria, see the Table Reservation Search Criteria
table below.
4. Click SEARCH to list the table reservations according to the entered search criteria.
5. Click CLOSE to close the table reservation search screen.
How to enter a new table reservation
1. From the Conference Booking screen click OPTIONS and select SHOW ATTACHED TABLE
RESERVATIONS from the short-cut menu.
The Table Reservation Search screen is displayed; any existing table reservations
attached to the selected booking are listed.
2. Click NEW; the Table Reservation Edit screen is displayed.
188
Conference Booking
3. The COMPANY and CONTACT profile names from the booking are automatically linked
in the PROFILES panel.
4. If the selected profile has a reservation then a message is displayed asking if the
reservation should be attached.
5. Click YES to attach the reservation to the table reservation.
If YES was selected then the reservation is now marked as selected in the
RESERVATIONS panel.
Conference Booking
189
6. The DATE defaults to the booking arrival date; enter the date for which the table
reservation is to be made or select a date from the calendar.
7. Select the RESTAURANT required from the list.
8. In the TEMPLATE box the first available reservation booking time is selected by
default. Click the down arrow to select the required reservation booking time.
9. The TIME FROM and TO are completed with the times from the reservation booking
template, but may be adjusted as required.
10. If the reservation is being made using a guest profile the # OF ADULTS defaults to
NO. OF ATTENDEES as defined in the booking, minus the number for which a table
reservation already exists; if the reservation is being made using a reservation
then the # OF ADULTS, BABY, CHILD and TEENAGER are taken from the reservation, but
maybe changed if required.
11. In the TABLES box, click on the down arrow to open the Select Available Table
dialog box.
Multiple tables can be selected if required and tables can be displayed according to
attribute type such as smoking or non-smoking.
The standard and maximum number of available seats is displayed for the selected
table or tables.
A table number must be selected if the parameter TABLE NUMBER IS MANDATORY is
active.
190
Conference Booking
12. Select the required table and then click SELECT.
13. Select the COLOUR in which the table reservation should be displayed in the Table
Reservation Availability grid.
14. Enter any additional information in the DESCRIPTION box.
15. Enter information in the TABLE CARD box.
16. Click OK to save the table reservation.
Table Reservation Search Criteria
Fill in this field
With this information
Restaurant
Select a restaurant from the list.
Date to
The dates are completed automatically with the booking
arrival and departure dates.
Start time from to
Enter from and to times to limit the search to a specific time
period.
Include history
Select this check box to include historical table reservation
bookings.
Not Assigned tables
only
Select this check box to display only tables which have not
been assigned.
Room #
Enter the room number to limit the search to a specific room
number.
Booking
Completed automatically with the booking name.
Event
Select an event from the list; all events within the selected
dates are displayed.
Last Name
The last name of the guest.
First Name
The first name of the guest.
Description
Enter the text to search for a table reservation with a specific
description. The text can be entered using wildcards (%) in
order to search anywhere within the description, e.g.
%highchair will return reservations with the text 'Highchair
required' and also 'Requires a highchair'.
Status
Select a table reservation status from the list, the status
DEFINITE is selected by default.
Reservation #
Enter the reservation number to limit the search to a specific
reservation.
Booking #
Completed automatically with the booking number.
Restaurants are linked to a function space via the option RESTAURANTS under Setup
→ Configuration → Table Reservations.
Conference Booking
191
4
Event Management
Event Management Search
How to access the event management search screen
1. On the MEETING PLANNER menu, click EVENT MANAGEMENT.
The Event Management search screen is displayed.
The event management search screen is divided into four distinct areas:
Query - consists of multiple basic event search criteria, such as Event Start Date, Event Status,
Event Type, Company Name, Contact Name and an advanced query option.
Query Results - the results of the query shown in a grid format, including Start Date, Start
Time, End Time, Status, Event Name, Number of persons (Pax), Function Space, Seating,
Booking Name, Company Name, Contact Name, Contact on Site and ID. In order to easily see
the events which belong to a specific day; events are grouped by day and the days are
coloured alternately yellow and white.
Tree View - a tree listing of all the details associated with this event.
HTML page - free definable HTML display which by default has a list format or a 'big' format
where the details are displayed in a non-grid style format.
Entering a event management query
The query screen is split into two sections:
The basic search criteria
The advanced query options
The basic search criteria
You may fill in multiple fields to narrow the search criteria. The actual query is
displayed in a script format in a window on the right hand side of the screen. If no
data is entered, the list of events displayed is in alphabetical order. The options are
explained in the Event Management Search dialog box.
Event Management
193
Fill in this Field
With this information
Event Start Date
Search for conferences based on the event start
date. By default, all events for today’s date will be
shown. Select a date from the calendar list box
To
To enter a date range, select a date from the
calendar list box until which the event start date
should be searched
Event Start Time
Search for conferences based on the event start
time
To
To enter a time range the To time can be entered or
selected from list box
Event Status
Select the conference statuses from the drop down
list. If no status is entered, conferences with all
booking statuses will be shown
Event Type
Search for bookings by event type. Select from list
box the available event types
Function Space
Search for bookings by Function Space. Select from
list box the available Function Spaces
Company Name
Click on the three dots next to the company name,
if you would like to search for existing company
profiles
Contact Name
Click on the three dots next to the contact name, if
you would like to search for existing contact profiles
incl. Participants
If a name is entered in the Contact Name search
box then selecting this check-box will search for all
bookings where this contact has been entered as a
booking contact as well as a participant.
Participants only
If a name is entered in the Contact Name search
box then selecting this check-box will search for all
bookings where this contact has been entered as a
participant.
The advanced query options
The advanced query consists of three selection fields:
The first allows you to select from a drop-down list of query possibilities.
194
The second limits the query to a second level or gives a choice of conditions.
The third field requires either a free-format value or for the user to select a possible value from
a drop-down list.
Event Management
The fields are explained in the Advanced Query dialog box.
Field
Definition
Event Id
Search by Event Id. The following options are available
while searching on event ID:
Is equal to
Is not equal to
Is less than
Is greater than
Note: The actual query is displayed in script format in a window on
the right hand side of the screen and as long as the filter is not cleared
by pressing the Clear button, each additional query will be added to
the actual query list.
Wildcards
The search criteria can also be entered using wildcards (%). This is helpful in the company and
contact name fields. For example, M%ller will return Miller, Muller, %Bank will return Investment
Bank, American Bank and Fidelio% will return Fidelio Gmbh or Fidelio Inc.
Activating the search
To activate the search the user must click the SEARCH button. Clicking the SEARCH button will
return the maximum number of events defined in the configuration, with the question to display
more if there are more to be displayed.
A list of events that match the specified criteria is displayed. The query criteria can be easily reset
by clicking the CLEAR button.
A full explanation of the event management screen search behaviour can be found
in the Suite8 Configuration Manual under Setup → Configuration → Global
Settings → Miscellaneous → Search Screens 2 tab.
The maximum number of lines displayed is controlled by the parameter MAXIMUM
LINES IN LIST under Setup → Configuration → Global Settings → Miscellaneous →
Search Screens 2 tab.
Event Management Options
From the Event Management screen the following options are available:
New (See page 54) - to open the Booking Master Search screen and create a new booking
master or edit an existing booking master.
Edit (See page 200) - to select an event and open the edit event screen.
Resources (See page 146) - to open the Event Detail Screen and access resources.
Booking Master (See page 69) - to select a booking and open the Edit Booking Master Screen.
Sub Event (See page 195) - to open the new event screen in order to add a sub-event.
The option SUB EVENT is controlled by the parameter USE MASTER-SUB EVENTS under
Setup → Configuration → Global Settings → CCM → Conference 1 tab.
Event Management
195
Sub Events via Event Management
The sub event option allows users to create events as sub-events into the same function space as
the master event without double booking.
Special features of the master and sub event relationship
A sub event must be in the same function space as the master event, but can have a different
seating arrangement or rate.
The start and end time of a sub-event, also taking into consideration any setup and set down
time must overlap with the start and end time of the master event. For example: A conference
from 09:00-18:00 will be created as the master event and morning coffee from 08:30-09:00 could
be created as a sub event.
The Block box in the event edit screen will always be updated with the earliest time of either
the sub or master event and with the latest time of either the sub or master event. This option
always indicates the start and end times the function space is blocked.
In the event grid
indicates a master event and
indicates the sub events. In addition
master/sub-events are displayed in a tree format and can be expanded and collapsed.
Easy conversion from a master event to a sub-event by vice versa.
Changing the number of attendees in the master event will prompt the user to change the
number of attendees in the sub events. The user will be given the option to change all sub
events or only the ones with the same number of attendees.
How to create a sub event
1. Click the MEETING PLANNER menu and select EVENT MANAGEMENT to display the Event
Management screen.
2. Search for and select an Event from the grid.
3. Click SUB EVENT or right-click and select ADD SUB EVENT from the short-cut menu.
The New Event screen is displayed with a comment indicating that this is a Sub
Event of 'Event Name'.
196
Event Management
5. Complete the options as detailed in the table below:
6. Click OK to save the sub event.
A master event is indicated by
in the first column. Clicking the plus sign lists
all the sub events which are then indicated by
in the first column.
The BLOCK option on the Master Event will be updated where applicable.
Event dialog box
Field Name
Explanation
Event Information
Event Status
(Required)
Event Management
The event status field will be filled automatically with
the status entered under conference status on the
booking master. It can be changed if required by
selecting the status for this particular event from the
drop down list.
197
198
Event Type
(Required)
Select the event type from the drop down list. When
selecting the event type the event name will be filled in
automatically with the definition entered under Setup
→ Configuration → Conference Management → Event
Type. It can be changed if required. If the event types
have been defined with default forecast figures under
Setup → Configuration → Conference Management →
Event Defaults, the forecast/revenue information at the
bottom of the event edit screen will be filled as well.
Event Name
(Required)
The name of the event will be filled automatically after
the event type has been selected. It can be changed at
any time.
No of Attendees
(Required)
The number of attendees for the event. The number of
attendees entered will be taken for several checks, for
example function space and seating arrangement
check.
Min Guarantee
Enter the minimum number of guaranteed persons.
This number is normally taken for billing even if less
should turn up for the function.
Start Date
The start date is filled automatically with the system
date if it is within the range of the arrival and
departure date. Future bookings will default to the
arrival date of the booking master. It is not possible to
create an event that is not within the arrival and
departure date of the booking.
End Date
The end date is filled automatically with the end date
of the booking master. It is not possible to create an
event that is not within the arrival and departure date
of the booking.
Start Time
If the event type has been configured with default start
time, then it is filled in automatically, but can be
changed by entering a time or selecting one from list
box. If the event was booked through the conference
diary then the start time is taken from the diary.
End Time
If the event type has been configured with default end
time, then it is filled in automatically, but can be
changed by entering a time or selecting one from list
box. If the event was booked through the conference
diary then the end time is taken from the diary.
Note: If an event finished past midnight, the end date
has to be changed to the next day.
Info Board
Enter the information that should be placed on the info
board outside the function space such as “Fidelio
Software – Dealer Conference”.
Info Board Profile
Mainly used in conjunction with the doorcard interface,
this option allows the property to enter a different
name. For example, the booking was made by Star
Conferences for the company IBM; so on the doorcard
IBM should be displayed.
Event Management
The handling is such that when a company and a
contact are entered the entry in the field Info Board
Profile replaces the company, if only a contact is
entered the entry in the Info Board Profile replaces the
contact. If no entry is made in the Info Board Profile
then the company/contact name from the booking will
be displayed.
Incl. in Package
Check this box to define if the event is included in a
conference package. The field is only accessible if a
conference package has been booked for this day.
Noisy
Select this box to indicate that the event will be a
‘noisy’ one such as a dinner party with live music
playing. If the noisy flag has been set, users can also
see the indication in the conference diary.
Block
This is a view only field and shows the start time and
the end time the function space is blocked for. This is
setup time plus event start time and event end time
plus set down time. This is completed automatically if a
room block with a block code is attached.
Function Space Information
Function Space
(Required)
Select the function space from the drop-down list of
defined function spaces. If a shareable function space
is linked to the event type selected, this will be
displayed automatically, but may be changed as
required.
Seating Arrangement
Select the seating arrangement from the drop-down
list. In some cases the seating arrangement might
already be filled in, i.e. if the parameter flag: MULTIPLE
FUNCTION SPACES PER EVENT has been activated under
Setup → Configuration → Global Settings → Conference
tab.
Rate
Select the rate from list box of defined rates, such as
full day or half day. The rate codes are defined under
Setup → Configuration → Conference Management →
Function Spaces → Rate Codes. In some cases the rate
might already be filled in, i.e. if the parameter MULTIPLE
FUNCTION SPACES PER EVENT has been activated under
Setup → Configuration → Global Settings → Conference
tab.
Amount
The amount is filled with the rate entered under Setup
→ Configuration → Conference Management →
Function Space Definition → Rates tab. It is also
possible to change this amount with a special rate. The
special rate field will be checked if this is the case.
Dept Code
(Required)
The department code. In order to use the posting
functionality, every resource item has to have a
department code assigned. This can be done via the
configuration part. The field is filled automatically with
the department code entered on the function space
definition.
Special rate
If a different rate has been entered in the amount field,
this field will indicate the change with a tick mark.
Event Management
199
Setup Time
If the seating arrangements have been defined with
default setup time, the default values will be filled in
automatically, but can be changed at any time.
Set down Time
If the seating arrangements have been defined with
default set down time, the default values will be filled
in automatically, but can be changed at any time.
Please note that the function space will be booked from
the event start until the event end time including the
defined setup and set down time.
Don’t Move
This field should be marked if a customer insists on a
particular function space. If this field is selected users
will also see the indicator in the conference diary.
Incl. in Package
The field is only accessible if a conference package has
been booked for this day.
How to convert a sub event to a master event
1. Click the MEETING PLANNER menu and select EVENT MANAGEMENT to display the Event
Management screen.
2. Select the sub event and right-click to display the short-cut menu.
3. Click CONVERT TO MASTER EVENT, a message is displayed informing you that the
previously selected function space is not available.
4. Select either the NEW FUNCTION SPACE or the WAITLIST button.
5. Complete the New Function Space dialog box.
6. Click OK, you are asked if you want to add default miscellaneous items.
7. Select YES to add the default miscellaneous items.
The event is converted and displayed in the grid as a master event.
How to convert a master event to a sub event
1. Click the MEETING PLANNER menu and select EVENT MANAGEMENT to display the Event
Management screen.
2. Select the master event and right-click to display the short-cut menu.
3. Click CONVERT TO SUB EVENT, the Event list of possible master events is displayed.
4. Select the required master event and click OK.
The event is converted and displayed in the grid as a sub-event. Any default items
are automatically removed.
Note: If the master event has existing sub events it can not be
converted unless the sub events have been removed or re-linked.
Note: Master/sub event functionality requires that the parameter USE
MASTER-SUB EVENTS is active, under Setup → Configuration → Global
settings → Conference tab.
200
Event Management
Edit Event
An event can be edited and adjustments made, such as changing the start/end time, the number of
attendees, the seating arrangement or changes to the info board.
How to edit an event
1. Click the MEETING PLANNER menu and select EVENT MANAGEMENT to display the Event
Management screen.
2. Search for and select an Event from the grid.
3. Click EDIT, the Edit Event screen is displayed.
4. Make any changes necessary, typical changes would be amending the start/end
time, the number of attendees or the seating arrangement.
5. Click OK to save the changes to the event.
Event Management
201
Event dialog box
Field Name
Explanation
Event Information
202
Event Status
(Required)
The event status field will be filled automatically with
the status entered under conference status on the
booking master. It can be changed if required by
selecting the status for this particular event from the
drop down list.
Event Type
(Required)
Select the event type from the drop down list. When
selecting the event type the event name will be filled in
automatically with the definition entered under Setup
→ Configuration → Conference Management → Event
Type. It can be changed if required. If the event types
have been defined with default forecast figures under
Setup → Configuration → Conference Management →
Event Defaults, the forecast/revenue information at the
bottom of the event edit screen will be filled as well.
Event Name
(Required)
The name of the event will be filled automatically after
the event type has been selected. It can be changed at
any time.
No of Attendees
(Required)
The number of attendees for the event. The number of
attendees entered will be taken for several checks, for
example function space and seating arrangement
check.
Min Guarantee
Enter the minimum number of guaranteed persons.
This number is normally taken for billing even if less
should turn up for the function.
Start Date
The start date is filled automatically with the system
date if it is within the range of the arrival and
departure date. Future bookings will default to the
arrival date of the booking master. It is not possible to
create an event that is not within the arrival and
departure date of the booking.
End Date
The end date is filled automatically with the end date
of the booking master. It is not possible to create an
event that is not within the arrival and departure date
of the booking.
Start Time
If the event type has been configured with default start
time, then it is filled in automatically, but can be
changed by entering a time or selecting one from list
box.
End Time
If the event type has been configured with default end
time, then it is filled in automatically, but can be
changed by entering a time or selecting one from list
box.
Note: If an event finished past midnight, the end date
has to be changed to the next day.
Info Board
Enter the information that should be placed on the info
board outside the function space such as Fidelio
Software Dealer Conference.
Event Management
Info Board Profile
Mainly used in conjunction with the doorcard interface,
this option allows the property to enter a different
name. For example, the booking was made by Star
Conferences for the company IBM; so on the doorcard
IBM should be displayed.
The handling is such that when a company and a
contact are entered the entry in the field Info Board
Profile replaces the company, if only a contact is
entered the entry in the Info Board Profile replaces the
contact. If no entry is made in the Info Board Profile
then the company/contact name from the booking will
be displayed.
Incl. in Package
Check this box to define if the event is included in a
conference package. The field is only accessible if a
conference package has been booked for this day.
Noisy
Select this box to indicate that the event will be a noisy
one such as a dinner party with live music playing. If
the noisy flag has been set, users can also see the
indication in the conference diary.
Block
This is a view only field and shows the start time and
the end time the function space is blocked for. This is
setup time plus event start time and event end time
plus set down time. This is completed automatically if a
room block with a block code is attached.
Function Space Information
Function Space
(Required)
Select the function space from the drop-down list of
defined function spaces. If a shareable function space
is linked to the event type selected, this will be
displayed automatically, but may be changed as
required.
Seating Arrangement
Select the seating arrangement from the drop-down
list. In some cases the seating arrangement might
already be filled in, i.e. if the parameter flag: MULTIPLE
FUNCTION SPACES PER EVENT has been activated under
Setup → Configuration → Global Settings → Conference
tab.
Rate
Select the rate from list box of defined rates, such as
full day or half day. The rate codes are defined under
Setup → Configuration → Conference Management →
Function Spaces → Rate Codes. In some cases the rate
might already be filled in, i.e. if the parameter MULTIPLE
FUNCTION SPACES PER EVENT has been activated under
Setup → Configuration → Global Settings → Conference
tab.
Amount
The amount is filled with the rate entered under Setup
→ Configuration → Conference Management →
Function Space Definition → Rates tab. It is also
possible to change this amount with a special rate. The
special rate field will be checked if this is the case.
Event Management
203
204
Dept Code
(Required)
The department code. In order to use the posting
functionality, every resource item has to have a
department code assigned. This can be done via the
configuration part. The field is filled automatically with
the department code entered on the function space
definition.
Special rate
If a different rate has been entered in the amount field,
this field will indicate the change with a tick mark.
Setup Time
If the seating arrangements have been defined with
default setup time, the default values will be filled in
automatically, but can be changed at any time.
Set down Time
If the seating arrangements have been defined with
default set down time, the default values will be filled
in automatically, but can be changed at any time.
Please note that the function space will be booked from
the event start until the event end time including the
defined setup and set down time.
Dont Move
This field should be marked if a customer insists on a
particular function space. If this field is selected users
will also see the indicator in the conference diary.
Incl. in Package
The field is only accessible if a conference package has
been booked for this day.
Event Management
5
Maintenance
Maintenance is helpful in recording and tracing repair service requests for rooms, function spaces
and public areas. The maintenance tool can be accessed via the option MAINTENANCE on the
Rooms Management menu. Users can enter new maintenance tasks and search for and edit
existing maintenance tasks. The Maintenance tool allows users to search by locality, maintenance
status, the type of maintenance task and the responsible employees.
Maintenance types configured as Out of Order will automatically prompt a confirm message,
answering yes will display the out of order dialog box. If a room is assigned to a reservation which
has a maintenance record, an indicator on the edit reservation screen shows MAINTENANCE, the
maintenance record can be accessed by clicking the maintenance indicator. Short message sending
functionality may be used to alert employees about maintenance tasks.
The maintenance option is controlled by the parameter HOTEL MAINTENANCE under
Setup → Configuration → Global Settings → Generic → Generic 3 tab.
Maintenance search functionality is controlled by the user right VIEW under Setup
→ Configuration → Users → User Definition → Rights → Hotel Maintenance →
Maintenance Search.
Maintenance edit functionality is controlled by the user rights NEW, EDIT, DELETE
and RESOLVE under Setup → Configuration → Users → User Definition → Rights →
Hotel Maintenance → Maintenance Edit.
SMS Sending functionality is controlled by the parameter ENABLE SMS SENDING
under Setup → Configuration → Global Settings → Interfaces → Misc. Interface 4
tab.
The parameters for short message sending for maintenance tasks are defined via
the section MAINTENANCE SMS NOTIFICATIONS under Setup → Configuration → Global
Settings → Generic → Generic 3 tab.
Access maintenance
Click the Rooms Management menu or the Meeting Planner menu and select Maintenance.
The Maintenance dialog box is displayed; all the Not Resolved maintenance records
are listed by default.
Maintenance
205
Note: Maintenance functionality is part of the Fidelio Suite8 Small
Business Edition feature list.
Entering a new maintenance task
1. Click the ROOMS MANAGEMENT menu or the MEETING PLANNER menu and select
MAINTENANCE .
2. Click NEW to enter a new maintenance task.
206
Maintenance
3. In the LOCALITY box click the drop-down arrow and select the location of the
maintenance task.
4. In the DESCRIPTION box click the drop-down arrow and select the description. The
descriptions are dependant on the locality selected.
5. In the TYPE box click the drop-down arrow and select the type of maintenance
task. If the number of minutes needed to complete this task have been defined
then the DUE DATE and time are automatically completed.
6. In the NOTES box enter a description of the maintenance task, if required.
7. Next to the RESP. EMPLOYEE box click the button to select an employee from the
Select Employee screen.
8. Type the due date for the task in the DUE DATE box or click the drop-down
arrow and select a date from the calendar. If the number of minutes needed to
complete this task have been defined then the DUE DATE and time are
automatically completed.
9. In the STATUS LEVEL box select the current status level of this task; the status level
can be updated at any time.
10. Click OK to save the maintenance task record.
11. If the maintenance type selected is configured as OUT OF ORDER then a message is
displayed asking if the room should be placed out of order.
Maintenance
207
11. Select YES to place the room out of order.
12. The out of order dialog box is automatically displayed when confirming the out of
order message; see setting a room status to OOO or OOS (See page 209) .
Maintenance task dialog box
Field
Definition
Locality
Select the location of the maintenance task - Room,
Function Space, Location or Public Location.
Description
The description selection is dependant on the locality
selected:
Rooms - choose a room number from the list of available
rooms.
Function Space - choose a function space from the list of
available function spaces.
Location - choose from a list of defined locations.
Public Place - a place is not required to be selected.
Type
Defines the maintenance issue, select a type from the list of
defined maintenance types.
Notes
Additional description about the defect can be entered in this
box.
Resp. Employee
Select the responsible employee from the profile search
screen.
Due Date
The date and time the task is due to be completed. This is
completed automatically if the number of minutes needed to
complete the selected task has been defined in the
configuration.
Entered
The date and time the defect was entered.
Date/ Time resolved
The date and time the defect was resolved.
Resolving a maintenance task
1. Click the ROOMS MANAGEMENT menu or the MEETING PLANNER menu and select
MAINTENANCE .
2. Select the task to be resolved.
3. Click RESOLVE NOW, the task is now marked as resolved.
4. The STATUS LEVEL is automatically updated with the status level defined as FOR
RESOLVE.
208
Maintenance
Setting a room status to OOO or OOS
1. Click the ROOMS MANAGEMENT menu or the MEETING PLANNER menu and select
MAINTENANCE .
2. Select the task to be placed out of order; only maintenance tasks which have been
configured as out of order can be selected.
3. Click OUT OF ORDER; the out of order dialog box is displayed with the room number
automatically completed.
4. Type the starting date for the out of order block in the DATE RANGE box or click the
drop-down arrow and select a date from the calendar.
5. Type the end date in the TO box or click the drop-down arrow and select a date
from the calendar.
6. In the STATUS box, click on the down arrow to open the drop-down list, and select
the room blocking status.
7. In the REASON box, click on the down arrow to open the drop-down list, and select
the reason for blocking the room.
8. In the REMARKS box, you can enter relevant comments.
9. In the RETURN STATUS box, select the status to which you want the room to revert
when the Out of Order status is removed.
10. Click OK to save the out of order record.
The out of order record can be viewed via the option OUT OF ORDER on the ROOMS
MANAGEMENT menu.
Marking a resolved maintenance task as unresolved
1. Click the ROOMS MANAGEMENT menu or the MEETING PLANNER menu and select
MAINTENANCE .
2. Select the task to be unresolved.
3. Click CLEAR RESOLVE the task is now marked as not resolved.
Maintenance
209
Deleting a maintenance task
1. Click the ROOMS MANAGEMENT menu or the MEETING PLANNER menu and select
MAINTENANCE .
2. Select the task to be deleted.
3. Click DELETE, the task is deleted.
Print, Email, SMS or Fax a maintenance task
The attendants report lists the room number, room category, status, number of persons in the
room, guest name (if still in-house), arrival and departure dates of guest and VIP code. In addition,
there is a summary of rooms and credits for each attendant.
How to print a maintenance task
1. Click the ROOMS MANAGEMENT menu or the MEETING PLANNER menu and select
MAINTENANCE .
The Maintenance dialog box is displayed; all the NOT RESOLVED maintenance
records are listed by default.
2. Select the maintenance task to be printed and click the PRINT button.
The Maintenance Task Print dialog box is displayed.
3. In the TEMPLATES box click the drop-down arrow and select the template to be
used.
4. In the LANGUAGE box click the drop-down arrow and select the language, if no
language is selected, the default language from the language configuration will be
used.
5. Click PRINT, the maintenance task is displayed in preview mode.
6. Click the print button
button
to print the maintenance task or click the close dialog
to return to the maintenance screen.
How to email a maintenance task
1. Click the ROOMS MANAGEMENT menu or the MEETING PLANNER menu and select
MAINTENANCE .
The Maintenance dialog box is displayed; all the NOT RESOLVED maintenance
records are listed by default.
2. Select the maintenance task to be sent by email and click the PRINT button.
The Maintenance Task Print dialog box is displayed.
210
Maintenance
3. In the TEMPLATES box click the drop-down arrow and select the template to be
used.
4. In the LANGUAGE box click the drop-down arrow and select the language, if no
language is selected, the default language from the language configuration will be
used.
5. Click EMAIL, the document is generated and the Email Report dialog box displayed.
6. The TO box is automatically completed with the email address from the profile, this
can be changed by clicking the drop-down arrow and selecting the email address
to which this email should be sent or by selecting the required email addresses
from the list of available in the panel on the upper right-hand side and clicking the
TO button. Click the SELECT ALL button and then the TO button to select all the
available email addresses.
7. In the CC box click the drop-down arrow and select the email address which
should be copied on this email or select the required email addresses from the list
of available in the panel on the upper right-hand side and click the CC button.
Click the SELECT ALL button and then the CC button to select all the available email
addresses.
8. In the BCC box click the drop-down arrow and select the email address which
should be blind copied on this email or select the required email addresses from
the list of available in the panel on the upper right-hand side and click the BCC
button. Click the SELECT ALL button and then the BCC button to select all the
available email addresses.
Maintenance
211
9. Enter the topic of the email in the SUBJECT box.
10. In the BODY box, make sure that all the entered information is correct; any
necessary changes can be made at this time.
11. Click SEND, the document is generated and the email sent.
How to email a maintenance task as an attachment
1. Click the ROOMS MANAGEMENT menu or the MEETING PLANNER menu and select
MAINTENANCE .
The Maintenance dialog box is displayed; all the NOT RESOLVED maintenance
records are listed by default.
2. Select the maintenance task to be sent by email and click the PRINT button.
The Maintenance Task Print dialog box is displayed.
3. In the TEMPLATES box click the drop-down arrow and select the template to be
used.
4. In the LANGUAGE box click the drop-down arrow and select the language, if no
language is selected, the default language from the language configuration will be
used.
5. Click EMAIL, the document is generated and the Email Report dialog box displayed.
212
Maintenance
6. The TO box is automatically completed with the email address from the profile, this
can be changed by clicking the drop-down arrow and selecting the email address
to which this email should be sent or by selecting the required email addresses
from the list of available in the panel on the upper right-hand side and clicking the
TO button. Click the SELECT ALL button and then the TO button to select all the
available email addresses.
7. In the CC box click the drop-down arrow and select the email address which
should be copied on this email or select the required email addresses from the list
of available in the panel on the upper right-hand side and click the CC button.
Click the SELECT ALL button and then the CC button to select all the available email
addresses.
8. In the BCC box click the drop-down arrow and select the email address which
should be blind copied on this email or select the required email addresses from
the list of available in the panel on the upper right-hand side and click the BCC
button. Click the SELECT ALL button and then the BCC button to select all the
available email addresses.
9. Enter the topic of the email in the SUBJECT box.
10. Select the SEND AS ATTACHMENT check box if the document should be sent as an
attachment rather than in the body of the email.
11. To edit the document click the EDIT ATTACH. button, the document is generated and
displayed on the screen. Depending on the setup of your system either MS Word
or the Fidelio Internal editor application will be used to display the document.
12. In the FORMAT box select the format for the attachment.
13. In the BODY box enter the text which should be included in the body of the email.
14. Click SEND, the document is generated and the email sent.
Note: Attachments sent in PDF format are automatically password
protected so that no changes can be made to the original PDF.
How to email a maintenance task with an attachment
1. Click the ROOMS MANAGEMENT menu or the MEETING PLANNER menu and select
MAINTENANCE .
The Maintenance dialog box is displayed; all the NOT RESOLVED maintenance
records are listed by default.
2. Select the maintenance task to be sent by email and click the PRINT button.
The Maintenance Task Print dialog box is displayed.
3. In the TEMPLATES box click the drop-down arrow and select the template to be
used.
4. In the LANGUAGE box click the drop-down arrow and select the language, if no
language is selected, the default language from the language configuration will be
used.
5. Click EMAIL, the document is generated and the Email Report dialog box displayed.
Maintenance
213
6. The TO box is automatically completed with the email address from the profile, this
can be changed by clicking the drop-down arrow and selecting the email address
to which this email should be sent or by selecting the required email addresses
from the list of available in the panel on the upper right-hand side and clicking the
TO button. Click the SELECT ALL button and then the TO button to select all the
available email addresses.
7. In the CC box click the drop-down arrow and select the email address which
should be copied on this email or select the required email addresses from the list
of available in the panel on the upper right-hand side and click the CC button.
Click the Select All button and then the CC button to select all the available email
addresses.
8. In the BCC box click the drop-down arrow and select the email address which
should be blind copied on this email or select the required email addresses from
the list of available in the panel on the upper right-hand side and click the BCC
button. Click the SELECT ALL button and then the BCC button to select all the
available email addresses.
9. Enter the topic of the email in the SUBJECT box.
10. Click ADD, the Attach documents dialog box is displayed.
214
Maintenance
11. In the DOCUMENT GROUPS list, select the document group required.
12. In the ALLOWED DIRECTORIES list, select the allowed directory required.
13. Click BROWSE to display the list of documents.
14. Select the required document and click OPEN, the Document Name field is filled.
15. To attach the document, click ATTACH, the document is shown as a linked
attachment on the email report dialog box.
Maintenance
215
16. In the BODY box, make sure that all the entered information is correct; any
necessary changes can be made at this time.
17. Click SEND, the document is generated and the email sent.
How to SMS a maintenance task
1. Click the ROOMS MANAGEMENT menu or the MEETING PLANNER menu and select
MAINTENANCE .
The Maintenance dialog box is displayed; all the NOT RESOLVED maintenance
records are listed by default.
2. Select the maintenance task to be printed and click the PRINT button.
The Maintenance Task Print dialog box is displayed.
3. In the TEMPLATES box click the drop-down arrow and select the template to be
used.
4. In the LANGUAGE box click the drop-down arrow and select the language, if no
language is selected, the default language from the language configuration will be
used.
5. Click SMS, the Send SMS dialog box is displayed.
216
Maintenance
6. The TO box is automatically completed with the mobile phone number for the
employee responsible for this task, this can be changed by clicking the drop-down
arrow and selecting the mobile phone number to which this SMS should be sent or
by selecting the required mobile phone numbers from the list of available in the
panel on the upper right-hand side and clicking the TO button.
7. In the SMS box, make sure that all the entered information is correct; any
necessary changes can be made at this time.
8. Click SEND to send the SMS.
How to fax a maintenance task
1. Click the ROOMS MANAGEMENT menu or the MEETING PLANNER menu and select
MAINTENANCE .
The Maintenance dialog box is displayed; all the NOT RESOLVED maintenance
records are listed by default.
2. Select the maintenance task to be printed and click the PRINT button.
The Maintenance Task Print dialog box is displayed.
3. In the TEMPLATES box click the drop-down arrow and select the template to be
used.
4. In the LANGUAGE box click the drop-down arrow and select the language, if no
language is selected, the default language from the language configuration will be
used.
5. Click FAX, the Send Fax dialog box displayed.
Maintenance
217
6. The TO box is automatically completed with the fax number for the employee
responsible for this task, this can be changed by clicking the drop-down arrow and
selecting the fax number to which this fax should be sent.
7. To edit the fax click EDIT, the maintenance task is generated and displayed on the
screen. Depending on the setup of your system either MS Word or the Fidelio
Internal editor application will be used to display the maintenance task.
8. Make sure that all the entered information is correct; any necessary changes can
be made at this time.
9. To schedule the time the fax should be sent, click ADVANCED, the Fax Scheduler
dialog box is displayed.
10. Select when to SEND THE FAX, the default is NOW, to specify a specific date and time
select a SPECIFIC TIME IN THE DAY and enter the date and time to send the fax.
11. Select the FAX PRIORITY, the default is Normal.
12. Click OK.
13. Click SEND, the maintenance task is generated and the fax sent.
SMS Sending functionality is controlled by the parameter ENABLE SMS SENDING
under Setup → Configuration → Global Settings → Interfaces → Misc. Interface 4
tab.
The parameters for short message sending for maintenance tasks are defined via
the section MAINTENANCE SMS NOTIFICATIONS under Setup → Configuration → Global
Settings → Generic → Generic 3 tab.
SMS Log
This option may be used to display the SMS log and is accessible via the option MAINTENANCE on
the ROOMS MANAGEMENT menu and on the MEETING PLANNER menu.
The SMS log lists details for SMS's which have been sent regarding maintenance tasks.
How to view the SMS log
1. Click the ROOMS MANAGEMENT menu or the MEETING PLANNER menu and select
MAINTENANCE .
2. Select the maintenance task required and click the SMS LOG button.
218
Maintenance
The SMS log screen is displayed.
The upper part of the screen consists of search criteria.
The lower part of the screen displays the search results in grid format.
3. Complete the search criteria and click the SEARCH button.
All SMS's meeting the search criteria entered are displayed.
4. Select the required SMS and click the DETAILS button to display the SMS Report
screen.
Maintenance
219
5. Click SEND AGAIN to re-send the SMS or click CANCEL to exit the SMS report screen.
6. Click CLOSE to exit the SMS log.
SMS Log search criteria
Fill in this field
With this information
Phone
The phone number to which the SMS was sent.
Sent
From
Select a date from the calendar from which to list log entries.
To
Select a date from the calendar until which to list log entries.
Successfully
Select this option to view SMS's which were sent successfully.
Failed
Select this option to view SMS' which were not sent successfully.
Email Log
This option may be used to display the email log and is accessible via the option MAINTENANCE on
the ROOMS MANAGEMENT menu and on the MEETING PLANNER menu.
The email log lists details regarding the emails which have been sent regarding maintenance tasks.
How to view the email log
1. Click the ROOMS MANAGEMENT menu or the MEETING PLANNER menu and select
MAINTENANCE .
2. Select EMAIL LOG.
The Email log screen is displayed.
220
The upper part of the screen consists of search criteria.
The lower part of the screen displays the search results in grid format.
Maintenance
3. Complete the search criteria and click the SEARCH button.
All emails meeting the search criteria entered are displayed.
4. Select the required email and click the DETAILS button to display the Email Report
screen.
5. Click SEND AGAIN to re-send the email, click PRINT to print the email or click CANCEL
to exit the email report screen.
6. Click CLOSE to exit the email log.
Email Log search criteria
Fill in this
field
With this information
Subject
The text that was entered in subject of the email.
Email
The email address to which the email was sent.
Sent
From
Set by default to today's date, but can be changed as required.
To
Set by default to one week later than today's date, but can be
changed as required.
Successfully
Select this option to view emails which were sent successfully.
Failed
Select this option to view emails which were not sent successfully.
Maintenance
221
6
Attaching a document..............64, 183
Scanning and attaching a document
...............................................64, 183
Printing .............................................. 74
Correspondence ............................ 74
Function Sheets ............................. 74
User Log.......................................... 135
Postings .............................................. 132
Adding posting functionality/information
................................................. 132, 187
Viewing .................................... 132, 187
Printing ................................................. 74
Correspondence ................................ 74
Function Sheets................................. 74
Search ................................................ 193
A
Accelerator keys ....................................... 12
Activities & Tasks
Activities & Tasks ................................ 175
Adding to a booking master ................. 175
Advanced Search ................................ 193
Booking Information
Conference Tab ................................. 55
Rooms Tab ........................................ 55
Cancellations ......................................... 62
Cancelling ............................................. 73
Conference Packages ......................... 108
Copying
Custom .............................................. 69
Fixed.................................................. 69
Deleting ................................................. 72
Adding new events............................. 86
Conference Packages ...................... 108
Copying ............................................. 86
Deleting ............................................. 86
Editing ............................................... 92
Manual Posting ................................ 132
Master and Sub Events .................... 126
Conversion of ............................... 126
Copying ........................................ 126
Creating ....................................... 126
Deleting ........................................ 126
Options
User Log ...................................... 135
Resources ....................................... 146
Adding a new function space .......... 86
Adding miscellaneous items.......... 151
Copying miscellaneous items........ 151
Deleting miscellaneous items........ 151
Editing miscellaneous items .......... 151
Notes ........................................... 119
Standard menu
Changing menu items ............... 167
Deleting menu items ................. 167
Set/Change Course Orders ....... 167
Deposits ................................................ 62
Financial Accounts .............................. 137
General Information ............................... 63
Linked Documents ......................... 64, 183
Linked Profiles ....................................... 64
linked to a booking master ................... 175
New....................................................... 54
on the booking master screen ................ 55
Options
Adding Booking Master Notes .......... 119
Billing Instructions ............................ 175
Deleting Booking Master Notes ........ 119
Editing Booking Master Notes .......... 119
Linked Documents ..................... 64, 183
Index
Index
B
Blue drill down arrow ................................ 13
Booking Master Search
Accessing ............................................. 32
New Booking......................................... 37
Quick Book ........................................... 33
Booking Options
Billing Instructions ............................... 175
Financial Accounts .............................. 137
Notes .................................................. 119
Participants List................................... 186
Postings .............................................. 132
User Log ............................................. 135
C
Changing an event start/end time
(Conference Diary) ................................ 39
Changing the date .................................... 19
Typing a new date ................................. 19
Using the calendar ................................ 19
Conference Diary
Adding to a booking master ................. 108
Booking Master Search ......................... 32
Query .............................................. 193
Wildcards ........................................ 193
Changing event start/end time ............... 39
Conference Packages ......................... 108
Copy ................................................... 108
Copying .............................................. 108
Creating a new booking or event ........... 54
using booking master search ............. 37
using quick book ................................ 33
Delete ................................................. 108
Deleting .............................................. 108
Displaying function space details ........... 27
Editing an event .................................... 92
Event Move ........................................... 37
223
Closed Periods................................... 48
Events ............................................. 86, 92
Adding to a booking master ................ 86
Advanced Search............................. 193
Basic Search...................................... 51
Booking Information ........................... 55
Conference Tab.............................. 55
Rooms Tab..................................... 55
Conference Packages ...................... 108
Copy an event .................................... 86
Delete an event .................................. 86
Deposits & Cancellations ................... 62
Edit an event ...................................... 86
Event details ...................................... 86
Financial Accounts ........................... 137
General Information ........................... 63
Linked Profiles ................................... 64
Manual Postings .............................. 132
New ................................................... 54
New event.......................................... 86
Notes ............................................... 119
Participants List................................ 136
Postings ........................................... 132
Resources
Function Spaces........................... 148
Menu Items .................................. 167
Miscellaneous Items ..................... 151
Resources .................................... 146
Standard Menus ........................... 158
Search ............................................. 193
Sub Events ...................................... 126
Waitlist Events ................................. 101
Function Space - Closed Periods ........... 48
Master and Sub Events ....................... 126
Moving an event .................................... 37
New..................................................... 108
New Booking ................................... 32, 37
on the booking master screen ................ 62
Options.................................................. 41
Financial Accounts ........................... 137
Linked Documents ..................... 64, 183
Manual Postings .............................. 132
Notes ............................................... 119
Participants List................................ 186
User Log .......................................... 135
Printing .................................................. 49
Quick Book ...................................... 32, 33
Resources
Miscellaneous items ......................... 151
Search dialog box .................................. 27
Searching for a function space............... 27
Shareable function space ...................... 39
creating an event into ......................... 39
Update ................................................ 108
Viewing ................................................. 27
Conference Diary Options
Add Sub Event ...................................... 41
Booking Options
Billing Instructions ............................ 175
Financial Accounts ........................... 137
224
Notes............................................... 119
Participants List ............................... 186
Postings .......................................... 132
User Log.......................................... 135
Convert Sub Event ................................ 41
Edit Booking.......................................... 41
Edit Company Profile............................. 41
Edit Contact Profile ............................... 41
Edit Event ............................................. 41
Edit Function Space .............................. 41
Printing ................................................. 41
Roomplanner ........................................ 41
Show Resources ................................... 41
Tasks & Activities .................................. 41
View all events ...................................... 41
E
Event Management
Options
Edit an event ................................... 195
Edit Booking Master......................... 195
New Booking Master........................ 195
Resources ....................................... 195
Sub Event........................................ 195
Resources
Function Spaces .............................. 148
Menu Items ..................................... 167
Miscellaneous Items ........................ 151
Resources ....................................... 146
Standard Menus .............................. 158
Search
Query ................................................ 51
Wildcards .......................................... 51
Sub Events ......................................... 126
Event Managment
Adding to a booking master ................... 86
Adding to a booking master ............. 108
Copy................................................ 108
Copying ........................................... 108
Delete.............................................. 108
Deleting ........................................... 108
New ................................................. 108
Update ............................................ 108
Closed Periods...................................... 48
Copy an event ....................................... 86
Copying ................................................ 86
Creating .............................................. 137
Creating on a booking master.............. 137
Delete an event ..................................... 86
Deleting ................................................ 86
Displaying details on the Conference Diary
............................................................. 27
Edit an event ......................................... 86
Editing................................................... 92
Entering fixed charges......................... 137
Entering Notes .................................... 137
Event details ......................................... 86
Event Options
Financial Accounts .......................... 137
Participants List ............................... 136
Index
Events ................................................. 132
Financial Accounts .............................. 137
from the conference diary ...................... 37
Linking billing instructions .................... 137
Linking credit cards.............................. 137
Linking profiles .................................... 137
Manual Posting.................................... 132
Manual Postings .................................. 132
Master and Sub Events ....................... 126
Conversion of ................................... 126
Copying ........................................... 126
Creating ........................................... 126
Deleting ........................................... 126
New....................................................... 86
New event ............................................. 86
Notes .................................................. 119
User Log .......................................... 135
on the booking master screen .......... 63, 64
Participants List ................................... 136
Resources ........................................... 146
Adding a new function space.............. 86
Adding a standard menu .................. 158
Adding miscellaneous items ............. 151
Copying miscellaneous items ........... 151
Editing miscellaneous items ............. 151
Function Spaces .............................. 148
Menu Items ...................................... 167
Miscellaneous Items......................... 151
Notes ............................................... 119
Resources ....................................... 146
Standard menu
Changing custom menu items....... 167
Changing menu items ................... 167
Deleting menu items ..................... 167
Standard Menus............................... 158
Set/Change Course Orders .......... 158
Search criteria on the Conference Diary. 27
Searching for on the Conference Diary .. 27
Sub Events .......................................... 126
Unlinking ............................................. 137
Waitlist Events ..................................... 101
F
Function Space - Closed Periods
Create ................................................... 48
Delete.................................................... 48
Edit........................................................ 48
Function Spaces (Resources) ................. 148
H
HTML
Change the HTML display ..................... 14
Collapse HTML Tree.............................. 14
Expand HTML Tree ............................... 14
View HTML display ................................ 14
HTML View ............................................... 14
L
Linked Documents
Index
Editing............................................64, 183
Linking ...........................................64, 183
Scanning and Linking .....................64, 183
Viewing ..........................................64, 183
Logging In ................................................ 10
M
Master and Sub Events........................... 126
Conference Diary
Changing an event start/end time ...... 39
Creating a new booking or event........ 54
using booking master search .......... 37
using quick book ............................ 33
Displaying function space details ....... 27
Event Move ....................................... 37
Function Space.................................. 48
Closed Periods............................... 48
Options.............................................. 41
Add Sub Event ............................... 41
Add/View Activities ......................... 41
Convert as Sub Event .................... 41
Edit Booking................................... 41
Edit Company Profile...................... 41
Edit Contact Profile ........................ 41
Edit Event ...................................... 41
Edit Function Space ....................... 41
Show Resources ............................ 41
Printing .............................................. 49
Search dialog box .............................. 27
Searching for a function space ........... 27
Shareable function space .................. 39
creating an event into ..................... 39
viewing........................................... 39
Viewing ............................................. 27
Meeting Planner menu .............................. 11
Adding Booking Master Notes ............. 119
Linked Documents ......................64, 183
Attaching a document..............64, 183
Scanning and attaching a document
...............................................64, 183
Printing
Correspondence ............................ 74
Function Sheets ............................. 74
User Log.......................................... 135
Adding posting functionality/information132
Adding to events ................................. 119
Conference Diary ................................ 119
Conference Diary) ............................... 119
Deleting Booking Master Notes ........... 119
Editing Booking Master Notes ............. 119
User Log.......................................... 135
Events............................................86, 119
Adding a new function space ............. 86
Adding a standard menu .................. 158
Adding miscellaneous items............. 151
Copying miscellaneous items ........... 151
Deleting miscellaneous items ........... 151
Editing a function space ................... 148
Editing miscellaneous items ............. 151
225
Notes ............................................... 119
Standard menu
Changing custom menu items....... 167
Changing menu items ................... 167
Deleting menu items ..................... 167
Set/Change Course Orders .......... 158
Function Spaces
Add .................................................. 148
Edit .................................................. 148
Menu Items
Add custom menu item..................... 167
Add pre-defined menu item .............. 167
Delete a menu item .......................... 167
Edit a menu item .............................. 167
Miscellaneous Items
Add .................................................. 151
Copy ................................................ 151
Delete .............................................. 151
Edit .................................................. 151
on the booking master screen .............. 135
Posting CCM Revenue ........................ 132
Postings .............................................. 187
Resources ........................................... 119
Standard Menus
Add .................................................. 158
Edit .................................................. 158
Viewing ............................................... 187
Q
Miscellaneous Items (Resources) ............ 151
T
Moving an event on the conference diary .. 37
Text Templates....................................... 119
Add ..................................................... 119
Import ................................................. 119
N
Navigation keys
Accelerator keys .................................... 12
Quick keys............................................. 17
Shortcut keys......................................... 12
New Booking............................................. 54
New Booking on the booking master search
.............................................................. 37
Notes (Conference Diary)........................ 119
Notes (Events) ........................................ 119
P
Participants List............................... 136, 186
Quick Book ............................................... 33
Quick keys................................................ 17
S
Shareable function space ......................... 39
Adding a standard menu ..................... 158
Changing custom menu items ............. 167
Changing menu items ......................... 167
Creating an event .................................. 39
creating an event into ............................ 39
Deleting menu items ........................... 167
Set/Change Course Orders ................. 158
Standard menu
Changing custom menu items .......... 158
View Bookings ...................................... 39
Shortcut keys............................................ 12
Sub Events
Convert master event to sub event ...... 126
Convert sub event to master event ...... 126
Copy a master event ........................... 126
Copy a sub event ................................ 126
Create a sub event .............................. 126
Delete master and sub event ............... 126
Delete sub event ................................. 126
U
User Log................................................. 135
W
Waitlist Events ........................................ 101
in an exclusive function space ............. 101
in an shareable function space ............ 101
moving an event
existing event is cancelled ............... 101
existing event reduced in numbers ... 101
waitlisted reduced in numbers .......... 101
viewing................................................ 101
Printing the Conference Diary.................... 49
226
Index