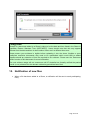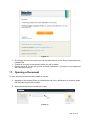
1
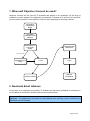
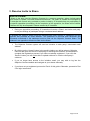
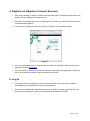
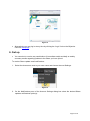
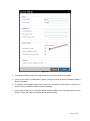
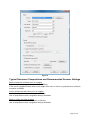
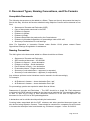
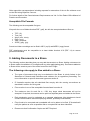
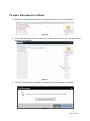
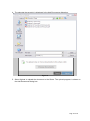
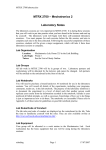
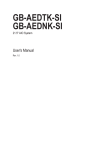
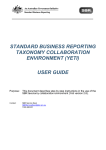
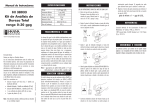
Objective Connect
User Guide - Patents
July 2014
Introduction
From 15 April 2013 new provisions were introduced to the Patents legislation regarding the filing
of evidence in opposition proceedings. Customers will be required to file evidence and other
specified documents for oppositions electronically via Objective Connect.
Objective Connect is a cloud-based computer application that IP Australia and customers will
use to share evidence that relates to an opposition proceeding. All shared documents are
accessible to opposing parties invited by IP Australia. Parties can simply log on to Objective
Connect to upload evidence and view or download another party’s evidence.
The Commissioner has given a direction about the filing of evidence and other opposition
documents under regulation 5.3 of the Patent Regulations. The information below is a guide to
using Objective Connect with IP Australia to meet those requirements.
Page 2 of 18
1. When will Objective Connect be used?
Objective Connect will be used by IP Australia and parties to an opposition for the filing of
evidence at certain stages of the opposition proceedings. Following is an outline of the activities
you will need to perform to use Objective Connect when supplying or receiving evidence.
Opposition
Proceedings
Begin
Nominate
Preferred Email
Address
Receive Invite to
Document
'Share'
Receive Email
Notification
On First Access
Registration and
Setup
Log In
Add Documents
Log In
Retrieve
Documents
2. Nominate Email Address
At the start of an opposition proceeding, IP Australia will ask each participant to nominate an
email address to be used for submitting and receiving documents.
Opponent – The opponent must provide an email address when filing the Notice of Opposition.
Applicant – The applicant must provide an email address after receiving a copy of the Notice of
Opposition from IP Australia.
Page 3 of 18
3. Receive Invite to Share
What is a Share?
A Share is the term used by Objective Connect for a common repository where invited parties
have access to upload, view and download documents. The Share is created and managed by
IP Australia with access only provided to parties invited by IP Australia that are participating in
the specific opposition proceeding. At the completion of the opposition, the Share will be closed.
Evidence will only be accepted in Shares created by IP Australia.
•
During an opposition proceeding, IP Australia will create a ‘Share’ and invite each party
to the proceedings to participate using a nominated email address.
IP Australia will create a Share once the opponent has filed a Notice of Opposition and the
applicant has provided an email address. The Statement of Grounds and Particulars and
documents mentioned in the statement must be filed via the Objective Connect Share. The
evidence in an opposition will also be filed via the Share.
•
The Objective Connect system will send an invitation to each party’s nominated email
address.
•
By clicking on the ‘Accept’ button in the email invitation you will be taken to Objective
Connect and given the choice of accepting or declining the invitation, and be asked to
complete the registration process if you have not already registered. If you click the
‘Decline’ button you will not be able to upload evidence or view the other party’s
evidence.
•
If you no longer have access to the invitation email, you may wish to log into the
Objective Connect website and navigate to your shares manually.
•
If you have not yet registered, proceed to Part 4 of this guide. Otherwise, proceed to Part
5 for login instructions.
Page 4 of 18
4. Register an Objective Connect Account
•
Each user intending to submit evidence electronically with IP Australia will be required to
register with the Objective Connect service.
•
Each time IP Australia invites you to participate in a ‘Share’ you will be sent a link to your
nominated email address.
•
If you have not registered, this link will take you directly to a registration page.
Figure 1
•
You may also register prior to receiving any invitation by clicking the Sign-up link on the
Objective Connect homepage.
•
You will receive an email from Objective Connect confirming your registration. Select the
link in the confirmation email to login and access the Share.
5. Log in
•
To access a Share in Objective Connect, users must first log in with their nominated
email address and password chosen during registration.
•
Once you have registered, following the link from a ‘Share’ invitation email will take you
directly to the login screen, with your nominated email address pre-filled.
Page 5 of 18
Figure 2
•
Alternatively you may log in at any time by clicking the ‘Login’ link on the Objective
Connect homepage.
6. Set up
•
You can elect to receive any combination of immediate emails and daily or weekly
summary emails regarding updates to the Share you have joined.
To receive Share update email notifications:
1. Select the down arrow next to your user name and choose Account Settings.
Figure 3
2. On the Notifications pane of the Account Settings dialog box select the desired Share
updates notifications option(s):
Page 6 of 18
Figure 4
•
Customers should set up their notifications as soon as an account is created.
•
If you do not select a ‘Notifications’ option, you will not receive email notification when a
Share is updated.
•
IP Australia encourages customers to select the ‘Immediate’ email option to ensure you
receive timely notification when a Share is updated.
•
If you wish to keep your nominated email address hidden from other participants of the
‘Share’, select the ‘Keep my email address private’ option.
Page 7 of 18
7. Document Quality
If your evidence is illegible or poor quality/low resolution, it may need to be resubmitted. This can
in turn put you to the unnecessary expense and uncertainty of having to apply for extensions of
time to file evidence. By adhering to the following guidelines, you will find that the quality of your
scanned documents will be sufficient in most instances.
Document Scanning Guidelines
All documents should be scanned at a minimum resolution of 300 dpi. This is in line with WIPO
standards for electronic image management and in most instances will provide a good quality
document with a manageable file size. To keep the time spent uploading documents to a
minimum and to reduce risk of failed transmission, scanned documents may also be optimised
to reduce their file size.
The following settings should be used when scanning documents (see also Figure 5):
Colour mode:
Auto-detect (where available) or see ‘Typical Document Compositions and Recommended
Scanner Settings’ below.
Resolution:
Minimum 300 dpi, maximum 600 dpi.
Resolutions outside of this range may not be accepted.
Paper size (when scanning to PDF):
A4 (210mm x 297mm) is preferred.
Larger sizes may be used when necessary.
Colour Space (when scanning to an image file such as PNG or TIFF):
The colour space of an image must be sRGB.
Page 8 of 18
Figure 5
Typical Document Compositions and Recommended Scanner Settings
Black printed text and black pen (no images).
Black and white setting, minimum resolution 300 dpi.
If the result is illegible/unclear due to line weight then scan in colour or greyscale at a minimum
resolution of 300dpi.
Colour printed text and colour pen (no images).
Colour setting at a minimum resolution of 300 dpi.
Use an auto-detect colour recognition setting if available.
Black or colour text (with images).
Colour setting at a minimum resolution of 300 dpi.
Use an auto-detect colour recognition setting if available.
Page 9 of 18
8. Document Types, Naming Conventions, and File Formats
Acceptable Documents
The following documents may be added to a Share. These are the only documents that may be
filed in this way. All other documents submitted using Objective Connect will be deemed as not
filed.
•
•
•
•
•
•
•
•
Statement of Grounds and Particulars (SGP)
Copy of documents mentioned in the SGP
Evidence in Support
Evidence in Answer
Evidence in Reply
Evidence Required to be produced by the Commissioner
Evidence in procedural oppositions or proceedings under s32 & s36
Summary of submissions for oral hearings
Note: For Opposition to Innovation Patents under Section 101M, please contact Patent
Oppositions Hearings & Legislation for assistance.
Naming Convention
The title/s given to the documents added to a Share should be as follows:
•
•
•
•
•
•
•
•
Statement of Grounds and Particulars
SGP mentioned document – US1235681
Evidence in Support – Jones declaration
Evidence in answer – Smith declaration
Part Evidence in Reply – Lee declaration
Produced evidence – Rogers declaration
Summary of oral submissions – opponent (or requestor)
Summary of oral submissions – applicant (or respondent)
Any evidence split due to size limitations must be named in the title accordingly.
For example:
•
•
All Evidence in Answer – Jones declaration Part 1.pdf
All Evidence in Answer – Jones declaration Part 2.pdf
For proceedings, parties are required to attach files as follows:
Statements of grounds and Particulars – The SGP should be a single file. Each document
mentioned in the SGP should be added to the share as an individual file. For oppositions filed on
or after 15 April 2013 a copy of each document referred to in the SGP is required if the
document is not an OPI AU or WO patent/application.
A declaration and its exhibits should preferably be bookmarked.
Covering letters associated with the SGP, evidence and other permitted document types can
also be filed using Objective Connect. These should be contained in a separate file and include
in its name the descriptor ‘letter’ and the date e.g. Evidence in support – Letter 15-04-2013.
Page 10 of 18
Other opposition correspondence including requests for extensions of time to file evidence must
not be filed using Objective Connect.
For further details of the Commissioners Requirements see Vol.3 of the Patent Office Manual of
Practice and Procedure.
Acceptable File Formats
The following are the acceptable file types:
We prefer the use of Adobe Acrobat PDF (.pdf), but will also accept attachment files as:
•
•
•
•
•
•
TIFF (.tif),
Text (.txt),
Word (.doc, .docx),
PNG (.png),
XML (.xml) and;
JPEG (.jpeg, .jpg).
Sound and video recordings can be filed in MP3 (.mp3) and MPEG (.mpg) format.
PDF attachments must be compatible to at least Adobe Acrobat v5.0 (PDF 1.4) to ensure
general accessibility.
9. Adding Documents to a Share
The following section describes how you may add documents to a Share. Adding a document to
a Share makes it available to IP Australia and any other participating party. Documents added to
a Share will be saved as part of the official record for the IP Right.
The following rules apply to files added to a Share:
•
The types of documents that may be submitted to the Share is strictly limited to the
Statement of Grounds and Particulars and evidence for an opposition proceeding. For
more information on specific document types see section 8.
•
IP Australia requires that all submitted files comply with the naming conventions as
described in section 8 of this guide.
•
Files must be in one of the acceptable formats listed in section 8.
•
The maximum size for each file is 1 GB. Any larger sized documents will not be
accepted. If required, documents can be split into separate parts and added to the Share.
•
Each declaration must be uploaded as a separate attachment (the attachment should
contain the declaration and accompanying exhibits, preferably bookmarked).
•
Files found to be corrupted and unreadable will not be taken to be filed. IP Australia will
notify the parties as soon as possible after a corrupted file has been identified.
•
Please note that Confirmation Copies are NOT Required.
Page 11 of 18
To add a Document to a Share:
1. Select the title of the desired Share, or follow the link from your Share invitation.
Figure 6
2. Select Add Document from the Objective Connect Control Pane. The Add Documents
dialog box is displayed.
Figure 7
3. Click Choose Document to browse and select documents to upload to the share.
Figure 8
Page 12 of 18
4. The selected document(s) is displayed in the Add Documents dialog box.
Figure 9
5. Select Upload to upload the document to the Share. The upload progress is shown on
the Add Documents dialog box.
Page 13 of 18
Figure 10
Filing Date
Receipt of a document added to a Share is taken to be the date and time listed in the Share in
Australian Eastern Standard Time (AEST/AEDT). Users should note that this may appear
different from the date and time in their location if they are in a different time zone.
Please ensure your evidence is legible before uploading it into the share. Illegible or poor
quality/low resolution documents may need to be resubmitted which could lead to added
expense should an extension of time be required to file evidence. Please see the ‘Document
Quality’ section of this document for more information.
The next evidence stage will not commence until IP Australia has formally notified the parties
that all (or no) evidence for the relevant evidentiary period has been filed.
10. Notification of new files
•
When a file has been added to a Share, a notification will be sent to each participating
Party.
Page 14 of 18
Figure 11
•
•
•
By clicking the link in the email you will be taken directly to the Share containing those
updated files.
If required you may be prompted to enter your log in details.
Please note that you will not receive an email notification if you have not yet registered
with Objective Connect.
11. Opening a Document
To open a document that has been added to a share:
1. Navigate to the desired Share by following the link from a Notification or Invitation email,
OR manually through the interface.
2. Select the document you would like to open.
Figure 12
Page 15 of 18
12. Frequently Asked Questions (FAQs)
I lost my invitation, what do I do?
If you misplace your email invitation to join the Share for your opposition, you can have the
invitation resent to your email address.
To request resending of your invite:
1.
2.
3.
4.
Go to the Objective Connect Website.
Select Sign Up.
Select lost your invitation email?
Enter your email address and select Resend.
You will receive an email invitation containing a link to login/register to Objective Connect.
Why is the Connect password twelve characters long?
The password (or passphrase) is twelve characters long to meet with minimum security
requirements. The twelve characters can be any combination of letters (upper and lower case),
numbers and symbols.
How do I sign out?
If you wish to sign out from your session:
1. Select the drop down arrow next to your name in the welcome banner.
2. Choose Log Out.
Note: After 20 minutes of inactivity you are automatically logged out of Objective Connect.
How can I prevent Objective Connect emails from being caught in my
spam filter?
If Objective Connect emails are getting caught in your spam filter, simply add the Objective
Connect email address or domain to your list of ‘allowed email addresses’. This will allow
Objective Connect emails to be delivered to recipients without being caught in the spam filter.
How can I change my Objective Connect Password?
1. While you are logged in to Objective Connect, select the down arrow next to your user
name and choose Account Settings.
2. Your user name is displayed in the Account Settings dialog box. Enter your old password
and your new password. This password must be at least 12 characters long.
3. Re-enter your new password to confirm and select save.
Do I have to pay to use Objective Connect?
Page 16 of 18
No, Objective Connect is a free service made available by IP Australia to allow customers to file
and receive evidence in opposition proceedings. By signing up to ‘Participant Free’ through the
Objective Connect website, you can access your Share/s free of any charges. Please note
however that Objective Connect will charge you fees if you sign up for ‘Standard’ or ‘Workgroup’.
Can I request assistance with using Objective Connect?
Yes, if you have encountered a problem with Objective Connect and wish to report an issue or
error, please complete the details on the Contact Form and select Submit.
You can also access the Contact Form from within Objective Connect by selecting the Feedback
tab on the left hand side of your Objective Connect browser window. If you require further
assistance please visit the assistance section of the Objective Connect website.
Page 17 of 18
© Commonwealth of Australia 2013
Published by: IP Australia
Discovery House, 47 Bowes Street, Phillip, ACT 2606
1300 65 10 10
www.ipaustralia.gov.au