1
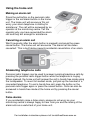
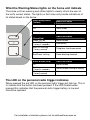
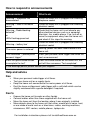
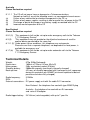
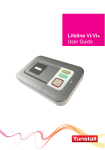
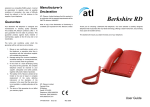
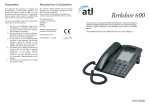
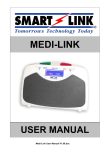
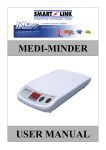
®
Tunstall Vi+
User Guide
Your Tunstall Vi home unit
The Tunstall Vi home unit is connected to the mains power supply and your
telephone line. It enables you to generate a call for help when and if you
need it by immediately contacting a monitoring centre which will be able to
provide you with the assistance you require.
Radio Antenna
Home/Away Button (Yellow)
Cancel Button (Green)
Status LED (Red/Green)
Microphone
Speaker
Alarm Button (Red)
Your personal radio trigger
Your personal radio trigger is wirelessly connected to your Tunstall Vi home
unit and enables you to generate a call for help from anywhere in your
home or garden. The personal trigger should be worn at all times and can
be worn around the neck or on the wrist using the attachments supplied.
Personal radio triggers are water resistant (to IP67 standard) up to 1m. It
can be worn in the shower however wearing it in the bath should be
avoided where possible.
The personal radio trigger has the below features:
Water resistant
Up to 50m
radio range (typical)
Auto Low Battery*
*NOTE: The trigger will automatically send a notification call via the home unit to the
monitoring centre when its battery is low.
For installation instructions please visit tunstallhealthcare.com.au
Using the home unit
Making an alarm call
Press the red button on the personal radio
trigger or the red alarm button on the home
unit. The home unit will announce ‘Do not
worry your alarm telephone is dialling for
assistance’. The call will be answered by an
operator at the monitoring centre. Tell the
operator why you have generated the alarm
call and they will arrange for assistance.
Cancelling an alarm call
Wait 5 seconds (after the alarm button is pressed) and press the green
cancel button. The home unit will announce ‘The alarm call has been
cancelled’. This in-built delay prevents accidental cancellation of an alarm.
Answering telephone calls
Personal radio triggers can be used to answer incoming telephone calls by
pressing the personal radio trigger button while the telephone is ringing.
When pressed, the home unit will answer the call in hands-free mode using
the loudspeaker. To revert to handset mode, just pick up the handset of a
connected telephone. To end a hands-free call, press the button on the
personal radio trigger again or press the cancel button. Calls can also be
answered in hands-free mode at the home unit by pressing the cancel
button.
False alarms
If you accidentally raise a false alarm, please do not worry as your
monitoring centre is always happy to hear from you and the raising of the
alarm acts as a useful test of your home unit.
For installation instructions please visit tunstallhealthcare.com.au
What the Warning/Status lights on the home unit indicate
The home unit has warning and status lights to clearly inform the user of
the unit’s current status. The lights on the home unit provide indications of
its status based on the below.
Home/Away Button
(Yellow)
On
Away mode
Off
Home mode
Flashing
Intruder entry/exit time period
Home unit status
Status LED
(Green/Red)
Green LED on
Red LED flashing
(1 every 4 seconds)
Normal mode
Red LED flashing
(1 every second)
Telephone line disconnected
Red/Green flashing
Radio blocking detected
Alarm Button (Red)
Home unit status
On
Normal mode
Flashing
(1 every 4 seconds)
Flashing
(1 every second)
Home unit status
Low battery
Normal mode running on battery
Alarm mode
The LED on the personal radio trigger indicates
When pressed the red LED on the personal radio trigger will light up. This is
to indicate that the button has been pressed. If the LED flashes when
pressed this indicates that the personal radio trigger battery is low and
should be replaced.
For installation instructions please visit tunstallhealthcare.com.au
How to respond to announcements
Announcement
What to do
‘Warning – telephone line
disconnected’
Check the home unit is plugged into a working
telephone socket
‘Warning – there is no mains
power’
Check the home unit is plugged into a working
electrical socket
‘Warning - Radio blocking
detected’*
or
LEDs flashing green/red
Check that the home unit is not close to any
other electrical devices such as a computer,
television, fan, mobile phone. If so, turn-off or
move the equipment away from the home unit
and check if this stops the warning.
‘Warning – battery low’
Check the home unit is plugged into a working
electrical socket
‘The mains power is restored’
Nothing, power has been reconnected to the
home unit.
‘Test Reminder – please press
personal trigger’*
Press your personal radio trigger and follow the
next announcement
Press the green cancel button
to complete the test*
Press the cancel button on the home unit, the
unit will then announce ‘Test completed’.
If the warnings persist please contact your supplier.
*Optional feature
Help and advice
Dos
•
•
•
•
Wear your personal radio trigger at all times.
Test your home unit on a regular basis.
Keep the home unit connected to the mains power at all times.
Dust the home unit/personal radio trigger with a soft cloth which can be
slightly moistened with a gentle detergent if required.
Don’ts
•
•
•
•
Expose the home unit to water or other liquids.
Connect cables other than those supplied with the home unit.
Move the home unit from the location where it was originally installed
Move objects close to the home unit that either; create lots of noise, heat,
or are made of metal such as a televisions, radios, washing machines,
microwaves, WiFi routers, mobile phones, laptops etc.
For installation instructions please visit tunstallhealthcare.com.au
Programming Pendants and Sensors
While your alarm comes with a pre-programmed pendant, if you have purchased
an additional pendant or a telecare sensor follow the step-by-step instructions to
program them in:
Step 1
Step 2
Step 3
Step 4
Step 5
Press and hold down the green cancel button until it beeps (approx 5
seconds). Release the cancel button, the Alarm announces
‘Programming Mode’ and the red alarm button flashes slowly.
Press and hold down the green cancel button again until it beeps
(approx 3 seconds). Release the cancel button, the Alarm announces
‘Registration Mode’ and the red alarm button flashes rapidly.
Activate the pendant or telecare sensor, the Alarm will beep to
confirm acceptance
Press and release the green cancel button. The alarm will beep
(programming mode exited)
Test the pendant or telecare sensor by activating it and ensuring it
raises an alarm call
Alternatively you can call the response centre and they can remotely program the
pendant or telecare sensor in for you.
Remove all pendants or telecare sensors from the alarm
If you have lost or no longer use a pendant or telecare sensor, the alarm
will alert that the device is missing. To stop these alerts the device needs to
be de-programmed from the alarm unit, this can be achieved by clearing all
pendants and sensors from the alarm using the following steps:
Step 1
Step 2
Step 3
Step 4
Press the green cancel button until the alarm beeps. Release
button
Pick up the handset of the telephone connected to the back of
the Tunstall Vi and then press 2060.
Momentarily press the green cancel button to exit “programming
mode.
Programme the required pendant/telecare sensor to the alarm
(See programming pendants and sensors)
Alternatively you can call the response centre and they can remotely deprogram the pendant or telecare sensor for you.
Battery information
All batteries should be disposed of in accordance with the latest legislation.
For installation instructions please visit tunstallhealthcare.com.au
Australia
Clause Declaration required
5.1.1.1 The CE will not cause harm or damage to a Telecommunications
Network or facility if any of the following events, or consequential event occurs:
(a)
Failure of any mechanical or electrical component in the CE; or
(b)
Failure of any power supplies resulting in total or partial loss of power to the CE
(c)
Discharge or partial discharge of any battery supply associated with the CE
(d)
Incorrect manual operation of the CE
New Zealand
Clause Declaration required
5.5.1 (3) “This equipment shall not be set up to make emergency calls to the Telecom
‘111’ Emergency Service”
6.3 (3)
“This equipment may not provide for the effective hand-over of a call to
another device connected to the same line”
6.11.1 (3) “Under power failure conditions, this telephone may not operate.
Please ensure that a separate telephone, not dependent on local power, is
available for emergency use”
8.1.7 (b) “This equipment shall not be set up to make automatic calls to the Telecom
‘111’ Emergency Service
Technical Details
Weight:
Dimensions:
Mains power:
Stand-by battery:
Back-up time:
572g (939g Packaged)
185mm x 122mm x 41mm (WxLxD)
240v ac electrical socket (3 Watts)
2000mAhr capacity (continually internally charged)
42 hours of stand-by operation with 5 emergency call sequences
during this period as per AS4607 (minimum expected at date of
purchase and when fully charged)
Radio frequency:
312MHz
REN:
1
External connections: DC power supply unit with 3m cable RJ11 connector
New Zealand - 3m telephone line cord with type BS6312 plug
Australia - 3m telephone line cord with an RJ connector
and series 610 adaptor
Radio trigger battery:
3V Lithium (not changeable) with up to 7 year life
Environmental
Temperature:
Humidity:
Operating temperature (to perform to full specification) = 0°C to
45°C, storage = -10°C to 50°C
Operating relative humidity (non condensing to perform to full
specification) = 0 to 80%, storage relative humidity (non
condensing) = 0 to 93%
Standards
EMC:
Safety:
Telecoms:
Radio:
PRS:
MEPS:
Design & Manufacture:
AS/NZS CISPR 22:2009
AS/NZS 60950-1:2011
PTC200:2006, AS/CA S002:2010, AS/ACIF S004:2008
AS/NZS 4268:2004
AS4607:1999
AS/NZS 4665-2005
ISO9001:2008
N72
Tunstall Healthcare, Unit 1, 56 Lavarack Avenue, Eagle Farm, QLD 4009, Australia
t: 07 3637 2200 f: 07 3637 2255 e. sales @tunstallhealthcare.com.au w. tunstallhealthcare.com.au
Tunstall LifeCare, 306 Cameron Road, Tauranga 3110, New Zealand
t: 07 571 2680 f. 07 571 2685 e. [email protected] w. tlcare.co.nz
Our policy of continual development means that product specification and appearance may change
without notice. Tunstall does not accept any responsibility for any errors or omissions contained in this
document.
© 2013 Tunstall Healthcare Group Ltd. ® TUNSTALL is a registered trade mark.
D5707015A
For installation instructions please visit tunstallhealthcare.com.au