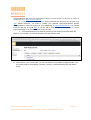
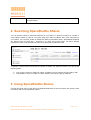
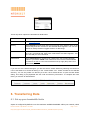
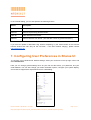
1
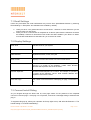
SpaceShuttle
User guide
1.Get Started with SpaceShuttle
1.1 For Windows
How to download and install Aspera® Connect™
1.2 For Mac
How to download and install Aspera® Connect
p2
p2
p2
p4
p4
2. Accessing SpaceShuttle Shares
p7
3. Browsing SpaceShuttle Shares
p9
4. Searching SpaceShuttle Shares
p10
5. Using SpaceShuttle Shares
p10
6. Transferring Data
p11
6.1. Set up your bandwidth limits
p11
6.2. Set up your download location
p12
6.3. Initiate a transfer
p13
7. Configuring User Preferences in Shares UI
p14
7.1 Email Settings
p15
7.2 Display Settings
p15
7.3 Connect Install Dialog
p15
7.4 Technical Support
p16
Intersect Australia - SpaceShuttle - User Guide
https://docs.google.com/document/d/13E_wPGK4fzd7rrmb8wh0d-YiSwra7nxV_z9ARXKbmCs/edit?usp=sharing
Page 1 of 16
SpaceShuttle is a storage solution that enables researchers to securely transfer, store, manage and
share large amounts of active research data. Data can be read, written, copied or moved over the
internet at maximum speed.
SpaceShuttle provides a suite of tools to help move your data to and from active storage, share your
TM
data with collaborators, leveraging IBM Aspera’s Fasp transfer technology to achieve speeds
hundreds of times faster than FTP/HTTP*. Visit asperasoft.com for more details.
SpaceShuttle uses Aspera Shares as the web user interface that allows you to upload, download and
share your data. The Aspera Connect™ plug-in is the key underlying software tool that facilitates the
data transfer.
This guide is based on information available at: http://asperasoft.com/software/webapplications/aspera-shares/#resources-391.
If you experience a problem while using SpaceShuttle, please contact the Intersect system
administrator via help.intersect.org.au.
1.Get Started with SpaceShuttle
1.1 For Windows
How to download and install Aspera® Connect™ 1.
2.
3.
4.
5.
Set up an account
Meet the firewall requirements
Meet the system requirements
Install Aspera® Connect™ browser plug-in
Connect and transfer
1.1.1 Set up an account
SpaceShuttle products are authenticated by the Australian Access Federation (AAF), so you can login
by using your existing credentials (your own institutional username and password).
To access specific data collections, you have to request access directly from the nominated data
collection owner or custodian, who is also likely to be a SpaceShuttle Shares Manager.
1.1.2. Meet the firewall requirements
SpaceShuttle’s Aspera® transfers use one TCP port for session initialisation and control, and one
UDP port for data transfer. It is configured to use TCP and UDP port 33001.
Please contact your IT department to open TCP and UDP port 33001 to dtn-1.intersect.org.au and
dtn-2.intersect.org.au (203.161.182.179 and 203.161.182.180).
Intersect Australia - SpaceShuttle - User Guide
https://docs.google.com/document/d/13E_wPGK4fzd7rrmb8wh0d-YiSwra7nxV_z9ARXKbmCs/edit?usp=sharing
Page 2 of 16
1.1.3. Meet the Aspera® Connect system requirements
SpaceShuttle (Aspera® Shares) requires an Intel processor and Aspera® Connect™ plug-in to
securely move files and folders of any size. The following web browsers are supported by Connect
Server:
Supported OS
Supported Browsers
Windows 2008r2, 2012
Internet Explorer 8+, Firefox 27+, Google Chrome 32+
Linux 64-bit
Firefox 27+
Note: Aspera® Connect™ does not support the 64-bit IE 10 browser on Windows 8. The detailed
user guide for Aspera® Connect™ including network requirements and firewall specifications, can be
found as a PDF Guide here.
1.1.4. Install Aspera® Connect™ browser plug-in
Aspera® Connect™ is a simple, self-installing browser transfer plug-in that performs the transfers
from clients to the server. You only need to install this plug-in once.
1. Make sure that your computer meets the above requirements. If you do not have the required
browser, install one. For example, Google Chrome can be installed here and Firefox can be
installed here.
2. Depending on your browser settings, you may have to “allow” the plug-in for the connect
browser to work.
3. Visit the Aspera® Connect™ website here and click the “Aspera Connect (latest suitable
version for your Operating System)” Install button to download Aspera® Connect™.
Intersect Australia - SpaceShuttle - User Guide
https://docs.google.com/document/d/13E_wPGK4fzd7rrmb8wh0d-YiSwra7nxV_z9ARXKbmCs/edit?usp=sharing
Page 3 of 16
4. Once the download is completed, the installation wizard should open automatically. If not,
double-click on the file to install the plug-in. Then, follow the wizard steps to complete the
installation.
5. You are now ready to use SpaceShuttle.
1.2 For Mac
How to download and install Aspera® Connect 1. Set up an account
2. Meet the firewall requirements
3. Meet the system requirements
Intersect Australia - SpaceShuttle - User Guide
https://docs.google.com/document/d/13E_wPGK4fzd7rrmb8wh0d-YiSwra7nxV_z9ARXKbmCs/edit?usp=sharing
Page 4 of 16
4. Install Aspera® Connect™ browser plug-in
5. Connect and transfer
1.2.1. Set up an account
SpaceShuttle products are authenticated by the Australian Access Federation (AAF), so you can login
by using your existing credentials (your own institutional username and password).
To access specific data collections, you have to request access directly from the nominated data
collection owner or custodian, who is also likely to be a SpaceShuttle Shares Manager.
1.2.2. Meet the firewall requirements
SpaceShuttle transfers use one TCP port for session initialization and control, and one UDP port for
data transfer. It is configured to use TCP and UDP port 33001.
Please contact your IT department to open TCP and UDP port 33001 to dtn-1.intersect.org.au and
dtn-2.intersect.org.au (203.161.182.179 and 203.161.182.180).
1.2.3. Meet the system requirements
Aspera Shares requires an Intel processor and Aspera® Connect™ plug-in to securely move files and
folders of any size. The following web browsers are supported by Connect Server:
Supported OS
Supported Browsers
Mac OS X 10.7+
Safari 6+, Firefox 27+, Google Chrome 32+
Linux 64-bit
Firefox 27+
Note: On OS X 10.6, Connect 3.5.1+ is supported on 32-bit browsers only.
1.2.4. Install Aspera® Connect™ browser plug-in
1. Make sure your computer meets the above requirements. If you do not have the required
browser, install one. For example, Google Chrome can be installed here and Firefox can be
installed here.
2. Depending on your browser settings, you may have to “allow” the plug-ins for the connect
browser to work.
Intersect Australia - SpaceShuttle - User Guide
https://docs.google.com/document/d/13E_wPGK4fzd7rrmb8wh0d-YiSwra7nxV_z9ARXKbmCs/edit?usp=sharing
Page 5 of 16
3. The detailed user guide for Aspera® Connect™, including network requirements and firewall
specifications, can be found as a PDF Guide here.
4. Visit the Aspera® Connect™ website here and click the “Aspera Connect” (latest version for
your Operating System) Install button to download Aspera® Connect.
5. Once the download is completed, the installation wizard should open automatically. If not,
double-click on the file to install the plug-in. Then, follow the wizard steps to complete the
installation.
Intersect Australia - SpaceShuttle - User Guide
https://docs.google.com/document/d/13E_wPGK4fzd7rrmb8wh0d-YiSwra7nxV_z9ARXKbmCs/edit?usp=sharing
Page 6 of 16
You are now ready to upload, download or access data using SpaceShuttle.
2. Accessing SpaceShuttle Shares
2.1 Connect and transfer
1. Make sure to restart your browser (e.g., Chrome) before taking the following steps.
2. Access SpaceShuttle here. If you get a certificate warning, please proceed with the
request. The SpaceShuttle server is currently using a “self-signed” SSL certificate, and all
communication between the user's browser and the website is encrypted.
3. To access your data, you first need to login. Enter your usual AAF details to login:
First enter your University/Institution, then your usual Institution login name & password. If you
don’t have an AAF login, you’ll need to get your affiliated University/Institution System
Intersect Australia - SpaceShuttle - User Guide
https://docs.google.com/document/d/13E_wPGK4fzd7rrmb8wh0d-YiSwra7nxV_z9ARXKbmCs/edit?usp=sharing
Page 7 of 16
Administrators to add you to the organisation's directory service (LDAP) or get them to create an
account for you in https://vho.aaf.edu.au/
4. If you want your collaborators to access SpaceShuttle and they are not part of an
AAF affiliate institution, you need to contact your affiliated University/Institution System
Administrators to create an account for your collaborator in https://vho.aaf.edu.au/. The detailed
FAQs on this can be found here. If you are still in doubt, please do not hesitate to contact
help.intersect.org.au or your eResearch Analyst for help.
5. Your Share Manager now needs to provide you with access to the data within the
share on your request. You will then be able to see the research data.
5. Depending on your access rights, you can use different functionalities of SpaceShuttle, such
as creating folders, downloading, uploading, renaming, and bookmarking files and folders.
Enjoy!
Intersect Australia - SpaceShuttle - User Guide
https://docs.google.com/document/d/13E_wPGK4fzd7rrmb8wh0d-YiSwra7nxV_z9ARXKbmCs/edit?usp=sharing
Page 8 of 16
3. Browsing SpaceShuttle Shares
When you browse a Share, you see all files and directories within that Share.
Note: You might not see all the options listed. You will only see options that you have permissions to
access. If you believe that you have restricted access in error, contact your system administrator.
You can also search for a directory name and sort the directory list. You can perform following actions
on a directory or directories:
Action
Description
Bookmark
Create a shortcut to the selected directory. If you do not select any
directory, the bookmark is the node's root directory.
Download
Download the selected directory or directories using the Aspera®
Connect™ browser plugin.
Upload
Upload a file or folder from another machine to this node using the Aspera®
Connect™ browser plugin.
Delete
Delete the selected directory or directories.
New Folder
Create a new directory on the node
Rename
Rename an existing directory on the node. Ensure naming does not include
the “/” symbol.
Create Share
Create a share for the selected directory. Ensure naming does not include
the “/” symbol. You can only select one directory at a time. Click Create
Share to open the New Share dialog. This dialog is pre-populated with the
Intersect Australia - SpaceShuttle - User Guide
https://docs.google.com/document/d/13E_wPGK4fzd7rrmb8wh0d-YiSwra7nxV_z9ARXKbmCs/edit?usp=sharing
Page 9 of 16
node and directory information. To complete the other fields, you must be
an administrator.
4. Searching SpaceShuttle Shares
You can perform simple or advances searches in your Share. To perform a search on a share or
node, select a share or node on your Home page, then within the Name: box, enter a keyword for
your search. You can also enable or disable the Search sub-folders option. SpaceShuttle appends
any keyword that you enter with *. Therefore, if you enter the keyword "Dec", the search actually
performs as "*Dec*" and SpaceShuttle returns any string that contains this word.
To perform a keyword search and limit the number of results, use Advanced search. You can set the
following filters:
●
●
Size - Enter minimum or maximum values. Include the unit of measure as bytes, MB, or GB.
Last Modified - Enter from date or to date. Select a date from the pop-up calendar.
5. Using SpaceShuttle Shares
Use the drop-down menu to the right of the SpaceShuttle share’s name to browse, view activity, make
comments, and choose notification options.
Intersect Australia - SpaceShuttle - User Guide
https://docs.google.com/document/d/13E_wPGK4fzd7rrmb8wh0d-YiSwra7nxV_z9ARXKbmCs/edit?usp=sharing
Page 10 of 16
These drop-down options are described in detail below:
Function
Description
Browse Share
See Browsing Shares
Activity
Select Activity from the drop-down list to the right of the Share’s name. A list
of all activity that has occurred on the selected Share appears. You can also
search for activity based on tagged events or a date range
Comments
Select Comments from the drop-down list to the right of the Share’s name. A
list of any comments that have been made about the Share appears. You
can also add your own comments
Notifications
Select Notifications to choose to be notified when new content has been
added to your Share. NOTE: This needs to be done for the individual Share
Permission as well as in the User Preferences at top right (Drop down from
User name)
If you are one of the Share Managers, you are also able to Create Shares by selecting the check box
next to the folder to be shared & clicking on the “Create Share” icon. Create a share for the selected
directory. You can only select one directory at a time. Click “Create Share” to open the New Share
dialog. This dialog is pre-populated with the node and directory information. To complete the other
fields, you must be an administrator.
6. Transferring Data
6.1. Set up your bandwidth limits
Aspera is configured by default to use the maximum available bandwidth within your network, which
Intersect Australia - SpaceShuttle - User Guide
https://docs.google.com/document/d/13E_wPGK4fzd7rrmb8wh0d-YiSwra7nxV_z9ARXKbmCs/edit?usp=sharing
Page 11 of 16
can potentially saturate the entire network traffic. Hence, we recommend you to check with your
Institution’s System Administrators the bandwidth limits available for your transfers.
To set up a bandwidth limit:
1. Select Preferences > Bandwidth.
2. Change the transfer speed settings to control transfer speed.
Your System Administrator may also allow you to use higher bandwidth during low-traffic times of day
(i.e. outside normal business hours or weekends).
Follow the same instructions to adjust the bandwidth settings.
6.2. Set up your download location
By default, Aspera Connect downloads files to the current user's desktop. You can change the
download location within the ‘Downloads’ section as follows:
1. Select Preferences > Download
2. To save a default location, select ‘Save downloaded files to’ and specify the path to save the
downloaded files.
3. Alternatively, to manually choose a location for each download session, select ‘Always ask me
where to save downloaded files’.
Intersect Australia - SpaceShuttle - User Guide
https://docs.google.com/document/d/13E_wPGK4fzd7rrmb8wh0d-YiSwra7nxV_z9ARXKbmCs/edit?usp=sharing
Page 12 of 16
You can set the retry rule within the ‘Retry’ section to automatically restart the failed transfer by
enabling or disabling: Automatically retry failed transfers box and filling in the appropriate values.
6.3. Initiate a transfer
You can upload or download data from any Share for which you have permissions.
Select one or more files or folders from an Share for which you have download permission.
1. Drag the files or folders to an Share for which you have upload permission, or to a bookmark.
When a transfer occurs, a transfer window opens showing the current status of each transfer that is
being made.
Intersect Australia - SpaceShuttle - User Guide
https://docs.google.com/document/d/13E_wPGK4fzd7rrmb8wh0d-YiSwra7nxV_z9ARXKbmCs/edit?usp=sharing
Page 13 of 16
In the Transfer dialog, you can also perform the following actions:
Action
Description
Pause
Temporarily pause a transfer.
Resume
Resume a previously paused transfer.
Clear all
Clear transfers from the list.
Remove
Remove transfer from the list. (This will also cancel any paused transfers.)
If you have an upload or download ‘hang’ without completing, try the ‘restart’ button in the Connect
transfer window and wait. Only do this one time! - if the item remains ‘hanging’, please contact
help.intersect.org.au.
7. Configuring User Preferences in Shares UI
To configure your individual user Share's settings, select your username in the top right corner and
select Preferences.
Here you can change general settings such as your first and last name, your password, and your
email address. You can also change your email notification options, configure your system display,
and choose to suppress the Aspera® Connect™ install dialog.
Intersect Australia - SpaceShuttle - User Guide
https://docs.google.com/document/d/13E_wPGK4fzd7rrmb8wh0d-YiSwra7nxV_z9ARXKbmCs/edit?usp=sharing
Page 14 of 16
7.1 Email Settings
Users can personalise the email notifications they receive from SpaceShuttle Shares by selecting
Email Settings => Edit (Note: All notifications are enabled by default).
●
●
“Notify me when I am granted access to a new Share” - Receive an email whenever you are
given access to a new Share.
“Notify me when a new transfer is completed to an Share” (Note: Share notification must also
be enabled) - Receive an email when new content has been added to your Share. An admin
must enable notifications for that Share for you to receive an email.
7.2 Display Settings
Time Zone
The time zone for your system
Date Order
The order that date, month, and year are displayed
Date Delimiter
Separates the date, month, and year
Time Format
Displays a 12-hour time format or a 24-hour time format
Number Delimiter
Denotes the thousands place in a number. For example, if a
comma (,) is chosen as the delimiter: "1,000". Note: Number
delimiter and separator cannot be the same.
Number Separator
Denotes the decimal place in a number. For example, if a period ()
is chosen as the delimiter: "10.25". Note: Number delimiter and
separator cannot be the same.
Items Per Page
The number of items the Share will display per page. The default is
50.
7.3 Connect Install Dialog
As you navigate through the Share web UI, each page checks for the presence of the Aspera®
Connect™ browser plug in. If the plug in is not present, it will show a message asking to download the
plug in.
To suppress this pop-up, select your username in the top right corner, and select Preferences=> The
lowest setting is "Connect Install Dialog".
Intersect Australia - SpaceShuttle - User Guide
https://docs.google.com/document/d/13E_wPGK4fzd7rrmb8wh0d-YiSwra7nxV_z9ARXKbmCs/edit?usp=sharing
Page 15 of 16
Changing the value for this option from the default "false" to "true" will stop Shares from autoprompting re Connect on each visited page.
If Connect continues to remind you to install Connect when you have already installed it, try this
workaround:
http://www.intersect.org.au/content/aspera-issue
7.4 Technical Support
If you need any assistance with SpaceShuttle, please contact the eResearch Analyst at your local
institution or contact help.intersect.org.au
Intersect Australia - SpaceShuttle - User Guide
https://docs.google.com/document/d/13E_wPGK4fzd7rrmb8wh0d-YiSwra7nxV_z9ARXKbmCs/edit?usp=sharing
Page 16 of 16