1
User Guide
2015-04-02
All trademarks used in this document are the property of their respective owners.
Turn-Key Systems states that the names are used to the benefit of the trademark
owner with no intention of infringement of the trademark.
1. Introduction to TopLeaf
This User Guide introduces the TopLeaf system, describes its features in detail, and sets out the
steps you need to set up a document and produce your desired output. See Section 1.2 for a
complete description of the available documentation.
1.1 What is TopLeaf?
TopLeaf is an XML or SGML rendering system for the production of high quality PDF and hard copy
output. It allows you to create stylesheets that apply consistent formatting to your content. The
same stylesheets used to create paginated output can also be used to create corresponding RTF
and HTML output.
TopLeaf can be used for looseleaf publications to automatically produce only those pages that
have changed between two versions of a document.
TopLeaf comes in two forms:
•
a desktop workstation;
•
a server based system run directly from third party applications such as data repositories.
Page 1
User Guide
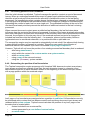
1.1.1 Where does TopLeaf fit into your document production system?
TopLeaf uses content that you create with an XML editor and store in a content management
system or as ordinary files. The content is transformed and formatted into output for publication.
TopLeaf implements the concept of single source publishing. The content does not contain any
formatting information. The final format is applied by a stylesheet that defines rules about what
each part of the output should look like. The advantages of this approach are:
•
The output format is consistent, since the same rules are applied to all content.
•
The same content can be used to produce a different format simply by using a different
stylesheet.
TopLeaf includes a set of stylesheet management tools that simplify the process of creating and
testing stylesheets.
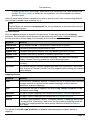
1.2 Structure of the documentation
TopLeaf documentation consists of the following volumes:
•
this User Guide — a general introduction to TopLeaf;
•
the Page Layout Guide — describes how to control the way formatted output is positioned
on the page;
•
the Mapping Guide — instructions on how to control the appearance of formatted output;
•
the TopLeaf API Manual — explains how the API enables TopLeaf to be driven by third
party applications, and provides a full explanation of all available function calls. Note that
you need to have purchased an API licence for this facility to be available.
Documentation for older versions of TopLeaf can be downloaded from
http://www.turnkey.com.au/tksweb/PDFs/TL7LG.pdf.
1.3 Structure of this volume
The TopLeaf User Guide contains the following chapters:
Page 2
Introduction to TopLeaf
•
•
•
•
•
•
•
•
•
Chapter 2 is a quick introduction to TopLeaf.
Chapter 3 describes the typesetting features provided by TopLeaf.
Chapter 4 describes how to set up and use the TopLeaf work area.
Chapter 5 describes the options for creating PDF renditions of your data.
Chapter 6 describes how you can automatically create tables of contents, indexes and
other generated material.
Chapter 7 discusses HTML and RTF output from TopLeaf.
Chapter 8 deals with looseleaf publishing.
Chapter 9 describes the extensions available for processing DITA content.
Chapter 10 describes the main TopLeaf window and toolbars.
1.4 Assumed knowledge and conventions
This documentation assumes that you have a working knowledge of XML syntax and structure.
References to characters use the standard “U+NNNN” notation for Unicode code points. The code
point value is always expressed as 4 hexadecimal values.
The notation File » Open... means to select the File menu and click on the Open... item.
Page 3
User Guide
2. Quick start guide
If you are new to TopLeaf or to XML typesetting the following will give you an introduction to the
system.
2.1 Installing TopLeaf
If you haven't already installed TopLeaf, you can download the current version from
http://www.turnkey.com.au/tksweb/topleaf_eval.html. Run the downloaded file to install
TopLeaf.
When you first run Topleaf it will request a licence key. The download page has a form you can fill
in to request an evaluation licence key. The evaluation licence allows you to try out all of the
features of the system. Output created with an evaluation licence will have a watermark applied to
it.
A Java™ runtime must be installed in order to use TopLeaf. The location of the Java runtime is set
in the TopLeaf workstation Preferences dialog. If you don’t have a Java runtime you can download
one from http://www.java.com.
If you use EPS (Encapsulated PostScript®) images you will need to install GhostScript. See
Section 12.1 for more information.
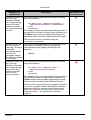
2.2 Creating a PDF
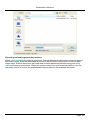
When you start TopLeaf the workstation interface window will appear. The following will guide you
through the process of creating a PDF using the menu interface. For example, File » Open... means
to select the File menu and click on the Open... item.
Note that menu commands usually have equivalent toolbar buttons or keyboard shortcuts. See
Chapter 10 for a complete description of the interface.
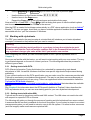
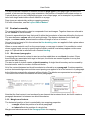
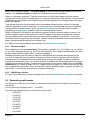
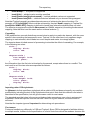
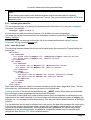
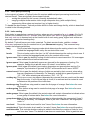
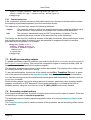
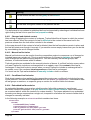
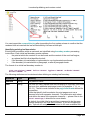
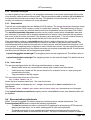
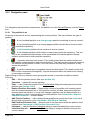
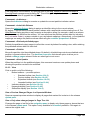
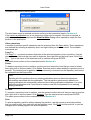
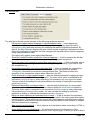
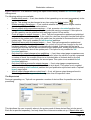
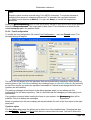
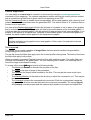
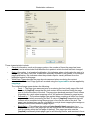
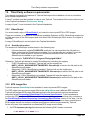
First select File » Open... to display the following dialog:
Click the “+” icons to open the Demonstrations and Introduction levels and click on Tutorial to
select it as shown above. In TopLeaf terminology this is called a partition. Click the Open button to
open it.
The title bar of the main window will now show the name of the partition that is open. Select
Commands » Compose to create a rendition of the document contained in the partition. When
composition is complete the first page of the document will appear in the preview pane.
Select Page » Zoom to choose how much of each page is displayed. You can also right-click in the
preview pane to select the zoom.
You can navigate through the preview pages in a number of ways:
Page 4
Quick start guide
•
Use the Page Up and Page Down keys to move to the next or previous page.
•
•
•
Use the buttons on the Preview toolbar:
Use the items in the Page menu.
Expand the Pages item in the left-hand pane and double-click a page.
Now select File » Create PDF.... Press OK on the first dialog that opens to use the default options
and choose a location to store the PDF file in the second.
After the PDF is created it should open automatically in a PDF viewer application (such as Adobe®
Reader®). If it does not open, check that you have a suitable application installed and that it is
associated with the “.pdf” file extension in Windows.
2.3 Working with stylesheets
The PDF you created in the previous step is a tutorial that will introduce you to basic stylesheet
concepts. It is based on the partition that you used to create it.
Warning:
Experimenting with the tutorial partition is a good way to learn how stylesheets work.
However, note that the TopLeaf installer replaces files in the Demonstrations folder, so
any stylesheet changes you make will be lost if you install a new version.
After completing the tutorial you can find a description of how TopLeaf stylesheets work in
Chapter 3.
Once you are familiar with the basics, you will want to start working with your own content. The way
to get started depends on the sort of content you have. The following describes the process for
different types of data.
2.3.1 Getting started with DITA
DITA (Darwin Information Typing Architecture) is a standard for representing topic-based
documents in XML. As well as a schema it defines how specific tags should be processed during
publishing.
If your content conforms to the DITA specification you can make use of the resources provided with
TopLeaf to accelerate your stylesheet development. The way to use these resources depends on
the publishing environment you are using. There is a supplement to this documentation called the
TopLeaf for DITA Guide located at
http://www.turnkey.com.au/tksweb/xmtp/webhelp_out/guide.html that describes the available
options.
See Chapter 9 for information about the DITA-specific facilities in TopLeaf. It also describes the
DITA stylesheets which you can use as a starting point for your own stylesheet development.
2.3.2 Getting started with other XML
TopLeaf can be used to format any well-formed XML content. The XML does not need to be valid
with respect to a specific DTD or schema.
The following will guide you through the process of creating an initial stylesheet from some content.
It assumes that the content is available on the local file system. If your content is stored in a content
management system you will need to extract a copy to the file system. If it refers to other resources
(such as images) make sure these are copied as well.
Page 5
User Guide
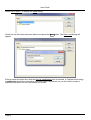
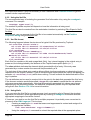
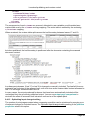
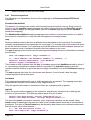
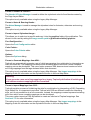
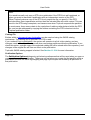
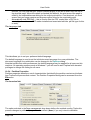
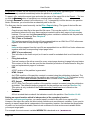
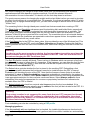
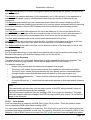
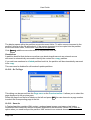
Select File » Open... to display the Open dialog.
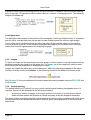
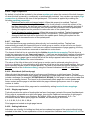
Select the top-level item as shown above and press the New button. The New Level dialog will
appear.
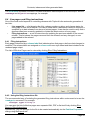
Enter a name and make sure that the Level is a publication box is checked. In TopLeaf terminology
a publication stores the information associated with a stylesheet, so you will need to create a
separate publication for each stylesheet you create.
Page 6
Quick start guide
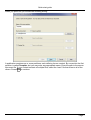
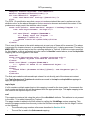
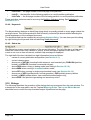
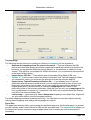
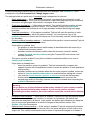
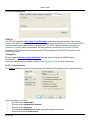
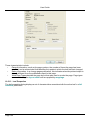
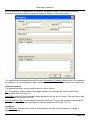
When you press OK you will see the following dialog:
A publication contains one or more partitions, each defining its own content. By convention the first
partition is called Template, but you may enter any appropriate name. Enter the path to the source
document file. If your content consists of multiple files, select the “main” file that refers to all of the
others. Press Next to continue.
Page 7
User Guide
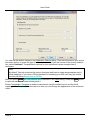
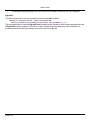
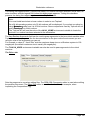
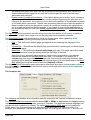
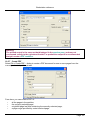
You can use the default values on the Publication Options dialog. TopLeaf will examine your source
document and try to guess the type of table markup used. If you are unsure of the correct model to
use, select Unknown. The publication options for your stylesheet can be changed later if
necessary.
Note:
By default TopLeaf examines the source document and tries to create an appropriate set of
initial mappings. If you have a CSS stylesheet for formatting your XML you may get a better
result by choosing Import from a CSS file.
After you press Finish the new partition will be selected in the Open dialog. Press the Open button
to open the partition and start working with it.
Select Commands » Compose to render the document using the default layout and the initial
mappings. See Chapter 3 for information on how you can change the appearance of the rendered
output.
Page 8
Typesetting concepts
3. Typesetting concepts
This is a description of how TopLeaf assembles formatted content and the type of structures you
can define in your stylesheet.
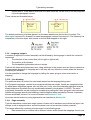
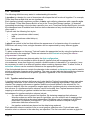
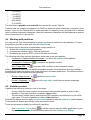
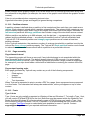
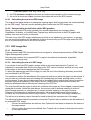
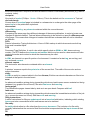
The process of applying a stylesheet is represented in the following diagram.
In summary:
•
The appearance of the content (text and images) is controlled by the mappings.
•
The layout defines where the content appears in the output.
•
Additional content, such as headers and footers, can be created by the stylesheet.
3.1 Mapping basics
A stylesheet defines a number of mappings. These mappings are applied when certain events
occur while processing the input. Examples of events are:
•
When a tag is read from the content.
•
When a header or footer is placed on the page.
•
When a footnote is generated.
Each mapping defines a number of properties that affect the appearance of the following content.
For example, a mapping could define the font and size for the following text.
See the Mapping Guide for a complete description of the different types of mappings and their
properties.
3.2 Layout basics
A layout defines a number of rectangular areas on the page into which content is assembled. The
boundaries of these areas control the arrangement of content as described in Section 3.3.
Page 9
User Guide
The layout defines a number of different formats or page types. Each page type can define the
number of columns on the page, page orientation, the position of headers and footers and so on.
TopLeaf allows you to use multiple page types on an output page, so for example it is possible to
have both single and double column material on a page.
Page types are selected by setting a mapping property.
For more information, see the Layout Editor Manual.
3.3 Content assembly
The material that forms the output is composed of text and images. Together these are referred to
as the content of the document.
Content is assembled into lines that must fit within the boundaries of an area defined by the layout.
The area defines a column with a left and right edge. The distance between the left and right
edges, or column width, determines the maximum length of a line of content.
Once a line is too long to fit in the column the line breaking rules are applied to find a place where
a new line can start.
When no more material can fit on the current page, a new page is started. It is possible to control
where a page break occurs by specifying that certain material must always appear on the same
page. In TopLeaf this is referred to as a content binding.
3.3.1 Blocks and paragraphs
A mapping that forces its content to start a new line establishes a new block of content. Since
these blocks are associated with tags in the input, the blocks are nested together in a way that
mirrors the XML hierarchy.
The start or end of a block creates a block boundary. A single block boundary can be caused by
the start and/or end of a number of different blocks.
All of the content between two block boundaries is referred to as a paragraph. Certain properties,
such as horizontal alignment and inter-word spacing are applied to all of the content in a paragraph.
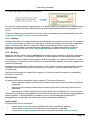
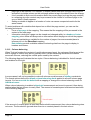
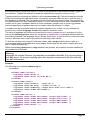
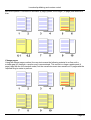
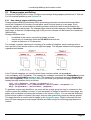
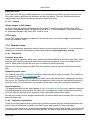
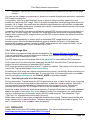
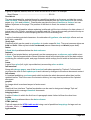
In the following example the elements all form blocks. The blocks are represented as rectangles.
This results in four block boundaries and three paragraphs.
Note that the final content is not enclosed by an element that creates a block, but it still creates a
paragraph because it is between two block boundaries.
3.3.2 Margins and indents
The horizontal position of text is controlled by two mapping properties:
•
a margin affects the position of a whole paragraph.
•
an indent affects the position of a single line.
Margins and indents are set in the Paragraph tab of a mapping.
Page 10
Typesetting concepts
Margins
Each paragraph has a left and right margin property. These properties define the left and right
edges of the paragraph relative to the edges of the column. The left and right margins are set
independently.
A margin property is set for a block and applies to all paragraphs contained in that block. The
effective margin value for a paragraph is the sum of all of the margin properties for the enclosing
blocks.
A margin property can be set to a negative value to move the paragraph edge closer to the column
edge. However, this cannot be used to make the effective value negative, since that would allow
the content to go outside the column. An attempt to do this will cause a typesetting error.
A mapping can reset the margins to ignore margin settings from enclosing blocks. This affects both
the left and right margins.
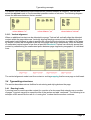
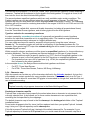
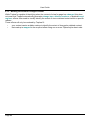
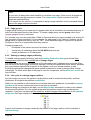
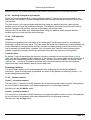
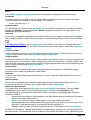
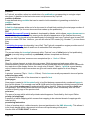
The following diagram illustrates this process:
The column boundaries are shown by the thick-bordered rectangle. The mappings for the elements
shown do the following:
•
The block mapping sets left and right margins.
•
The leftmargin mapping sets a left margin. The margin value is added to the one set by
the block mapping.
•
The rightmargin mapping sets a right margin.
•
The negative mapping sets negative values for both the left and right margins. This has
the effect of allowing the content to move outside the boundaries defined by the block
mapping.
•
The reset mapping resets the margins without setting any margins of its own. This allows
the content to extend to the full column width.
•
The resetmargin mapping also resets the margins and sets its own left and right
margins.
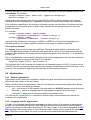
First/left indent
The first/left indent only applies to the first line of a paragraph and affects its starting point relative
to the effective left margin. The indent value is set by the block that contains the paragraph. It is not
affected by the settings of other blocks.
Page 11
User Guide
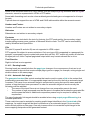
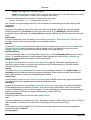
A positive value moves the starting point of the line to the left. A negative value moves the starting
point to the right. This produces what is often called an “outdent” or “hanging indent”. The following
diagram illustrates this:
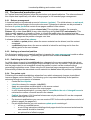
Last/right indent
The last/right indent applies to the last line of the paragraph. Unlike the first/left indent, it is always a
positive value, and specifies how far the last line can extend beyond the effective right margin.
This is often used in conjunction with an effect that uses all the available space on the last line,
such as a space or dot fill. In the following illustration the mapping for section sets a last/right
indent, and a dot fill is generated by the mapping for page.
3.3.3 Images
To insert an image into the output there must be a tag or custom marker in the input stream with an
attribute containing the location of the image file. The Image tab of the mapping is used to name
the attribute and set properties for displaying the image.
Images are treated the same way as text characters. When text and images appear in the same
line they all share a common baseline. In the following illustration the baseline is shown in red:
See Chapter 12 for some additional information about processing images using the EPS, PDF and
SVG formats.
3.3.4 Vertical spacing
The default behavior of TopLeaf is to only include vertical space between paragraphs when it is
required. Space can be discarded in the following situations:
•
at the top or bottom of a page, or the top or bottom of a column in a multi-column layout.
•
where multiple spaces are present at a block boundary all but the largest is discarded.
The second case occurs because the vertical space at a block boundary consists of all of the space
below properties of the blocks that end there, plus the space above properties of the blocks that
begin there.
Page 12
Typesetting concepts
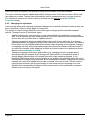
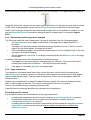
The following diagram illustrates this process:
The title mapping defines a space below of 12 points, while the p mapping has a space above of
6 points. The smaller space is discarded, so the actual space between the two paragraphs is 12
points.
There are mapping properties that can be set to prevent the space from being discarded. See the
mapping paragraph properties for more information.
3.3.5 Leading
Leading is defined as the distance between the baselines of successive lines of type. For example,
if a font style declares a 10 point font size with a 10 point font leading, then successive baselines
will be 10 points apart. With a 12 point font leading, the baselines will be 12 points apart. If
additional vertical space is inserted between paragraphs, the distance between successive
baselines is equal to the size of the inter-paragraph space plus the current font leading.
3.3.6 Binding
Mappings can be used to create a binding between some lines of content so that they will appear
together in the output. This concept is referred to as keep together in some rendering systems.
Lines that are bound together cannot appear on different pages, or in different columns in a multicolumn layout. A common use for binding is to ensure that a title appears on the same page as the
material it introduces.
Binding should be defined only when necessary. If the amount of content bound together exceeds
the depth of the area defined by the layout an error may occur, and the output format may be
compromised.
A binding can be explicitly created by a mapping, or it can be implicitly created by a typesetting
structure or constraint.
Explicit binds
An explicit bind can be created by a block mapping. The types of binds are:
•
bind to following creates a bind between content at the end of one block and the following
paragraph;
•
bind to previous creates a bind between content at the start of a block and the previous
paragraph;
•
bind element content creates a bind between all content enclosed by the current element.
Note that a bind between paragraphs only ensures that the start and end of the two paragraphs will
appear together. It is still possible for a break to occur in either paragraph. Breaks within
paragraphs are controlled by the widow and orphan setting discussed below.
Implicit binds
An implicit bind can be created for:
•
content within a box with a style that does not set the “breakable” property;
•
content within a table row if the table style does not allow row splitting;
•
content within a page segment that does not exceed a specified minimum depth;
Page 13
User Guide
•
•
the last row in a table header, so that it appears with the first row of the table body;
lines in a paragraph to satisfy widow and orphan constraints (see below).
In typesetting terminology, widows and orphans are lines in a larger paragraph that appear by
themselves at the top or bottom of a page or column, and are generally considered to be
undesirable. One of the mapping properties controls the minimum number of lines that are
allowed to appear in these contexts.
For example, if a minimum of 2 lines is allowed at the bottom of a page, then there is an implicit
bind placed between the first 2 lines of each paragraph. Note that this will have no effect on
paragraphs that consist of a single line.
Segment binding
A bind to following defined at an internal boundary creates a bind between the content at the end
of one segment and the content at the beginning of the following segment. A bind to previous
defined at an internal boundary creates a bind between the content at the beginning of one
segment and the content at the end of the previous segment. A content bind is automatically
cancelled if an internal boundary is declared within the scope of bound element content.
Image scaling
In some cases it may be necessary to reduce the size of images in order to place bound content.
See the section on image scaling in the Mapping Guide for more information.
3.3.7 Paragraph merging
Paragraph merging allows block boundaries to be discarded so that the content of two adjacent
paragraphs is joined into a single paragraph. A mapping indicates that this should occur by setting
the merge with following paragraph property.
In the following example all of the mappings create blocks. The sect mapping creates a merge
with the following block, so the content of the next page element is in the same paragraph. The
page mapping inserts a dot fill before its content.
A mapping can indicate that it will not participate in a merge even if one is requested by the
preceding block. This is done by setting the disable merge with previous property. In the above
example, the sect mapping sets this property, so the “Rendering” and “Typesetting” paragraphs
do not merge.
3.3.8 Labels
A label is a piece of content that appears at the start of a paragraph and spaced so that it lines up
with similar labels in the same column. Labels are most often used for bullets or numbers at the
start of list items.
A label is treated as a block mapping that merges with the following paragraph.
The position of the label content and the content after it are controlled by the following mapping
properties:
•
The label offset is the distance from the start of the label content to the current left margin.
It must be a positive value.
•
The minimum gap is the minimum distance from the end of the label to the start of the
Page 14
Typesetting concepts
content after it. If the label is wider than the label offset this can be used to visually separate
it from the paragraph content.
These values are illustrated below.
The default positioning of a label places it on the same baseline as the first line of content. The
label style can be set to “dropped” to make the paragraph content flow around it. The following is a
comparison of the two styles, with normal on the left and dropped on the right:
3.3.9 Language support
A number of aspects of content assembly can be affected by the language in which the content is
expressed:
•
The direction of the content flow (left-to-right or right-to-left).
•
The position of line breaks.
•
The acceptable hyphenation points in words.
TopLeaf will detect and process any xml:lang attributes in the content and use them to determine
the appropriate language. A language set in this way will only affect the content within the element
containing the attribute.
It is also possible to change the language by calling the text-properties command in a
mapping.
3.3.10 Line breaking
The positions where a content line can break depend on the language being used.
For European languages, content lines usually break between words. Words are separated either
by white space characters (space, tab, line feed, etc.) or by one of the character specified as word
break characters. By default the only word break character is the hyphen (U+002D). The set of
word break characters can be changed in a mapping by calling the text-properties command.
Additional language specific line breaking rules are applied when processing Chinese, Japanese,
Korean and Arabic content. For more information see Section 11.2.16.
Lines can also be broken by using hyphenation as described in Section 3.6.
3.3.11 Page assembly
TopLeaf assembles content as a single column of data until it reaches a point where the layout can
change, such as a page break or a switch between one-column and two-column material.
This design affects the rendering of a document in the following ways:
•
Data cannot flow to a format with a different column width unless the mappings force a new
Page 15
User Guide
•
•
page type to be selected. For example, a chapter cannot start with a single-column layout
and switch to double-column on the next page without a tag in the data to force the change.
It isn’t possible to find or set information about the current page (such as the page number)
in a mapping since the content may be processed in the context of a different page to the
one on which it finally appears.
Setting a variable to appear in a header or footer can cause unexpected results for the
same reason.
To avoid problems with variables that depend on or affect the page context, you can use the
following techniques:
•
Force a new page in the mapping. This means that the mapping will be processed in the
context of the new page.
•
Information relating to a page can be viewed and changed safely in a header or footer
mapping, since these will always return information about the page on which they appear.
If you are maintaining a variable for the number of pages, the recommended place to
increment it is in the $headfoot mapping.
Data telltales provide a reliable means of extracting data from the page to display in
headers and footers.
3.3.12 Column balancing
When TopLeaf renders the content of a multi-column page layout, the columns of that layout at the
end of a page or section may be only partially filled. Column balancing distributes the content
across all columns, reducing the vertical space used by the content.
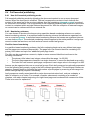
The following diagram illustrates the two styles. Column balancing is disabled for the left sample
and enabled on the right.
In some cases it will not be possible to make all columns equal because of binding constraints.
The format options define the default column balancing mode applied to all multi-column page
layouts. You can override the default with a mapping or change the column balancing mode for
individual cases.
When column balancing is enabled a threshold measurement can be set to prevent it from being
applied when the last column is nearly filled. The amount of unused space is determined as shown
in the following diagram:
If the amount of unused space is less than the threshold measurement then column balancing does
not occur. The threshold is ignored when there is no content placed in the last column.
Page 16
Typesetting concepts
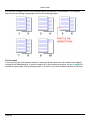
The default column balancing mode distributes the content between all columns. You can also
select the minimal mode to use the smallest possible number of columns. The following diagram
shows the difference between the two modes.
3.3.13 Vertical alignment
When no additional content can be allocated to a page, TopLeaf will vertically align the allocated
content within the page data area. Vertically aligning the page content involves redistributing the
unallocated vertical space in order to position the content at the top, bottom, or middle of the page.
By default, content will be aligned to the top of the page data area. Alternatively, when the amount
of unallocated vertical space is less than a specified threshold, Topleaf can vertically spread that
content by redistributing the unallocated space between page segments, paragraphs, or individual
lines.
The vertical alignment mode is set from a start or end tag mapping that forces a page or leaf break.
3.4 Typesetting structures
The section describes various facilities for structuring and styling data on the page.
3.4.1 Running heads
A running head is used to provide context for a section of a document that extends over a number
of pages. A typical usage is to repeat the title of the section and add “continued”. The following is an
example of this as well as the use of a “running foot” to show that the section continues.
Page 17
User Guide
Running heads and feet are placed in the same area as the page content. To place a continuation
heading outside of this area use a header or footer mapping.
To create a running head, use the Assign content to running head property of the mapping. The
running head will stay in effect until it is replaced by different content, or it is cancelled by a
mapping with the Cancel running head property set.
The style and content of a running head is set by one of the note mappings. A running foot is
enabled whenever a running head is active.
The note mappings allow you to add content to the text that is displayed. For example, the “—
continued” in the example above would be specified by the mapping post-content. The content for a
running foot is entirely determined by the mapping.
The appearance of running heads and feet can be enabled and disabled by options in the layout.
There are five running head levels arranged in a hierarchy. These can be used to reflect the
document structure. For example, the level 1 running head could be used for the chapter title, level
2 for the section title, level 3 for a subsection, and so on. Defining a running head has the effect of
cancelling all the lower level running heads. For example, defining a level 3 running head will
cancel levels 4 and 5.
Note:
The data column width determines the maximum available measure for a running head and
running foot. For this reason, running heads are automatically reset at any forced segment
boundary (for example, when changing from a single column to a double column layout). The
inclusion of running heads is not recommended on pages assembled using more than one
page type.
3.4.2 Data telltales
Data telltales provide a means of defining pieces of content for a range of pages. This content can
be used to display contextual information in headers or footers.
Page 18
Typesetting concepts
It is possible to define up to 9 different telltales by using the Assign content to data telltale mapping
property. The telltales are independent, so defining one does not affect the others.
A telltale is set for the first page on which it appears and for all following pages until it is replaced or
cancelled by the Cancel data telltale property.
A header or footer mapping can extract various information about the telltale values on a page,
such as whether a value was defined before the page started, the last value defined on the page,
and so on.
One possible use of telltales is where the content consists of alphabetically-ordered items. By
setting a telltale for each item a header can show the first and last items on each page as shown in
the following example.
3.4.3 Notes
It is a common requirement to place a piece of content outside the normal flow of the text, optionally
with a small marker to alert the reader to its presence. This allows the reader to locate it if
necessary without interrupting the flow of the main content. TopLeaf uses the term note to describe
this type of material.
There are several types of notes, distinguished by where the content of the note is displayed:
•
the content of a column footnote is displayed at the bottom of a text column.
•
the content of a page footnote is displayed at the bottom of a page.
•
the content of a sidenote appears alongside the place where it is referenced.
•
the content of an endnote appears at the end of the document, or at the end of part of the
document (for example, at the end of a chapter).
Footnotes and sidenotes are assigned by using mapping properties found on the Content tab.
There is no direct support for endnotes, but these can be created as described below.
Footnote types
The distinction between column and page footnotes is most apparent in a multi-column layout.
Page 19
User Guide
The following example shows the use of column footnotes:
The following is the same content using page footnotes:
It is possible to have both column and page footnotes present on the same page. When both are
present, the page footnotes always appear below the column footnotes.
When using page footnotes it may be necessary to adjust the area used to display the footnote
content. The <note-properties/> command can be used to specify the appropriate layout
page type to use.
Page footnotes can be formatted into two columns by setting an option in the current layout.
Footnote structure
A footnote consists of:
•
A reference marker in the main content.
•
A label in the footnote display area that identifies the footnote.
•
The body of the footnote containing its content.
Page 20
Typesetting concepts
In the examples above the reference marker and label are both numbers enclosed in parentheses.
The style of these is controlled by note mappings.
In addition, there is an optional separator that appears between the first footnote and the main text.
Each type of footnote has a mapping which controls the appearance of the separator. In the
examples above the separator is a short horizontal rule.
By default footnotes are numbered starting from 1 and continue throughout the document. Options
for controlling this, as well as using non-numeric markers are available by using the <noteproperties/> command.
Sidenotes
The content of a sidenote appears alongside the main content in an area defined in the layout.
Unlike a footnote, a sidenote does not usually display a reference marker in the main text, since its
vertical position associates it with the content. However, it is possible to create a marker by
inserting custom content when the sidenote is defined.
The vertical position of a sidenote is determined by the position of the line of content with which it is
associated. Sidenotes are arranged into the area defined by the layout in the order in which they
occur. The style of the sidenote content is controlled by the $sidenote note mapping.
If there are multiple sidenotes associated with a line the first one will always be at the same vertical
position as the content line. If necessary, extra vertical space will be added before the content line
to allow this.
By default the baseline of the content line is aligned with the baseline of the first line of the sidenote.
The <note-properties/> command allows the alignment method to be altered.
The following diagram illustrates sidenote alignment.
In the above the $sidenote mapping draws a rule below each sidenote. The red lines identify the
points in the content which are associated with the sidenotes. Note that the second paragraph has
been moved down so that the final sidenote can be aligned correctly.
Endnotes
There are no mapping properties specifically intended for the creation of endnotes. However, they
can be created using custom content in mappings. The following is a summary of what is required.
If you are not familiar with the use of custom content consult the Mapping Guide.
•
In the $document mapping set a counter variable to zero, and initialize a variable to
contain the notes to an empty string.
<set var="NoteCount" value="0"/>
<set var="Notes" string=""/>
Page 21
User Guide
•
•
In the mapping for the note, scan and suppress the note content. Increment the note
counter. Emit a note reference, and add the note content to the variable.
<set var="NoteCount" value="{NoteCount}+1"/>
<NoteRef>({NoteCount})</NoteRef>
<set var="Notes">
{Notes}
<Note label="{NoteCount}"><content/></Note>
</set>
At the appropriate place for the notes, emit the notes variable. You will need to create a
%Note custom marker to format each note as required.
3.4.4 Floats
A float is a piece of content that can be repositioned to appear at the top or bottom of a page. This
is often used to make the text flow around large objects like images or tables to avoid large areas of
empty space on the page and to avoid breaks in the text.
A float is created by capturing some content (typically by using the scan and suppress mapping
properties) and using it with the float command.
The position in the content where the float command is issued is called the reference point of the
float. The position of the float is subject to the following constraints:
•
A float will always be positioned after its reference point.
•
The width of a float is determined by the layout in effect for its reference point. If the layout
page type is changed any pending floats are rendered in the current format before the new
format takes effect.
The <float-properties/> command allows you to control aspects of float placement, such as
how much space to leave between a float and the page content, and the maximum percentage of a
page that can be occupied by floats.
3.4.5 Boxes
A box can be used to apply a border and/or a color fill to one or more contiguous paragraphs,
tables, or images.
A box starts when a mapping sets the Start box property and ends when a (possibly different)
mapping sets the End box property.
The appearance of the box is determined by the box style that is in effect when it starts.
One of the properties of the box style is whether the content within the box is “breakable”. If the
Breakable box property is not set an implicit bind is applied to the box content.
TopLeaf does not support general nesting of boxes. The only nesting allowed for boxes is that a
box whose style has the breakable property set can contain a box that is not breakable. See
Section 11.4.8 for more information on this and other box limitations.
3.4.6 Tables
TopLeaf supports either CALS or HTML style table markup. The type of markup used can be set in
the Format » Options... dialog.
The table markup defines the row and column structure of the rendered table. Other aspects of the
appearance, such as border color and cell padding, are controlled by the table style in effect when
the table starts.
The table style can be set by the properties on the Table tab of the mapping, or by using the
<table-properties/> command.
Page 22
Typesetting concepts
It is also possible to render content that is not marked up as a table in tabular form. Mappings can
use the custom table commands to arrange content into rows and columns.
3.4.7 Margin rules
Margin rules, or change bars, are annotations drawn alongside content, often to indicate where
material has been added or changed.
To use margin rules the layout must define where they will be positioned.
A margin rule is created by either:
•
setting the Start margin rule and End margin rule mapping properties, or
•
using the marginrule command.
There is a special type of marker intended to indicate that content has been deleted. This type of
marker does not have a start and end because it is used to mark a single point. Deletion markers
can only be created by using the <marginrule/> command.
The appearance of margin rules and deletion markers can be controlled by using the
<marginrule-properties/> command.
3.4.8 Links
A link is an object in the output that can be activated by the user to show a different part of the
document or an external resource. They are sometimes called “hyperlinks”.
A link requires:
•
a piece of content that will be used to create a link in the output (for example, a phrase or
image), and
•
a target that is shown when the link is activated.
A link is created by assigning the value of an attribute to the Link to Target using attribute mapping
property. If there is no suitable attribute in the source data, you can use the value of a custom
marker attribute to assign the link target.
A target can be defined in two ways:
•
Use the Set Target ID from attribute property to create a target that points to the element
that triggered the mapping. The values in the attributes for the link and target elements
must match.
•
Certain values of the link attribute define an existing target. For example, a link value
beginning with “http://” indicates that the target can be found by interpreting the attribute
value as a Uniform Resource Identifier.
The composition engine does not attempt to check that links are valid. Links are implemented as
part of the output creation. When creating a PDF you can set values in the PDF profile to indicate
how invalid links should be processed.
Link content
In some cases all or part of the content for a link can be generated by the stylesheet. For example,
you may wish to add the page number of the link target.
The Xref file described in Section 6.3 can be used to generate this type of content.
3.5 Character rendering
This section describes how TopLeaf determines the appearance of characters placed on the page.
Page 23
User Guide
3.5.1 Definitions
The following definitions may assist in understanding this section.
A typeface is a design for a set of characters with shapes that will work well together. For example,
Times New Roman and Arial are two typefaces.
Each typeface typically contains a number of fonts, each defining characters with a specific style.
For example, Times New Roman Bold is a font in the Times New Roman typeface. (In classical
typesetting terminology a font also has a specific size, as in Time New Roman Bold 9 point, but with
the widespread use of scalable fonts that can define characters of any size this distinction is less
often made.)
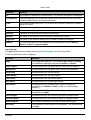
TopLeaf uses the following font styles:
•
regular (sometimes called roman).
•
bold.
•
italic (sometimes called oblique).
•
bold italic.
A glyph is a symbol in the font that defines the appearance of a character when it is rendered.
Since there are many fonts, a single character can be represented by many different glyphs.
3.5.2 Procedure
To place a character on the page, TopLeaf locates the appropriate font by using the typeface and
style selected by the mappings. These are selected on the Font tab or by using the <fontproperties> command.
The available typefaces are determined by the font configuration.
In some cases it is not possible to define a specific typeface that will be appropriate in all
circumstances, since most fonts only contain a limited number of characters. For example, it may
be necessary to switch to a different typeface when rendering Japanese data. To allow for this, a
selection scheme can be created to determine the appropriate typeface.
If the font selected does not contain the character to be rendered, a character map can be used to
select an alternate character and/or typeface. The map can also indicate that a particular character
should always be rendered with a specific typeface, regardless of the font selected by the
mappings.
3.5.3 Typeface selection scheme
A typeface selection scheme defines a set of rules that the TopLeaf typesetting engine uses when
rendering a character in the context of a mapping. When a mapping is processed, TopLeaf first
checks if the mapping references a typeface selection scheme defined in the scheme file. If a
scheme is defined, then the composition engine applies the typeface selection rules declared for
that scheme. If a typeface selection scheme cannot be located, then TopLeaf assumes that the
mapping is referencing a typeface installed on the current platform.
Advantages of a typeface selection scheme include:
•
you can define a set of generic font families. By declaring mappings that reference
selection schemes, rather than specific typefaces, you can create a set of mappings that
are both publication and system independent. Migrating a set of mappings to a different
publication (or platform) is simplified — you only need to declare or adjust a single
publication selection schemes file.
•
the typeface selected can depend on the data being rendered.
Each selection scheme consists of one or more typeface selection rules. TopLeaf tests each
selection rule in a scheme in the order they are specified. The first one which contains a glyph for
Page 24
Typesetting concepts
the character being rendered is chosen. If none of the typefaces in the scheme contain a glyph for
the character, TopLeaf will attempt to render the character by using the character map.
Typeface selection schemes are defined in a file called scheme.cfg. TopLeaf locates the scheme
file by first checking the publication folder, followed by its parent folder and so on, until the root of
the repository is reached. The first instance found of a file with this name is used. The scheme.cfg
file contains data in an XML-compatible format. The root element should be called <schemes> and
contain one or more <scheme> elements. Each <scheme> contains one or more <typeface>
elements specifying a typeface that may be chosen when this scheme is in effect.
A condition can be associated with each typeface selection rule, so that it is only available for
selection for a certain language, locale and/or specific character codes.
The value of language and locale can be set by the <text-properties/> command or by the
value of the xml:lang attribute when the <topleaf-properties/> command indicates that this
should be processed. The language value is always lower-case, so you should only use lower-case
values in selection rules. Case is ignored when selecting locale values.
To limit the selection rule to specific character codes, add a range attribute whose value is a
comma-separated list of hexadecimal value ranges. Each range can be either a single value or a
pair of values separated by “-”.
When several lang, locale and/or range attributes are present, all conditions must be satisfied for
the typeface to be included.
Warning:
Although the scheme file uses a syntax that is compatible with XML, it is not read using a
full XML parser. Do not put anything other than tags and comments in this file, and only
use ASCII characters.
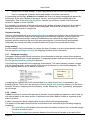
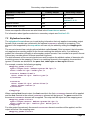
Example
The following is an example scheme.cfg file:
<schemes>
<scheme name="Titles">
<typeface name="Arial"/>
<typeface name="Arial Unicode MS"/>
</scheme>
<scheme name="Body">
<typeface name="Fraktur"
<typeface name="MS Song"
<typeface name="UnBatang"
<typeface name="Times New
</scheme>
<scheme name="Arial" >
<typeface name="Times New
<typeface name="Times New
<typeface name="Times New
<typeface name="Times New
<typeface name="Arial" />
</scheme>
</schemes>
lang="de"/>
locale="zh-CN" />
range="AC00-D7A3,1100-11FF"/>
Roman"/>
Roman"
Roman"
Roman"
Roman"
range="0600-06FF"
range="0750-077F"
range="FB50-FDFF"
range="FE70-FEFE"
/>
/>
/>
/>
Page 25
User Guide
This defines three schemes. The first one, called Titles, specifies two typefaces. When rendering a
character, TopLeaf will first attempt to find a glyph in the Arial typeface. If no glyph is found, it will
then look for one in the Arial Unicode MS typeface.
The second scheme specifies typefaces which are only available under certain conditions. The
Fraktur typeface can only be selected when the current language is German. The MS Song
typeface can only be used when the current language locale is simplified Chinese. The UnBatang
typeface will only be used for rendering characters in the ranges U+AC00 to U+D7A3 and U+1100
to U+11FF inclusive.
The third scheme, called Arial, sources all Arabic characters (including all presentational forms)
from the Times New Roman typeface, and all other glyphs from the Arial typeface.
Typeface selection for secondary transforms
In output created by secondary transforms it is generally not possible to control typeface
selection for individual characters as it is in paginated output. The transform engine therefore
processes typeface selection schemes in a slightly different way.
You can create a scheme file used for a specific output type by using the name “schemeformat.cfg”. The transform engine will use this in preference to the standard scheme file. For
example, when producing RTF output the scheme-rtf.cfg file will be used if it is present; otherwise
scheme.cfg will be used.
Within a specific scheme, preference will be given to unqualified typefaces (i.e. those without any
selection attributes). The way typefaces are selected depends on the type of output format:
•
For formats that require a specific typeface (e.g. RTF) the first unqualified typeface in the
scheme is used, or the first typeface in the list if there are no unqualified typefaces.
•
For formats that can use a list of typefaces (e.g. HTML) the unqualified typefaces are listed
first, followed by the other typefaces.
In the example above, the Body scheme would select typefaces as follows:
•
For RTF: Times New Roman;
•
For HTML: Times New Roman, Fraktur, MS Song, UnBatang.
3.5.4 Character map
XML documents can contain any of the characters defined in the Unicode standard. A given font
will probably not contain symbols for every possible character. This is particularly true for Type 1
fonts, which do not allow for more than 256 glyphs to be encoded in a single font, and which do not
use a Unicode encoding.
Note:
TopLeaf currently only supports characters in the Basic Multilingual Plane.
Declaring a character map file
TopLeaf uses a character map to specify the action taken when a character is not present in the
currently selected font. It also allows you to force certain characters to use a particular font,
overriding the font specified by the mappings.
The default character map is found in the file charmap in the data\sgml subfolder of the TopLeaf
installation folder.
Do not make changes to this file, since it will be replaced each time you update TopLeaf. Instead,
copy it into your TopLeaf repository as file charmap.loc.
If this file is present TopLeaf will use it instead of the default charmap file. For example, if your
TopLeaf repository is located at C:\TopLeaf, then you could create a local character map file at
Page 26
Typesetting concepts
C:\TopLeaf\charmap.loc. A file in this location will apply to the whole repository. You can also
place it in other locations as described in Section 4.6.
If a definition for the character cannot be found after applying the rules in the character map, an
error is generated and a default character is drawn. The default character depends on the currently
selected font.
Character map file structure
A character map contains <range> and <replace> elements. Use a range element to map
characters to a specific font. Use a replace element to specify an alternate character in the same
font.
The information in the range elements is applied first. If this does not result in a match the replace
elements are examined.
Warning:
Although the charmap file uses a syntax that is compatible with XML, it is not read using a
full XML parser. Do not put anything other than tags and comments in this file, and only
use ASCII characters.
The <range> element
A range element maps a contiguous sequence of Unicode characters to a contiguous sequence of
data points in a font. The Unicode range is specified by the ustart and uend attributes. The target
data points are specified by the data attribute (only the start of the sequence is required, because it
is always the same length as the Unicode sequence). All of these attributes are interpreted as
hexadecimal values if they start with “x”, or as decimal values if not.
Note:
If the replacement characters do not form a contiguous sequence in the same order as the
original characters, then you must use multiple <range> elements to specify the map.
The typeface attribute determines the target font. The font used is the regular style font for the
nominated typeface (normal weight and not italic).
For example:
<range ustart="x39A" uend="x39D" data="x4B" typeface="Symbol"/>
defines the action for the Unicode characters with hexadecimal codes 39A, 39B, 39C and 39D.
When one of these characters is encountered and it is not present in the current font, TopLeaf
switches to the Symbol font and draws the character at data point 4B, 4C, 4D or 4E, respectively.
Note:
The typeface must appear in the font configuration.
If the uend value is not present the action applies to the single character given by ustart. If the
data attribute is not present it defaults to the value of ustart. The ustart attribute must be present.
Note:
Characters in the range U+0020 to U+007F (i.e. ASCII) cannot be mapped. If these code
points are used an error will be generated.
When the target font uses the Unicode character set the data attribute can be omitted to indicate
that the code point is not changed. However, it can still be used to map to a different code point if
required.
Page 27
User Guide
You may also specify that the substitution will always happen by including the select attribute with
value always, for example:
<range ustart="9986" data="x22" typeface="Wingdings"
select="always"/>
which causes the character with decimal code 9986 (U+2702) to always produce the “scissors”
character from the Wingdings font, regardless of whether the current font contains this character.
If the sequences specified by the <range> elements overlap, the ones later in the document take
precedence over the earlier ones. In other words, define the most general rules first, and more
specific rules last.
For example:
<range ustart="x4E00" uend="x9FBF"
typeface="CJKStandard" select="always"/>
<range ustart="x4EAC"
typeface="CJKSpecial" select="always"/>
maps all of the characters in the range U+4E00 to U+9FBF (the CJK Unified Ideographs) to a
standard typeface, but maps a specific character in this range to a different typeface.
The <replace> element
The replace element must contain two attributes. The char attribute defines a character code
point. The alt attribute defines an alternate code point that is used if the font does not contain the
character. Both attributes are interpreted as hexadecimal values if they start with “x”, or as decimal
values if not.
This is intended to be used to identify characters with identical appearance that can be substituted
without changing the meaning of the output. For example:
<replace char="x2011" alt="x002D"/>
This indicates that if the font does not contain the non-breaking hyphen (U+2011) a hyphen-minus
(U+002D) can be used instead. Note that this only changes the appearance of the character, not its
meaning. The composition engine will still treat it as a non-breaking character.
3.6 Hyphenation
3.6.1 What is hyphenation?
Hyphenation occurs when the composition engine must split a word that would otherwise extend
beyond the right margin of the text column.
When a word needs to be hyphenated, TopLeaf can determine the permitted hyphenation points
using one or more of the following methods:
•
soft — split a word if a soft hyphen (Unicode code point U+00AD) appears within that word;
•
dictionary — search a language specific hyphenation exception list or dictionary;
•
rule-based — apply a set of language specific hyphenation rules.
You can use the <hyphenation/> command to set the length of the smallest word that will be
considered for hyphenation.
3.6.2 Language specific hyphenation
The xml:lang attribute specifies the language for a given context. If an element is declared with
an xml:lang=ID attribute, then the value of ID may influence the hyphenation method used by
TopLeaf to process content within that element. The value of xml:lang can be defined as an ISO
639 language code (usually a two or three character code), followed by an optional ISO country
code. Note that in most cases, the country code will be the main factor that determines the
Page 28
Typesetting concepts
hyphenation language rules. You can control how TopLeaf interprets the value of xml:lang by
including a <topleaf-properties/> directive in the custom content for a tag mapping.
You can use the <text-properties/> directive to assign an ISO 639 language code if your
XML markup uses a different attribute to declare the current language.
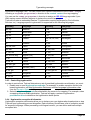
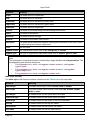
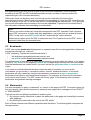
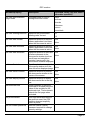
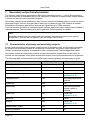
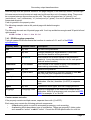
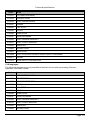
TopLeaf includes an embedded Dashes™ hyphenation module (developed by Circle Noetics
Services Inc). Language specific hyphenation is supported for the following languages:
xml:lang
Language
xml:lang
Language
alb, sqi
Albanian
it, ita
Italian
be, bel
Belorussian
lv, lav
Latvian
bg, bul
Bulgarian
lt, lit
Lithuanian
ca, cat
Catalan
nob, nb, no, nno,
nor
Norwegian
hr
Croatian
pl, pol
Polish
cs, cse, cze
Czech
pt, por
Portuguese
da, dan
Danish
ro, ron, rum
Romanian
nl, nla, dut
Dutch
ru, rus
Russian
en, en-US, eng
English (US)
sk, slo, slk
Slovak
fi, fin
Finnish
sl, slv
Slovenian
fr, fra, fre
French
es, esl, esa
Spanish
de, deu, ger
German
sw, swa
Swahili
de-1901
German (1901)
sv, sve, swe
Swedish
el, ell, gre
Greek
de-CH, ger-ch
Swiss-German
hu, hun
Hungarian
tr, tur
Turkish
is, isl, ice
Icelandic
uk, ukr
Ukrainian
3.6.3 Controlling hyphenation
In order to control how TopLeaf determines a set of permitted hyphenation word breaks, you must:
1. Enable one or more hyphenation methods. For example, to enable exception list and rule
based hyphenation, set Use Hyphenation Dictionary and Use Language hyphenation rules
from the Format » Options dialog.
2. Select the hyphenation mode permitted within the context of a mapping. For example, when
a mapping requests Full hyphenation, TopLeaf will apply a series of hyphenation
precedence rules to determine the hyphenation break points.
3.6.4 Hyphenation exception dictionaries
Hyphenation exception dictionaries allow you to declare your own hyphenation break points or stop
TopLeaf from hyphenating a word altogether. Each dictionary file declares a list of exception words
for a specific language. When processing multi-lingual content, you can define and load multiple
exception lists.
Page 29
User Guide
Using a hyphenation exception dictionary
To use a hyphenation exception dictionary you must:
1. Create an exceptions dictionary file;
2. Enable Use Hyphenation Dictionary from the Format » Options dialog;
3. Load the exceptions list using the <dictionary/> directive.
Exception dictionary file format
An exception dictionary file is a text file created using either UTF-8 or UTF-16 character encoding.
The first two or three characters are examined to see if a byte order mark character (U+FEFF) is
present. If so, this is used to determine the encoding. The byte order mark is not treated as part of
the data. If no byte order mark is found UTF-8 is assumed.
The dictionary file declares one or more hyphenation word definitions, entered on separate lines
terminated by a recognized line break. A hyphenation word definition specifies the permitted
hyphenation points for a single word. Hyphenation points are identified using either a hard hyphen
(Unicode code point U+002D) or a soft hyphen (Unicode code point U+00AD), as shown in the
following examples:
pre-car-iously
pol-y-mor-phic
mis-place
mis-placed
pre-ce-dent
Restrictions
Entries within an exception dictionary:
•
have a maximum length of 255 characters;
•
are case insensitive;
•
can be entered in any order;
•
can include XML character references to refer to specific Unicode code point values;
•
cannot include white space characters.
Word definitions should not include any punctuation characters (other than hyphens).
3.7 Bidirectional processing
TopLeaf supports top-to-bottom bidirectional typesetting, allowing the mixture of LTR (left-to-right)
and RTL (right-to-left) content without disrupting line breaks or causing punctuation problems. For
example, European languages are normally rendered left-to-right, whereas Arabic and Hebrew
content is rendered from right-to-left. Bidirectional processing occurs within distinct presentational
layers at the document, block, paragraph, contextual, and character level.
3.7.1 Document directionality
In TopLeaf the whole document has a directionality that controls the placement of fixed blocks and
the way the book is bound. The document directionality is responsible for the selection of left and
right page layouts, and in a multi-column page layout the order in which the data block columns are
filled.
The document directionality is determined from the language associated with the document root
element. The default document language is declared as a publication formatting option. This can
be overridden by the language set by the xml:lang attribute or through the <text-properties
lang="LA" /> directive.
Page 30
Typesetting concepts
You can use the same stylesheet for RTL and LTR documents. Rather than swap the terms left and
right when the document direction is RTL, the TopLeaf convention is that all right and left terms
switch direction when RTL mode is in force. For example, if the document directionality is RTL, and
the current page type declares separate left and right page layouts, TopLeaf selects the left page
layout when processing a recto page, and the right page layout when processing a verso page. The
terms Inside and Outside are not affected by the page directionality, with Inside always adjacent
to the binding.
3.7.2 Block directionality
The document directionality determines the default directionality for the content of the following
page regions:
•
Data blocks
•
Header and Footer fixed blocks
•
Footnotes, sidenotes, and running heads
•
Floats objects
3.7.3 Paragraph directionality
Paragraph directionality controls the interpretation of line breaking, alignment, margins, indents,
and list item labels declared by the current paragraph style. The paragraph directionality
determines the base direction — left-to-right or right-to-left — assigned to neutral text surrounded
by text of differing directions in the content of the paragraph. The paragraph directionality is
assigned at the point at which content is first added to a paragraph and remains in force until the
paragraph ends.
Where a paragraph is assembled by merging the content of one or more elements, the paragraph
directionality is assigned at the beginning of the merged content. For example, the paragraph
directionality for a list-item or labeled paragraph is determined by the directionality in force at the
start of the label. In the case of a page or column footnote, the directionality for the footnote body is
determined by the directionality in force at the start of the footnote label.
Paragraph directionality is determined by:
1. a block mapping’s paragraph style where this explicitly declares the direction as LTR or
RTL.
2. the directionality of the parent block mapping from within which the paragraph is rendered.
The parent mapping either sets or inherits an explicitly declared paragraph direction.
3. The directionality of the language specified by the {language} system variable.
Rather than swap the terms left and right when the paragraph direction is RTL, the TopLeaf
convention is that all right and left terms switch direction when RTL mode is in force. For example,
the First left indent in a paragraph with RTL directionality performs exactly the same function as its
LTR equivalent, except that the indent is on the right side of the block.
3.7.4 Contextual directionality
Most paragraphs define a single contextual region whose directionality matches that inherited from
the paragraph. It is possible to define additional LTR and RTL contextual regions within a
paragraph using one of the following three markers:
•
LRE (Unicode code point U+202A) introduces an LTR context;
•
RLE (Unicode code point U+202B) introduces an RTL context;
•
PDF (Unicode code point U+202C) reverses the current context.
3.7.5 Character directionality
Every character has an associated inherent directionality, which in broad terms, is one of:
Page 31
User Guide
•
•
•
•
LTR (for example, Roman/Cyrillic characters, and CJK characters);
RTL (for example, Arabic and Hebrew characters);
Weak (for example, number characters);
Neutral (for example, punctuation and whitespace).
At the character level, the composition engine is responsible for the directional rendering of runs of
LTR and RTL sequences, character mirroring, and the selection of RTL ligatures and
presentational forms.
3.7.6 Data block allocation order
In a document processed with LTR directionality, data in a multi-column page layout is allocated to
data blocks from left to right. In a document processed with an RTL directionality, the order in which
the data block columns are filled is reversed — text begins at the top of the right hand column and
ends at the bottom left.
3.7.7 Tables
The directionality of a table is the paragraph directionality inherited from the parent block
mapping. You can use the <table-properties/> directive to explicitly declare the preferred
table directionality. For HTML tables, the directionality can be specified by the table element dir
attribute.
For a left-to-right table, column zero is on the left side and row zero is at the top. For a right-to-left
table, column zero is on the right side and row zero is at the top.
3.7.8 Image and rules
TopLeaf assumes that the inherent directionality of images and rules is neutral. For all practical
purposes, they can be assumed to be processed in the same way as neutral characters.
Page 32
The repository
4. The repository
TopLeaf uses a repository to store stylesheets and content, as well as configuration information
and temporary working areas.
A repository uses a folder in the local file system. The contents of a repository are ordinary files and
folders, so they can be manipulated using the operating system tools. You use the TopLeaf
workstation to create and modify components of the repository structure.
To create a new repository, make an empty folder in the appropriate place and use the
Preferences Dialog to set the repository location. Use the Open Dialog to create objects in the
repository.
TopLeaf always deals with a single repository at a time. If you have multiple repositories you can
select the current repository in the Preferences Dialog.
Warning:
Some of the repository components may contain information specific to the machine on
which they were created. This means that care must be taken when copying a repository
to a different machine.
In particular, see the comments regarding the font configuration.
4.1 Repository components
A repository contains one or more publications. A publication can be used to create a number of
documents, each using the same style. The document style for a publication is defined by its
stylesheet.
Within a publication are one or more partitions. A partition is a work area for creating and
rendering a document. Each partition defines the content that is rendered to produce the output.
A repository can also contain folders used to group publications together.
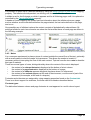
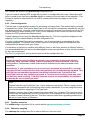
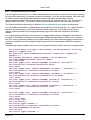
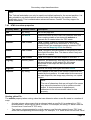
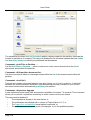
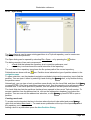
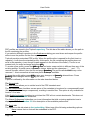
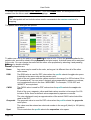
The following shows an example repository as it would appear in the Open Dialog:
In this example the Catalog publication has three partitions. Each partition defines a different set of
content, but all of them will produce output using the publication style.
The Group1 folder is used to contain the Reference Manual and Training Guide publications.
4.2 Releases
You can manage the life cycle of a partition by creating a release each time you need to distribute a
new version of the rendered partition content.
A partition release is a document snapshot defined when a partition is first created and then each
time you create a new update. A looseleaf partition will include at least two releases — an update
Page 33
User Guide
phase and a published phase. The update phase contains material being prepared for the next
release. The published phase contains the material most recently published.
When you compose a partition, TopLeaf creates one or more output pages using the content
referenced from the partition update phase. In a typical update cycle, both the input content and the
stylesheets used to produce the rendered output may be adjusted until an approved set of output
pages is produced.
TopLeaf assumes that the page output is not acceptable unless the input content is rendered
without composition errors or warnings. To enforce this rule, all publishing controls are disabled
until a partition is typeset without error. The partition properties include an option to allow
publishing a change pages release if there are warnings but not errors.
When all changes to the partition content are complete, and the rendered output is correct, the
partition update is ready to be published. TopLeaf creates a new document baseline using the
current update phase, and this becomes the new published phase of the partition. If you have
decided to track changes between releases, TopLeaf uses the published release as a baseline to
detect changes made during the next update cycle.
The ability to manage releases is an important part of looseleaf publishing.
4.2.1 The release label
Each release can have a release label. This might be a number (e.g. 15), a date (e.g. June 2014)
or any other identifying string (e.g. Act 07/37 amendments). Each page of the document can then
be associated with the release when it was last changed.
Release information can be useful in electronic documents, as it provides an indication of the
currency of pages as the document is changed over time. However, the main role of release
management is in the distribution and maintenance of paper documents. In order to minimize
printing and distribution costs, it is common practice to publish only those pages which have been
changed since the last release. These are then issued to the end users, along with a set of filing
instructions (e.g. Remove pages 25 to 28, replace with new pages 25 to 28/2) which tell the user
how to update their document. Since this usually involves replacing pages or groups of pages in a
ring binder, it is commonly referred to as looseleaf publishing.
4.2.2 Publishing a release
For more information about release management, see the Publish and Next Update commands.
4.3 Repository path names
The names of repository levels (folders, publications and partitions) are subject to the following
restrictions.
A level name may not begin with a ‘.’ (U+002E).
The following characters may not be used in a level name:
•
\ (U+005C)
•
/ (U+002F)
•
: (U+003A)
•
, (U+002C)
•
* (U+002A)
•
? (U+003F)
•
" (U+0022)
•
' (U+0027)
•
< (U+003C)
Page 34
The repository
•
•
•
•
•
•
> (U+003E)
| (U+007C)
_ (U+005F)
- (U+002D)
$ (U+0024)
% (U+0025)
The level names graphics and notesdef are reserved for use by TopLeaf.
TopLeaf uses the underscore character (U+005F) to represent space characters in repository level
names. If you use the TopLeaf API to create a partition or repository level, and that level or partition
name contains underscore characters, then the underscore characters will be displayed as spaces
when viewed from the TopLeaf GUI.
4.4 Working with partitions
You can use the TopLeaf workstation to access one or more partitions in the repository. To open
the partition you wish to work with, use the Open Dialog.
The most common sequence of steps when using a partition is:
1. Define the content used by the partition;
2. Compose the content using a TopLeaf stylesheet;
3. Rendering the output to PDF or one of the alternate formats.
The following are some common operations performed on an open partition:
•
Commands » Replace Partition Document... to define the content of the partition.
•
Commands » Compose or
•
File » Create PDF... or
to compose the partition content.
to create a PDF rendition of the composed content.
When a partition is open you can edit the stylesheet stored in the publication. Note that editing a
stylesheet will affect the output of all of the partitions in the same publication. The different parts of
the stylesheet can be edited using the following:
•
Format » Page Layout... or
•
Format » Mappings... or
opens the layout editor.
opens the map editor to edit tag and custom mappings.
4.5 Partition content
A partition can define its content in one of two ways:
•
A copy of the document content can be stored in the partition update as a part of the
repository. This type of partition is called a copy partition.
•
The document content can be held outside of the repository and referred to by its full file
path name. This type of partition is called a linked partition.
Note that the above does not apply to full looseleaf partitions after the mainwork (initial release).
These partitions always store a copy of the document content.
There are two ways to modify the content of a partition:
•
Use Commands » Edit or press
to edit the content using the editor application of your
choice. You can set the preferred content editor from the Preferences Dialog.
Page 35
User Guide
•
Use Commands » Replace Partition Document... to update from or link the partition to an
external file.
The way that a partition refers to its content is determined when the partition is created. Unless the
partition contains the content of a full looseleaf update, you can change an existing partition from
a linked partition to a copy partition, or from a copy partition to a linked partition by replacing the
partition document content.
In general, it is preferable to use a linked partition to ensure that any resources referred to using
relative paths are resolved. Content stored in the partition as part of the repository must be selfcontained.
Note:
When the partition document content is being updated an edit lock is placed on the partition.
This prevents anyone else from attempting to edit the content at the same time. An edit lock
can be removed by using Commands » Unlock.
4.5.1 Book lists
If you are using a change pages page management model or the partition page management
model is not specified, then your partition can use a book list to reference content sourced from
multiple document files. A book list is a text file where each line contains the path to a file containing
content. When the partition is composed each file is read in the order it occurs in the book list.
To create a book list use Commands » Add Files to Partition....
The book list can be edited by using Commands » Edit Partition Document List....
If a book list name entry declares a simple filename (i.e. the entry does not specify an absolute file
path) then the entry identifies a document held within the partition source document folder.
If a book list name entry declares an absolute file path then the entry identifies a document held
externally to the partition source document folder.
Note:
When working with XML content, it may be preferable to use file entities to reference multiple
source documents from a single top level document. If you are working with DITA content,
then you can use a bookmap to organise content referenced from multiple source documents.
4.6 Configuration files
In addition to stylesheets, the repository contains a number of files containing information used
during composition and output generation. The section contains information about these
configuration files.
The position of a configuration file in the repository is significant. In general, a configuration file
applies to the level containing it, and all levels below it. This means that a configuration file:
•
in a partition folder affects only that partition;
•
in a publication folder affects all of the partitions in that publication;
•
in the root folder of the repository affects all publications.
4.6.1 PDF profiles
When creating a PDF from composed data you can specify a profile that determines the type of
PDF created. See Chapter 5 for information about PDF creation, and Section 10.5.10 for a
description of the profile editor.
Page 36
The repository
PDF profiles are stored in the profiles.cfg configuration file.
TopLeaf contains a default PDF profile that is used if no configuration file exists. When the profile
editor is used for the first time a profiles.cfg file is created in the root folder of the repository. This
file can be copied to other folders if you wish to create profiles that only apply to part of the
repository.
4.6.2 Font configuration
TopLeaf uses a cross-platform system for accessing and using fonts. This means that if you install
a standard font (either TrueType or OpenType) it will normally be immediately available for use (but
see Warnings below). However, it is sometimes necessary to exercise finer control over fonts. This
is particularly true when creating PDF output, since selection of the correct font can be crucial to
whether the PDF produces the desired result.
Topleaf manages fonts using the font.cfg configuration file. The list of typefaces displayed in the
mapping Font tab is determined by the font configuration file.
If no font configuration file exists for a repository, one is constructed by enumerating all of the
installed typefaces. This means that you don’t need to do anything unless the constructed font
configuration file doesn't meet your needs.
If a repository is copied to a machine with different fonts, or with fonts stored in a different location,
it is recommended that you remove the font.cfg files in the new repository so they can be recreated
for the new environment.
The Font Configuration dialog can be used to edit the configuration file.
Warning:
In work groups involving multiple document users connecting to the same network
repository, each machine running TopLeaf must have all fonts referenced in the font
configuration, Furthermore, these fonts must be installed in the same location on all
machines.
Alternatively, if your repository is on a server and is accessed by several PCs, consider
changing its font configuration so that new typefaces are not automatically updated. This
will help prevent unwanted typefaces from being included in the TopLeaf font list.
OpenType fonts are only partially supported. If you choose to use these fonts you must
test that they work correctly. Turn-Key Systems accepts no responsibility for problems
caused by the use of OpenType fonts.
Note:
TopLeaf can also use PostScript Type 1 fonts with some restrictions. This is a legacy format
that is not compatible with Unicode and other modern standards. If you are using this format
you should consider migrating to TrueType fonts.
Windows versions from Vista onwards have diminished Type 1 support. This can give rise to
fonts simply not appearing in the font configuration. If this happens, the only solution may be
to obtain a newer version of the font. This issue can also arise when upgrading a desktop or
server to a new version of Windows.
4.6.3 Typeface selection
The scheme.cfg configuration file is used to define typeface selection schemes.
4.6.4 Character mapping
The charmap.loc configuration file is used to define a character map.
Page 37
User Guide
4.6.5 Color palette
The palette.cfg configuration file stores information about colors used in the stylesheet.
Since this file relates to a particular stylesheet it should always be placed in the publication folder.
Use the color palette dialog to create and modify this file.
4.7 Stylesheets
A stylesheet defines the appearance of rendered output. Each publication in the repository contains
a stylesheet. This section discusses the management of stylesheets in the repository. See
Chapter 3 for information about creating and using stylesheets.
4.7.1 Stylesheet files
A stylesheet is defined by two XML files:
•
mappings.tlx contains the mappings
•
layout.xml contains the page layout information
Note:
If your publication folder does not contain a mappings.tlx file, use the Commands »
Stylesheet Upgrade menu item to upgrade to the new format.
The layout.xml file is edited using the layout editor. Changing this file manually is not
recommended, since it contains measurements which must all be consistent to ensure correct
results.
The mappings.tlx file is normally edited using the map editor. The next section contains
information about this file to assist you if you want to change it manually.
A schema for mappings is installed in the sys\lib\mappings folder. This is provided as a
convenience only. It is not used by TopLeaf to validate the mappings, so it should not be regarded
as definitive.
Mappings Source Format
The mappings.tlx file contains an XML document with the following characteristics:
•
The root element is called mappings. It must contain a version attribute. The version
value to use with the format described below is “1.1”. The other attributes are used
internally by TopLeaf. You should not change any of these.
•
The first child element is called options and contains information about how the stylesheet
will operate.
•
The remaining child elements are called mapping and each one describes a separate tag,
custom marker, header, footer or note mapping.
The order of mapping elements is not important, except that if there are duplicate mappings
TopLeaf will use the last one encountered. Mappings are treated as duplicates if they have the
same values for the path, type, predicate and occurs attributes.
The following sections describe the attributes that may be present on the mapping element and its
children. The following attribute types may be used:
•
measure is a numeric value followed by a two-character unit specifier. The possible units
are pt (points), cm (centimeters), mm (millimeters), in (inches), pc (picas) or dp
(decipoints).
•
boolean may have the value yes or no. The values 1 and 0 may also be used.
•
color is an RGB color specification. This can be one of the 16 color names described here
Page 38
The repository
or a string of the form “#RRGGBB” where each color component is a 2-digit hexadecimal
number. If a color palette is defined for the stylesheet, one of the defined color names
should be used.
Where the map editor allows a variable to be used to specify a value, the corresponding attribute
may contain a variable name enclosed in {...}.
Note:
TopLeaf does not validate the mappings.tlx file, so any attributes or elements with incorrect
names will be ignored.
options element
Only one options element is allowed in the document. It must precede all of the mapping
elements. The information in this element can be edited with the Format » Options dialog. Consult
the documentation for this dialog for information on the attribute values.
Attribute
Meaning
table-model
One of CALS or HTML. If not present no table model is defined.
rule-width
A measure defining the default width of rules.
hyphen-dict
A boolean determining whether dictionary-based hyphenation is used.
hyphen-rules
A boolean determining whether rule-based hyphenation is used.
language
This is the numeric code of the default language. The value zero indicates
English. Contact Turn-Key support for a list of language codes.
balance-cols
A boolean determining whether column heights are equalized at a segment
boundary.
run-build
This optional element controls typesetting behavior for stylesheets created with
older versions of TopLeaf. Consult Turn-Key support before making any changes
to this attribute.
mapping element
Attribute
Meaning
path
This is the only mandatory attribute. It contains the tag-in-context value (including
the page context) for tag and custom marker mappings, and the name for
head/footer and note mappings.
type
This identifies the type of mapping, and may be tag, custom, headfoot or note.
The default value is tag.
predicate
For tag or custom mappings, this contains the attribute selector expression.
occurs
For tag or custom mappings, this contains the occurrence selector.
priority
This is an integer between 1 and 5. The default value is 3. Mappings with priority
1 are tested first, followed by 2 and so on; the first matching mapping found will
be used. For mappings with the same priority value the normal precedence
rules apply.
The values of the path, type, predicate and occurs attributes together uniquely identify a
mapping.
Page 39
User Guide
start element
The start child element contains values from the Start Tag tab of the map editor. It is only used for
tag and custom mappings.
Attribute
Meaning
class
The mapping classification. One of block, inline, listitem or label. This
attribute is mandatory for tag and custom mappings.
listtype
Only used for list items. One of bullet, circle, square, shadowbox, diamond,
decimal, lalpha, ualpha, lroman, uroman, emdash or endash.
bind-prev
A boolean for bind to previous paragraph.
conspace-above A boolean for consolidate space above.
cancel-merge
A boolean for disable merge with previous.
bind
A boolean for bind element content.
start-box
A boolean for start box.
start-mrule
A boolean for start margin rule.
new-page
A boolean for a page break that starts a new page. This is deprecated; use
page-break instead.
new-group
A boolean for a new leaf group or leaf section (ignored if not full looseleaf).
This is deprecated; use page-break instead.
page-type
The name of the page type to select.
page-break
One of next, odd, column or group corresponding to the map editor options
Page, Leaf, Column and Group, respectively.
headers
Determine if headers are displayed. Ignored unless the mapping forces a
page break or page type change. One of honor, show, hideall or hideone.
footers
Determine if footers are displayed. As for headers.
valign
Control vertical justification of the page. Ignored unless the mapping forces a
page break or page type change. One of top, bottom, center or spread.
The start element may contain a child element called rule-above if the mapping generates a
horizontal line above. This can have the following attributes.
Attribute
Meaning
width
A measure determining the rule weight.
space
A measure determining the space between the rule and the mapping content.
color
The rule color.
end element
The end child element contains values from the End Tag tab of the map editor. It is only used for
tag and custom mappings.
Page 40
The repository
Attribute
Meaning
bind-next
A boolean for bind to following paragraph.
merge-next
A boolean for merge with following paragraph.
conspace-below A boolean for consolidate space below.
end-box
A boolean for end box.
end-mrule
A boolean for end margin rule.
end-page
A boolean for end page. This is deprecated; use page-break instead.
end-group
A boolean for an end leaf group or leaf section (ignored if not full looseleaf.
This is deprecated; use page-break instead.
end-part
A boolean for end partition (ignored it not full looseleaf).
page-type
The name of the page type to select.
page-break
One of next, odd, column or group corresponding to the map editor options
Page, Leaf, Column and Group, respectively.
cancel-tt
The number of the data telltale to cancel (1–9), or all.
cancel-rh
The number of the running head to cancel (1–5).
headers
Determine if headers are displayed. Ignored unless the mapping forces a
page break or page type change. One of honor, show, hideall or hideone.
footers
Determine if footers are displayed. As for headers.
valign
Control vertical justification of the page. Ignored unless the mapping forces a
page break or page type change. One of top, bottom, center or spread.
The end element may contain a child element called rule-below if the mapping generates a
horizontal line below. This can have the following attributes.
Attribute
Meaning
width
A measure determining the rule weight.
space
A measure determining the space between the rule and the mapping content.
color
The rule color.
content element
The content child element contains values from the Content tab of the map editor.
Most of the attributes are ignored if scan is not yes.
Attribute
Meaning
scan
A boolean determining whether the element content is stored.
suppress
A boolean determining whether the content is not rendered.
runhead
The number of the running head (1–5) to which the content is assigned.
telltale
The number of the data telltale (1–9) to which the content is assigned.
Page 41
User Guide
Attribute
Meaning
toc
The number of the table of contents level (1–9) to which the content is assigned.
toc-suppress
A comma-separated list of element names to be removed from the toc content.
Currently used only by secondary transforms.
index
The number of the index level (1–9) to which the content is assigned, or xref to
assign it to XREF.
col-footnote
A boolean for assigning the content to a column footnote.
page-footnote A boolean for assigning the content to a page footnote.
sidenote
A boolean for assigning the content to a side note.
link-attr
The name of the attribute used to create a link from the content.
target-attr
The name of the attribute whose value is used to create a link target.
content
The content model to use for reading the element content. One of default,
element, mixed or preserve-space.
para element
The para child element contains values from the Paragraph tab of the map editor.
These are ignored for inline mappings.
Attribute
Meaning
align
The paragraph alignment. One of left, right, center or justify.
For head/foot mappings may also be inside or outside.
before-space
A measurement for the space before (above) the paragraph.
after-space
A measurement for the space after (below) the paragraph.
left-margin
A measurement for the left margin.
right-margin
A measurement for the right margin.
first-indent
A measurement for the first/left indent.
last-indent
A measurement for the last/right indent.
label-offset
A measurement for the label offset. Ignored unless the
classification is listitem or label, or this is a footnote body
mapping..
label-type
The type of label. One of normal or dropped. Ignored unless the
classification is label.
label-mingap
A measurement for the minimum gap after a dropped label.
label-mindepth
A measurement for the minimum depth of a dropped label.
reset-margins
A boolean for ignoring the current left and right margins.
last-align
The alignment of the last line in a paragraph. The values are as
for align.
Page 42
The repository
Attribute
Meaning
iws
The inter-word space when defined by a variable. See note
below.
miniws
A number giving the minimum inter-word space as a percentage
of the font size. See note below.
maxiws
A number giving the maximum inter-word space as a percentage
of the font size. See note below.
widow-orphan
A number, or two numbers separated by / specifying the
minimum number of lines allowed at the bottom and top of a
page, respectively. May also be the string any or none.
before-space-boundary
The retention rule for before space. One of discard, intbound or
retain.
after-space-boundary
The retention rule for after space. One of discard, intbound or
retain.
direction
The paragraph reading direction. One of ltr or rtl.
Note:
When the inter-word space is defined both the miniws and maxiws attributes must be
present.
If the inter-word space is defined by a variable, use the iws attribute and omit the miniws and
maxiws attributes.
font element
The font child element contains values from the Font tab of the map editor.
Font attributes identified as tri-state have three possible values: on, off or inherit (the default). For
these attributes, yes and no have the same meaning as on and off, respectively.
Attribute
Meaning
typeface
The name of the typeface or typeface selection scheme.
size
A measurement for the font size.
leading
A measurement for the font leading.
baseline
A number giving the baseline shift as a percentage.
char-space
A number giving the character spacing. This is a positive or negative integer
expressed in thousandths of the current font size.
letter-space
A number giving letter spacing as a percentage. This is deprecated; use charspace instead.
scale
A number giving the horizontal scaling value as a percentage, where 100 is
normal scaling.
italic
A tri-state value for italic style.
bold
A tri-state value for bold weight.
small
A tri-state value for small size.
Page 43
User Guide
Attribute
Meaning
super
A tri-state value for superscript.
sub
A tri-state value for subscript.
lowercase
A tri-state value for transform to lower case.
uppercase
A tri-state value for transform to upper case.
underline
A tri-state value for underlined.
reverse
A tri-state for reversed foreground and background colors.
frame
A tri-state for boxed text.
strikeout
A tri-state for strike through.
overbar
A tri-state for line drawn over the text.
kern-pairs
A tri-state which determines whether kerning pair information in the font is used
to adjust the space between characters.
color
The text color.
hyphen-mode The hyphenation mode. One of off, emergency or normal.
hyphen-type
The type of hyphenation split points used. One of explicit, good or poor.
Note:
The hyphenation mode was formerly controlled by a single attribute called hyphenation. The
corresponding new attribute values are:
•
For hyphenation="full" use hyphen-mode="normal" and hyphentype="good".
•
For hyphenation="soft" use hyphen-mode="normal" and hyphentype="explicit".
•
For hyphenation="none" use hyphen-mode="off".
table-style element
The table-style child element contains values from the Tables tab of the map editor.
Attribute
Meaning
frame-style
The table frame style. One of normal, bold or double.
frame-type
The type of table frame to draw. One of all, top, bottom, topbot,
sides or none.
top-margin
A measurement for the space above the table.
bottom-margin
A measurement for the space below the table.
left-margin
A measurement for the space to the left of the table.
cell-top
A measurement for the top cell indent.
cell-bottom
A measurement for the bottom cell indent.
cell-sides
A measurement for the cell side indents.
Page 44
The repository
Attribute
Meaning
col-sep
A boolean for the default column separator.
row-sep
A boolean for the default row separator.
page-sep
A boolean for whether to draw the page break separator.
rule-width
A measurement for the width of table rules.
rule-color
The color of table rules.
bind-prev
A boolean for bind to current paragraph.
reset-margins
A boolean for ignoring the current left and right margins.
The table-style element may contain child elements called head and body to define the style of
header and body rows. These elements can have the following attributes.
Attribute
Meaning
font-style
The font style for text. One of normal, bold, italic or bolditalic.
fill-color
The background color for cells.
box-style element
The box-style child element contains values from the Box tab of the map editor.
Attribute
Meaning
frame-style
The table frame style. One of normal, double or shadow.
frame-type
The type of table frame to draw. One of top, bottom, topbot, all,
sides, none, left, right, sidetop or sidebot.
fixed-depth
A measurement to set a fixed depth for the box.
top-margin
A measurement for the space above the box.
bottom-margin
A measurement for the space below the box.
left-margin
A measurement for the space to the left of the box.
right-margin
A measurement for the space to the right of the box.
text-top
A measurement for the top indent.
text-bottom
A measurement for the bottom indent.
text-sides
A measurement for the side indents.
breakable
A boolean for whether this box can break across a page.
page-sep
A boolean for whether to draw the page break separator.
reset-margins
A boolean for ignoring the current left and right margins.
rule-width
A measurement for the weight of the box frame rules.
rule-color
The color of the box frame rules.
fill-color
The background color of the box.
Page 45
User Guide
image element
The image child element contains values from the Image tab of the map editor.
Attribute
Meaning
attribute
The name of the attribute defining the image location.
path
The path used to locate the image.
width
A measurement for the maximum image width.
depth
A measurement for the maximum image depth.
scale
A number for the scale of the image as a percentage.
rotate
A number for the image rotation in degrees.
defdpi
A number for the default resolution in dots per inch.
mindpi
A number for the minimum resolution in dots per inch.
custom-pre and custom-post elements
These two elements contain the content of the two fields on the Custom tab. They both contain
character data.
convert element
This element contains style overrides for secondary output formats. It is ignored by the
composition engine when creating paged output.
4.7.2 Importing a CSS stylesheet
TopLeaf provides a means of initializing the style for a publication by interpreting a CSS (Cascading
Style Sheet) file. It is important to note that TopLeaf and CSS use different models for describing
style, so it is not possible to do a full conversion. Instead, the mappings created represent a starting
point from which more complete mappings can be developed.
The importer attempts to recover from syntax errors in the CSS file, as required by the CSS
standard (http://www.w3.org/TR/REC-CSS2) but using the importer on invalid files may lead to
unpredictable results. If a rule either cannot be recognised, or cannot be expressed as a TopLeaf
mapping, it is silently ignored.
The importer only uses information from the CSS file, not the DTD (if any). This means that
mappings may be created that refer to elements and/or attributes that are not in the DTD.
The importer can be run when a publication is created or by selecting Import mappings in the
Mapping Editor. If any errors are encountered a dialog box will open with details of the problem.
Selectors
Only rules whose selectors can be converted into the format used by TopLeaf mappings will be
read — all other rules are ignored. TopLeaf mappings can refer to any number of elements, using
parent and ancestor relationships. Attribute selectors are only allowed on the lowest element in the
hierarchy.
The following are examples of selectors that will not be processed:
•
* [lang=fr] — must map a specific element
•
head1 + head2 — TopLeaf mappings are not context sensitive
•
chapter * title — generic ancestor syntax not supported
•
head1.intro — class syntax not supported
Page 46
The repository
•
•
•
•
head1#chap3 — ID syntax not supported
head1[title] — attribute value must be specified
head1[class=intro][style=stressed] — multiple attribute values not supported
head1[class=intro]/title — attribute selectors allowed only on element being mapped.
Note that TopLeaf generally provides alternate means of achieving the above functions. For
example a CSS head1[title] effect could be achieved by the plain head1 mapping in TopLeaf if a
head1[title="#IMPLIED"] mapping is defined to handle tags where the attribute does not exist.
The importer recognizes the selector $document (an XMetaL extension) for setting the document
mapping. Note that this is not the same as the universal selector (*).
Cascading
CSS implements a cascade that allows several rules to apply to a particular element, with the more
specific rules overriding the less specific ones. TopLeaf, on the other hand, only applies a single
mapping to each element, which leads to a much simpler and easier to manage system.
The importer does a limited amount of processing to simulate the effect of cascading. For example,
in the following two rules:
title {
display: block;
color: red;
}
chapter>title {
font-weight: bold;
color: green;
}
the information from the first rule is inherited by the second, except where there is a conflict. The
end result is as if the two rules were specified as follows:
title {
display: block;
color: red;
}
chapter>title {
font-weight: bold;
color: green;
display: block;
}
Importing other CSS stylesheets
An @import rule that specifies a stylesheet with a relative URI and does not specify any media is
processed by including the text of the Stylesheet at that point. Note that this method is not what is
described in the specification, but will give the same result in most cases.
The standard says that rules in the source stylesheet take precedence over rules in an imported
stylesheet. Since the importer uses the last rule it sees for a given selector, the same effect is
achieved.
Note that the importer ignores !important for determining rule precedence.
Font names
Fonts are handled very differently in CSS and TopLeaf. Since CSS is designed to facilitate delivery
to multiple media, it allows for the specification of a list of fonts from which the renderer chooses the
Page 47
User Guide
most appropriate. TopLeaf, on the other hand, is capable of much more precise formatting which
requires a specific font to be selected.
For any given mapping, the importer either selects a specific font, or leaves it to be inherited from
the ancestor elements. The following table shows how fonts are selected. Each string in the fontfamily list is compared in turn against the values in the first column (ignoring case). If the string
starts with the value in the first column, then the font name in the second column is used. The first
successful match determines the font. If there are no matches, the mapping inherits the font name
from its ancestors.
Match String
Font Used
serif
Times New Roman
sans
Arial
monospace
Courier New
times
Times New Roman
arial
Arial
courier
Courier New
Generated text
Text created using the :before and :after pseudo-elements is generated in TopLeaf using the preand post-content properties of the mapping. If the rule which generates the text contains only a
content property, the text is inserted directly into the content box of the appropriate mapping. If the
rule contains other properties that require mapping (for example, display: block;) then a custom
marker is created for the generated content. For example, a rule with selector
procedure>step:before could generate a custom marker called %Before_ProcedureStep.
The converter attempts to convert Unicode escapes (hexadecimal digits following a \) in generated
content into XML character references. Note that the CSS2 specification requires that whitespace
following a Unicode escape is part of the character unless there are exactly 6 hexadecimal digits.
Some CSS processors incorrectly include the terminating whitespace as part of the content.
The following conversions of generated content take place:
•
runs of whitespace are replaced by the <space breakable="yes"/> directive
•
a line break character (for example, “\A”) is replaced by the <break/> directive
•
a non-breaking space character (for example, “\A0”) is replaced by the
<space breakable="no"/> directive
•
an attribute function (for example, “attr(style)”) is replaced by an attribute reference (e.g.
{@style})
•
limited support for the “counter()” function is implemented (see below)
Counters are supported in generated text, but only with “decimal” style. The counter-reset and
counter-increment properties are recognized.
Nested counters are simulated by using the <stack/> directive to implement the counter-reset
property. This will yield the same result as CSS when each element that emits a counter has a
reset property in its parent.
Recognized properties
The properties recognized by the importer are:
•
display
•
font-family (but see Section 4.7.2)
Page 48
The repository
•
•
•
•
•
•
•
•
•
•
•
•
•
•
•
•
•
•
•
font-size
font-style (italic only)
font-weight (bold only)
text-decoration (underline only)
margin-top
margin-bottom
margin-left
margin-right
text-align (left, right, center or justify only)
color
border (solid only)
border-style (solid only)
list-style-type (only if the rule has “display: list-item”)
white-space (pre only, if display is block)
page-break-before (always or avoid only)
page-break-after (always or avoid only)
page-break-inside (avoid only)
counter-reset
counter-increment
For properties that define a measurement, the property will only be recognized if it defines an
absolute value. Measurements with a unit of em or ex are ignored. A unit of px (pixels) is treated
the same as pt (points).
4.8 Shared repositories
Since a repository is stored on the file system, it is possible to place a repository on a network or
shared drive so that it is accessible to multiple users.
When a repository is shared it is important that all users have access to the same resources in
order to produce consistent results.
This is particularly true for fonts. Fonts referenced in the font configuration must be installed on
each machine that uses the repository, and must be installed in the same location on each
machine. When using a shared repository it is strongly recommended that you disable the
Automatically add new typefaces option in the font configuration dialog so you can control the
typefaces that are available for use in stylesheets.
Page 49
User Guide
5. PDF creation
TopLeaf can render XML content directly into PDF documents without the need to create
intermediate PostScript or to use special printer drivers. TopLeaf's built in PDF builder provides
access to a wide range of configurable options, allowing you to easily control the content of your
PDF documents.
5.1 PDF profiles
TopLeaf allows you to select a profile when creating a PDF. This lets you select a consistent set of
options for a particular PDF usage. For example, you could set up the following two profiles:
•
A profile called online for PDFs to be placed on your web server. This profile doesn’t
embed fonts (to reduce file size) and produces warnings about internal links that have no
destination.
•
A print profile for PDFs that are sent to a print shop. This selects CMYK colors, embedding
for all fonts and disables bookmarks and links.
See Section 10.5.10 for a description of the profile editor. Profiles are stored in the repository in a
configuration file.
Note:
The name of the profile used to create a PDF is stored in its metadata. If the PDF viewing
application you are using is capable of displaying the metadata, look for TopLeaf-Profile in
the Extended PDF Properties.
5.2 PDF and fonts
When a PDF is displayed (such as in the Adobe Reader®) text is rendered using one or more
fonts. The application must select fonts based on information encoded in the PDF. If the font
chosen matches the one that TopLeaf used when composing the pages, the user will see the text
exactly as laid out by TopLeaf. If an exact match can’t be found, the application will typically try to
use a font similar to the original one. The results in such a situation are hard to predict — at best the
text will be indistinguishable from the intended appearance; at worst it will be illegible. When
delivering PDF documents, it is therefore prudent to ensure that you know exactly which fonts will
be used to render the text.
There are two basic strategies for ensuring that the correct font is used:
•
Use fonts that you know will be installed or available on every computer that will be used to
display the PDF.
•
Include the font information in the PDF so it will always be available. This is also known as
embedding the font in the PDF.
The PDF specification requires that all PDF applications include a number of “standard” fonts. This
means that if you restrict your mappings to use only the typefaces Times, Arial and Courier you
can be confident that the PDF will always use the correct font, and there is no need to worry about
font embedding. If you look at the standard font configuration, you’ll notice that the fonts for these
typefaces are set to “never embed” to reflect this fact.
While it might seem that the safest strategy would be to embed every font, it’s worth noting that font
descriptions are typically quite large, and can therefore have a significant effect on the size of the
resulting PDF.
Font embedding is controlled by both the PDF profile chosen when the PDF is created, and by the
font configuration settings for the fonts used during composition. Regardless of the settings,
however, if characters outside the 8-bit “standard Latin” character set defined by the PDF standard
Page 50
PDF creation
are rendered using the font, then all or part of the font will be embedded. This is to ensure
portability of the PDF (the PDF standard predates unicode, and has no intrinsic method for
representing all of the Unicode characters).
While many fonts can be freely used, some must only be used within the terms of the
manufacturer’s licence. These terms may prohibit the embedding of a font in a PDF, since this may
allow a recipient of the PDF to use the font without compensating the manufacturer. TrueType fonts
can include information about whether a font may be embedded; TopLeaf will not embed a font if
this information indicates that embedding is not permitted.
Note:
There is no need to embed any fonts that correspond to the PDF “standard” fonts. However,
some PDF consumers, or those with older applications, may insist that you embed all fonts in
PDFs. In this case, use a PDF profile with the “embed always” option selected.
Selecting this option forces the PDF to embed the local TrueType fonts into the PDF, and to
use them rather than the standard fonts.
5.3 Bookmarks
A PDF can contain bookmarks that appear in a separate area of the viewing application (these are
sometimes referred to as “outlines”).
A PDF created by TopLeaf will contain bookmarks if:
•
the stylesheet generates bookmark entries; and
•
the profile has the Enable bookmarks option selected.
The default mode of operation is to create bookmarks that mirror the table of contents. If you assign
content to TOC levels on the mapping Content tab corresponding bookmarks will also be created.
Note that bookmarks are created even if you don’t include the generated table of contents in the
output.
If you need to create bookmarks that don’t match the table of contents, you can use the
<bookmark-properties/> command to select “manual” bookmark creation. In this mode
bookmarks are only created by using the <bookmark> command in a user customisation
Bookmarks must follow a strict hierarchical sequence. For example, all of the level 3 bookmarks
must have a level 2 parent. The PDF creator will fill any “gaps” in the hierarchy with unnamed
bookmarks and generate warning messages.
5.4 Watermarks
It is often necessary to apply a “watermark” or “stamp” to the pages of a PDF. A common reason for
this is to identify a provisional document by stamping each page with a message such as “DRAFT”
or “PRELIMINARY”.
TopLeaf provides two different methods for achieving this:
1. By using an overlay fixed block to place the watermark on the page and controlling its content
with mappings.
2. By defining the watermark to be used in the PDF profile.
Each of these methods has different capabilities and limitations. The following table compares the
two approaches.
Page 51
User Guide
Using overlay fixed blocks
Using a PDF profile
Requires changing layout and mappings.
Layout and mappings are not affected.
Enabling and disabling the watermark requires
changes to the data composed by TopLeaf.
Watermark is controlled by selecting the
appropriate profile; data is not affected.
Watermarks may vary depending on the page
content.
Watermarks may be selected by page number,
but not page content.
Some page content may obscure part or all of
the watermark.
Watermark can be placed either over or under
page content.
No transparency or blending is supported.
All of the transparency and content blending
allowed in a PDF is supported.
Text can only be rotated by multiples of 90
degrees (other rotations can only be achieved
by creating a graphic from the text).
Text can be rotated by any angle.
Any font may be used for text.
Only standard PDF fonts (Helvetica, Times,
Courier) are supported.
Must be positioned within the print area defined
in the layout.
Can appear anywhere on the page.
To control the watermarks that are applied when a profile is selected, choose the Watermarks tab in
the profile editor.
5.5 Viewer preferences
A PDF can contain information telling a viewing application how it should be displayed. For more
information, consult the relevant documentation from Adobe. The following is a summary of the
preferences supported by TopLeaf.
Viewer preferences can either be set in the PDF profile or by setting values for metadata
variables in the mappings.
Page layout The page layout to be used when the document is opened:
Single Page
Display one page at a time.
One Column
Display the pages in one column.
2 Col Left
Display the pages in two columns, with odd-numbered pages on
the left.
2 Col Right
Display the pages in two columns, with odd-numbered pages on
the right.
2 Page Left
Display the pages two at a time, with odd-numbered pages on
the left (only for PDF 1.5 or later).
2 Page Right
Display the pages two at a time, with odd-numbered pages on
the right (only for PDF 1.5 or later).
Page mode Specifies how the document should be displayed when opened:
None
Page 52
Neither document outline nor thumbnail images visible.
PDF creation
Bookmarks
Document outline (bookmarks) visible.
Thumbnails
Page thumbnail images visible.
Full Screen
Full-screen mode, with no menu bar, window controls, or any
other window visible.
Opt Content
Optional content group panel visible (only for PDF 1.5 or later).
Attachments
Attachments panel visible (only for PDF 1.6 or later).
Non-fullscreen mode The document’s page mode, specifying how to display the document on
exiting full-screen mode. The values are as for Page mode.
Reading direction The predominant reading order for text, either left to right or right to left.
Hide toolbar A flag specifying whether to hide the viewer application’s tool bars when the
document is active.
Hide menubar A flag specifying whether to hide the viewer application’s menu bar when the
document is active.
Hide window UI A flag specifying whether to hide user interface elements in the document’s
window (such as scroll bars and navigation controls), leaving only the document’s
contents displayed.
Fit window A flag specifying whether to resize the document’s window to fit the size of the first
displayed page.
Center window A flag specifying whether to position the document’s window in the center of the
screen.
Show document title A flag specifying whether the window’s title bar should display the
document title taken from the Title entry in the document metadata. If False, the title
bar should instead display the name of the PDF file containing the document.
5.6 Security settings
PDF security can be controlled by either the selected PDF profile or by setting metadata
variables. In the event of a conflict, the metadata value will be used.
In order to enable security settings, you must supply a master password (sometimes called the
owner password). This password needs to be supplied in order to change the security of the
document.
It is also possible to set a user password which must be supplied in order to open the document
(this can only be set by using a metadata variable).
The individual security settings are listed below.
Copy
Allow text and graphics to be extracted from the document (for example, copy them
to the clipboard).
Print
Allow high-quality printing.
Print degraded Allow printing in a possibly low quality which would make it difficult to scan an
exact copy of the document. This has no effect if high-quality printing is allowed.
Modify
Allow the contents of the document to be modified.
Annotate
Allow text annotations to be added or modified and interactive form fields to be filled
in. If modification is allowed, this also allows form fields to be added and modified
(including signature fields).
Page 53
User Guide
Fill in forms Allow interactive form fields to be filled in, even if modification of the document is not
allowed.
Assembly
Allow pages to be inserted, deleted and rotated; also allow bookmarks and
thumbnails to be created.
Screen reading Allow text and graphics to be extracted in support of accessibility to users with
disabilities or for other purposes.
5.7 Metadata
A PDF can store a number of metadata values, such as a document title or the name of the author.
TopLeaf allows you to set a number of metadata values in the mappings. Metadata names
beginning with “pdf.” are used to set values in the PDF or to control aspects of PDF creation. See
the Mapping Guide for information on setting metadata variables. A list of the property names can
be found in Section 5.7.6.
5.7.1 Page labels
PDF pages can be labeled using a number of separate ranges, each with its own numbering style
and optional prefix.
To create a labeling range, define a metadata value named pdf.pagelabel.startrange.N, where N
is the number of the first page in the range (starting from 1). The value of this variable has three
parts, separated by “/”:
•
The first part is required, and is the first page number to use in the range. This is usually 1.
•
The second optional part determines the numbering style. Use one of the following. The
default is “decimal”.
•
decimal
decimal numbers
alpha or lalpha
lower-case alphabetic
ualpha
upper-case alphabetic
roman or
lroman
lower-case roman numerals
uroman
upper-case roman numerals
The third optional part is a prefix string.
If the variable value does not conform to the required format it will be ignored. An invalid numbering
style name will be treated as decimal.
For example, the following definitions:
<set var="Label1" meta="pdf.pagelabel.startrange.1"
string="1/roman"/>
<set var="Label7" meta="pdf.pagelabel.startrange.7" string="1"/>
<set var="Label93" meta="pdf.pagelabel.startrange.93"
string="1/decimal/Appendix-"/>
number the first 6 pages with lower-case roman numerals, reset the numbering to 1 for page 7, and
label the final pages starting with “Appendix-1”.
5.7.2 Additional PDF files
Metadata values can be used to create additional PDF files from selected pages. This does not
affect the creation of the main PDF file, which always contains all of the composed pages.
Page 54
PDF creation
Note:
The creation of additional PDF files is suppressed when creating a PDF that does not contain
all composed pages. This occurs when:
•
the “Changed pages only” option is selected; or
•
a specific range of pages is selected in the Create PDF dialog; or
•
the PDFPMAP API call is used to create a PDF from a specified list of pages.
To create an additional PDF, create a metadata value with the name pdf.output.N where N is “1”
for the first file, “2” for the second, and so on. The numbering must be consecutive and start from 1;
any break in the sequence will cause subsequent values to be ignored.
Each metadata value has the form PAGES:FILE where PAGES is a comma-separated list of
inclusive page ranges and FILE is the path to the PDF file to be created.
Page ranges must use ordinal page numbers (i.e. starting from 1) and consist of either a single
number or two numbers separated by ‘-’. If the second number is omitted the range continues to
include the final page.
If the file path is relative, it is resolved relative to the folder where the main PDF file is created.
The additional PDF files are created using the same profile as the main PDF file. The only
restrictions on additional PDF files are:
•
Links to other pages are suppressed — regardless of whether the page is in the PDF being
created. This does not affect links to other targets, such as internet URLs.
•
Bookmarks are disabled.
Example
It is necessary to publish a large book as two volumes. The PDF for both volumes should include
the pages from the front matter, which contains the title page and table of contents.
If the front matter is contained in pages 1 through 14, and the first chapter in the second volume is
on page 491, the following commands will create suitable metadata values:
<set var="Vol1" meta="pdf.output.1" string="1-490:Vol1.pdf"/>
<set var="Vol2" meta="pdf.output.2" string="1-14,491-:Vol2.pdf"/>
When TopLeaf is instructed to create a PDF, three files will be created in the same folder. The first
will contain all of the pages and have the name selected by the user. The other two will be called
“Vol1.pdf” and “Vol2.pdf”.
5.7.3 Omitting pages
Metadata values can be used to omit some pages from the PDF. The metadata names are:
•
pdf.omit.page.N to omit pages by page number; or
•
pdf.omit.id.N to omit pages by page identifier.
In both cases N is “1” for the first page to omit, “2” for the second, and so on. The numbering must
be consecutive and start from 1; any break in the sequence will cause subsequent values to be
ignored. The value of the variable is either a page number (starting with 1) or an identifier string, as
appropriate.
Pages can only be omitted by number when all pages are being processed (so, for example, this is
ignored when creating a “changed pages only” PDF).
Warning:
Since PDF links are based on page numbers, links may no longer work correctly when
some pages are omitted.
Page 55
User Guide
5.7.4 JavaScript links
Some PDF viewers include a scripting engine which can run a script when the user clicks on a link.
A link created by setting Link to Target using attribute in a mapping can execute a JavaScript
program if the attribute value starts with a nominated prefix string. The prefix value is set with the
pdf.javascript.prefix metadata value.
For example, the following could be used to set the prefix in the $document mapping:
<set var="JsPrefix" meta="pdf.javascript.prefix" string="js:"/>
and the following to create a link that opens the print dialog:
<Action script="js:this.print()">PRINT</Action>
For more information on JavaScript support in PDFs, visit www.adobe.com.
5.7.5 Linking to named destinations
Links can be created that refer to a named destination in the current document by defining a prefix
that identifies this type of link. The prefix value is set with the pdf.ndlink.prefix metadata value.
For example, the following could be used to set the prefix in the $document mapping:
<set var="NdPrefix" meta="pdf.ndlink.prefix" string="nd:"/>
This will remove the “nd:” from the link value and use the remainder as the name to link to.
5.7.6 List of metadata properties
Metadata property
Description
Permitted values (any text unless
otherwise specified)
pdf.title
Document title
pdf.keywords
Document keywords list
pdf.author
Document author name
pdf.subject
Document subject
pdf.creator
Document creator application
pdf.view.page-layout
Specifies the page layout to be single-page
used when the document is
one-column
opened.
two-column-left
two-column-right
two-page-left
two-page-right
pdf.view.page-mode
Specifies which controls or
menus are visible when
viewing.
none
outlines
thumbs
fullscreen
use-oc
use-attach
Page 56
PDF creation
Metadata property
Description
Permitted values (any text unless
otherwise specified)
pdf.view.non-fullscreenpage-mode
The page mode to use on
exiting full-screen mode.
none
outlines
thumbs
fullscreen
use-oc
use-attach
pdf.view.reading-direction
pdf.view.hide-toolbar
pdf.view.hide-menubar
Specifies the predominant
reading order for text.
l2r
Specifies whether to hide the
viewer application’s tool bars
when the document is active.
true
Specifies whether to hide the
viewer application's menu bar
when the document is active.
true
r2l
false
false
pdf.view.hide-windowui
Specifies whether to hide user true
interface elements in the
false
document’s window (such as
scroll bars and navigation
controls), leaving only the
document's contents displayed.
pdf.view.fit-window
Specifies whether to resize the true
document's window to fit the
false
size of the first displayed page.
pdf.view.center-window
Specifies whether to position
the document’s window in the
center of the screen.
true
Specifies whether to display
the document’s title in the top
bar.
true
pdf.view.display-doctitle
pdf.bookmark.title
If this is present, a top-level
bookmark is created using the
value of the variable for the
bookmark text. The bookmark
selects the first page when
activated.
pdf.profile.default
This sets the default name of
the profile to use if the PDF
creation does not explicitly
select a profile.
pdf.sec.master-password
Sets the master (owner)
password required to change
security settings.
false
false
Page 57
User Guide
Metadata property
Description
Permitted values (any text unless
otherwise specified)
pdf.sec.user-password
Sets the user password
required to open the document.
pdf.sec.can-copy
Determines whether text and
true
graphics can be extracted from false
the document.
pdf.sec.can-print
Determines whether highquality printing is allowed.
true
false
pdf.sec.can-printdegraded
Determines whether printing is true
allowed, possibly at a low
false
quality that makes scanning
difficult.
pdf.sec.can-modify
Determines whether the
contents of the document can
be modified.
true
false
pdf.sec.can-annotate
Determines whether comments true
and form fields can be added
false
and modified.
pdf.sec.can-fillforms
Determines whether interactive true
form fields can be modified.
false
pdf.sec.can-assemble
Determines whether page
insertion and deletion, and
bookmark and thumbnail
creation is allowed.
true
Determines whether text can
be extracted for use in
accessibility support (e.g.
screen readers).
true
pdf.sec.can-readscreen
false
false
pdf.pagelabel.startrange.N Start a label range for page N.
See Section 5.7.1.
pdf.output.N
Create an additional PDF file.
See Section 5.7.2.
pdf.omit.page.N
Omit a page by number.
See Section 5.7.3.
pdf.omit.id.N
Omit a page by identifier.
See Section 5.7.3.
pdf.bookmarks.always
Enable bookmarks when not all true
pages are included.
false
pdf.javascript.prefix
Set a prefix to identify
JavaScript links.
See Section 5.7.4.
pdf.ndlink.prefix
Set a prefix to identify named
destination links.
See Section 5.7.5.
Page 58
Contents, indexes and other generated data
6. Contents, indexes and other generated data
TopLeaf provides facilities for creating data files for indexes, tables of contents and other generated
material. When using this feature it is usually necessary to run the composition several times so
that the generated content can be included. The <readgen/> command provides a means of
including generated content as well as controlling multiple composition runs.
6.1 Tables of contents
A table of contents (hereafter abbreviated to TOC) is a list of headings (possibly structured) and the
page labels (folios) on which they appear. The distinguishing feature of a TOC is that the structure
and order of entries reflects the structure and ordering of the document.
6.1.1 Entries and levels
All TOCs consist of a series of entries. Each entry typically contains a title and a page label (folio).
In addition, each entry occupies a particular level in the TOC hierarchy. A simple list of chapters
has only one level, but more complex TOCs tend to have a structure reflecting that of the original
document. The following TOC fragment has three levels:
In the simplest case, the mapping that produces the heading (for example, chapter/title) can also
create the TOC entry. This is done on the Content tab of the mapping.
Tick the Assign to TOC level box and select a level. Up to 9 levels are provided, though it is rare to
use more than three or four in practice.
Page 59
User Guide
The content of any occurrence of the mapped element will be assigned to a TOC entry, including
any internal tagging which may be present. The following sections will explain how to make use of
this captured material.
For more complex situations, such as where the TOC text is not always the same as the heading,
you may need to insert a custom marker into the custom content of the mapping.
For example, say the title element has an attribute which has the value no when the heading
should not appear in the TOC. In the mapping for the title, set the Scan element content option
and place the following in a user customisation:
<if var="@toc" target="no" test="not-same">
<Toc1><content/></Toc>
</if>
The %Toc1 custom mapping can then be used to create the TOC entry.
6.1.2 TOCs and PDF
In a PDF rendition of a document it is common to mirror the TOC in the bookmarks, which provide
an interactive display of the document structure.
See Section 5.3 for more information about PDF bookmarks.
6.1.3 Including the TOC file
The recommended way of including the generated TOC information is by using the <readgen/>
command. For example:
<readgen type="toc" passes="3"/>
The number of passes required can depend on a number of factors, such as how the TOC pages
are numbered:
•
If the document has a single sequence of page numbers, then the inclusion of the TOC will
affect the numbering of the following pages. This means that at least 3 passes are required.
After the TOC is included in the second pass it may affect the numbering for following
pages, so an additional pass is required to make it correct.
•
If the page numbering resets after the TOC, then the additional pass is not required. This is
the reason that many books use a separate numbering scheme for the front matter (such
as i, ii, iii, ...) and start numbering the body of the document from one.
The TOC file can also be created from the workstation interface by selecting File » Export » Table of
contents » Partition.
Alternatively, you can arrange for the TOC file to be created automatically via the Partition
Properties dialog using the Exports tab.
6.1.4 TOC file format
The following fragment shows the structure of a typical TOC file produced by TopLeaf:
<tl:toc2>
<tl:tocline>
<tl:title id="tl:Mapman.27" >The <emph>Font</emph> Tab</tl:title>
<tl:folio id="tl:Mapman.27" >35</tl:folio>
</tl:tocline>
<tl:toc3>
<tl:tocline>
<tl:title id="tl:Mapman.103" >Selecting a Font</tl:title>
<tl:folio id="tl:Mapman.103" >35</tl:folio>
</tl:tocline>
</tl:toc3>
Page 60
Contents, indexes and other generated data
<tl:toc3>
<tl:tocline>
<tl:title id="tl:Mapman.269" >Font Characteristics</tl:title>
<tl:folio id="tl:Mapman.269" >37</tl:folio>
</tl:tocline>
</tl:toc3>
</tl:toc2>
Each TOC level has a tl:tocline element containing a title and a page label (folio). The title will
contain any child elements that were present in the original data.
Custom markers in the title will be identified by the __MMCT: prefix. When these are processed
they will trigger custom mappings that use the normal % prefix.
The inclusion of the original title markup allows effects (such as emphasis or subscripting) to be
reproduced in the TOC if desired. If you do not want such effects preserved, define a mapping (for
example, tl:title/emph) which does nothing. This will override the default behavior of the tag in
question.
A common requirement when formatting a TOC is to place the page labels at the right margin,
sometimes preceded by leader dots. The <fill> command provides an easy way to do this.
The id attributes can be used to create a link to the point in the data that generated the TOC entry.
If the element contains an attribute called idtype with value auto it means that the id attribute
value was generated automatically. Note that automatically-generated link values may change
depending on the preceding content, so additional composition passes may be required when
using them. See Section 11.4.14 for more information.
6.1.5 Content-based TOCs
Some publications, especially looseleaf services, have TOCs which are not based on page
numbers. Instead they will refer to a paragraph number, or some other fixed ID which is
permanently assigned to the entry in question thus:
You can use TopLeaf to create such a TOC as follows:
•
Make sure that the element being assigned to each TOC entry includes the paragraph
number as a sub-element. If this is not the case, assemble a custom marker with the
required structure and assign it instead.
•
The <tl:folio> elements will still appear in the TOC file, so you have to use the Content
tab to suppress these folios.
•
Once the folios are suppressed you can map the internal structure of the <tl:title>
elements to produce the desired appearance.
Page 61
User Guide
6.2 Index generation
The main difference between a Table of Contents and an Index is that the latter is typically
composed of multiple entries that need to be sorted into alphabetical order. In addition, there may
be multiple items with the same name that must be merged into a single entry.
6.2.1 Entries and levels
All Indexes consist of a series of entries. Each entry typically contains a title and a page label
(folio). In addition, each entry occupies a particular level in the Index hierarchy. The following Index
fragment has three levels:
You can assign the content of any element in your source document to an Index entry. This is done
on the Content tab of the mapping.
Tick the Assign to Index level box and select a level. Up to 9 levels are provided, though it is rare
to use more than three or four in practice.
The content of any occurrence of the mapped element will be assigned to an Index entry, including
any internal tagging which may be present. The following sections will explain how to make use of
this captured material. It may be necessary to transform the content and use a custom marker to
assign the index data.
6.2.2 Index entry markup
In order to create the correct hierarchy, it is necessary to include all the levels to which an entry
belongs. For example, a section on TopLeaf box fills might have the following index entries in the
source document:
<section>
<heading>Box Color Fills</heading>
<ihead1><emph>Box</emph> tab</ihead1>
<ihead2>Effects</ihead2>
<ihead3>color fills</ihead3>
<ihead1>Stylistic Effects</ihead1>
<ihead2>Backgrounds</ihead2>
<ihead3>box color fills</ihead3>
<para>To fill a box with …</para>
</section>
Two rules need to be followed:
•
the index levels must be presented in the correct order (highest to lowest);
•
do not nest the index elements as all nesting is handled automatically.
Page 62
Contents, indexes and other generated data
Note:
If the markup uses nested index definitions these must be transformed into separate
elements before they can be processed by TopLeaf. The pre-processing used for DITA is an
example of this.
6.2.3 Including the index file
The recommended way of including the generated index information is by using the <readgen/>
command. For example:
<readgen type="index"/>
In most cases the default number of passes (2) is suitable for index incorporation.
The index file can also be created from the workstation interface by selecting File » Export »
Index » Partition.
Alternatively, you can arrange for the index file to be created automatically via the Partition
Properties dialog using the Exports tab.
6.2.4 Index file format
The following fragment shows the structure of a typical index file produced by TopLeaf before the
sort/merge:
<tl:ndx1>
<tl:ndxline>
<tl:title id="tl:Mapman.27" ><emph>Box</emph> tab</tl:title>
<tl:folio id="tl:Mapman.27" >62</tl:folio>
</tl:ndxline>
<tl:ndx2>
<tl:ndxline>
<tl:title id="tl:Mapman.28" >Effects</tl:title>
<tl:folio id="tl:Mapman.28" >62</tl:folio>
</tl:ndxline>
<tl:ndx3>
<tl:ndxline>
<tl:title id="tl:Mapman.29" >color fills</tl:title>
<tl:folio id="tl:Mapman.29" >62</tl:folio>
</tl:ndxline>
</tl:ndx3>
</tl:ndx2>
</tl:ndx1>
Each index level has a tl:ndxline element containing the title and a page label (folio). The title
will contain any child elements that were present in the original data.
Custom markers in the title will be identified by the __MMCT: prefix. When these are processed
they will trigger custom mappings that use the normal % prefix.
The inclusion of the original entry markup allows effects (such as emphasis or subscripting) to be
reproduced in the index if desired. If you do not want such effects preserved, define a mapping (for
example, tl:title/emph) which does nothing. This will override the default behavior of the tag in
question.
The id attributes can be used to create a link to the point in the data that generated the index entry.
If the element contains an attribute called idtype with value auto it means that the id attribute
value was generated automatically. Note that automatically-generated link values may change
depending on the preceding content, so additional composition passes may be required when
using them. See Section 11.4.14 for more information.
Page 63
User Guide
6.2.5 Index post-processing
In the majority of cases, a TopLeaf index file requires additional post-processing to achieve the
desired format. There are typically three steps involved:
•
sorting the entries into the correct (normally alphabetical) order;
•
merging multiple similar entries into a single composite entry (with multiple folios);
•
suppressing folios where not required (eg. in higher levels).
To handle the above steps, TopLeaf provides a built-in index sort/merge facility, which is described
in detail in the following section.
6.2.6 Index sorting
Each index is regarded as a series of entries, where an entry consists of a <tl:ndxN> (N=1 to 9)
which in turn consists of a <tl:title> (entry text) and a <tl:folio> (page reference). Note
that <tl:folio> is honored only at the lowest level of each entry group, higher level entries are
generally regarded as headings only.
By default, TopLeaf leaves your index unsorted. To obtain a sorted index, add the <indexsorter> command to the pre-content box of your $document mapping. This command may
contain the following attributes:
lang
This is a two-letter language code which determines the sorting rules to use. If this is
omitted the language/locale set by the content will be used.
locale
This is a locale code in the form “xx-XX” which determines the sorting rules to use. If
this is omitted the language/locale set by the content will be used.
ignore-case If this is yes (the default) sorting of index entries is case-insensitive. If it is no uppercase names will sort before lower-case.
ignore-space If this is yes (the default) spaces are ignored for the purposes of sorting. For
example, setting this to no will cause “et cetera” to sort before “eta”.
ignore-punc If this is yes (the default) punctuation characters are ignored when sorting. For
example, if punctuation is ignored “AC/DC” will be sorted as if it were “ACDC”.
numeric-sort If this is yes (the default) strings of digits are sorted by their numeric value rather
than as a sequence of characters. For example, setting this to yes will produce “9”,
“13”, “124” while selecting no will produce “124”, “13”, “9”.
sortkey-tag This is one or more tag names (separated by commas) that are used to set the sort
key for the entry. If one of these tags is found, it is removed and its content is used
to determine the position of the index item.
startrange-tag This defines a tag used to create the first page of a range. See below for more
information.
endrange-tag This defines a tag used to create the last page of a range. See below for more
information.
make-groups If this is yes (the default) the sorted output will contain information to indicate when
a new group of entries starts. See below for more information.
group-base-letter If this is yes (the default) grouping is determined by the unaccented (“base”)
first letter of the entry. For example, if this is yes then “Österreich” will be grouped
under “o”.
see-level
This is the index level used for “see” items. See below for more information.
seealso-level This is the index level used for “see also” items. See below for more information.
seelink-enable This controls whether markup is added to facilitate the creation of links for “see”
and “see also” items. The default of no does not create links. If this is yes links are
Page 64
Contents, indexes and other generated data
created if the target item is found. If it is all links are also added if the target does not
exist. See below for more information.
seelink-leveltag This is the name of the tag used to separate levels in the “see” and “see also”
text.
seelink-prefix This is a prefix added to the link/target strings used for “see” and “see also” links.
If you use hyperlinks elsewhere you can set this to a value which will make these
distinct from other link strings.
Note:
Older stylesheets may use the deprecated <index-sort> command. This has less
functionality than the new command, and is not suitable for languages other than English.
Grouping
If grouping is selected the sorter also inserts an element to identify when the first letter of the toplevel entry changes, for example:
<tl:grouping letter="a"/>
In most cases the letter attribute is a single lower-case letter. If the first character is not alphabetic,
the letter attribute value will be empty and a type attribute will be added with the value “numeric” if
the first character of the index entry is a digit, or “symbol” if the entry starts with some other
character (such as punctuation).
Ranges
A range indicates an inclusive range of pages that relate to the index item. To create a range there
must be a start item that determines the first page, and an end item for the last page. These two
items are connected by a range key which is a string unique to that range.
To create ranges, you must define values for the startrange-tag and endrange-tag
attributes of the index-sorter command. Both of these attributes contain either a tag name, or a
tag name and attribute name separated by ‘@’. The range key value is the text of the element if just
a tag name is given, or the attribute value if both are specified.
The text that appears in the sorted index is taken from the start item. The content of the end item is
ignored.
A range appears as a single tl:folio element. The end page is contained in a tl:endrange
element within the tl:folio.
For example, using the following command:
<index-sorter startrange-tag="range" endrange-tag="end@id"/>
and these level-1 index values in the data:
<index1>farm animals<range>XYZ</range></index1>
...
<index1><end id="XYZ"/></index1>
might produce the following in the sorted index:
<tl:ndx1><tl:ndxline>
<tl:title>farm animals</tl:title>
<tl:folio>13<tl:endrange>27</tl:endrange></tl:folio>
</tl:ndxline></tl:ndx1>
See and See Also items
It’s common for an index to contain items that direct the reader to an alternate item, for example:
Page 65
User Guide
Bovines
See Cows
or to items that contain related information, such as:
Cows, 23, 29
See Also Dairy farming
These are referred to below as “see” and “see also” items, respectively.
A common convention is that when a “see” item is present it should be the only item for that index
item. However, the index sorter does not require that you follow this convention.
The index sorter allows you to reserve a level in the index hierarchy for each of these item types.
The only restriction on the choice of number is that you may not use levels with a higher number for
index entries. For example, if you choose level 3 for “see” items, then only levels 1 and 2 are
available for use. The recommended approach is to use level 8 for “see” items and level 9 for “see
also”.
You must define mappings that assign content to these levels in the Content tab of the mapping.
The index sorter generates the <tl:ndx-see> and <tl:ndx-seealso> elements to represent
these items. The above examples would generate data like this:
<tl:ndx1>
<tl:ndxline>
<tl:title>Bovines</tl:title>
</tl:ndxline>
<tl:ndx-see>
<tl:ndxline>
<tl:title>Cows</tl:title>
</tl:ndxline>
</tl:ndx-see>
</tl:ndx1>
<tl:ndx1>
<tl:ndxline>
<tl:title>Cows</tl:title>
<tl:folio id="tl:pub1177.26">23</tl:folio>
<tl:folio id="tl:pub1177.41">29</tl:folio>
</tl:ndxline>
<tl:ndx-seealso>
<tl:ndxline>
<tl:title>Dairy farming</tl:title>
</tl:ndxline>
</tl:ndx-seealso>
</tl:ndx1>
The sorter can also add information into the generated index which makes it easy to create a link
from a “see” or “see also” item to the referenced index item. To enable this, set the seelink-enable
attribute to yes or all. Setting the attribute to all creates a link even if the target item cannot be
found, so you can check for missing index items.
Page 66
Contents, indexes and other generated data
Links are created by making a sort key from the “see” text and locating the item with a matching
sort key. If the reference is to a lower-level item, it is necessary to use a tag to identify the text of
each lower level. Use the seelink-leveltag attribute to specify the name of the tag used.
A link is created by adding a ref attribute to the <tl:ndx-see> or <tl:ndx-seealso> element.
The link target is created by adding an id attribute to the corresponding <tl:ndxline>. See the
Content tab of the Mapping Guide for information on how to create links and targets from attribute
values.
The following fragment shows an example of this, using <level> to identify the levels:
<tl:ndx1>
<tl:ndxline>
<tl:title>farming</tl:title>
</tl:ndxline>
<tl:ndx2>
<tl:ndxline id="tl.see.000002">
<tl:title>dairy</tl:title>
<tl:folio id="tl:Template.25">2</tl:folio>
</tl:ndxline>
</tl:ndx2>
</tl:ndx1>
<tl:ndx1>
<tl:ndxline>
<tl:title>cows</tl:title>
</tl:ndxline>
<tl:ndx-see ref="tl.see.000002">
<tl:ndxline>
<tl:title>farming<level>dairy</level></tl:title>
</tl:ndxline>
</tl:ndx-see>
</tl:ndx1>
6.3 Cross referencing
The TopLeaf cross reference (Xref) facility is similar to index generation. The main difference is
that Xref entries are independent rather than existing in a hierarchy.
Each Xref also contains information about how it was created, so different types of data can be
easily extracted from the same file.
The Xref information can be used for a number of purposes, for example:
•
adding the page number of the target to the text of a link, or
•
creating a list of figures in the publication.
6.3.1 Marking up an Xref
Unlike contents or index entries, Xrefs have no internal nested structure. You can assign the
content of any element in your source document to an Xref. This is done on the Content tab of the
mapping.
Tick the Assign to index level or XREF box and select the XREF level.
The content of any occurrence of the mapped element will be assigned to an Xref entry, including
any internal tagging which may be present. The following sections will explain how to make use of
Page 67
User Guide
this captured material. It may be necessary to use a transform and a custom marker to get the
content into the required format.
6.3.2 Using the Xref file
The recommended way of including the generated Xref information is by using the <readgen/>
command. For example:
<readgen type="xref"/>
The number of passes required will depend on how the information is being used.
The Xref file can also be created from the workstation interface by selecting File » Export » Xref »
Partition.
Alternatively, you can arrange for the Xref file to be created automatically via the Partition
Properties dialog using the Exports tab.
6.3.3 Xref file format
The following fragment shows the structure of a typical Xref file produced by TopLeaf:
<tl:xrefline class="title">
<tl:title id="tl:Tutorial.19">Overview</tl:title>
<tl:folio id="tl:Tutorial.19">2</tl:folio>
</tl:xrefline>
<tl:xrefline class="%Heading">
<tl:title id="tl:Tutorial.56">The <ital>Preferred</ital>
Method</tl:title>
<tl:folio id="tl:Tutorial.56">4</tl:folio>
</tl:xrefline>
Each Xref line contains a title and a page label (folio). Any internal tagging in the original entry is
preserved, but distinguished by the absence of the TopLeaf namespace prefix (tl:).
The class attribute indicates the element which generated the Xref entry. If the entry was
generated by a custom marker the name will be preceded by a %.
The inclusion of the original entry markup allows effects (such as emphasis or subscripting) to be
reproduced in the output if desired. If you do not want such effects preserved, define a mapping (for
example, tl:xrefline//ital) which does nothing. This will override the default behavior of the
tag in question.
The id attributes can be used to create a link to the point in the data that generated the Xref entry.
If the element contains an attribute called idtype with value auto it means that the id attribute
value was generated automatically. Note that automatically-generated link values may change
depending on the preceding content, so additional composition passes may be required when
using them. See Section 11.4.14 for more information.
6.3.4 Using Xrefs
If you are using the Xref file for a single purpose (such as creating a list of figures) the simplest
approach is to include it at the appropriate place by inserting a <readgen/> command and add
appropriate mappings to format the content.
If, however, you wish to use the Xref file for multiple purposes it is probably more convenient to
process it as an XML fragment. This involves:
•
Creating a mapping for tl:xref that scans and suppresses its content and assigns it to
an appropriate variable:
<set var="XrefData" copy="element"/>
•
Using the <xmlproc/> command to extract the required data at the appropriate place.
Page 68
Contents, indexes and other generated data
The DITA/book stylesheet included in the demonstrations has examples of this technique. See the
%AddPage and figurelist mappings, for example.
6.4 Live pages and filing instructions
One of the most useful aspects of controlling releases with TopLeaf is the automatic generation of
two lists:
•
Live pages list — a list showing the folio, release number or string, and change status for
every page or leaf in the release. This can be used within a distribution centre to construct a
complete up to date release from stores of printed pages. It can also be used to verify that a
document has been correctly updated to contain the latest version of every page.
•
Filing instructions — a set of instructions for updating the previous release to the current
release. This list shows the pages removed from the release, and any changed, or new
pages added to the release.
6.4.1 Filing instructions
Each page is identified by a release label that indicates when that page or leaf was last changed or
modified. The release label can assigned or referenced from a style sheet and then included in the
rendered page output.
The List of Effective Pages can be viewed by clicking File » Filing Instructions.
6.4.2 Using the filing instructions file
The recommended way of including the generated filing instructions within a document is to use the
<readgen/> command. For example:
<readgen type="filing"/>
You can save the list of effective pages as a separate XML, PDF or flat text file by clicking File »
Export » Filing Instructions.
Alternatively, you can arrange for the file to be created automatically via the Partition Properties
dialog using the Exports tab.
Page 69
User Guide
6.4.3 Filing instructions file format
The file begins with a list of <tl:leaf> elements that describe every leaf in the document showing
its folios (front and back), its release string(s) and whether it is in the current release. After this a set
of actions is given describing what needs to be done with each changed leaf: remove,
remove/replace or insert. Note that for each existing leaf (for example, leaf 2/1,2/2), the previous
release label (“UPDATE”) is included to assist correct identification of the leaf to be removed.
The format is different depending on whether full looseleaf or change pages is being used.
In a full looseleaf publication, release labels are assigned to the leaf, and the <tl:leaf> element
declares the leaf currency via the relnum and relstr attributes. The inclusion of a leaf in a
release implies that both the front page and back page of the leaf were modified in the same
release.
In a change pages publication, the currency of a page is determined by changes to the content of
the page. The release information for each page is defined independently, with the <tl:front>
and <tl:back> elements declaring the release status for the front and back pages of each leaf. It
is entirely possible for the front page and back page of a leaf to have been modified in separate
releases.
The following fragment shows the structure of a typical file produced by TopLeaf in looseleaf mode:
…
<tl:filing xmlns:tl="http://www.turnkey.com.au/topleaf/v7.0/filing"
parts="1" pages="644" >
<tl:partition path="Demonstrations/test" name="test" pages="22"
spage="1" >
<tl:release relnum="3" phase="update" >3</tl:release>
<tl:label>Demonstrations-test</tl:label>
<tl:live.list>
<tl:leaf type="live" relstr="UPDATE" relnum="2" current="0" >
<tl:front>1</tl:front><tl:back>2</tl:back>
</tl:leaf>
<tl:leaf type="live" relstr="REVISION" relnum="3" current="1" >
<tl:front>2/1</tl:front><tl:back>2/2</tl:back>
</tl:leaf>
<tl:leaf type="live" relstr="REVISION" relnum="3" current="1" >
<tl:front>2/2/1</tl:front><tl:back>2/2/2</tl:back>
</tl:leaf>
<tl:leaf type="live" relstr="UPDATE" relnum="2" current="0" >
<tl:front>2/3</tl:front><tl:back>2/4</tl:back>
</tl:leaf>
<tl:leaf type="live" relstr="INITIAL" relnum="0" current="0" >
<tl:front>3</tl:front><tl:back>4</tl:back>
</tl:leaf>
…
<tl:leaf type="live" relstr="UPDATE" relnum="2" current="0" >
<tl:front>101</tl:front><tl:back>102</tl:back>
</tl:leaf>
</tl:live.list>
<tl:filing.list>
<tl:instruction>
<tl:action type="remove" >
<tl:front>2/1</tl:front><tl:back>2/2</tl:back>
<tl:relstr>UPDATE</tl:relstr>
</tl:action>
<tl:action type="replace" >
Page 70
Contents, indexes and other generated data
<tl:front>2/1</tl:front><tl:back>2/2</tl:back>
<tl:relstr>REVISION</tl:relstr>
</tl:action>
<tl:action type="insert" >
<tl:front>2/2/1</tl:front><tl:back>2/2/2</tl:back>
<tl:relstr>REVISION</tl:relstr>
</tl:action>
…
Note:
•
•
It is possible to create a live pages list for non-looseleaf partitions (i.e. if Page
management is set to “None” in the partition properties). Such partitions will create
a live pages list with every page in the current release, and an empty filing list.
The list of effective pages may not be valid if a composition run generates warnings or
errors.
Page 71
User Guide
7. Secondary output transformations
The primary output format generated by TopLeaf is paginated content — a set of discrete pages
that can be printed or assembled into a PDF document. In addition to these primary output formats,
TopLeaf can also generate secondary outputs.
Secondary outputs can be created at a very low cost using the stylesheet rules you have set up for
paginated output. As such, they provide an easy way to transform your XML content to formats
accessible to third-party applications such as word processors or HTML browsers.
TopLeaf provides a number of standard transformations. Additional output formats can be added if
required (see the Transform Manual in the Programmer Documentation for details).
Note:
Secondary output files may contain text that indicates an evaluation licence was used to
create them. This text will not appear if you are using a valid license.
7.1 Characteristics of primary and secondary outputs
Primary and secondary outputs share a common set of stylesheet rules, but the output generated
by primary and secondary outputs is not identical. In particular, secondary output formats can
contain unexpected variations in presentation when compared with TopLeaf paginated output.
Secondary outputs are intended to provide an alternate rendition of data that can be useful for
internal review purposes. Using them as published output is not recommended and not supported.
The following table summarizes the main differences between primary and secondary outputs:
Stylesheet component
Primary Output
Secondary Output
Format type
Paginated
Continuous stream
Looseleaf and change pages
Yes
No
Variable page styles
Yes
No
Typefaces and font styles
Yes
Most, see
Section 11.4.12
Paragraph style
Yes
Most paragraph styles
honored
Hyperlinks
Yes
Yes
Bookmarks
Yes
Used for formats that
include a table of
contents
Table style
Yes
Partial, see
Section 11.4.12
Box style
Yes
Partial
Images
Yes
Partial, see
Section 11.4.12
Headers and Footers
Yes
No
Running Headers
Yes
No
Page 72
Secondary output transformations
Stylesheet component
Primary Output
Secondary Output
Sidenotes
Yes
No
Footnotes
Yes
Yes, but see
Section 11.4.12
Right-to-left text
Yes
No
Multiple labels on a line
Yes
No
Some more specific differences are also listed in the Known Issues section.
For information about typeface selection in secondary outputs see Section 3.5.3.
7.2 Stylesheet overrides
The stylesheet format allows you to add styling information that only applies to secondary output
formats. Style overrides are contained in the optional <convert> element in a mapping. This
element is not supported by the map editor and can only be added by editing the mappings.tlx
file.
The convert element has a single optional attribute called format. If this is present, the information
only applies when creating output for the format matching the attribute value. If no attribute is
present the information will apply to all secondary output formats. If an override for a specific format
is found any override without a format specified is ignored.
The child elements of the convert element are used to replace the attribute values of elements with
a matching name in the mapping. If there is no matching element in the mapping, the override is
ignored. Overrides are allowed for the para, font, table-style and box-style elements.
For example, consider the following mapping:
<mapping path="title">
<para align="left" before-space="24.0pt"/>
<font size="16.0pt" bold="yes"/>
<convert format="html">
<font size="14.0pt" italic="yes"/>
</convert>
<convert>
<font size="12.0pt" color="blue"/>
<para align="center"/>
</convert>
</mapping>
When creating html format output, the font override in the first <convert> element will be applied
and the font override in the second <convert> element will be ignored. The para override from
the second <convert> element will be applied. The output will be styled as if the mapping were:
<mapping path="title">
<para align="center" before-space="24.0pt"/>
<font size="14.0pt" italic="yes" bold="yes"/>
</mapping>
For other output formats only the second <convert> element overrides will be applied, and the
output will be as if the mapping were:
<mapping path="title">
Page 73
User Guide
<para align="center" before-space="24.0pt"/>
<font size="12.0pt" color="blue" bold="yes"/>
</mapping>
7.2.1 Content extraction
If the <convert> element contains a child called <extract> the source element which invoked
the mapping is processed separately from the conversion stream.
The <extract> element may contain the following attributes:
output
The content is written to a file in the target output directory using the attribute value
as the file name. If this attribute is not present the content will be discarded.
xslt
The content is transformed using an XSLT script before it is written. The file
containing the script must be in the same directory as the stylesheet.
This facility can be used for conditional creation of the table of contents. When producing an output
that contains its own table of contents it may be preferable to suppress the table of contents
generated by the stylesheet. For example:
<mapping path="toc">
<start class="block"/>
<convert format="epub">
<extract/>
</convert>
</mapping>
7.3 Enabling secondary outputs
To enable secondary output for a partition you must tick the Enable secondary transforms box in
the Partition Properties dialog. This causes the composition engine to create an auxiliary XML file
that will be used as the input to the transform program.
The transform program requires that a Java runtime be installed. The location of the runtime must
be correctly set in the Preferences dialog.
To start a transformation, choose one of the options on the File » Transform To menu, or press
one of the transform buttons on the standard toolbar. See Section 10.5.8 for more information.
You can also arrange to have the transformed outputs generated automatically. See the partition
properties for details.
Some transformations can require a large amount of memory, particularly when creating metafile
graphics to embed in an RTF document. If the transformation fails, try increasing the limit on
available memory using the preferences or the TLJAVA_ARGS environment variable.
7.4 Secondary output options
Each output format can have a number of options that control how the output is created. These are
controlled by a number of transform properties.
The preferred method of setting transform property values is by using metadata variables in the
stylesheet.
The Transform dialog can be used to set some of the properties, as well as setting default values
for a partition.
Page 74
Secondary output transformations
Note:
The TopLeaf workstation can only be used to set default options for the current partition. It is
also possible to set default options at other levels of the hierarchy (for instance, at the
publication level). This is considered an advanced feature. Contact Turn-Key support for
more information.
7.4.1 HTML transform properties
Property Name
Possible values
Description
title
any string
The HTML page title.
newfile
see below
Determines when a new HTML file is started. Note that
when creating a table of contents with maketoc a
separate file is created when the TOC starts.
maketoc
true or false
If true, creates a table of contents with links to the
corresponding parts of the document. A TOC is only
created if there are mappings to assign content to TOC
levels (see the Mapping Guide for details).
addnav
true or false
If true, navigation links are added to the bottom of each
file to link to the other files. This has no effect if only one
output file is created.
xhtml
true or false
If true, the output is valid with respect to XHTML 1.1.
imgcopy
directory name
If present, a subdirectory with the given name is created in
the same directory as the output file. All images
referenced in the output will be copied into the
subdirectory.
imgscale
a number
Controls the image scaling as described below.
fileprefix
any string
This is added to the start of the names of additional files
created by the transform. It is not added to the names of
the main output file, the image copy directory nor copied
images.
Note:
The use of characters that are not legal in file names
may cause the transform to fail or produce invalid
output. A short sequence of alphanumeric
characters is the recommended value for this
property.
Starting a New File
The newfile property takes a string value that can determine when a new file starts in a number of
ways:
•
A single integer value means that an element starts a new file if it is assigned to a TOC
level between 1 and the given value, inclusive. For example, the string “2” starts a new file
for each level 1 and level 2 TOC entry.
•
Two integer values separated by a dash cause a new file to be started for any TOC level
within the corresponding inclusive range. For example, “2-3” starts a new file for level 2 and
Page 75
User Guide
•
level 3 TOC entries, but not for level 1.
The string page causes a new file to be started wherever a page break is forced by a
mapping. Note that page breaks cause by the normal flow of text cannot be used to trigger
a new file.
One of the two numeric specifiers can be combined with the page keyword by separating them with
a comma. This has the effect of starting a new page if either condition is satisfied. The two parts
can occur in any order.
Image Scaling
Images are normally included without any processing, so their size will be determined by the output
medium.
By setting the imgscale property the actual size will be set based on the size calculated by the
composition engine. If the property value is greater than zero the width and height of each image is
multiplied by the value to determine the size. A value of one results in the same size as calculated
during composition. Note that the specified size may or may not be honored by the output medium.
7.4.2 RTF transform properties
Property Name
Possible values
Description
imgembed
true or false or
wmf
If true (the default), images are embedded using PNG or
JPEG format if possible, or WMF (Windows Metafile) if
not. If false, images are included as links instead of being
embedded. If wmf all images are embedded in WMF
format.
Note:
Using the WMF format for bitmap images can result
in very large RTF files.
newfile
as for HTML
property
Determines when a new RTF file is started. See the
corresponding HTML property description for more
information.
imgscale
a number
Controls the image scaling. See the corresponding HTML
property description for more information.
page
see below
A string containing a number of space or commaseparated values that set the page size and margins.
newpart
section or page
or nobreak
When using multiple partitions as input, this controls the
action between partitions. If the value is section (the
default) a section break is inserted. If page a page break
is inserted. If set to nobreak there will be no break
between partitions (except for any explicit page break
added by the stylesheet).
Page Size and Margins
The page property takes a string value containing one or more values separated by spaces and/or
commas.
The page size is specified by either a single value containing a paper size or a pair of values giving
the width and height. Paper sizes can be an ISO name (e.g. “A4”) or the names “Letter” or “Legal”.
A paper size can also have a trailing “P” for portrait orientation or “L” for landscape.
Page 76
Secondary output transformations
After the page size are optional values for the page margins, in the order top, bottom, left and right.
All measurements must be numeric and may be followed by a unit of measure string. There must
be no space between the number and the unit. The units recognized are “pt” (points), “cm”
(centimetres), “mm” (millimetres), “in” (inches) and “pc” (picas). If no unit is present the value is
interpreted as points.
Case is ignored in the property value.
The following example sets an A4 portrait page with default margins:
A4P
The following also sets an A4 portrait page with 1 inch top and bottom margins and 30 point left and
right margins:
210mm 297mm 1.0in 1.0in 30 30
7.4.3 EPUB transform properties
TopLeaf creates EPUB documents that conform to versions 2.0.1 and 3 of the EPUB
specifications.
Property Name
Possible values
Description
title
any text
The title of the publication.
id
any text
A unique identifier for the publication. If this is not
specified an identifier will be generated.
creator
see below
This contains one or more names of the publication
creator(s). It may also describe the role for each person
(such as author or editor).
contributor
as for creator
This is similar to the creator property, but intended for
those making a secondary contribution.
publisher
any text
Identifies the publisher.
date
a year or date
The date of publication in ISO 8601 format (YYYY-MMYY). Only the year component is mandatory.
description
any text
A description of the publication's content.
subject
any text
One or more phrases or keywords relevant to the
publication. Use the | character (U+007C) to separate
them.
rights
any text
A statement about rights, such as a copyright notice.
language
a language code
Identifies a language of the intellectual content of the
publication. Must be a language code compliant with RFC
3066, for example “fr” or “en-US”.
Creator names and roles
If the property contains multiple names, separate them with | (U+007C).
Each name may contain the following optional components:
•
A file-as string which is used for automated processing, such as sorting.
•
A role string which describes a type of contribution. These are generally 3-letter codes
such as aut for “author” or edt for “editor”. Consult the EPUB specification for a full list.
Page 77
User Guide
The optional components appear after the name. The file-as value is enclosed in braces ({...}) while
the role value is enclosed in brackets ([...]). If both are present the file-as value must appear first.
The following example defines an author and editor.
<set var="Author" meta="convert.epub.creator"
string="Joe Bloggs [aut] | Fred Nurke {Nurke, FJ} [edt]"/>
If multiple instances of {...} or [...] occur in a name, only the last one has a special meaning. You
can add an empty string at the end to force the name to include the previous occurrences. For
example, the following sets the name to “Jeanne d'Arc [Joan of Arc]” without defining a role:
<set var="Author" meta="convert.epub.creator"
string="Jeanne d'Arc [Joan of Arc] []"/>
7.4.4 tekReader transform properties
The tekReader platform created by eGloo technologies allows you to create electronic
publications which adapt automatically to any output device.
In order to display the tekReader publications created by TopLeaf you will need to have a server
account. Contact Turn-Key Systems for more information.
Note:
Unlike other output formats, a table of contents is mandatory for tekReader publications. Your
stylesheet must have mappings that assign values to the appropriate TOC levels.
Property Name
Possible values
Description
title
any text
The title of the publication.
url
a valid URL
The URL to which the publication will be uploaded. See
below for more information.
pubid
an integer
A number identifying the publication.
datakey
a string
A string identifying the publication.
upload
yes or no
Controls whether to upload to a server.
newfile
as for HTML
property
Determines when a new tekReader part is started. See
the corresponding HTML property description for more
information.
include.N
a file path
Each instance contains the path to a file to be included in
the publication. There must be a value with N set to 1. For
additional values increase N by one. See below for more
information.
include.N.path
a file name or
relative path
Sets the destination path for an included file. See below
for more information.
book
a javascript object Specifies the content written to the “book.json” file. See
below for more information.
thumbnails
yes or no
If yes (the default) thumbnail versions of large images are
created.
index.N.title
any text
Sets the title for an index. The value of N must be 1-9 or
xref. See below for more information.
Page 78
Secondary output transformations
Property Name
Possible values
Description
index.N.group
true or false
If true an index level is created when the first letter of the
item changes in index N. See below for more information.
Uploading the publication
The default action is to attempt to upload the data to a server. A warning will be generated if the
upload is not successful. Set the upload property to no to disable this.
All of the url, pubid and datakey properties are required for a successful upload. Contact Turn-Key
Systems for information about the appropriate values to use.
Including additional files
A file can be included in the publication as follows:
•
Set one of the include.N properties to the absolute path of the file.
•
Use the book property to create publication meta-data that includes the file name.
The file must exist when the publication is created. By default it is stored at the top level of the
publication using the same file name. If the include.N.path property is set (using the same value of
N) its value is used as the destination path. This must be either a simple file name or a relative path
(for example, “resources/logo.png”).
A common use for this is to include a PDF rendition of the publication that is displayed when the
user clicks the “print” button. The following example demonstrates this:
<set var="TekrPdf" meta="convert.tekr.include.1"
string="C:\pub\sample.pdf"/>
<set var="TekrBook" meta="convert.tekr.book">{
"pdf" : "sample.pdf"
}</set>
Note the use of a character reference to encode the “{” character, since this is a reserved character
in custom content.
Generating indexes
Indexes can be generated from data produced by mappings that set the Assign to index level or
XREF field on the Content tab.
To create an index in the publication you must set an appropriate title. The following sets a title for
items captured using level 5:
<set var="TekrIndex" meta="convert.tekr.index.5.title"
string="catchwords"/>
Document identifiers
The converter will generate unique identifiers for each element in the output. A consequence of this
is that each conversion run creates new identifier values.
The following command can be used to set the identifier prefix to a known value for all content from
this point on:
<tekr-info name="docid" value="PREFIX"/>
Page 79
User Guide
8. Looseleaf publishing and version control
8.1 Basic concepts
8.1.1 What is looseleaf publishing
Looseleaf publishing minimizes the number of replacement pages required to update one release
of a publication to the next. Instead of re-issuing an entire publication (which could be many printed
volumes), an update pack contains replacements for only those pages which have been recently
added or updated. In a typical publication the size of an update pack is significantly smaller than
that of a complete reprint, resulting in substantial reductions in printing and distribution costs.
To help the end-user update a printed publication from one release to the next, a set of filing
instructions is usually included. These tell the user which current pages should be removed, and
where the update pages should be inserted. More correctly we should talk of leaves (sheets of
paper) rather than pages, as each leaf is normally printed on both sides and so contains two pages.
To facilitate the updating process, the printed publication is normally in the form of one or more ring
binders which can be opened at any point to allow the insertion or removal of individual leaves.
Hence the name looseleaf.
Looseleaf methods also have a place in the world of electronic publishing where corporations and
government regulatory authorities are required by law to ensure that their publications identify the
currency of each page. This can be done by including a release specific label on each page and
by providing a list of effective pages.
8.1.2 Looseleaf terminology
The content of a looseleaf publication consists of a number of leaves. A leaf is normally printed on
both sides, with the odd numbered page on the front and the even on the back (e.g. pages 65–66
would form a single leaf), though single sided looseleaf is also possible. Intentionally blank
pages are included where necessary to retain the leaf structure. Each partition can contain a
maximum of 32,000 pages.
Each publication starts off as an initial release, which contains all the material. Then at intervals an
update release is issued. This is normally in the form of an update pack, which consists of a set of
updated leaves, usually with the release number printed on each page, plus filing instructions
that explain when pages are to be removed or replaced, and where new pages should be inserted.
There may also be a live pages list, which shows when each page was last released.
If a new customer wants to purchase a complete, up to date, printed looseleaf publication, it is also
possible to produce a full release, which contains the entire publication identical to what existing
customers have at the current release.
8.1.3 Looseleaf methods
TopLeaf supports two forms of looseleaf:
•
full looseleaf, which is designed to minimize the size of each update pack;
•
change pages looseleaf, which is designed to minimize the size of the whole updated
publication.
Which method you choose is governed by a number of factors.
The full looseleaf method:
•
Produces smaller update packs for print publications.
•
Supports two page or single page leaves. A two page leaf consists of a front and a back
page. Both pages are included in the numbering sequence. In single page looseleaf, each
leaf consists of a single page which always has an unnumbered back in the printed version.
Page 80
Looseleaf publishing and version control
•
•
•
•
•
•
•
Uses a sequential page numbering scheme. If the replacement material for an existing leaf
cannot be rendered on that leaf, the excess material is automatically set on additional point
pages.
Supports gapping and link lines to allow for growth without point pages.
Declares all content as a single flattened document file — with the exception of external
images, no content may be referenced from an external file. This is because the content of
the partition document is allocated to one or more leaves, and the document leaf
boundaries correspond to a portion of that file.
Creates updates based primarily on changes to the document content. Each time the
content is modified TopLeaf identifies all leaves where the content has changed. Leaves
that do not contain changed content can also be manually, conditionally, or
automatically included in a release.
Allows editorial intervention and checking. For example, if a change in one part of the
document causes a change to a cross reference in another location, then you may
manually include those other leaves in the release. When non-adjacent leaves within a
section of the publication change frequently, you may consolidate those changes to
avoid the creation of an unwieldy collection of point pages that run to several levels.
Provides limited support for on-the-fly transformations of the input document stream.
Places some restrictions on data and mappings.
whereas the change pages method:
•
Produces larger update packs, since a change early in a section may require the whole
remainder of the section to be included in the release. However the size of the whole
updated publication is optimized.
•
Uses a section based page numbering scheme. Point pages and link lines (for example,
Your next page is ...) are not required.
•
Assigns a unique identifier to each page and then identifies changes within the rendered
pages to determine the set of pages in a release.
•
Issues leaves in the update pack.
•
Places no restrictions on data or mappings.
•
Requires minimal editorial intervention and checking and is ideal for full automation.
8.1.4 Method comparison
In the following diagrams each pair of pages is printed on a single leaf, with the odd-numbered
page on the front and the following even-numbered page on the back. Text lines added during the
update are shown in red, while leaves needing to be updated are highlighted in yellow.
Page 81
User Guide
It is useful to compare how the two methods handle the addition of new material. For example,
assume you are adding a paragraph of text to the following pages:
Full looseleaf
If you are using the full looseleaf method, a new leaf will be created for the overflow from page 6
caused by the additional text. In order to make it fit in the numbering scheme, the point pages 6.1
and 6.2 are generated. The remaining leaves (7–8 and 9–10) were not altered and so do not form
Page 82
Looseleaf publishing and version control
part of the update. This results in a smaller (4 page) update, but a larger (12 page) total document
size.
Change pages
Using the change pages method, the new text causes the following material to re-flow until a
suitable gap (for example, a section end) is encountered. This results in a larger update pack (6
page) than with the full looseleaf model, but the overall document size remains at 10 pages and the
required filing is easier to perform.
Page 83
User Guide
8.1.5 Marking the extent of changed content
While Topleaf is capable of identifying when the content of a leaf or page has changed, this does
not mean that Topleaf automatically generates change bars, deletion markers, or shaded boxed
regions, effects often used to visually identify the extent of new or deleted content within a specific
release.
These effects will only be rendered by TopLeaf if:
•
your content carries suitable markup to identify the extent of changed or deleted content;
•
that markup is mapped to the required effect using one or more Topleaf style sheet rules.
Page 84
Looseleaf publishing and version control
8.2 The looseleaf production cycle
All TopLeaf looseleaf partitions follow the production cycle described below. The other sections of
this chapter deal specifically with either change pages or full looseleaf page management.
8.2.1 Release management
A looseleaf partition is produced as a set of releases (updates) . The initial release, or mainwork,
contains a set of output pages for the entire document. Subsequent releases can be produced in
the form of update packs that contain those pages modified in the release.
Each release is identified by a unique release label. This might be a number (for example,
Release 15), a date (June 2013) or any other identifying string (Act 07/37 amendments). This
label normally appears in a header or footer, to inform the reader when the material was last
updated. This visible release information is also useful in electronic documents because it indicates
the currency of pages as the partition changes over time.
A release can be in one of two phases:
•
an initial or update phase, where the source material can be altered, and the content
composed;
•
a published phase where the source material is locked for archiving and to form the
starting point for the next release.
8.2.2 Setting up a looseleaf partition
The first step in setting up a looseleaf partition is to assign the page management model as either
full looseleaf or change pages. Typesetting the partition now creates a mainwork.
8.2.3 Publishing the initial release
An initial release is ready to be published when changes to the source material and style sheet
rules have been finalized and the paged output verified by the user. By default, TopLeaf assumes
that the page output is not acceptable unless the partition content can be rendered without
generating composition errors. When using the full looseleaf page management model, TopLeaf
automatically divides the associated source material into leaves when the partition is published.
8.2.4 The update cycle
Publishing the mainwork establishes a baseline from which subsequent changes to published
leaves or pages can be identified. The following cycle is repeated indefinitely as the partition
advances through a succession of releases:
•
Create the Next Update.
•
Label the release (for example, July 2013).
•
Apply any corrections and alterations to the source content.
•
Compose the release and proof the output pages.
•
In a full looseleaf publication, you may want to consolidate the set of changed leaves to
minimise the number of leaves issued in the release.
•
Publish the release. A full looseleaf release can only be published if it can be composed
without warnings and errors.
•
For electronic publications you can now create a PDF for the entire publication and a list of
effective pages (live pages list).
•
For printed publications you can create an update pack consisting of:
○
all new or modified leaves;
○
a set of filing instructions detailing which pages should be removed and where the
new material should be inserted;
○
an optional list of effective pages.
Page 85
User Guide
After each cycle is complete, the system is ready for the creation of the next release.
The cycle continues between update and publish throughout the life of the document. When each
new update is created, TopLeaf can automatically remove releases that are no longer required.
The number of releases you want to keep is declared on the Exports tab of the Partition
Properties dialog.
8.2.5 Changing the stylesheet
Care must be taken when applying stylesheet changes to a looseleaf publication because they can
have a significant effect on every page of a document.
The impact of a style change depends on both the type of change and the selected looseleaf
options. Changes can be of three basic types:
•
Adding mappings for new elements, or new element/attribute combinations is generally
safe. This is because the new mappings have never been called from the existing material,
and so they will only affect new or updated content.
•
Changing mappings which are called infrequently is safe if done with care. In a change
pages publication, any pages affected by the change (to the end of the section) will need to
be re-issued. In full looseleaf publications where output checking is not enabled, changes
to mappings will only affect pages associated with leaves that contain modified content. If
you want the changes to the mappings to affect any other leaves in the update then these
leaves must be manually included.
•
Changing mappings which have global effect (e.g. changing font size or page layout)
should generally be avoided. Such changes will often result in a complete re-issue of
change pages jobs and also full looseleaf jobs with output checking enabled. In full
looseleaf publications where output checking is not enabled, the modified styles will not by
themselves force pages to be re-issued. But in subsequent releases, changes to the source
material will cause all modified leaves to be re-issued in the new format. This will result in
mixed-format releases, with the percentage of new format leaves increasing over time.
Whether this is acceptable will depend on the requirements of the publication compared
with the cost of issuing a full reprint.
Page 86
Looseleaf publishing and version control
8.3 Change pages publishing
This section explains how to create, configure and manage change pages publications in TopLeaf.
For full looseleaf publishing, see Section 8.4.
8.3.1 How change pages publishing works
Change pages publishing works best when processing technical manuals and documentation
which are composed of a number of small parts, each of which starts on a new page. Such
manuals typically use a hierarchical numbering scheme that lends itself to the generation of a
unique identifier for each page. The change pages looseleaf model assigns a unique identifier to
each page, so that the corresponding page in the previous release can be located for comparison
(differencing).
All page identifiers must:
•
be defined in the custom content of a header or footer
•
consist only of characters within the US-ASCII character set
•
contain a maximum of 32 characters
For example, consider a document consisting of a number of chapters, each containing one or
more sections. Each section starts a new right-hand page. This diagram shows how the pages are
organized and labeled:
In the TopLeaf mappings you could maintain three counters called {ChapterNum},
{SectionNum} and {PageNum}. The mapping for a chapter increments the ChapterNum counter
and resets the SectionNum counter to zero. The mapping for a section increments SectionNum
and resets PageNum. In the custom content for the footer you generate the page identifier and
display the page number (folio) as follows:
<set var="PageNum" value="{PageNum}+1"/>
<page-properties id="{ChapterNum}-{SectionNum}.{PageNum}"/>
Page {ChapterNum}-{SectionNum}.{PageNum}
To generate unique page identifiers, you must call the <page-properties/> command in the
custom content for a header or footer. It is not necessary to assign an identifier to every page, but
pages with no identifier will always be included in the current release. You can use this technique
to ensure that a table of contents, title page, and any other preliminary pages are always printed.
The page identifier is used to label the page in the navigation pane. Pages in the page list that
have not been assigned a unique page identifier are listed using the underlying page sequence
number.
Page 87
User Guide
Note:
It is an error to assign the same identifier to more than one page. If this occurs, all pages will
be listed using a page sequence number. The composition log file includes a list of all
duplicate page identifiers.
You cannot use the <folio/> command to assign a page identifier as this command always
returns the page sequence number.
8.3.2 Page groups
A page group allows you to create a set of pages which are all included in the release when any of
them have changed since the last release. To create a page group, set the group value of the
<page-properties/> command.
For example, say your document has a Table of Contents which you want included in its entirety if it
has changed, and not included if it is unchanged. For each page in the Table of Contents, set the
group value to a particular string, such as “TOC”. Note that while pages in a group will usually be
contiguous, there is no requirement that they must be.
All page groups must:
•
be defined in the custom content of a header or footer
•
consist only of characters within the US-ASCII character set
•
contain a maximum of 32 characters
8.3.3 Setting up change pages publishing
To enable change pages publishing, open the Partition Properties dialog and set the Page
management control on the Looseleaf tab to Change Pages.
You must define the area of the page that will be checked to see if changes have occurred. Often
this will not be the whole page, but will for example, exclude the header and footer blocks, because
they may contain material that is specific to the update, such as a release number or date.
Excluding material that changes with each update is important in order to prevent false change
indications. To define which part of the page is used for comparison, set the difference area in the
Layout Editor.
8.3.4 Life cycle of a change pages partition
Once the output is correct, the partition can be printed, and/or created electronically, and then
distributed. At this point the partition is published.
While it is not possible to edit material once a release has been published, it is possible to cancel
and delete the current release and revert to the previous release.
Before making any changes to the data, use the Next Update command to create a new release.
At this point the partition is in the update phase and the partition content may be altered and
retypeset. If you have not selected Only check for output changes when publishing in the partition
properties the Pages display will show changed pages with a tick:
A green tick indicates a change caused by the content of the page, while a red tick indicates a
derived change.
Page 88
Looseleaf publishing and version control
When the release is ready to distribute, use the Publish command. The Pages display changes to:
where the color of the corners has the same meaning as above. At this point you can print or create
a PDF of the changed pages, produce a list of filing instructions and a list of effective pages.
While TopLeaf always assigns the next sequential number when a new release is created, you can
use the Label this Release command to assign a specific release label (for example, August
2013).
8.3.5 Determining which pages have changed
The following method is used to determine if a page is included in the list of changed pages:
•
the page identifier for the page is determined. If the page has no page identifier it is
included.
•
the page in the previous release with the same page identifier is found. If there is no such
page in the previous release, the page is included;
•
if the corresponding page in the previous release exists, but is on a different side of the leaf,
the page is included; otherwise
•
the two pages are compared. If a change is identified within the difference area, the page
is included.
In addition, the page can be included because of a derived change:
•
if the page is on the same leaf as a changed page (for example, if the front of the leaf is
unchanged, but the back is different — the front must also be issued);
•
if the page is in the same group as a changed page.
8.3.6 Page comparison
Two pages are considered equal when they contain the same content within the page layout
differencing area, and that content is at the same vertical and horizontal position on both pages.
When comparing two pages, TopLeaf looks at sequences of text, rules and graphics within the
difference area.
Graphics are considered to be equal if the base filename (that is, the name excluding the folder
path) of each graphic is identical. The content of the graphic files is not compared.
Color is not considered when comparing text and rules.
Hyperlink launch and target identifiers are ignored during comparison.
Excluding specific content
Any rendered content can be excluded from the page comparison:
•
by setting the suppression level of content using the <content-properties/> command;
•
by setting the suppression level of margin rules and deletion markers using the
<marginrule-properties/> command;
•
by setting the level above which the content will be excluded either by using the <contentproperties/> command or by setting the Ignore output changes above content level
partition property.
Page 89
User Guide
8.4 Full looseleaf publishing
8.4.1 How full looseleaf publishing works
Full looseleaf publishing works by allocating the document content to one or more document
leaves. When the document is modified, TopLeaf compares the content of each leaf with the
content of the same leaf in the previous release. Any leaf containing changed content is marked
for inclusion in the release. It is a requirement of full looseleaf publishing that all partition document
content is contained within a single flattened document file. With the exception of external images,
no content can be referenced from an external file.
8.4.2 Numbering schemes
You can choose to structure the leaves using a partition based numbering scheme or a section
based numbering scheme. In a partition based numbering scheme the leaves are organised into
one or more leaf groups. In a section based numbering scheme the leaves are organised into one
or more leaf sections. The selected numbering scheme applies to the entire partition. Leaf groups
cannot contain leaf sections, and leaf sections cannot contain leaf groups.
Partition based numbering
In a partition based numbering scheme, the folio numbering begins at a user defined start page,
and the pages are numbered sequentially. The page folio is a numeric identifier consisting of a
primary folio index and up to four additional point page levels.
The folio can be rendered as a numeric, alpha or roman numeral label that conforms to the
following constraints:
•
The primary folio index is an integer value within the range 1 to 32,000;
•
The point page separator character is a single character. It cannot be declared as an entity;
•
The value for each numeric point page component is an integer value in the range 0 to 999.
Leaves can be organised into one or more leaf groups. Each leaf group can be optionally separated
from the following leaf group by a gap in the folio numbering sequence. This technique is known as
gapping. Gapping helps to minimize the total number of point pages by reserving a folio range into
which a leaf group may expand if necessary.
Leaf groups are usually associated with a major document structural unit, such as a chapter, a
table of contents, or an index. For example, consider a document consisting of a number of
chapters, with each chapter beginning on a right-hand page and numbered with consecutive folios.
There is no room for expansion:
Page 90
Looseleaf publishing and version control
When a leaf gap of 100 is applied by starting a new leaf group on the mapping for the <chapter>
tag, the folio numbering sequence will look like this:
There is now room for expansion at the end of each chapter.
Leaf groups and leaf gaps can only be declared in a mainwork. Once established, the number of
leaf groups and the gap size remains unchanged. For this reason, if you decide to organise your
content using leaf groups, first identify the parts of your content that can be associated with a leaf
group, and estimate an appropriate gapping size. The default leaf gapping is 100 pages. You can
use the <leaf-settings> command to change the default gap size.
Section based numbering
In a section based numbering scheme, the folio numbering for each leaf section begins at 1, and
each leaf folio is numerically greater than the previous leaf folio in the same section. A document
can consist of any number of leaf sections, and sections can be created, inserted or removed in any
release.
Each leaf section is associated with a unique section prefix that identifies all pages within that
section. All leaf sections starts on a recto page and are numbered from 1. Point pages may be
created between existing leaves within a section, but changes at the end of the section will always
result in the creation of additional leaves.
Page folios consist of two components — the section prefix and a sequence number. The section
prefix may consist only of characters within the US-ASCII character set and contain a maximum of
32 characters. The sequence number consists of a primary index and up to four additional point
page levels and can be rendered as a numeric, alpha or roman numeral.
The sequence number can be rendered as a numeric, alpha or roman numeral label that conforms
to the following constraints:
•
The folio index is an integer value within the range 1 to 32,000;
•
The point page separator character is a single character. It cannot be declared as an entity;
•
The value for each numeric point page component is an integer value in the range 0 to 999.
Leaf sections are often associated with a major document structural unit, such as a chapter,
section, table of contents, or an index. For example, consider a document consisting of a number of
Page 91
User Guide
chapters, with each chapter containing one or more sections. Each section starts a new right-hand
page. This diagram shows how the leaves are organized and labelled:
Now suppose that each <chapter> tag declares an attribute that identifies the chapter number,
and each <section> tag declares an attribute that identifies the section within that chapter. In the
TopLeaf mappings you can capture the chapter identifier as {ChapterID}, and the section
identifier as {SectionNum}.
To create or start a leaf section, declare the section prefix by including a <leaf-properties/>
command in the custom content of a mapping triggered at the beginning of the section:
<leaf-properties section-prefix="{ChapterID}-{SectionNum}."/>
A section remains in force until the end of the document or until a new section prefix is declared.
The page folio can be referenced by including the <folio/> command within a page header or
footer. In some publication styles it may be necessary to suppress either the section prefix or page
sequence number. The following example shows how the <folio/> command can be used to
reference a page folio without the section prefix:
<folio prefix=”no” />
8.4.3 Setting up full looseleaf publishing
To enable full looseleaf publishing, open the Partition Properties dialog and set the Page
management control on the Looseleaf tab to Looseleaf. You must then decide how you want
TopLeaf to manage the partition content. Some of the options to consider are:
•
•
•
•
•
whether to use single or double sided looseleaf processing;
The page folio format;
whether leaf, page and line boundary markers are hidden or always visible;
whether to minimise the number of leaves issued in a release by consolidating the set of
changed leaves;
whether to reduce the size of the update pack by enabling output page comparison.
8.4.4 The page folio format
When using a partition based numbering scheme, the page folio format determines the general
format of the primary folio index. If you are using a section based numbering scheme, the page folio
format determines general format of the page folio sequence number. The page folio format is
declared when setting up a partition mainwork and cannot be changed in any subsequent update.
You can use the <leaf-settings/> to set the point page level separator character.
8.4.5 Point pages
If the replacement material for an existing leaf cannot be rendered on that leaf, the excess material
is automatically set on additional point pages. With the exception of the 999(ab) page folio
Page 92
Looseleaf publishing and version control
format, which permits a single point page level, you can create leaves that specify a primary folio
index and up to 4 additional point page levels.
8.4.6 Boundary markers
Each time a release is published, TopLeaf automatically re-allocates the partition content to a set of
leaves. When you retrieve the content of an update release from a partition, TopLeaf assembles
the content as a single document for processing by your document authoring tool or for archival
within your CMS.
A boundary marker defines the position of a published leaf, page or line break within a document.
You can optionally view the published boundaries when editing the partition content or include
the published boundaries when exporting that content to an external document file. If you decide
to show boundaries, Topleaf uses processing instructions to mark the position of these boundaries
within that content. The following table lists the processing instructions that TopLeaf inserts within a
document in order to identify the position of leaf, page, and line boundaries:
Type
PI name
Example
Leaf
<?TL ...?>
<?TL partition="looseleaf/BOM" folio="5"
hyphen="1" ?>
Page
<?TLeop ... ?>
<?TLeop partition="looseleaf/BOM" relnum="0"
relstr="Original Document" folio="6" ?>
Line
<?TLeol ... ?>
<?TLeol partition="looseleaf/BOM" relnum="0"
relstr="Original Document" folio="6" lineno="12" ?>
Each processing instruction marks the position of the associated boundary type within the
document content. Page and line boundary markers identify the position of a page or line break for
the release in which the containing leaf was last changed or included. A boundary marker describes
characteristics of the boundary using one or more of the following attributes:
Atttribute
Type
Meaning
partition
string
The partition name
relnum
number
The TopLeaf release number in which the leaf was last changed or
included
relstr
string
A release label that identifies the release in which the leaf was last
changed or included
folio
string
Identifies the leaf or page to which the boundary applies, or in the
case of a line boundary, in which the line occurs.
hyphen
number
If defined, and equal to 1, indicates that the leaf or page boundary
occurs within a hyphenated word.
wrdbrk
number
A non-zero offset specifying a word break point at which the
boundary occurs. For example, in the case of a leaf boundary marker,
the declaration wrdbrk="8" indicates that the leaf boundary is
positioned eight characters from the start of the current word.
The TL, TLeop and TLeol processing instruction names are reserved for use by TopLeaf. When
editing or replacing the content of an update release, you must not add, remove or modify the
attributes of any processing instruction declared with these names.
Page 93
User Guide
8.4.7 Processing published leaf boundaries
After the initial release is published, TopLeaf manages the partition content as a set of document
leaves. When an unchanged looseleaf document is typeset, each published leaf boundary
identifies a leaf break point that prevents the allocation of additional content to the leaf being
processed. If a looseleaf document contains leaves that have been changed or manually included,
TopLeaf ignores all published leaf boundaries within runs of adjacent changed or included leaves,
typesetting the content of each leaf run as a single unit. The published boundary at the end of the
run identifies a break point that prevents the allocation of additional content to the leaf run being
processed.
When scanned document content spans a published leaf boundary, the leaf inclusion status
influences how the content of the leaves is processed. If neither of the leaves sharing the boundary
have been changed or included then the position of the boundary within the scanned content will be
honored. An exception to this rule may occur if the rendered scanned content of a changed or
included leaf overflows into the following leaf — for example, where a leaf boundary follows a
hyphenated word or word break character, or is positioned within a split table row.
The composition engine may be required to automatically include a leaf if the adjacent leaf sharing
a scanned leaf boundary is changed or included. This action may result in the inclusion of
additional leaves in the release if you have not enabled output page comparison.
However, TopLeaf will not honor the position of an existing scanned leaf boundary that is rendered:
•
after being transformed;
•
solely within the context of a custom marker or a system marker;
•
within a custom table;
•
using a copy of the scanned content;
•
using the {content} system variable.
8.4.8 Determining the position of leaf boundaries
The TopLeaf composition engine processes a full looseleaf XML document content as a primary
input stream sourced from a series of leaf files. As each character is read, a character count
associates the position of each character relative to the beginning of the document input stream
with a page position within the rendered output.
Leaf, page or line boundaries are assigned when a partition is published. All boundaries can only
be positioned within content that has been sourced from the primary document input stream and
rendered within a data column. TopLeaf cannot calculate the position of any leaf, page or line
boundary that is located within:
•
content included from an external file;
•
content generated by a user defined customisation;
•
a custom table;
Page 94
Looseleaf publishing and version control
•
•
a table row that splits across a page boundary;
a note, running head, fixed block, or float.
The position of page and line boundaries is immediately invalidated by any change to the document
content. Leaf boundaries however, remain fixed until the release is published.
8.4.9 Content scanning
Style sheet mapping rules allow you to scan and reuse the content of an element. The scanned
content can be rendered immediately, or assigned to notes, running heads, fixed blocks, and
floats. You can also apply a user customisation to reassign or transform the scanned content.
While scanning is permitted within a full looseleaf partition, TopLeaf can only position leaf, page or
line boundaries within scanned content that is:
•
sourced entirely from the flattened partition document file;
•
rendered immediately, or if the content is suppressed, by referencing the <content/>
command;
•
rendered before any other content generated by a user defined customisation.
TopLeaf cannot calculate the position of leaf, page or line boundaries located within scanned
content that is rendered:
•
•
•
•
•
•
•
after being transformed;
after being re-scanned and rendered by a custom marker or a system marker;
from within a custom table;
within content extracted from an XML fragment using <xmlproc/>;
as a note, running head, or float
using a copy of the scanned content;
using the {content} system variable.
When any of these events occur, the boundary will be positioned after the element containing the
scanned content.
Scanned document content that is suppressed at the end of a paragraph will not be associated with
that paragraph unless you force a content break or generate additional custom content — for
example, by outputting a zero width space (U+200B) — before the paragraph ends.
Examples
The following table lists examples of mapping rules that process scanned content, together with a
possible implementation. A
in the final column indicates whether or not TopLeaf can position
leaf, page or line boundaries within the scanned content.
Mapping rule
requirement
Description
Scan the content of a
tag. Assign the
content of a tag to a
running head and
render the original
scanned content.
The requirement is implemented by scanning the tag
content and assigning a running head directly from the
mapping Content tab. The scanned content is rendered
automatically.
Boundaries can
be positioned
Page 95
User Guide
Mapping rule
requirement
Description
Scan the content of a The requirement is implemented using the following
tag. If the tag
user customisation:
identifies a telltale,
then assign the tag
<if var="@id" target="telltale" >
content to a data
<TellTale><content/></TellTale>
telltale and render
</if>
the original scanned
<content/>
content.
The mapping scans and suppresses the tag content. If
the element is a telltale, the tag content is passed to a
%Telltale custom marker mapping that assigns the
data telltale without rendering any additional content.
The scanned content is rendered using the
<content/> command.
Scan and suppress
the content of an
inline tag. The tag is
positioned
immediately before
the end of a
paragraph. Assign
the scanned content
to a sidenote.
The requirement is implemented by rendering a zero
width space (U+200B) within the end tag user
customisation of the mapping that assigns the
sidenote:
​
Scan the content of a The requirement is implemented using the following
tag. If the tag
user customisation:
identifies a footnote,
then assign the tag
<if var="@id" target="note" >
content to a data
<Note><content/></Note>
telltale and render
</if>
the text of the
{content}
scanned content.
The mapping scans and suppresses the tag content. If
the element is a note, the tag content is passed to a
%Note custom marker mapping that assigns a page
footnote without rendering any additional content
The text of the scanned content is rendered using the
{content} system variable. Boundaries cannot be
positioned within the scanned content because the
value of{content} is a transform version of the
scanned content — the tag structure has been
stripped.
Page 96
Boundaries can
be positioned
Looseleaf publishing and version control
Mapping rule
requirement
Description
Boundaries can
be positioned
Scan the content of a The requirement is implemented using the following
tag. Output additional user customisation:
content before and
after the scanned
[<I>Warning:</I> <content/> ]
content.
The mapping scans and suppresses the tag content. It
then formats and renders additional text before
rendering the scanned content. Boundaries cannot be
positioned within the scanned content because
additional content has been inserted by the user
customisation.
8.4.10 The leaf status
The partition leaf list reflects the leaf group structure and the leaf status within the published leaf
set. In an update phase, the leaf list displays changes in the status of each leaf. A change in the
status of a leaf means that one of the following events has occurred: the leaf content has been
altered, the leaf was manually included, or the leaf was automatically included in the release. The
status of individual leaves can be inspected from the TopLeaf workstation leaf list. In an update
phase, the icons associated with each leaf in the leaf list represent one, or a combination of the
following leaf properties:
Icon
Meaning
The leaf marks the start of a leaf group or leaf section.
The content of the leaf is neither changed or marked for inclusion in the current
release.
The content of the leaf has been modified.
The output pages associated with the leaf have changed.
The leaf has been manually included in the release.
The leaf has been manually included in the release. It will be included even if the
associated output pages remain unchanged.
The leaf has been conditionally or automatically included in the release by the
composition engine.
The leaf belongs to a leaf group that has been renumbered.
When the partition is published, TopLeaf reallocates the document content to a new set of leaves.
This reallocation is a consequence of changes to leaf content, or manual, conditional, or automatic
leaf inclusions. Note that if you have enabled output page comparison, a change to the status of
a leaf in an update phase does not necessarily mean the leaf will be regarded as changed when the
phase is published.
In a published phase, the leaf list displays the published leaf set and specifically, which leaves
have been replaced or added. The icons associated with each leaf represent the following:
Page 97
User Guide
Icon
Meaning
The leaf marks the start of a leaf group or leaf section.
The leaf content and associated output pages are unchanged.
The leaf was changed or added to the partition leaf set.
The leaf status for an updated or published leaf can be inspected by selecting an individual leaf and
right clicking the leaf icon to open the leaf properties dialog.
8.4.11 Changed and deleted content
After editing or replacing the content of a release, TopLeaf identifies all leaves in which the content
has been altered. When the content of a leaf is different to the content of the same leaf in the
previous release then the leaf will be included in the release.
In the case when all of the content of a leaf is deleted, then the leaf boundaries remain in place and
the leaf still exists even though it is empty. If you need to remove empty leaves then you can do this
by consolidating the set of changed leaves.
8.4.12 Manual leaf inclusion
Manual leaf inclusion can be used to force the composition engine to compose a run of changed or
included leaves as a single unit. This is a useful technique if you want to optimise the impact of
input changes on the leaf numbering sequence. You can manually include leaf groups, leaf
sections, or individual leaves within a release.
TopLeaf provides two methods for the manual inclusion of leaves. A soft leaf inclusion occurs when
you want TopLeaf to include an unchanged leaf in an update, even if the content of that leaf is
unchanged. A hard leaf inclusion occurs when you want TopLeaf to include an unchanged leaf in
an update, even if the rendered visual appearance of that leaf is unchanged.
You must use the TopLeaf workstation to manually include a leaf in a release.
8.4.13 Conditional leaf inclusion
Style sheet mapping rules applied by the composition engine can conditionally include leaf groups
or leaf sections. You can set the include attribute in the <leaf-properties/> command to mark
all leaf groups or sections, or a specific group or section for inclusion within the release.
8.4.14 Embedded leaf boundaries
An embedded boundary occurs when a leaf boundary falls within scanned or transformed
document content (for example, in a split table row, a split column footnote, when reformatted
as a custom table or within the context of a custom marker) . The leaves adjacent to an embedded
boundary are always composed as a single unit, irrespective of whether the content of either leaf is
changed or manually included.
In the following example, an <invoice> block contains two items:
<invoice>
<item>
<code>SL6500A</code>
<quantity>20</quantity>
<unit-price>14.50</unit-price>
<total-price>290.00</total-price>
</item>
Page 98
Looseleaf publishing and version control
<item>
<code>SL7600N</code>
<quantity>8</quantity>
<unit-price>6.25</unit-price>
<total-price>50.00</total-price>
</item>
</invoice>
The components of each <item> are scanned, allocated to user variables, and formatted as a
custom table row by the </item> end tag mapping. The entire table is emitted by the enclosing
</invoice> mapping.
When rendered, the custom table splits across the leaf boundary between leaves 17 and 19:
but when published, the leaf boundary is positioned after the elements containing the scanned
document content:
In subsequent releases, if leaf 17 or leaf 19 is changed or manually included, TopLeaf will force an
automatic leaf inclusion of the adjacent leaf, until such time as the custom table content allocated to
leaf 17 is no longer rendered within leaf 19.
In many cases, the output produced for leaves that have been automatically included will be
unchanged from the previously published output. You can use output page comparison to
minimise the effect of automatic leaf inclusions on the size of the update pack.
8.4.15 Optimizing input change tracking
The number of point pages created when composing a partition can be minimized by merging runs
of adjacent changed or included leaves. The Optimize input change tracking setting in the partition
properties selects this option.
Page 99
User Guide
8.4.16 Page comparison
By default, a leaf will be included in the release update pack when the content of the leaf changes,
or when the leaf is manually, conditionally or automatically included. You can also use output page
comparison to influence the size of the update pack. This control is applied by enabling the
following partition properties:
•
Exclude all leaves with unchanged output. When this property is enabled, TopLeaf
compares the updated and published output for those leaves in which the content of the
leaf has changed or the leaf has been manually, conditionally or automatically included. If
the output for the leaf is unchanged, then the leaf will be excluded from the update pack.
Setting this option has the potential to reduce the size of the update pack.
•
Check all pages for output changes. When this property is enabled, TopLeaf compares the
updated and published output for all leaves in the partition. If the output for a leaf has
changed, then that leaf will be included in the update pack. Setting this option has the
potential to increase the size of the update pack.
8.4.17 Link lines
A link line identifies a page numbering discontinuity in a looseleaf partition. TopLeaf can
automatically generate link lines at the end of a leaf group or section, at the end of a run of point
pages, or at the end of a partition. Link lines are a natural consequence of page gapping, but they
can also occur when leaves are removed or inserted into a document.
The format of the link line is controlled by the linkline header/footer mapping.The link line is a
single line message such as: Your next page is .... Link lines are declared by creating a fixed block
outside the data area for each of the page types of your layout. It is important to create a link line
fixed block in every page type to ensure that a link line always appears when there is a gap. See
the Layout Editor Manual for more information.
The value of the folio at the end of a leaf group or section can be retrieved using the <linkfolio/> directive. If your publication style requires a link line at the end of each partition, then you
must manually declare a link to another partition. The end of document link folio is declared in the
General section of the Indicators dialog, using the General Indicators Link ID and Link Folio.
8.4.18 Blank back (left hand page)
Where the text that precedes a leaf or leaf group end finishes on a right hand page, TopLeaf
automatically inserts a blank page unless it is operating in single page leaf mode. It is customary to
include a message (for example, INTENTIONALLY BLANK) on this page to assure the reader that
there is no missing content. The layout for the intentionally blank page can include header and
footer content and the page is included within the page numbering sequence even if no page
number is visible.
The content and format of this page can be controlled by setting header/footer mappings.
8.4.19 Single page leaves
TopLeaf provides the option of treating the leaf as a front page, instead of the usual front/back pair.
Every page is composed as a right-hand page, ignoring the traditional convention of right pages:
odd numbers; left pages: even numbers. By default, folios use the sequence 1, 2, 3… for
successive leaves. When point pages are needed, the numbering is as follows:
1, 1.1, 2, 2.1, 3, 3.1, 3.1.1, 3.2, 4
Point pages are treated as single page leaves.
8.4.20 Setting indicators
Indicators are a facility for holding text that can be rendered on pages of the output without being
included in the data. For an explanation of how to set partition indicators see Section 10.5.14. The
Page 100
Looseleaf publishing and version control
menu item Commands » Indicators opens the Indicators dialog with which you can set Default Leaf
Indicators for the partition. In full looseleaf, the composition engine will copy the default leaf
indicators to each new leaf created in a release. In a mainwork, the default leaf indicators are
assigned to all leaves. In an update, the default leaf indicators are assigned only to new leaves
generated as a result of changes to the partition content. See Section 10.5.14 for more details.
Next partition indicators
The indicators Link ID and Link Folio declare the link line value generated at the end of a partition.
In a publication that consists of several partitions, this will normally identify the starting page for the
next partition in the sequence.
The values of these indicators are accessed by the system command <link-folio> (normally
included in the custom code for the link line fixed block – see header/footer mappings).
Leaf indicators
Once a full looseleaf partition has been typeset, the user can access properties for individual leaves
through the menu Page » Leaf Properties…. This opens a dialog which includes an area where Leaf
Indicators can be set. Leaf indicators are labeled text strings that are stored by TopLeaf as
properties of the associated leaf. They can also be set with the TopLeaf API. These indicators
function in the same way as partition indicators as described above.
8.4.21 Renumbering leaf groups
During the course of updating the content, new material may be added into a leaf, resulting in new
leaves with point page numbers. After many changes the point page numbering may become
cumbersome and unsightly. If your document content is organised within one or more leaf groups,
you can use the TopLeaf workstation to renumber individual groups. Renumbering can consolidate
part of the document, replacing point pages by a normal sequence, making use of the unused
numbers in the gaps either side.
The Renumber dialog is opened from the menu Commands » Renumber.
The Before Renumber pane shows the existing leaf and group structure where the yellow icons
identify group start leaves. Note that the leaves are numbered with the same numbers that are
displayed in the leaf navigation pane even if you are using different identifiers on the rendered
pages.
Click on the icon for any leaf in the group you want to renumber. The icons for the leaves that make
up this section are changed from white to grey to identify them and the current number of the
starting leaf is written into the Target Folio text box. Alter this number to the new start number you
wish to use.
Press Renumber >> to test the change — TopLeaf will provide an explanatory message if the
chosen number is not valid, otherwise the new leaf structure that will apply will be shown in the
After Renumber pane.
If the displayed result is acceptable, press Apply to make this change to your partition. TopLeaf will
make the changes and automatically start a composition run. Otherwise press Cancel to exit
without making any changes.
You can also force an automatic renumbering of a leaf group when the point page level exceeds a
preferred maximum, as in the following example:
<leaf-settings max-pointlevels=”2” />
Page 101
User Guide
8.4.22 Renumbering leaf sections
In a section based full looseleaf publication, you can use data driven style sheet mapping rules to
conditionally include all leaf sections or a specific leaf section. Including all leaves in a leaf section
will automatically renumber the leaves in that section, as in the following example:
<switch>
<case var="@type" target="revision" >
<leaf-properties include="all" />
</case>
</switch>
This action will also remove all point pages from that section.
You can also force an automatic renumbering of a leaf section when the point page level exceeds a
preferred maximum, as in the following example:
<leaf-settings max-pointlevels=”2” />
8.4.23 Importing existing looseleaf material
In some circumstances it may be necessary to import a set of leaf boundaries for an existing
looseleaf service. A manual leaf split establishes a set of published leaves from an existing set of
leaf boundaries. The document content declares one or more leaf boundary markers to identify
the existing leaf boundaries. TopLeaf allocates the content between successive leaf boundary
markers to one or more document leaves, then automatically moves the partition to the published
phase.
Procedure
To import an existing set of leaf boundaries you must:
1. Insert one or more leaf boundary markers into your document content;
2. Assign a mainwork release label to identify all leaves in the initial leaf set;
3. Perform a leaf split;
4. Create the Next Update phase;
5. Compose the partition.
Output pages
A manual leaf split allocates the content of a mainwork to one or more leaves and then publishes
the release. It does not render the content of those leaves. Rendered output pages are only
produced for a manually leaf split mainwork when the content of the first update release is typeset.
The published output page baseline that is created when you typeset the first release will include
two output pages for each leaf declared in the imported leaf set. If it is not possible to construct
TopLeaf style sheet rules that produce output that is identical to your existing published pages, the
rendered content for some leaves may overflow as one or more additional leaves that were not
defined by the manual leaf split. The paged output associated with these additional leaves will not
be accessible until the leaves that overflow are changed or manually included, or you are checking
all pages for output changes.
In the following example, a manual leaf split creates an initial set of leaves displayed in the leaf list
as 1, 3, 5 … 17. After typesetting the first update, an inspection of the composition log indicates
that TopLeaf created an additional leaf 2a when rendering the content of leaf 1. The output pages
for leaf 1 will be included in the published page baseline, but the output pages for leaf 2a will only
be included in the baseline if leaf 1 is changed or manually included, or you are checking the output
for that leaf for output changes.
Page 102
Looseleaf publishing and version control
You can inspect the composition log after typesetting the first update release to confirm that the
rendered leaf set matches the leaf set declared by the manual leaf split.
Identifying existing leaf boundaries
Existing leaf boundaries within a mainwork are identified using boundary marker processing
instructions. Each initial leaf boundary marker defines:
•
the point at which the content of one leaf ends and the content of the next leaf begins;
•
an optional leaf folio that identifies the leaf;
•
if the boundary is located after a hyphenated or non-hyphenated word break;
•
if the boundary is located within a paragraph, or after a paragraph break.
The format of an initial leaf boundary marker is:
<?TL partition="NAME" folio="FOLIO" hyphen="VALUE" wrdbrk="VALUE"
block="VALUE" ?>
The following attributes can be declared when defining an existing leaf boundary:
Atttribute
Type
Meaning
partition
string
The partition name.
folio
string
The folio is a valid TopLeaf leaf folio consisting of a primary folio index
and up to four additional point page levels (for example, 1, 1.1, or
123.1.1). The folio must conform to the page folio format defined for
the partition.
Folios that identify leaf boundaries for point pages must use a
common folio level separator character. The publication style sheet
must define the same folio separator character — please refer to the
<leaf-settings/> directive for more details.
By default, the initial folio for a partition is assumed to be the page
number declared in the First Folio indicator. If you do not specify a
folio, TopLeaf will assign the leaf content to the next available folio.
Page 103
User Guide
Atttribute
Type
Meaning
hyphen
number
If defined, and non-zero, specifies a hyphenation word break within a
paragraph at which the leaf boundary occurs.
When the mainwork is leaf split, TopLeaf will position the leaf break
within the word. When the leaf is rendered in the first update, TopLeaf
will automatically justify the last line within the leaf and insert a
hyphen at the end of that line. TopLeaf will apply the current font and
paragraph style to the content that continues on the following leaf.
It is the user's responsibility to ensure that the word break is a valid
hyphenation point.
wrdbrk
number
If defined, and non-zero, specifies a word break point at which the
leaf boundary occurs.
It is sufficient to declare wrdbrk as a non-zero value to mark the
position of a word break within a word. TopLeaf will automatically
calculate the effective position of the word break offset when the leaf
split is applied.
When the mainwork is leaf split, TopLeaf will position the leaf break
within the word. When the leaf is rendered in the first update, TopLeaf
will automatically justify the last line within the leaf then apply the
current font and paragraph style to the content that continues on the
following leaf.
block
number
If defined and non-zero, specifies that the leaf boundary marker
coincides with a paragraph boundary. If defined and zero, specifies
that the leaf boundary marker is positioned within a paragraph.
If the leaf boundary is positioned within a paragraph, then when the
leaf is rendered in the first update, TopLeaf will automatically justify
the last line within the leaf then apply the current font and paragraph
style to the content that continues on the following leaf.
By default, TopLeaf assumes that a leaf boundary coincides with a
paragraph boundary unless it is declared immediately after a space
(U+0020) character, in which case the boundary is assumed to be
positioned within a paragraph. An explicit block declaration can be
used to override this behaviour.
The options hyphen, wrdbrk, and block are mutually exclusive.
In most cases, you will only need to specify the leaf folio and whether or not the leaf boundary is
positioned after a hyphenated or non-hyphenated word break, as in the following example:
… assumes that any docu<?TL folio="7" hyphen="1" ?>ment presented to
it …
When an existing leaf boundary is positioned after an inline word break or hyphenation point, the
justification of the last line before the leaf boundary may cause it to be rendered with excessive
interword spacing. The TopLeaf composition engine will automatically align the last line of a leaf to
the left margin if the spaces between words in that line are stretched beyond a maximum
threshold.
Positioning leaf boundaries
A leaf boundary marker declared at the beginning of a structural block must be positioned
immediately before all adjacent start tags. Leaf boundaries that fall at the end of a structural block
Page 104
Looseleaf publishing and version control
must be positioned immediately after all adjacent end tags. For example, if a leaf begins with the
first item of an itemized list, position the leaf boundary marker before the itemized list:
Restrictions
You should be aware of the following:
•
A manual leaf split can only be applied to a full looseleaf partition that uses a partition
based numbering scheme.
•
Leaf boundaries can only be positioned within content that is rendered within a data block.
•
Leaf boundaries cannot be positioned within a split table row or within a split column
footnote.
•
All leaf folios must conform to the partition page folio format.
•
All leaves share a common release label. You cannot assign different initial release labels
to individual leaves.
•
It may not be possible to construct TopLeaf style sheet rules that produce output that is
identical to your existing published pages. In some circumstances, hyphenation and page
ends will be different. This is not a problem if the TopLeaf output can be guaranteed to take
less space.
•
A leaf boundary can only be declared when that boundary has a precise corresponding
location in the source document. This means that there are some situations — for example,
when a leaf boundary falls in the middle of an auto-generated disclaimer or table of
contents — where a leaf boundary cannot be declared.
•
The TopLeaf stylesheets are not referenced when applying a manual leaf split.
•
Style sheet rules or content that force automatic leaf inclusions can result in the
repositioning of leaf boundaries when the content is typeset and published.
•
The option to Exclude all leaves with unchanged output is ignored when processing the first
update release created from a manually split mainwork. If you wish to use this option you
must apply the changes to the second update release.
•
The restrictions on the positioning of leaf boundaries within scanned content also apply to
initial leaf boundaries.
•
Correctly setting the release and page numbers is difficult at best.
•
The resulting document leaf structure can contain hidden problems which only manifest at
some future release.
In general it may be faster and cheaper to let TopLeaf establish and manage the leaf set for the
publication.
Page 105
User Guide
8.5 Link considerations
When using any form of looseleaf with output page differencing, you need to be aware of the
potential for problems with links.
Output differencing is used for change pages and for full looseleaf when the Exclude all leaves
with unchanged output option is set in the partition properties.
The problem is best explained by an example. Consider the following link between two pages in
release 1 of a publication:
For the next release the identifier and section title are changed. When these pages are typeset they
now look as follows:
When the pages are compared there is no difference on the first page, since the change to the id
attribute has no visible effect. As a result the page from the first release is used and the link is
broken.
To avoid this problem, make sure that the data used to create links does not change from one
release to the next. In addition, you should avoid the use of automatic link targets since these will
almost certainly change between releases.
Page 106
DITA processing
9. DITA processing
This chapter describes the features in TopLeaf which can be used to simplify the processing of
DITA (Darwin Information Typing Architecture) documents. To enable these features, add the
following command to your $document mapping:
<dita-properties mode="enable"/>
The class attribute is used to identify the inheritance information for each element, so it must have
the correct value. The recommended way to ensure this is to use the DITA Open Toolkit to preprocess the data. This will also apply standard processing such as conref resolution and filtering.
TopLeaf provides its own pre-processor that should be used after the Open Toolkit pre-processing.
The changes applied are described in Section 9.3.
Note:
It is not necessary to enable DITA mode to process DITA documents; the normal facilities
provided by mappings can be used to achieve equivalent results if you prefer.
9.1 Mapping selection
When DITA mode is enabled, mapping selection is enhanced to use the inheritance information in
the class attribute. This allows a mapping to be used not only for a specific element, but for all
elements that inherit from it.
For each element, mapping selection in DITA mode works as follows:
1. The mappings are first searched using the actual name of the element and its ancestor
elements.
2. If no mapping is found using the above, the search is repeated using the actual element
names as well as the element names contained in the class attributes.
For example, consider the following fragment of data:
<steps class="- topic/ol task/steps ">
<step class="- topic/li task/step ">
and a mapping with tag-in-context of ol/li. When processing the <step> element the mapping will
not be matched during step (1) above because the element names do not match. During step (2)
the matching will be extended to include the element names “ol” and “li” in the class attributes, so
the mapping will be matched.
During the step (2) matching the syntax “module#element” can be used to explicitly match a
component of the class attribute. Thus in the example above the mapping could also have been
specified as topic#ol/topic#li.
The precedence rules apply during the step (2) matching for deciding between mappings with the
same target element name. However, there is no rule to decide between mappings with different
target element names. For example if the data is:
<c class="- mod/c mod/b mod/a ">
and there are mappings for elements “a” and “b” but not “c” there is no rule for which of the “a” or “b”
mappings will be selected. The mapping priority can be used to resolve any ambiguity that this
causes.
9.2 Targets and links
In DITA mode some extra processing is done to simplify the creation of hyperlinks.
Page 107
User Guide
9.2.1 Target creation
The following automatic link targets are created:
•
For each file read the target PATH is created, where PATH is the normalized path to the
file.
•
For any element that inherits from topic with an id attribute the target PATH#TOPICID is
created.
•
For any other elements with both class and id attributes the target PATH#TOPICID/ID is
created.
Note that targets are created regardless of whether a mapping is found for an element, so you do
not need to make mappings just to enable link targets.
Target positioning
For elements with a title, TopLeaf will generally place the link target immediately before the title. In
order to have the target correctly positioned, anything that affects the position (such as starting a
new page) should be done by the mapping for the element rather than the mapping for the title.
For example, see the Demonstrations/DITA/book stylesheet. The topic and topic/title mappings
together provide styling for a topic title. The former takes care of starting a new page where
appropriate by inserting a <NewTopic> custom marker.
9.2.2 Link evaluation
For any element with an href attribute, an extra attribute variable called dita.fullref is created
which includes the resolved and normalized path to the link target.
To use this to create a link, you can enter dita.fullref in the Link To Target using attribute field of
the mapping Content tab.
9.2.3 Topic identification
For each element that inherits from topic and has an id attribute, the variable dita-full-topic-id is
set to a value that uniquely identifies the topic.
The value of the variable has the form PATH#TOPICID where PATH is the normalized path to the
file containing the topic.
9.2.4 Page numbers
An XREF entry is automatically created for each link target. This allows the label of the page
containing the target to be identified. It contains the normalized link identifier as its “title” and
responds as if it was created by the %PageRef custom mapping (even if this custom mapping does
not exist).
See the xref mapping in the Demonstrations/DITA/book stylesheet for an example of using this
information.
9.3 DITA pre-processing
A Java program is provided for performing pre-processing on source files as described below. This
should be used after the pre-processing step of the Open Toolkit. It is contained in the tldita.jar file
in the common/jars folder.
9.3.1 Map titles
The main title of a map can be either specified as an attribute or with a <title> element. If the first
child of the map does not inherit from title, a title element is created using the value of the title
attribute.
Page 108
DITA processing
9.3.2 Deferred link targets
In order to position links correctly, it is sometimes necessary to associate a link target with the title
of an element, rather than the element itself. The pre-processing add an attribute called tl.defer.id
to elements that should be processed this way. This attribute is used internally by TopLeaf; it is
usually not necessary to reference it in the stylesheet.
9.3.3 Simpletables
TopLeaf can render tables that use standard CALS markup. The <simpletable> elements needs
to be converted into CALS markup in order to render them correctly. The default action of the preprocessing is to convert any element that inherits from simpletable into an equivalent CALS table.
The topleaf.simpletable.tagnames property can be used to control which simpletable elements
are converted. It should be set to a space-separated list of names. Only elements with tag names
that occur in the list will be converted. If the property value starts with “!” the list contains names to
be ignored; all elements with tag names that are not in the list will be converted.
If the simpletable contains a relcolwidth attribute this is used to determine the column widths.
Otherwise, the pre-processor examines the content of the table to calculate column widths. The
calculation depends on both the longest word in each column, and the largest total length of a cell
in the column. A weighting factor is applied to each of these two values. You can adjust the factors
using the following properties if the default values do not produce acceptable results. If both factors
are set to zero all columns will be assigned equal widths.
topleaf.simpletable.wordweight The weighting factor for the longest word. The default value is
1.0.
topleaf.simpletable.textweight The weighting factor for the total cell length. The default value is
0.25.
9.3.4 Index terms
The pre-processing performs the following transformations on index terms:
•
Nested index terms are converted into markup that contains level information.
•
Index terms are moved into the correct location (for example, terms in a topic prolog are
moved before the title).
•
Tags are added to identify ranges.
The converted index terms are of the form:
<tl.index level="N"/>
where the level number starts from 1 for a top-level index.
Range information is indicated by <tl.range> elements with a start or end attribute as
appropriate.
The <index-see>, <index-see-also> and <index-sort-as> elements are not changed.
If the topleaf.indexterm.transform property has the value false the index term transformation will
be disabled.
9.4 Demonstration stylesheets
When TopLeaf is installed it creates a repository containing some sample stylesheets. The
Demonstrations/DITA folder contains the following stylesheets:
•
The basic stylesheet contains a minimal set of mappings for processing a DITA map and
applying a simple style. It is a useful starting point for your own stylesheet.
•
The book stylesheet is more sophisticated and implements features often required in
books such as tables of contents and an index. The style is intentionally simple to make it
Page 109
User Guide
easier to modify it to suit your own needs.
9.4.1 The book stylesheet
The following is an explanation of some of the mappings in the Demonstrations/DITA/book
stylesheet.
$headfoot//booktitlealt
The booktitle element can contain other elements such as booktitlealt. Since it inherits
from title, the map/title mapping assigns the content of this element to the BookTitle variable,
which is used to display the left page header (see the 1 column page layout and the booktitle
header/foot mapping).
The $headfoot//booktitlealt mapping suppresses the booktitlealt element when it is used in
the context of a fixed block, so only the main title appears in the page header.
map
Some processing needs to be done at different times depending on the input data. For example,
consider the appropriate time to generate the cover page. For a simple map it can be done as soon
as the title content is known. For a bookmap it should be deferred until the bookmeta element has
been processed, since it contains information that may appear on the cover.
The map mapping (which will be used for both map and bookmap because of inheritance) contains
the following:
<set var="MapContent" copy="element"/>
<!-- Test whether the bookmeta element is present -->
<xmlproc source="MapContent" var="HasMeta"
select="count(//bookmeta[1])"/>
This creates an XML fragment from the map or bookmap and sets the HasMeta variable to either 0
or 1 according to whether a bookmeta element is present. The map/title mapping uses this
variable to decide whether to generate the cover page immediately or to let the bookmeta mapping
do it.
The map mapping also looks for a frontmatter element. If one is found it sets the page
numbering style to roman numerals.
bookmeta
This mapping demonstrates the use of “pull” processing for an element. The mapping scans and
suppresses the element, and creates an XML fragment from it.
Only the required information is extracted for later use; everything else is ignored.
topicref
This is the most complex mapping in the stylesheet, and plays an important role in defining the
structure of the document. The following explain parts of its pre-content.
<stack var="TopicLevel" value="{TopicLevel}+1"/>
<stack var="TopicContext" string="{TopicContext}"/>
The use of the stack command is important, since topicref elements can be nested. Using
stack instead of set restores the previous value of the variable when the end tag of this element is
processed. The value of TopicContext may be altered by what follows; this command makes sure
that the former value will be restored.
<!-- set the navigation title -->
<set var="Topicref" copy="element"/>
Page 110
DITA processing
<xmlproc source="Topicref" var="Navtitle"
select="topicmeta/navtitle/node()"/>
<if var="Navtitle" target="">
<set var="Navtitle" string="{@navtitle}"/>
</if>
The DITA 1.2 specification says that a navtitle element should be used in preference to the
attribute value, so the above attempts to find a navtitle element and extract its content. If this
produces an empty result, the attribute value is used.
<case var="@class" test="matches" target="* bookmap/chapter *">
<set var="TopicContext" string="C"/>
<if var="@href" target="#IMPLIED">
<!-- dummy topic for chapter -->
<NewTopic level="C1"/>
<Title level="C1">{Navtitle}</Title>
</if>
</case>
This is one of the cases in the switch statement; at most one of these will be executed. The above
is executed if a chapter element, or something that inherits from it, is being processed. The test for
#IMPLIED is the correct way to test for a missing attribute in TopLeaf. If there is no topic specified
for this chapter, a title is generated using the value for Navtitle created above, since the topic/title
mapping will not be triggered in this case.
<switch>
<case var="@processing-role" target="resource-only">
<!-- ignore objects included as resources -->
</case>
<case var="@href" target="#IMPLIED">
<!-- ignore if there is no referenced object -->
</case>
<case>
<read file="{document-folder}/{@href}" use-fragment="yes"/>
</case>
</switch>
The final part reads the referenced topic unless it is not directly part of the document content.
The TopicContext and TopicLevel variables are used in the topic and topic/title mappings to
apply an appropriate style.
topic//topic
If a file contains multiple nested topics, this mapping is used for the inner topics. It increments the
level counter so the topic title will be rendered with the appropriate style. The topic mapping is the
one used for the top-level topic in a file.
xref
This mapping creates a link using the value of the dita.fullref attribute. This attribute is not present
in the data — it is added internally by TopLeaf.
The page number is added to the link content by calling the %AddPage custom mapping. This
extracts the page number from the entry in the xref file that corresponds to the link target. It relies
on the following:
•
The automatic page number references described in Section 9.2.4.
•
The xref file is read in the $document mapping.
Page 111
User Guide
•
The tl:xref mapping assigns the xref content to the Xref variable as an XML fragment.
figurelist
This also relies on the xref content being read into the Xref variable.
<xmlproc source="Xref" var="FigureCount"
select="count(tlx:xrefline[@class='%FigureRef'])"/>
The command above sets the FigureCount variable to the number of xref entries generated by the
%FigureRef custom marker. If the value of this variable is greater than zero, the code below it
sends the entries to the input stream to produce the list of figures.
Page 112
Workstation reference
10. Workstation reference
The TopLeaf workstation is a Microsoft Windows application that allows you to create and work in
one or more repositories. This chapter describes the components of the application interface top
level window as shown below
The diagram illustrates one of several possible configurations for the top level application window.
The appearance can be customized:
•
by changing the position of the toolbars. To reposition a toolbar, click the mouse anywhere
in the toolbar that is not occupied by a button or other control and drag it to a new position.
Toolbars can dock at any of the four edges of the window.
•
by selecting the appropriate options in the View menu to hide or show the toolbars.
10.1 Preview pane
This shows a preview of the pages made by the most recent composition run for the selected
partition. The preview shows an approximation of the final output. There are some types of output
(such as rotated text) that may not display the same way as they will appear in the published
output.
The Page Up and Page Down keys can be used to move through the pages sequentially.
The Page menu and Preview toolbar can be used to control the preview display. Right-click in the
preview pane to open the Zoom menu.
Page 113
User Guide
10.2 Navigation pane
The navigation pane has three components: the partition icon; the Format Files tree; and the Pages
tree.
10.2.1 The partition icon
At the top of the pane is an icon representing the current partition. The icon indicates the type of
partition:
•
•
— A non-looseleaf partition or a change pages partition containing its source content.
— A non-looseleaf partition or a change pages partition which links to source content
held outside the repository.
•
— A full looseleaf partition which contains its source content.
•
— A full looseleaf partition which links to content held outside the repository. This can
only be an unpublished initial release, since a published full looseleaf partition always
contains content that is held inside the repository.
•
— A partition with read-only access. This usually means that the partition folder and
the partition content have the read-only attribute set. TopLeaf requires read-write access to
the partition and all partition content. You must remove the read-only permission to fully
access the partition.
•
— A partition whose type or properties cannot be determined. This usually means that
one or more components managed by TopLeaf and stored within the partition are missing
or have been corrupted.
Right clicking on this icon raises a menu giving quick access to a number of partition related
functions:
•
Edit — edit the partition source files (see Section 4.5).
•
Compose — typeset the current partition.
•
Print — calls a restricted version of the Print Partition dialog that always prints the whole
partition (see Section 10.5.6).
•
Replace Partition Document — Replace the content of a partition with content copied
from an external document file, or if the partition content is linked, associate a different
document with the partition. You can also change a partition from a linked partition to a
copy partition, or from a copy partition to a linked partition. See Commands » Replace
Partition Document ... for more details.
•
Add Files to Partition — calls a dialog allowing additional source files to be copied and
stored within the partition (see Commands » Add Files to Partition).
•
Edit Partition Document List — allows the list of the files stored within the partition to be
updated (see Commands » Edit Partition Document List).
•
Indicators — calls the Partition Indicators dialog to examine/update the current values.
•
Label this Release — calls the Label Release dialog to assign an identifier string to the
current release.
Page 114
Workstation reference
•
Properties — calls the Partition Properties dialog to examine/update the current values.
10.2.2 The Format Files tree
The Format Files tree is provided for maintaining publication style sheets created for TopLeaf 6.2 or
earlier.
10.2.3 The Pages tree
For a non-looseleaf or a change pages partition, the Pages tree shows a list of pages created
during the most recent typesetting run. For a full looseleaf partition, this tree displays the partition
leaf list and is labeled the Leaf tree.
Double clicking on a page icon will display an image of the typeset page in the preview pane.
Right clicking on an icon brings up a menu with the following options:
•
Preview — equivalent to a double click, displays the page in the preview pane.
•
Print — opens the Print dialog (see Section 10.5.6).
•
Create PDF — opens the Create PDF dialog (see Section 10.5.7) .
In a change pages partition or a full looseleaf partition the icons in this tree also indicate the page or
leaf status. For example, the status information can indicate whether the page or leaf has been
altered since the last release, or whether it is the start of a leaf group or leaf section. See
Section 8.3.4 for the icons used in change pages partition and Section 8.4.10 for a description of
the icons used in a full looseleaf partition.
10.3 Menus
10.3.1 File
File » Open …
Calls the Open dialog to open or create a partition.
File » Close
Closes the selected partition. You may want to do this to allow another user to modify the partition,
or to set global TopLeaf preferences (for example, selecting the repository root directory).
File » Save As …
Calls the Save As dialog, which saves the source of the current partition as a single XML or SGML
document.
File » Publication
Contains options for printing, creating a single PDF, or set of filing instructions for all partitions
within a publication. After choosing an output option, use the Open dialog to select a publication.
File » Export …
Brings up a submenu which can export one of five automatically generated documents:
•
a Table of Contents;
•
a list of cross references (XREFs);
•
an Index;
•
a list of partition indicators;
•
filing instructions (looseleaf only).
Page 115
User Guide
All except the filing instructions contain an option to select either the whole partition or the update
pack as the source. See Chapter 6 for information on the generation of a Table of Contents or
Index.
File » Partition Properties …
Opens the Partition Properties dialog for the current partition.
File » Filing Instructions …
Brings up a dialog which displays the filing instructions for the current release. From this dialog you
can print or export the filing instructions. See Section 6.4.1 for more information.
File » Transform to
Contains options for creating RTF or HTML secondary output formats.
File » Print Preview
Opens a separate preview window, similar to the preview pane but with its own navigation controls
and the ability to be resized to view more of the output page.
File » Print Special
Contains options for quickly printing the update pack, the entire partition, the composition log, or
parittion filing instructions. The selected output is sent to the default printer without opening a
dialog. For a non-looseleaf partition, only the composition log may be printed from this menu.
File » Print
Opens the Print dialog for the current partition.
File » Create PDF
Opens the Create PDF dialog for the current partition.
File » Print Setup …
Opens a standard Windows dialog for setting printer options.
File » Preferences …
Opens the Preferences dialog, which allows TopLeaf general preferences to be specified.
File » PDF Profiles …
Opens the PDF profiles editor, which allows you to set up options for PDF creation.
File » 1–5
Immediately above the exit command are listed up to five recently opened partition names. Clicking
on one of these, or pressing the numbers 1 to 5 will open the corresponding partition.
File » Exit
Terminates the program. Any open partitions are automatically closed.
10.3.2 Commands
Commands » Unlock
Removes any edit or composition lock current applied to the partition.
Page 116
Workstation reference
Commands » Undo
Opens the Confirm Undo dialog, which allows previous changes to source files and publication
style sheets to be reversed. You cannot use this option to undo edit changes to linked source
documents.
Warning:
Only attempt to undo a change to a publication styles sheet from the same partition in
which the change was originally applied. Failing to do this may lead to unpredictable
results.
Changes to the page layout must be reversed in the Layout Editor.
Commands » Cancel Update
Discards the current update and returns the partition to the most recently published release. Note
that this command cannot be reversed.
Commands » Cancel Publish
Discards the published phase and returns the partition to the previous update phase. The update
can only be republished after composition.
Commands » Edit
Edit the partition content. The editor used is determined by the current preferences (see
Section 10.5.3).
Commands » Compose
Typesets the current partition.
Commands » Debug
Switches debug logging on or off.
Commands » Renumber …
This option will renumber the leaf group folio numbering sequence in a full looseleaf partition that
uses a partition based numbering scheme.
Commands » Replace Partition Document…
You can use this option to replace the content of a partition with content copied from an external
document file, or if the partition content is linked, associate a different document with the partition.
For a non-looseleaf partition, a change pages partition, or a full looseleaf mainwork release, you
can also change a partition from a linked partition to a copy partition, or from a copy partition to a
linked partition. To force TopLeaf to establish a link between the partition and the selected
document, select the replacement document, then clear the Copy to partition check box. To force
TopLeaf to store a copy of the selected document within the partition, select the replacement
document, and tick the Copy to partition check box, as shown in the following example:
Page 117
User Guide
The replacement content for a full looseleaf update is always copied to the partition, because the
content is leaf split as it is copied. This option is disabled for full looseleaf updates that use visible
leaf boundary markers to identify the published leaf boundaries.
Commands » Add Files to Partition …
Use the Add Files to Partition … option to add one or more source documents to the list of
documents stored within the partition.
Commands » Edit partition document list...
Use this command to delete or rearrange entries within the list of documents stored within the
partition.
Commands » Leaf Split
TopLeaf can initialize a looseleaf partition from an existing set of leaf boundaries. A leaf split
allocates the content between successive user defined leaf boundary markers to one or more
document leaves before automatically publishing the partition.
Commands » Stylesheet Upgrade
A new stylesheet format using XML documents is available for version 7.6 onwards. This command
allows you to convert a stylesheet created by an older version into the new format.
This command is disabled if:
•
The stylesheet is already in the new format, or
•
The publication was created with a version of TopLeaf prior to 7.2, or
•
The Legacy font compatibility format option is selected, or
•
The publication is in read-only mode (for example, it is in the published phase).
Page 118
Workstation reference
If the upgrade is not successful, try opening each of the Map, Header & Footers and Notes &
Running Heads managers and pressing OK. This will bring the stylesheet version up to date. You
should then be able to upgrade the stylesheet.
Commands » Indicators…
Opens the Indicators dialog to examine or update the current partition indicator values.
Commands » Label this Release
Opens the Label this Release dialog to assign an identifier string to the current release.
By default, TopLeaf identifies each partition release with a sequential number starting from 0. The
Label Release dialog provides a way to assign a descriptive string (for example, a date or a release
title) that uniquely identifies the release. You can reference the partition release label by including
the {release-label} system variable in your stylesheet mappings. Alternatively, your stylesheet
mappings can assign the partition release label using the <release-properties/> directive.
Commands » Refresh published pages
Refresh the published output pages to reflect the current stylesheet formatting rules, while retaining
the published release label for each leaf.
Commands » Publish
Moves the partition into the published phase. By default, all publishing controls are disabled until a
partition is typeset without error. The partition properties includes an option to allow you to
publish a change pages release if there are warnings but not errors.
Commands » Next Update
When the partition is in the published phase, this command creates a new update phase and
allowing the partition content to be modified.
10.3.3 View
Click to switch on/off the following:
•
Button toolbars — provides options:
○
Standard toolbar (see Section 10.4.2)
○
Preview toolbar (see Section 10.4.5)
○
Stylesheet toolbar (see Section 10.4.3)
○
Looseleaf toolbar (see Section 10.4.4)
•
Indicators display (see Section 10.4.6)
•
Keywords display (see Section 10.4.8)
•
Status Bar display (see Section 10.4.9)
View » Preview Changed Pages in a Separate Window
Opens a separate preview window to display all pages that marked for inclusion in the release
update pack.
View » Only show changed pages in Page Tree List
Changes the page or leaf list in the navigation pane to display only those pages or leaves that are
in the release update pack. This option is only available for looseleaf partitions. Click again to
restore the original view.
Page 119
User Guide
View » Show Boundary Markers when Editing Partition
This item is only enabled in a full looseleaf partition. When the partition document is edited,
processing instructions identifying the leaf and boundary markers are inserted into the data.
View » Composition Log
Uses the Other Files editor to open the composition log file created by the most recent typesetting
run.
View » Publish/Update Phase
Toggles the current partition view from the current update phase to the previous publish phase and
vice versa.
10.3.4 Page
The page menu is used to navigate your way through a document, adjust the view of pages
displayed in the preview pane, and examine or change the properties of the page currently selected
in the page tree.
Page » Previous
Preview previous page.
Page » Next
Preview following page.
Page » Go To …
Calls the Go To Page dialog to select a page to preview.
Page » Facing Pages
Previews pages as left/right pairs. Click again to restore default view.
Preview » Full Page
View full page height. Click again to restore default view.
Page » Zoom
Opens a menu to allow you to select a magnification factor for the preview.
Page » Refresh
Refresh preview to remove any screen drawing errors.
10.3.5 Format
Format » Mappings...
The map editor is used to create and maintain a set of stylesheet rules that will be applied when
typesetting the partition.
Format » Page Layout...
The layout editor is used to specify the size and shape of the page types that can be referenced
when typesetting a document.
Page 120
Workstation reference
Format » Headers & Footers...
The Header & Footer Manager is used to define the stylesheet rules for fixed blocks created by
the Page Layout Editor.
This option is only available when using the legacy Map Manager.
Format » Notes & Running Heads...
The Notes Manager is used to manage the stylesheet rules for footnotes, sidenotes and running
heads.
This option is only available when using the legacy Map Manager.
Format » Import Stylesheet Image...
This allows you to select an image file and copy it into the graphics folder of the publication. This
allows it to be used by setting the image search path to {publication-folder}/graphics.
Font Configuration …
Opens the Font Configuration editor.
Color Palette...
Opens the Color Palette editor.
Options
Opens the Options dialog.
Format » Generate Mappings from XML...
TopLeaf can automatically generate a set of initial tag mappings for a publication by interpreting an
XML document file. The mappings created provide a starting point from which a more complete
mapping set can be developed. This menu option scans an XML document and creates an initial
set of tag mappings from the tags declared within that document.
This option is only available when using the legacy Map Manager. See Import mappings in the
Mapping Guide for information on the equivalent function in the new Map Editor.
Warning:
If you generate a new set of tag mappings for a legacy TopLeaf publication all existing tag
and custom markers mappings will be overwritten.
Format » Import Mappings from CSS...
TopLeaf provides a means of initializing the style for a publication by interpreting a CSS (Cascading
Style Sheet) file. It is important to note that TopLeaf and CSS use different models for describing
style, so it is not possible to do a full conversion. Instead, the mappings created represent a starting
point from which more complete mappings can be developed.
This menu option imports a CSS Stylesheet to create an initial set of TopLeaf mappings. See
Section 4.7.2 for more information.
This option is only available when using the legacy Map Manager. See Import mappings in the
Mapping Guide for information on the equivalent function in the new Map Editor.
Page 121
User Guide
Warning:
If you create a new set of tag mappings for a legacy TopLeaf publication by importing a
CSS stylesheet, all existing tag and custom markers mappings will be overwritten.
Format » DTD File
You can force TopLeaf to use a specific document type declaration by defining a primary DTD file.
This menu option edits the primary DTD file using the “Other Files” editor defined in the
preferences.
Format » Catalog File
Entities within a document type declaration can be resolved using the OASIS catalog mechanism.
This menu option edits the partition catalog file using the “Other Files” editor defined in the
preferences.
Legacy Format Files
This menu allows the user to directly access the format files used by a TopLeaf legacy partition or
publication. From here, you can edit a legacy style, macro or mapping file. You can also export a
set of legacy font macros for use in other publications.
Warning:
Direct access to TopLeaf's underlying format files is only required when working with
legacy partitions.
10.3.6 Tools
Allows the user to create and invoke custom tools.
To add an item to this menu, select Customize … to open the Customize Tools dialog:
To create a new custom tool, press the New... button to open the New Tool dialog. Enter the name
of a custom tool that will appear in the Tools menu.
The Command: field identifies the executable file that will be run when the tool is invoked.
Page 122
Workstation reference
Arguments
The Arguments: field defines the arguments passed to the command. There are a number of
values of the form %param; that can be inserted into the arguments. These change according to
the partition which is open when you invoke the tool, so you can create tools that work on many
partitions. The variable can be selected from the menu which opens when you press the button to
the right of this field.
The argument variables that can be chosen from this menu are:
•
Partition » Name — the path of the current partition (relative to the TopLeaf repository).
•
Partition » Update Document — the current work-in-progress XML document, no leaf
markers.
•
Partition » Published Document — the current published XML document, no leaf markers.
•
Partition » Folder — the file path of the partition folder.
•
Partition » Publication Folder — the file path of the publication folder for this partition.
•
Partition » Leaf Folder — for an update, this would be the folder that contains the partition
document.
•
Partition » Current Leaf — currently selected leaf in leaf list.
•
Preview » Changed Pages — the set of changed pages (looseleaf only).
•
Preview » Partition Pages — the set of all pages in the partition
•
Preview » Published Pages — the published page set.
•
Dependencies » Format File — the file path of the mapping rules file used by the
publication. This is an XML description of the mappings created by the Map Manager.
•
Dependencies » DTD File — the file path of the DTD used by the publication.
•
Dependencies » Catalog File — the file path of the catalog file used by the publication.
•
Exports » Partition Index File — an extracted index file, generated from the current phase.
•
Exports » Partition TOC File — an extracted TOC file, generated from the current phase.
•
Exports » Partition XREF File — an extracted XREF file, generated from the current phase.
•
Exports » Changed Leaf Indicators — a list of indicators for the set of all changed leaves.
•
Exports » Partition Leaf Indicators — a list of indicators for the set of all leaves.
•
Exports » Filing Instructions — the current filing instructions, as an XML document.
•
Exports » Composition Log — output log file from the last run of the composition engine.
•
Exports » Partition PDF File — PDF for all pages in the currently selected phase (update or
publish).
•
Transforms » RTF (Rich Text Format) — RTF for all pages in the current update.
•
Transforms » HTML (Web page) — HTML for all pages in the current update.
•
Properties » Release Label — the identifier of the current release as defined through the
Label this Release dialog.
•
Properties » Current Phase — either UPDATE or PUBLISH.
•
Properties » Partition Type — TOPBOOK for a non-looseleaf or change pages partition, or
TOPLEAF for a full looseleaf partition.
•
Properties » Markup Language — the markup language used by data in this partition; either
XML, SGML or GENCODE.
•
Preferences » Program Files Folder — the file path of the folder where TopLeaf is installed
(C:\Program Files\TKS by default).
•
Preferences » TopLeaf Repository — the file path of the folder containing the TopLeaf
repository.
•
Preferences » Common Files Folder — the file path of the folder containing common data
(C:\Program Files\TKS\common by default).
Page 123
User Guide
•
•
Preferences » XML/SGML Editor — the executable file run to edit a data file in an XML or
SGML partition.
Preferences » Other Files Editor — the executable file run to edit files other than XML or
SGML.
Initial Directory
The Initial Directory: field allows you to set the directory which is current when the command starts.
You can make this dependent on the current partition by choosing one of the entries in the menu
which opens by pressing the button on the right of the field.
Properties
You may also select the following Properties: for the command:
•
Browse for command argument — if this is checked, when the command is run the user is
prompted to select a file. The path to this file is appended to the command arguments.
•
Page composition required — when checked, running the command causes the partition to
be typeset if necessary.
•
Start new tool group — this causes a separator to appear in the menu before this item.
•
Run as detached process — when checked, control is returned to TopLeaf as soon as the
command is started, instead of waiting for it to terminate.
10.3.7 Windows
This allows you to control windows that have been opened within the main application window, for
example the page preview window or the composition log editor.
Select a window from this menu to bring it to the front. Select Close All to close all windows opened
from the main window.
10.3.8 Help
Help » Contents
Opens the on-line version of this documentation, equivalent to pressing the F1 key.
Help » Enter License Keys
Opens the License Keys dialog.
Help » Turn-Key Systems Home Page
Open the Turn-Key Systems website in a browser. You can use this to check for new versions of
the software.
Help » About TopLeaf
Opens the About TopLeaf dialog, listing the build number of the installed Topleaf distribution, your
TopLeaf license key, and any relevant copyright information.
10.3.9 Menu accelerator keys
Menu accelerator keys provide fast access to frequently used menu commands without having to
use the mouse to select a menu option. Accelerator keys are key combinations consisting of the
letter key pressed along with the Ctrl or the Ctrl-Alt key.
The following table describes the set of available menu accelerator keys:
Page 124
Workstation reference
Key
Description
Where Defined
Ctrl-A
Cancel the current update
Commands » Cancel
Update
Ctrl-C
Edit the primary catalog file
Format » Catalog File
Ctrl-D
Edit the primary DTD file
Format » DTD File
Ctrl-E
Edit the partition document
Commands » Edit
Ctrl-F
View the partition filing instructions
Section 6.4.1
Ctrl-J
View the composition log file
View » Composition Log
Ctrl-L
Open the page layout editor
Layout Editor
Ctrl-M
Open the map editor
Map Editor
Ctrl-O
Open partition
Section 10.5.1
Ctrl-P
Print one or more pages from the partition
Section 10.5.6
Ctrl-T
Compose the partition
Commands » Compose
Ctrl-V
Preview the current update in a separate window
File » Print Preview
Ctrl-Alt-P
Select the partition published phase
View » Published phase
Ctrl-Alt-U
Select the partition update phase
View » Update phase
10.4 Toolbars
10.4.1 Title bar
The window title bar displays the path of the current partition and the label of the page currently
displayed in the preview pane.
10.4.2 Standard toolbar
The standard toolbar contains the most commonly used TopLeaf functions.
The File group
The File group is used to open a partition:
•
Open Partition — open an existing partition or create a new one — see the Open dialog.
The Output group
The Output group is used to print or preview typeset jobs:
•
Preview Pages — calls a separate preview window to display the pages — see Print
Preview in Section 10.3.1.
•
Print Pages — opens the Print dialog for the current partition.
•
Create PDF — opens the Create PDF dialog for the current partition.
Page 125
User Guide
The Transform group
The Transform group allows the production of alternate forms of output. See Transform to in
Section 10.3.1.
The Edit group
The Edit group is used to edit the partition document source file and undo stylesheet changes:
•
Edit Source — edits the document source file — see Edit in Section 10.3.2.
•
Undo last action — reverse the last stylesheet change — see Undo in Section 10.3.2.
Warning:
Only attempt to undo a change to a publication styles sheet from the same partition in
which the change was originally applied. Failing to do this may lead to unpredictable
results.
The Compose group
The Compose group is used to control typesetting:
•
Compose — typesets the current partition — see Compose in Section 10.3.2.
•
Toggle Debug Mode — switches debug logging on or off — see Debug in Section 10.3.2.
•
View Log File — edits the log file created from the last typeset run — see Composition Log
in Section 10.3.3.
10.4.3 Stylesheet toolbar
The Stylesheet toolbar allows you to control output format:
•
Mappings — specifies the stylesheet mapping rules for document content.
•
Page Layout — specifies the size and shape of output pages, as well as how information is
positioned on each page.
•
Header & Footer Manager — specifies the stylesheet mapping rules for page headers and
footers. This is only available when using the legacy Map Manager.
•
Notes Manager — specifies the stylesheet mapping rules for footnotes, sidenotes, running
heads, and floats. This is only available when using the legacy Map Manager.
•
DTD — opens the top level DTD document file for editing.
•
Catalog — opens the OASIS catalog file for editing.
10.4.4 Looseleaf toolbar
This toolbar is relevant only to Looseleaf jobs.
•
Show changed leaf set — toggle Only show changed pages in page tree list in the View
menu.
•
Show leaf boundaries when editing looseleaf documents — toggle Show boundary
Page 126
Workstation reference
•
•
•
•
•
•
•
•
•
•
•
markers when editing partition in the View menu.
Indicators — open the Indicators dialog.
Label release — open the Label Release dialog.
Filing instructions — displays the filing instructions.
Leaf split — perform a leaf split.
Renumber a leaf group — open the Renumber dialog.
Publish the partition — execute the Publish command.
Review published boundaries — review or adjust the position of published boundary
markers. This option is enabled from the partition properties dialog.
Create next update — execute the Next Update command.
Toggle phases — switch the preview display between the published pages and the update
pages.
Cancel update — execute the Cancel Update command.
Cancel published phase — execute the Cancel Publish command.
10.4.5 Preview toolbar
The Preview toolbar controls the page preview displayed in the preview pane.
The Navigation group
The Navigation group selects which output page to preview:
•
Go to first page — previews the first page in the document.
•
Goto the previous page — previews the previous page.
•
Goto the next page — previews the following page.
•
Goto the last page — previews the last page in the document.
•
Goto a specific page —Open the Go To Page dialog and select a page to preview.
The Display group
The Display group controls the sizing of the output view:
•
Zoom View — magnify page view — see Zoom in Section 10.3.4.
•
Refresh View — refresh the preview pane to remove any screen artefacts — see Refresh
in Section 10.3.4.
10.4.6 Indicators
TopLeaf can display up to three information bars. Bars can be enabled or disabled using the View
menu. You can then drag and drop each indicator bar to a suitable location on the screen.
10.4.7 Partition indicators
This bar displays the values of certain indicators within the current partition:
•
ID — the identifier for the current partition.
Page 127
User Guide
•
•
•
First Folio — the page number of the first page in the partition.
Link ID — the identifier for the following partition in a multi-partition publication.
Link Folio — the first page number of the following partition in a multi-partition publication.
These and other indicators can be set using the Partition Indicators dialog. See Indicators in
Section 10.5.14.
10.4.8 Keywords
The Keywords bar displays an identifying string which is normally printed on every page outside the
usual print area. This allows production staff to identify individual job sheets without affecting the
overall appearance of the rendered document.
The keywords field can be modified by using the Indicators dialog. You can also open this dialog
by right-clicking the Keywords field and selecting Modify Keywords.
10.4.9 Status bar
The Status bar gives a visual indication of the current job status. The left of the bar is a Help area.
When the cursor is held over a button or control, a brief description appears in this area. If the
cursor is not over an item of interest, a default help message is displayed.
The right half of the bar is divided into eight information boxes as follows:
•
names of current publication and partition (see Section 4.1);
•
current release name;
•
shows one of INITIAL (looseleaf initial release or non-looseleaf job), PUBLISH (partition
locked), or UPDATE (looseleaf incremental release);
•
shows DBG when running in debug mode (see Debug in Section 10.3.2);
•
shows MRK when running in looseleaf marker mode;
•
shows SPL when running in single page looseleaf mode (see Section 8.4.19);
•
shows one of UPD (update phase, normal operation), PUB (publish phase, partition
locked), or MOD (update phase, view modified looseleaf pages only);
•
shows ERR if the previous typesetting run issued any errors.
10.5 Dialogs
The following describes the operation of the dialogs that can be opened from the main window. For
a description of the map editor, see the TopLeaf Mapping Guide. The Layout Editor Manual
describes how to control the way formatted output is positioned on the page.
Page 128
Workstation reference
10.5.1 Open dialog
The Open dialog is used to open existing partitions in a TopLeaf repository, and to create new
repository levels and partitions.
The Open dialog can be opened by selecting File » Open... or by pressing the
button.
The dialog consists of two main components:
•
a Level field that shows the repository level or partition pathname, and
•
a repository tree that shows the overall structure of the repository.
The root item of the repository tree shows the file system path of the current repository.
Publications are shown with an
navigation pane.
icon. Partition icons indicate the type of partition shown in the
To open a partition, use the standard navigation methods to traverse the repository tree to find the
partition. You can open it either by selecting it and clicking the Open button, or by double-clicking
the partition name.
Alternatively, you can type a level or partition name directly into the Level field, and then click Open
or press ENTER. If the name specifies a repository level, then the repository tree will open to the
selected level. If the name specifies a partition, then the partition will be opened immediately.
The Level field also lists the partitions that have been opened in the current TopLeaf session. To
access a partition from the address bar list, click on the address bar dropdown, and select the
partition. You can now edit the address bar selection, or click Open or press ENTER to open a
partition.
Creating new levels
To create new levels select the item in the tree where the level is be added and press New, or
right-click and select New Level.... To create a new publication at the top of the repository, select
the repository root item.
Adding a level in a publication opens the New Partition Dialog.
Page 129
User Guide
Otherwise, the following dialog opens:
The level name must be entered and must conform to the constraints listed in Section 4.3.
If the Level is a publication box is not checked, a folder level is created. If the box is checked, a
publication level will be created and the New Partition Dialog will be opened to create the first
partition in the publication.
Other operations
A number of partition specific operations can be accessed from the Open dialog. These operations
are available by selecting a repository level, and right-clicking on the level name. The available
commands are:
Copy To...
The Copy To... command creates a duplicate of the selected repository level or partition. Use the
mouse to select the level that you want to duplicate, then right-click on the level name. Click Copy
To... . Type in the name of the duplicate level or partition and press ENTER.
The name must conform to the constraints listed in Section 4.3.
Delete
To delete a repository level or partition, use the mouse to select the level that you want to delete,
then right-click on the level name. Click Delete. Exercise caution when deleting a repository level or
partition. The deleted level or partition will be permanently removed from the repository and cannot
be retrieved from the Recycle Bin.
Note:
Deleting all of the partitions from an existing publication does not delete the stylesheet
information associated with the publication. The first partition subsequently added to an
empty publication will automatically reference the existing publication stylesheets. You must
delete the publication level if you intend to create a new set of stylesheets for an existing,
empty publication.
Rename
To rename a repository level or partition, use the mouse to select the level that you want to rename,
then right-click on the level name. Click Rename. Type the new level name and press ENTER.
The name must conform to the constraints listed in Section 4.3.
Print
To print a repository partition without opening the partition, use the mouse to select the partition
that you want to print, then right-click on the partition name. Click Print to either print all, or just the
changed and included pages in the selected partition.
Page 130
Workstation reference
10.5.2 New Partition
This dialog opens when a new partition is being created in a publication.
The partition name must be entered and must conform to the constraints listed in Section 4.3. By
convention, the recommended name for the first partition in a publication is Template. Some
implementations use the partition with this name as a model for creating new partitions.
You may also provide an initial source document for the partition. Leave the field empty if no
suitable document is available.
Fill in all the tabs then click the Next button to move to the next step.
Source document
If you tick the Copy to partition checkbox then TopLeaf will copy the source document into the
partition. If this option remains unchecked, then TopLeaf will set up a link between the source
document and the partition. If you set up a copy partition, make sure that the source document is
self contained, as external documents or graphics referenced from the document will not be copied
into the partition.
TopLeaf will check the source document file type when it creates the partition. If the source
document file type is .sgm, then TopLeaf will assume that the initial partition markup type is SGML.
DTD File
A DTD is not required by TopLeaf, so it is recommended that you leave the DTD File checkbox
blank.
When the option Copy to publication is unchecked, the system will operate via a link to the DTD,
and any changes made externally will be honored when composing partitions within the publication.
If you check this option, a private copy of the selected DTD file will be stored within the repository,
and changes to the original file will have no effect on the publication.
Page 131
User Guide
Note:
You would normally only copy a DTD into a publication if the DTD file is self contained, or
when you want to associate a publication with an independent version of the DTD.
When TopLeaf makes a copy of the DTD it only copies the file you specify. If the DTD
includes other files via parameter entities, then the included files will not be copied. This can
result in the DTD being incomplete, and cause errors when TopLeaf composes the partition.
In most cases, these errors relate to the resolution of relative paths declared within the DTD
file, and can be addressed by copying the folders containing the DTD inclusions into the
TopLeaf publication folder.
Catalog File
Entities within a document type declaration can be resolved using the OASIS catalog
mechanism. The catalog will be ignored if no DTD is used.
If you uncheck Copy to publication, the system will operate via a link to the catalog, and any
changes made externally will be honored when composing partitions within the publication. If you
check this option, a private copy of the selected catalog file will be stored within the repository, and
changes to the original file will have no effect on the publication.
TopLeaf's OASIS catalog support is limited. See Section 11.2.14 for more information.
Publication Options
The Publication Options dialog sets up the basic preferences that will be used when you open or
create partitions within a publication. These are only set when you create the first partition within a
publication because the same tag mapping and page layout styles are shared by all partitions in
that publication.
Page 132
Workstation reference
Tag mappings
The following are the options for creating an initial set of mappings for the stylesheet:
•
Generate the mappings from the source document — TopLeaf analyses the XML
source document and assigns provisional mappings for each tag based on its depth in the
hierarchy, the tag position within the parent element, or the presence or absence of text
content. This option is not available for SGML documents, or if no document was specified
in the New Partition dialog.
•
Import from a CSS file — TopLeaf can read a Cascading Style Sheet (CSS, see
Section 4.7.2) and convert most of the format information into TopLeaf mappings. When
you choose this option, you must use the selector to locate the relevant .css file.
•
Import from a TopLeaf format specification file — If you already have a TopLeaf
publication with the same or similar format, you can use that format to start off your new
publication. Note that a copy is made, so you can modify the style without affecting the
original publication. Use the selector to locate the mappings.tlx file located in the
publication folder of the relevant publication. Note that you can only use a mappings.tlx file
from a publication in a repository; if you select a file that is not in a publication the creation
may fail to find other necessary files.
•
Leave empty — generates only a basic $document mapping to set default font, alignment
etc, plus some default rules for paragraph splitting.
The initial mappings represent a starting point only. You can then fine tune the output format by
refining these mappings and adding new mappings as required.
Paper Size
The paper size selector allows you to assign the preferred page size for this publication. In general
you will normally select Letter within the USA and A4 anywhere else. The Layout Editor allows you
to choose from a more extensive range of paper sizes (and to create your own custom sizes if
necessary).
Page 133
User Guide
Table Model
TopLeaf supports the following table models:
•
a subset of the CALS table model as defined at http://www.oasis-open.org/html/a502.htm
•
a subset of the HTML table model as defined at http://www.w3.org/TR/REChtml40/struct/tables.html
If you do not know which table model to choose, then select Unknown.
10.5.3 Preferences
This dialog is invoked from the File menu to set TopLeaf general preferences.
The Folders tab
The location of the repository folder cannot be changed while a partition is open. Select File » Close
to close the current partition.
The Java Runtime field displays the path to the Java runtime used by TopLeaf's Java components.
Press the Change... button to open the Java runtime selection dialog.
TopLeaf searches for all suitable installed Java runtimes and displays them in a list. Click on an
item from the list to select a runtime and press OK. Use the Refresh button to reload the list of
runtime options (for example, after installing a new runtime).
If a Java runtime is installed but does not appear in the list, use the Browse... button to locate it.
Be sure to select the folder into which you installed the runtime; some operations will not work
correctly if you select the wrong folder. TopLeaf will only find runtimes of version 6 or later. Using
an earlier version may give incorrect results.
Page 134
Workstation reference
This dialog also appears when TopLeaf first starts if no runtime has been selected. In this case, an
extra checkbox with the legend Don't show this dialog again appears. Ticking this checkbox
prevents the dialog from appearing the next time TopLeaf starts.
Note:
You must install and select a Java runtime in order to use TopLeaf.
On a 64-bit operating system only 32-bit runtimes will be displayed. If you select a runtime by
using Browse... make sure it is a 32-bit runtime. Some components used by TopLeaf will not
work correctly with a 64-bit runtime.
The TopLeaf API will use the value of the JAVA_HOME environment variable to locate the
runtime if no runtime has been selected in the workstation.
The Java Runtime Arguments field can be used to pass arguments to the java virtual machine when
TopLeaf runs a java program. See the documentation for the java runtime environment you are
using for a list of the arguments you can set.
For example, a value of “-Xmx128m” sets the maximum heap size on a Windows system to 128
megabytes (the default maximum size is usually 64 megabytes).
The TLJAVA_ARGS environment variable can also be used to pass arguments to the virtual
machine.
The Editors tab
Sets the programs to use when editing files. The SGML/XML Documents editor is used when editing
the partition document. The Other Files editor is used for all other files (for example, when
inspecting the Composition Log).
Page 135
User Guide
The Environment tab
Symbolic variables definition file
This file path identifies the name of a text file that declares one or more environment variables
that may be referenced from within the content of a mapping customisation. You can use
environment variables to identify path names to external folders or files referenced from a tag
mapping. Variable names are case sensitive and must not contain spaces.
TopLeaf symbolic variables are assigned using the following command:
SET variable=string
Within a tag mapping customisation, symbolic variables are referenced using the following syntax:
{$variable}
where variable is the name of a symbolic variable.
Note:
Scripts processed by the composition engine's Perl interpreter cannot reference variables
declared within the variables definition file.
Catalog file
The Catalog file identifies the name of a default OASIS catalog file. If defined, TopLeaf will use this
file when composing any XML partition that does not explicitly declare its own OASIS catalog file.
TopLeaf's OASIS catalog support is limited. See Section 11.2.14 for more information.
Page 136
Workstation reference
The General tab
The settings in this tab control the state of the following global parameters:
•
List tag and custom marker mappings in map precedence order — when applying a
stylesheet rule, TopLeaf chooses the most appropriate mapping by applying a set of
precedence rules and then selecting the mapping that has the highest precedence. By
default, the Map Manager displays tag and custom marker mappings in alphabetical order.
When this preference is checked, the map manager lists tag and custom marker mappings
using map precedence order.
•
•
•
•
•
•
•
•
The option only applies to the legacy Map Manager.
Show the Format file folder name when viewing mappings — if this is checked the title bar
of a stylesheet dialog shows the folder containing the stylesheet component.
Notify me when the composition engine flags warnings or errors — if this is checked, after a
typesetting run with warnings and/or errors a dialog will appear asking if you wish to view
the composition log.
No multiple composition runs when called from GUI — if this is checked, the composition
engine will only run once when called from the GUI, even if the stylesheet contains
<readgen/> commands to create and read generated files. This does not affect the
operation of the composition engine when called from the API.
Check all leaves for output page changes — sets the default preference for applying output
page comparison to a full looseleaf partition. The state of this option is assigned to the
equivalent partition property when selecting a full looseleaf page management model.
You can override this setting for individual partitions by setting or clearing the equivalent
partition property.
Exclude all leaves with unchanged output — sets the default preference for using output
page comparison to minimise the size of a release update for a full looseleaf partition.
The state of this option is assigned to the equivalent partition property when selecting a
full looseleaf page management model. You can override this setting for individual
partitions by setting or clearing the equivalent partition property.
Notify me when displaying an undefined font or image — if this is checked, the previewer
will issue a warning message when a font or image recorded in the output page description
cannot be found. These warnings can occur if the output pages for a partition were created
on one platform and viewed on another platform that has different fonts installed or assigns
different network drive mappings.
View output transformations — this is used as an initial default when converting to HTML or
RTF.
Honor settings for unprintable area — for some print devices, the dimensions of the
physical page are larger than the dimensions of the logical page, so when you print to these
Page 137
User Guide
•
devices, you may find that your output is shifted slightly to the left or down from the top of
the physical page. When this option is checked (the default), the print area of the page is
offset by the unprintable area setting for the output print device. If not checked, you must
ensure that your page margins are large enough to allow for the unprintable area.
Automatically view PDF files — this is used to start the PDF reader after a PDF file is
created (you must have a PDF reader installed and associated with the .pdf file type for this
to work).
The Languages tab
This tab allows you to set your preferred default language.
The default language is used to set the initial document language for a new publication. The
document language for a publication can be changed in the Options dialog.
Note that unlike most other preferences, the default language may be applied for all users on this
machine. On operating systems such as Windows 7 you will need to start TopLeaf with elevated
privileges to change the setting for all users.
10.5.4 Partition Properties
Partition properties describe a set of characteristics that identify the partition content and indicate
how TopLeaf will process that content. The Partition Properties dialog can be accessed from the
File menu.
The Looseleaf tab
The option selected in the Page management drop-down defines the method used by TopLeaf to
process changes to published pages. Use the default (None) if you only intend to distribute
Page 138
Workstation reference
complete publications rather than just the pages that have changed. See Section 8.1.3 for a
comparison of the Full looseleaf and Change pages modes.
The settings below are active only if Looseleaf page management is selected.
•
•
•
•
Single page leaves — When the content is typeset, one page will be allocated to a leaf
instead of two pages. Every leaf is composed as a right-hand page ignoring the traditional
convention of right pages: odd numbers, left pages: even numbers.
Track page boundaries — If this option is enabled, TopLeaf will track the position of each
page boundary within the partition content. You can export a copy of the published
document content that includes a set of page boundary markers identifying each page
boundary.
Track line boundaries — If this option is enabled, TopLeaf will track the position of each
data block line boundary within the partition content. You can export a copy of the
published document content that includes a set of line boundary markers identifying each
line boundary.
Content contains boundary markers — Indicates that the partition content contains TopLeaf
boundary marker processing instructions.
If this option is enabled, then:
○
the position of each document leaf boundary is identified within the content by a
TopLeaf leaf boundary marker;
○
boundary markers are always visible when the document content is edited;
○
content imported into the partition using the TopLeaf API must contain leaf
boundary markers.
This option must be enabled if you plan to initialize a looseleaf partition from a set of
existing leaf boundaries.
If this option is disabled then:
○
when the partition content is updated, TopLeaf automatically compares the
updated content with the published content to locate the position of each published
leaf boundary;
○
boundary markers are not shown when the document content is edited, unless the
option to view the published boundaries is selected before editing the content;
○
you must set Include boundary markers in document to include leaf boundary
markers when exporting the partition content to an external document file;
○
tracked page and line boundary markers can only be included when exporting the
published document content.
Warning:
Do not delete any of the published leaf boundary markers if your content contains
explicitly declared leaf boundary markers. If you need to remove content
containing boundary markers, move the markers out of the content before deleting
it.
•
•
Use default leaf indicators — If this option is enabled, TopLeaf will copy the partition default
leaf indicators to each new leaf created in a release. In a mainwork, the default leaf
indicators are assigned to all leaves. In an update, the default leaf indicators are assigned
only to new leaves generated as a result of changes to the partition content. See
Section 10.4.6 for more details.
Optimize input change tracking — If this option is enabled, TopLeaf composes the content
of all adjacent changed or included leaves within the same leaf group or leaf section as a
single unit. This usually minimises the total number of replacement pages in a release. If
Page 139
User Guide
•
you disable this option then each leaf will be composed independently and TopLeaf will
create additional point pages for any leaf that overflows past the end of the last page
associated with each leaf.
Enable review of published boundaries —This option allows you to review, and if necessary,
adjust the positions of published boundary markers without registering the alteration as a
change to the document. A boundary marker defines the position of a published leaf, page
or line ends within a document. Topleaf uses processing instructions to mark the position of
these boundaries within the document content. At a minimum, enabling this option allows
you to review the published leaf boundaries. If you intend to review the published page or
line boundaries then you must also Enable page boundary markers and Enable line ending
markers.
The Page Folio control specifies how folio strings are to be formatted in a full looseleaf partition.
You can use the <leaf-settings/> to set the point page level separator character.
The Initial Page Types controls declares an initial set of page types when typesetting a full
looseleaf partition. The following initial page types are defined:
•
First — This defines the default page type applied when rendering the first page of the
partition.
•
Followed By —This defines the default page type used when rendering all non-blank pages
after the first page.
•
Blank Back — This defines the intentionally blank page type. This page type will be used
when the content of a leaf fits entirely within the first page of that leaf.
Running heads, automatic table headings, margin rules (change bars), and deletion
markers are disabled on the Blank Back page type. For example, if you assign the 1
column page type as your Blank Back page type, then running heads and automatic table
headings will be disabled on all pages that use that layout. For most publications, the Blank
Back page type should be declared as either {implied} or Blank.
The initial First and Followed By page types can be overridden by a tag or custom marker mapping.
In a full looseleaf update, you can also declare a set of initial page types as properties applied at
the start of a leaf.
The Compose tab
The Compose tab declares a set of partition specific options for the TopLeaf composition engine.
The Document Markup Language selector shows XML or SGML as appropriate (the Legacy setting
is provided for jobs created using older versions of TopLeaf). The document markup language can
only be set when a partition is created. The option Ignore case in SGML tags is only enabled for
SGML data. If set, the processing of all element and attribute names is case insensitive. For
example, this means that TopLeaf will regard the tags <title type="section" > and <Title
Page 140
Workstation reference
Type="section" > as identical. Setting this option automatically disables full looseleaf page
management.
The following settings are available:
•
Enable debug mode — if set, then details of the typesetting run are sent progressively to the
•
•
•
•
•
•
•
log file. This setting can be changed at any time using the Debug button
Enable secondary transforms — if set, controls whether the composition engine creates
data for the HTML and RTF transformations.
Do not publish with composition warnings — if set, prevents a looseleaf partition from
being published if the last composition run produced warning messages. If this option is
not set a partition can be published with warnings, but not if it has errors.
Check all pages for output changes — if set, TopLeaf compares the updated and published
output for all leaves in the partition. If the output for a leaf has changed, then that leaf will be
included in the update pack. Setting this option has the potential to increase the size of the
update pack. This is only enabled for full looseleaf partitions.
Exclude all leaves with unchanged output — if set, TopLeaf compares the updated and
published output for those leaves in which the content of the leaf has changed or the leaf
has been manually, conditionally or automatically included. If the output for the leaf is
unchanged, then the leaf will be excluded from the update pack. Setting this option has the
potential to reduce the size of the update pack. This option is only enabled for full
looseleaf partitions.
Only check for output changes when publishing — if set, then output page comparisons are
deferred until the partition is published. This is useful when the partition must be composed
a number of times, for example if there is an included table of contents built by the first
composition pass and rendered by the second pass. This option is not enabled for full
looseleaf partitions.
Only check difference area for output changes — If set, output page comparisons are
restricted to the differencing area defined by that style sheet. This option is only enabled
when processing a full looseleaf partition and your publication style sheet uses a TopLeaf
legacy page layout.
Ignore output changes above content level — if set, will ignore output changes found in
content tagged with a suppression level greater than the specified value.
The Exports tab
During a typesetting run, TopLeaf can generate a number of derived files for possible use in later
processing.
This tab allows the user to specify where in the system each of these derived files is to be saved.
Each file is specified separately, and only those files of interest need be set up. If Export after each
Page 141
User Guide
composition is ticked, the file is saved automatically at the end of every typesetting run. If not ticked,
the files are only created immediately before the partition is published.
To export a file, select the export type and enter the name of the export file in the Export ... To: box
or click the Browse button to navigate to an existing folder or target file.
If a simple file name is entered (one without any ‘/’ or ‘\’ characters) it will be stored in the partition
folder. Otherwise, you should enter an absolute path for the file.
The files may also be saved manually via the File » Export dialog. The types of derived file are:
•
Document
•
Copy the input data file to the specified file name. This may be useful in full looseleaf
processing where the file may have markers inserted to show leaf, page or line boundary
markers. You can use the {document-file} system variable to reference this file path from
your stylesheet mappings. See Chapter 8.
TOC (Table of Contents)
•
TOC entries mapped from the input file are assembled into an XML file of TOC references
together with their corresponding output page folios.
Index
•
Index entries mapped from the input file are assembled into an XML file of index references
together with their corresponding output page folios.
XREF (Cross reference)
•
This is similar to the Index output, but it can be used for metadata that is not hierarchical in
form.
Filing Instructions
•
TopLeaf creates a file with a record for every output page showing its page folio and status.
The content of this file can be used for the automatic production of instructions for filing the
new and replacement pages of a release.
PDF
•
A PDF version of the partition is generated.
HTML Output
•
An HTML rendition of the partition content is created using the publication stylesheet. The
default transform properties for the partition are used (see Section 7.4). This option is only
available if the Enable secondary transforms box is ticked on the Compose tab.
RTF Output
•
A RTF (Rich Text Format) rendition of the partition content is created using the publication
stylesheet. The default transform properties for the partition are used (see Section 7.4).
This option is only available if the Enable secondary transforms box is ticked on the
Compose tab.
Indicators
A file is created that records all the indicators used in the partition. See Section 10.4.6.
Setting an export location which is independent of the repository location
Unlike the post-processing step, you cannot specify a relative file path for an exported file.
However, the export file name can also include references to environment variables. If you need to
specify an export target that is independent of the repository location, first declare the target folder
or path in an environment variable, then include a reference to that environment variable within
your export target path.
For example: the environment variable WEBDATA is declared as F:\MYWEBDATA.
Page 142
Workstation reference
To export an HTML rendition of the input partition to this folder, declare the HTML output path as:
$WEBDATA/MyHTML.HTM
TopLeaf defines the environment variable $TLPPATH which points to the current partition folder.
Versioning
These selectors control how many previous versions of the partition are retained. Increasing this
number allows you to roll back further into the history of the partition, at the cost of increasing the
storage required. You can choose to Keep the following:
•
Releases — the maximum number of releases retained each time a new partition update
release is created.
This is the number of releases in addition to the published release and the update release
(if present).
•
The release immediately before the published release is always retained. This means that
there are always at least 2 releases present, or 3 if there is an update release.
Undo Levels — the maximum number of copies of the partition content retained within a
release. When you edit the content of a partition from within the TopLeaf workstation,
Topleaf creates a copy of the document immediately before opening the document editor.
You can use the undo option to cancel the changes applied in a previous edit session.
The Post-process tab
TopLeaf can invoke a post-processing program (.EXE or .BAT) after the typesetting run has
finished. Browse for the name of the program, and enter any required arguments in the box.
If the Command is either “java” or “javaw” (case-sensitive) the Java runtime specified in the
preferences dialog will be used.
If the Launch after running the composition engine box is ticked, the post-processing will be run
every time the partition is typeset, otherwise it will only be run immediately before the partition is
published.
Tick the Run in a minimized window box if you want your post-processing to run in the background.
Page 143
User Guide
The DTD & Catalog tab
DTD File
The DTD file identifies a Document Type Definition associated with the partition. This can be
useful if your XML documents do not contain a document type declaration or if the referenced DTD
external subset cannot be resolved or is undefined. The DTD is always defined when the first
partition is created within a publication. All other partitions inherit the publication DTD file.
Note that a DTD defined here will override any DTD specified in the DOCTYPE directive of the
source document.
Catalog File
Entities within a document type declaration can be resolved using the OASIS catalog
mechanism.
TopLeaf's OASIS catalog support is limited. See Section 11.2.14 for more information.
10.5.5 Format Options
The Options dialog lets you set various options that affect the formatting of the current publication.
From this dialog you can set:
•
The document table model;
•
The document hyphenation method;
•
The document language;
•
The displayed measurement units used within stylesheet editors;
•
General style sheet preferences.
Page 144
Workstation reference
Table model
TopLeaf supports the following table models:
•
a subset of the CALS table model as defined at http://www.oasis-open.org/html/a502.htm
•
a subset of the HTML table model as defined at http://www.w3.org/TR/REChtml40/struct/tables.html
If you do not know which table model to choose, then select Unknown.
Rule Weight
This value sets the default rule weight used for margin rules and horizontal rules that appear
above or below mapped element content.
Measurement units
Although TopLeaf's internal unit of measure is the decipoint, a number of different measurement
units can be used to display the values shown in the stylesheet editors. The following list describes
the available units:
•
One Inch = 720dp (1.5in is stored internally as 1080 decipoints).
•
One Centimeter = 283.5dp (4.5cm is stored as 1276 decipoints).
•
One Millimeter = 28.35dp (45mm is stored as 1276 decipoints).
•
One Point = 10dp (65.2pt is stored as 652 decipoints).
•
Decipoints (TopLeaf's internal measure) are stored directly (15dp is stored as 15
decipoints).
Note:
You can use centimeters, millimeters, or picas to specify and display the values shown in the
stylesheet editors. TopLeaf automatically converts all values to decipoints, and this may
result in a slight loss of accuracy. Choose points or decipoints if you need to use the full
accuracy of the program.
Document language
The document language can influence the hyphenation rules used by TopLeaf when processing
content within a document. An embedded Dashes™ hyphenation module provides Language
specific hyphenation support for most European languages. The document language declares
the implied initial setting for the document, and is overridden by any language set by the xml:lang
attribute or through the <text-properties lang="LA" /> directive. In the case where the
content of a partition is sourced from a multi-document book list, the document language declares
the implied language for each document in the book list.
Hyphenation method
The hyphenation method specifies the action TopLeaf can take when it tries to split a word that
would otherwise extend beyond the right margin of a data or fixed block.
TopLeaf provides three types of hyphenation:
•
soft — TopLeaf splits a word if a soft hyphen (Unicode code point U+00AD) appears within
a word;
•
Use hyphenation dictionary — TopLeaf looks up a hyphenation exception list or dictionary
for the current language;
•
Use language hyphenation rules — TopLeaf splits words according to a set of rules
appropriate to the current language.
Page 145
User Guide
Hyphenation precedence rules
When TopLeaf determines that it is permitted to hyphenate a word, it applies the following
precedence rules to determine the hyphenation break points:
1. Use embedded soft hyphens (Unicode code point U+00AD) within the word;
2. If dictionary hyphenation is enabled, check the hyphenation exception dictionary;
3. If rule-based hyphenation is enabled, apply a set of language specific hyphenation rules.
Note:
The first precedence rule that is satisfied determines the hyphenation break points. A word
will only be hyphenated if one or more hyphenation methods are enabled, and when
permitted by the hyphenation mode declared for the context of a mapping.
By default, TopLeaf will not attempt to hyphenate any word of five characters or less.
General preferences
The following preferences can be set:
•
Balance columns. If set, then TopLeaf attempts to minimize the depth of the rendered
content by allocating an equal amount of content to each column. If this option is not set,
then content flows into the next column only when the previous column is full. You can use
the <topleaf-properties/> and <segment-properties/> directives to override
this setting.
•
Read-Only Format Files. This provides a simple way to prevent unintentional changes to
the publication mapping rules and layout specifications. When enabled, the stylesheet
editors will open in read-only mode, permitting a review of the current settings, but inhibiting
changes to those settings.
•
Legacy Font Compatibility. When enabled, this will generate mapping rules and layout
specifications that can be processed by the TopLeaf 7.0 legacy PDFlib PDF builder.
•
Honor settings for unprintable area. This option is only enabled when processing
TopLeaf legacy publications.
10.5.6 Print
Select File » Print … to print one or more pages from the selected partition phase.
From here, you can select a print device and print:
•
all the pages in the partition;
•
the currently selected page;
•
a right/left page leaf that containing the currently selected page;
•
a page range specified by a start and end page.
Page 146
Workstation reference
Warning:
The printed output is the same as that displayed in the preview pane, and may not
correspond exactly to the stylesheet format. For production output it is recommended
that you create a PDF rendition.
10.5.7 Create PDF
Select File » Create PDF … dialog to create a PDF document for one or more pages from the
currently selected partition phase.
From here, you can create a PDF of:
•
all the pages in the partition;
•
the currently selected page;
•
a right/left page leaf that containing the currently selected page;
•
a page range specified by a start and end page.
Page 147
User Guide
The PDF Profile drop-down list allows you to select the profile used to select the options for
creating the PDF.
If the View the PDF file after creating it checkbox is ticked, the PDF viewer is launched after the file
is created. For this to work a suitable application must be installed and associated with the file
extension used when creating the PDF.
For a looseleaf partition you can use the Changed Pages Only option to only include the pages that
are different from the previous release.
Note:
The following are disabled if you select a page range other than All, or if you select Changed
Pages Only:
•
Hyperlinks in the PDF are disabled because they are based on page number, which
could become incorrect if some pages are omitted.
•
Bookmarks are disabled because omitting items can cause the hierarchy to become
incorrect. A metadata variable can be used to enable bookmarks in this case.
10.5.8 Transform
To run one of the secondary transformations choose one of the options on the File »
Transform To menu, or press one of the transform buttons on the standard toolbar. The
following dialog will appear.
The text in the title bar will show the type of transform to be performed.
Enter the path for the output file, or use the Browse... button to select a location.
The table allows you to set values for some of the transform properties. The properties displayed
depend on the type of transform.
The view property is common to several transform types. If set to true TopLeaf will attempt to start
an application to view the transformation output. This depends on an application being associated
with the file extension. Consult the documentation for your operating system for information on how
to achieve this.
Page 148
Workstation reference
Note:
Property values must be entered using 7-bit (ASCII) characters. To express characters
outside of this range use character references. For example, the copyright character
(U+00A9) can be entered as ©. You can use & to include an ampersand
character.
Press the Save Properties button to save the property values so they will be used as the defaults
when the dialog is next used. The output path is also saved. This information is saved in a file
called transprop.xml in the partition folder.
10.5.9 Font Configuration
To modify the font configuration file, select Font Configuration ... from the Format menu. The
following dialog will appear.
The list on the left shows all of the typefaces that can be selected by mappings, either directly by
entering them in the Font tab or indirectly by including them in a selection scheme. By removing
an item from this list you make the typeface unavailable to TopLeaf even though the fonts in the
typeface are still installed.
The warning message at the bottom of the dialog appears when you are editing the font
configuration for the whole repository. This is a reminder that the changes you make apply to all
publications.
If any problem occurred when locating the fonts on your system, the Messages button will be
enabled. Click it to display the messages.
Select a typeface from the list to display the relevant details for each of the four styles in the righthand pane.
Typeface styles
The Font Name drop-down list allows you to select one of the installed fonts. Changing this also
sets the Typeface, Weight and Slant fields below to values that will cause TopLeaf to select this
Page 149
User Guide
font. Before changing the Weight or Slant fields, make sure you understand how Windows
applications select fonts based on typeface and style. Consult the relevant Microsoft
documentation for more information. If in doubt, use the font drop-down to set them.
The most common reason for changing the weight and/or slant fields is when you want to simulate
an effect for which there is no equivalent font. For example, if you have a typeface called “X” which
provides only an upright normal-weight font, you can set the weight to bold in order to simulate the
“X Bold” font.
The remaining fields in the right-hand pane control how fonts are used when creating a PDF.
The Skew Angle and Overstrike values are used for simulating italic and bold effects, respectively.
These are normally only used if no physical font with the desired characteristic is available. The
skew angle specifies a clockwise angle from the vertical used to distort the characters. A value
between 10 and 20 gives a good result for most fonts. The overstrike value is a horizontal distance
(in points) at which the characters are repeated to make them appear thicker. Acceptable results
are usually achieved with very small values.
If the Font Name field in the PDF box has a value, this overrides the use of the Windows font. This
is set automatically for the PDF core fonts Times, Helvetica and Courier. Clearing this field for
these typefaces will force the use of the Windows font, rather than using the font built into the PDF
viewer.
Warning:
In order to get the most accurate rendering, the font used when typesetting must have the
same character metrics as the font used to render in the PDF. Take care to ensure this is
true when changing the PDF Font Name field.
The Font File field is normally left blank. There is a bug in Windows which can prevent a font from
being found if its name is longer than 31 characters. If this happens, you can enter the font file here
so that the PDF builder can locate it. Note that this must be the full path to the file (for example,
C:\Windows\Fonts\ARIALBD.TTF).
The Embed value controls whether the font is stored in the resulting PDF. Embedding a font
guarantees portability because the font doesn't need to be installed when the PDF is viewed.
Embedding will increase the size of the PDF. Note that the licences of some fonts do not allow
embedding. A value of Default embedding means that embedding is controlled by the options in
force when the PDF is created. Select Never embed to prevent the font from being embedded; this
is an appropriate selection for the core fonts mentioned above. Select Always embed to force
embedding; this would be appropriate for a custom or proprietary font that won't otherwise be
available when the PDF is viewed.
The Embed subset only check box controls what happens when the font is embedded. If it is
selected, only those characters actually used (a subset of the font) will be included in the PDF. If it
is not selected the whole font will be included.
Warning:
Font subset creation is not supported for some fonts that use CFF (compact font format)
outlines. When a font using CFF outlines is added to the font configuration, the subset
option is turned off by default. It is recommended that you do not enable subset creation
for these fonts to avoid data loss.
Font embedding can also be controlled by using a PDF profile.
Managing typefaces
If the Automatically add new typefaces box is checked, the installed typefaces are checked each
time the font configuration is used. Any new typefaces which have been installed are automatically
Page 150
Workstation reference
added to the list. Uncheck this option if your repository is located on a shared drive so that you can
control when new typefaces are added.
To manually add typefaces to the list, press the Add... button. A dialog will appear showing the
installed typefaces that are not in the current configuration. The add dialog can be empty if all of the
installed typefaces are present in the configuration. Multiple typefaces can be selected for addition.
By default, the list only includes typefaces that have a character set which is compatible with
Unicode. Tick the Include non-unicode typefaces checkbox to include typefaces that have their own
private character set (for example, Symbol and Wingdings). See below for more information.
The Default button resets the styles of the selected typeface to their original values (as if created
by the automatic font configuration builder).
The Remove button deletes the selected typeface from the list.
The Remove Unused... button examines all of the publications in the repository to determine
which typefaces are being used. This includes typefaces referred to by a selection scheme or a
character map. If there are any typefaces that are not referred to, a dialog is opened to display
them. Select the check mark next to any typefaces you wish to remove and press OK.
Non-Unicode typefaces
Since XML data always uses the Unicode character set, in most cases you will only use typefaces
that employ the Unicode, ASCII or Latin-1 character sets (these character sets are all compatible).
Some typefaces use a non-standard character set that contains graphic or decorative symbols
rather than letters, numbers and punctuation. In Windows terminology, these are the typefaces that
use a “symbol” character set.
As an example of using a non-Unicode font, let’s say you want to include an envelope symbol
before a piece of text. A suitable symbol is available in the Wingdings font at character position 42.
This could be done by creating a custom marker “WD” that selects the Wingdings font, and adding
the following to the appropriate mapping customisation:
<WD>*</WD>
TopLeaf does not distinguish between Unicode and non-Unicode typefaces, so you must take care
to select a typeface appropriate for the context in which it is used.
10.5.10 PDF Profiles
A PDF profile contains information used when creating a PDF. See Chapter 5 for information about
PDF creation.
To examine, modify or create profiles, select the File » PDF Profiles... menu item to open the
profile editor.
Page 151
User Guide
PDF profiles are stored in the TopLeaf repository. The title bar of the editor shows you the path to
the file containing the profiles.
If you select a different repository in the Preferences dialog you must close and reopen the profile
editor to see the profiles for the new repository.
TopLeaf provides a standard PDF profile. When the profile editor is opened for the first time in a
repository, it will show the standard profile. At this point, the file containing the profiles does not
exist in the repository (even though its path appears in the title bar of the editor). The file is not
created until you make a change and press OK.
To create a new profile, press the Add... button and enter a name which is different from any of the
existing profiles. A profile name may contain letters, digits and the characters ‘-’, ‘_’ and ‘.’. To
remove a profile, select it from the list and press Remove. The profile called default may not be
removed — this ensures that at least one profile is always available.
To close the profile editor, press OK to save your changes, or Cancel to discard them. Press
Apply to save changes without closing the editor.
A profile is defined by the information on the tabs described below.
The General tab
The PDF Version allows you to set the level of the PDF standard used.
The Full compression checkbox causes some of the metadata to be stored in a compressed format
(the page content is always compressed), resulting in smaller files. This option is only available for
version 1.5 or later.
If the Enable bookmarks checkbox is not ticked the PDF will not contain bookmarks. This does not
affect the table of contents extraction.
The Viewer Preferences fields allow you to set information that tells a viewing application how to
display the PDF. See Section 5.5 for a description of the available preferences.
The Fonts tab
The options on this tab relate to font embedding. Select one of the following embedding options:
•
Never means that no fonts will be embedded in the PDF.
Page 152
Workstation reference
•
•
•
Default to not embed means that, in general, fonts will not be embedded in the PDF. The
only exceptions are fonts that have Always embed selected in their font configuration
entry.
Default to embed means that, in general, all fonts will be embedded in the PDF. The only
exceptions are fonts that have Never embed selected in their font configuration entry.
Always means that all fonts will be embedded, even the core PDF fonts. See Section 5.2
for more information.
You may also select the way TopLeaf behaves when a font cannot be embedded:
•
Ignore means that a failure to embed a font is not reported in any way.
•
Warn and continue means that all embedding failures are reported in a log file, but the PDF
is created. A PDF with font embedding failures can only be viewed or printed successfully if
the fonts are available on the computer on which the PDF is being viewed.
•
Do not create PDF means that any failure to embed a font is fatal and that the PDF will not
be created. A log file listing the embedding errors will be produced.
The Links tab
This tab controls the creation of hyperlinks in the PDF.
If the Enable links checkbox is not ticked the PDF will not contain any hyperlinks. This does not
affect formatting applied by mappings that create hyperlinks (in other words, the text of the link will
appear the same, but the link will not be active).
A hyperlink which does not have a destination is sometimes referred to as a broken link. When
TopLeaf fails to find the destination for a link, it does not activate the link in the PDF. This means
that nothing will happen if the user clicks on the corresponding text or image. In fact, there is no
indication to the user that this is a broken link, unless a specific format has been applied to the text
of links.
One of the following actions can be selected for links with no destination:
•
Ignore means that broken links are simply ignored.
•
Warn and continue means that all broken links will be reported in a log file, but the PDF will
be created.
•
Do not create PDF means that any broken link will be regarded as a fatal error and prevent
the PDF from being created. A log file listing the broken links will be produced.
Check the Annotate bad links with comments box to produce a PDF comment for each bad link that
contains the target identifier that could not be found. This can be very useful when trying to
determine why the target could not be found. This is only relevant when the “Warn and continue”
option above is selected, since the other options do not result in a PDF with broken links.
The Security tab
This allows you to restrict what end users can do with the PDF.
TopLeaf supports 128-bit password encryption. In order to enable security controls, a master
password must be supplied. See Section 5.6 for more information about security settings.
Note:
The security provided by these options is relatively weak, and is not intended to be a
substitute for a full Digital Rights Management or strong encryption solution.
In particular, these options rely on the PDF viewing application honoring the security settings.
While the Adobe Reader® application operates according to the PDF standard, there is no
guarantee that other PDF readers will do the same.
Page 153
User Guide
Content Suppression
You can assign a content level to content in a document by using the <content-properties/>
command in your mappings. The content suppression options can then be used to prevent content
with a content level greater than a given value from appearing in the PDF.
Set the Content level value to enable content suppression. All text and graphics with a security level
greater than this will be excluded from the generated PDF. The default value of “9” indicates that no
content is to be excluded.
You can set the Replacement graphic field to the full path of a graphic to use in place of any graphic
that is excluded from the PDF. The graphic will take up the same space as the excluded graphic. If
it is larger than the excluded graphic it will be scaled to fit and centered in the space available. If it is
smaller, it will appear at its natural size, centered in the available space. If the excluded graphic is
rotated, the same rotation will be applied to the replacement graphic.
Note:
Content exclusion is only applied to text and graphics. Other output (for example horizontal
rules) is not affected.
The Images tab
This allows you to create a number of image filters that are used to transform images before
incorporating them into the PDF.
The top list shows the filters that apply when the current profile is being used. The bottom list shows
the filters that apply to all profiles.
When an image is processed TopLeaf looks for a filter with a matching type. The profile filters are
checked first, followed by the global filters. The first matching filter is used. If no matching filter is
found the image is processed normally.
To create a filter press Add... and enter the following details:
•
The Name can be used to describe the purpose of the filter.
•
The Input is the type of image to be processed.
•
The Output is the output format created by the filter. This may be the same as the input
format.
•
The Working directory is the path to the directory in which the command is run. This may be
blank.
•
The Command contains the command to be executed. Each line is passed as a separate
argument. The first line must be the path to the command executable. The strings {input}
and {output} must be present and are replaced by the paths to the input and output files.
Page 154
Workstation reference
For example, the following filter uses the ImageMagick software to change the resolution of PNG
images (the ImageMagick application must be downloaded and installed separately).
The Colors tab
This allows you to select how colors are processed when creating the PDF.
Select the desired item from the Color model drop-down. The default value (rgb) uses the colors
specified in TopLeaf as device-dependent RGB colors. If a color palette exists for the stylesheet,
the RGB values defined in it will be used instead.
The cmyk model uses the color palette to find a CMYK equivalent for each color. A warning will be
given if there is no palette or if a color has no CMYK value defined.
Note:
Selecting the cmyk color model does not have any effect on graphics. It is only used for
converting colors selected in the mappings.
The grayscale model can be used to create a PDF that only contains black, white and shades of
gray. If the stylesheet has a color palette the grayscale value defined for the color (if any) is used.
Otherwise a map is used to specify how each color is converted.
Select Convert images to grayscale to convert all images to grayscale form. Note that this will cause
vector images to be converted into a bitmap format.
Warning:
The default grayscale image conversion may cause a decrease in quality and remove
transparency information. If the result is unacceptable you can use an image filter to
apply a different conversion.
Tick the Use default map box to use a map that gives good results under most circumstances. You
can also enter relative weights for each of the red, green and blue components in the color — a
greater weight results in a lighter shade of gray for that component.
Note:
The grayscale map is not used for converting graphics — these are converted by calculating
a standard luminance value for each pixel.
The separation model uses the spot color definitions in the color palette if they are defined.
Otherwise it will try to use CMYK colors. If neither of these are found, or if there is no color palette,
RGB colors will be used.
Page 155
User Guide
The Page tab
This tab allows you to set page boundaries using the page size, the print area and the crop area.
For each of the boundary boxes select one of the page areas to define it, or select Undefined. You
can also apply offsets to the selected area by entering an offset definition in the following field (see
below for a description of how to specify offsets).
Note:
To get correct results, make sure all page types used on a page define the same print and
crop areas.
Offset definition
An offset definition consists of one, two or four measurements separated by spaces. Each
measurement is a number optionally followed by a unit of measure. Both positive and negative
values are allowed. If no unit is given, points are assumed. Valid units are “pt” (points), “cm”
(centimeters), “mm” (millimeters), “pc” (picas) and “in” (inches).
The interpretation of the measurements is as follows:
•
A single measurement is applied to all four sides.
•
If two measurements are present, the first is applied to the top and bottom and the second
is applied to the left and right sides.
•
Four measurements are interpreted as top, left, bottom and right offsets.
In all cases, a positive measurement has the effect of increasing the size of the area, and a
negative value decreases it. For example, a positive value for the top offset moves the top edge up,
while a positive bottom offset moves the bottom edge down.
The Watermarks tab
This allows you to control whether one or more watermarks are applied to each page when this
profile is selected.
The list on the left shows all of the available watermarks. Click on a watermark to display a preview
in the right-hand pane. The checkbox next to a watermark shows whether it is applied by this
profile.
To create a new watermark, press the Add... button and fill in the details. To change a watermark,
select it and press Edit... or double-click it.
A watermark may not be removed if it is applied by any profiles. To remove a watermark, uncheck
its name for all of the profiles, then select it and press Remove.
The following options in the Edit Watermark dialog control the appearance of the watermark. All
measurements are a number of points.
Select Over content to draw the watermark on top of the page content, or Under content to draw it
underneath.
The Horizontal alignment determines the position of the watermark when it is smaller than the
available space on the page. When it is wider than the available space, it is scaled down to fit.
The Horizontal padding determines the amount of space reserved on the left and right sides of the
page. Increasing this space decreases the space available for the watermark.
The Vertical alignment and Vertical padding have the same meanings as the above, but in the
vertical direction.
The Rotation is expressed as a number of degrees in the counter-clockwise direction.
Page 156
Workstation reference
The Pages field allows you to select the pages on which the watermark will appear. See below for
more information.
The Opacity is a measure between 0 (fully transparent) and 1 (fully opaque). If the watermark is
drawn above the page content, it determines to what extent the content is obscured by the
watermark.
The Blending mode determines how a watermark drawn above the content combines with the
content. An appropriate blending mode allows you to have an opaque watermark without obscuring
the content beneath it. See the PDF Reference for more information about blending modes.
Text Details
The Text, Font and Size fields determine the text to be displayed. If a line of text starts with the
string “META:” the remainder of the line is used to locate a metadata variable with that name. If
found, the line is replaced by the metadata value; if not found, the line will become empty.
The Line space determines the extra vertical space between each line of text.
The Color specifies the color used to draw the text. It is either a color name or a string of the form
#RRGGBB, where each of the red, green and blue values are 2 hexadecimal digits.
The Outline width is the width of the line used to draw the outlines of the characters; if this is zero
the characters are filled.
Image Details
For an image watermark you must specify the absolute path to the file containing the image. The
Browse button opens a file selection dialog to help you locate the file.
Watermark Page Selection
The page selection for a watermark determines on which pages the watermark will appear. The
selection is based on page number, where the first page in the PDF has number “1”.
The possible values are:
•
A blank string means that the watermark will appear on all pages.
•
The string “odd” means that the watermark will only appear on odd-numbered pages.
•
The string “even” means that the watermark will only appear on even-numbered pages.
•
A single number means that the watermark will appear on that page number only.
•
Two numbers separated by “-” means that the watermark appears on the corresponding
inclusive range.
•
A number followed by “+” means that the watermark appears on that page and all following
pages.
Note:
The watermark page selection uses the page number of the PDF being created; it does not
use page numbers assigned by the mappings.
This is particularly important if you are creating a PDF from a part of a document. The page
selection always treats the first page in the PDF as page number one, even if it is not the first
page of the document.
10.5.11 Color Palette
Colors are specified in mappings as RGB (Red, Green, Blue) values. These are used to create
device-dependent RGB colors when creating a PDF.
You can create a color palette for a stylesheet. This allows you to see all of the colors used in the
stylesheet and assign properties to each one. For example, this allows you to specify CMYK (Cyan,
Magenta, Yellow, Black) values to be used if the PDF profile selected uses the cmyk color space.
Page 157
User Guide
To create a color palette select Color Palette... from the Format menu. An initial palette will be
created from the colors used in the current mappings.
Note:
The initial palette will not include colors used in commands in the custom content of a
mapping.
The palette editor dialog will be opened:
To add a new color to the palette, press Add... and enter a color. This is the preview color for the
palette color, and will be used in the page preview and print output. A default name will be assigned
to the color. You can change the name and the other color properties by selecting it and pressing
Edit..., or by double-clicking it.
The color properties are:
Name
Any name may be used for the color, as long as it is different from all of the other
color names.
RGB
The RGB value is used for PDF colors when the profile selects the rgb color space.
It defaults to the same value as the preview color.
Each of the red, green and blue values must be in the range 0 to 255 inclusive (00 to
FF hexadecimal). You can enter 3 decimal values separated by spaces or commas,
or a hexadecimal value in the form “#RRGGBB”. For example, “0 128 255” and
“#0080FF” are equivalent.
CMYK
The CMYK value is used for PDF colors when the profile selects the cmyk color
space.
Each of the cyan, magenta, yellow and black values must be in the range 0 to 100
inclusive. Enter them as decimal values separated by spaces or commas.
The color displayed is only an approximation of the actual CMYK value that will be
used in the PDF.
Grayscale
The grayscale value is used for PDF colors when the profile selects the grayscale
color space.
The value must be entered as a decimal number in the range 0 (black) to 100 (white)
inclusive.
Spot
Page 158
This is used when the profile selects the separation color space.
Workstation reference
The value must be a name, optionally followed by a tint value, optionally followed by
an alternate color specification. Use a comma to separate these. The tint must be in
the range 0 to 100 and defaults to 100. The alternate color must be a hexadecimal
RGB specification in the form “#RRGGBB”. For example:
Meadow Green,80,#008040
The alternate color should correspond to the appearance with a tint value of 100 (so
all spot colors with the same name should have the same alternate color).
To delete a palette color, select it and press Delete. A color may only be deleted if it is not used in
any mappings.
Using the color palette
When a color palette exists for the stylesheet, pressing a Set Color... button will open the palette
editor dialog. Select one of the colors and press OK to set the color. You can also add new colors
or edit existing ones.
When using colors in command directives declared within a mapping customisation, use an RGB
value that corresponds to a preview color in one of the palette colors.
Removing a color palette
You can remove the color palette from the stylesheet by pressing the Remove Palette button.
This is only visible when you open the dialog from the Format menu, not when you are selecting a
color in a mapping.
If you remove the palette the names and properties of the palette colors will be lost.
10.5.12 Page Properties
The Page properties dialog displays a set of characteristics associated with the active page from a
non-looseleaf or change pages publication.
Page 159
User Guide
These characteristics include:
•
General information, such as the page number, the number of times the page has been
modified, and a release label that identifies the update in which the leaf was last changed
•
Status information. In a change pages publication, this indicates when the printed output is
visually different from the published output for this page.
•
Initial Page Types describe the page layout that was used to render the page. Page types
are created using the layout editor and are applied by mappings.
10.5.13 Leaf Properties
The leaf properties dialog displays a set of characteristics associated with the active leaf in a full
looseleaf publication.
Page 160
Workstation reference
These characteristics include:
•
General information, such as the page number, the number of times the page has been
modified, and a release label that identifies the update in which the leaf was last changed
•
Status information. In a looseleaf publication, this indicates when a leaf marks the start of a
leaf group, can carry a link line, or has been manually included in the update. In a changed
pages publication, this indicates when the printed output is visually different from the
published output for this page.
•
Initial Page Types describe the page layouts assumed when rendering the content
associated with the leaf. Page types are created using the layout editor and are applied by
mappings.
The initial leaf page types declare the following:
○
Front — The page type assumed prior to rendering the front (odd) page of the leaf.
A value of {implied} means that the leaf content will be rendered using the page
type in force at the start of the leaf. The page type declared remains in force unless
overridden by a style sheet mapping rule or the preferred followed by page layout.
○
Followed by —The preferred page type applied when rendering all other non-empty
pages created when processing the leaf. A value of {implied} means that the leaf
content will be rendered using the page type in force at the start of the leaf. The
page type declared here can be overridden by a style sheet mapping that assigns a
different current and followed by page layout.
○
Blank Back — This defines the preferred intentionally blank page type. In a
looseleaf publication, this page type will be used when the rendered content of the
leaf fits entirely within the first page of that leaf. This page type also sets the
{implied} intentionally blank page type for all following leaves, and remains in force
Page 161
User Guide
unless overridden by the intentionally blank page type specified for a subsequent
leaf.
•
TopLeaf will ignore an attempt to use a Blank Back page layout to render the content of a
non-empty page.
Leaf Indicators associate leaf specific metadata to individual leaves. When you compose
the partition document, TopLeaf assigns the content of the default leaf indicators to each
new leaf created. If the default indicators are varied from release to release, you can use
the indicators to track a leaf-by-leaf version history for the document. See Section 10.5.14
for more details.
Manually including leaves
TopLeaf provides two methods for the manual inclusion of leaves. A soft leaf inclusion occurs when
you want TopLeaf to include an unchanged leaf in an update, even if the content of that leaf is
unchanged. A hard leaf inclusion occurs when you want TopLeaf to include an unchanged leaf in
an update, even if the rendered visual appearance of that leaf is unchanged.
To apply a soft leaf inclusion to a leaf, highlight the leaf you want to include from the leaf list. Check
the Include control and then press OK to close the dialog. To remove a soft leaf inclusion uncheck
the Include control, then press OK to close the dialog. The partition leaf tree will be redisplayed
after you close the properties dialog. A
icon identifies a manually included leaf.
To apply a hard leaf inclusion to a leaf, highlight the leaf you want to include from the leaf list.
Check the Include Unchanged Output control and then press OK to close the dialog. To remove a
soft leaf inclusion uncheck the Include control, then press OK to close the dialog. The partition leaf
tree will be redisplayed after you close the properties dialog. A
inclusion.
icon identifies a hard leaf
Leaf groups
If you are using a partition based numbering scheme the leaf set can be organised into one or
more leaf groups. Leaf groups are usually associated with a major document structural unit, such
as a chapter, a table of contents, or an index. If set, the Leaf Group control indicates if the selected
leaf is the first leaf in a leaf group.
In some circumstances you may need to manually alter the leaf group status. For example,
removing the leaf group status on the second of two adjacent leaf groups allows you to reflow or
renumber the leaves as a single leaf group. Alternatively, marking a leaf as the start of a new leaf
group allows you to reflow or renumber a leaf subset within an existing leaf group. To apply or
remove the leaf status that indicates a start of a leaf group, highlight the first leaf of the leaf group
and check the Leaf Group control. Be aware that making arbitrary changes to the leaf group status
can have implications for optimized input change tracking and the generation of additional point
pages.
If you are using a section based numbering scheme the Leaf Group indicates if the selected leaf
is the first leaf in a section. You cannot manually adjust this status.
Suppressing link lines
You can suppress a link line by enabling the Suppress link line leaf property. This property is
located on the leaf properties dialog, and is enabled for the last leaf of a leaf group, or the last leaf
of a partition. To suppress the link line at the end of a leaf group, highlight the last leaf of a leaf
group and check the Suppress link line control.
10.5.14 Indicators
Indicators are a facility for holding text that can be rendered on pages of the output without being
included in the data. They can be used to store content that might include standard headers and
Page 162
Workstation reference
footers, effectivity or release dates, leaf specific modification history, or instructions used by
stylesheet rules when rendering particular pages or sections of your documents.
The indicators are accessible through the menu Commands » Indicators and are set for the partition
as a whole. In a looseleaf partition other indicators are accessible that are effective for a single leaf.
General indicators
The general indicators are provided for specific use as follows.
ID: is intended to supply a prefix for the page numbers (for example, V1 for the partition that
contains the data for Volume 1)
First Folio: instructs TopLeaf to start numbering pages from the given number. This must be an odd
number within the range 1 to 32,767.
Link ID: and Link Folio: are intended for looseleaf partitions. They provide a means for printing link
information that relates to the next partition and are described in Section 10.5.14.
Keywords
The Keywords: field provides a place to store arbitrary text that can be rendered on a page or
pages as required.
Page 163
User Guide
Partition Indicators
Partition indicators declare a set of labelled text strings that contain partition specific metadata. You
can use this information to pass release specific information (for example, a revision history) into
the rendered output leaves.
To insert a new indicator, right click in the open area within the group to display the Insert Indicator
menu. Select a type (A to Z or blank) and insert the required text. Right click an existing indicator to
display a modification menu that provides actions to insert before, insert after, modify or delete
indicators.
Partition indicators can be accessed from a tag mapping by assigning their content to a user
variable using the <set/> command. The following example shows how to assign a variable with
the value of a partition indicator:
<set var="Supplier" indicator="partition:S1" />
Default Leaf Indicators
Default leaf indicators declare a set of labelled text strings that will be assigned to all new leaves
created in a looseleaf update. You can use this information to record release specific information
(for example a revision history) within the rendered output leaves.
In a mainwork, the default leaf indicators are assigned to all leaves. In an update, the default leaf
indicators are assigned only to new leaves generated as a result of changes to the partition
content.
Leaf indicators can be accessed from a tag mapping by assigning their content to a user variable
using the <set/> command. The following examples shows how to assign a variable with the
value of a leaf indicator:
<set var=LeafAuthor" indicator="leaf:A1" />
<set var=LeafAuthor" indicator="A1" />
10.5.15 Label Release
By default, TopLeaf identifies each partition release with a sequential number starting from 0. The
Label this Release dialog provides a way to assign a descriptive string (for example, a date or a
release title) that uniquely identifies the release. You can reference the partition release label by
including the {release-label} system variable in your stylesheet mappings. Alternatively, your
stylesheet mappings can assign the partition release label using the <release-properties/>
directive.
10.5.16 Renumber
The Renumber dialog renumbers the leaf group folio numbering sequence in a full looseleaf
partition that uses a partition based numbering scheme.
Page 164
Workstation reference
The dialog is opened with the menu command Commands » Renumber.
The Before Renumber pane shows the existing leaf and group structure where the yellow icons
identify group start leaves. Note that the leaves are numbered with TopLeaf's native scheme (the
same numbers that are displayed in the leaf navigation pane) even if you are using custom code to
print different page labels.
Click on the icon for any leaf in the group you want to renumber. The icons for the leaves that make
up this section are changed from white to grey to identify them and the current number of the
starting leaf is written into the Target Folio text box. Alter this number to the new start number you
wish to use.
Press Renumber >> to test the change — TopLeaf will provide an explanatory message if the
chosen number is not valid, otherwise the new leaf structure that will apply will be shown in the
After Renumber pane.
If the displayed result is acceptable, press Apply to make this change to your partition. TopLeaf will
make the changes then automatically start a composition run to reset the numbering to this pattern.
Otherwise press Cancel or the Close button to exit without making any changes.
10.5.17 Add Files
The option Add Files to Partition … allows additional files to be set up in the partition book list.
Page 165
User Guide
The display opens within the partition source document folder. To add a source document to the
partition, browse to the file and select it. If the source document is to be copied into the partition
source document folder, tick the box Copy files to this partition.
Click Open to add the source document to the partition book list.
Restrictions
A partition book list that declares more than one absolute path name to an external source
document is automatically assumed to identify the content for a copy partition.
If you add new members to a linked partition book list, the partition will be automatically assumed
to be copy.
This command is disabled for all looseleaf update partitions.
10.5.18 Go To Page
This dialog can be opened from the Page menu or the Preview toolbar. It allows you to select the
page displayed in the preview pane.
Select the page from the list of labels on the left and press OK. You can also enter a page number
to select the corresponding page in the list.
10.5.19 Save As
A TopLeaf partition contains XML content, rendered page images, and page or leaf status
information that collectively defines a release snapshot of the document. Select File » Save As …
option when you need to export the partition XML content to an external document file.
Page 166
Workstation reference
Exporting leaf and page boundary markers
When a full looseleaf document is published, TopLeaf allocates the document content to a set of
document leaves. Each leaf associates a portion of the document content with a front and back
output page. Within a document, leaf, page and line boundaries are identified using boundary
marker processing instructions. When you export content from a full looseleaf partition, you can
optionally choose to include the published boundary markers in the exported document.
Page 167
User Guide
10.5.20 License Keys
This dialog allows you to enter the license keys supplied by Turn-Key Systems to activate TopLeaf.
If the Set for all users on this machine checkbox is enabled you can select it to set the license
information for anyone who uses this machine. If it is not selected the license information will only
be applied to your account.
You can set the default language for all stylesheets by pressing the Change... button. This opens
the Preferences dialog.
The remaining fields on the dialog are only used for legacy stylesheets. Contact Turn-Key support if
you have any questions about them.
Page 168
Technical specifications
11. Technical specifications
This chapter summarises the technical specifications for TopLeaf, including supported platforms,
XML compliance issues, and known application issues of which you will need to be aware.
11.1 Supported platforms
This section contains information about the platforms on which TopLeaf runs.
11.1.1 Windows
TopLeaf runs on the following 32-bit and 64-bit versions of Microsoft Windows:
•
desktop systems: Windows XP (SP2) or later;
•
server systems: Windows Server 2003 or later.
Warning:
If you install TopLeaf on a 64-bit Windows platform you must install and select a 32-bit
Java runtime system.
11.1.2 Linux
The TopLeaf API is available for 64-bit implementations of Linux. The TopLeaf workstation does
not run on Linux.
Contact [email protected] for information about the supported distributions.
11.2 XML and SGML conformance
This section details those areas where TopLeaf does not fully comply with XML and SGML
specifications.
11.2.1 Input documents
TopLeaf requires its input to be in one of the following forms:
•
XML (DTD optional)
•
SGML (DTD required)
The supported encodings for XML documents are:
•
UTF-8
•
UTF-16
•
ISO-8859-1
The following IANA-registered aliases for ISO-8859-1 are also recognised:
•
ISO_8859-1:1987
•
ISO_8859-1
•
iso-ir-100
•
csISOLatin1
•
latin1
•
l1
•
IBM819
•
CP819
Finally, documents encoded as US-ASCII will be regarded as equivalent to ISO-8859-1. This
means that 8-bit characters in such documents will not be flagged as errors.
Page 169
User Guide
TopLeaf will not render source documents in other formats (for example, RTF, MS Word).
Turn-Key Systems provides freely under an open source licence the X-ICE system which allows
you to set up a set of rules to convert MS Word readable documents into XML. This XML will be
valid for any user supplied DTD. X-ICE requires that XMetaL be installed on your system.
11.2.2 Documents assumed to be valid
TopLeaf is not an XML or SGML validator. It assumes that any document presented to it is valid. An
XML document that has no DTD is assumed to be well-formed. A DTD that is both defined and can
be located by TopLeaf will be used only to identify empty elements, assign default attributes and
control default whitespace handling.
TopLeaf does not process XML schemas.
TopLeaf deals with invalid document content as follows:
•
Structural invalidity, such as a child element appearing at the wrong place in its parent, is
ignored.
•
Unknown tags or attributes will cause a runtime error unless TopLeaf is operating in DTDless mode.
•
Documents that are not well-formed will trigger a fatal error as soon as the badly formed
element is encountered.
Source documents that are not well-formed or contain invalid markup may generate errors or
warnings, or produce output that is rendered incorrectly when processed by TopLeaf.
11.2.3 XML name characters
Tag and attribute names declared or referenced in any document processed by TopLeaf must use
name characters located within the US-ASCII (7 bit) character range:
NameChar
::=
Letter | Digit | '.' | '-' | '_' | ':'
Name
::=
Letter | '_' | ':') (NameChar)*
Letter
::=
[#x0041-#x005A] | [#x0061-#x007A]
Digit
::=
[#x0030-#x0039]
This restriction also applies to TopLeaf tag and custom marker mappings. Custom marker names
may not contain the following characters:
‘ : ’ .
11.2.4 User variable name characters
User variables are variables defined by the user from within the context of a tag mapping . A user
variable name is a token beginning with an upper-case letter and followed by one or more user
variable name characters.
A variable name that contains a ‘%’ that is not followed by two hexadecimal digits is invalid.
Name
::=
StartChar (NameChar)*
StartChar
::=
[A-Z]
NameChar
::=
Letter | Digit | PEseq | '.' | '-' | '_' | ':'
Letter
::=
[A-Za-z]
Digit
::=
[0-9]
Page 170
Technical specifications
HexDigit
::=
[0-F]
PEseq
::=
'%' HexDigit HexDigit
11.2.5 Comments
Comments may appear anywhere in a document outside other markup; in addition, they may
appear within the document type declaration at places allowed by the grammar. They are not part
of the document's character data and it is not possible to retrieve the text of comments.
11.2.6 Entity resolution
TopLeaf predefines entities in the ISO 8879 (SGML) sets listed below. This means that references
to these entities will be replaced by the corresponding characters, even if the entities are not
defined in the data or DTD.
ISO entity set
Description
iso-amsa
Added Mathematical Symbols: Arrows
iso-amsb
Added Mathematical Symbols: Binary Operators
iso-amsc
Added Mathematical Symbols: Delimiters
iso-amsn
Added Mathematical Symbols: Negated Relations
iso-amso
Added Mathematical Symbols: Ordinary
iso-amsr
Added Mathematical Symbols: Relations
iso-box
Box and Line Drawing
iso-cyr1
Cyrillic-1
iso-cyr2
Cyrillic-2
iso-dia
Diacritical Marks
iso-grk1
Greek-1
iso-grk2
Greek-2
iso-grk3
Greek-3
iso-grk4
Greek-4
iso-lat1
Latin-1
iso-lat2
Latin-2
iso-num
Numeric and Special Graphic
iso-pub
Publishing
iso-tech
General Technical
TopLeaf automatically defines a fallback definition for these entity sets. The fallback definitions will
only be used for entities that are not declared in the DTD or catalog, and are unlikely to have any
negative impact when typesetting your documents. To locate problems with entity resolution, select
the debug option when composing. This will list all files read in the log, which will allow you to trace
how and when entities are being defined.
Page 171
User Guide
11.2.7 DTD interpretation
While TopLeaf will scan a DTD it does not attempt to verify the correctness of the DTD, nor to
validate the source against the DTD. Only the following information is extracted:
•
valid tag and attribute names
•
default attribute values
•
content type (mixed, element or empty)
•
entity definitions
TopLeaf allows elements to be stored and re-used. However, when composing a document, this
interpretation of the DTD becomes a useful feature rather than a limitation.
Where an element is declared in a DTD then the content type is used to determine how TopLeaf
processes white space within the element content or any user customization emitted when that
element tag is mapped.
11.2.8 SGML declaration
TopLeaf ignores any supplied SGML declaration and instead makes the following assumptions:
•
All tags/entities are in the standard forms <tag>…</tag> and &ent;
•
All elements have a required start tag and optional end tag.
•
Standard name and number characters are used.
If your source document complies to a non-standard declaration you will need to apply a pretransform to comply with the above assumptions.
11.2.9 CALS table processing
TopLeaf supports a subset of the CALS table model DTD as defined at http://www.oasisopen.org/html/a502.htm.
Implementation
The TopLeaf composition engine renders CALS tables incrementally — as table rows arrive —
rather than waiting for all the data before beginning to render each table.
Table directionality
The directionality of a table is determined by the inherited directionality (the default is left-to-right).
Table nesting
The <entrytbl> element allows for a single level of nesting within CALS tables. A table cell can
contain another nested table subject to the following restrictions:
•
Nested tables may have a header, but nested table header rows do not repeat if the table
breaks across a page or column.
•
The maximum depth of a nested table header is the data block depth less the minimum
table row depth.
Table orientation
The orient attribute is ignored by the table processor. However, it can be used in a mapping
selector to change to an appropriate layout.
Column separators
Internal table column separators are declared using the colsep attribute. This is interpreted as
adding a single ruling to the right side of a table cell. If a DTD is not specified then the implied table
Page 172
Technical specifications
column separator is visible. Individual mappings can control the implied table column separator by
toggling the state of the Implied column separator is visible from the mapping Table tab.
Row separators
Internal table row separators are declared using the rowsep attribute. This is interpreted as adding
a single ruling to the bottom edge of a table cell. If a DTD is not specified then the implied table row
separator is visible. Individual mappings can control the implied table row separator by toggling the
state of the Implied row separator is visible from the mapping Table tab.
Table groups
The DocBook DTD allows a table or informaltable to contain a number of graphic or
mediaobject elements instead of tgroup elements.
Tables that do not declare tgroup elements are processed as non-tabular container block
elements. In particular, none of the standard table styling effects (for example, the table frame
style) will be applied.
Row groups
Table rows may be grouped into a table head and one or more table body sections, using the
thead and tbody elements. The use of a tfoot block will generate a non-fatal warning, and the
block will be processed as a tbody block.
Table columns
The number of columns within a table <tgroup> is defined by the cols attribute, not by the
number of <colspec/> declarations or the number of <entry> cells defined in a table row. The
cols attribute must be declared as a positive integer.
Table columns widths may be specified using one or more <colspec/> declarations. If the
number of table columns defined by the cols attribute exceeds the number of explicitly declared
<colspec/> definitions, additional declarations equivalent to <colspec colwidth="1*" > will
be inferred. The typesetting engine will generate an error if the number of <colspec/>
declarations is greater than the number of columns declared in the containing <tgroup>, or when
a table <entry/> or <spanspec/> range references an undefined <colspec/>.
Column widths
Column widths can be specified as either a fixed measure using one of the CALS units — pt
(points), cm (centimeters), mm (millimeters), pi (picas), px (pixels) and in (inches), or a
proportional measure such as “10*”.
A non-standard extension to the CALS table model recognises the following additional fixed
measure units: pc (treated as a synonym for pi) and dp (decipoints).
The default fixed unit is interpreted as pt if neither a proportion or a fixed unit is specified.
Measurements in px (pixels) are converted to an absolute measure using the current device
resolution. The <topleaf-properties/> directive can be used to set the device resolution.
The use of mixed mode specifications that declare a combination of proportional and fixed
measures (e.g. “2*+3pt”) is not supported.
If the total requested width for all columns exceeds the available measure, TopLeaf will
proportionally reduce all table widths to ensure that the table fits within the block.
Cell horizontal alignment
Explicit references to the char and charoff attributes may generate a warning when the table is
rendered. A value of align="char" is interpreted as align="right"
Page 173
User Guide
Cell vertical alignment
A non-standard extension to the CALS table model recognises the following vertical alignment
mode: step. A cell step alignment vertically aligns the first line of content in a cell with the last line
of content in the previous adjacent cell. See the <cell-properties/> directive for more details.
Cross page cell vertical spanning
Cell vertical spanning is supported. The typesetting engine will generate a fatal error if a cell
declares a negative vertical span. By default, a vertical span will not split across a page boundary.
Use the command <table-properties split-rows="yes"/> if you want a cell vertical span
to split across a page boundary.
Cross page row splitting
CALS tables that are allowed to continue across column or page boundaries will normally break
between table rows. When splittable table rows are enabled, a break across a column or page
boundary may also occur within a table row. See the <table-properties/> directive for more
details.
Tag processing
When CALS table processing is enabled the following elements are assumed to be components of
a CALS table structure:
•
table
•
informaltable
•
thead
•
tbody
•
tfoot
•
colspec
•
rowspec
•
spanspec
•
row
•
entry
•
entrytbl
The processing of all recognised CALS table element names is case insensitive. For example, this
means that the CALS table processor regards the tags <entry> and <Entry> as identical.
The processing of all recognised CALS table attribute names is case insensitive. For example, this
means that the CALS table processor regards the row tag attributes rowsep="1" and
Rowsep="1" as identical.
In DTD-less mode, TopLeaf refers to an internally defined CALS table DTD fragment that defines
these tags and a set of default attribute values.
These restrictions may have implications if you need to map CALS table elements or attributes.
See CALS table tag classifications for more details.
Unsupported features
The following features are not supported:
•
The tfoot element.
•
Separate colspec declarations within thead or tbody elements.
•
The ability to redefine columns within thead or tbody elements.
Page 174
Technical specifications
11.2.10 HTML table processing
TopLeaf supports a subset of the HTML table model DTD as defined at
http://www.w3.org/TR/REC-html40/struct/tables.html.
Implementation
The TopLeaf composition engine renders HTML tables incrementally — as table rows arrive —
rather than waiting for all the data before beginning to render each table.
Table width and alignment
The table width and align attributes cannot be used to specify a preferred width or alignment for
the entire HTML table.
Table directionality
The directionality of a table is either the inherited directionality (the default is left-to-right) or that
specified by the dir attribute for the TABLE element.
Table nesting
A table cell can contain another nested table subject to the following restrictions:
•
Cells in a header row may not contain tables.
•
Nested tables may have a header, but nested table header rows do not repeat if the table
breaks across a page or column.
•
The maximum depth of a nested table header is the data block depth less the minimum
table row depth.
Table frames
The table frame attribute specifies which sides of the frame surrounding a table will be visible.
The table border attribute is recognised and is processed in the following way:
•
Setting border="0" implies frame="void" and, unless otherwise specified,
rules="none".
•
Other values of border imply frame="border" and, unless otherwise specified,
rules="all"
•
If the border attribute is not explicitly declared, the default value of the rules attribute is
"none"
You cannot use the value of the border attribute to set the table border width.
Certain table frame requests may produce unexpected results. For example, the use of <table
frame="void" rules="rows" > will produce a ruleoff under each table row, including the last
row in the table.
Internal table rules
The table element rules attribute specifies which rules appear between cells within an HTML
table. The implied value of the rules attribute is "none". Unless otherwise specified, a non-zero
border implies rules="all"
A non-standard extension to the HTML table model recognises the colsep and rowsep attributes
within a <td> or <th> element. These attributes are analogous to the equivalent attributes within a
CALS <entry> tag. They can be used to declare the internal table column and row separator for
an individual table cell.
Individual mappings can control the way TopLeaf interprets the implied rules attribute value. This
is done by toggling the settings for Implied row/column separator is visible from the mapping Table
Page 175
User Guide
tab. The state of the implied column separator is used when processing vertical rules that appear
between table cells or column groups. The state of the implied row separator is used when
processing rules that appear below table cells or row groups.
Row groups
Table rows may be grouped into a table head and one or more table body sections, using the
thead and tbody elements. The tfoot element is not supported. The use of a tfoot block will
generate a non-fatal warning, and the block will be processed as a tbody block.
The table element attributes scope and headers are not supported.
Table columns
A table may contain optional col and colgroup elements to specify column widths and
groupings. If you do not specify a colgroup block or explicit col declarations then each table
column will be allocated a percentage of the available data column width.
TopLeaf applies the following rules when calculating the number of table columns:
1. If the table element contains colgroup or col elements, then the number of columns is
calculated by summing the following:
•
For each col element, take the value of its span attribute (default value 1).
•
For each colgroup element containing at least one col element, ignore the span
attribute for the colgroup element. For each col element within the colgroup take
the value of its span attribute (default value 1).
•
For each empty colgroup element, take the value of its span attribute (default value
1).
2. Otherwise, if the table element does not contain any colgroup or col elements, the
number of columns is calculated on the basis of what is required by the table cells for each
row processed as the table is incrementally rendered.
It is an error if a table contains colgroup or col declarations and the calculated number of
columns determined by steps 1 and 2 are not identical.
Because TopLeaf renders HTML tables incrementally, it is preferable that an HTML table defines
the number of columns and their widths before the first row of the table is processed. The simplest
way to do this is to specify the table columns using col or colgroup declarations.
Column widths
Column widths can be specified as a pixel value, a percentage, or a relative length. Percentage
(e.g. width="20%") and proportional (e.g. width="20*") specifications are resolved as a
percentage of the available measure (the space available after applying paragraph formatting).
A non-standard extension to the HTML table model permits the specification of column widths
using one of the following fixed measure units — pt (points), cm (centimeters), mm (millimeters), pi
(picas), in (inches), pc (treated as a synonym for pi) and dp (decipoints).
The column width is interpreted as a pixel value (px) if neither a proportion, relative length, or a
non-standard fixed unit is specified.
Measurements in px (pixels) are converted to an absolute measure using the current device
resolution. The <topleaf-properties/> directive can be used to set the device resolution.
Use of the special form width="0*" (zero asterisk) is not supported.
In the case where an HTML table does not define a set of col or colgroup declarations, the table
renderer will attempt to determine the column widths using the value of the width attribute in td
and th elements. Specifying column widths in this way can lead to malformed tables.
Page 176
Technical specifications
If the total requested width for all columns exceeds the available measure, TopLeaf will
proportionally reduce all table widths to ensure that the table fits within the block.
Cell margins
The table cellspacing, cellpadding, scope and header attributes are not supported.
Cell horizontal alignment
Explicit references to the char and charoff attributes may generate a warning when the table is
rendered. A value of align="char" is interpreted as align="right".
Cell vertical alignment
A non-standard extension to the HTML table model recognises the following vertical alignment
mode: step. A cell step alignment vertically aligns the first line of content in a cell with the last line
of content in the previous adjacent cell. See the <cell-properties/> directive for more details.
Cross page cell vertical spanning
Cell vertical spanning is supported. The typesetting engine will generate a fatal error if a cell
declares a negative vertical span. By default, a vertical span will not split across a page boundary.
Use the command <table-properties split-rows="yes"/> if you want a cell vertical span
to split across a page boundary.
Cross page row splitting
HTML tables that are allowed to continue across column or page boundaries will normally break
between table rows. When splittable table rows are enabled, a break across a column or page
boundary may also occur within a table row. See the <table-properties/> directive for more
details.
Tag processing
When HTML table processing is enabled the following elements are assumed to be components of
an HTML table structure:
•
table
•
caption
•
thead
•
tbody
•
tfoot
•
colgroup
•
col
•
tr
•
th
•
td
The processing of all recognised HTML table tags is case insensitive. For example, this means that
the HTML table processor regards the tags <td> and <Td> as identical.
The processing of all recognised HTML table attribute names is case insensitive. For example, this
means that the HTML table processor regards the attributes declared in the tags <table
border="1"> and <Table Border="1" > as identical.
In DTD-less mode, TopLeaf refers to an internally defined HTML table DTD fragment that defines
these tags and a set of default attribute values.
Page 177
User Guide
These restrictions may have implications if you need to map HTML table elements or attributes.
See HTML table tag classifications for more details.
11.2.11 Advanced SGML features
Features supported include:
•
INCLUDE, IGNORE and CDATA blocks
•
omitted end tags
Features not supported include:
•
RCDATA blocks are treated as CDATA
•
SHORTREF, SUBDOC, CONCUR, RANK
11.2.12 Attribute handling
The maximum length of an attribute value is 32,000 characters. Note that some characters are
expanded into character references internally, and the extra characters required for this are
included in this limit.
All attributes are treated as type CDATA, except that ENTITY attributes are expanded.
Default attribute values are honored. If the default is #IMPLIED, then the attribute is assigned the
value “#IMPLIED” as a literal string. The same applies to #CURRENT, #CONREF etc.
If there is no DTD, any missing attributes default to #IMPLIED.
11.2.13 Pseudo parameter entities
TopLeaf expands some strings of the form %_name; in attribute values as if they were parameter
entities.
Workaround: use %_name; instead.
11.2.14 OASIS catalog support
TopLeaf can use the catalog mechanism as described in OASIS Technical Resolution 9401:1997
(see http://www.oasis-open.org/specs/tr9401.html) to assist in the resolution of entity
references.
TopLeaf's support for the OASIS catalog mechanism is subject to the following restrictions:
•
The NOTATION, DELEGATE, BASE and OVERRIDE keywords are ignored.
•
TopLeaf will always use the public identifier to resolve an entity if it can.
•
References to unresolvable secondary catalog files will generate a non-fatal error.
XML catalogs are not supported.
11.2.15 Language support
TopLeaf can process content for Western, RTL, East Asian (CJK) and many other languages
provided the necessary fonts are installed on the host system. TopLeaf also provides support for
bidirectional processing.
11.2.16 Line breaking rules
TopLeaf applies language specific line breaking rules to determine the position at which a line
break may occur.
When processing languages that use white space to identify word breaks (for example, Western
European languages), a word break will only be used to end a line if the following character is
permitted at the start of the next line. The table below lists the characters that are not permitted at
the start of a line unless followed immediately by an alphabetic or numeric character:
Page 178
Technical specifications
Code
Name
U+0021
EXCLAMATION MARK
U+0025
PERCENT SIGN
U+0029
RIGHT PARENTHESIS
U+002C
COMMA
U+002E
FULL STOP
U+003A
COLON
U+003B
SEMICOLON
U+003F
QUESTION MARK
U+005D
RIGHT SQUARE BRACKET
U+007D
RIGHT CURLY BRACKET
U+00A8
DIAERESIS
U+00B0
DEGREE SIGN
U+00B7
MIDDLE DOT
U+00BB
RIGHT-POINTING DOUBLE ANGLE QUOTATION MARK
U+02C7
CARON
U+02C9
MODIFIER LETTER MACRON
CJK languages
The following characters are not permitted at the start of a line when processing Chinese,
Japanese, or Korean content:
Code
Name
U+0021
EXCLAMATION MARK
U+0025
PERCENT SIGN
U+0029
RIGHT PARENTHESIS
U+002C
COMMA
U+002E
FULL STOP
U+003A
COLON
U+003B
SEMICOLON
U+003F
QUESTION MARK
U+005D
RIGHT SQUARE BRACKET
U+007D
RIGHT CURLY BRACKET
U+00A8
DIAERESIS
U+00B0
DEGREE SIGN
Page 179
User Guide
Code
Name
U+00B7
MIDDLE DOT
U+00BB
RIGHT-POINTING DOUBLE ANGLE QUOTATION MARK
U+02C7
CARON
U+02C9
MODIFIER LETTER MACRON
U+2010
HYPHEN
U+2013
ENDASH
U+2014
EMDASH
U+2016
DOUBLE VERTICAL PRIME
U+2019
RIGHT SINGLE QUOTATION MARK
U+201D
RIGHT DOUBLE QUOTATION MARK
U+2022
BULLET
U+2025
TWO DOT LEADER
U+2026
HORIZONTAL ELLIPSIS
U+2032
PRIME
U+2033
DOUBLE PRIME
U+203C
DOUBLE EXCLAMATION MARK
U+2047
DOUBLE QUESTION MARK
U+2048
QUESTION EXCLAMATION MARK
U+2049
EXCLAMATION QUESTION MARK
U+2103
DEGREE CELSIUS
U+2236
RATIO
U+3001
IDEOGRAPHIC COMMA
U+3002
IDEOGRAPHIC FULL STOP
U+3003
DITTO MARK
U+3005
IDEOGRAPHIC ITERATION MARK
U+3009
RIGHT ANGLE BRACKET
U+300B
RIGHT DOUBLE ANGLE BRACKET
U+300C
LEFT CORNER BRACKET
U+300D
RIGHT CORNER BRACKET
U+300F
RIGHT WHITE CORNER BRACKET
U+3011
RIGHT BLACK LENTICULAR BRACKET
U+3015
RIGHT TORTOISE SHELL BRACKET
U+3017
RIGHT WHITE LENTICULAR BRACKET
Page 180
Technical specifications
Code
Name
U+3019
RIGHT WHITE TORTOISE SHELL BRACKET
U+301C
WAVE DASH
U+301E
DOUBLE PRIME QUOTATION MARK
U+301F
LOW DOUBLE PRIME QUOTATION MARK
U+303B
VERTICAL IDEOGRAPHIC ITERATION MARK
U+3041
HIRAGANA LETTER SMALL A
U+3043
HIRAGANA LETTER SMALL I
U+3045
HIRAGANA LETTER SMALL U
U+3047
HIRAGANA LETTER SMALL E
U+3049
HIRAGANA LETTER SMALL O
U+3063
HIRAGANA LETTER SMALL TU
U+3083
HIRAGANA LETTER SMALL YA
U+3087
HIRAGANA LETTER SMALL YO
U+308E
HIRAGANA LETTER SMALL WA
U+3095
HIRAGANA LETTER SMALL KA
U+3096
HIRAGANA LETTER SMALL KE
U+30A0
KATAKANA-HIRAGANA DOUBLE HYPHEN
U+30A1
KATAKANA LETTER SMALL A
U+30A3
KATAKANA LETTER SMALL I
U+30A5
KATAKANA LETTER SMALL U
U+30A7
KATAKANA LETTER SMALL E
U+30A9
KATAKANA LETTER SMALL O
U+30C3
KATAKANA LETTER SMALL TU
U+30E3
KATAKANA LETTER SMALL YA
U+30E5
KATAKANA LETTER SMALL YU
U+30E7
KATAKANA LETTER SMALL YO
U+30EE
KATAKANA LETTER SMALL WA
U+30F5
KATAKANA LETTER SMALL KA
U+30F6
KATAKANA LETTER SMALL KE
U+30FB
KATAKANA MIDDLE DOT
U+30FC
KATAKANA-HIRAGANA PROLONGED SOUND MAR
U+30FD
KATAKANA ITERATION MARK
U+30FE
KATAKANA VOICED ITERATION MARK
Page 181
User Guide
Code
Name
U+31F0
KATAKANA LETTER SMALL KU
U+31F1
KATAKANA LETTER SMALL SI
U+31F2
KATAKANA LETTER SMALL SU
U+31F3
KATAKANA LETTER SMALL TO
U+31F4
KATAKANA LETTER SMALL NU
U+31F5
KATAKANA LETTER SMALL HA
U+31F6
KATAKANA LETTER SMALL HI
U+31F7
KATAKANA LETTER SMALL HU
U+31F8
KATAKANA LETTER SMALL HE
U+31F9
KATAKANA LETTER SMALL HO
U+31FA
KATAKANA LETTER SMALL MU
U+31FB
KATAKANA LETTER SMALL RA
U+31FC
KATAKANA LETTER SMALL R
U+31FD
KATAKANA LETTER SMALL RU
U+31FE
KATAKANA LETTER SMALL RE
U+31FF
KATAKANA LETTER SMALL RO
U+FE4F
WAVY LOW LINE
U+FE50
SMALL COMMA
U+FE52
SMALL FULL STOP
U+FE54
SMALL SEMICOLON
U+FE55
SMALL COLON
U+FE56
SMALL QUESTION MARK
U+FE57
SMALL EXCLAMATION MARK
U+FE5A
SMALL RIGHT PARENTHESIS
U+FE5B
SMALL LEFT CURLY BRACKET
U+FE5E
SMALL RIGHT TORTOISE SHELL BRACKET
U+FF01
FULL-WIDTH EXCLAMATION MARK
U+FF02
FULL-WIDTH QUOTATION MARK
U+FF05
FULL-WIDTH PERCENT SIGN
U+FF07
FULL-WIDTH APOSTROPHE
U+FF09
FULL-WIDTH RIGHT PARENTHESIS
U+FF0C
FULL-WIDTH COMMA
U+FF0E
FULL-WIDTH FULL STOP
Page 182
Technical specifications
Code
Name
U+FF1A
FULL-WIDTH COLON
U+FF1B
FULL-WIDTH SEMICOLON
U+FF1F
FULL-WIDTH QUESTION MARK
U+FF3D
FULL-WIDTH RIGHT SQUARE BRACKET
U+FF40
FULL-WIDTH GRAVE ACCENT
U+FF5C
FULL-WIDTH VERTICAL LINE
U+FF5D
FULL-WIDTH RIGHT CURLY BRACKET
U+FF5E
FULL-WIDTH TILDE
U+FF60
FULL-WIDTH RIGHT WHITE PARENTHESIS
U+FF64
HALF-WIDTH IDEOGRAPHIC COMMA
U+FFE0
FULL-WIDTH CENT SIGN
U+FFE6
FULL-WIDTH WON SIGN
The following characters are not permitted at the end of a line when processing Chinese,
Japanese, or Korean content:
Code
Name
U+0028
EXCLAMATION MARK
U+003C
LESS THAN
U+003F
QUESTION MARK
U+005B
LEFT SQUARE BRACKET
U+005C
BACKSLASH
U+007B
OPEN CURLY BRACKET
U+00AB
LEFT POINTING DOUBLE ANGLE QUOTATION MARK
U+2018
LEFT SINGLE QUOTATION MARK
U+201C
LEFT DOUBLE QUOTATION MARK
U+2035
REVERSE PRIME
U+3008
LEFT POINTING ANGLE BRACKET
U+300A
LEFT DOUBLE ANGLE BRACKET
U+300C
LEFT CORNER BRACKET
U+300E
LEFT WHITE CORNER BRACKET
U+3010
LEFT BLACK LENTICULAR BRACKET
U+3014
LEFT TORTOISE SHELL BRACKET
U+3016
LEFT WHITE LENTICULAR BRACKET
Page 183
User Guide
Code
Name
U+3018
LEFT WHITE TORTOISE SHELL BRACKET
U+301D
REVERSED DOUBLE PRIME QUOTATION MARK
U+FE59
SMALL LEFT PARENTHESIS
U+FE5B
SMALL LEFT CURLY BRACKET
U+FE5D
SMALL LEFT TORTOISE SHELL BRACKET
U+FF04
FULL-WIDTH DOLLAR SIGN
U+FF08
FULL-WIDTH LEFT PARENTHESIS
U+FF0E
FULL-WIDTH FULL STOP
U+FF10
FULL-WIDTH ZERO
U+FF11
FULL-WIDTH ONE
U+FF12
FULL-WIDTH TWO
U+FF13
FULL-WIDTH THREE
U+FF14
FULL-WIDTH FOUR
U+FF15
FULL-WIDTH FIVE
U+FF16
FULL-WIDTH SIX
U+FF17
FULL-WIDTH SEVEN
U+FF18
FULL-WIDTH EIGHT
U+FF19
FULL-WIDTH NINE
U+FF3B
FULL-WIDTH LEFT SQUARE BRACKET
U+FF5B
FULL-WIDTH LEFT CURLY BRACKET
U+FF5F
FULL-WIDTH LEFT WHITE PARENTHESIS
U+FFE6
FULL-WIDTH WON SIGN
RTL languages
The following characters are not permitted at the start of a line when processing RTL content:
Code
Name
U+060C
ARABIC COMMA
U+061B
ARABIC SEMICOLON
11.2.17 Soft hyphens
TopLeaf processes all soft hyphens (Unicode code point U+00AD) declared within a word as
invisible zero-width formatting characters that indicate a preferred line break position. Any soft
hyphen that is not followed by a character identified by Unicode as a letter is processed by the
composition engine as a hard hyphen (Unicode code point U+002D) .
Page 184
Technical specifications
11.2.18 Spaces
The following table lists the space, non-breaking space, and fixed width spaces recognised by
TopLeaf. All fixed space widths are expressed as a fraction of an em (nominally, the font point
size):
Code
Name
Width
U+0020
SPACE
The width of an interword space is determined by the
current minimum and maximum interword space width.
U+00A0
NO-BREAK SPACE
The non-breaking counterpart of a SPACE (U+0020).
U+2002
EN SPACE
1/2 em
U+2003
EM SPACE
1 em
U+2004
3-PER-EM SPACE
1/3 em
U+2005
4-PER-EM SPACE
1/4 em
U+2006
6-PER-EM SPACE
1/6 em
U+2007
FIGURE SPACE
1/2 em
U+2008
PUNCTUATION SPACE
width of a FULL STOP (U+002E) in the current font.
U+2009
THIN SPACE
1/4 em
U+200A
HAIR SPACE
1/8 em
U+200B
ZERO WIDTH SPACE
0
U+200C
ZERO WIDTH NONJOINER
0
U+202F
NARROW NO-BREAK
SPACE
1/2 em to the current maximum interword space width.
U+205F
MATHEMATICAL SPACE 1/4 em
U+2060
WORD JOINER
0
Note:
In TopLeaf, the width of a thin space (U+2009) is equal to the width of a 1/4 em space. The
Unicode standard defines the width of a thin space as being either 1/5 em or 1/6 em. You can
redefine the width of a thin space if this is a requirement of your document style.
11.2.19 Unicode support
When rendering Unicode characters:
•
Only characters in the Basic Multilingual Plane are recognised.
•
The Unicode formatting characters U+2028 (line separator) and U+2029 (paragraph
separator) are ignored.
•
Within RTL content, combining characters are merged with the corresponding base
character. Within LTR content, combining characters are rendered correctly, but are not
merged with the corresponding base character.
•
TopLeaf does not support the use of characters in the Unicode control code range U+0080
to U+009F (the C1 control range). Any use of these characters will give indeterminate
Page 185
User Guide
results in the rendered output.
11.3 Implementation
The following specifications are supported when you run TopLeaf. Actual limits and performance
will depend on your computer's configuration. The composition engine may generate a fatal error if
you exceed these limits.
11.3.1 Partition
Attribute
Maximum
Number of pages
32,000
Number of leaf groups or leaf sections
32,000
Number of releases
999
11.3.2 Mappings
Attribute
Maximum
Number of tag and custom marker mappings 32,000
Length of a Tag-In-Context path or a Custom 240 characters
Marker name
Length of an Attribute Selector path
240 characters
Number of user variables
256,000
User variable or system variable string length 32,000 characters
Assigned user variable integer value
± 2,000,000
Assigned user variable measure
32,760 decipoints (approximately 115.5cm, or 45.5
inches)
Length of scanned captured content
2,000,000 characters
Length of a start tag or end tag user
customization
32,000 characters
11.3.3 Layout
Attribute
Maximum
Number of page layouts in a single style
sheet
100
Number of data columns per page layout
9
Number of fixed blocks or fixed rules per
page layout
32,000
Maximum page width
32,760 decipoints (approximately 115.5cm, or 45.5
inches)
Page 186
Technical specifications
Attribute
Maximum
Maximum page depth
32,760 decipoints (approximately 115.5cm, or 45.5
inches)
Maximum length for a content name or page
type name
32 characters
Number of rendered lines per page
32,000
Length of rendered line
32,000 characters
11.3.4 Typesetting structures
Attribute
Maximum
Table nesting
1 (CALS), 9 (HTML)
Number of table columns
1000
Number of table rows
32,000
Number of times a table row may split (if
table row splitting is enabled)
Any
Table header depth
Data block depth less minimum table row depth
Auto repeating table headers
1 (the table header from the outermost table will be
repeated if the table spreads over multiple data
columns)
Active running heads
5
Active data telltales
10
Column footnotes per page layout
1000
Number of times a column footnote may split 1
(if column footnote splitting is enabled)
Page footnotes per document
1000
Number of times a page footnote may split (if Any
page footnote splitting is enabled)
Number of floats per document
32,000 characters
Maximum depth of an unsplittable page
footnote
Page depth less minimum data block height
Maximum depth of a sidenote, running head, Data block depth
or float
Maximum depth of bound content
Data block depth
Length of a XML start or end tag (tag name,
and all explicitly declared attributes)
32,000 characters
Length of a running head, note or float
2,000,000 characters
Length of a TOC, Index or XREF entry
32,000 characters
Default page assembly timeout interval
180 seconds
Page 187
User Guide
11.3.5 Custom content
The content of a user defined mapping customization must be a text string or well-formed XML
fragment. Because pre-content and post-content customizations are parsed separately, any
custom marker container opened within a mapping customization must be closed within the same
customization.
Each mapping customization is processed as mixed content. This means that all keyed white space
characters will be honored, with multiple white spaces collapsing to a single space .
11.3.6 Notes and floats
When the depth of a column float exceeds the maximum available float depth, TopLeaf will attempt
to split the float into two or more separate floats. The content of the split float will be rendered over
as many columns as needed to hold the material, after which the normal text will resume. TopLeaf
will generate a non-fatal error if an oversized float cannot be split.
11.3.7 Page size and measures
You can use centimetres, millimetres, or picas to specify and display the values shown in each
Topleaf style sheet management dialog. TopLeaf automatically converts all values to decipoints,
and this may result in a slight loss of accuracy. Choose points or decipoints if you need to use the
full accuracy of the program.
11.3.8 Input leaf comparison
Full looseleaf publishing works by allocating the document content to one or more document
leaves. When the document is modified, TopLeaf compares the content of each leaf with the
content of the same leaf in the previous release. Any leaf containing changed content is marked for
inclusion in the release.
The following rules apply when determining the changed leaf set:
•
The content and rules defined within any associated document schema, or internal and
external DTD subset is ignored;
•
Tag attributes, if present, are compared in lexicographic order;
•
Empty elements are compared as a start tag / end tag pair;
•
Whitespace within attribute values is normalized;
•
Character references are normalised;
•
References to ISO 8879 entities are resolved to an equivalent Unicode code point value;
•
Changes within XML content referenced via entities are ignored;
•
Changes within comments and processing instructions are ignored.
White space is only regarded as significant if it follows non white space content declared at the
same tag level. All other white space is ignored.
Note:
Some aspects of canonicalization may not be applied to tags that declare a namespace.
11.3.9 Output page comparison
When comparing two pages, TopLeaf looks at sequences of text, rules and graphics within a page
difference area defined in the Layout Editor.
Two pages are considered equal when they contain the same content in the page difference area,
and each piece of content is at the same vertical and horizontal positions on both pages.
Graphics are considered to be equal if the filename parts (ie. excluding the folder path) of their
paths are equal. The contents of the graphic files are not tested. One way to ensure that TopLeaf
Page 188
Technical specifications
tracks changes within graphic images is to include some form of versioning information along with
the reference to the graphic (for example, the name of the graphic could include the graphic version
number).
Color is not considered when comparing text and rules.
Hyperlink information (jumps and targets) is ignored during comparison.
11.3.10 Partition releases
A partition release is defined when a partition is first created and then each time you create a new
update. Each release is stored within a partition release folder. The release folder contains a copy
of the rendered output pages and a copy of all images referenced from those pages. Releases for
full looseleaf partitions and copy partitions also include a copy of the document source content.
While a partition can define up to 999 releases, only the last two — corresponding to the update
release and the published release — are directly accessible from the TopLeaf workstation and
TopLeaf API. Full looseleaf partition and change pages partitions must contain at least two
partition releases.
In the TopLeaf workstation, the maximum number of versions stored within a partition is set by the
value of the Keep releases partition property. The TopLeaf API Pack partition function can be used
to reduce the number of releases stored within a partition to a preferred minimum.
11.3.11 Page assembly
Page timeout interval
The typesetting engine will force an error exit if any individual page is not assembled within the
page assembly timeout interval. The default timeout interval is 180 seconds. You may need to
increase the timeout interval if your TopLeaf stylesheet processes a large number of mappings,
for example if your style sheet loads a included Xref table before rendering the content of the first
page.
Page output layering order
Each page generated by TopLeaf may contain any or all of the following components:
•
Filled regions;
•
Images;
•
Ruled lines;
•
Text characters.
When TopLeaf is requested to print or create a PDF for a page, these components are processed
in a fixed order. Text characters will always be rendered last, so they will appear on top of other
content.
11.3.12 Fonts
Type 1 fonts
Type 1 fonts are only partially supported on Windows Vista and Windows 7. To install a Type 1 font,
you will need a PFM and PFB file for the font. Both files must be present within the Windows Font
folder. Note that Windows XP will automatically create a PFM file when you install a Type 1 font,
but Windows Vista and Windows 7 do not. If possible, it is recommended that you convert to the
more modern TrueType format to make these fonts available for use in TopLeaf. Contact
[email protected] if you required additional information.
Page 189
User Guide
OpenType fonts
OpenType fonts are only partially supported. If you choose to use these fonts you must test that
they work correctly and have the character set that you require. Turn-Key Systems accepts no
responsibility for problems caused by the use of OpenType fonts.
11.3.13 Images
Bitmap images in SVG images
An SVG image can contain embedded bitmap images. TopLeaf supports the PNG and JPEG
formats for embedded images, as required by the SVG 1.1 recommendation. Using other formats
for embedded bitmaps may cause PDF creation to fail.
TIFF images
Not all TIFF image formats are supported. As a workaround, convert the image to an alternative
format (for example, PNG).
11.4 Known issues
This section describes application specific issues you may need to be aware of. If you encounter a
problem not covered in this chapter, please send details to [email protected].
11.4.1 Repository
Common drive letter
TopLeaf resolves repository paths into a standard Windows pathname including drive letter. Users
accessing the repository across a network will experience problems if they use a different drive
letter or folder path to access the root level of a shared TopLeaf repository.
Workaround: always access a shared TopLeaf repository using a fixed drive letter and/or folder
path.
Repository folder name
The TopLeaf repository is a directory hierarchy beginning with a single root folder. The location of
the repository is set in File » Preferences tab.
On Windows systems, a TopLeaf repository folder name may include space characters, but when
this occurs, the TopLeaf API will reference the repository folder using the equivalent Windows 8.3
short file name. On Unix systems, the repository folder name can not include space characters.
Page comparison
The pages generated for the initial release of a full looseleaf or change pages partition reference
embedded graphics using absolute file paths. As a consequence, users accessing the repository
across a network will experience problems when output differencing these pages.
Workaround: ensure that all images referenced in an initial release are accessible from a common
absolute folder path.
11.4.2 Publication stylesheets
There is a known problem when a publication contains looseleaf and non-looseleaf partitions that
share TopLeaf stylesheets created by the Map, Notes, and Header & Footer managers.
The fault occurs when a non-looseleaf tag mapping requests a forced end of page. If the stylesheet
is subsequently used to process a looseleaf partition, the end of page request generates an error.
Page 190
Technical specifications
Workaround: Do not create publications that contain looseleaf and non-looseleaf partitions.
11.4.3 Undoing changes to style sheets
There is a known problem when undoing changes made to TopLeaf stylesheets created by the
Map, Notes, and Header & Footer managers and where the stylesheets are shared by more than
one partition.
The fault occurs if you make stylesheet alterations using one partition and then open another
partition and try to undo the stylesheet changes. The problem occurs because the undo state is
held as a property of a partition, and not as a property of the style sheet.
Workaround: Do not make style sheet alterations using one partition and then open another
partition and try to undo the style sheet changes.
11.4.4 Full looseleaf
Graphics
References to graphics are considered to be unchanged if the filename parts (ie. excluding the
folder path) of their paths are equal. This can mean that a leaf that references a changed image will
not be detected as changed unless another, possibly unrelated change to that leaf occurs, or the
leaf is manually included within a release. You can ensure that TopLeaf tracks changes within
graphic images by including versioning information along with the reference to the graphic.
Custom tables
By default, TopLeaf associates the document content consumed when constructing a custom
table row with the rendered custom table row. If the content of a custom table row is emitted from a
tag positioned immediately before a leaf boundary, use the command <table-nextrow leafcount="no" /> to force TopLeaf to associate any consumed content with the next rendered
object (this may not necessarily be the custom table row).
Renaming partitions
You must never rename a full looseleaf partition after publishing the first issue (called the
mainwork) . When the mainwork is published, the name of the partition is effectively frozen — no
further changes are permitted.
11.4.5 Custom content
Use of ^ in custom content
The use of the ^ (Unicode U+005E) character is not permitted within custom content. Attempting to
do so will result in a character entity being substituted for the offending character.
Workaround: use the ^ entity.
Use of > in custom content
The use of the > (Unicode U+003E) character is not permitted within custom content. Attempting to
do so will result in a character entity being substituted for the offending character.
Workaround: use the > entity.
Page 191
User Guide
11.4.6 Paragraphs
Merging paragraphs
A request to merge with following paragraph signals that an end tag and the immediately
following content should be processed within the same paragraph. The merge request will be
ignored if the following content:
•
cancels the merge;
•
applies a page change;
•
inserts a content break;
•
identifies the end of a leaf run or the start of a leaf group;
•
declares a table, table row, or table cell;
•
starts a box or inserts a horizontal rule.
11.4.7 Tables
Table spacing
If a table is positioned immediately within a box, then the vertical space above the table is
determined by the sum of the box style top text indent and the above space declared by the
current table style. Otherwise, the vertical space above the table is the larger of the above space
declared by the current table style and any pending inter-paragraph space.
Table headers
The outermost table header is automatically repeated at the top of each column or page boundary
that occurs within the scope of a table.
Row styling within table headers and vertical spans
When rendering a multi-row table header, or within rows containing table cells that span more than
one row, TopLeaf applies a built-in transform to the table header or spanned content before
processing the rows as a single unit. Only the first row in this unit is used for styling purposes;
mappings for the other rows are ignored.
For example, the following CALS table declares a vertical span:
<table><tgroup cols="2"><tbody>
<row outputclass="red"><entry>A</entry><entry
morerows="1">B</entry></row>
<row outputclass="blue"><entry>C</entry></row>
</tbody></tgroup></table>
The row mapping sets the background color using the outputclass attribute. In this case the entire
table will have a red background color, because the mapping for the second row element is
ignored.
Cell occurrence
It is not possible to map table cell occurrence within multi-row table headers or within rows
containing table cells that span more than one row.
11.4.8 Boxes
Box margins
The placement rules applied to a box are defined by the current margins and the content
immediately adjacent to the top and bottom of the box. This may not always give the expected
result.
Page 192
Technical specifications
Consider the following data:
<doc>
<box>
<item><label>1.</label>First.</item>
<item><label>2.</label>Second.</item>
</box>
</doc>
If the mapping for <item> sets a left margin, the box drawn by the <box> mapping will not enclose
the label content:
To solve this problem, emit some content in the pre-content box of the mapping for <box>. For
example, a custom marker containing a non-breaking space, with the custom mapping setting a
small font size.
Box spacing
If a box begins with tabular content, then the vertical space above the box is determined by the box
style above spacing. Otherwise, the vertical space above the box is the larger of the above space
declared by the current box style and any pending inter-paragraph space.
Nested boxes
The restriction that the only valid box nesting is an unbreakable within a breakable is difficult to
enforce. Attempts to circumvent this restriction usually give rise to unpredictable effects and can
abort the typesetting run. The typesetting engine will generate a non-fatal error if the calculated
vertical offset for the start of a breakable box and an unbreakable box is identical.
Breakable boxes
The following restrictions apply to breakable boxes:
•
Breakable boxes cannot be used within unbreakable boxes.
•
Breakable boxes cannot be used within table cells.
•
Breakable boxes cannot be used within fixed blocks.
•
If a box does break, the frame may not extend all the way to the bottom of the page.
Fixed block box frames and fill patterns
The following restriction applies to fixed block frames and fill patterns:
•
If a fixed block mapping applies a box or fill pattern, then the associated fixed block must
emit content before the box or fill is displayed. The simplest way to add non-visible content
to a fixed block is to declare a non-breaking space ( ) within the fixed block custom
content.
Header & Footer boxed content
The depth of a box generated by a Header/Footer mapping is determined by the height of the
header or footer defined in the page layout, not by what it contains. If the height of a header or
footer block exceeds the depth of the content in that block, TopLeaf will vertically centre the content
within the block.
Page 193
User Guide
11.4.9 Fonts
Font characteristics
The Frame, Reverse and Overbar cannot be applied to the content emitted by the following
commands:
•
<folio/>
•
<link-folio/>
11.4.10 Images
Filename characters
Images with filenames that contain characters outside of the range U+0020 to U+007F cannot be
referenced from Windows TopLeaf installations.
11.4.11 PDF
Link destinations
The value #IMPLIED cannot be used as a PDF link destination. TopLeaf does not distinguish
between this value and a missing attribute.
URI schemes
The TopLeaf PDF builder recognizes the following URI schemes when processing references to
external link targets:
•
http:
•
https:
•
mailto:
•
file:
•
ftp:
11.4.12 Secondary output transformations
Typefaces and Fonts
The font characteristics: reverse and frame are not supported.
If a typeface selection scheme is referenced in a mapping the converter will use it to determine
the typeface to use. For HTML secondary transforms, all of the typeface names are used in the
CSS style. For RTF transforms, only the one typeface name is used.
Images
The supplied output plugins for the secondary output transformations do not attempt any significant
processing of images. In general, images are included as is, so properties such as rotation will not
be honored. The image may not appear at all if it is in a format that the output medium does not
support. For example, TIFF graphics generally won’t appear in HTML output because most
browsers don’t support this format.
The architecture of the transformation mechanism allows additional or modified plugins to be
created to modify images as required. See the Transform Manual in the Programmer
Documentation for more information.
Tables
Nested tables are only partially supported in secondary output transformations.
Page 194
Technical specifications
Some of the advanced features of CALS tables, such as multiple tgroup elements and entrytbl
elements, cannot be represented in HTML or RTF tables.
Some table formatting such as rule colors and background shading are not supported in all output
formats.
TopLeaf does not support the use of HTML and CALS table models within the same document.
Headers and Footers
Headers and Footers are not written to secondary outputs.
Sidenotes
Sidenotes are not written to secondary outputs.
Footnotes
When images are included in the text of a footnote, the RTF produced by the secondary output
transformation causes some versions of Microsoft Word to crash. The RTF can be successfully
read by WordPad and OpenOffice.
Fills
Fills (dot fill, space fill and rule fill) are not supported in HTML output.
RTF supports fills subject to some restrictions. Only one type of fill is supported in a paragraph (for
example, a paragraph cannot contain both space and rule fills). RTF output will contain at most one
fill object per line, unlike TopLeaf paginated output which may contain several fills in a line.
Text Direction
Right-to-left text is not supported.
11.4.13 Running heads
Running heads are cancelled when the page type changes. As a consequence, their use is not
recommended for layouts that create multiple page types on a page (for example, mixing single and
double column on the same page).
11.4.14 Automatic link targets
The generated content files contain markup that can be used to create a link to the content that
produced the generated item. If no appropriate target can be found for the link an automatic target
is created. The name for an automatic target is constructed by using the input file name and the
number of tags that have been processed. In order for automatic targets to work correctly the
following must be satisfied:
•
The name of the input file must not change from one composition pass to the next.
•
The number of tags processed must be the same in the pass that creates the generated file
and the pass that read it. Additional composition passes may be required to satisfy this
requirement.
The use of automatic link targets should be avoided when using output page differencing in a
looseleaf publication.
These restrictions can be avoided by creating explicit target identifiers in the Content tab of the
mappings. An explicit target will be used in preference to an automatic target if it occurs at the
same vertical position on the page. One way to ensure this is to create the explicit target in the
same mapping that produces the generated content.
Page 195
User Guide
Another way to avoid the need for automatic targets is to include the link information in the
generated content itself. For example, to include a target in a table of contents entry you could put
the following in the custom content of the mapping for a title:
<Toc1><Target id="{LevelId}"/><content/></Toc1>
where the %Toc1 mapping assigns its content to a top-level TOC entry and the LevelId variable
contains the identifier for the level. The mapping that processes the level should create an explicit
target for the TOC link to use.
To assist with avoiding problems related to automatic targets, an idtype attribute with value auto is
added to each element in a generated file that refers to an automatic target.
11.4.15 Temporary files folder
TopLeaf references your default temporary files folder to hold temporary files. If you are running
TopLeaf via a system service (for example, from a Java based TopLeaf client/server application)
then TopLeaf may fail to start if it cannot locate the temporary files folder, or does not have
permission to create one or more temporary files within that folder.
Workaround:
1. Create a temporary files folder for TopLeaf (for example, at C:\temp)
2. Declare the environment variable TMPDIR path with the value of this temporary files folder
Page 196
Third Party software requirements
12. Third Party software requirements
This chapter lists details for features of TopLeaf that require the installation of one or more third
party software applications.
A Java™ runtime must be installed in order to use TopLeaf. The location of the Java runtime is set
in the TopLeaf workstation Preferences dialog.
A copy of Java™ is not included in the TopLeaf distribution.
12.1 GhostScript
You must install a copy of GhostScript if you intend to view or print EPS or PDF images.
There are a number of versions of GhostScript available. Releases of GPL GhostScript made prior
to 2004 were part of the GNU project and were titled GNU Ghostscript (GNU version 6 or higher is
required).
A copy of GhostScript is not included in the TopLeaf distribution.
12.1.1 GhostScript location
The location of GhostScript is determined in the following way.
•
If the environment variable TLGSPATH is defined, its value specifies the full path to a
folder containing the GhostScript executable. You must declare this variable if you want
TopLeaf to select a specific version of GhostScript and more than one version of
GhostScript is installed on your system.
For example: TLGSPATH="C:\Program Files\gs\gs8.54\bin"
Otherwise, TopLeaf will attempt to locate GhostScript by searching the registry:
•
If GPL GhostScript is installed, TopLeaf will use the registry key
HKEY_LOCAL_MACHINE\SOFTWARE\GPL Ghostscript to resolve the full path to the
GhostScript executable.
•
Otherwise, if AFPL GhostScript is installed, TopLeaf will use the registry key
HKEY_LOCAL_MACHINE\SOFTWARE\AFPL Ghostscript to resolve the full path to the
GhostScript executable.
•
Otherwise, if GNU GhostScript is installed, TopLeaf will use the registry key
HKEY_LOCAL_MACHINE\SOFTWARE\GNU Ghostscript to resolve the full path to the
GhostScript executable.
12.2 EPS image files
TopLeaf requires GhostScript to be installed in order to process EPS images.
For PDF output you can use an image filter in the pdf profile to use a different EPS converter.
TopLeaf will process EPS image files that conform to the document structuring conventions
described in the Encapsulated PostScript File Format Specification. To be considered a
conforming EPS image, an EPS file must describe a single page document that fully conforms to
the PostScript Document Structuring Conventions Specification version 3.0 or later. It is the
user's responsibility to ensure that any referenced EPS image conforms to these specifications.
EPS images that do not conform to these specifications cannot be processed by TopLeaf.
At the very least, this means that a referenced EPS image must include:
1. An EPS document prolog that declares the following DSC header comments:
%!PS-Adobe-3.0 EPSF-3.0
Page 197
User Guide
%%BoundingBox:llx lly urx ury
2. An EPS document script that declares a complete representation of the document page.
3. An end of a document %%EOF comment that marks the end of the EPS content.
12.2.1 Calculating the size of an EPS image
The %%BoundingBox declares a rectangular clipping region that fully encloses the content defined
by the EPS image. TopLeaf uses the bounding box to determine the EPS image size.
12.2.2 Unexpected font substitution within EPS graphics
When you include an EPS image created from another application (for example, Adobe
PageMaker, Illustrator, or QuarkXPress) TopLeaf may substitute fonts in the EPS graphic with
another font such as Courier or Helvetica.
This can occur if the EPS image references a font that is not installed on your system. In general,
you can avoid this problem by including all of the fonts required by the EPS image within the EPS
file, or by converting the text in the EPS to outlines.
12.3 PDF image files
12.3.1 Restrictions
TopLeaf cannot read PDF documents that are encrypted or otherwise protected by a DRM (Digital
Rights Management) system.
Only the page content of an imported PDF is copied. Annotations (bookmarks, hyperlinks,
comments etc.) are ignored.
12.3.2 Calculating the size of a PDF image
If you decide to include PDF graphic images within a document processed by TopLeaf, it is
important to remember that only the first page of the PDF can be included, and that you may need
to take steps to include the appropriate part of the page.
To select the appropriate part of the image you can use one of the following boundary boxes that
can be defined on a PDF page.
The media box defines the boundaries of the physical medium on which the page is to be printed. It
may include any extended area surrounding the finished page for bleed, printing marks, or other
such purposes. It may also include areas close to the edges of the medium that cannot be marked
because of physical limitations of the output device. Content falling outside this boundary can
safely be discarded without affecting the meaning of the PDF file.
The crop box defines the region to which the contents of the page are to be clipped (cropped) when
displayed or printed. Unlike the other boxes, the crop box has no defined meaning in terms of
physical page geometry or intended use; it merely imposes clipping on the page contents.
However, in the absence of additional information, the crop box determines how the page’s
contents are to be positioned on the output medium. The default value is the page’s media box.
The art box is an arbitrary region that can be used to identify the important part of the page.
The following list describes the precedence rules that TopLeaf uses to determine the dimensions of
an embedded PDF image:
•
•
If the art box dimensions are defined, then Topleaf will use these to determine the extent of
the page content;
If the crop box dimensions are defined, then Topleaf will use these to determine the extent
of the page content;
Page 198
Third Party software requirements
•
otherwise, TopLeaf will use the media box dimensions to determine the extent of the page
content.
You can use the <image-properties/> directive to override this behavior and select a preferred
PDF image bounding box.
Unfortunately, there is no hard and fast rule as to which of these boundary types is the most
suitable for a particular PDF image. Often, the media box specifies the target page dimensions (for
example, A4 or Legal), this means that the selected image dimensions can include a considerable
amount of surrounding white space, whereas the crop box usually describes the portion of the page
that contains the true page content.
It must be noted that the crop box and art box are optional PDF features that may not be present in
all PDF files. In some cases, the TopLeaf PDF image processor can produce unexpected image
clipping when rendering PDF images that rely on the PDF art box to declare the dimensions of the
true page content.
It is the user's responsibility to ensure that if an embedded PDF image declares any of these
boundary types, then the declared dimensions properly describe the portion of the page that
contains the true page content. If rendering a PDF image produces an unexpected result, use an
alternative scalable graphic format, such as EPS or SVG.
12.4 SVG image files
SVG content is processed using software developed by the Apache Software Foundation.
TopLeaf automatically converts references to external SVG content to bitmap images in the page
preview and when creating print output.
For PDF output you can use an image filter in the pdf profile to use a different SVG converter.
SVG content must be referenced from separately stored SVG document files. TopLeaf does not
support the direct processing of embedded SVG content.
SVG image processing requires that a Java™ runtime be installed. The location of the Java runtime
is set in the TopLeaf workstation Preferences dialog
Processing an SVG image can require a large amount of memory, particularly when converting to a
bitmap version with a large resolution (dpi). If conversion fails, try increasing the limit on available
memory using the preferences or the TLJAVA_ARGS environment variable.
12.4.1 Calculating the size of an SVG image
During composition, TopLeaf reads the SVG to determine its size. It scans the file for an <svg> tag
that either has both the width and height attributes, or has the viewBox attribute. Note that if
you have nested svg elements and the outermost one does not specify a size, TopLeaf will
calculate an incorrect size. SVG images of this form are not suitable for use by TopLeaf.
If both the width and height attributes are present, TopLeaf will use them to calculate a natural
size for the graphic (see Image Size in the Mapping Guide). For this purpose, any unit that does
not have a constant size (for example, pixels) will be treated as points. This means that “72px”,
“72pt” and “1in” all produce the same result (one inch).
When either or both of the width and height attributes are missing, TopLeaf uses the width and
height values in the viewBox attribute. These are always interpreted as a number of points. The “x”
and “y” components of the viewBox value are ignored.
12.5 PDFlib+PDI
Please refer to the legacy PDF builder documentation. This can be downloaded from
http://www.turnkey.com.au/tksweb/PDFs/TL7LG.pdf.
Page 199
User Guide
13. Glossary
alignment
The horizontal placement of text in a paragraph. The four available alignments are: left, right,
center and justify. TopLeaf provides two additional alignments (inside and outside) for fixed
blocks only.
ancestor
In the XML hierarchy, any element which contains the current element.
API
Application Programming Interface. A mechanism by which third party applications can access
many of the functions of the TopLeaf typesetting system.
attribute
A means of conveying additional information or metadata within a tag. Each attribute consists of a
name="value" pair (e.g. <emph style="bold">).
baseline
A notional line on which characters and images are positioned.
binding
A typesetting action which forces a group of lines to be rendered together on the same
page/column. If there is insufficient vertical space available then the whole group must be taken
over to the following page/column.
block
Rendered text corresponding to the content of a block element with paragraph breaks above and
below. May be empty and may contain sub-blocks. See also fixed block.
block element
An element whose content is rendered as one or more paragraphs.
booklist
A file maintained within a TopLeaf partition containing links to the source XML for that partition.
box
A region of text surrounded by a rectangular frame. The appearance, position, shading and other
aspects of the box can be controlled via mappings.
CALS
TopLeaf supports the CALS table model via a set of predefined mappings for tags such as
<tgroup>, <colspec>, <row> etc.
cell
The lowest level container of a table. Each row consists of a number of cells. Cells are marked with
the <entry> element in CALS tables, while HTML tables use <th> and <td> for header and data
cells respectively.
change pages
Along with full looseleaf, one of the looseleaf methods supported by TopLeaf. Change pages is
designed to minimize the size of the final document after each update is applied and is normally
driven by changes to the printed output.
change bar
A margin rule set to indicate recently added/changed material.
Page 200
Glossary
child
In the XML hierarchy, an element which is immediately enclosed by the current element.
command
A construct similar to an XML element, which can be used within custom content to access
TopLeaf functions not available via the dialogs. For example:
<rule width="2pc"/>
content model
In TopLeaf this term refers to how whitespace in the content of an element is handled. Available
models are Element (ignore whitespace); Mixed (collapse whitespace to a single space); and
Preserve (honor all whitespace).
crop box
A crop box is intended for publications where the final size of the paper is smaller than the paper
that is initially printed. In other words, the paper is cropped after printing to remove the unwanted
parts
CSS
Cascading Style Sheets: a form of stylesheet used widely on the Internet. TopLeaf has some
features in common with CSS, but CSS is directed towards screen display rather than paginated
output.
custom content
Content specified in a mapping to be generated immediately before or after the normal element
content. It can contain text, custom markers and/or commands.
custom marker
A construct similar to an XML element, which can be used within custom content to augment the
markup present in a document. It can be mapped just like a normal element. Custom markers are
defined by the user and generated as required to trigger appropriate actions in the typesetting, but
have no effect on the actual source document.
custom table
A custom table is a structure that maps individual elements directly into a tabular format that
conforms to the underlying publication table model.
data area
An area of the output page which contains data columns, and their associated sidenotes and
margin rules.
data column(s)
One or more rectangular blocks on the output page which is filled by material from the input
stream along with any required notes. Specifically excludes fixed blocks.
data flow / input stream
The natural flow of text and markup as the source document is processed. The term input
stream refers to the XML source material being fed to TopLeaf, while data flow is the
corresponding flow of material into columns of output. In a typical output page there are three
classes of material:
•
Normal text and graphics, which appear in the input stream and are rendered in the same
order in the output data columns.
•
Notes (e.g. footnotes, floats), which appear in the input stream but whose
presence/placement is determined by the output layout (e.g. where a column ends). Thus
they affect, and are affected by, the data flow but are not part of it.
•
Material which is neither part of the input stream nor of the data flow (e.g. fixed blocks).
In addition to the above, TopLeaf has facilities for suppressing, saving and re-using material from
the input stream. This allows the order of material in the output document to vary significantly from
Page 201
User Guide
the source document if required, and also allows the creation of secondary documents (e.g. table of
contents, index).
decipoint
One tenth of a point (720dp = 1 inch = 2.54cm). This is the default unit for measures in TopLeaf.
derived change
Occurs when a looseleaf page is included in a release due to a change to the other page of the
same leaf or in the publication stylesheet.
descendant
In the XML hierarchy, any element contained within the current element.
differencing
Comparing the same page from different releases of the same publication, in order to locate new,
changed or deleted material. TopLeaf allows differencing to be limited to a specific difference area
of the page. This means that changes to headers that declare a release date will not be identified
as different.
DITA
Darwin Information Typing Architecture. A form of XML markup in which documents are built up
from small reusable topics.
DTD
Document Type Definition. A set of rules which specify what an SGML or XML document may
contain. The DTD defines the elements and entities which may be used in a document and it also
controls the order and context in which the elements may be used.
element
In XML, an element is a specific portion of a document. It consists of a start tag, an end tag, and
any enclosed content.
element content
The text and/or sub-elements contained within an element.
em
A printers’ measure equal to the point size of the current font. The width of the em rule and em
space characters.
entity
In XML an entity is a named object in the form &name; Entities can denote characters or files to be
included at that point in the document.
error
An abnormal condition arising during typesetting which may lead to some source material not being
rendered (e.g. graphic file not found). See also fatal error and warning.
facing pages
Two consecutive pages viewed side by side as in an open book. Compare with leaf.
fatal error
An abnormal condition arising during typesetting which causes the immediate termination of the job
(e.g. source document not found). See also error and warning.
filing instructions
A set of instructions for filing an update pack into a looseleaf publication, indicating which existing
leaves are to be removed and which new leaves are to be inserted.
file entity
An entity which refers to a file other than the source document. The inclusion of a file entity
normally indicates that the content of that file should be incorporated into the input stream at that
point.
fill
Page 202
Glossary
A group of spaces, dashes, dots etc. which fills out a line of text. For example:
Steak Dianne ........................................................... $21.50
fixed block
The area designated for material placed in a predefined position on the page, outside the normal
data columns. Fixed blocks can contain material extracted from the input stream for the current
pages (e.g. folio and telltales). Fixed blocks may take the form of headers or footers, but can
appear anywhere on the page. The position of the block is fixed, the content is variable.
float
A collection of text/graphics whose rendering is deferred until the top or bottom of a data column. A
typical use is for Figures, consisting of a graphic and title. Figures are normally printed at the top or
bottom of the column to avoid disrupting the flow of the surrounding text.
font
A style of rendering printed characters. A combination of typeface, size and style effects such as
bold, italic, underline.
(font) style
Variations which can be made to a typeface to invoke a specific font. The most common styles are
bold and italic. Other styles include condensed (narrow characters) and black (super-bold).
footer
A fixed block positioned below the data columns.
footnote
A block of text printed below, and generally on the same page as, a reference point within a text
column. TopLeaf supports both column footnotes which are printed at the end of the data column
containing the reference point, and page footnotes which occupy the full width at the bottom of the
text.
frame
A set of four rules (left, right, top and bottom) surrounding a box or table.
full looseleaf
Along with change pages, one of the looseleaf methods supported by TopLeaf. Full looseleaf
minimizes the size of each update pack and is driven by changes to the source document content.
full release
In looseleaf publishing, a release pack which includes the whole document rather than just the
updated leaves. This is the norm for electronic delivery, but may also be produced for a printed
document.
graphic
An image which is rendered as part of a document.
GUI
Graphical User Interface. TopLeaf workstation can be used to design and change TopLeaf
stylesheets and to manage looseleaf documents.
hanging indent
A style of indent in which the first line of a paragraph starts further left than the other lines.
header
A fixed block positioned above the data columns.
HTML (tables)
TopLeaf supports the HTML table model using a set of predefined mappings for tags such as
<thead>, <col>, <tr> etc.
hyphenation
Page 203
User Guide
The action of breaking a long word over two lines to avoid short lines or excessive whitespace.
TopLeaf includes hyphenation rules for most European languages. It also supports user supplied
exception dictionaries for control of individual words and for specialist terminology (e.g. medical,
legal). East Asian languages such as Chinese and Japanese do not use hyphenation as such, but
do have special word breaking rules.
inch
One inch equals 2.54 cm, 72 points, or 720 decipoints.
index
A set of references to a document grouped alphabetically or by subject. TopLeaf has facilities for
generating indexes automatically.
inheritance
The process whereby the typesetting properties of an element can be passed on to its
descendants.
inline element
An element which is rendered as part of a paragraph, but which does not itself trigger the start or
end of a paragraph (e.g. a hyperlink or italicized phrase).
input stream
See data flow.
intentionally blank
A filler page printed on the back of a leaf which contains only enough content to fill the front page.
May be completely blank or contain a printed page number and headers and footers.
interword space
As a style property, a range giving the minimum and maximum space inserted between words
before attempting to calculate a word break. In an output document, the actual space inserted
between words. In unjustified text, this will be the minimum defined above. In justified text this will
normally be somewhere between the minimum and maximum values. If possible the system will
use techniques such as hyphenation to avoid exceeding the maximum acceptable space.
ISO
International Standards Organization. A body responsible for setting global standards in many
fields. These standards are typically referred to by a number prefixed by ISO, ISO/IEC etc.
ISO 8859 — a family of 8-bit character sets that cover mainly the European languages. ISO 8859-1
(Latin1) is probably the most widely used — it covers most of the Western European languages.
ISO 8879:1986 — SGML
ISO/IEC 10646 — Unicode
justify
A line of text is (fully) justified when it is spread out enough to reach both left and right margins. See
also alignment. TopLeaf justifies text by assigning an appropriate value to the interword space.
A page is vertically justified when the data columns run from the top of the page to the bottom.
TopLeaf adds extra space between paragraphs and/or between lines to achieve this effect.
label
A small text fragment (such as a bullet, number or graphic), usually offset from an associated block
of text and serving to identify that block.
label element
An element whose content is set as a label which automatically attaches to the following
paragraph.
layout (editor)
Page 204
Glossary
The general shape of a page, including paper size, print area, fixed blocks, data columns etc.
TopLeaf provides the Layout Editor dialog to control these properties.
leading
[Pron: ledding] A measure of line spacing, expressed in TopLeaf as the vertical distance between
baselines of two successive text lines.
It is common practice to add extra leading to open out the text. Thus a document set in Arial 12/13
has a 12 point font set with 13 point leading. A document set in Arial 12/24 would be double-spaced
(vertically).
leaf
A printed sheet of paper, as in the leaves of a book. Normally printed with the odd-numbered page
on the front and the following even numbered page on the back. Single sided leaves can also be
created if necessary.
leaf group
In a full looseleaf publication, a leaf group identifies a set of adjacent leaves separated from
another leaf group by a gap in the folio numbering sequence. Leaf groups are usually associated
with a document structural unit. Leaf groups help minimize the number of generated point pages by
reserving a leaf folio range into which the group may expand if required.
leaf indicator
A user defined string variable that can be used to hold metadata or typesetting controls for
individual leaves.
leaf section
In a full looseleaf publication, a leaf section identifies a set of adjacent leaves that share a
common section identifier. A section based leaf numbering scheme permits the division of the leaf
numbering range into any number of separate sections, with each section containing any number of
leaves.
legacy partition
A TopLeaf partition that declares content that is neither XML or SGML, or uses a component of
TopLeaf that has been superseded.
line indent
An effect where the first or last line begins or ends at a different point to the remainder of the
paragraph. See also margin.
link
A pointer to another part of the document or even an arbitrary location on the internet. In printed
documents usually just a text fragment such as see section 3.1. In web pages, PDF files and other
electronic documents is usually a hyperlink which, when clicked, takes the user to the indicated
location.
link line
A line of the form Next page is NNN printed on the last page before a gap in page numbering.
list-item element
An element whose content is rendered as part of a list and which generates its own label.
live pages list
Also known as List of Effective Pages. A list showing the current release number (or date etc) for
every page or leaf in a looseleaf document.
Page 205
User Guide
log file
A file generated by the TopLeaf composition engine which gives by default a list of pages set,
errors encountered, and job statistics. If debug mode is selected the log file contains much more
detailed information.
looseleaf
A form of publishing where, rather than printing complete revisions of a document, the publisher
produces only those leaves which have changed since the previous release. The recipient
removes the old leaves and inserts the revised leaves. To facilitate this process the document is
normally stored in a ring or lever-arch binder.
TopLeaf supports two different looseleaf models: full looseleaf and change pages.
Looseleaf publishing involves a number of complex processes: retention of leaf boundaries;
correctly identifying differences; generation of point pages; consolidation of multiple revisions;
page gapping; production of filing instructions etc.
mainwork
The initial (full) release of a looseleaf document before any updates are applied.
mapping
The association of a set of typesetting actions with a particular element or custom marker. The
fundamental trigger for how TopLeaf renders each part of a document. For example the mapping
for an <emph> element may simply be Set Italic On.
margin
The left and right margin settings determine how far from the edges of a column the text of a
paragraph is set (see also line indent). The term Page margin is similarly used to define how far
the printable area should be set in from the edges of the page.
margin rule
A vertical rule running beside all or part of a data column.
marker
A tag or custom marker. Each marker can have an associated mapping.
markup
Metadata interspersed with text which serves to identify the structure and/or formatting of that text.
measure
A numerical value expressing a height or width. TopLeaf accepts measures in points, decipoints,
picas, inches, centimeters, and millimeters.
merge
The act of physically combining two adjacent paragraphs into one output paragraph.
metadata
Data which is not part of the printed text of a document, but which indicates structure, format, or
other relevant information about the text (such as creation date or index keywords). Metadata in
XML typically appears in the form of tags, attributes and processing instructions.
mixed content
XML content which can contain text as well as elements.
newline
A generic term for a line end in the source document. May be a CR (carriage return) character, LF
(line feed), or CR/LF. The content model determines if these characters are honored or ignored.
notes
The collective term for footnotes, sidenotes, floats and running heads. Notes appear within data
columns.
orientation
Page 206
Glossary
The aspect ratio of the page when reading normal text columns: either portrait (like most books) or
landscape (like most computer screens).
output document
The fully rendered output of a typesetting run. Can be accessed as printed pages or as a PDF
document.
page
A single printed page or electronic equivalent. There are normally two pages per leaf (sheet of
paper) printed front and back.
page gapping
Deliberately introduced breaks in the page numbering of a looseleaf publication so that new
material has an area to expand into. This may reduce the need to create point pages. For example
it might be decided to start new sections on every hundred page boundary, so that a section ending
on page 525 might immediately followed by a section starting at page 601. A link line is often used
to inform the reader that the gapping is intentional.
page group
In looseleaf jobs, an unbroken sequence of consecutively numbered pages. A group may contain
sequences of point pages. See run.
page number
Can refer to one of:
•
folio / page ID — the number normally printed on the page and used to locate it in Tables
of Contents etc. May be a simple number, or a string that reflects the document structure
(e.g. C-47, 64.2.5). Blank and title pages may have no visible folio, while preface material
may have roman numbering (i, ii, iii...);
•
sequence number — a number reflecting the order on which pages are produced, always
a simple count (1, 2, 3...).
page type
The TopLeaf description of an output page layout, including paper size, margins, headers and
footers, and placement of data columns.
pagination
The process whereby a stream of typeset text is divided into individual pages. Includes such
aspects as page numbering, paragraph splitting, column management, footnote placement,
generation of headers and footers etc.
paper size
The dimensions of the physical/virtual paper on which the output is rendered. The two most
common sizes are Letter in the USA and A4 elsewhere. TopLeaf supports a range of predefined
sizes and also lets you define your own.
paragraph
In TopLeaf terminology, a non-empty area of text between two block boundaries. More simply a
single physical paragraph with no internal structure. For example a <para> element containing an
internal <list> with four simple items consists of six paragraphs: the pre-list text, each list item,
and the post-list text, if any.
The difference between paragraphs and blocks is that blocks (which correspond to block elements
in the source) nest just like elements do. They can be empty or contain any number of sub-blocks.
Paragraphs on the other hand do not nest or overlap and cannot be empty. An output document
can be considered as a series of paragraphs, one after the other.
Can paragraphs be identified in the source document? Yes, but not as easily as blocks. In the
example, the last “paragraph” would be the text between the </list> and </para> tags.
parent
In the XML hierarchy, the (unique) element which immediately encloses the current element.
Page 207
User Guide
partition
In TopLeaf, a partition refers to a subdivision of a publication corresponding to a single output
document. A partition is the basic document unit processed by TopLeaf.
partition indicator
A user defined string variable that can be used to hold metadata or typesetting controls for a
partition.
partition link line
A link line that appears at the end of a document in a fixed block advising the start page number of
the next partition (ie. the next document that makes up the publication).
PDF
Portable Document Format A standard, developed by Adobe, which allows output documents to
be stored in paginated form. This preserves the physical appearance of the finished document,
which can then be viewed using Acrobat Reader or printed as hard copy.TopLeaf uses its own PDF
builder to create PDF files. However, you will still need a PDF reader (e.g. Acrobat ™) to view these
files.
Perl
A scripting language developed by Larry Wall. The TopLeaf composition engine provides a set of
commands for passing data to and from an embedded Perl interpreter.
phase
The current state of a looseleaf document within TopLeaf, one of initial (prior to first publication),
update (currently being modified) or published (release completed and locked).
pica
[Pron: pie-kah] A printers’ measure now accepted as 6pc = 1 inch = 2.54cm.
pixel
Short for picture element, a single dot on a screen. While images and web pages often use
measurements in pixels, they are not suitable for the printed page as their physical size varies with
the resolution of the display device. As a rough rule of thumb, 1 pixel = 1 point is a good starting
value. However this simple conversion can give odd results when applied to hi-res images.
point
A printers’ measure (72pt = 1 inch = 2.54cm). Font sizes are usually expressed in terms of points.
point size (type size)
An indication of the size of the characters in a specific font.
point pages
New pages (created in full looseleaf only) to be filed between consecutively numbered leaves in
the current release. For example new leaf 6.1–6.2 would be filed between existing leaves 5–6 and
7–8. Also called stroke pages if rendered as 6/1 rather than 6.1. Other forms such as 6a-6b are
also possible. With double-sided leaves these pages always come immediately after the even
numbered (back) page of the previous leaf.
print area
The area of a page within which all printed material appears. Controlled by the Layout Editor.
priority (of mappings)
A property of each mapping which causes that mapping to be selected ahead of mappings with
lower priority.
processing instruction
A form of markup which, unlike elements, does not participate in the XML hierarchy. This allows it
to be freely placed within a document to influence the processing at that point.
Has the form <?TARG CONT ?> where:
Page 208
Glossary
•
•
TARG is the target (ie. instruction name).
CONT is the (optional) content. The content is fairly free-form. It can resemble one or more
attribute/value pairs, or simply be an arbitrary text string.
Note that the declaration at the start of a typical XML document:
<?xml version="1.0" encoding="utf-8" ?>
has the form of a processing instruction, but is treated as a separate type of object during XML
processing.
property
A generic term applied to any of the numerous TopLeaf settings available through the dialogs.
Some properties (e.g. Font Size) are fully inherited, some (e.g. Left Margin) are inherited as
computed values, and some (e.g. Space Above) must be explicitly set on every element that uses
them.
publication
A TopLeaf repository level consisting of a number of partitions. The stylesheets, DTD etc. are
normally stored at this level and used by all contained partitions.
publish
A TopLeaf looseleaf function which produces the final version of the current release, creates the
filing instructions and live pages list, sets a change lock on the partition to prevent further
changes, and stores a copy of the release as a basis for change tracking.
published phase
TopLeaf maintains each looseleaf partition in two phases, the published phase and the update
phase. The published phase is locked against further change and ready to be published, as
distinct from the update phase which is still in preparation.
reference point
The point in the text where a footnote or sidenote is triggered. Footnotes typically place an
identifying index number or symbol at the reference point. Sidenotes do not, as their position
indicates which line of text is referenced.
release
The state of a looseleaf document once an update has been published. The initial release (or
mainwork) is the whole document as originally published. Each release normally has a unique
label which appears on all leaves updated by that release.
release line
A line printed on each leaf of a looseleaf release which indicates when the page was published.
Typically contains the release name/number or publication date.
rendering
In general, the action of converting a source document into a fully paginated human readable
format appropriate for the delivery medium. We use the term typesetting to refer to the internal
process of assembling lines of text into pages. Thus a typesetting run generates the output pages,
which can then be rendered on-screen, as hard copy, or as a PDF file.
TopLeaf repository
A directory folder in which TopLeaf stores publications.
row
The intermediate level container of a table. Marked as <row> in CALS tables and <tr> in HTML. A
table consists of a vertical set of rows each consisting of a horizontal set of cells.
rule
A horizontal or vertical straight line. A horizontal rule drawn above or below a text paragraph is
sometimes called a ruleoff.
run (of pages)
Page 209
User Guide
In looseleaf publishing, a number of new pages to be inserted as part of a release, which will
appear in the publication as a continuous set of pages and which, therefore, can all be inserted into
the publication by following a single line of the filing instructions. See page group.
running head
A continuation heading which is printed at the top of a page or a data column to indicate that a
recent heading is still in force at a particular level. Running heads (unlike telltales) appear within
the main data columns. TopLeaf provides up to five levels of running heads. TopLeaf can also
produce running feet, which are lines indicating that the material continues in the next
page/column.
segment
A portion of a page which is set as a unit. For example, a change from single-column to doublecolumn text on the same page requires a new segment to be commenced. Column footnotes will be
printed immediately at any change of segment, whereas page footnotes always appear at the
bottom of the page.
SGML
Standard Generalized Markup Language. A markup language, which was adopted as an
international standard (ISO 8879:1986), for marking up documents in such a way as to be
independent of the software which created or which processes the document. TopLeaf can process
SGML data, but most markup is now in the form of XML.
sidenote
A word, phrase or reference number which is printed to the side of a data column adjacent to the
reference point.
soft hyphen
A special character (Unicode U+00AD) which is normally invisible, but marks where a word can be
broken between two lines. If this happens, the hyphen will appear at the end of the first line.
source (document)
An XML document which is being rendered by TopLeaf. The source document may consist of a
number of files that optionally reference separate graphic files.
string
A fragment of text without internal markup.
stylesheet
One or more files which indicate how a source document is to be rendered. TopLeaf stylesheets
are processed using the TopLeaf workstation or can be edited directly.
table
A rectangular grid in which data can be arranged in a series of rows and cells. TopLeaf supports
both CALS and HTML table markup.
tag
In XML a tag is a unit of markup used to delimit elements within a document, and to convey
metadata in the form of attributes. Tags come in three forms: the start tag <name>, the end tag
</name> and the empty tag <name/>. Attributes may be carried by both the start and empty forms
thus <name attr="value"/>.
tag-in-context
A tag name which includes some or all of the tag’s ancestors (e.g. /book/chapter/title). Used to
distinguish between different occurrences of the same tag name, say between a chapter title and a
section title.
telltale
An indicator rendered within a fixed block once the content of the page is known. For example, a
dictionary header like aardvark–acumen would be assembled from two telltales defining the first
and last term on the page.
Page 210
Glossary
transform
A process whereby material from the source document is substantially modified and/or re-ordered
prior to rendering. TopLeaf can perform some transformations on the fly using a Perl extension.
Other rendering systems require a preliminary transformation phase, using systems such as XSLT.
typeface
A set of printable characters with a specific look and feel (e.g. Times New Roman, Arial, Palatino).
Combines with point size and style to define a specific font.
type size
See point size.
Unicode
A character coding system for assigning a unique number to all of the characters used in human
languages, plus mathematical and other useful symbols. Every character is also assigned a
general category and subcategory. The general categories are: letter, mark, number, punctuation,
symbol, or control (in other words a formatting or non-graphical character). All XML documents
specify an encoding which maps the byte sequences in the document to a set of Unicode
characters.
Unix/Linux
Operating systems widely used for servers and for automated applications. The TopLeaf API is
available for both 64 bit Linux and Windows versions.
update
A set of changes made to one release of a looseleaf document in order to create the next release.
update pack
A set of printed pages required to update a looseleaf document from one release to the next.
Normally also contains a set of filing instructions and possibly a live pages list.
update phase
In TopLeaf, the stage at which a looseleaf release is in preparation. See also published phase.
US-ASCII
An encoding scheme for representing characters as 7-bit values. Can only represent the standard
Latin alphabet, numbers, punctuation, and controls such as tab and newline.
UTF-8
An encoding scheme for representing Unicode characters as 8-bit values. US-ASCII characters
are represented as themselves, whereas non-standard characters are denoted by sequences of up
to 6 bytes. UTF-8 is typically used for European language documents, as most characters can be
represented by a single byte. For languages with a large number of non-Latin characters (eg.
Japanese), UTF-16 is usually more efficient.
UTF-16
An encoding scheme for representing each Unicode character as a sequence of 16-bit values
(usually just one such value is sufficient). UTF-16 documents normally begin with a special byte
order mark which identifies both the encoding and the order in which the originating machine has
placed the constituent bytes. UTF-16 is typically used in non-European language documents,
where there can be a significant size reduction compared to UTF-8.
value
A value is a string of text which can be interpreted as a number or measure. TopLeaf stores values
internally as integers.
variable
A named area in which TopLeaf can store strings or values to be used in calculations or put back
into the input stream at some later point.
W3C
Page 211
User Guide
The World Wide Web Consortium is a group of representatives of leading companies and other
Web professionals that sanctions Web related standards such as XML, XSLT etc.
warning
An abnormal condition arising during typesetting which may lead to some source material being
incorrectly rendered (e.g. attempt to set a margin outside the column boundary). See also error
and fatal error.
whitespace
In XML input, those non-printing characters (newline, space, tab) which serve to separate words in
the text. How whitespace is handled by TopLeaf depends on the content model of the current
element, and is also affected by settings such as interword space. In an output document, any
horizontal space between words or vertical space between lines.
widows and orphans
A widow line occurs when the first line of a paragraph stands alone at the end of a column or page,
with the rest of the paragraph rendered at the top of the following column or page. A similar
situation occurs when the last line of a paragraph stands alone at the top of a new column or page.
This is known as an orphan line. Widow and orphan lines can also occur if column footnotes are
permitted to split across a column or page boundary.
word break character
One of a configurable set of characters after which a word can be broken.. By default the only such
character is the hyphen, but other characters (such as ampersand) can also be designated for word
breaking.
XML
eXtensible Markup Language: a subset of SGML, sanctioned by the W3C, which removes much
of the complexity of the older standard, while allowing the development of a number of associated
standards and tools. Has largely replaced SGML as the standard of choice.
XML hierarchy
The arrangement of elements within an XML document in which every element (other than the
topmost) is completely contained within exactly one parent element, and may contain zero or more
child elements.
XSL-FO
XSL Formatting Objects are a form of markup, sanctioned by the W3C, in which partially
processed documents can be stored prior to final rendering. Since TopLeaf processes source
material directly, it has no need of an intermediate form of the document.
XSLT
XSL Transforms are a form of markup, sanctioned by the W3C, in which specifications for
document transforms can be written. TopLeaf has a number of facilities for re-ordering and
converting portions of the source document during processing, so a separate transform step is not
usually required. However, in the event that a radical transformation is necessary, it is possible to
use XSLT (or similar tools) on the document before passing it to TopLeaf.
Page 212