1
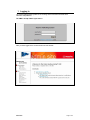
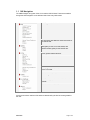
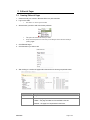
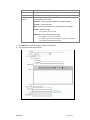
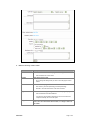
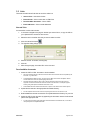
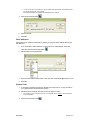
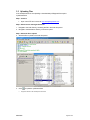
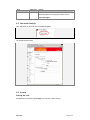
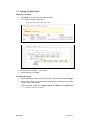
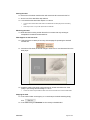
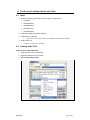
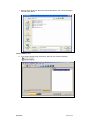
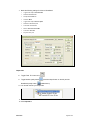
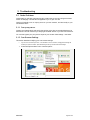
Cruising Yacht Club of Australia Rolex Sydney Hobart Yacht Race Sydney Mooloolaba Yacht Race Sydney Gold Coast Yacht Race Site User Guide // Content v2.4 Prepared by: Adrian Wiggins Massive Interactive User Guide Welcome to the User Guide The Massive Content Management System (CMS) enables Administrators, Site Managers and Content Managers to control the content of the club and racing sites owned by CYCA. Index User Guide............................................................................................................................. 1 Welcome to the User Guide........................................................................................ 1 Index .......................................................................................................................... 1 Conventions used in this Manual................................................................................ 2 1 Logging in ................................................................................................................... 3 1.1 CMS Navigation ............................................................................................... 4 2 Editorial Pages ............................................................................................................ 5 2.1 Creating Editorial Pages................................................................................... 5 2.2 News stories................................................................................................... 10 2.3 Calendar......................................................................................................... 14 2.4 Homepage Features....................................................................................... 19 2.5 FAQs .............................................................................................................. 21 2.6 Footer............................................................................................................. 24 3 Editor Box reference................................................................................................. 27 3.1 Controls.......................................................................................................... 27 3.2 Editing content directly in the Editor Box ........................................................ 28 3.3 Pasting from Word to the Editor Box .............................................................. 28 3.4 Pasting HTML to the Editor Box ..................................................................... 28 3.5 Links............................................................................................................... 29 4 Gallery Reference ..................................................................................................... 32 4.1 Photographers................................................................................................ 32 4.2 Sizing and optimising images for the gallery................................................... 32 4.3 Adding an image ............................................................................................ 33 4.4 Adding images to stories ................................................................................ 36 4.5 Removing images from stories ....................................................................... 38 4.6 Sizing and optimising images in Photoshop ................................................... 39 5 FTP ............................................................................................................................. 57 5.1 Setting Up ...................................................................................................... 57 5.2 Troubleshooting.............................................................................................. 59 5.3 Uploading Files............................................................................................... 60 6 Racing Site Mode ...................................................................................................... 62 6.1 Calendar of changes ...................................................................................... 62 6.2 Site mode controls.......................................................................................... 63 6.3 Lead-up .......................................................................................................... 63 6.4 In-race ............................................................................................................ 63 6.5 Ex-race........................................................................................................... 64 7 Skeds (Streaming Audio) ......................................................................................... 66 7.1 Approach overview......................................................................................... 66 7.2 Audio capture set-up ...................................................................................... 66 7.3 Setting the Sked Times .................................................................................. 69 8 Producing On-demand Audio and Video ................................................................ 74 8.1 Setup.............................................................................................................. 74 08/04/05 © Massive Interactive – Proprietary & Confidential Page 1 of 13 8.2 8.3 9 Creating Audio FLVs ...................................................................................... 74 Creating Video FLVs ...................................................................................... 82 Troubleshooting........................................................................................................ 90 9.1 Cache Problems............................................................................................. 90 9.2 Notifying Massive of Changes to the site or Bugs........................................... 95 Conventions used in this Manual This manual covers a range of controls, technical and non-technical elements, site content and management processes. Given this some conventions are used to better present the content in this User Guide. Buttons Buttons and links that are to be clicked are in “Bold”. For example, click the button labelled “Click Me” Links are underlined, for example in “click this link”. Text and Code HTML code is shown in Courier. Where possible, code is shown inline in paragraphs. Sections of code are presented in boxes. <p> This is a paragraph of text. </p> Similarly, text that appears onscreen may also be shown boxed in Arial. This is a paragraph of text. This is the second paragraph of text. The following font conventions are used in this functional specification: Italic Used for pathnames, filenames, program names and control element values. Serif Used for displayed HTML content. Constant width Used for object, element and attribute names, parameters, statements, explicit code, quoted data values and command lines. Constant width italic Used for replaceable terms such as named variables. Bold Used for emphasis or control labels. (+), (-) These are sort order attributes. + = ascending, - = descending. 8/04/2005 Page 2 of 59 1 Logging in The Content Management System for the Cruising Yacht Club sites is secured with a username and password. The CMS is at http://admin.cyca.com.au After you have logged in the screen should now look like this. 8/04/2005 Page 3 of 59 1.1 CMS Navigation The CMS manages many parts of the CYCA and the RSHYR sites. These are accessible through the CMS navigation on the left-hand side of the every CMS screen. RSHYR general editorial sections. Ex-race home page features, News and Footer for the RSHYR site. Stills gallery for the CYCA and RSHYR site. Audio and video gallery for the RSHYR site. CYCA general editorial sections. Home page features, News, Calendar and Footer for the CYCA site. Yacht listing and Race Entrant controls RSHYR race year, site mode and Sked broadcast controls. FAQs for CYCA and RSHYR Access to the various sections of the admin is determined by the kind of access granted to the user. 8/04/2005 Page 4 of 59 2 Editorial Pages 2.1 Creating Editorial Pages 1. Create and edit your content in Microsoft Word or a plain text editor. 2. Log in to the CMS • See Section 1 for how to login to the CMS. 3. Select the site you wish to edit from the site pull down. • • The system will remember the last site you edited. Always check this pull-down to ensure that you are editing the correct site before creating or updating pages. 4. Click Editorial Pages 5. Click the section you wish to edit. 6. After clicking on a section the pages within that section are shown grouped and sorted Element Description Page Page label Status Live – the page is published in the site. Hidden – the page is hidden and not available in the site. Queued – the page is to be published in the future. 8/04/2005 Page 5 of 59 Expired – the page is no longer available in the site. Publish Date and time that the page is available in the site. Expire Date and time that the page is no longer available in the site. Controls and Actions Show current – shows pages currently available in the site or queued to be published in the future. Show All – shows all pages regardless of publishing status. Preview – preview the page. Edit – access the update screen to make changes to this page. Delete – delete this page. • Only available for third level pages. Add child – add a child page to this page. • Only available for top or second level pages. • To add primary and secondary level pages you will need to have Massive create navigation artwork before proceeding. 7. Click Add Child on the parent page to create your new page. 8. This will open the Edit Content screen: 8/04/2005 Page 6 of 59 9. Make the following content entries Element Description Label Label is used as the link to the page in the navigation. • Parent The parent of this page. • Sort order Type • Sort order is by sort order (ascending), then label (ascending). • Defaults to 100. Use increments of 10 for other sort orders. This is used to manage the type of content the page displays. • 8/04/2005 Do not change this setting unless you want to move the page to another section. Sort order for the page within its section. • Page title This should be a two or three words. This should be left as its default “Editorial”. “Functional” is used by Massive Interactive to add in new sections with complex functionality. Do not use this option. The main heading for the page shown at the top of the content area. This can be the same as the Label, or a longer version of the Label. Page 7 of 59 Element Description Body n Body 1, 2 and 3 consists of editorial content and an image. Image file • See Section 3 Editor Box Reference for information on how to use the Editor Box. • See Section 4 Gallery Reference for information on how to add images to the editorial section. • Use headings to break up and group content. • Bold the first paragraph. • Bold the names of people and yachts. File name for the editorial image. • W For information on selecting images please see Section 4 Gallery Reference Width of the image. • H Height of the image. • Alt Set automatically. Set automatically. Alt tag for the editorial image. This is the text that appears while a user is mousing over the image. Caption Photographer • Set automatically. • Should be updated to suit the context. The text that his shown underneath the image. • Set automatically. • Should be updated to suit the context. The name of the photographer. • Set automatically. Body 2 As for Body 1, with controls to show a smaller second image. Body 3 As for Body 1, with controls to show a smaller third image. Calendar Selects a calendar category to show events between Body 2 and Body 3. • Venue Selects a calendar venue to show events between Body 2 and Body 3. • Keywords It is highly recommended that keywords related to the content on this page be set in this element. Internet description assists users to find this page on search engines like Google and Altavista. • • 8/04/2005 See Section 2.3 Calendar Entries for more information. Internet keywords assist users to find this page on search engines like Altavista. • Description See Section 2.3 Calendar Entries for more information. It is highly recommended that description related to the content on this page be set in this element. Use the first paragraph of editorial content, or create a new description. Page 8 of 59 Element Description Related Sites Clicking Related Sites adds a linked record for displaying a related link at the bottom of the content area. Related Yachts Clicking Related Yachts adds a linked record for entering a related yacht. • On the CYCA site current member yachts are listed. • On the race site race entrant yachts for the current race year are listed. Override Controls whether the page is published in the site regardless of its publish and expire dates. Publish The calendar date time that the page is available in the site. • Expires The calendar date time that the page is no longer available in the site. • Members only Expiry date may be set to a duration, an explicit date time, or to not expire. In the CYCA site only this controls whether the user needs to be a logged in member to access the page. • Update log For complicated pages it is recommended the publish date be set to a date in the future until the page has been completed. If this is set to True the user will be redirected to the login page if they are not logged in. An area for making notes on changes to the page. 10. Click save. • The page is not stored until you click save. 11. Preview the page to confirm that it is correctly formatted. 8/04/2005 Page 9 of 59 2.2 News stories 2.2.1 Creating and Editing News Stories 1. Create and edit your content in Microsoft Word or a plain text editor. 2. Log in to the CMS 3. See Section 1 for how to login to the CMS. 4. Select the site you wish to edit from the site pull down. • The system will remember the last site you edited. • Always check this pull-down to ensure that you are editing the correct site before creating or updating pages. 5. Click News Articles 6. All News Articles are shown grouped and sorted Element Description Page Page label Status Live – the page is published in the site. Hidden – the page is hidden and not available in the site. Queued – the page is to be published in the future. Expired – the page is no longer available in the site. Publish 8/04/2005 Date and time that the page is available in the site. Page 10 of 59 Sort Sort order for the page within this section (defaults to 100) Expire Date and time that the page is no longer available in the site. Controls and Actions Add News – add a new page to this section Show current – shows pages currently available in the site or queued to be published in the future. Show All – shows all pages regardless of publishing status. Preview – preview the page. Edit – access the update screen to make changes to this page. Delete – delete this page. • Only available for third level pages. 7. Click Add News to create a new page in this section 8. This will open the Edit Content screen: 8/04/2005 Page 11 of 59 8/04/2005 Page 12 of 59 12. Make the following content entries Element Description Headline Headline is used as the link to the page in the navigation on the Home Page and News section • Choose site This should be a phrase or short sentence Choose which sites the news story will appear on • Do not change this setting unless you want to move the page to another site. On tile Shown on the homepage news tile. Priority This controls the priority of a story and how long it has a hot priority. Use this when you have a story that you want to stay at the top of the news listings for a period of time. Note – use hot sparingly – its effectiveness is dependent on it being used with one or two stories at a time. Body n Body 1, 2 and 3 consists of editorial content and an image. • See Section 3 Editor Box Reference for information on how to use the Editor Box. • See Section 4 Gallery Reference for information on how to add images to the editorial section. • Use headings to break up and group content. • Bold the first paragraph. • Bold the names of people and yachts. Image folder Folder name for the editorial image Image file File name for the editorial image. • W For information on selecting images please see Section 4 Gallery Reference Width of the image. • H Height of the image. • Alt Set automatically. Set automatically. Alt tag for the editorial image. This is the text that appears while a user is mousing over the image. Caption Credit 8/04/2005 • Set automatically. • Should be updated to suit the context. The text that is shown underneath the image. • Set automatically. • Should be updated to suit the context. The name of the photographer. Page 13 of 59 Element Description • Set automatically. Change File Update editorial image Body 2 As for Body 1, with controls to show a smaller second image. Body 3 As for Body 1, with controls to show a smaller third image. Calendar Selects a calendar category to show events between Body 2 and Body 3. • See Section 2.3 Calendar Entries for more information. Short Leader Up to 500 chars of text which will appear on the news tile Long Leader Up to 1000 chars of text which will appear in News Section Related Yachts Clicking Related Yachts adds a linked record for entering a related yacht. • On the CYCA site current member yachts are listed. • On the race site race entrant yachts for the current race year are listed. Override Controls whether the page is published in the site regardless of its publish and expire dates. Publish The calendar date time that the page is available in the site. • Expires The calendar date time that the page is no longer available in the site. • Save For complicated pages it is recommended the publish date be set to a date in the future until the page has been completed. Expiry date may be set to a duration, an explicit date time, or to not expire. Save changes to page 13. Click save. The page is not stored until you click save. 14. Preview the page to confirm that it is correctly formatted. 15. To edit an existing page, choose the Edit control and make changes as above to the Editor Box 2.3 Calendar 2.3.1 Creating and editing events on the Calendar 1. Log in to the CMS See Section 1 for how to login to the CMS. 2. Select CYCA from the site pull down. The calendar is available in the CYCA site only 3. After clicking on Calendar all the events are shown grouped and sorted. 8/04/2005 Page 14 of 59 Element Description Event Name of the Event Start / End Date of Event and start and end times Category Select Category for the Event Venue Select Venue for the Event Controls and Actions Add Event – add a new event to this section Manage Categories – view list of categories and add or edit categories Manage Venues – view list of venues and add or edit categories Show current – shows events currently available in the site or queued to be published in the future. Show All – shows all events regardless of publishing status. Edit – access the update screen to make changes to this event. Delete – delete this event. 16. Click Add Event to create a new event in this section 17. This will open the Insert Event Screen 8/04/2005 Page 15 of 59 8/04/2005 Page 16 of 59 18. Make the following content entries Element Description Event Name Event name is used as the title and the link in the navigation On Homepage Select whether this event will appear on Home Page On Calendar Page Select whether this event will appear on the Calendar Page Category Select from pull down the category the event belongs to Venue Select from pull down the venue the event will be held in Short Leader Up to 500 chars of text to describe the Event (optional) Links to Creates links from the Event name • Either to another page in the site, for example a news page, or • To another site - useful if the event is being held by another organisation • Event Text 8/04/2005 Select open in a new window to keep CYCA site active when link is to another organisation’s website Event Text consists of editorial content • See Section 3 Editor Box Reference for information on how to use the Editor Box. • See Section 4 Gallery Reference for information on how to add images to the editorial section. • Use headings to break up and group content. • Bold the first paragraph. Page 17 of 59 Element Description • Bold the names of people and yachts. Image folder Folder name for the editorial image Image file File name for the editorial image. • W For information on selecting images please see Section 4 Gallery Reference Width of the image. • H Set automatically. Height of the image. • Alt Set automatically. Alt tag for the editorial image. This is the text that appears while a user is mousing over the image. Caption Photographer • Set automatically. • Should be updated to suit the context. The text that is shown underneath the image. • Set automatically. • Should be updated to suit the context. The name of the photographer. • Set automatically. Change File Update editorial image Override Controls whether the page is published in the site regardless of its publish and expire dates. Start / End • The calendar date and time that the event will start and end Date / Time Save Save changes to page 19. Click save. • The page is not stored until you click save. 20. Check that the Event is correctly formatted by going to <http://www.cyca.com.au/calendar.asp?key=796> 21. To edit an existing Event, choose the Edit control and make changes as above to the Editor Box 8/04/2005 Page 18 of 59 2.4 Homepage Features Homepage features are short leaders shown on the club site and the race sites in ex-race mode. 1. Create and edit your content in Microsoft Word or a plain text editor. 2. Log in to the CMS • See Section 1 for how to login to the CMS. 3. Select the site you wish to edit from the site pull down. 4. • The system will remember the last site you edited. • Always check this pull-down to ensure that you are editing the correct site before creating or updating pages. 5. Click Homepage Features 6. The Homepage Features are shown grouped and sorted Element Description Label Page label Page or Link Page within site, or link out of site from the Page label Status Live – the page is published in the site. Hidden – the page is hidden and not available in the site. Queued – the page is to be published in the future. Expired – the page is no longer available in the site. Publish Date and time that the page is available in the site. Expire Date and time that the page is no longer available in the site. Sort 8/04/2005 Sort order for the page within its section. Page 19 of 59 Controls and Actions Show current – shows pages currently available in the site or queued to be published in the future. Show All – shows all pages regardless of publishing status. Preview – preview the page. Edit – access the update screen to make changes to this page. Delete – delete this page. • Only available for third level pages. Add Feature – add a new feature. 22. Click Add Feature to create a new feature in this section 23. This will open the Add Feature page 24. Make the following content entries Element Description Headline Headline is used as the title and the link in the navigation • Type 8/04/2005 This should be a phrase or short sentence Select whether this Feature will be Primary or Secondary on the Homepage Page 20 of 59 Element Description Priority Give the page a priority Leader Up to 500 chars of text Image folder Folder name for the editorial image Image file File name for the editorial image. • W For information on selecting images please see Section 4 Gallery Reference Width of the image. • H Set automatically. Height of the image. • Alt Set automatically. Alt tag for the editorial image. This is the text that appears while a user is mousing over the image. • Set automatically. • Should be updated to suit the context. Change File Update editorial image Links to Creates links from the Homepage Features • Either to another page in the site, for example a news page, or • To another site - useful if the event is being held by another organisation Override Controls whether the page is published in the site regardless of its publish and expire dates. Publish The calendar date time that the page is available in the site. • Expires For complicated pages it is recommended the publish date be set to a date in the future until the page has been completed. The calendar date time that the page is no longer available in the site. Expiry date may be set to a duration, an explicit date time, or to not expire. Save Save changes to page 25. Click save. • The page is not stored until you click save. 26. Preview the page to check it is correctly formatted. 27. To edit an existing Homepage Feature, choose the Edit control and make changes as above to the Editor Box. 2.5 FAQs 8/04/2005 Page 21 of 59 Frequently asked questions provide information about common problems and questions visitors to the site may have. 1. Create and edit your content in Microsoft Word or a plain text editor. 2. Log in to the CMS • See Section 1 for how to login to the CMS. 3. Click FAQs 4. The FAQs are shown grouped and sorted Element Description Category Category of FAQ Question Question of about 10 words – provides link to information/answer Site/s Sites that the question and answer appear on Sort Order Controls and Actions Sort order for the page within its section. Edit – access the update screen to make changes to this page. Delete – delete this page. • Only available for third level pages. Add FAQ – add a new FAQ. Manage Categories – add or edit FAQ categories 5. Click Add FAQ to add a new FAQ to the list 8/04/2005 Page 22 of 59 6. Make the following content entries Element Description FAQ Category Choose which category the FAQ belongs to from the pull down Site Select which site/s the FAQ will appear on Question The question – a max of 500 chars. This will provide the link to the answer Answer The Answer Text – a max of 5000 chars - consists of editorial content 8/04/2005 • See Section 3 Editor Box Reference for information on how to use the Editor Box. • See Section 4 Gallery Reference for information on how to add images to the editorial section. • Use headings to break up and group content. • Bold the first paragraph. Page 23 of 59 Element Description Bold the names of people and yachts. Sort Sort order for the question within its category. Save Save changes to page 7. Click save. • The page is not stored until you click save. 8. To edit an existing FAQ, choose the Edit control and make changes as above to the Editor Box 2.6 Footer 1. Log in to the CMS • See Section 1 for how to login to the CMS. 2. Select the site you wish to edit from the site pull down. 1. • The system will remember the last site you edited. • Always check this pull-down to ensure that you are editing the correct site before creating or updating pages. 3. Click Footer 4. The Footers are shown grouped and sorted Element Level Description Level of Footer • Level 1 is above • Level 2 is below Label Name of footer Page or Link Link to page within site Status Live – the page is published in the site. 8/04/2005 Page 24 of 59 Hidden – the page is hidden and not available in the site. Queued – the page is to be published in the future. Expired – the page is no longer available in the site. Publish The calendar date time that the page is available in the site. For complicated pages it is recommended the publish date be set to a date in the future until the page has been completed. Expire The calendar date time that the page is no longer available in the site. Expiry date may be set to a duration, an explicit date time, or to not expire. Sort Sort order for the footer as it appears on the page Controls and Actions Edit – access the update screen to make changes to this page. Preview – preview the page. Delete – delete this page. Add Footer – add a new Footer. 5. Click Add Footer to add a new footer 6. The Add Footer page will appear 7. Make the following content entries Element Description Label Name for the footer – usually one word – this will provide a link in the navigation URL Link to page within site Level Select which level to choose position on at bottom of each page Sort Sort order for the footer amongst the other footers Save Save changes to page 8/04/2005 Page 25 of 59 8. Click save. • The page is not stored until you click save. 9. To edit an existing Footer, choose the Edit control and make changes as above to the Editor Box 8/04/2005 Page 26 of 59 3 Editor Box reference Each Body section of the site has a related editor box for managing content in the body area. The editor box is used to enter and format text and to set inline links. The editor box is set up to allow you to enter content in the following ways: • Directly entering by typing into the editor box. • Copying and pasting from MS Word. • Pasting in HTML code. Note this approach is recommended for programmers and Massive use only. These approaches are covered in more detail below. 3.1 Controls Name Text format Control Usage This pull-down enables the setting of heading styles and normal body text. Default is normal. Bold Bold text Italic Italic text Underline Underline text Ordered list Creates a numbered list. Start your list on a new line. Unordered list Creates a bulleted list. Start your list on a new line. Cut Cut the selected content to the clipboard. Copy Copy the selected content to the clipboard. Paste Paste content on the clipboard into the editor box at the insertion point. 8/04/2005 Page 27 of 59 Name Control Usage Undo Undo the last change. Redo Redo the last change. Internal link Use to set a link within the site from the body of the content. Also use for mailto links. External link Used to set a link to an external site. The new site will open in a new window. HTML mode Toggles the editor into HTML mode. This is an expert option. 3.2 Editing content directly in the Editor Box 1. Tab or click into the editor box and start entering content directly. • Press ENTER for a new paragraph. • Press SHIFT-ENTER for a new line 3.3 Pasting from Word to the Editor Box 1. Select the content from MS Word, or an email, that you want to put into the editor box and copy to the clipboard. 2. Paste the content using CTRL-V or the button. 3. All formatting should have been stripped from the content – ie if it was in Times in the Word document, it should now be in the correct font format for the site. • Lists will need to have the list style reapplied in the editor box. • Do not paste in table content from Word. Please contact Massive to discuss entering tabulated content. 3.4 Pasting HTML to the Editor Box Use this option only for special circumstances. 1. Edit and refine your HTML in an external editor. 2. To paste in HTML toggle the mode button • . Make sure you toggle the mode before pasting. 3. Paste in the HTML. 4. Detoggle the mode button to see the HTML rendered in the editor box. • 8/04/2005 Javascript, CSS and forms and other HTML elements may not work. Page 28 of 59 3.5 Links There are several kinds of links that are set in the editor box. • Internal links – links within the site • External links – links to other sites or HTML files • Downloadable documents – links to PDFs • Email addresses – links to email addresses Internal links An internal link is a link within the site. 1. In a browser navigate to the page or site that you want to link to, or copy the URL to your clipboard from an email or other source. 2. Select the text in the editor box that you want to make into a link. 3. Click the internal link button 4. The hyperlink dialog will pop open: 5. Paste in the URL of the site, including http. 6. Click OK 7. After saving the page, check the URL on the front-end. Downloadable documents 1. Create the PDF or HTML document to be downloaded. • PDF is the preferred format for all documents other than documents that need to be updated by the end-used – eg a Word form • The ideal filesize is 200kb for a PDF. An upper limit of 1MB is the maximum acceptable. Please contact Massive for advice on optimising larger documents. • Filenames should include the name of the so that the user later knows where the document originated. The filename should also reflect the content of the document. An example might be RSHYR_2003_NOR.pdf for the RSHYR 2003 notice of race. • Downloadable document filenames should have no spaces. Use underscores to denote spaces. 2. Upload the documents to the appropriate downloads directory. • See the separate section of this document for putting documents onto the server via FTP. 3. Downloadable documents are stored in the /sysfile/downloads/ directory for your site. 4. Create the URL for the document by appending the document name to the download path for the appropriate site. • 8/04/2005 For the document RSHYR_2003_NOR.pdf to be downloaded from the RSHYR site, FTP the file to rolexsydneyhobart.com/sysfile/downloads/ Page 29 of 59 • The URL for this document will be http:// plus the filepath rolexsydneyhobart.com/sysfile/downloads/ plus the filename RSHYR_2003_NOR.pdf: http://rolexsydneyhobart.com/sysfile/downloads/RSHYR_2003_NOR.pdf 5. Click the external link button 6. Paste in the URL. 7. Click OK. Email addresses Email links can be entered automatically by pasting or typing the email address directly into the editor box. 1. If you would like to make someone’s name a link to an email address, select the name and click the internal link button. 2. Select mailto: in the type pulldown 3. Enter the email address after mailto: in the URL field: mailto:[email protected] 4. Click OK. External links 1. In a browser navigate to the page or site that you want to link to, or copy the URL to your clipboard from an email or other source. 2. Select the text in the editor box that you want to make into a link. • Do not apply any other text styling to the link – such as bold, italic or underline – this will break the external link setting. 3. Click the external link button 8/04/2005 Page 30 of 59 4. Paste in the URL, including http. 5. Click OK. 8/04/2005 Page 31 of 59 4 Gallery Reference Each of the sites has a photo gallery that shows the latest images added to the system. When images are added they can be toggled to appear in any or all of the sites. It is also possible to add a image to the system without publishing it in any of the site galleries. The gallery admin is also used to manage images for editorial purposes and for adding images to stories. Steps to add images to the system are: 1. Adding the photographer to the system. This is an optional first step. 2. Sizing and optimising the images. 3. Transferring the images to the server 4. Adding the images in the gallery admin 4.1 Photographers Setting up a photographer in the system enables pictures to be attributed to a photographer when they are added to a story and in the gallery. It also adds a directory to the /sysfiles/images/ directory to store the images from a photographer. Note that it is not necessary to put pictures from a particular photographer in their own directory. 4.1.1 Adding photographers 4.2 Sizing and optimising images for the gallery 1. Size and optimise the set of crops of the original image. • See Section 4.4 Sizing and optimising images in Photoshop for more details. The image sizes used in the site are: Image type Sizing Usage Size WxH Gallery News Article Yacht Profile Thumb Thumbnail for the gallery. Note: should not be used as the thumb for news, audio or video. Gallery Gallery 145 x 94 Full Full size 258 x 386 or 478 x 370 47 x 34 Portrait 47 x 70 Landscape 89 x 59 Small 122 x 134 Large 176 x 192 Small 102 x 144 Large 146 x 206 2. FTP the images to the appropriate directory. Directories in the site are based on race and year. 8/04/2005 Page 32 of 59 • See Section 5 FTP for more details. 4.3 Adding an image 1. Add the photographer. See above. 2. Prepare the image that you wish to add. See above. 3. Select the site you wish to add the image to: • The system will remember the last site you edited. • Always check this pull-down to ensure that you are editing the correct site before creating or updating pages. 4. Click Stills to open the gallery browser pop-up. 5. Click Add Item. This will open the gallery image detail screen. 8/04/2005 Page 33 of 59 8/04/2005 Page 34 of 59 Element Description Title Title for the image Caption Short editorial caption for the image – shown in the gallery popup. Should be different to the title of the image. Alt tag Alt tag for the image. Optional. Recommend that image title is used here. Year Year of the image. Used to associate race images with race years. Sort Order Sort order is used to keep selected images at the top of the list until they expire. Photographer The name of the photographer. Use of the pull-down is recommended for photographers who have supplied more than one image or have a website. Show on site Checkboxes for publishing the image. The image will be published in the gallery of the current race year of each race site. Folder Folder that the image is stored in. File prefix File prefix for the image. Gallery sizes There are nine image usages that can be set in the gallery. Each 8/04/2005 Page 35 of 59 Element Description usage has one size, with the exception of gallery full which has two optional sizes. See Section 4.2 Sizing and optimising for more information on image sizes. Gallery Thumb Gallery Full News Portrait Landscape Article Small Large Yacht Profile Small Large To set a particular usage simply click the Use file prefix checkbox. For the full-size usage select the image size using the radio buttons. Related Yachts Override Publish Clicking Related Yachts adds a linked record for entering a related yacht. • On the CYCA site current member yachts are listed. • On the race site race entrant yachts for the current race year are listed. Controls whether the page is published in the site regardless of its publish and expire dates. The calendar date time that the page is available in the site. • Expires The calendar date time that the page is no longer available in the site. • Save For complicated pages it is recommended the publish date be set to a date in the future until the page has been completed. Expiry date may be set to a duration, an explicit date time, or to not expire. Save changes to page 6. Set all image sizes that you have created when you sized and optimised the image. 7. Click Save The image is now published in the selected site galleries and is available to be added to news stories. 4.4 Adding images to stories 1. Navigate to a story that you wish to add an image to. 2. Click Change File to the right of the editor box. 8/04/2005 Page 36 of 59 3. Click Choose from existing images in the pop-up 4. Use the keyword, year and photographer search fields to look for an image for your story. 5. The search will return a list of matching images. A preview of the image is shown on the left side Previews of alternate image sizes are also available. 6. Click Use for the image that you want to place in your story. This will add the image to the story. For the first body area in your story use the 176 x 192 size, for the second and third body text areas use the 122 x 135 size. 8/04/2005 Page 37 of 59 7. Add the images for the body 2 and body 3 text areas. 8. Click save to schedule the story for publishing. See and Section 2.1 Editorial Pages and Section 2.2 News Stories for details on how to edit stories. 4.5 Removing images from stories 1. Access the story in the CMS that you wish to remove the image from. 2. Set all the image attribute fields to null by deleting all of the image details: Folder File Size Alt Caption Credit 3. Save the story Note: this does not delete the image from the gallery. 8/04/2005 Page 38 of 59 4.6 Sizing and optimising images in Photoshop 4.6.1 Setting up 1. Install Photoshop 2. Create the following directories: • c:/temp • ../desktop/site • ../desktop/site/images • ../desktop/site/images/scripts 3. Create shortcuts to the following in ../desktop/site • Photoshop • c:/temp/ 4.6.2 Images sizes The image sizes used in the site are: Image type Sizing Usage Size WxH Gallery News Article Yacht Profile Thumb Thumbnail for the gallery. Note: should not be used as the thumb for news, audio or video. Gallery Gallery 145 x 94 Full Full size 258 x 386 or 478 x 370 47 x 34 Portrait 47 x 70 Landscape 89 x 59 Small 122 x 134 Large 176 x 192 Small 102 x 144 Large 146 x 206 4.6.3 Sizing Images using Actions Loading Actions 1. Open Photoshop 2. Click on the Actions tab of the History/Actions palette. 8/04/2005 Page 39 of 59 3. Click the right arrow 4. Select Load Actions 5. Open the Action file. • 8/04/2005 Use the latest version available. Page 40 of 59 8/04/2005 Page 41 of 59 6. The Actions palette should look like this: 7. Select Button Mode 8/04/2005 Page 42 of 59 8. The Actions palette should look like this: 9. Create a directory C:/TEMP. • When images are sized they will initially be saved into this directory. 10. Create a shortcut in that directory to the root of your shared image directory. 8/04/2005 Page 43 of 59 Running the Actions 1. Select and drag the images that are to be resized onto the Photoshop icon 2. Each of the images will open in Photoshop. • The original images must be at least 500 x 500 px in size. • Original images should be no larger than 1024 x 1024 px in size. 3. Run the set of required Actions for each image. • Each Action will create a set of crops for the original image. • Determine which is the best crop for the main gallery sized image – portrait or landscape, and run only one of the gallery scripts. • Yacht profile is only required if this is the image that will be used for the yacht profile in the site. Do not create yacht profile images if you already have these for the yacht in question. 4. The Action will pause while you select the area and size of each crop. • 8/04/2005 If you cannot see the full crop rectangle, zoom out using CTRL-minus until you can see the crop rectangle. Page 44 of 59 5. The Action will pause while you select the area and size of each crop. • Size and drag the crop rectangle to select a newsworthy crop. In the example below the more newsworthy crop of Assa Abloy is that of the crew including the bow, as opposed to the default crop of the stern. • If you cannot see the full crop rectangle, zoom out using CTRL-minus until you can see the crop rectangle. 6. Double-click in marquee area. 7. The image will resize and the Optimisation dialog will open. 8. Check the quality of the cropped image on the right. • 8/04/2005 If the quality is poor, select JPEG High as the optimisation setting. Page 45 of 59 9. Click OK. 10. This will open the save dialog. 11. Overwrite the prefix name with a prefix that describes the image and add a sequence number for the image. In this example use assa_01. 12. Select the prefix and press CTRL-C to copy it to the clipboard. 13. Click Save. 14. For each image size paste the filename prefix over name. 8/04/2005 Page 46 of 59 4.6.4 Setting Levels • Use Levels to improve images with poor contrast. • Press CTRL-L. 8/04/2005 Page 47 of 59 • Drag the top black arrow slider to the right. • This will darken and increase the contrast. 8/04/2005 Page 48 of 59 • If the image is overall too dark, slide the bottom black arrow to the right. • Click OK to finalise. 8/04/2005 Page 49 of 59 4.6.5 Sizing Images manually Alternatively the image may need to be sized manually for special sizes not in the actions. Open the image 1. Start Photoshop. 2. Open the image. 3. Zoom to full-screen or 100%, whichever is smaller. Select the crop tool 4. Left click the marquee tool • This will display the marquee options. 8/04/2005 Page 50 of 59 8/04/2005 Page 51 of 59 5. Select the crop tool • Your tool panel should look like this. Set target size 6. Navigate to window > show options 7. Set the image size width and height 8. Set the resolution to 72 dpi. Crop the image 9. Select the crop 10. Place the crop tool at the top left of the crop 11. Click and hold left mouse button and drag down to the right. 8/04/2005 Page 52 of 59 12. Double-click in marquee area. • Image will resize. 8/04/2005 Page 53 of 59 Optimise 13. Press CTRL-ALT-SHIFT-S 14. Select 2-up. 8/04/2005 Page 54 of 59 15. Select JPEG High in Settings. 16. Check JPEG size on right window. 17. Click OK Save 18. Name file according to convention of appending _WxH to filename. Revert to Original 19. Click History 20. Click Open • Reverts to original image. 8/04/2005 Page 55 of 59 8/04/2005 Page 56 of 59 5 FTP File Transfer Protocol (FTP), a standard Internet protocol, is the simplest way to exchange files between computers on the Internet Massive recommends Leech FTP, a commonly-used FTP program.1 5.1 Setting Up This section describes basic set-up and simple troubleshooting for Leech FTP. Step 1. Install 1. Download Leech FTP from http://stud.fh-heilbronn.de/~jdebis/leechftp/downloads.html 2. Install Leech on your local drive. Step 2. Configure 3. Click to open the bookmark controls. 4. Right click in the left panel to create a folder. 5. Create folders for each CYCA site. 6. Right click in the right panel to create an FTP bookmark. 1 Note: This reference is based on Leech v1.3, build 1.3.1.207. This section does not aim to be a comprehensive reference for either Leech or FTP in general. For more information on FTP please see: http://searchnetworking.techtarget.com/sDefinition/0,,sid7_gci213976,00.html 8/04/2005 Page 57 of 59 7. Enter the Login information for the remote directory you wish to create an FTP bookmark for. 8. You will need to enter the following details: • base URL of the server – always use bne449d.server-web.com • port – always use 21 • username – your username Note: Each user should have a personal username and password. Please contact Massive to set up a username and password for each new user. • password – your password • You can also specify a local drive to access site assets. . 9. Set your default local drive in advanced settings. 8/04/2005 Page 58 of 59 10. Click Save. Step 3. Check you can connect 11. Double-click your bookmark to connect. 12. To disconnect click . 5.2 Troubleshooting The following table addresses a few common FTP problems. It is not intended to be a comprehensive referece. Problem Message Solution Can’t connect ! Invalid username or password for www.business.nsw.gov.au Check and re-enter username and password ! Socket Error: no DNS entry Check and re-enter site URL 8/04/2005 Page 59 of 59 5.3 Uploading Files In the example below we are uploading a downloadable pdf RegionalFirst15.pdf to /sysfile/download Step 1. Connect 1. Open Leech FTP and connect to www.rolexsydneyhobart.com Step 2. Select source and target directories 1. Navigate to the local directory containing the file in the local drive panel. 2. Navigate to the destination directory in the server panel Step 3. Select the file to upload 3. Select the file to upload in the local drive panel. 4. Click • to upload to sysfile/download Progress is shown in the Threads panel on the left: 8/04/2005 Page 60 of 59 Step 4. Refresh the server panel 5. When the upload is completed the server panel needs refreshing. 6. To refresh click • You should now be able to see your uploaded file on the server. Step 5. Set the URL on the editor box 7. The URL of the file is http://rolexsydneyhobart.com/sysfile/download/RegionalFirst15.pdf. Use this as the URL for the selected download link in the editor box. 8/04/2005 Page 61 of 59 6 Racing Site Mode 6.1 Calendar of changes The site goes through five modes: • Lead-up The site goes into a more active stance. Race entrants are listed in the site. News stories are published more frequently. • Pre-race • Race started From race start. • Race finished From race finish. • Post-race The site is in ex-race mode from the 1st of February to 31st October. The various automatic and manual changes in the site are listed in the table below. Manual changes are detailed in the following sections. Mode Change date Changes Lead-up 1st November Automatic changes Ex-race home page. Manual changes The Yachts is changed from editorial to functional page yachts.asp. Stills, Audio and video gallery pages and published. News title graphics are changed to “Breaking News”. Content changes Editorial in site starts to become more race-oriented. Frequency of news increases (content). In-race Pre-race midDecember Automatic changes In-race home page. Clock counts up from race.start_datetime. In-race Race started In-race Race finished Ex-race th 26 December early January Automatic changes Race clock stopped at finish elapsed time. Automatic changes Ex-race home page. Clock counts down to 13:00 26/12 of current calendar year. Manual changes The Yachts is changed from functional to editorial page. Stills, Audio and Video pages are expired. 8/04/2005 Page 62 of 59 Mode Change date Changes Audio and Video stories are expired. News title graphics are changed to “News Archive”. Content changes 6.2 Site mode controls Click “Site Mode” on the lower left of the CMS navigation. You should see this screen: 6.3 In-race Starting the race Just before the race starts change Stage from Pre-race to Race running 8/04/2005 Page 63 of 59 Click You can check that this change has been effected by looking at the homepage. You should see the leader winner tile and the sked promotion. Note: There is a 30 second delay on the update propagating through to the front-end of the site. This means you may need to refresh the homepage several times to see the change. Changing the start time The start time is set in this control: Select the new start-time Click 6.4 Ex-race Hosting changes • Give 30 days notice to shutdown load-balanced webservers, media server. • Shutdown database server and move to web-server. 8/04/2005 Page 64 of 59 Gallery changes • Expire Stills, Audio and Video subsections. • Expire Audio and Video stories. • Change The Yachts to editorial type page. Suggested wording: Entrants in the next Rolex Sydney Hobart Yacht Race will be listed on this page from mid-November. 8/04/2005 Page 65 of 59 7 Skeds (Streaming Audio) Skeds are played out via streaming audio from the site during the race. 7.1 Approach overview Skeds are captured in the RYCT radio room using a client Flash application in a web browser on a PC with audio in from the radio console. The Flash application streams the audio to the Flash MX Communications Server hosted at WebCentral. Users connect to this server to receive the audio stream via Flash player application. In order to do this a dedicated Sked capture PC needs to be set-up in the race management room of the RYCT. The system requires several steps of set-up and testing. 7.2 Audio capture set-up The following process, while lengthy and specific, is designed to ensure smooth trouble-free set-up of the sked capture. If any of the following steps are skipped or not followed to the letter, there will be problems with the sked set-up. Machine set-up 1. Set up the Sked capture machine in the Race Management room at the RYCT. • • • Bill of materials: Desktop PC: P3, 1GHz, 256MB RAM, CD-ROM, 1024 x 768 screen, sound card with line-in female mini-jack connector. Microphone Speakers RCA-to-minijack adaptor RCA leads to reach from radio room to race management room Gaffer tape to tape down leads and secure all connections Machine set-up Create login for race managers to access this PC – should be an administrator level of access to allow installation of software if need be. Machine should also allow remote access for Massive from the ip range 203.62.157 Software installed Internet Explorer 6.0.26 plus Flash Player 6.0+ iTunes – this will enable Massive to create a sound output to the speakers test the microphone. Rip a CD. Something listenable please. 2. Tape name of PC to top of monitor: “Sked PC” • This is so when talking to volunteers on the phone at 2am I can say “go to the sked PC” and be sure they know which one I’m talking about. 3. This machine needs to be connected to the internet over a 256 kbps connection through the RYCT LAN – see below. Network set-up 4. Set up the LAN in the race management room at RYCT. 5. Open ports 20, 21, 80, 1935 and 3389 on the firewall for this PC. • 8/04/2005 Remote administrator access to the Sked machine should be enabled on the firewall for Massive on the ip range 203.62.157. Page 66 of 59 Audio connection set-up 6. Connect radio console audio-out to PC microphone audio-in on the Sked PC via RCA leads and RCA-to-minijack adaptor. 7. Set sound-card control panel of the Sked PC to receive audio input from the microphone audio in jack. 8. Test audio from radio console can be recorded and played back using Windows Sound Recorder. • Start Menu > Programs > Accessories > Entertainment > Sound Recorder. Test Flash MX Communications Server set-up 9. Set-up an MP3 player application like iTunes on the PC. Record a music CD to the iTunes library. • Choose a CD that won’t get on people’s nerves when listened to for a long time. 10. Start playing the CD on repeating loop with a decent audio level out of the speakers.. 11. Plug in the microphone and point it at the speakers. 12. Open a web browser and enter the following URL http://admin.cyca.com.au/sked_broadcast.asp • During the race you will need to login to the CMS and access the sked panel from there. 13. You will see the audio capture application: • Note 8 kHz refers to the quality of the compression. The higher the number the lower the compression rate and the better the audio quality. Low compression is good, because it means low traffic charges. 14. Click 8/04/2005 Page 67 of 59 15. If this is the first time you have started the stream in this window, you should see the following dialog box: 16. Click 17. The button will change to The streaming is now running. 18. At this point call Adrian Wiggins (Massive Interactive) on 0412 469 309 to confirm set-up. 19. Open a web browser on a different machine with speakers log in to the CMS, set the race to Sydney Hobart, click Skeds and click Check Sked Stream. 20. Click You should hear the stream playing-out on the speakers of your machine. 8/04/2005 Page 68 of 59 7.3 Setting the Sked Times Setting up a sked time 1. Click Skeds on the lower left of the CMS navigation. 2. You should see the list of sked times. • Shown here are two skeds that have been set-up. 3. Click Add Sked to add a new sked time. 4. A filename is unnecessary – enter a dash. 5. Set the start time. Click Save. Pre-sked audio checks 6. 30 minutes before the sked is to commence login to the CMS and navigate to Skeds. 7. Ensure there is audio-in to the PC from the radio console. If necessary tune the radio console to ABC radio 936 kHz. 8. Log in to the CMS, set the race to Sydney Hobart, click Skeds and click Broadcast • 8/04/2005 You will see the audio capture application: Page 69 of 59 • Note 8 kHz refers to the quality of the compression. The higher the number the lower the compression rate and the better the audio quality. Low compression is good, because it means low traffic charges. 9. Click 8/04/2005 Page 70 of 59 10. If this is the first time you have started the stream in this window, you should see the following dialog box: 11. Click 12. The button will change to The streaming is now running. 13. Open a web browser on a different machine with speakers log in to the CMS, set the race to Sydney Hobart, click Skeds and click Check Sked Stream. 14. Click You should hear the stream playing-out on the speakers of your machine. 15. Once you are satisfied with the audio levels click 8/04/2005 Page 71 of 59 Starting the sked 16. At the hour of the sked check that the radio console is still connected to the PC. 17. On the hour of the sked follow step 8 above. 18. 1 minute before the sked follow steps 9 to 14 above. • This is to ensure that the sked audio stream is available when the sked players are accessed by users. • Note: steps 10 and 11 may not be required due to earlier test. Monitoring the sked 19. While the sked is running monitor the audio-in to ensure that only exchanges acceptable for broadcast are streamed out. What happens on the front end? 20. Until race time 0:14:00:00 (27/12 3:00), the homepage tile promoting the sked will look like this: 21. At the time of the sked, the tile will change to “Sked now on” and become a link to the sked player: 22. Check the quality of the audio coming through for volume and white noise. If the quality is poor change the kHz setting to 11 or 22. • There is no need to stop and start the stream to do this and it should have a near immediate effect. Stopping the sked 23. In the case of either an emergency or a normal stop to the sked streaming simply click 24. In the Skeds listing click End Now for the currently scheduled sked. 8/04/2005 Page 72 of 59 25. Follow steps 3 to 5 above to set-up the next sked time. 8/04/2005 Page 73 of 59 8 Producing On-demand Audio and Video 8.1 Setup 1. Create the following directories for working with your various files: • site/media • site/media/DVFs • site/media/WAVs • site/media/FLVs • site/media/video 2. Install Sony Digital Voice Editor Software 3. Install Sorenson Squeeze • Create a shortcut to Sorenson Squeeze in the /media/WAVs and /media/video directories 4. Install Leech FTP • See Section 7 Leech FTP for more details 8.2 Creating Audio FLVs Import from the Sony IC Recorder 1. Open the .DVF in Sony Voice Editor 2. Right-click filename to be converted. 3. Select Convert File Format 8/04/2005 Page 74 of 59 4. Save the file in the format “WAV Files (44kHz 16bit Stereo)” with a short meaningful filename under /WAVs Convert .WAV to .FLV 5. In the /WAVs directory drag and drop the .WAV file onto Sorenson Squeeze 8/04/2005 Page 75 of 59 First run only 6. For the first file that you process on a machine you should also set the default output directory and compression settings. 7. Select /FLVs 8. Click OK 9. Tick Remember Output Folder 10. Set the default compression filter settings for Modem 8/04/2005 Page 76 of 59 11. Make the following settings for audio on Modem: • Toggle Audio Output: Fraunhofer MP3 • Data Rate: 8 Kilobits/Sec • Sample Rate: 22.050 kHz • Channels: Mono • Untoggle Video Output Output files 12. Toggle Flash .FLV button only. 13. Toggle Modem quality button (first blue striped button on the left). 14. You should now see your output files: 15. Click Squeeze It 16. You have now optimised and converted your file to .FLV saved into the /media/audio/FLVs directory 17. Leave Sorenson Squeeze open in case you need to change the optimisation settings. FTP to server 18. FTP the file up to the server. • To be advised 19. Test the file with the following URL. Replace streamSource=filename with the name of the file minus its file extension. 8/04/2005 Page 77 of 59 Set-up an audio story in the CMS 20. Login to the CMS 21. Navigate to the site, race and race year that you wish to add the audio story to. 22. Click Audio 23. You should see the audio listing 8/04/2005 Page 78 of 59 24. Click Add Audio Element Description Headline Label is used as the link to the page in the navigation. • This should be a two or three words. On tile Sets whether the story is promoted on the homepage tile. Priority The priority is the overall sort order of the story. 8/04/2005 Page 79 of 59 Element Description • File name The filename stem of the audio file. • • Length Stories are ordered by their priority then in descending order of publication date. Note for a filename Neville_Crichton_Modem.flv output from Sorenson squeeze, set only “Neville_Crichton” in the filename. The player will append the connection speed. The length of the clip. • Thumb Used to control the progress slider on the player. File name for the editorial image. • For information on selecting images please see Section 4 Gallery Reference Full Full size image for display on the pop-up audio player. Directory Directory of the image. In this case it is the name of the photographer. • W Set automatically. Width of the image. • H Set automatically. Height of the image. • Alt Set automatically. Alt tag for the editorial image. This is the text that appears while a user is mousing over the image. • Set automatically. • Should be updated to suit the context. Short Leader Short leader for the story, published under the headline on the tile. Long Leader Long leader for the story – this is shown on the player pop-up. Override Controls whether the page is published in the site regardless of its publish and expire dates. Publish The calendar date time that the page is available in the site. Expires The calendar date time that the page is no longer available in the site. • Expiry date may be set to a duration, an explicit date time, or to not expire. 25. Click Save. • The story is not stored until you click Save. 26. View the story in the front-end to see if it is OK. 27. The optimisation settings may need to be checked. If the audio Changing the optimisation settings 28. Return to Sorenson Squeeze 8/04/2005 Page 80 of 59 29. Right-click the .FLV filename 30. Select Edit Output Compression Settings… 31. Change the settings as appropriate. 32. Click OK 33. Click Squeeze It 34. FTP the file and recheck 8/04/2005 Page 81 of 59 8.3 Creating Video FLVs Convert .MOV to .FLV 1. In the /video directory drag and drop the .MOV file onto Sorenson Squeeze 8/04/2005 Page 82 of 59 First run only 2. For the first file that you process on a machine you should also set the default output directory. This should only need to be done once. 3. Select /FLVs 4. Click OK 5. Set the default filter settings for Modem and Broadband. 8/04/2005 Page 83 of 59 6. Make the following settings for video on Modem: • Toggle Audio Output: Fraunhofer MP3 • Data Rate: 8 Kilobits/Sec • Sample Rate: 22.050 kHz • Channels: Mono • Toggle Video Output: Sorenson Spark • Data Rate: 48 Kilobits/Sec • Frame Rate: 1 Frames/Sec • Method: Sorenson 2-Pass VBR • Frame Size: 160 x 120 • Key frame every: 30 8/04/2005 Page 84 of 59 7. Make the following settings for video on Broadband: • Toggle Audio Output: Fraunhofer MP3 • Data Rate: 24 Kilobits/Sec • Sample Rate: 22.050 kHz • Channels: Mono • Toggle Video Output: Sorenson Spark • Data Rate: 160 Kilobits/Sec • Frame Rate: 8 Frames/Sec • Method: Sorenson 2-Pass VBR • Frame Size: 160 x 120 • Key frame every: 30 Output files 8. Toggle Flash .FLV button only. 9. Toggle Modem quality button Broadband quality button (first blue striped button on the left) and the (middle button) 10. You should now see your output files: 11. Click OK 12. Click Squeeze It 8/04/2005 Page 85 of 59 13. You have now optimised and converted your file to .FLV saved into the /media/audio/FLVs directory 14. Leave Sorenson Squeeze open in case you need to change the optimisation settings. FTP to server 15. FTP the file up to the server. Set-up a video story in the CMS 16. Login to the CMS 17. Navigate to the site, race and race year that you wish to add the audio story to. 18. Click Video 19. You should see the audio listing 8/04/2005 Page 86 of 59 20. Click Add Video 8. Element Description Headline 9. Label is used as the link to the page in the navigation. • This should be a two or three words. On tile Sets whether the story is promoted on the homepage tile. Priority The priority is the overall sort order of the story. • File name 10. The filename stem of the audio file. • • 8/04/2005 Stories are ordered by their priority then in descending order of publication date. Note for a filename Neville_Crichton_Modem.flv output from Sorenson squeeze, set only “Neville_Crichton” in the filename. The player will append the connection speed. Page 87 of 59 Element Description Length 11. The length of the clip. • Thumb Used to control the progress slider on the player. File name for the editorial image. • Directory For information on selecting images please see Section 4 Gallery Reference Directory of the image. In this case it is the name of the photographer. • W Set automatically. Width of the image. • H Set automatically. Height of the image. • Alt Set automatically. Alt tag for the editorial image. This is the text that appears while a user is mousing over the image. • Set automatically. • Should be updated to suit the context. Short Leader Short leader for the story, published under the headline on the tile. Long Leader Long leader for the story – this is shown on the player pop-up. Override Controls whether the page is published in the site regardless of its publish and expire dates. Publish The calendar date time that the page is available in the site. Expires The calendar date time that the page is no longer available in the site. • Expiry date may be set to a duration, an explicit date time, or to not expire. 12. 21. Click Save. • The story is not stored until you click Save. 22. View the story in the front-end to see if it is OK. The optimisation settings may need to be checked. Changing the optimisation 23. After setting the files in the CMS, you may decide to change the optimisations for this particular file. In this case 24. Right-click the .FLV filename 8/04/2005 Page 88 of 59 25. Select Edit Output Compression Settings… 26. Change the settings as appropriate. 27. Click OK 28. Click Squeeze It 29. FTP the file and recheck 8/04/2005 Page 89 of 59 9 Troubleshooting 9.1 Cache Problems Occasionally you will view a page and be fairly certain that you are not looking at the latest version of that page. This will be most apparent to you on your own site. Caching will typically occur on a proxy server on your own network , and also locally on your own browser client. 9.1.1 Your proxy server Contact your network admin and ask for the caching on the site you are administering to be switched off. This will mean that you always get the latest version of your site from the server. You can also bypass your proxy server as part of your browser client settings – see below. 9.1.2 Your Browser Settings This section describes modifying your own browser settings. • If you are on a home dial-up account, or are sensitive to the cost of traffic, changing these settings will increase your traffic to all sites. After administering the site you should revert these settings. 1. In Internet Explorer select Tools > Internet Options 8/04/2005 Page 90 of 59 Caching 2. Under General > Temporary Internet Files, click Settings 3. Change the settings to “Every visit to the page” and 1MB of disk space. 4. Click OK 8/04/2005 Page 91 of 59 Proxy server 5. Click Connections 6. Select the connection you are using to browse the site. • If on dial-up select the appropriate connection under the Dial-up heading. Click Settings. • If on a corporate LAN, click LAN Settings. 8/04/2005 Page 92 of 59 Dial-up Settings 7. Click Advanced 8. Add your site’s domain name to the Exceptions list. 9. Click OK on the three screens. 8/04/2005 Page 93 of 59 LAN settings 10. If “User a proxy server” has been checked, Click Advanced 11. Add your site’s domain name to the Exceptions list. 12. Click OK on the three screens. 8/04/2005 Page 94 of 59 9.2 Notifying Massive of Changes to the site or Bugs 9.2.1 Logging a bug notification or work request (Variation) This section describes how to notify Massive of changes or bugs in the site. 2. Login to the massive extranet at http://extranet.massive.com.au 3. If you have more than one project with Massive you will need to navigate to the project in which you are making notification. 4. If the item is a bug, review the tracker to see if your bug is already tracked. 5. If it is a new bug, click Submit Item 6. Complete the following fields: • Title – a succinct descriptive title for the item – required. • Type – required. 8/04/2005 o Bug – a broken element – in some cases this may need to be validated as a deliverable against the Functional Specification. o Variation – a work order, or a change to the site as described in the Functional Specification. o Task – a project related task. o Test case – a test for proving that a deliverable has been met. Page 95 of 59 • Priority – how important this item is – this will help the producer schedule the item into a release. Required. Note once an item has been scheduled it may be reprioritised within the release. • Description – the full description of the item. Requried. o Bugs: how the bug was created and description of how the bug is apparent. o Variation: full description of the desired effect of the change to the site, including if possible all affected sections or components. • Component – which named component of the site does the item affect or appear in? Optional. If in doubt leave blank. • Category – what kind of work is involved – this is usually set by the producer. Optional. If in doubt leave blank. • Reference – a reference to a numbered requirement or specification in the Functional Specification document. Optional. If in doubt leave blank. • Filepath / URL – the address at which the change or problem occurs. Optional. Very helpful for understanding bugs. • Fix in release – the release in which the work will be addressed – normally set by the producer. Optional. If in doubt leave blank. • Assign to – you should either assign to none or the your producer. Optional. If in doubt leave blank. • Need date – the date you need to work completed by. Optional. If in doubt leave blank. Your producer will respond with a commit date. 7. Click Submit What happens next 8. The producer reviews the item and responds with: 9. A request for more information. Your producer may contact you by email or phone asking for further details and screenshots. Please supply all requested additional information as soon as possible. 10. A costing if the item is new work, or if the item is a bug out of warranty or out of original scope. For more information on Variations please review the Massive Project Methodology. 11. The item once approved for work is assigned to a resource and a release. 12. Once the resource has completed the item it is marked as resolved in the tracker. 13. The producer reviews and tests resolved items, and closes them if they are finalised. 14. Once the work is completed it will be scheduled for release. 8/04/2005 Page 96 of 59 9.2.2 Glossary Component Your site will be made up of a number of customised elements. These elements are listed on an as-need basis in the tracker as components. A component may be general or specific – eg a particular page, or a whole section. Release Releases are used to prioritise, schedule and group related changes and fixes in the site. Release numbering consists of 3 numbers separated by dots. The first number corresponds to the phase of the project. The second is a major release of deliverables. The third number is a subset micro-release of deliverables. 0.x.x is a pre-release of the site, usually on Massive’s development environment. 1.x.x is the phase one release of the site. 2.x.x is the phase two release of the site. In phase one this is used as a place to put good ideas or out-of-scope work from phase one. 8/04/2005 Page 97 of 59