1
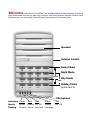
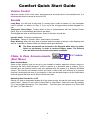
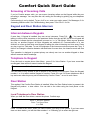
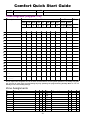
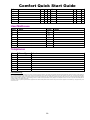
Quick Start
User Guide
Comfort
the intelligent home system
Welcome
to the world of Comfort, the Intelligent Home & Office System. This Quick
Start Guide shows how you can start using Comfort's most useful features, while the Comfort User’s
Reference goes into more detail on how to take full advantage of this unique system.
Speaker
Volume Control
Away Mode
Night Mode
PANIC
Day Mode
FIRE
Holiday Mode
(press twice)
Microphone
Indicators Green Red
Red
Green
Red
Steady
Home Armed AC Off
Memo
Mic ON
Flashing
Trouble Alarm Low Batt. Message
Comfort Quick Start Guide
Getting to Know Your Keypad
The Keypad is the control centre for Comfort. In addition to arming and disarming the security
system, your Keypad allows you to record and access your messages on the built-in answering
machine, gives short-cut access to commonly used menus and functions, and acts as an
intercom with other Keypads on the premises. This section introduces you to the buttons, controls
and indicators on the Keypad
Indicators
Steady if disarmed
Blinking if Trouble
(Phone Cut, AC Fail, Low
Battery, Zone Trouble
Steady if Microphone is ON,
for recording message or in
intercom
On (Steady)
Blinking
Steady if Armed
Blinking if Alarm or Alert
State
Steady if New Memo from user.
Blinking if New message from
incoming call
Press # to find out who the
message is for
Steady if AC Fail
(Power Failure)
Blinking if Low
Battery
3
Comfort Quick Start Guide
One-Touch Buttons
Arm to AWAY Mode
Arm to Away when all occupants are away from the premises.
Arm to NIGHT Mode
Arm to Night when going to bed. All zones are protected except for selected zones
where movement is allowed
Arm to Day Mode
Arm to Day Mode during the day or at night to protect only doors and windows,
allowing movement in interior zones.
#
New Messages, or Force Arm Key when arming
If Messages Indicator is steady or blinking, press # to find out who has new
messages. However, if # is pressed while Comfort is doing a dial-out, a long beep
tone is heard. Try again in a minute.
If # is pressed during arming while open zones are announced, the system will be
force-armed, automatically bypassing open zones.
The F key selects a Function by pressing any of the other keys. The Functions are
defined in the next table. The F key also ends the menu, Intercom or other keypad
operation.
(
Pressing the F key while in a menu or Intercom Mode will end the keypad
operation. Comfort will say “Goodbye, Thank You”. In Office situations, or
where user accountability is required, One Touch arming should not be
used due to it’s anonymity. In this case, arming the system can be done
from each users pin code followed by Menu 1 and the required number
which is assigned to the desired Security Mode.
Function Keys
Press the F key followed by 0 to 9, * or #. For high-security functions, you will be asked for your
sign in code and # key to access the selected function.
Default Functions
Icon
F+1
F+2
F+3
F+4
Function and Instructions
Bypass Zones
"Enter Zone number & # key
Press 1 to bypass, 0 to unbypass.
Home Control Menu
Menu
User 3,1
User 4
The list of appliances controlled will be announced, if any
User 3,4
Test Menu
1 - Battery Test (turn off AC to test battery)
2 - Security Check (announce activated zones)
3 - Dial Test (audible dial to programmed phones)
4 - Siren Test (test the siren for a few seconds)
5 - Strobe Test (turn on and off strobe)
User 2,4
Record Memo
Record a Memo message into any mailbox. New Message LED will light up. Pressing
# tells who the memo is for. Hear message by pressing *+code+#
User 3,3
Event Log
4
Comfort Quick Start Guide
Icon
F+5
F+6
Function and Instructions
Menu
1 - Next Event, 2 - Previous Event, 3 - Next Day,
4 - Previous Day, 9 - Last Event
Program 4
Program Phone Numbers
Select Phone 1 to 8
For each Phone, assign Phone Type as follows:
0 = No Phone, 1 = Voice Phone (mobile or wired ) 2 = Pager, 3 = Alarm Voice
Message, then "Enter Telephone number and # Key"
User 3,0
Change Sign In Codes
F+7
Sign in with your present code.
Enter new code and # key. Repeat to confirm
F+8
F+9
F+0
Program 2
INTERCOM
Broadcast to all keypads, whoever answers by pressing any keypad/intercom
button, all other keypads are switched off except the two who may then talk. To
change conversation direction, each caller must press their button to talk, the lights
shows up as a cue to talk. Menu - only if more than I Keypad!
N/A
Time Program Menu
Up to 14 available times to change the timing of events such as heating and
air-conditioning.
Program 3,4,1
Enable Engineer Sign-in Code
Allow Installer's Engineer Code to gain access for programming. This is
automatically disabled when armed or at the end of the day
Program 1
Answering Machine Settings (or Baby Monitor)
F+*
1 - No of Rings before answer in each mode
2 - Record Time (record time for messages etc.
3 - Erase All User (users & codes)
4 - Add Users (add user codes)
5 - Erase user (individual codes & messages)
6 - Record Greeting Message (for incoming calls)
7 - Play Greeting Message
#
Reminder Messages Menu
F+#
Enter Reminder no (1-8) and #. 1=message, 2=Time, 3=Day of week, 4=reminder
off, 5 =mailbox
Arm to Holiday Mode
Arm to Holiday Mode (same as Away) when all occupants are away from the
premises. Holiday Program responses will run and the system will assume a Holiday
Mode Status.
F+F
User 2,5
Emergency Keys (2-key combinations)
Press the following 2--key combinations simultaneously to activate the built-in Emergency
functions. Practice pressing the two keys at the same time. For best results, put your thumb on
the F key and your index finger on the other key (AWAY or NIGHT) and hold them until you hear
the alarm.
Keys
Function
F + AWAY causes a PANIC Alarm
F + NIGHT causes a FIRE Alarm
5
Comfort Quick Start Guide
Volume Control
Adjust the volume of the voice menu, announcements and siren tones to the desired level. It is
recommended that the volume is never left ‘Off’.
Sounds
Long Beep: You will hear a long beep if a wrong sign-in code is entered, or if an incomplete
code is entered, i.e. without a # key, or if you try to use a Keypad when another Keypad is in
use.
Continuous Short Beeps: Trouble alarm or loss of communication with the Comfort Control
Panel. Sign in to acknowledge and silence the alarm.
The Keypad also acts as an internal siren. Some of the siren sounds are:
Intruder Alarm: Continuous wailing tone
Fire Alarm: Series of 3 pulses, with a short silence in between.
Entry Warning: When the entry door is opened when the system is armed, a slow beeping tone
acts as a reminder to disarm before the Intruder alarm goes activates.
(
The Siren sounds will not be heard on the Keypads when there is a power
failure or low battery, in order to conserve battery power. The External
siren will still sound as normal under these conditions.
Chime & Zone Announcements
(Alert Menu)
2 6
alert menu
Home Control Menu:
Areas of your property may be set-up by your installer to make a detector/s initiate a sound or
announce the zone name whenever a door is opened or a protected area is entered. This is
intended as a low security function and only operates while the system is in Security Off Mode
(Unset). This function can announce when you have a visitor enter your driveway or if ‘persons
unknown’ should enter the rear of your property. It may also be used simply to let you know that a
child has opened the door and is about to leave the house.
Switching Alert Sounds On or Off
Should you wish to temporarily disable all of the chime sounds, this can be done using the home
control menu. Option 6 in the Home Control Menu is ‘Alert Menu’. Select this menu by pressing
F2 on any keypad followed by 6 for ‘Alert Menu’. This then gives two options: 0 for Door Alert
Off’ and 1 for ‘Door Alert On’.
6
Comfort Quick Start Guide
Using The Security System
Arming the Security System
You can arm the security system to Away, Night, Day or Holiday Modes using the one-touch
keys (the 4 keys on the far right). Follow the steps below.
Away Mode
Arm to Away if all occupants are leaving the premises, by pressing the Away Key
If any
doors and windows are open, their names will be announced, close them and leave the premises
by the entry door. When the door is closed, you will hear 2 beeps on the siren and/or voice on
the doorphone to confirm that the system is armed.
Re-entry
Now enter the premises by the Entry door. The Keypad gives a steady beeping signal to warn
you that you must turn off the security system before it goes into alarm. Enter your code (default
1234#) on the Keypad. The red Armed/Alarm LED indicator turns off and the green
Home/Trouble LED indicator turns on to show that security is off, and the voice says “Security
Off”. Using the *star key in front of you code will take you to a menu rather than switch off the
system, should this happen, pressing the 0 key will disarm the system as usual.
Day Mode
Press the Day button
to arm to Day Mode. Depending on your design Day Mode may
either protect the perimeter of your property or separate areas requiring daytime protection. The
security system will arm after a few seconds and announce “Day Mode”. The red Armed/Alarm
indicator on the Keypad will be lighted. You may move around freely within the premises without
causing an alarm while the doors and windows are protected. To turn off the security, enter your
code (default 1234#). The voice will announce “Security Off” and the green Home/Trouble LED
will come on.
Night Mode
Press the Night button
(to arm to “Night Mode”. Arm to “Night Mode” when everyone goes to
sleep at night. All zones are protected, with the possible exception of designated interior zones
such as Bedrooms and landings. After a few seconds, the red Armed/Alarm LED indicator comes
on and the Keypad announces “Night Mode”.
If the Entry door is opened in “Night Mode”, an entry delay will be started to allow time to turn off
security, to allow people to come home at night. If the system was previously armed to “Day
Mode”, you can arm to “Night Mode” directly without having to disarm from “Day Mode”.
Holiday Mode
This is identical to arming the system to “Away Mode” if all occupants are leaving the premises,
the difference is that sequenced events such as operating lights, curtains, radio or TV, intended
to give the impression of an occupied house, will come into operation each day or evening
(provided they have been provided by your installer). These events do not happen at precise
times but will operate randomly within one hour of their scheduled time. This way, someone
watching the property will find it difficult to identify a pattern, providing a deterrent effect. To set
this mode simply press the function key twice.
Force-Arming
7
Comfort Quick Start Guide
If some zones are open while you are trying to arm, you may force-arm by pressing the # key.
This bypasses all open zones until they are closed. If the open zones are closed later, they will be
protected like other zones.
Security Off
Kitchen Window
Bypass Off
Press 1 for On, 0
for Off
To turn off an alarm, enter your code (default 1234#). Entering the
code (and # key) during an alarm, or when the system is armed will
turn off the security. Pressing * before the code will access the
voice menu and not turn off the security or alarm, in the case of an
alarm during “Night Mode” allowing access to Menu 5 to help
determine if there is an intruder in the house.
Changing Your Code
Press F+7 it
. The Keypad menu says
Please Sign In
Enter your existing code and # key. The voice menu will ask for the new code.
Enter new code and # key
Enter your new code of 4 to 6 digits and the # key. The Keypad will ask for the code to be
entered again as confirmation.
To confirm, Enter New Code and # key
If the number corresponds with the 1st number entered, the voice menu will say
Sign-in Code OK
Always change your code as soon as you can after Comfort is commissioned.
Bypassing Zones
To temporarily bypass a zone (i.e. cause the system to ignore a zone), press F +1
window icon). The Keypad voice menu says:
(open
Enter Zone Number and # key
The Zone assignment table is at the back of this booklet. Enter the zone number to bypass and
the # key. The zone name is then announced, e.g.
Press 1 to bypass and 0 to un-bypass. A bypassed zone will not cause an alarm. It is
automatically un-bypassed the next time security is switched off.
Emergency Menu
Press the code * 9999 # on the keypad or telephone The menu says:
1 for Fire
2 for Panic
8
Comfort Quick Start Guide
Press 2 for Panic. The Panic alarm will be activated. Enter your code to turn it off. This can be
used to raise the alarm if there is no Panic button close by.
Press 1 for Fire to activate the Fire alarm. The siren pattern (3 pulses repeated) is distinct from
the Intruder alarm. Enter your code to turn it off.
Changing Telephone Numbers
Press F+6
The Keypad menu is
Select Phone
Up to 8 telephones or pagers may be programmed for dial out in case of an alarm or event. First,
select which of the 8 telephone positions to use. If your premises is monitored by a Central
Station, phone positions 1 and 2 will be taken up, and 3 to 8 will be available for telephones or
pagers. If not, all 8 positions can be used. Press 3 for phone position 3.
No Phone...
Press 0 for No Phone
1 for Voice Phone
2 for Pager
3 for Alarm Message
4 for Monitoring Station
To program a telephone (wired or mobile) press 1. For numeric pager, press 2.
The voice menu says
Voice Phone (or Pager)
Enter new number and # key
Enter the new number and # key. This sub-menu does not allow the Monitoring Station type or
number to be changed.
Monitoring Station Phone Type may not be assigned from this menu. If a phone position is
already assigned to Monitoring Station, it may not be changed except by the Installer.
Check that Comfort can dial to the programmed numbers with the Dial Test, described below in
Checking Comfort.
Checking Comfort
Press F+3
to hear the Test Menu
Press 1 for Battery Check
2 for Security Check
3 for Dial Test
4 for Siren
5 for Strobe
This allows you to test your security system.
Battery Check
Press 1 to test your standby battery. This test will turn off the mains power to Comfort for 2
minutes. If a low battery condition is detected, a Low Battery Alarm is generated and the Mains is
turned on again.
Security Check
9
Comfort Quick Start Guide
Press 2 for Security Check. Walk through the premises, opening protected doors and windows
and triggering detectors. All zones activated will be announced on the Keypads. 24 hour
detectors like Smoke detectors and Panic switches can be tested without causing an alarm or dial
out. To end, press any key. Warning: Any 24 hour detectors left on will cause an alarm.
Dial Test
Press 3 for Dial Test. This initiates a dial out to all the programmed phones. On pagers, the code
reported is xxxx-27-xx for Dial Test. For Voice Phones, the Alarm Type announced is “Dial Test”.
For Central Stations, the event reported is Test. During the dial test, all tones and sounds are
audible, so you can monitor the progress of the calls.
Siren Test
Press 4 for Siren test. This produces a short burst on the siren to test that it still working.
Strobe Test
Press 5 for Strobe Test then 1 for ON or 0 for Off.
Allowing Engineer Access
To allow the Engineer Code to gain access to Comfort for programming, troubleshooting, or
interrogation after an alarm, press F+0
. In some cases this may dial-out directly to your
installer.
What to do during an Alarm
See “What to do During an Alarm” in the Comfort User Reference
Event Log
Comfort has an Event Log for the most recent 250 events, which are retained in non-volatile
memory even when power, including the standby battery is completely removed. This event log
includes arming, disarming, alarms, zones triggered and all relevant security events. Each event
is date and time stamped. Press F+5
to hear the event log. When listening to the Voice
menu you can navigate through the Event Log by pressing 1 for next event, 2 for Previous event,
3 for Next Day, 4 for Previous Day, 0 for 1st event, 9 for last event. It is best to start by pressing
9 for the last event and then move back from there.
This is extremely useful to determine what happened after an alarm.
Changing Date and Time
It is important to ensure that Comfort has the correct date and time. Events in the event log and
messages in the mailboxes are date and time stamped. Time Programs also make use of Date
and Time. To change Date and Time, enter the program Menu by entering your Master Code and
then selecting Menu 9 and press 2 for Date and Time
3:34 PM, 1998 February 1, Sunday (e.g.)
Press 1 to Change Date
2 to Change Time
Press 1 to change Date, 2 to change Time.
10
Comfort Quick Start Guide
Check the accuracy of the clock every few months. Comfort will make clock adjustments known
as ‘Daylight Savings’. These will occur at 2AM on the last Sunday of the months of March and
October ensuring that your clock is set to the correct time.
11
Comfort Quick Start Guide
Using the Answering Machine
Record a Memo Message
You can leave messages for members of the family or staff in the office.
To record a message, press F+4
The Keypad prompts you to leave a message.
Leave Your Message after the Tone.... (beep)
Leave a short message, and press any key to end. The Message LED should light up when a
new message is available. Press the # key. Comfort will announce who the message is for.
New Message for .. Mailbox number 1
If you record a name for the mailbox, then the name will be announced in the above sentence
instead of the mailbox number.
To retrieve the message, just enter your code. Comfort automatically plays any new messages in
your mailbox.
Up to 8 mailboxes can be set up. If there is more than 1 mailbox, you can leave memos messages
in any mailbox.
If you assign a telephone number to your mailbox, Comfort will forward the new message to the
programmed telephone.
Adding Users
Each member of the family or staff can have their own mailbox and personal code. Using their
own code, they can retrieve messages in their own mailbox. To add a user code or mailbox,
Press F+* for Answering Machine Settings, then press 4 for Add Mailbox.
New User... 2, Enter New code and # key
Enter a 4 to 6 digit code and #. Comfort asks for confirmation. Enter the code again when
prompted.
Comfort supports up to 16 users, but only the first 8 users have mailboxes.
Recording User Names
Press * followed by your code (default 1234#). The User Menu will be heard. Press 2 for
Messages, 6 for Mailbox Options, 2 to Record Mailbox Name. You will be prompted
Say Your Name After the Tone... (beep)
Say your name and press any key to end.
Press 3 to hear the name recorded.
(
The recording quality will be better if this is done on the home telephone
rather than a Keypad.
Record a Greeting Message
Record a Greeting Message if you would like to use the built-in answering machine. Press F+*
for Answering Machine settings, 6 for Record Greeting Message. Record the greeting message
12
Comfort Quick Start Guide
after the tone and press # to end the recording. After recording, you may listen to the greeting
message by pressing 7. If a greeting message is not recorded, incoming callers will hear "Please
Sign In" when the system answers the phone. When recording this message, It is worth
considering the suitability of the message for systems which are also capable of recording
messages at the doorphone.
Recording Messages from Incoming Callers
If the Greeting Message and mailbox names are recorded, the incoming caller will hear the
Greeting Message, followed by
Press 1 for (user name 1)
2 for (user name 2)
3 for (user name 3)
...
The user names are recorded by each user. The caller can select any user they wish to leave a
message for. Mailboxes without recorded names will not be announced in the list. Callers can
leave messages in mailboxes that do not have a name by selecting the user number , but it is
better to have recorded names. The answering machine can store more than 10 minutes of
messages. When a new message comes in and the memory is full, Comfort automatically erases
the oldest saved message. If a telephone is assigned to a mailbox, new messages will be
automatically forwarded to the telephone. (See New Message Forwarding)
Retrieving Messages from Mailboxes
The MSG LED blinks if there are new messages from incoming callers, and it is steady if there
are new memos from other users. Press # to find out who the new messages are for. Each user
can retrieve the messages in their mailbox by entering their own code. Comfort plays any new
messages in the mailbox. When new messages have been played, they become saved
messages. Saved messages can be played by going into User Menu 2 for Messages, and 2 to
hear saved Messages.
Changing the Number of Rings for Comfort to Answer
Comfort answers the phone after a programmable number of rings for each mode that the system
is in. To change this, Press F+* for Answering Machine Settings and press 1 for Number of
Rings.
Press 0 for Security off
1 for Away Mode
2 for Night Mode
3 for Day Mode
You can set the number of rings to answer in each of the 4 security modes.
New Message Forwarding
Comfort has the unique ability to forward new messages for your mailbox to your mobile phone.
To turn this on this, enter your code, then 2 for Messages, 6 for Answering Machine, 7 to Select
Phone. Press the number corresponding to the position (1 to 8) your mobile phone was
programmed. This assigns your telephone to your mailbox. To stop forwarding of new voice mail
, enter 0 for No Phone for your mailbox.
13
Comfort Quick Start Guide
Screening of Incoming Calls
If you let Comfort answer calls, you can screen incoming callers on the Keypad while they are
recording a message. You may take the call, ending the recording by picking up your telephone
handset.
Call screening is on by default. To turn it off or on, enter your code, press 2 for Messages, 6 for
Answering Machine and 6 for Call Monitoring, then press 0 for Off or 1 for On.
Keypad and Door Station Intercom
Intercom between Keypads
If more than 1 Keypad is installed, they can act as intercoms. Press F+8
. You can start
talking to all the other intercoms on the premises. Notice that the red MIC led on the Keypad will
illuminate to indicate that the microphone is turned on, i.e. in Talk Mode. When anyone presses
any key on another Keypad, all other Keypads are switched off. Communication is in one
direction at a time so that when one Keypad is talking the other is listening and vice versa. Press
any key to go into Talk state. To end, the originator of the Intercom mode must press the F key. If
there is no change in direction between talk and listen for some time, the Intercom mode will time
out.
This operation is designed to protect privacy as nobody can turn on another Keypad to listen
without someone else's knowledge
Telephone to Keypad
From the local or remote phone User Menu, press 5 for Voice Station. If you have more than
one Keypad, there will be a menu to select the Keypad
Select Station 1 to (maximum)
You can listen to any sounds or talk to anyone in the vacinity of the Keypad. Press the Keypad
number 1 to 4 to select another Keypad to monitor. Press # to end. On some telephones the #
key and some other keys may not be detected by Comfort. Press * to end in such cases.
Door Station
This applies if the Comfort Door Station is installed. When the Door Station button is pressed, the
Keypad will produce a door chime. You can talk to the visitor using the local phone or the
Keypad.
Local Telephone to Door Station
When you hear the Door chime, answer the phone. Comfort says
Press 1 for Door Station
Press 7 to Open Door
# to End
Press 1 to talk to the visitor. When you have finished, just hang up the phone. If you have more
than one door station, you will also hear number 1 or 2 allowing you to select the right one.
14
Comfort Quick Start Guide
Keypad to Door Station
When you hear the Door chime, press any key on the Keypad. You will be asked to press 1 for
Door Station just like on the phone. The difference with using the Keypad is that only one side
can talk at a time. Press 1 on the Keypad to change the direction of conversation. To end, press
F. If your installer has provided an electric lock-release for your door or Gate, pressing ‘7’ during
the menu will Open the lock.
Remote Door Station
If the security system is armed to Away or Holiday Modes and the Door station button is pressed,
Comfort can call to your mobile phone (if instructed to do so), so that you can talk to the visitor
wherever you are.
Door Station Recording
If no one answers the Door Station either in the premises or remotely, after a certain time
(approx. 30 seconds), the Door Station can take a message from the visitor. This message will
show as a solid light on the keypad and can be retrieved from the assigned mailbox in the usual
way.
Comfort Voice Menus
By Keypad
Press * and your code and # key to access the User Voice Menu. If you put * before your code,
it does not disarm the security system.
(
When the system is armed (security is on) or there is an alarm, entering
your code without the * key in front turns off the security or alarm
The default Master Code is 1234. Change your code as soon as possible to prevent unauthorised
access into your security system.
By Local Telephone
Any telephone on the same line as your system can be used to for controlling Comfort.
1. Lift the handset or turn on hands-free mode
2. Within 4 seconds, press *, then your code and # key
3. Comfort will play the User Menu.
By Remote Telephone
You can also access Comfort from any telephone in the world.
1. Dial to your telephone number.
2. If no one answers the phone after the programmed number of rings, Comfort
answers, and plays the greeting message (if it has been recorded).
3. While the greeting message is playing, press *, then your User and # key.
4. The User Menu will be played as usual.
Program Menu
15
Comfort Quick Start Guide
Only the Master Code (default 1234) is allowed to go into the program Menu (9) to add and
delete users, change time and date, and change answering machine settings. From the User
Menu, press 9 for Program menu.
Details of the User and Program Menus can be found in the User Reference Manual.
16
Comfort Quick Start Guide
Pager Display Format
The information displayed on numeric pagers is in the following format
XXXX - YY - ZZ
XXXX is the Pager Report Code which identifies your Comfort System. This can be changed in
Program Menu, 3 for Security Options, 3 for Pager Report Code.
YY is the Alarm Type,
ZZ is either the Zone, User number or Keypad address depending on the Alarm Type, according
to the table.
YY Description
ZZ
YY
Description
ZZ
1 Intruder
Zone
17 Security Off
User
2 Duress
User
18 CMS Test
User
3 Line Cut
01
19 System Armed User
4 Arm Fail
User
20 Alarm Abort
User
5 Zone Trouble
Zone
21 Entry Warning 6 Zone Alert
Zone
22 Siren Trouble
7 Low Battery
01
23 Force Arm
User
7 Low Bat Restore
00
24 RS485 Comms Keypad
8 Power Fail
01
24 RS485 Restore
0
8 Power Fail Restore 00
25 Doorbell
Door Station
9 Panic
Zone
26
User
10 Entry Alert
Zone
27 Dial Test
User
11 Tamper
Zone
28 CMS Fail
11 Tamper Restore
00
29 New Message
User
12 Fire
Zone
30 Engineer Dial
13 Gas
Zone
31 Sign-in Tamper 14 Family Care
Zone
15 Perimeter
Zone
16 Bypass Zone
Zone
Not all of the above Alarm Types may be transmitted to the pager.
Home Control Menu (Keypad - F2) (Phone - Menu 4)
0
5
0
1
2
3
4
5
6
7
8
0
1
2
3
4
5
6
7
8
9
*
9
*
17
Comfort Quick Start Guide
Lights Menu
1
0
1
2
3
4
5
6
7
8
6
Alert Menu
0
1
2
3
4
5
6
7
8
Door Alert Off
Door Alert On
9
9
*
*
HVAC Menu
2
0
1
2
3
4
5
6
7
8
7
0
1
2
3
4
5
6
7
8
9
9
*
*
Outside Lights Menu
3
0
1
2
3
4
5
6
7
8
8
0
1
2
3
4
5
6
7
8
9
9
*
*
4
9
0
1
2
3
4
5
6
7
8
0
1
2
3
4
5
6
7
8
18
Comfort Quick Start Guide
9
9
*
*
Time Programs (Keypad - F9)
No Description
Day of Week
Mon
Tue Wed Thu
1
2
3
4
Time
Fri
Sat
Sun
Hol
5
6
7
8
Hours
Resp
Mins
(0-23) (0-59)
(0-255)
Press 2
Press
3
Press 1
1
2
3
4
5
6
7
8
9
10
11
12
13
14
15 ARC 24-Hr Dial
Test
16
1
1
1
1
1
1
DST Adjust
+/-1hour
1
23
00
29
1
2
00
90
Do not adjust Time Programs 15 & 16 as these are essential for correct system operation. The Holiday Flag (Hol)
will override all other days of week settings by only operating the program during Holiday Mode or if it is a
Holiday as set in the Holiday settings.
Zone Assignments
Zone
1
2
3
4
5
6
7
8
9
Description
D
A N
19
Zone
17
18
19
20
21
22
23
24
25
Description
D
A
N
Comfort Quick Start Guide
10
11
12
13
14
15
16
26
27
28
29
30
31
32
User/Mailboxes
User
1
2
3
4
5
6
7
8
Name
User
9
10
11
12
13
14
15
16
Name
Telephones
No
1
2
3
4
5
6
7
8
Phone Type
Number
Limited Warranty
Cytech Technology Pte Ltd. provides a warranty for a period of 12 months from the date of purchase. This warranty covers defects in materials and workmanship under conditions of normal use by the original buyer
only. In the case of any breach of such warranty, Cytech Technology Pte Ltd shall either repair or replace the defective equipment upon return of the equipment to its repair center. This warranty does not apply to
damages incurred in shipping, handling or other causes beyond the control of Cytech Technology Pte. Ltd, including but not limited to: alterations to the product, abuse, improper application, lightning, physical
damage, excessive voltage or temperature. Cytech Technology Pte Ltd is not liable under any circumstances for any damages, loss of anticipated revenue, loss of time or any other losses resulting from the
purchase, installation, use or failure of this product.
The telephone company may ask that you disconnect this equipment from the network until the problem has been corrected or until you are sure that the equipment is not malfunctioning. This equipment may not be
used on coin service.
20