1
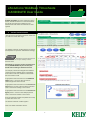
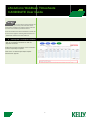
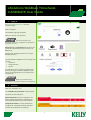
eSolutions WebBase Timesheets
CANDIDATE User Guide
1.
Logging In
Go to www.kellyservices.com.au and select
“eSolutions Login”
Select “Candidates”
The Candidate Login page will appear
Enter your “User ID” and “Password”
If you have forgotten your
password, please go to “Forgotten your password?”
and select click here
Please note: After 5 unsuccessful login attempts, the
system will automatically lock the user out for a 2hour period.
Please contact your Kelly Consultant to re-set your
WebBase password.
The initial eSolutions WebBase screen will appear with
icons for:
• Timesheets
• Change Password
• Log Out
It is advisable for you to change your password the
first time you log in to eSolutions WebBase, simply
click on the “Change Password” icon and enter your
new password.
Make your password easy to
remember as you will be using this on a weekly basis.
2.
Timesheets
Select the “Timesheets” icon
The “Candidate jobs / timesheets” window displays.
Timesheets are sorted by status:
Rejected timesheets are colour coded with a red
border. Rejected timesheets are reviewed by the
client and denied based on incorrect information.
Incomplete timesheets are colour coded with an
orange border. Incomplete timesheets have been
saved by the candidate but not submitted.
1
eSolutions WebBase Timesheets
CANDIDATE User Guide
Available Timesheets are colour coded with a green
border. Available timesheets are new timesheets for
the period and require the candidate to enter
timesheet data and submit the timesheet for client
approval
3.
Add New Timesheet Details
Within the “Candidate jobs/timesheets” window click
“Add” against the appropriate timesheets. Make sure
you select the correct date range.
Start Stop Times Timesheet (Hourly Timesheet Interface)
The “Adding Timesheet” window displays, the format
will depend on the job order. Add details accordingly.
Timesheets must be entered in 24
hour time. You can use your Tab key to move
between fields
Please Note: it is necessary to enter start/stop times
for any UNPAID BREAKS only. Do not enter paid
breaks such as morning or afternoon tea break
For example, in illustration alongside the candidate
commenced work at 8.00am with an unpaid break
from 12.00 to 13.00. The candidate continued their
shift from 13.00 to 17.00.
If appropriate enter information into the Additional
Claims section – use this to alert the client to
additional payment claims incurred.
If appropriate enter information into the Comment to
Client section –use this to alert the client of planned
leave or information relating to the contract.
If appropriate enter information into the Comment to
Agency section – use this to alert Kelly of planned
leave or information relating to the contract.
Once the timesheet had been completed and is ready
to submit click “Save” icon.
The “Submit Timesheet” window appears.
Select “Yes Submit Timesheets” button.
2
eSolutions WebBase Timesheets
CANDIDATE User Guide
You can also key the timesheet and
then save it so you can key more time later in the
week before sending it for approval. Select “No Save
for Later Use” button if you wish to do this.
Once the timesheet has been submitted an email will
be sent to the approver advising them that there is a
“Submitted” timesheet for their approval.
4.
Edit Rejected or Incomplete Timesheets
On the “Candidate jobs/timesheets” window, click
“Edit” for “Incomplete” timesheets or “Edit” for
“Rejected” timesheets.
Update the timesheet accordingly, insert “Comments”
to Client and/or Kelly as required.
Select “Save” to resubmit rejected/incomplete
timesheets for approval
3