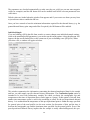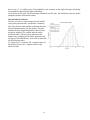
1
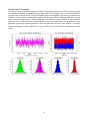
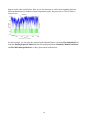
QTQt User Guide
Kerry Gallagher
[email protected]
1
Introduction
QTQt is a program to infer thermal histories from low temperature thermochronology data using
multiple samples. The name comes from QT being Quantitative Thermochronology and Qt
(pronounced as cute or cutie) being the software used to develop the user interface. QTQt is
currently implemented for apatite and zircon fission track, apatite (U-Th)/He data and vitrinite
reflectance, although future versions should include Argon data too. You can enter you own kinetics
for any mineral/isotope system combination (e.g. to simulate zircon (U-Th)/He or mica argon data,
subject to the requirement that the diffusion domain can be treated as a single sphere, whose size, or
equivalent dimesions of a rectangular crystal need to be sepcified also). Also, the current version
allows for multiple sample modelling only if the samples under consideration have the same form of
thermal history, i.e. can be treated as a vertical profile (see Gallagher et al 2005). You can still model
a single sample, but for generality we will still refer to a profile (even if there is just one sample). A
future version will include the 3D partition model-vertical profile approach developed by Stephenson
et al. (2006).
The program uses the multicompositional algorithms of Ketcham et al (1999, 2007) and the
original Durango apatite-based algorithm of Laslett et al. (1987) for predicting fission track
annealing in apatite, and those of Tagami et al (1998) and Yamada (2007) for zircon. Currently, a
given sample can be modelled with a constant composition (if appropriate). The composition could
be taken as the average of measured single grain compositions or alternatively a single real sample
could be divided up into multiple samples based on different compositions for example amd then
treated as mutliple sample for modelling purposes. Similarly a sample with both apatite and zircon
data should be treated as 2 samples. For predicting He diffusion, standard diffusion equations are
used (explicitly a spherical grain with the same surface area to volume ratio as the dimensions
specified for a real grain). You can input kinetic parameters to simulate He diffusion in any mineral
(zircon for example). The He diffusion model also includes the recent developments on radiation
damage trapping (Flowers et al. 2009, Gautheron et al. 2010), using fission track annealing as a
proxy to recalibrate the helium diffusion coefficient. It is possible also to include 4He/3He degassing
spectrum as part of the He data modelling process. Finally, vitrinite reflectance data can be
incorporated, being used either as a direct constraint on the inferred thermal histories, or it is possible
just to predict vitrinite reflectance and make a qualititative comparison to the observed values.
The inversion scheme is Bayesian transdimensional Markov chain Monte Carlo (MCMC), in
which the number of time temperature points (or the complexity of the thermal history solutions are
inferred from the data rather than being specified in advance). The development of the method for
thermal history modelling is given in Gallagher (2012), and some other relevant publications are
Gallagher et al. (2009), Charvin et al. (2009), Hopcroft et al. (2007) and Sambridge et al (2006). The
approach as implemented in QTQt allows the user to specify one general time-temperature box, from
which time-temperature points are sampled to construct a continuous thermal history by linear
interpolation between the sampled points. It also allows for up to 5 additional time-temperature boxes
to be specified to allow the user to add more specific constraints on the thermal history.
It is possible to select resampling schemes for the observed data, or the errors on the
observations it it is considered they are not well known (or could be more noisy than the default
values may suggest). This is sometimes referred to as Empirical or Hierachcial Bayes and examples
of this are given in Gallagher et al. (2011).
When the program is actually running there is little to see (just a progress bar in the top level
window). The results of the run are saved to a file (which is deleted when you quit the program,
unless you choose to save it), and this summary file is used for generating a series of plots to examine
the results once the run has finished.
2
QTQt was written in C and C++ by Kerry Gallagher ([email protected]), although
some of the implementation of the fission track annealing algorithms is based substantially on
subroutines provided by Richard Ketcham, and Rich’s co-operation is gratefully acknowledged. We
also acknowledge QT for providing such a professional programming environment for free. This
software would not exist without them.
QTQt has been developed on a Macintosh using OS X 10.6 (Snow Leopard). The 64 bit version (built
with Qt 4.7.0) will run on machines with OS X 105 (Panther) or higher, and requires an Intel
processor (32 or 64 bit). The 32bit version (built with Qt 4.5.2) will run on at least OS 10.4 (Tiger)
and also run on the older PPC processors (although is likely to be pretty slow).
The PC version has been tested on various operating systems (Windows XP, Vista), but not
extensively.
If you have problems with any version (i.e. it crashes) then feel free to contact Kerry Gallagher. Try
and detail as much as you can concerning what you did and how it crashed. Also, send the data files
you were using as that seems to be the most common fault. Some platform specific issues are
highlighted in this documentation as PC USERS.. or MAC USERS…
However, read this documentation closely before trying to run the software on your own data – if it is
not clear, please contact Kerry Gallagher, who is happy to change things to make them clearer.
3
REFERENCES
Charvin, K., Gallagher, K., Hampson, G. & Labourdette, R. (2009) A Bayesian approach to infer
environmental parameters from stratigraphic data 1: Methodology, Basin Research, 21, 5-25.
Flowers, R.M., Ketcham, R.A., Shuster, D.L. & Farley, K.A. (2009) Apatite (U-Th)/He
thermochronometry using a radiation damage accumulation and annealing model. Geochimica et
Cosmochimica Acta, 73, 2347-2365.
Gallagher, K . (2012) Transdimensional inverse thermal history modelling for quantitative
thermochronology, J. Geophys Res. 117, B02408, doi:10.1029/2011JB00882.
Gallagher, K., Bodin, T. Sambridge, M, Weiss, D, Kylander, M, and Large, D. (2011) Inference of
abrupt changes in noisy geochemical records using Bayesian transdimensional changepoint models,
Earth Planet. Sci. Letts., 311, 182-194.
Gallagher, K., Charvin, K., Nielsen, S., Sambridge, M. and Stephenson, J., (2009) Markov chain
Monte Carlo (MCMC) sampling methods to determine optimal models, model resolution and model
choice for Earth Science problems, J. Marine and Petroleum Geology, 26, 525-535.
Gallagher, K., Stephenson, J., Brown R., Holmes, C. and Fitzgerald, P. (2005) Low temperature
thermochronology and modelling strategies for multiple samples 1 : vertical profiles, Earth Planet
Sci. Letts., 237, 193-208.
Gautheron, C., Tassan-got, l., Barbarand, J. & Pagel, M. (2009) Effect of alpha-damage annealing on
apatite (U-Th)/He thermochronology. Chemical Geology, 266, 157-170.
Hopcroft, P., Gallagher, K. and Pain, C.C., (2007). Inference of past climate from borehole
temperature data using Bayesian Reversible Jump Markov chain Monte Carlo, Geophys. J. Int, 171,
1430-1439.
Ketcham, R.A., Carter, A., Donelick, R.A., Barbarand, J., Hurford, A.J., 2007. Improvedmodeling of
fission-track annealing in apatite. American Mineralogist 92, 799–810.
Ketcham, R.A., Donelick, R.A., Carlson,W.D., 1999. Variability of apatite fission-track annealing
kinetics. III. Extrapolation to geological timescales. American Mineralogist 84, 1235–1255.
Ketcham, R. Gautheron, C. and Tassan_Got, L. (2011) Accounting for long alpha-particle stopping
distances in (U-Th-Sm)/He geochronology : Refinement of the baseline case, Geochim. Cosmochim
Acta., 75,7779-7791.
Laslett, G.M., Green, P..F., Duddy, I.R., and Gleadow, A.J.W., (1987), Thermal annealing of fission
tracks in apatite, 2. A quantitative analysis, Chem. Geol. 65, 1-13.
Sambridge, M., Gallagher, K., Jackson, A. and Rickwood, P. (2006) Trans-dimensional inverse
problems, Model Comparison and the Evidence. Geophysical Journal International,167, 528-542.
Stephenson, J., Gallagher, K. and Holmes, C. (2006) Low temperature thermochronology and
modelling strategies for multiple samples 2 : Partition modeling for 2D and 3D distributions with
discontinuities, Earth Planet Sci. Letts. 241, 557-570.
4
Sweeney, J.J. and Burnham, A.K. (1990) Evaluation of a simple model of vitrinite reflectance based
on chemical kinetics. AAPG Bulletin, 74, 1559–70.
Tagami, T., Galbraith, R., Yamada, R., and Laslett, G. (1998) Revised annealing kinetics of fission
tracks in zircon and geological implications. In : Van den Haute, P. and De Corte (Eds) Advances in
Fission-Track Geochronology, Kluwer, 99-112.
Yamada, R., Murakami, M., and Tagami, T. (2007) Statistical modelling of annealing kinetics of
fission tracks in zircon; Reassessment of laboratory experiments. Chemical Geology 236, 75–91.
5
INSTALLING QTQT
If you are reading this you have probably already installed QTQt.
MAC USERS..
On a Macintosh the installer by default puts the application QTQt, some example files and this
documentation file into a directory called QTQt (the location depends on what you choose for the
install directory), and installs 3 libraries into the system directory /Library/Frameworks/ or into your
home directory (under /Library/Frameworks/). You can move the location of the QTQt application,
but the libraries (QtCore, QtGui, QtSvg) must not be moved from the default location. If you wanted
to do a manual install (by copying files), then you just need to copy the 3 library files to
/Library/Frameworks/ and you can put the QTQt application wherever you want. Note that if you
change from one version to another, you will probably need to remove the framework libraries that
are already installed to make sure the versions are compatible.
PC USERS..
On a PC I have set up QTQt such that all the required libraries need to be in the same directory as the
application itself.
The figures in this documentation are all taken from a version of QTQt running on a Macintosh, so
may differ visually on a PC.
DATA INPUT FORMAT
The current input format required for QTQt is summarised in appendix 1 and a series of example data
files are provided with the installation package. QTQt allows the user to input the data via the screen
and this is the recommended method as there will be no problems with the format of the data files
saved from the program, which may not be the case if you create the files using just a text editor (you
do use a text editor, a word of caution - make sure that the values entered on the same line are
separated by a single space or tab only).
MAC USERS.. On a Macintosh, there have been problems with the default “end of line” character
(which is invisible). Qt (the environment used to develop the user interface) apparently does not yet
recognise the Macintosh end of line. This can be a problem with Excel and TextEdit for example. If
the program crashes when you open a file created with a text editor on a Macintosh, this is a likely
explanation. You can use TextWrangler (the old BBEdit) and use save as with Unix “end of line
“characters.
The example files included are
(i) QTQtexample.txt – this has AFT data and 3 AHe ages from a single sample with a simple
reheating-cooling history
(ii) A series of 8 samples in a vertical profile - SynA1750HR.txt….to SynA0HR.txt with AFT
data and 1 AHe age for each sample.
In appendix 2, there are examples of input and output for these 2 sets of data, so you can test these
out quickly.
RUNNING QTQT
Having launched QTQt, you will see a menu bar over a main window as shown below :
Currently, the number of samples in a vertical profile is limited to 20.
The various menus are described as they appear on the menu bar. Note that some menu options are
disabled until certain parameters have been set. If you try to run a different profile having already run
6
another one, then many menu options enabled for the previous run will be disabled for the current
one, until you set the appropriate parameters for the current run.
7
FILE MENU
Open Existing QTQt files(s)
This will produce a dialog window as below
Clicking on Open file will produce a general open file dialog with a list of files in the current
directory. The usual options will apply to selecting multiple files at once (e.g. on a Macintosh, using
shift will allow you to select consecutive files in the file list, while shift-command lets you select
mutliple files that are not consecutive in the the file list. Once you have selected one or more files
from the first file list, another dialog box will appear allowing you to select another file using Open
another file. You can keep doing this, and when you have selected all files for a particular run, you
can select Finish.
When you click on the finish button, or if you have loaded a file from the previously opened file list
at the bottom of this menu, the run title window will appear
This lets you give a name or identifier to the current modelling run. This name is used for all output
files and will appear on all of the plots subsequently. When multiple samples are used in a profile,
sample specific results will also have the sample’s file name. This name is also used for a file with
the appendix “.run” which will contain the filenames and thermal history modelling parameters, the
last model sampled and the best model found during the current run. This can be reloaded as
described below (so you do not have to enter all the parameters again).
Open Previous QTQt Run
This allows you to open a file containing the filenames and thermal history modelling parameters, the
last model sampled and the best model found during a previous run. This file will have the name of
the modelling run (see Run Title above) and the suffix “.run”. It is saved into either the directory
where the QTQt application is located, or a user-specified output directory (see Select Output
Directory below). If no name is enter, then the default is to save the information for the current run to
a file called QTQt.run, in the current directory. Only files with the suffix run will be available to
open. When you have selected to open a previous run file, you will see the following dialog window.
This allows you to start the model run from the last model or best data fitting (maximum likelihood)
model of the previous run, or start from a completely random thermal history model.
The run title window (described above) will appear after this window disappears.
Select Output Directory
8
This allows you to select or create a directory for all output from QTQt for a given run.
Save Run Summary file as
A text file is created during a model run and all the results are output to this file. By default it is
deleted when you quit QTQt. If you want to save the file, select this option, and give you preferred
name to the file. This file is created once you run the thermal modelling in QTQt, so if you are
running several individual samples and want to save the file for each, you will need set the name to
different values between sample run. If you have selected the output directory (above), this file will
be saved to that directory. This also saves some other files to that directory, which need to be kept it
you want to produce plots later (as described directly below).
Open Previous Summary File for plotting
This lets you open a Run Summary file (as described above) to generate plots, if you decide you did
not save ones you wanted previously.
If you have opened files previously with QTQt, you will have a list of previously opened files. This
provides a short cut to open a single file. You can not open multiple files using this option.
Build QTQt data file
This allows you to input FT single grain age counts, length data, (U-Th)/He age and vitrinite
reflectancedata for a given sample. You can optionally input track count and track length data, as
well as some other specific information concerning a given sample and U-Th/He and vitrinite
reflectance data, before being able to save the data to a file.
Fission track count data
The window below appears first.
If you have no count data, then click on the No Count Data button. Otherwise, you need to enter a
sample identifier (name), and the location information. The X and Y coordinates represent grid
locations or longitide-latitude, but are not actually used in the current version. Z is the elevation in
metres (enter negative Z for depth).
You can manually enter the spontaneous and induced track count pairs (Ns, Ni) for a given sample, or
these can be cut from an standard application such as Excel by placing the cursor in the first row of
Ns and pasting them into the table. If you find that the values do not line up in two columns, then it is
because the character(s) between the Ns and Ni values in the original file are not a single space or a
tab. The simple solution to this is to replace what ever that character is with a single space.
PC USERS… using the control-v option does not seem to work for pasting, but you can use the paste
option int the edit menu to do this.
The 3rd column labelled Comp allows you to input compositional data for individual grains in the
same data file and this can be actual compostional data (e.g. Cl Wt %) or proxy data such as Dpar. In
practice the average compositional value, taken as the mean of all input values (for both age grains
and track length measurements) will be used for all calculations for a given data file.
9
Finally, you need to input Zeta (the analyst specific calibration factor used in the External Detector
Method), Rho_d (the dosimeter track density) and Nd (number of tracks counted in the dosimeter).
Clicking on the button will calculate the central age.
Having input the age data, you then need to input track length data (actually the order in which you
do this is not important, but you do need to do both, even if there is no data as the file format
expected when reading files will not be correct).
Fission track length data
The next windon allows you to input track lengths, and other length relevant data for a given sample.
The window below appears.
If you have no length data, click on the No Length Data button. Otherwise, if you have already input
information concerning the sample identifier and location, this will appear automatically. As with age
data, you can cut and paste values for the length and angle (and the same caveat applies about
generally having a single space between each value). You can input just length measurements or
lengths and angle to c-axis data (and in this case you can choose to use a project track length
annealing model or not – see Ketcham et al. 1999, 2007). As with the age data, the Comp field
allows for individual compositional data for each track length measurement and the mean value will
be calculated (and output to the final data file).
Select Use projected tracks to use a projected track length model, obviously this makes sense only if
you have put in angle information, or you have previously transformed length data into c-axis
equivalent lengths (not using projected tracks is the default).
Select the appropriate Etchant (5 M is the default).
Select Cf tracks if your sample used Cf irradiation to increase confined track revelation (the default
is no Cf tracks).
IF you want to return to the Counts data window, click on that button.
10
U-Th/He data (and 4He/3He data)
To incorporate (U-Th)/He data (or any single domain diffusion type data), the window below will
appear.
If you have no U-Th/He data, click on the No He Data button. Otherwise, you can enter just the
observed age and error, or if you want to calculate the age you can enter the U, Th, Sm and He
concentrations (in the units indicated on the window) and click the Calculate Age button. Note this is
the uncorrected (for alpha ejection) age. The He age will be compared to the input age. If these are
not equal, and the He ejection distance is not zero, then by default, the inut age is reset to the
calculated age for consistency. If you want to use Monte Carlo sampling of the observed He age
(using a normal distribution, centred on the observed value, with a standard deviation equal to the
input error), you can check the box Resample He age with MCMC. Instead of trying to fit just the
single input age, this process samples the normal distribution, allowing for the uncertainty in the
observation. In practice this can be thought of as a way of allowing for uncertianty in the predictive
model (e.g. the kinetics), in that we do not try to fit the obsrved age exactly. Alternatively, you can
select Resample He Error with MCMC. This option samples a scaling factor for the input error,
which is used in the calculation of the data fit. The scaling factor is between 0.1 and 10 so the data
can effectively be treated as being more precise (low scaling factor) or less precise (high scaling
factor), relative to the input error value. This may be useful when you are not sure of how good you
error estimates are. When you set the MCMC parameters (described later) this is controlled by the He
Diffusion proposal scale parameter. When you save the data file, you will notice that the either He
age or the He age error will be a negative value – this indicates that you will use this sampling
approach (varying either the age of the error as described above).
11
The U and Th ppm values are required if you want to use a radiation damage model (to allow for
preferential He retention).
For the diffusion calculation, you need to enter the dimensions of the grain. In QTQt we use the long
axis (length), and the other 2 axes (width, thickness). In terms of the the calculation, a sphere is
used, and its radius is calculated from the three input dimensions, under the assumption that the
sphere has the same surface area to volume ratio as a rectangular grain. If you enter the thickness as
zero, then it is assumed that the width and thickness are the same (and we use the width value for
both). If you enter the width as zero, then it is assumed that the length is the radius of a spherical
grain.
For each grain you need to enter an activation energy (Act Energy), and diffusivity at infinite
temperature (Do) and the helium ejection (He ejection) distance. These will be initally set to
standard default values for apatite, with the Helium ejection distance being calculated (following
more or less Ketcham et al, 2011) as a function of U, Th and Sm contents, if these are input In terms
of the calculation, the input age should be the uncorrected (i.e. no FT correction) age, as the Heejection effect is calculated as part of the thermal modelling. If you want to use the corrected age,
then set the helium ejection distance to zero. If the He ejection distance is not zero and you have
input an age not equal to that calculated from the input U, Th and He, then the input age will be
replaced by the calculated age. To avoid this set the He ejection distance to zero.
Finally, you can select one of two published models to allow for the possible effect of alpha damage
on the diffusivity of He. Note this will not be available if there are no U, Th and He concentration
data enter for any analysis from a given sample.
You can add another age (Add more) and you can have up to 25 separate He ages for a given
sample.
As mentioned at the beginning of this section, you can input any single domain diffusion data (e.g.
U-Pb ages from apatite), as well as ZHe ages. You just need to put in the ages, grain dimensions and
the appropriate diffusion kinetics (Do and E). Set the alpha ejection distance to zero if appropriate.
The He age data and parameters in a datfile can look as below
2
No of He ages
0
0 = No radiation damage, 1 = Gautheron, 2 = Flowers
51326 23. 72.0 0.0 15.97 0.64 50.0 0.0 0.0 He, U, Th, Sm; Age, Error; length, width thickness
20.66 0.0032 138000.0
He ejection, Do, Act. Energy
0.0 0.0 0.0 0.0 29.0 -0.5 100. 0.0 0.0
20.0 0.0032 138000.0
Note the age or error will be negative if you selected a resampling option for one of them (you can
only choose one or the other for resampling).
12
4
He/3He data
To include such data in the modelling process, you need to have the data in a separate file, in the
following format (modified from a format provided by David Shuster at University of California at
Berkeley).
%
Sample_name
grain_radius(cm) bulk[U](ppm)
bulk[Th](ppm)
age1
delage1 age2
0.00682 0.0060
148.0
235.0
1.0452 0.10
%Istep, Time step; Temperature; No. of 3He atoms (x10^6), error, Rstep/Rtotal, error, with R = 4He/3He
1
260.00 0.38000 0.79000 0.040000 0.28477 0.059952
2
270.00 0.38000 0.38000 0.030000 0.50959 0.089927
3
290.00 0.51000 0.74000 0.040000 0.47961 0.059952
4
300.00 0.66000 0.85000 0.040000 0.50959 0.054956
5
310.00 0.66000 0.83000 0.040000 0.57454 0.059952
6
330.00 0.46000 0.95000 0.040000 0.56954 0.044964
7
340.00 0.45000 0.96000 0.040000 0.62450 0.049960
8
350.00 0.48000 1.1300 0.050000 0.73940 0.049960
9
350.00 0.66000 1.1900 0.050000 0.70943 0.044964
10
370.00 0.53000 1.4800 0.050000 0.75439 0.039968
11
400.00 0.48000 2.4500 0.070000 0.79436 0.029976
12
410.00 0.50000 2.2400 0.060000 0.90927 0.039968
13
420.00 0.56000 2.1000 0.060000 0.95423 0.034972
14
440.00 0.63000 2.9400 0.070000 1.1341 0.039968
15
475.00 0.50000 3.8600 0.080000 1.2190 0.029976
16
500.00 0.50000 2.5800 0.070000 1.3289 0.039968
17
550.00 0.50000 1.4100 0.050000 1.2440 0.049960
18
700.00 0.50000 4.6900 0.090000 1.3539 0.029976
19
900.00 0.50000 1.1700 0.050000 1.3339 0.069944
delage2
The name of the 4He/3He datafile must be the same as the general data file, with 43 added at the end,
before any “.”. For example, if the general datafile (with AFT and AHE data for example) is called
“Mydata.txt”, then the name of the 4He/3He datafile needs to be “Mydata43.txt”. This file must be in
the same directory as the general data file.
13
40
Ar/39Ar data
To include such data in the modelling process, you need to have the data in a separate file, in the
following format (modified from a format provided by Peter Zeitler at Leigh University). The
modelling uses the MDD approach, and Peter Zeitler provided the calculation routines (based on the
publications and code of Oscar Lovera, University of California Los Angeles).
0.00000000000001
1
6
33.12 6.3010 0.16667
33.12 5.6990 0.16667
33.12 5.3468 0.16667
33.12 5.0969 0.16667
33.12 4.9031 0.16667
33.12 4.7447 0.16667
20
0.08040 27.243 1.0000
0.11170 45.861 1.0000
0.13260 53.636 1.0000
0.14550 58.686 1.0000
0.15470 62.478 1.0000
0.16700 65.519 1.0000
0.17790 68.064 1.0000
0.18950 70.321 1.0000
0.20140 72.489 1.0000
0.22590 74.760 1.0000
0.25270 77.172 1.0000
0.26820 79.549 1.0000
0.28340 81.719 1.0000
0.30450 83.621 1.0000
0.32790 85.403 1.0000
0.37820 87.227 1.0000
0.56170 89.106 1.0000
0.63300 90.944 1.0000
0.81650 92.713 1.0000
1.0000 94.657 1.0000
Convergence criterion for series sum
Geometry flag : 1 = sphere, 2 = slab.
Number of domains
Act. energy (kcal/mol=4.184 kJ/mol), log10(Do/a2), propn of domain
1
1
1
1
1
1
1
1
1
1
1
1
1
1
1
1
1
1
1
1
Number of heating steps.
Fraction released, age (Ma), Error on age (Ma) 1 (0)–use for fitting (or not)
The name of the 40Ar/39Ar datafile must be the same as the general data file, with Ar added at the
end, before any “.”. For example, if the general datafile (with AFT and AHE data for example) is
called “Mydata.txt”, then the name of the 40Ar/39Ar datafile needs to be “MydataAr.txt”. This file
must
be
in
the
same
directory
as
the
general
data
file.
14
Vitrinite Reflectance data
Once you click on OK, the following window will appear to allow the input of vitrinite reflectance.
Here you enter a (mean) observed vitrinite reflectance (VR obs), with an error value, (Error) as well
selecting whether or not to use the observed value as a constraint (Use for thermal history
calibration) for the inverse modelling (if not, then you can still plot the predicted vitrinite reflectance
for various thermal history models once the inversion run has finished). The table on the right shows
the default kinetic parameters, for EasyRo (from Sweeney and Burnham,1990). You can enter up to
20 of your own values (Eact = Activation Energy, F is the stoichiometric factors, which need to total
1, and A is the frequency or pre-exponential factor).
Similar to the He age data description above, you can choose to Resample VR, which will sample
the observed vitrinite reflectance from a normal distribution centred on the input value, with a
standard deviation equal to the input error value. Alternatively, you can select Resample Error. This
option samples a scaling factor for the input error, which is used in the calculation of the data fit. The
scaling factor is between 0.1 and 10 so the data can effectively be treated as being more precise (low
scaling factor) or less precise (high scaling factor), relative to the input error value. This may be
useful when you are not sure of how good you error estimates are.
Note in the datafile, the input value will be negative if you choose to Resample VR or the error will
be negative if you choose Resample Error
15
There is a conversion of the calculated time-temperature integral to equivalent VR (VR = exp(a +
bF), and again the default values for a and b are for EasyRo.
Finally, you can also enter a function (Calculate Ln(A) = c + d*Eact) to calculate the frequency
factor (A) as a function of the activation energy (Eact). This needs to be a log linear relationship and
the default parameters (c = d = 0.0)are equivalent to EasyRo.
In a data file, the Vitrinite Reflectance data and parameters typically look as below
1
No. of VR observations
0.833180 0.200000
VR obs, VR error (one can be negative if
resampling has been selected)
1
1 (or 0 ) indicates used as a constraint (or not)
-1.3 3.7 0 0
Conversion to VR parameters (a,b,c,d)
20
No. of activation energy values
142.256 0.030000 3.1536e+26
Act Energy, Proportion, Frequency factor
150.624 0.030000 3.1536e+26
158.992 0.040000 3.1536e+26
167.360 0.040000 3.1536e+26
175.728 0.050000 3.1536e+26
184.096 0.050000 3.1536e+26
192.464 0.060000 3.1536e+26
200.832 0.040000 3.1536e+26
209.200 0.040000 3.1536e+26
217.568 0.070000 3.1536e+26
225.936 0.060000 3.1536e+26
234.304 0.060000 3.1536e+26
242.672 0.060000 3.1536e+26
251.040 0.050000 3.1536e+26
259.408 0.050000 3.1536e+26
267.776 0.040000 3.1536e+26
276.144 0.030000 3.1536e+26
284.512 0.020000 3.1536e+26
292.880 0.020000 3.1536e+26
301.248 0.010000 3.1536e+26
IMPORTANT – when you have input vitrinite reflectance data, QTQt will assume that this is a
sediment. Then you will need to input a time-temperature point (or box) as constraints for the
stratigraphic age, and also some constraint on the present day temperature. This is described in
the next section.
16
Once you have entered the data, a final window will appear will provides a short summary and
allows to you to choose certain modelling parameters (e.g. the annealing model for fission tracks).
IMPORTANT
– when
youfollowing
want to save
the input
data,
needappear,
to click on the button.
Once
you click on
OK, the
window
(or one
likeyou
it) will
which summarises the input so far.
This window allows you to set the fission track annealing and compositional models, as well as
sample specific thermal history information for the current sample (data file) being created. The
Constrained point option is intended to be used with sedimentary samples for which you know the
stratigraphic age and temperature at the time of deposition (these can be input as a range). If this
option is selected, then another time-temperature point is used in the modelling to allow for the predepositional thermal history. It is assumed that the temperature of this pre-depositional point is
within the range specified for general prior of the total profile (see the next section for discussion of
this) and the time is between the stratigraphic age and the maximum time specified for the general
profile. Even if the post-depositional thermal history implies that the sample is totally
annealed/degassed, this pre-depositional time-temperature point will still be incorporated (it is not a
significant computational overhead).
This stratigraphic age and present day temperature constraints
are required for any sample with vitrinite reflectance, and it is
only the post-depositional thermal history that is used for
modelling the vitrinite reflectance value for a given sample. If you
have input vitrinite reflectance, you will see the window to the left
as a reminder. Just click on OK to continue the input.
The Constrained Present day option can be used to set the present day temperature to be within
given limits (mean±range) for any sample. This is most likely to arise for well data. If the ±Range
parameter is set to zero, the value will be fixed at the Mean value.
You can set the Annealing Model for a particular run, and for the two Ketcham et al. models, you
will need to set the Compositional Model parameter. Value is required according to the type of
kinetic parameter you want to use. If you set the Uncertainty to 0, then the annealing model is
chosen using this fixed value of the kinetic parameter. If you set the Uncertainty to a non zero value,
then the compositional parameter is sampled from a normal distribution, with a mean equal to Value
and a standard deviation equal to Uncertainty. This is one way to allow for uncertainty in the
annealing models or their calibration.
You can set the Initial track length to a specified value. Note that for the Ketcham et al. annealing
models, the default is to Calculate initial track length using the compositional information. You can
uncheck this option if you do not want to do this. You can modify the annealing models parameters
for Use Projected lengths, Cf tracks, or Etchant if desired, and the appropriate adjustment will be
made to the annealing model predictions. Note if you use the Laslett et al. (1987) the options for Cf
tracks, projected lengths, etchant, and the compositional parameters will not be used. The same
17
applies to the 3 zircon models (and for these the appropriate default value for the initial track length
will be inserted).
If the sample has He analyses, then the number of ages is summarised, together with the choice of
alpha radiation damage model (one of : none, Gautheron, Flowers). Note this will be set to none if
there are no U, Th and He concentration data enter for any analysis from a given sample as the U and
Th concentrations are required for the alpha radiation damage models .
Finally, if you are building a QTQt file for the first time, or modifying an existing file, you can Save
data for reload, and you will be prompted for a file name. If you do not select this, the changes will
not be saved.
It is recommended to build all the data files you might need (for example samples from a vertical
profile or borehole suite) and save them as you build them. When you want to proceed to running
thermal histories models, it is probably best to quit QTQt and restart it.
18
Review existing QTQt data file
This allows you to open an existing data file and check or edit the values. This process follows the
same progression as described above for creating a new QTQt data file.
19
THERMAL HISTORY CONSTRAINTS MENU
Before running the modelling, we need to set up the constrants on the thermal history relevant to all
samples,, and if required/desired any sample specific information. Thus, the run option is not
available until we have at least chosen to set up a forward model or set the general thermal history
constraints for an inverse modeling run. Also, to activate these menus, we need to have already
opened one of more data files (as these contain data and information concerning the data we need for
the modelling).
Draw forward thermal history
This allows us to use a graphics window to set up a forward model for one or more samples in a
vertical profile.
After selecting this option a window will appear, in the form of the one of the two possibilities shown
below.
If you have opened only one data file you will see the window on the left, while if you have opened
more than one (for a vertical profile) you will see the window on the right.
In the second case, you will initially see the Edit Cold option in colour and Edit Hot greyed out.
Here, Cold refers to the thermal history for the top (or shallowest) sample in a vertical profile, and
Hot refers to the lowest (or deepest) sample. These two thermal histories (Cold and Hot) will have
the same number of time-temperature points, and the same time points. They only differ in the
temperature values you assign.
The thermal histories for all samples between the top and bottom samples are determined by using
the elevation/depth differences and linear interpolation of the temperature offset between the top and
bottom thermal histories.
You have the option to save an input thermal history to a file (Save T(t) to file) , or open a
previously created thermal history file (Open T(t) file).
Set Axes Scales allows you to change the range on the time and temperature axes.
20
We start the input the top thermal history by placing the cursor in the white part of the window. If
you click the mouse and hold it pressed down, you will see cross-hairs in the window, and the timetemperature points given by the position of the cursor is written at the bottom left of the window.
You select a point by releasing the mouse click. The thermal history will be drawn in blue, adding in
each point as a '+' as you create them.
To move an already created point, place the mouse on the point, click and hold down the mouse and
drag the point to the new desired location. You can move a point so its time value crosses (becomes
older or younger) than an adjacent point.
To delete a point place the cursor on the point and double click.
Notes :
The time-temperature points can be input in any order (QTQt will sort them).
If you place the cursor at a time < 0.0, QTQt will set the time to 0.
If you do not input a point with time = 0, QTQt will add one, using the temperature of the closest
time point.
When using a profile, you can then click on the Edit Hot button. Again you place the mouse in the
window, and when you press and hold the mouse, you will see the time, temperature and temperature
offset written at the bottom left of the window. The temperature offset is the difference in the
temperature between the Hot and Cold thermal histories (i.e. the top and bottom samples in a profile).
Note : The temperature offset is not the temperature gradient.
You do not have to be too precise with the time coordinate as QTQt will just choose a point with the
time closest to the mouse coordinate value. Choose any time point then click and and move the
mouse (with the button held down) to get the offset you want. When you release the mouse, you will
see a red thermal history drawn below the blue one, using a constant temperature offset (equal to the
value selected for the point in the Hot thermal history (see figure below left). You can choose any
point to set this constant offset value.
To edit points in the Hot thermal history to change from a constant temperature offset, again select
and drag the point vertically and the point will change (see figure below right).
21
You can not change the time values not can you delete a point while editing the Hot thermal history).
To do this you need to click on the Edit Cold option and move or delete the relevant time point for
the cold (blue) thermal history.
Once you have created the forward thermal history for one or more samples, you can select the Run
option and a new window will appear summarising the results (either for a single sample, or the
predictions as a function of elevation/depth for a vertical profile).
For plotting the forward model predicted values for individual samples in a profile, the plotting menu
(Max. Likelihood Model) is active and can be used (see the later section on plotting).
You can edit the thermal history and rerun a forward model as many times as you like. To
stop this process, you need to click on the Stop button.
Note : when using sedimentary samples, the stratigraphic age is used as a constraint in the thermal
history models (such that a given sample needs to be a surface temperatures at the time of
deposition). This may then lead to the thermal history being different to that input using the graphical
approach above. To confirm the actual thermal history used in the calculation, use the Plotting/Max.
Likelihood Model/Thermal History menu option.
22
Total profile
This allows us to set up information used in the MCMC sampling for the thermal history for one or
mutliple samples. The window below will appear.
The window shows the oldest central age from all samples in the current profile as a guide to the time
constraints we might want to use. To set the Ranges for General Prior, we need to enter a box in
time-temperature space, defined by the time and temperature point in the middle of the box, and the
half width for time and temperature. These are best set to be fairly broad. However, the values you do
use will affect the solution you obtain as the broader the range, the more likely we will end up with a
fairly simple thermal history solution unless there is a lot of thermal history information in the data.
That is how transdimensional MCMC works.
If you are using multiple samples in a profile, then the thermal history parameters you enter
are relevant to the the highest elevation (or shallowest in a well) sample. For multiple samples, the
thermal history for lower elevation (or great depth in a well) samples has the same form as that for
the shallowest sample, but is offset by a value to be determined during the modelling. The offset
parameters are the temperature difference between the lowest and highest elevation (or shallowest
and deepest) samples over time. The thermal history for samples between these two is obtained by
linear interpolation, based on the difference in elevation (or depth).
If you are running multiple samples, you will also need to set a prior range on the offset. If you have
been running a single sample profile, then decide to use multiple samples, you might see the
following dialog box.
This is just to remind you that you need to see the Temp offset parameter prior range. If you do not,
as an additional reminder, the OK button in the General Thermal History window will not be
enabled. By default, the offset values for each time-temperature point are the same for all points,
except the present day (but currently the same prior range in offset is used for the present day offset –
the option to use a different range has not yet been enabled). If you want to let the offset vary
between all time-temperature points, the you can check this option in the window. If you want to fix
the present day temperature for various samples in a well for example, this is possible by using the
Individual Sample menu, which we will come to below.
Finally, you can add in some constraints to the general thermal history that are applied directly to the
highest elevation (or shallowest in a well) sample, and these are then imposed on the other samples
by using the offset temperature. To do this check the Constrain box and add in the parameters
defining a time-temperature box as described above, as shown below.
You can add up to 5 constraints (although this is a little against the spirit of transdimensional
MCMC).
Note that you need to add these points is order of decreasing time (to the present day). However,
these points are independent to the general thermal history prior desscribed above (so can be older or
younger or within the range defined by the general prior).
If you want to save the thermal history information to a file for later runs, you can do that by clicking
in the button . You will be prompted for a file name.
If you want open a saved thermal history file, click on the . Again you will be prompted for a file.
23
The parameters are checked automatically to make sure they are valid (you can not enter negative
values for examples) and the OK button will not be enabled untill all the relevant parameters have
valid values.
Default values are loaded when the window first appears and if you want to use them you may have
to just edit one value to enable the OK box.
Once you have entered at least the minimum information required for the thermal history (e.g. the
general thermal history prior range and offset if required), the OK button will be enabled.
Individual Sample
If you are building a QTQt data file from scratch, or want to change some individual sample settings
(such as the annealing model parameters), you need to use this menu option. A drop down menu will
appear with the current loaded files (or the current run if you are building a new QTQt file). When
you select a file, a window will appear as below.
This window summarises the information concerning the thermochronological data for the sample
and lets you add sample specific thermal history information. The Constrained point option is
intended to be used with sedimentary samples for which you know the stratigraphic age and
temperature at the time of deposition (these can be input as a range). If this option is selected, then
another time-temperature point is used in the modelling to allow for the pre-depositional thermal
history. It is assumed that the temperature of this pre-depositional point is within the range specified
for general prior of the total profile (see the next section for discussion of this) and the time is
between the stratigraphic age and the maximum time specified for the general profile. Even if the
post-depositional thermal history implies that the sample is totally annealed/degassed, this pre24
depositional time-temperature point will still be incorporated (it is not a significant computational
overhead).
The Constrained Present day option can be used to set the present day temperature to be
within given limits (mean±range) for any sample. This is most likely to arise for well data. If the
±Range parameter is set to zero, the value will be fixed at the Mean value.
You can set the Annealing Model for a particular run, and for the two Ketcham et al. models, you
will need to set the Compositional Model parameter. Value is required according to the type of
kinetic parameter you want to use. If you set the Uncertainty to 0, then the annealing model is
chosen using this fixed value of the kinetic parameter. If you set the Uncertainty to a non zero value,
then the compositional parameter is sampled from a normal distribution, with a mean equal to Value
and a standard deviation equal to Uncertainty. This is one way to allow for uncertainty in the
annealing models.
You can set the Initial track length to a specified value. Note that for the Ketcham et al. annealing
models, the default is to Calculate initial track length using the compositional information. You can
uncheck this option if you do not want to do this. You can modify the annealing models parameters
for Use Projected lengths, Cf tracks, or Etchant if desired, and the appropriate adjustment will be
made to the annealing model predictions. Note if you use the Laslett et al. (1987) the options for Cf
tracks, projected lengths, etchant, and the compositional parameters will not be used. The same
applies to the 3 zircon models (and for these the appropriate default value for the initial track length
will be inserted).
If the sample has He analyses, then the number of ages is summarised, together with the choice of
alpha radiation damage model (one of : none, Gautheron, Flowers). Note this will be set to none if
there are no U, Th and He concentration data enter for any analysis from a given sample as these are
required for the alpha radiation damage modelling.
Finally, if you are building a QTQt file for the first time, or modifying an existing file, you can Save
data for reload, and you will be prompted for a file name. If you do not select this, the changes will
not be saved.
Note that the Save data for reload and OK buttons will not be enabled until valid input parameters
have been set for the particular annealing model selected. This applies also for the thermal history
constraints which must have positive temperature values.
25
MCMC RUN MENU
This menu lets you set parameters controlling the MCMC sampling and run the sampler for thermal
histories.
Set MCMC parameters
When you select this menu option, the window below will appear
The sampler for MCMC has 3 parameters to set controlling the number of iterations used in the
sampling chain. The total number of iterations is equal to the Burn-in + Post-burn-in. The Burn-in
is the number of iterations which will be discarded while the Post-burn-in is the number of iterations
that will be used in subsequent inference of the thermal history. Thinning is a parameter that controls
how many of the number of Post-burn-in iterations are used. If the parameter is set to 1, then all
sample will be used, if it is set to 5, then every 5th sample will be used, if it is set to 10, then every
10th sample, etc. Larger values use samples which are further apart in the chain, and therefore less
likely to be correlated. In general provided enough iterations are used, the thinning parameter is not
too important.
There are no hard and fast rules about how to choose these except that they should be large enough
that the inference is reliable (see Gallagher et al. 2009). While the values can be too small to have
achieved satisfactory sampling, they can not really be too big, although larger values will increase the
computation time accordingly. A qualitative check on whether the chain is sampled appropriately is
to examine the likelihood or posterior values as a function of iteration. We will return to this later.
The other parameters to set are the proposal scales for moving Time, Temperature and (if relevant)
Offset, for sampling the FT annealing kinetic parameters, He Diffusion data/errors and Vitrinite
26
Refl. data/errors (if these options have has been previously selected when building a data file) and for
Birth and Death, that is creating/deleting (referred to as birth/death) new time-temperature points
(including offset if the offset is allowed to vary with time). For birth, the time is selected randomly
between two existing time-temperature points and a temperature is calculated using linear
interpolation between the two existing temperatures. The birth proposal scale Temperature is used
to perturb this interpolated value. The same applies to the offset parameter if this is allowed to vary
over time, using the Offset birth proposal scale. For moving the parameters, the scale parameters (in
the same units as each parameter type) are in fact the standard deviation of a normal distribution used
to generate new values of the time, temperature or offset during the sampling chain. For the birth
parameters, these represent the width of a uniform distribution between –0.5 and 0.5.
In the terminology of MCMC, we take the current model, choose a parameter from this
model, then peturb that parameter (using a random sample from a normal or uniform distribution,
centred on the parameter value of the current model, and a standard deviation equal to the value input
here). This concept is explained further in Gallagher et al. (2009).
The remaining boxes in the windows are not enabled but will summarise the acceptance rates for the
sampling (from the most recent sampling run). These rateswill be between 0 and 1 and are useful to
assess the performance of the sampler. The first 3 summarise the acceptance rates for the time,
temperature and offset parameters. The birth and death terms reflect the acceptance rate for adding a
new time-temperature point or deleting an existing time-temperature point respectively.
As with the number of iterations, there are no hard and fast rules about what values are
optimal for the acceptance rates. However a general rule of thumb is a value between 0.1 and 0.7 is
probably OK for the time, temperature and offset parameters. By changing the scaling parameters,
the acceptance rates for the thermal history parameters can be improved to lie within this range. In
general, if you need to increase the acceptance rate, you should decrease the scale parameter.
However, as the thermal history parameters are not independent (in terms of how they affect the
better data fitting models), and also the prior ranges set on the time, temperature and offset
parameters will influence the acceptance rate, then this not always true.
Note that if you are modelling a single sample, the offset parameter is not used and the acceptance
rate is zero.
Run
This runs the MCMC sampler and you will see a standard progress bar to indicate where you are, as
below.
You can cancel the run at anytime, and any subsequent inference or plotting will be made using the
number of post-burn-in samples at the time you cancel the run.
Once the run is finished, you will see a window similar to the Set MCMC parameters window, but
this time the acceptance values will be for the run just completed. This time however you can review
the acceptance rates, and change the proposal scale parameters and/or the number of iterations if
desired. This window has the option, Save for Rerun, to save these new parameters for a subsequent
run. Normally, you will do this next run immediately. You need to click on the OK button and then
27
use the Run menu option again. Note that if you change the parameters and do not click Save for
Rerun, the changes will not be saved.
The acceptance rates for the time; temperature and offset parameters should usually be around 0.20.5, with similar valuesfor the FT Annealing, He Diffusion and Vitrinite Refl. sampling values,
while the Birth and Death acceptance rates tend to be low (e.g. 0.05) , but in general should be more
or less the same.
28
PLOTTING MENU
This menu allows you to examine various plots summarising the output from a given sampling run.
Each plot window has the menu options illustrated below
By clicking on the appropriate image, a plot can be saved in the generic Scaled Vector Graphics
format (this is the WWW standard and readable by Adobe Illustrator for example, although different
versions of Illustrator seem to import the graphics differently, so sometimes the layout is not the
same as the screen version), printed directly (and generally you can print to a pdf file, if you prefer
this format), or you can change the axis scales from the original default values.
Examine Chain
These plots let you examine the performance of the chain in terms of the log likelihood (Likelihood
Chain) or log posterior (Posterior Chain) as a function of post-burn-in sampling (blue curve, and
use the left hand axis). On the same plot, you will see the number of time temperature points (green
curve, and use the right hand axis). There should be no obvious trend in the likelihood/posterior (i.e.
the mean value should be pretty much flat) and the values should change almost every iteration (i.e. it
should not get stuck on the same value for too many iterations). Belwo the first panel shows a chain
with poor convergence, while the other two are well mixed. Not the right hand panel is the posterior,
and this tends to be lower as the number of model parameters increase.
Max. Likelihood Model
This option lets you examine details of the maximum likelihood model, that is the best data fitting
model. The philosophy adopted here is that generally this model is likely to be too complex, that is it
may have features which are not really justified from the data. However, it can be useful to examine
the model.
Thermal History
This plots the maximum likelihood thermal history. There are no uncertainties associated with this
single model.
29
The figure shows an example of a thermal history for 3 samples in a profile. The blue curve is the
reference thermal history (highest elevation sample), and the red curve is this plus the offset
parameter (for the lowest elevation sample). Intermediate sample thermal histories are shon in grey.
Plot Individual predictions
This lets you select a single sample from the profile (using a drop down menu), and produce a
summary plot of the observed data and the predictions from the maximum likelihood thermal history
for that sample. This plot includes the track length distribution.
Summary Model Predictions
This lets you plot the observed data (circles) and predicted values (cross for a single value, or
continuous line) for FT age, FT MTL, He age as a function of elevation for all the samples in the
profile.
Summary Information
At the moment, this option does nothing, but has been included for future developments.
Max. Posterior Model
This has the same options as described above for the maximum likelihood model, but for the
maximum posterior model. The posterior probability is proportional to the likelihood multiplied by
the prior. For models of constant dimension (i.e. the number of time-temperature points) and for
uniform prior distributions (used in QTQt), the maximum likelihood and posterior models will be the
same. However, QTQt implements a transdimensional MCMC sampler (the number of time
temperature points is not fixed) Then the prior acts as a penalty against making the model too
complex and the maximum posterior model will generally be simpler (less time-temperature points)
that the maximum likelihood model. The choice of maximum posterior model is then sensitive to the
range of the prior specified for the general thermal history model. The larger the range on the priors,
the more we encourage the posterior models to be simple (i.e. the more we penalise models with a
larger number of time temperature points).
Max. Mode Model
This model is obtained from the distribution of all models sampled. In 1-D, the mode is the peak of a
1-D probability distribution. If we divide the time-temperature space into squares with a resolution of
1 million year and 1°C, then for all temperature paths we can count how many temperature paths pass
through each square. The mode model is the temperature value at each 1 million year step that has the
most number of paths passing through it. The plot options for this model are described below (for the
Expected Model).
Expected Model
In Bayesian formulations (as adopted in QTQt), the preferred single model is the Expected Model.
This is effectively a weighted mean model, where the weighting is provided by the posterior
30
probability for each model. This model contains features of all the models sampled in the post-burnin sampling and in terms of complexity will generally lie between the maximum likelihood model
(more complex) and the maximum posterior model (less complex). Also, we can use the MCMC
sampling to calculate the uncertainty for the expected model and so draw meaningful credible
intervals (more or less the Bayesian equivalent of confidence intervals). These intervals represent a
95% probability range for a given parameter, calculated so that 2.5% of the parameter values lie
below and above the limits defined by the range.
The plot options for the Expected Model are a little different than the other two models. The drop
down menu is below.
Thermal History
The thermal history here represents the average of all the models sampled. If the profile contains
more than one sample, then the uppermost sample thermal history will be plotted in blue, and the
lowermost sample thermal history will be plotted in red. The thermal histories for all samples in
between are drawn in grey. For the uppermost sample, the 95% credible intervals are draw in cyan
(light blue) and these reflect the uncertainty in the inferred thermal history alone. For the lowermost
sample, the 95% credible intervals are drawn in magenta and these reflect the combined uncertainty
in the inferred thermal history and also the offset parameters. Any constraints will be drawn as black
boxes.
Offset Temperature History
This is enabled only when there is more than one sample in the profile and plots the offset
temperature (between the upper and lower samples in a profile) as a function of time. During the
MCMC run, the mean and standard deviation of the offset temperature is calculated as a function of
time. The mean is plotted as a red line and the ± 1 standard deviation bounds as magenta lines. Also
shown is the 95% credible range (a little like the ±2 standard deviation bounds) as green lines,
calculated directly from the all post-burn-in samples in the MCMC chain.
Plot Offset Histograms
This is enabled only when there is more than one sample in the profile and plots a histogram of the
offset temperature parameter for either the present day or the palaeo-offset temperature parameter
(only enabled if the offset parameter is set to be constant over time).
Plot Individual T(t)
This plots the thermal history for a given sample (selected from the drop down menu). On this plot.
The maximum likelihood and maximum posterior models are shown as a yellow and magenta lines,
respectively. The expected model is shown as a black line, as are the 95% credible intervals. The
latter are calculated directly from the probability distribution of the model parameter (i.e. the
temperature at a given time) and can be assymmetric if the distribution is not symmetric. The black
dashed lines are the credible intervals calculated as the expected model parameter ± 2 standard
deviations (and so are symmetrical). Underlying these is a coloured plot showing the probability
density of the thermal history (effectively the probability that the thermal history passes through a
31
box of size 1°C x 1 million years). The probability scale is shown on the right of the plot, blue being
low probability and red being higher probability.
Also shown on this plot are the maximum likelihood model (red), the maximum posterior model
(magneta) and the mode model (white).
Plot Individual Predictions
This lets you select a single sample from the profile
(using a drop down menu), and produce a summary
plot of the observed data and the predictions from the
expected thermal history for that sample. This plot
includes the track length distribution (observed and
predicted, with the 95% credible intervals on the
predicted values). This plot also summarises the
output of any sampling on the kinetic parameter and
He ages (as described below). Each value is indicated
by the following codes :
O = observed, P = Predicted, SP = sampled values of
the Predicted value, SO = sampled values of the
observed value.
32
Plot Individual FT sampling
This allows you to examine the sampling of the FT compositional parameter, if this has been selected
as a variable (by adding an uncertianty to the input value). Each sample can be examined individally.
A typical plot is shown below. The top left panel shows the sampling of the kinetic parameter as a
function of post-burn-in iteration (the proposed and accepted values, although often these are the
same, as in the example below). The top right show the variation in the predicted FT age and MTL
(note this also is a function of the thermal history). The lower panels show the distribution of the
proposed (green) and accepted (magenta) values, the latter have the inut value with the ±1σ range,
and the distributions of the predicted FT Age and MTL (with the black line indicating the input
value).
33
Plot Individual He/VR sampling
This allows you to examine the sampling of the
He ages for a given sample. The top panel
summarises the sampling as a function of
iteration of each He age for a given sample (there
will be on such plot for each group of 5 He ages).
The coloured curves for each sample are the
proposed and accepted He ages (the proposed are
drawn as a dotted line) and black curve
represents the predicted He age (a function of the
thermal history).
The distributions are
summarised below for each He age in terms of
the proposed distribution (left) and the accepted
(right). On the latter you will see the input He
age and its uncertainty (the black bars) and the
distribution of the predicted He ages (the
continuous black line).
If Hierachical sampling of the input data errors
has been selected, then similar plot will be
produced, but the variable plotted will be the
estimated error scaling parameter for each datum
that has been sampled.
Plot Individual PreDepositional sampling
This lets you examine the sampling of the
stratigraphic ages/temperature and predepositional time/temperature points. The top
two panels summarise these parameters as a
function of post-burn-in iteration and the lower
two, the joint sampling of time and temperaure
(which is useful to assess any correlation). On
these last two plots, the maximum likelihood
(ML) and the expected (AV) model values are
also given.
Summary Model Predictions
This lets you plot the observed data (circles) and
predicted values for the expected model (cross for
a single value, or continuous line) for FT age
(blue), FT MTL (red), He age (green) as a function of elevation for all the samples in the profile. If
the kinetic parameter has been varied, this will also be shown (yellow curve), relative to the axis for
the MTL.
34
Summary Information
This option is not currently enabled.
Generate all plots
This option automatically generates and saves to files the available plots. You may be prompted to
save the run summary file (although this is not required , so you can select cancel). The files are
saved to the directory where the QTQt application is running or to a previously selected directory.
The file names will start with the run name you selected, and use the individual data file names where
appropriate (the individual data predictions, and individual thermal histories for example). The final
part of the file name indicates in a reasonably obvious fashion which plot it contains. The plot files
will either be in Svg (Scaled Vector Graphics) or JPEG format.
35
Appendix 1. Example of QTQt input file format
OCO-04-07
0.1 0.2 198
2 101 21 338.0 1.106e6 6131
105
0 2.04 0.0
0 16.300000
0
0
1
100. 10. 100. 10.
20. 20.
61.600 3.0
12.80 0.1270
1.275 0.1275
61 135
.
16.264987 30.0
15.561141 67.16
.
2
0
11.35 32.61 106.51 0.0 51.4 3 160.2 45.6 38.2
20. 0.005 138000.0
6.02 16.24 45.56 0.0 54.1 3.2 197.4 50.2 40.5
20. 0.005 138000.0
Sample ID
X, Y, Z co-ordinates (Z in metres)
No of time temp points1, Nlengths Ncounts zeta ρdos Ndos
code for annealing model2
code for composition, Value, error on value,3
code for initial track length4
code for projected track data5
6
code for Cf tracks
code for etchant 7
Time, ∂time, Temp, ∂temp
Present Temp, ∂temp
FT age, error on FT age (Ma)
MTL, error on MTL (microns)
Std Dev, error on Std Dev(microns)
Ns Ni (must have Ncounts values)
Individual track lengths (must have Nlengths values),8
and angle to C-axis (if available - see note 5) and
compositional parameter (if available)
No of AHe ages for the sample
Code for Radiation Damage Model9
He (ncc/gm or atoms), U, Th, Sm (ppm or atoms),
Age (Ma)10, error on age10, Grain length, width,
height (microns)11. The line below is α-ejection
distance (microns), Do (m**2/s) and activation
energy (Jmol/K)
1
Apart from sediments, the temperature history can be ignored (set the number of time temperature points to 0). If you
want to fix a stratigraphic temperature or time point within a specified ∂ range, set the ∂temp to a negative value. If
you set the errors to zero, there will be a fixed time-temperature point. Remember these ∂ values are the half width of
the range used to sample the time-temperature points. You will also have to set the present day temperature value to a
value and range (otherwise the program may crash).
Also, if the length data are in binned format enter a negative number for the number of track lengths. Enter zero if there
are no track length measurements
2
code for annealing models :1= Laslett 1987, 100 = Ketcham multikinetic 1999, (102 = Laslett 1987 recoded by
Ketcham), 105 = Ketcham multikinetic 2007
3
code for composition: 0 = Dpar, 1 = Cl (apfu), 2 = OH (apfu), 3 = Cl (wt%). Value is that appropriate to the
composition code. If the error is non-zero, the value will be sample from a normal distribution centred on the valu
with a standard deviation equal to the error.
4
code = 1 – calculate compositionally dependent initial length, 0 – use input value. You need to give a value of the initial
length whether it is used or not
5
code = ±1 for inputting c-axis projected lengths +1 means use the projected length model, -1 just to read the angles, but
not use them, 0 for no angles, and 2 for already projected track lengths with no angle data
6
code = 1 - Cf tracks, 0 – no Cf tracks
7
code = 0 for 5.5 Molar (Donelick), 1 for 5 Molar (everyone else)
8
For binned length data enter 20 bin interval values (1-20) and the frequency for each interval
9
code = 0 – no Radiation Damage, 1 – Gautheron et al (2009), 2 – Flowers et al (2009)
10
Age, error – set age/error to a negative value to sampling from a distribution centred on the observed age/input error.
11
The AHe data need to be in this format (i.e. the concentrations or number of atoms), but at the moment I use just the
uncorrected age (and the error). Alpha ejection is dealt with when running the diffusion model (as in Meesters and
Dunai).For the grain geometry you need 1, 2, or 3 values. I do the calculation for a spherical grain, which just requires
the radius as the length parameter (set the width = height = 0.0). If you input the last height = 0.0, I assume this is
equal to the width. I convert this to a sphere with the same surface are to volume ratio.
To sample the He age, set the error to a negative value.
36
Appendix 2. Examples of typical input and output from runs with the example files provided
(note these results may differ from a run you make using these files).
(i) Single sample - QTQtExample.txt
QTQtExample.txt
If you open this file, then select the Thermal History
Constraints menu, you should see a window as shown to the
right. Click OK and the select Set MCMC parameters (from
the MCMC Run menu). You will see the window below with
default proposal scales.
Click OK and choose Run
(from the MCMC Run menu).
Once the run ios finished, you should see a window similar to the one
below.
Here you can see the acceptance rates
around 20-30% for the Time and
Temperature, and typically lower values for the birth and death (but the
two values birth and death are similar). You can change proposal scales
and look at how the acceptance rate changes. If the scales are small then
the acceptance rates tend to be higher, and vice-versa. This is not always
the case as there is some interaction between the different parameters and
MCMC moves.
However, if we continue, let us look at the sampling in terms of the
likelihood (the fit to the data) as a function of the MCMC iterations.
Choose the first option from the plot and you will see a plot similar to that
below on the left.
The likelihood (blue curve) shows too much structure, which indicates that
we need to do more iterations. In the plot on the right , we have the results
of running 10000 iterations for the burn-in and 10000 post-burn-in.
Finally if
we run
50000
burn-in
and
50000
post37
burn-in we have the results below. Here we see less structure as well as more sampling between
different dimensions (or numbers of time-temperature points, the green curve). This is what we
expect to see.
For this example, we can select the expected model thermal history (choosing Plot Individual T(t)
from the Plotting-Expected Model and also the model predictions (Summary Model Predictions
and Plot Individual predictions) we have plots similar to that below.
38
(ii) Multiple samples
As a second example we will consider a vertical profile – the 8 files SynA1750HR.txt,
SynA1500HR.txt ….to SynA0HR.txt represent samples at intervals of 250 m and each sample has
AFT data and one AHe age. These data were generated with a thermal history equivalent to that used
in Gallagher et al. (2005), their figure 3.
Using the default values for the Total profile thermal history constraints, the likelihood plot should
resemble that on the left – again showing too much structure and not much transdimensional
sampling. Running for 20000 iterations for the burn-in and 60000 post- burn-in gives us the plot on
the right, and much better sampling. Overall, we can have too few iterations, but never too many
(except for the amount of time it may take…). In this case the data are high quality and the solution is
well constrained, so the burn-in period is relatively short.
Below are the plots for the Expected Model – Thermal History and Summary Model Predictions
The thermal history starting around 110 Ma at temperatures below the total annealing temperature for
the shallower samples implies rapid cooling from above these temperatures immediately before this
time. If we add a constraint on the total profile thermal history, as shown in the dialog to the right
(this constraint is possible as we know the solution). Running the profile data again, we have the
results shown below. The fit to the data does not change much, and the form of the thermal histories
after 100 Ma are similar. This shows there is little information in the data concerning the early part of
the thermal history.
39
Index
acceptance rates ...........................................27
Act energy
Helium.....................................................13
Annealing Model........................................24
Birth ...........................................................26
Build QTQt data file....................................10
Burn-in .......................................................25
Calculate Age ..............................................12
Calculate initial track length .....................18
Caluclate Initial Length................................24
Cf tracks .......................................... 11, 18, 24
Comp.....................................................10, 11
Compositional Model...........................18, 24
Uncertainty ........................................18, 24
Value .................................................18, 24
Constrain
Time-temperature box..............................22
Constrained Point ........................................17
Constrained Present day......................18, 23
Constrained Time-Temperature point......23
Data Entering, 4He/3He ..............................14
Data Entering, fission track counts, ..........10
Data Entering, fission track lengths ..........11
Data Entering, U-Th/He (4He/3He)...........12
Data Entering, Vitrinite Reflectance.........15
DATA INPUT FORMAT .................................... 6
Death ..........................................................26
Do
Helium.....................................................13
Etchant ............................................ 11, 18, 24
Examine Chain ...........................................28
Expected Model...........................................30
FILE MENU ................................................... 8
Forward thermal history
Entering ...................................................19
Generate all plots .......................................36
He ejection distance .....................................13
Individual Sample
Menu .................................................22, 23
INSTALLING QTQT....................................... 6
Introduction ................................................ 2
length
crystal for He ...........................................13
Likelihood Chain .......................................28
Max. Likelihood Model...............................29
Max. Mode Model .......................................30
Max. Posterior Model .................................30
MCMC RUN MENU .....................................25
No Count data..............................................10
No He data ..................................................12
No Length Data ...........................................11
Offset Temperature History ........................32
Open Existing QTQt files(s)..........................8
Open Previous QTQt Run.............................9
Open Previous Summary File for plotting ..10
Plot Individual FT sampling.......................34
Plot Individual HeVR sampling..................35
Plot Individual PreDepositional sampling ..35
Plot Individual predictions
Expected Model.......................................33
Max. Likelihood model............................29
Plot Individual T(t) .....................................33
Plot Offset Histograms................................32
PLOTTING MENU .........................................28
Post-burn-in ...............................................25
Posterior Chain..........................................28
Projected lengths .......................................18
Proposal scale..............................................26
Ranges for General Prior
Setting .....................................................21
Resample He age with MCMC ....................12
Resample He Error with MCMC..................12
Run .............................................................26
RUNNING QTQT............................................6
Save data ....................................................18
Save data for reload .....................................24
Save for Rerun ...........................................27
Save Run Summary file as............................9
Scaled Vector Graphics
SVG ........................................................28
Select Output Directory.................................9
Set MCMC parameters ...............................25
Summary Model Predictions
Maximum Likelihood model....................30
Temp offset ................................................22
Thermal History
Expected..................................................32
Maximum likelihood................................29
THERMAL HISTORY CONSTRAINTS
Menu .......................................................18
thickness
crystal for He ...........................................13
Thinning.....................................................25
Total profile ................................................21
Use Projected Lengths .................................24
Use projected tracks.....................................11
40
VR
Error ........................................................15
Observed..................................................15
Resample .................................................15
Resample Error ........................................15
use for thermal hisory calibration.............15
width
crystal for He ...........................................13
41