1
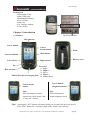
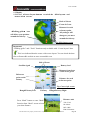
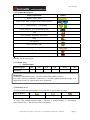
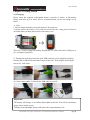
User’s Guide
Sonocaddie V300
Golf GPS
User’s Guide
Sonostar Inc.
This document is the property of Sonostar Inc. Any unauthorized reproduction is prohibited.
V.3.0.0.7_E
Page 1
User’s Guide
Contents
Welcome ........................................................................................................................4
Warnings ................................................................................................................4
Cautions .................................................................................................................4
Chapter 1. Introduction ..................................................................................................5
1.1 Features ............................................................................................................5
1.2 Display .............................................................................................................6
1.2.1 Press “Course Layout button" to switch the “Hole layout" and
“course info" screens.................................................................................6
1.2.2 Symbol Description ..............................................................................7
1.2.3 Status Area ............................................................................................7
1.2.4 Battery level ..........................................................................................7
Chapter 2. Getting started ..............................................................................................8
2.1 Charging...........................................................................................................8
2.2 Carrying Sonocaddie on the Golf Course ........................................................9
2.2.1 Belt Attachment ....................................................................................9
2.2.2 Other Carrying Options.........................................................................9
Chapter 3. Before starting a Game...............................................................................10
3.1 Power ON/OFF ..............................................................................................10
3.2 Main Menu.....................................................................................................10
3.2.1 GPS .....................................................................................................10
3.2.2 Settings................................................................................................11
Chapter 4. Course Management...................................................................................12
4.1 Before downloading course information, you need to log in to the
membership page at www.sonocaddie.com.........................................................12
4.1.1 Login or Join Sonocaddie Membership ..............................................12
4.1.2 Install “V300 Software" in Your Computer...................................12
4.1.3 Connect the USB Cable between Sonocaddie V300 and Computer...13
4.2 Download Course...........................................................................................14
4.2.1 Manage data in V300 ..........................................................................15
Chapter 5. Starting a game...........................................................................................17
5.1 Start with Existing Courses............................................................................17
5.1.1 Select a Course....................................................................................17
5.1.2 Select a Hole .......................................................................................17
5.2 Course Management for V300 device ...........................................................18
5.2.1 Create a New Course ..........................................................................18
5.2.2 Delete a Course ...................................................................................18
This document is the property of Sonostar Inc. Any unauthorized reproduction is prohibited.
Page 2
User’s Guide
5.2.3 To Rename a Course...........................................................................19
5.3 Adding New Reference Points.......................................................................19
5.3.1 Mapping a hole ...................................................................................19
5.3.2 Editing a Course layout.......................................................................19
5.4 Reference Points next to Green......................................................................20
5.5 Reference Points on Green.............................................................................20
5.6 Editing Reference Points................................................................................21
5.7 Delete Reference Points.................................................................................21
5.8 Track your game ............................................................................................22
5.8.1 Shot Track...........................................................................................22
5.8.2 Auto track............................................................................................22
5.8.3 Track review .......................................................................................23
5.9 Green Close-Up Function ..............................................................................24
5.10 Mark Function..............................................................................................24
5.11 Scorecard Function ......................................................................................25
5.11.1 Enter Scores ......................................................................................26
5.11.2 Review Scorecard and View Analysis..............................................26
Appendices...................................................................................................................27
A. Specification....................................................................................................27
B. System Requirement .......................................................................................28
C. Description Abbreviations...............................................................................29
D. FAQs ...............................................................................................................30
Regulatory Agency Compliance ..................................................................................32
This document is the property of Sonostar Inc. Any unauthorized reproduction is prohibited.
Page 3
User’s Guide
Welcome
Welcome to the Sonocaddie guide. This guide has been designed to provide you with
everything you need to know about operating your Sonocaddie. Please read the user
guide thoroughly in order to understand the features of the Sonocaddie.
Note that there are multiple ways to navigate and use the various Sonocaddie
functions. Sonocaddie is very intuitive to use, so feel free to use which ever way you
find to be the easiest.
Warnings
Please read the guidelines below, since failure to do so may result in mis-use of the
equipment and may be dangerous or illegal.
The Global Positioning System (GPS) is operated by the government of the
United States, which is solely responsible for its accuracy and maintenance. The
system is subject to changes which could affect the accuracy and performance of
all GPS equipment.
z Operating
¾ Sonocaddie may take at least 10~15 minutes to receive satellite
signals the first time you turn it on. It may take longer to receive
signals if it has been off for 4 or more hours, or if you traveled more
than 100 miles away from the last location where you used your
Sonocaddie.
¾ Sonocaddie performs best under clear sky. Furthermore, 6 satellite
signals should be sought, so it might be necessary to wait for these to
be registered.
¾ Should you experience any problems with your Sonocaddie (e.g.
malfunction/damage) please contact Sonocaddie Customer Service at
www.Sonocaddie.com. Do not attempt any repairs on your own as this
may void the warranty.
¾ The USB cable provided is solely for the use of Sonocaddie devices (see
the accessory list). Do not connect any other cable for data transfer as this
could damage the data port (I/O port).
¾ A full battery charge may take 4 hours. We recommend not charging over
8 hours.
Cautions
z Golf course
¾ Sonocaddie should not be used while driving any vehicle including golf
carts. Always place Sonocaddie in a secure place to avoid any impact
which could cause damage to it.
z GPS reception
¾ Sonocaddie has a built-in GPS antenna. This antenna should face upward
to gain the best signals and should not be covered with anything as this
may affect the quality of reception. GPS reception might be affected by
the following environmental factors such as rain, dense clouds, fog,
solar flares, high voltage electricity, cellular phone towers, etc.
¾ Coverage/reception levels may be adversely affected by forests and/or
buildings. Optimal usage will be gained in wide open areas.
This document is the property of Sonostar Inc. Any unauthorized reproduction is prohibited.
Page 4
User’s Guide
Packing List
¾ Sonocaddie V300
¾ Mini USB Cable
¾ Rechargeable Battery
¾ User’s Guide
¾ Belt Clip
¾ AC Charger Adaptor
¾ Carry Pouch
Chapter 1. Introduction
The Serial Number
1.1 Features
GPS antenna
Power button/
Course
Layout button
Hook
Mark button
Scorecard button
Battery cover
Right soft key
Left soft key
Esc
5-way key
1. Left / Hole selection
2. Right / +
3. Up / +
Mini-USB Cable & Charging Port 4. Down / 5. Select / Save
Course layout
button
Tips:
Press this button to switch
between the “Hole layout” and
“Course inf” screens.
Power button/
Brightness button
Tip:
Press this button to
adjust brightness levels.
Tips: Pressing the “ESC” button will always bring you to back to the previous screen.
Press “ESC” button for 3 seconds to back to the “Main” menu directly.
This document is the property of Sonostar Inc. Any unauthorized reproduction is prohibited.
Page 5
User’s Guide
1.2 Display
1.2.1 Press “Course Layout button" to switch the “Hole layout" and
“course info" screens.
Back of Green
Front of Green
Distance for each
reference point.
All yardages will
change as you move
around the fairway.
“Walking golfer" icon
will follow your position
around the fairway.
Fig: Hole layout screen
Important!
“Walking golfer” and “Track” functions only available with “Course layout” data.
This icon indicated that the course with course layout. You can check the data
first on Sonocaddie website at www.sonocaddie.com.
Side of Green
Battery level
Satellite signal
Distance from front
/ back of the green
Reference
point on the
fairway
Distance for each
reference point
Fig: Course info screen
Rough/Fairway Left
Fairway
Press “Mark” button or enter “Mark”
function from “Main” screen to know
your shot distance.
Rough/Fairway Right
Distance unit
YD= Yard
M= Meter
ML= Mile
KM= Kilometer
This document is the property of Sonostar Inc. Any unauthorized reproduction is prohibited.
Page 6
User’s Guide
1.2.2 Symbol Description
Status explanation
Symbol
Bunker Front/ Back
Water Front/ Back (includes major water hazards)
* 2nd Green Front/ 2nd Green Back
Creek (includes: river, ditch and stream)
Trap
Tree (includes: shrubbery and forest)
Hills
Lay-up area
Out of Bounds (OB)
Dogleg Left/ Right
Rock
Delete
*Note: For some courses that have two greens on one hole these icons provide
distance for the extra green.
1.2.3 Status Area
¾
Satellite signal
Satellite signal
Accuracy
0~2
3~5
5~6
6~8
8~10
>10
None
Poor
Fair
Good
Very good
Optimal
Important!
To achieve optimum accuracy it is advised that Sonocaddie performs
best under clear sky conditions. Furthermore, 6 satellite signals should be sought, so it
might be necessary to wait for these to be registered.
1.2.4 Battery level
Quickly confirm remaining battery level with the on-screen battery gauge.
Scale of power
Conditions
Full
Empty
No battery *
* Note: This symbol indicates that: 1.The unit is without battery. 2. The battery
insert incorrectly. 3. The battery is defect originally.
This document is the property of Sonostar Inc. Any unauthorized reproduction is prohibited.
Page 7
User’s Guide
Chapter 2. Getting started
2.1 Charging
Please insert the supplied rechargeable battery correctly as below. A full battery
charge may take up to 4 hours and we recommend that you do not charge over 8
hours.
* Note:
1. Please charge the battery at least 4 hours for first time use.
2. Please remove the battery if you will not use the unit for a long period of time to
avoid the battery leaking and corrosive the battery case.
There are 3 ways to charge the battery through the 110~240v wall outlet, USB port, or
12v car adapter (optional).
1) Through the wall plug. Insert the mini-USB connector of the supplied wall plug
into the mini-USB slot located at the bottom of the unit. Then plug the wall charger
into an AC wall outlet.
2) Connect Sonocaddie V300 with the USB cable to your PC.
Important!
The battery will charge, even with the Sonocaddie turned off. You will see the battery
gauge shown on the screen.
Turning on the Backlight feature will reduce the expected battery life.
This document is the property of Sonostar Inc. Any unauthorized reproduction is prohibited.
Page 8
User’s Guide
2.2 Carrying Sonocaddie on the Golf Course
2.2.1 Belt Attachment
1. Place the clip on to your trouser belt.
2. Slide the hook into the clip until you hear a ‘clip’ sound.
3. To remove the Sonocaddie, press down the top clip
button and slide Sonocaddie upward out of the clip.
2.2.2 Other Carrying Options
The clip can also be attached to different things.
For example, it can be clipped onto the golf bag.
Make sure that the clip has been properly fixed for maximum
security.
Sonocaddie can be mounted to the golf
cart with optional golf cart mounts
(visit Sonocaddie website for more
details). Make sure that the hook has
been properly fixed for maximum
security.
This document is the property of Sonostar Inc. Any unauthorized reproduction is prohibited.
Page 9
User’s Guide
Chapter 3. Before starting a Game
3.1 Power ON/OFF
Power
button
Power ON: Press the “Power button” for at least 3 seconds to turn the Sonocaddie
on. Users will see a welcome page.
Power OFF: To switch Sonocaddie off, simply press the “Power button” for at least
3 seconds or select “OFF” function from the “MAIN” menu and then press “YES”.
Important!
Please allow approximately 5~10 minutes when turning the Sonocaddie on to search for
GPS signals (make sure to be in an open-sky area).
3.2 Main Menu
3.2.1 GPS : Provides the GPS reception status information.
DOP = Dilution of Precision
Dilution of precision (DOP) is a measure of the
quality of the GPS data being received from the
satellites. DOP is a mathematical representation for
the quality of the GPS position solution. The main
factors affecting DOP are the number of satellites
being tracked and where these satellites are
positioned in the sky. The effect of DOP can be
resolved into HDOP, VDOP, PDOP and TDOP.
EPE = Estimated Position Error
A measurement of horizontal position error in feet
or meters based upon a variety of factors including
DOP and satellite signal quality.
Note: Lower DOP numbers provide better accuracy.
Important !
To achieve optimum accuracy please be aware that Sonocaddie performs best under clear sky
conditions. Since at least 6 satellite signals should be sought, it might be necessary to wait for
these to be registered.
This document is the property of Sonostar Inc. Any unauthorized reproduction is prohibited.
Page 10
User’s Guide
3.2.2 Settings
There are 9 selections in SETTINGS:
1. LANGUAGE: English / Traditional Chinese/ Simplified Chinese
2. TIME ZONE: Please choose your correct time zone
3. DISTANCE UNIT: YARD / METER/ MILE/ KILOMETER
4. THEMES: BLUE / PURPLE/ GREEN/ ORANGE
5. BRIGHTNESS: OFF/1/2/3/4/5
6. BACKLIGHT TIME: ALWAYS/ 15sec/ 30sec/ 60sec
7. AUTO TRACK: ON /OFF
8. TRACK INTERVAL: 10sec / 20sec/ 30sec
9. SCORECARD: NORMAL / PRO
10. RESET: Back to default settings
※ Please be sure to press “SAVE” after completing all settings.
This document is the property of Sonostar Inc. Any unauthorized reproduction is prohibited.
Page 11
User’s Guide
Chapter 4. Course Management
4.1 Before downloading course information, you need to log in to the
membership page at www.sonocaddie.com.
4.1.1 Login or Join Sonocaddie Membership
Membership account is required to download course data. If you are not a member,
please link to “Member” on V300 Software or go to V300 website, “Member” page at
www.sonocaddie.com to join the membership in advance.
Important!
Serial Number (S/N) is required to join
Sonocaddie V300 membership.
4.1.2 Install “V300 Software" in Your Computer
This application software is used for you to access and download course information
and manage your V300 personalized course folder. Please install it from enclosed CD
or from website at www.sonocaddie.com.
System Support: Microsoft Windows 2000/ XP/ Vista
1. Press “Sonocaddie V300” button to install V300 software.
This document is the property of Sonostar Inc. Any unauthorized reproduction is prohibited.
Page 12
User’s Guide
2. After completing installation, please press “Close” to finish. A Sonocaddie shortcut
will appear on your desktop. Double clicking the Sonocaddie shortcut icon will start
“Sonocaddie V300” software.
4.1.3 Connect the USB Cable between Sonocaddie V300 and Computer
Step 1. Turn on Sonocaddie V300.
Step 2. Connect the USB Cable between Sonocaddie V300 and Computer. You will
see the message “USB cable connected. Enable USB link now? ” on the Sonocaddie
display. Please press “YES” (right soft key) to link the unit with your computer.
This document is the property of Sonostar Inc. Any unauthorized reproduction is prohibited.
Page 13
User’s Guide
4.2 Download Course
Step1. Log in membership to enter V300 Software.
Important !
Internet connection is required to log in
V300 Software to access course data.
It is required to fill in the email account
and password to run V300 Software. They are
same with the account you registered your
member account.
B.
D.
F.
A.
E.
C.
A. Information bar: User’s name/ Type of Membership Plan/ Membership Valid
Period/ Registered Country
B. Course Tab
(links to Sonocaddie database) for downloading course
data.
Steps to download course data:
Step 1. Please select the Country and State, enter the Course Name then press “GO”
for the course you want.
Step 2. Check one or more box beside each course you wish to download, and press
“Download↓” button to transfer the course(s) to your Sonocaddie V300.
This document is the property of Sonostar Inc. Any unauthorized reproduction is prohibited.
Page 14
User’s Guide
Step 1
Step 2
This picture indicates this specific golf course has scorecard information.
This picture indicates this specific golf course has GPS information.
This picture indicates this specific golf course has color layout.
4.2.1 Manage data in V300
C. V300 Tab:
When linking with V300 device, the course data/ scorecard/ track record(s) on the
device is ready to be uploaded, deleted, renamed and reviewed (scorecard record
only).
-Upload: You can upload the course GPS (up to 30 courses), Scorecard (up to 100
records) and Track (up to 100 records) data to “My Folder” tab.
-Delete: Tick one or more box of data, press “Delete” button to remove the data.
-Rename: Double click the data name to rename.
-Review (scorecard only): Review scores and analysis of your round(s).
This document is the property of Sonostar Inc. Any unauthorized reproduction is prohibited.
Page 15
User’s Guide
To review scorecard record, please
press “Scorecard” button on the top
of the display, then tick the record
you want to review. Just press
“Review” button, and the scores
and analysis will show on the
display for you to refer your game.
You could review the scorecard
record both in “V300” tab and “My
Folder” tab.
Note: Please do not disconnect the cable between V300 device and PC when
transferring.
D. GPS/ Track/ Scorecard buttons on the top of the display:
These buttons bring up the course data from your Sonocaddie V300 unit. You can
switch to review the track, GPS and Scorecard data simply by pressing the buttons.
GPS
GPS
Note: Please do not disconnect the cable between V300 device and PC when
transferring.
Important!
When you stay in the “V300” tab and press the top button “GPS”, the “My Folder” tab
will also switch to GPS data. In other words, when pressing “Scorecard” button on the,
both “V300” and “My Folder” tab will switch to scorecard data in the same time.
This document is the property of Sonostar Inc. Any unauthorized reproduction is prohibited.
Page 16
User’s Guide
E. My Folder Tab:
This is the personal folder to manage your
data. You can upload the course GPS (30 courses), Scorecard (100 records) and Track
(100 records) data from your V300 unit to this folder. (Par level user has NO access to
“My Folder” unless the membership upgraded.)
Important!
It is not possible to download course(s) from the Sonocaddie web site to “My Folder”
directly.
The downloading process should go through your Sonocaddie V300 device. From the
V300 you can load courses into “My Folder”
F. More functions:
Pressing each button, it will link you to the Sonocaddie V300 website for further
information and assistance.
Chapter 5. Starting a game
5.1 Start with Existing Courses
5.1.1 Select a Course
Select “PLAY” from “Main” menu to enter course list and select the appropriate
course using the 5-way key or the right soft key. When the desired course is selected,
press “select” on the 5-way key or press “MORE” (right soft key) and select “PLAY”.
The “SELECT HOLE” page will pop up.
Important!
You must select a course and a hole first. Then, SCORECARD function and course
5.2.2 Select a Hole
layout
cantobe
used.a hole. One is to use 5-way key left or right to select a
There
arefunction
two ways
switch
5.1.2 Select a Hole
There are several ways to select a hole. From the “SELECT HOLE” screen, navigate
to the desired hole and press the “select” (center of 5-way key) or “SELECT” (right
soft key). From the “HOLE VIEW” screen you can press the “hole selection” key
This document is the property of Sonostar Inc. Any unauthorized reproduction is prohibited.
Page 17
User’s Guide
(see figure) to bring up the “SELECT HOLE” screen, and then use the 5-way keys to
select a hole. From the “HOLE VIEW” screen you can also scroll left and right
through all holes using the left-right buttons on the 5-way key. This also can be used
to scroll through close-up views of the greens.
.
Hole selection
button
5.2 Course Management for V300 device
5.2.1 Create a New Course
Select “MAP NEW” from the “Main” menu or press
“MORE” to select “NEW” after you entered the
course list.
Key in the course name by using the 5-way key. Then
please press “Record” to save it. The new course you
created will show on the course list right away.
5.2.2 Delete a Course
From the “COURSE LIST” screen, select a course name, and press “MORE” (right
soft key). Select “DELETE/DELETE ALL” to delete the selected course or to delete
all courses at once. When the confirmation dialog box opens, press “YES” (right soft
key) to confirm or “NO” (left soft key) to go back. Once “YES” is selected, the
course information and all reference points will be deleted permanently.
This document is the property of Sonostar Inc. Any unauthorized reproduction is prohibited.
Page 18
User’s Guide
5.2.3 To Rename a Course
From the “COURSE LIST” screen, select the course you wish to rename. Press
“MORE” (right soft key) and select “RENAME” from the pop-up list using the
5-way key. To rename, use the 5-way key to edit the course name.
5.3 Adding New Reference Points
Users can record reference points on the course while playing.
5.3.1 Mapping a hole
Bring up the “Course info” screen with the “Course Layout Button”. Standing at the
reference points which you would like to add, press “EDIT” (right soft key), and
navigate the cursor to the appropriate location on the screen. Press “SELECT” (right
soft key) go to the “ICON” screen. Choose the correct icon for the new reference
point, and while standing still, press “RECORD” (right soft key). Press “Esc” key to
complete the mapping and return to the Course Layout Screen.
5.3.2 Editing a Course layout
From the “Hole layout” screen, bring up the “Course Info” screen with the “Course
Layout” button. Similarly to 5.3.1, standing at the reference points which you would
like to add. Press “MORE”, and press “EDIT” to add reference points as 4.3.1.
This document is the property of Sonostar Inc. Any unauthorized reproduction is prohibited.
Page 19
User’s Guide
Important!
Sonocaddie performs best under clear sky.
Furthermore, 6 satellite signals should be sought,
it might be necessary to wait for these to be
registered.
Important!
Each row only allows one reference point. Maximum of 10 reference points per
hole-(on/off fairway, Green Front/Back and next to Green) can be recorded. It is suggested
that each reference point should be recorded based on the order of course features for that
hole. All reference points’ distance will disappear when standing within 5 yards. To record
a reference point, the player must stand still for 5 seconds at the reference point before
pressing “Record”. The yardage will show “0” right away when you press record.
5.4 Reference Points next to Green
To add icons to the side of the green, (for example, add a water icon to the left of the
green) press “SELECT” (right soft key) and then choose from the icons.
Important!
These two reference points do not provide any distance yardage.
Under the course layout function, reference points next to the Green would not be displayed.
5.5 Reference Points on Green
To add Green reference points, stand at the front or back of the green, select the Green
front or back icon and press “RECORD” to record the coordinates.
This document is the property of Sonostar Inc. Any unauthorized reproduction is prohibited.
Page 20
User’s Guide
Add Green Front:
Add Green Back:
5.6 Editing Reference Points
Users can edit existing reference points according to their preference while playing on
the course.
If the icon on the screen of the actual course is incorrect and needs to be changed,
stand at the reference point, press “EDIT” and choose the particular reference point
icon that requires editing. Then press “SELECT” and choose one icon from the icon
page. Press “RECORD” and the icon is now changed to the new icon.
If the Sonocaddie shows an incorrect distance to the course feature, users can update
the new coordinates by standing at the reference point, pressing “EDIT” and choosing
the particular reference point icon that requires updating. Press “SELECT” to go to
the icon page. Highlight the same icon on the icon page, and press “RECORD”. The
distance is now corrected permanently.
Important!
To record a reference point the player must stand still for 5 seconds at the reference
point before pressing “RECORD”. The yardage will show “0” right away when you
press record.
5.7 Delete Reference Points
Press “EDIT” (right soft key) and then highlight the particular reference point icon
that requires erasing by using the 5-way key. Press “SELECT” to go to the icon page.
Highlight the “DELETE icon” and press “DELETE” from the 12 icons’ menu.The
reference point is now deleted.
Once erased, the previous reference point icon and yardage distance will disappear
from the screen. (Note: the same procedure should be followed to erase reference
point icons on both sides of green)
This document is the property of Sonostar Inc. Any unauthorized reproduction is prohibited.
Page 21
User’s Guide
5.8 Track your game
5.8.1 Shot Track
This function works only when the course has a course layout and is used to
record every shot on the course. After hitting a shot, proceed to the ball and press the
“SHOT TRACK” button. Repeat the same process for every shot to record the
information in the track record. To review the round, enter “TRACK REVIEW”
function on the “MAIN” menu to review each shot on the course.
Important!
To use SHOT TRACK, you must be located on a particular hole and the Golfer Icon
must be visible on the display for that hole.
5.8.2 Auto track
To use the AUTO TRACK function, please follow the steps below.
Step1. In the “SETTINGS” menu Set “AUTO TRACK” to “ON”.
Step2. Select the course you are about to play.
Step3. Once Sonocaddie begins to receive satellite signals, the track function will start
when you begin your round.
This document is the property of Sonostar Inc. Any unauthorized reproduction is prohibited.
Page 22
User’s Guide
Important!
To use AUTO TRACK, you must be located on a particular hole and the Golfer Icon
must be visible on the display for that hole.
z AUTO TRACK can only track one round of golf per golf course per day
Important!
Selecting different track intervals will affect the recording time.
TRACK INTERVAL
10 SECONDS
20 SECONDS
30 SECOND
Recording Period
5 hours
11 hours
16 hours
5.8.3 Track review
The TRACK REVIEW function allows you to review both your own route and the
results of each shot you played. When “AUTO TRACK” is “ON”, you will be able to
view your actual route on the course. When you use the “SHOT TRACK” function
after each shot during the round, you will be able to see each shot played. All
information is recorded and saved for you to review, and plot your strategy for your
next round!
Auto track on only
Shot track on only
Auto track on & Shot track on
Important!
If the course layout has been deleted, you will not be able to review the track record
unless you reinstall the course layout.
This document is the property of Sonostar Inc. Any unauthorized reproduction is prohibited.
Page 23
User’s Guide
5.9 Green Close-Up Function
At any time during your round, press “GREEN” (left soft key) to get a close-up view
of the putting green. You will see the distances to the Front, Center and Back of the
green. Press the “FULL” (left soft key) to go back to the previous screen.
Back
Center
Front
5.10 Mark Function
The Mark function is used to measure distance of each shot. After hitting a shot, press
the ‘START’ button and proceed to the ball. The distance figure stops after pressing
‘END’. The display then shows the distance of the actual shot.
Important!
The user does not have to travel in a straight line to the ball. The distance shown on the
display is always the straight line distance from where the ‘START’ button was pressed.
The Mark Function can be used anytime, except when the ‘Green View’ function is
activated. This can be done in two ways:
1. Press ‘MARK’ button (Right side key) directly.
2. Select MARK Function icon on the ‘MAIN’ page.
Important!
This function can only be activated
when there is GPS reception.
To begin, press “START” (right soft key) at the point from where the shot is taken.
The screen will show ‘0’ on the display. When you move toward the ball position, the
yardage number will increase according to your location.
This document is the property of Sonostar Inc. Any unauthorized reproduction is prohibited.
Page 24
User’s Guide
ESC
Once reaching the ball position, the the distance
of the shot is shown. Pressing “END” (right soft
key) locks in the number until “START” is
pressed again.
5.11 Scorecard Function
Sonocaddie provides a scorecard function that allows you to score your personal
round and provides an analysis of your round…
There are 2 types of scorecard functions, “NORMAL” and “PRO”. Normal keeps
track of total strokes only, and adds all strokes to provide scores for both front nine
(out) and back nine (in).
To choose either “NORMAL” or “PRO”, go to the “SETTINGS” screen, scroll
down to “SCORECARD” and choose either “NORMAL” or “PRO” with the left-right
5-way key. Press “SAVE” (right soft key) to save the setting..
In the “PRO” scorecard you can enter Par (P), Strokes (S), Putts (Pt) in numeric form,
and Faiway Hit (Fw) and Sand Save (Sd) as either Y (yes) or N (no). Note: when
Sonocaddie has the course information stored, and you go to the “SCORECARD”
screen during the round, the “Par” field will automatically show the par for the hole
you are playing.
PRO
H = Hole
P = Par
S = Score
Pt = Putt
Fw = Fairway
Sd = Sand
Important!
To have GIR analysis, Par number,
Score and number of Putt are required
to input.
To have Sand Save analysis, input “Y
(yes)” or “N (no)” on “Sd” space, and
it will automatically calculate
according to your scores.
This document is the property of Sonostar Inc. Any unauthorized reproduction is prohibited.
Page 25
User’s Guide
Use 5-way key left or right to select the item which you want to change. Up and down
to enter your scores. After input the 1~9 holes scores, please use 5-way key to go to
next 9 holes. Press ‘Esc’ button to go back to the previous page and the scores will be
saved automatically. Press “ANALYSIS” (right soft key) to view compiled statistics
and the scores for that round.
NORMAL
H = Hole
P = Par (unchangeable)
S = Score
NOTE: When using “NORMAL” scorecard, there is NO
“ANALYSIS” function available.
Use the up and down 5-way key to choose the hole number and then use the left or
right 5-way key to enter your scores. Press the ‘Esc’ key to go back to the previous
page and the scores will be saved automatically.
5.11.1 Enter Scores
Select the course to play, press “Scorecard button” during the game, and enter scores
directly.
5.11.2 Review Scorecard and View Analysis
Sonocaddie can save scores for up to 100 rounds. To view prior scores, go to
“SCORECARD” from the “MAIN” menu and “SELECT” one course. With this
feature you can review previous scores, analysis and also edit them.
Important!
Scorecard’s scores will be saved for that course until the user clears the scores or deletes
the course.
This document is the property of Sonostar Inc. Any unauthorized reproduction is prohibited.
Page 26
User’s Guide
Appendices
A. Specification
z Size
¾ H 108mm×W 53.5mm×T 28.4mm (H 4.3”×W 2.3”×T 1.1”)
z Weight
¾ 140g ( 4.9 ounces)
z Screen
¾ 2.2” high-resolution color LCD w/ Backlight
z Operating temperature
¾ Maximum 70 º C / 158 º F
¾ Minimum -5 º C / 23 º F
z Storage
¾ Course: 30
¾ Scorecard: 100
¾ Track: 100
z Battery
¾ Rechargeable battery
¾ 15 hours in normal operation (may be different by the frequency of
backlight on)
¾ Battery charging time: 8 hours in operation mode, 5 hours in power-off
mode
z Acquisition Rate
¾ Cold start: Approx 5~10 minutes
z Accuracy
¾ 3 Meters CEP (80%), 7 Meters CEP(90%) horizontal, SA off
z
Built-in GPS Receiver
z
Built-in High Sensitivity GPS Antenna
z
Waterproof, IPX6
z
Membership is optional - you can self-map a course any time, but note that
for full color course layout, Sonocaddie membership is required.
This document is the property of Sonostar Inc. Any unauthorized reproduction is prohibited.
Page 27
User’s Guide
B. System Requirement
¾ Windows 2000/XP/Vista
¾ CD-ROM
¾ 512 MB RAM (XP)、1 GB RAM (Vista) or higher
¾ 12 MB or more hard disk space
(Computer access not required when self-mapping)
This document is the property of Sonostar Inc. Any unauthorized reproduction is prohibited.
Page 28
User’s Guide
C. Description Abbreviations
Lat = Latitude
Lon = Longitude
DOP = Dilution of Precision
EPE = Estimated Position Error
P = Par
S = Score
H = Hole
Hcp = Handicap
Pt = Putt
Fw = Fairway
Sd = Sand
GIR = Green in Regulation
B/BK = Back
F/FT= Front
CT = Centre
YD = Yard
M = Meter
ML = Mile
KM = Kilometer
ESC = Escape/ Previous page
This document is the property of Sonostar Inc. Any unauthorized reproduction is prohibited.
Page 29
User’s Guide
D. FAQs
Q1. What do I do when my Sonocaddie is not detecting a signal?
A. Your Sonocaddie uses the global satellite positioning system, (GPS) and works
best in wide, open spaces, regardless of weather. In order to receive GPS signals you
must be in an open sky area, away from buildings, trees cliffs, etc. The first time you
start Sonocaddie in a new area it may take up to 10~15 min. to receive sufficient
satellite signals. You may monitor GPS signal reception on the ‘GPS Status’ screen.
Once you receive 6 or more stable satellite signals Sonocaddie will provide very good
accuracy.
Otherwise it won't receive GPS signal and will show nothing on the display. After
turn-on, there should be a number on the upper-left corner of the screen, which means
the number of satellites received. If showing “X”, it means no signal.
If you are on the course, all distance numbers will automatically show on the screen.
However the limit of displayed number is set to 999 yards. Therefore any distance
beyond 999 yard will show 999 only. Besides, if the unit shows " ─ ─ " when the
satellite is available, it means that the distance is within 0~5 yards.
Q2. How can I track my driving distance?
A. Sonocaddie uses the global positioning satellite system (GPS). Simply press a
button to record the beginning coordinates of your shot and the end coordinates of
your shot and Sonocaddie will accurately calculate the shot distance. Please consult
the user guide for more details.
Q3. Can I connect my Sonocaddie to other computer devices?
A. Apart from the computer systems approved by Sonocaddie, we do not provide any
assurances, and advise against attempting to connect it to any non-approved devices.
Q4. Why is the distance of the course marker different from the distance
measured by Sonocaddie?
A. 1. First, please make sure that the distance unit either in Sonocaddie or the course
is the same (i.e. “YARDS” vs. “METERS”). If they are different, please go to
‘Settings' in main menu and select “Yard” or “Meter” as the right unit.
2. Some courses measure the distances by using laser equipment. If the Green and Tee
box are not at the same horizontal level, the yardage numbers could be different from
the one of Sonocaddie. Most Golf GPS devices measure the distance only in
horizontal level, which is more useful for golfers than straight-line of laser unit.
This document is the property of Sonostar Inc. Any unauthorized reproduction is prohibited.
Page 30
User’s Guide
3. However, some courses measure the distance from tee box to the green along the
middle line of fairway. For example, the distance on the tee mark or scorecard shows
410 yards, but Sonocaddie only shows 380 yards. Please see figure below.
Q.5 Will I lose my data when the power goes off on my Sonocaddie?
A. The data you store in your Sonocaddie will never be lost unless you edit or erase
the data on purpose.
Q6. Why are the distances shown on Sonocaddie incorrect for each hole on this
course?
A. Please check the GPS reception on the GPS Status screen at the time to be sure you
have at least 6 stable satellite signals. Also check the Settings menu (Wrench icon) to
be sure the distance units (yard or meter) are correct.
In addition, the distance in GPS device is not related with the locations of tee
boxes-The distance is calculated based on the difference between the apparent
position and the known position. The apparent position is the moveable location of the
GPS device which receives the signal. The known position is the position of the target
or reference point.
The known position is fixed and is the coordinates, such as bunker and green,
downloaded from the database of website. Therefore when you stand by the tee box
(apparent position of GPS device you carry), the unit will calculate the distance
between you and the green (known position).
Q7. Can I connect Sonocaddie to Mac OS?
Sonocaddie is not compatible with Apple Mac OS systems including X Leopard and
Windows XP under Virtual PC in the short term.
This document is the property of Sonostar Inc. Any unauthorized reproduction is prohibited.
Page 31
User’s Guide
Regulatory Agency Compliance
Federal Communications Commission (FCC)
This device complies with part 15 of the FCC Rules. Operation is subject to the
following two conditions: (1) this device may not cause harmful interference, and (2)
this device must accept any interference received,
including interference that may cause undesired operation.
NOTICE The FCC warns that user modifications of this device without the express
approval of Sonostar Inc. could void the user’s authority to operate the device.
This document is the property of Sonostar Inc. Any unauthorized reproduction is prohibited.
Page 32
User’s Guide
V.3.0.0.7_E
This document is the property of Sonostar Inc. Any unauthorized reproduction is prohibited.
Page 33