1
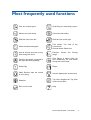
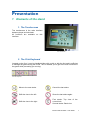
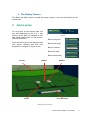
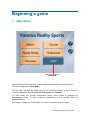
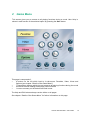
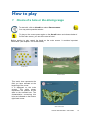
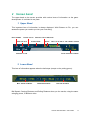
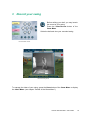
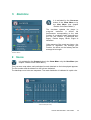
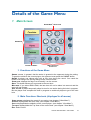
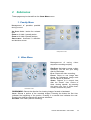
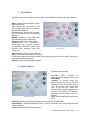
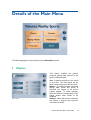
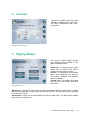
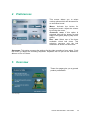
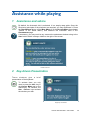
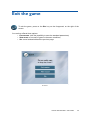
GOLF SIMULATOR
Golf Simulator V 7
User Guide
English version
2001.06.12
Copyright
This documentation is owned by SAS Société Nouvelle Visiotics© and is protected by French
copyright laws and international treaty provisions. You may not provide copies of the
documentation to others without prior written permission of SAS Société Nouvelle Visiotics ©.
Table of contents
Preface
5
Most frequently used functions
6
Presentation
7
1
2
Elements of the stand
1. Touchscreen
2. Club Keyboard
3. Replay camera
Game areas
7
7
7
8
8
Driving of the simulator
1
2
9
Initializing and stopping the system
1. Bringing into service
2. Stopping the system
The game
9
9
9
9
Game initialization
10
Beginning a game
14
1
2
Main Menu
Game Menu
14
15
How to play
1
2
3
4
5
6
16
Choice of a hole or the Driving range
Screen Band
1. Upper Band
2. Lower Band
Record your swing
Top View
Statistics
Score
16
17
17
17
18
19
20
20
Details of the Game Menu
1
2
21
Main Screen
1.
Functions of the Game Menu’
2.
Main Functions Shortcuts (displays in all menus)
Submenus
1.
Penalty Menu
2.
Video Menu
3.
View Menu
4.
Option Menu
21
21
21
22
22
22
23
23
Visiotics Golf Simulator—User Guide
3
Details of the Main Menu
1
2
3
4
5
Players
Courses
Playing Modes
Preferences
Overview
Putting
1
2
24
24
25
25
26
26
27
Goal
Slopes indications
27
27
Assistance while playing
28
1
2
Assistance and advice
Key-driven Presentation
Exit the game
28
28
29
Visiotics Golf Simulator—User Guide
4
Preface
Welcome on the Visiotics simulator.
This Golf simulator re-creates the conditions of a golf course or of a practice session in a
20 m² area. It provides the golfer equipped with clubs and a ball all game sensations.
The simulator uses various mobile detection, trajectory calculation and tridimensional
picture representation leading edge technologies. The simulator meets these quality targets which differentiate it from competing products:
•
Visual environment and rendering of the most prestigious golf courses giving an
illusion of reality.
•
Sharp detection of ball striking and real time reproduction of its trajectory and effects.
•
Adapted ergonomics to the golfer’s habits and psychology.
•
Installation and maintenance easiness.
•
Great equipment reliability.
You will find in this user guide a brief but explicit presentation of all fundamental elements of the stand as well as the elementary functions of the simulator. Illustrations have
been inserted to help you understand and supplement your research.
Wishing you a good course on the simulator.
Visiotics Golf Simulator—User Guide
5
Most frequently used functions
Golf: the complete game
Club fitting: the Club-fitting program
Move to the next stroke
Cancel the last stroke
Shift the view to the left.
Shift the view to the right
Show the last stroke again
First stroke: Top view of the
current hole
Second stroke: Back view
Hole #: choose any hole at any
time during the round.
Practice:
range
Gimmie: the stroke is granted to
the opponent during putting.
Skip Player: a player skips his
turn temporarily for one stroke
during the current hole.
Show Flag
Player
Video Record: start the record
of your swing.
Scores: displays the scores card.
Statistics
Top View: displays the Top View
of the current hole.
Exit: end of round.
Help
launch
the
Driving
Visiotics Golf Simulator—User Guide
6
Presentation
1
Elements of the stand
1. The Touchscreen
The touchscreen is the main interface
between player and simulator.
All functions are available on this
interface.
The Touchscreen
2. The Club Keyboard
Located on the floor, it may be handled either with a club or with the foot and is sufficient
to manage the game during the round. Thus it enables you to get to the main functions of
the game while preventing you moving.
The Club Keyboard
Move to the next stroke
Cancel the last stroke
Shift the view to the left.
Show the last stroke again
Shift the view to the right
First stroke: Top view of the
current hole
Second stroke: Back view
Visiotics Golf Simulator—User Guide
7
3. The Replay Camera
This black and white camera records the player’s swing. It may be controlled from the
touchscreen.
2
Game areas
You must play on the striking mats. Set
your ball depending on the « lie » (the
location of the ball) as indicated on the
right band (Upper band on the screen).
(Picture «Band lie»)
Once the ball is set on the adequate mat
(see picture «Striking Mat and Club
Keyboard»), swing as on a golf course.
Band lie
Ball on the green
Ball on the rough
Ball on a bunker
Ball at the start
Ball on the fairway
PUTTING
FAIRWAY
BUNKER
ROUGH
CLUB KEYBOARD
Striking Mat and Club Keyboard
Visiotics Golf Simulator—User Guide
8
Driving of the simulator
1 Initializing and stopping the system
1. Bringing into service
After checking the simulator is properly plugged on the electrical network (115V or 230V
depending on the country), briefly press the remote control for the setting up of the
machine. Wait for the flyleaf to appear.
Note: in order to ensure a better picture quality, we advise you to wait for 15mn after
switching the machine on before starting a round.
2. Stopping the system
Shutdown the computer before stopping the system. The regular switching off of the
simulator is performed via the remote control.
2 The Game
To launch the game, press the GOLF button.
PRESS TO SHUTDOWN
THE COMPUTER
Startup screen
PRESS TO ENTER THE GAME
PRESS TO ENTER THE
CLUB-FITTING PROGRAM
Visiotics Golf Simulator—User Guide
9
Game initialization
The game initialization enables to configure the round to be played. You may choose the
language, the number of players, the players’ color and name, the course and game
mode.
Choose your language
Language choice screen
Choose the number of players: from 1 to 4.
Select the button corresponding to the total
number of players for the round.
The system can save unfinished rounds if one of
the players has been registered. The unfinished
round can be continued by selecting CHOOSE.
Number of Players screen
Visiotics Golf Simulator—User Guide
10
You are identified by a color and your name.
Players screen
COLOR: A color is automatically assigned but can
be modified according to your wish. This color will
identify you throughout the round.
NAME: The default color name is automatically
assigned. You can play without entering your
name but you are advised to enter your own
name so that your personal golfing data will be
saved. You will also be able to later continue
unfinished rounds.
Press ENTER to register your selection.
Several courses are available. They are grouped
geographically. Select a geographic area
represented by a red dot.
Geographic area choice screen
The courses available in a geographic area are
listed. Use the arrows at the top and bottom of the
list to see the entire list.
Choose a course by pressing the name on the list.
Press ENTER to play on the chosen course.
Course choice screen
Visiotics Golf Simulator—User Guide
11
Weather conditions affect the ball trajectory,
rebound and the way the ball rolls on the ground.
Weather conditions are associated with the
course chosen to reproduce the real environment.
You can modify these conditions as you wish
according to three criteria (Wind, Air, Ground).
Changing weather conditions
Wind influences the ball trajectory and carry
according to its speed, variableness and direction.
SPEED: Press the + or – squares to modify wind
speed. Speed is listed in three units (Mph, km/h,
m/s).
VARIABLENESS: Choices are constant wind and
wind gusts. Choices concerning frequency and
duration of the gusts are TURBULENCE and
STRONG TURBULENCE.
Weather conditions Wind
DIRECTION: To modify wind direction, press the left and right arrows or press the symbol of
the desired direction.
Press ENTER to register your selection. Return to Weather Screen.
Air has an influence on ball trajectory and carry
according to its pressure, temperature and
humidity level.
Weather conditions Air
PRESSURE: Low pressure provides more carry.
High pressure provides less carry.
TEMPERATURE: Press the + or – squares to modify
air temperature. Temperature is listed
simultaneously in two units (°C and °F degrees).
HUMIDITY: Humidity levels are relative to the
average humidity at 45° latitude. Relative humidity
levels are HUMID 85%, NORMAL 60%, and DRY
30%.
Press ENTER to register your selection. Return to Weather Screen.
Visiotics Golf Simulator—User Guide
12
Ground conditions and greens speed influence
ball rebound and roll.
GROUND CONDITIONS: rolling of the ball from the
tee to the green.
GREENS SPEED: up to your skills.
Press ENTER to register your selection.
Weather conditions Ground Screen
Selection screen for playing modes and formulas.
UNOFFICIAL: A playing mode which allows you to
cancel shots and to practice on-site at any
moment.
OFFICIAL: A competition mode which takes your
handicap into account. The options Mulligan and
Practice are not available.
STROKE PLAY: The player who plays the hole(s) in
the fewest strokes is the winner.
Playing Modes Screen
MATCH PLAY: The player which holes its ball in the fewest strokes wins the hole. In a game
played with handicaps, the lowest net score wins the hole. The team which wins the most
holes wins the round.
STABLEFORD: Points are counted against the Par for each hole. The player who obtains
the best score overall wins.
Press ENTER to begin a game.
Visiotics Golf Simulator—User Guide
13
Beginning a game
1
Main Menu
PRESS TO ENTER THE
GAME MENU
After the Game initialization part, press the PLAY button to begin the defined round.
This button displays the GAME MENU.
On this page, you still can switch back to the previous windows so as to alter the
previous initialization data: PLAYERS, PLAYING MODES and COURSES.
You can modify the general configuration before round begins by pressing the
PREFERENCES button. To show a general presentation of the simulator push the
OVERVIEW button.
See chapter “Details of the Main Menu” for further information on these pages.
Visiotics Golf Simulator—User Guide
14
2
Game Menu
This screen gives you an access to all playing functions during a round. User Help is
shown in each screen of the selected option by pressing the HELP button.
This page is composed of:
•
4 buttons on the left which lead to 4 sub-menus: Penalties, Video, Views and
Options (see chapter “Details of the Game Menu”)
•
7 Game Menu buttons which give an access to all playing functions during the round
•
4 shortcut buttons leading to frequently used functions
•
1 course summary on the bottom left-hand corner
The Help and Exit buttons always remain visible on all pages.
See chapter “Details of the Game Menu” for further information on this page.
Visiotics Golf Simulator—User Guide
15
How to play
1
Choice of a hole or the driving range
To start with, click on HOLE# then select DRIVING RANGE:
You may start a practice session.
To play on the course press again on the HOLE# button and choose button 1.
On the main screen, you are at the start of hole 1.
Before starting to play, watch the band on the main screen. It contains important
information. (see chapter “The screen band”)
Hole# screen
Practice Session
This aerial view represents the
field you have selected at the
beginning of the round.
It is displayed on the main
screen. The white player
represents the position at the
start on the selected hole. The
characteristics concerning this
hole are indicated on the bottom
right-hand corner.
Whole view window
Visiotics Golf Simulator—User Guide
16
2
Screen band
The upper band on the screen provides with various items of information on the game
development. It is divided in two parts.
1 Upper Band
This important item of information is always displayed. With Distance to Pin, you can
assess the power you need to put into your next swing.
HOLE NUMBER
PLAYER COLOR
PAR FOR HOLE
PRACTICE / PLAY INDICATOR
PLAYER NAME
SCORE
DISTANCE TO PIN
BALL LIE AT END OF THE CURRENT STROKE
TOTAL DISTANCE COVERED
2 Lower Band
This item of information appears when the ball stops (except on the putting green).
BALL SPEED ON IMPACT
CARRYING DISTANCE
ROLLING DISTANCE
Ball Speed, Carrying Distance and Rolling Distance show you the results, using the same
swinging power, of different clubs.
Visiotics Golf Simulator—User Guide
17
3
Record your swing
Before striking your ball, you may launch
the record of your swing.
Press the VIDEO RECORD button of the
GAME MENU.
Strike the ball and view your recorded swing.
The Game Menu Screen
Launch the swing record
To manage the video of your swing, press the VIDEO button of the GAME MENU to display
the VIDEO MENU. (see chapter “Details of the Game Menu”)
Visiotics Golf Simulator—User Guide
18
4
Top View
PAR FOR HOLE
TOTAL DISTANCE
ORIENTATION
HOLE NUMBER
TOP VIEW OF THE
CURRENT HOLE
WITH INDICATION
OF VARIOUS AREAS
POSITION
PLAYER COLOR
AND POSITION
CROSS SECTION OF
CURRENT HOLE
WITH VARIOUS/ALL
SURFACES
Prologue upper view
To obtain this view press the TOP VIEW button of the GAME MENU or the
VIEW button of the Club Keyboard. (see chapter “Details of the Game
Menu”)
The players are represented by characters identified by a color :
• player 1: blue,
• player 2: magenta,
• player 3: purple,
• player 4: orange
The player in progress is represented by a character whereas the other players are
represented by colored balls.
Visiotics Golf Simulator—User Guide
19
5
Statistics
It is activated by the STATISTICS
button of the GAME MENU or by
the VIEW MENU (see chapter
“Details of the Game Menu”).
The simulator updates the player in
progress’ statistics. It shows his
performance corresponding to the total
number of completed holes depending on
the Par: the number of performed Par,
Bogey, Double bogey, Birdie, Eagle et
Albatross.
Other aspects of the round are shown : the
greens in regulation, the average putt
number, the drives on the fairway and the
average drive length.
Statistics window
6
Score
It is activated by the SCORES button in the GAME MENU or by the VIEW MENU (see
chapter “Details of the Game Menu”).
This is a score map where each participant’s result obtained on the holes played appears.
The Par number and the distance to the hole are indicated.
The handicap round rules are respected. The mark distribution is indicated in a pink color.
Scores window (nine holes)
Visiotics Golf Simulator—User Guide
20
Details of the Game Menu
1
Main Screen
GAME MENU’S FUNCTIONS
SUBMENUS
COURSE SUMMARY
M AIN FUNCTIONS
SHORTCUTS
1. Functions of the Game Menu
GIMMIE: means, in general, that the stroke is granted to the opponent during the putting.
To grant the stroke to the current player, the opponent must press the GIMMIE button.
HOLE#: A player can choose any hole at any time during the round. You reach the
PRACTICE owing to the Driving Range of the current course.
SHOW FLAG: displays the flag so as to identify it on the course.
NEXT: This button allows you to proceed to the next shot.
MULLIGAN: If you select MULLIGAN, the last shot will not be taken into account and the
score will not change.
SKIP PLAYER: a player temporarily skips his turn for one stroke during the hole in progress.
But the player must complete the hole in progress to enable all players to get to the next
hole.
2. Main Functions Shortcuts (displayed in all menus)
VIDEO RECORD: start/stop the record of your swing. (see chapter “Video Menu”)
SCORES: displays/hide the score card. (see chapter “View Menu”)
STATS: displays/hide the statistics of the current player. (see chapter “View Menu”)
TOP VIEW: displays/hide the Top View of the current hole. (see chapter “View Menu”)
EXIT: End of round.
Visiotics Golf Simulator—User Guide
21
2
Submenus
These pages may be issued from the GAME MENU screen.
1. Penalty Menu
Management of penalties possible
during a round.
AIR SHOT: Adds 1 stroke for a missed
shot.
PENALTY 1: Adds 1 penalty stroke.
PENALTY 2: Adds 2 penalty strokes.
UNPLAYABLE: Accesses a definition
and decision screen.
Penalty Menu screen
2. Video Menu
Management of swing video
sequence recording and play.
Video Menu screen
REC/STOP: Activates or stops a video
recording. You will see your swing
after the ball stops.
PLAY: Shows the video recording.
PAUSE: Stops on one image then
shows the subsequent image each
time the button is pressed.
SPEED: Returns to a normal view
after the “Pause” view. Choice of
three viewing speeds, by pressing
the button one, two or three times:
normal, slow and very slow.
FWRD/BWRD: Selects the direction for showing images: forward or backward.
LOOP: Selects a portion of the recorded images. Pressing the button the first time
indicates the beginning of the portion. Pressing it a second time indicates the end.
Pressing it a third time cancels the previous selections.
SETTINGS: Live Video (without recording).
Visiotics Golf Simulator—User Guide
22
3. View Menu
Accesses various information screens, also views settings of courses and ball trajectory.
BACK: Shows the ball trajectory from
the ball’s final lie.
TOP: Shows the top view of the
current hole with players’ positions
and the last trajectory.
Simultaneously shows the cut-away
view of the course with textures and
altitudes.
NORMAL: Returns to the initial view
from the ball’s point of departure.
SCORES: Shows the current scores.
S T A S T I S T I C S : Al l i nf orm at ion
concerning the current player’s
performance: difference versus par,
success rate, average putts and
drives, etc.
View Menu screen
LEFT: Shifts the current view to the left.
RIGHT: Shifts the current view to the right.
Pushing the button the first time initiates the image shifting to the left or right. Pushing it a
second time ends the shifting.
REPLAY: Shows the ball trajectory again.
4. Option Menu
Accesses play settings.
Option Menu screen
P LAYERS : Adds, modifies or
removes current players. (like in the
MAIN MENU)
CONTEST: In contest mode, the
player strikes from the tee off only
and must arrive the closest to the
hole. This mode can be activated
only at the tee off. When the
contest begins several players can
play one to another. The System
displays the best score until it is
beaten.
HINT: Gives playing tips from time to
time.
WEATHER: Defines settings concerning wind, air and ground conditions.
PREFERENCES: Adjusts background music, volume, automatic help, virtual ball size and
video recording.
SERVICE: Reserved for the manufacturer.
Visiotics Golf Simulator—User Guide
23
Details of the Main Menu
The following pages may be issued from the MAIN MENU screen.
1
Players
This screen modifies the golfers’
personal golfing data entered in the
game initialization part.
Players Screen
ADD: To add a new player in the round
at any time. The new player will be
taken into account as of the next hole.
MODIFY: To modify a player’s personal
golfing data. When this option is
selected, the names of all current
players appear. To make changes,
press the button corresponding to the
player whose data needs to be
modified.
REMOVE: When this button is selected,
the names of players who could be
removed are shown.
Visiotics Golf Simulator—User Guide
24
2
Courses
This screen modifies the course and
weather conditions data entered in
the game initialization part: wind,
air, ground.
Geographic area choice screen
3
Playing Modes
This screen modifies playing modes
and formulas data entered in the
game initialization part.
UNOFFICIAL: A playing mode which
allows you to cancel shots and to
practice on-site at any moment.
OFFICIAL: A competition mode which
takes your handicap into account.
The options Mulligan and Practice
are not available.
STROKE PLAY: The player who plays
the hole(s) in the fewest strokes is
the winner.
Playing Modes Screen
MATCH PLAY: The player which holes its ball in the fewest strokes wins the hole. In a game
played with handicaps, the lowest net score wins the hole. The team which wins the most
holes wins the round.
STABLEFORD: Points are counted against the Par for each hole. The player who obtains
the best score overall wins.
Visiotics Golf Simulator—User Guide
25
4
Preferences
This screen allows you to select
various options which will be saved for
an unfinished round.
Preferences screen
M USIC : Activate the button for
background music. Adjust the volume
by moving the cursor.
AUTOMATIC HINTS: If this option is
selected, hints will be shown at each
stage of the game (step-by-step user’s
guide).
BALL SIZE: Select one of the three
available virtual ball sizes. This
selection concerns only the ball
dimension as shown on the screen.
RECORDING: This option concerns the settings for the video recording of your swing. Push
the button to adjust the recording sequence. Emphasis can be put on the BEGINNING,
MIDDLE or END OF SWING.
5
Overview
These four pages give you a general
product presentation.
Overview page 1
Visiotics Golf Simulator—User Guide
26
Putting
1
Goal
The putting, a game on the green, generally is the ultimate phase of the game on one
hole. On the simulator, the putting is virtual and is performed till you put the ball in the
hole. The player places himself on the green mat exactly in front of the screen and sets
his ball on the sign intended to this purpose, then plays, taking into account distances
and slopes.
2
Slopes Indications
A graph down on the right gives information on slopes.
UPHILL OR DOWNHILL
PUT
RIGHT OR LEFT SLOPE
The upper part is the indication for an uphill or downhill putt:
•
•
•
Uphill putt
Flat putt
Downhill putt
The lower part is the indication for a right to left or left to right slope:
Putting line
•
Straight
•
Brake: left to right
•
Brake: right to left
Visiotics Golf Simulator—User Guide
27
Assistance while playing
1
Assistance and advice
By default, the Automatic hint is activated. It is a step-by-step guide. Once the
functioning principles of the simulator are acquired, you may deactivate it. Press
the PREFERENCES button of the MAIN MENU or of the OPTIONS MENU (see chapter
“Details of the Game Menu”) and deselect the Automatic hints in the
PREFERENCES page.
If necessary, you may recall at any moment the assistance window owing to the
HELP button which is always visible to the right of the screen.
Assistance window
2
Key-driven Presentation
These windows g ive a
presentation of the keyboard.
br ief
To activate them you only
need to press the HINT key in
the OPTION MENU and on the
wished key. For instance, the
HINT + REPLAY keys activate
the window you wish.
Replay Key Presentation
Visiotics Golf Simulator—User Guide
28
Exit the game
To exit the game, press on the EXIT key on the foreground, on the right of the
screen.
You are then offered three options:
• END SESSION: (with the possibility to save the standard parameters)
• NEW ROUND: a new sort of game in the same conditions,
• NO: cancel and switch back the previous page.
Exit window
Visiotics Golf Simulator—User Guide
29
S.A.S. SOCIÉTÉ NOUVELLE VISIOTICS
Energy Park I • 32, avenue de l’Europe • 78140 Vélizy • FRANCE
Tél: (33-1) 39 45 17 77 • Fax: (33-1) 39 45 17 78
E-mail: [email protected] • Web-Site: http://www.visiotics.com
Visiotics Golf Simulator—User Guide
30