1
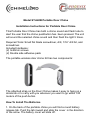
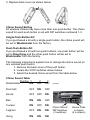
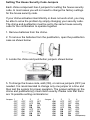
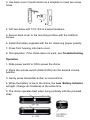
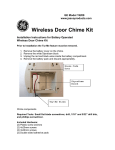
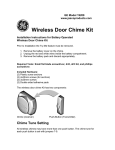
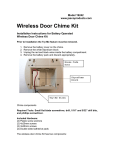
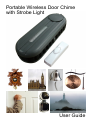
Portable Wireless Door Chime
with Strobe Light
User Guide
Model ST-640B Portable Door Chime
Installation Instructions for Portable Door Chime
This Portable Door Chime has both a chime sound and flash tube to
alert the user that the chime pushbutton has been pressed. The unit
will sound the selected chime sound and then flash the light 5 times.
Required Tools: Small flat blade screwdriver, drill, 1/16” drill bit, and
screwdriver.
Included Hardware:
(2) 3x20mm screws
(2) Double side adhesive pads
The portable wireless door chime Kit has two components:
The attached strap on the Door Chime makes it easy to hang on a
doorknob or to carry with you wherever you want to go within 100
meters of the push button.
How To Install The Batteries
1. On the back of the portable chime you will find a round battery
release tab. Push the tab inward and slide the cover in the direction
of the arrow. The battery cover will slide off.
2. Install 4 C-cell batteries (Alkaline batteries recommended) and refit
the battery cover.
3. Remove the back of wireless push button and install the 12-volt
battery (included) as detailed below.
Wireless push button
To install or replace the battery in the wireless push button:
1. Remove the back cover of the push button.
2. Install the A23 (12 volt) battery with the negative end of the battery
(-ve) toward the spring and the positive end of the battery (+ve)
toward the positive battery contact as shown below.
3. Replace back cover as shown below:
Chime Sound Setting
All wireless chimes may have more than one push button. The chime
sound for each push button is set with DIP switches numbered 1-3.
Single Push Button Kit:
If you purchased a kit with a single push button, the chime sound will
be set to Westminster from the factory.
Dual Push Button Kit:
If you purchased a kit with two push buttons, one push button will be
set to Ding Dong and the other push button will be set to
Westminster from the factory.
The following instructions explain how to change the chime sound on
any wireless push button:
1. Remove the back cover of the push button.
2. Locate the 3 DIP switches shown below.
3. Select the desired chime sound from the table below.
Chime Sound Table
Position 1
ON
Westminster
2
OFF
3
OFF
Door bell
OFF
ON
OFF
Knock
OFF
OFF
ON
Bell
ON
ON
OFF
Cuckoo
ON
OFF
ON
Foghorn
OFF
ON
ON
Gong
ON
ON
ON
(Default)
Chime Sound
DIP Switches
(3 switches)
House Code
Jumpers
(4 Jumpers)
Setting The House Security Code Jumpers
Each chime component has 4 jumpers for setting the house security
code. In most cases you will not need to change the factory settings
for the house security code.
If your chime activates intermittently or does not work at all, you may
be able to solve the problem by simply changing your security code.
The chime and pushbutton must be set to the same house security
code for the combination to operate together.
1. Remove batteries from the chime.
2. To remove the batteries from the pushbutton, open the pushbutton
case as shown below:
3. Locate the chime and pushbutton jumpers shown below:
5. To change the house code, add (ON), or remove jumpers (OFF) as
needed. It is recommended to change only one jumper at a time and
then test the system for proper operation. The jumper settings on the
chime and pushbutton(s) must match exactly. Please note that there
are 16 possible setting combinations:
Jumper 1
OFF
OFF
OFF
OFF
OFF
OFF
OFF
OFF
2
OFF
OFF
OFF
OFF
ON
ON
ON
ON
3
OFF
OFF
ON
ON
OFF
OFF
ON
ON
4
OFF
ON
OFF
ON
OFF
ON
OFF
ON
Jumper 1
ON
ON
ON
ON
ON
ON
ON
ON
2
OFF
OFF
OFF
OFF
ON
ON
ON
ON
3
OFF
OFF
ON
ON
OFF
OFF
ON
ON
4
OFF
ON
OFF
ON
OFF
ON
OFF
ON (Default)
Push Button Mounting Instructions
Note: Avoid mounting on metal surfaces, as it may result in a
reduced range of transmission. Do not mount in an area where
exposed to direct rain or sunlight.
a. Removing the back cover
b. Replacing the back cover
1. Push buttons are typically mounted at the same height as the door
knob or handle (between 36" and 44" above the floor).
2. Before mounting, choose a mounting location that is not farther
than 45 meters from the proposed chime unit location(s).
No further than 45 meters
3. Use back cover of push button as a template to mark two screw
holes.
4. Drill two holes with 1/16” drill in marked locations.
5. Secure back cover to the mounting surface with the 3x20mm
screws.
6. Install the battery supplied with the kit, observing proper polarity.
7. Press front housing onto back cover.
8. Test operation, if the chime does not work, see Troubleshooting.
Operation
1. Slide power switch to ON to power the chime.
2. Place the volume switch (HIGH/LOW) into the desired volume
position.
3. Gently press transmitter button to sound chime.
4. When the battery is low in the chime, the Low Battery Indicator
will light. Change all 4 batteries at the same time.
5. The chime operates best when hung vertically with the provided
strap.
Troubleshooting
Chime doesn't work:
1. Make sure push button switch is depressed and held for at least 1
second.
2. Make sure plastic tag is removed from battery.
3. Make sure house code switches 1-4 on chime and push button
match exactly.
4. Verify battery orientation in push button.
5. Try fresh batteries.
6. Make sure chime is not farther than 45 meters away from push
button.
7. Ensure push button is not mounted on metal, near metal studs, or
near the floor.
8. Try a new location for the chime.
9. Functional range may be adversely affected by one or more of the
following factors: weather, radio frequency interference, low
transmitter battery and obstructions between the transmitter and
receiver.
Unit 6
49 Butterfield Street
HERSTON QLD 4006
T: 07 3852 4622
F: 07 3852 4633
www.phoenixhearing.com.au