1
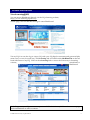
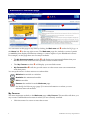
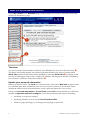
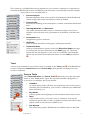
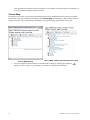
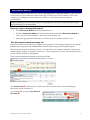
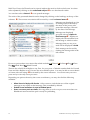
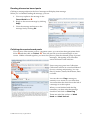
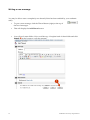
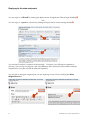
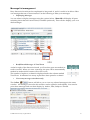
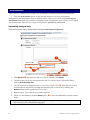
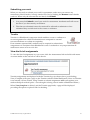
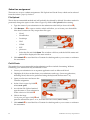
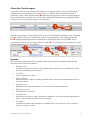
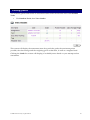
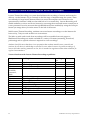
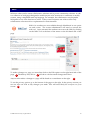
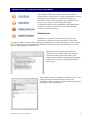
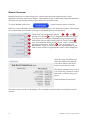
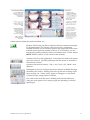
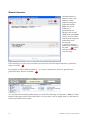
Contents
Introduction...................................................................................................... 4
What is Blackboard?
4
Before you start: Check your software
4
Web browser ......................................................................................................................... 4
Other required software ...................................................................................................... 4
A note on downloads .......................................................................................................... 4
Access Blackboard .......................................................................................... 5
Via eLearning@UQ
5
Blackboard’s Welcome page ............................................................................ 6
My Courses
6
My course isn’t listed under My Courses! ........................................................................ 7
Modify the Welcome page
7
Logging Out
7
What’s in my Blackboard course? ..................................................................... 8
The menu
8
Update your personal information
8
Tools
9
Course Tools ......................................................................................................................... 9
Course Map ......................................................................................................................... 10
Discussion boards .......................................................................................... 11
How do I view a discussion board?
11
The discussion board message list
11
Reading discussion board posts
13
Collating discussion board posts
13
Writing a new message
14
Attachments ........................................................................................................................ 15
Tips for writing messages ................................................................................................. 15
Replying to threads and posts
16
Message list management
17
Email .............................................................................................................. 18
Sending email
18
Attaching files
19
Assessments .................................................................................................. 20
Uploading assignments
20
Submitting your work
21
Turnitin
21
View the list of assignments ............................................................................................. 21
Submit an assignment ....................................................................................................... 22
Check the Turnitin report ................................................................................................. 23
Quizzes
23
Check your progress in the quiz ...................................................................................... 24
Viewing grades............................................................................................... 25
Lecture Theatre Recording (also known as Lectopia) ...................................... 26
Wiki ................................................................................................................ 27
2
© 2008 The University of Queensland
Blogs .............................................................................................................. 28
Wimba Voice, Classroom and Podcaster ......................................................... 29
Wimba Voice
29
Wimba Classroom
30
Wimba Podcaster
32
Other useful links and contacts ....................................................................... 34
© 2008 The University of Queensland
3
Introduction
What is Blackboard?
Blackboard is the e-learning system used by The University of Queensland (UQ) to provide
online learning experiences and assessment to students. It has a number of uses:
•
It can be used as a tool to facilitate communication and online learning between students
and course co-ordinators and to foster an online community.
•
It can also provide online assessment items, including online tests or electronic
submission of assignments.
Before you start: Check your software
Web browser
As Blackboard is a web-based application, you will need a recently-released browser.
Blackboard recommends that you use one of the following:
•
Internet Explorer 5.5 or later
•
Netscape 7 or later
•
Firefox 1.0 or later
Get the latest browsers
The latest browsers are available online from the UQconnect website at
http://uqconnect.net/helpdesk/downloads/ or on the free CDs available from Ask I.T. and
UQconnect desks. Contact Ask I.T. on (07) 3365 8811 or UQconnect on (07) 3365 6000.
Other required software
Some components of your Blackboard course (eg. Chat) requires the software Sun Java to be
loaded on your machine before they will work. Check if your machine needs the software at the
ITS website at http://www.its.uq.edu.au/helpdesk/support/blackboard/.
Get Sun Java
If you need to install Sun Java, you can download it from
http://uqconnect.net/helpdesk/downloads/. It is also available on the free CDs available from
Ask I.T and UQconnect desks. Contact Ask I.T. on (07) 3365 8811 or UQconnect on
(07) 3365 6000.
A note on downloads
If you are using a free student dialup account you have a monthly download quota of 200 MB
for accessing sites from outside of the uq.edu.au domain. If you attempt to download a web
browser (for example) from a site outside uq.edu.au it will be charged against this quota, and
can be a significant amount.
If this quota is exceeded in a month you will no longer be able to access external websites via
your student dialup account. However if you download from the ITS or UQconnect websites
these will not count against this quota.
4
© 2008 The University of Queensland
Access Blackboard
Via eLearning@UQ
You can access Blackboard directly via the UQ eLearning website,
http://www.elearning.uq.edu.au/.
At this page, click the Blackboard logo to enter Blackboard.
Via my.UQ You can also log in via my.UQ with your UQ Sign In username and password (the
same ones you use for mySI-net). The eLearning link is located under Go Direct To on the left
hand side menu of my.UQ. Click on the eLearning link to access the University’s eLearning
website,
which links to
Blackboard.
Note: Forgotten your UQ username or password? Check Other useful links and contacts on page
34 for information on who to contact.
© 2008 The University of Queensland
5
Blackboard’s Welcome page
After logging in, you will see a Welcome page.
2
1
3
4
5
You can return to this page at any time by clicking the Welcome tab n under the UQ logo, or
the Home link o in the top-right corner. The Welcome page also includes a series of panels
(or modules) that display information relating to various aspects of your Blackboard courses.
For example, on this page there are five major modules.
•
The My Announcements module p will display any important bulletins that your
Blackboard course instructors have posted to users of their courses.
•
The My Courses module q will display your enrolled courses.
•
My Communities r will also provide access to other areas users can communicate
with their peers,
You can perform two or three actions on each module:
Minimise the module to a title bar.
Maximise this minimised module.
Edit this module.
Remove the module from the Welcome page.
See Modify the Welcome page (page 7) for more information on where you can
reinstate removed modules.
My Courses
The most important module on the Welcome page is My Courses. This module will show you
any courses with Blackboard content in which you are currently enrolled.
•
6
Click the name of a course to enter that course.
© 2008 The University of Queensland
Also under My Courses is a course called Blackboard Student Training from Ask I.T. This
course has been set up to provide a “play and
explore” area for students to get to know and
experience some of the features of Blackboard.
Access this course at any time.
There is also a Course Catalog tab at the top of
the screen. This will always be visible in any
Blackboard screen and provides links to all of the
current UQ Blackboard courses – but you will
only be able to access those in which you are
enrolled.
My course isn’t listed under My
Courses!
If your course isn’t listed, don’t worry – it can take
up to 48 hours after enrolling in a course for your
enrolment to be registered in Blackboard.
•
Check the MyStudy area of my.UQ to see if your course is available via Blackboard.
Note: If your course doesn’t have any Blackboard content it will not be listed; not all UQ
courses use Blackboard. Many courses have their content openly available on School websites.
Modify the Welcome page
The Welcome page can be modified
in a number of ways. You can change
colours, add or remove modules or
move them between the two columns.
All of these changes can be
performed using the Modify Content
and Modify Layout buttons (shown
right).The Modify Content button
will allow you to pick and choose which modules appear on the Welcome page by selecting or
deselecting them.
The Modify Layout button allows you to change the order, positioning and colours of visible
modules.
Note: Modules with an asterix next to them cannot be removed.
Logging Out
When you are finished using Blackboard on a
public computer, it’s very important that
you log out of Blackboard before you close
the browser to minimise the risk of others
accessing it in your name.
•
At the top of every page there is a
Logout button (above right). Make sure
you click Logout before closing the
browser window.
© 2008 The University of Queensland
7
What’s in my Blackboard course?
Under My Courses in the Welcome page, click the name of a course to enter that course and
display its introductory page.
The menu
You can access all of the material available in your Blackboard course from the side menu n.
This menu will usually display only the most prominent links in the course (a mode called
Quick View); however the menu can be modified by selecting Detail View o to display a link
to every possible page in the course. A link to the alternate viewing mode should, if enabled by
your course co-ordinator, always be available at o.
Update your personal information
When you select a course, The Tools box on the left side of the course Welcome screen is where
you will find quick links to different parts of every course in which you are enrolled. These
include the email controls, announcements, events, tasks and grades for every course.
Check your Personal Information in Course Tools under Tools. Under this link you will find a
number of important options to configure. You will be presented with options including:
8
•
the ability to set privacy options;
•
specifying whether or not to set the Visual Text Box Editor.
•
a link to a page allowing you to change your UQ Sign In password.
© 2008 The University of Queensland
The content of your Blackboard course depends on your course co-ordinator. It’s important to
note that all Blackboard courses are different; and some may vary markedly from the example
shown above. You may find links to:
1. Announcements
Important bulletins from course staff to all participants. Most Blackboard
courses display this as the introductory screen by default.
2. Course Profile
Information including course description, contacts, assessment details and
more.
3. Learning Materials and Resources
Any useful information that course co-ordinators judge to be of use to
students, such as lecture notes, presentations, documents, web links and
others.
4. Assessment items
Assignments, quizzes, and tests.
5. UQ Library
Links to course materials, exam papers, reading list material.
6. Communications
Links to communication options such as the Discussion Board (see page
11 of this guide for more information) and Email (page 17). The exact
options shown will depend on your course co-ordinator. Note that this
option may be shown in the main side menu or in the Tools panel (below
n).
Tools
A list of tools available for use in this course is available in the Tools paneln. Most Blackboard
courses will feature Course Tools and the Course Map, although this will depend on your
course co-ordinator.
Course Tools
Like Communications, the Course Tools ooption may be in the main side
menu or in the Tools panel. Again, the exact list available will depend on
your course co-ordinator, but it may include:
•
Calendar
An online diary which will show any important events in the course’s
schedule, plus (if enabled by your course co-ordinator) any additional
dates entered by you.
•
My Grades
A list of grades and weightings for all assessment items in the course.
•
Tasks
A list of tasks set for you by the course co-ordinator. You may be
required to specify that you have completed certain tasks before other
aspects of the course become available to you.
•
User Manual
The official user guide to Blackboard is available online via this link.
© 2008 The University of Queensland
9
Note that this download will count against your student download quota if accessed via
your free student dialup internet account.
Course Map
In Quick View mode, only the most prominent sections of the Blackboard course are available
from links at the top of the left-side menu, the Course Map link displays a list of direct links to
deeper sections. The Course Map will display as a separate pop-up window (below left):
Course Map window
•
10
Course Map window with expanded menu item
You can expand a menu item to reveal the links within by clicking the adjacent
button (as above right), or go directly to an item by clicking the link itself.
© 2008 The University of Queensland
Discussion boards
A discussion board (sometimes also called a messageboard or a bulletin board) is a place where
course users can post discussion items and reply to other posts. This is similar to a live chat
system, but is designed so that students do not have to be online at the same time to
communicate.
Note: Depending on your course, the level of participation you show in the discussion board
may form part of your assessment.
How do I view a discussion board?
•
Click Discussion Board on the left-hand menu or
•
Click the Communication link in the left-hand menu and then Discussion Boards to
view a list of boards available – there may be more than one.
•
Select the appropriate board and you will see the list of forums ready to read.
The discussion board message list
Discussion board conversations are logged and organised. Conversations take place in separate
forums and are grouped into threads that contain a main posting and all related replies.
The discussion boards are listed by forum. You are able to see statistics relating to each forum
indicating the number of messages in each one. The total posts in a forum, the unread posts in a
forum and the number of participants.
This is what a Blackboard discussion board looks like:
The search tool o will always be visible across the top of the screen when entering the
discussion board content area.
You will be able to choose Tree View or
List View n
© 2008 The University of Queensland
11
With Tree Views, the Threads can be viewed without the need to click on the forum. You then
select a forum by clicking on the underlined subject o to see the threads within.
You can then select a thread
oto see posted messages.
The order of the presented threads can be changed by clicking on the headings at the top of the
columns.
n
The current sort criteria will be noted by a small coloured arrowp.
Messages are displayed as a list
of message titles, followed by
the name of the person who
posted the message, followed
by the date of the message.
Messages are displayed
grouped with any replies to
that messageo. Replies are
displayed with an indent from
the message to which it refers.
Messages that you are yet to
read will be displayed in bold.
Each message can be read by
clicking the message title in the
left column.
For more options there is an Action Bar which includes
Flag
Mark Read
Thread
Collect
Flag
Clear
Mark Unread
There is also a field, New Replies to my Post, for your posts. Clickable number links for Unread
Posts and New Replies to my Post are also an available option. You may be able to rate a thread
or forum with star ratings oif activated by the course instructor. You cannot rate your own
posts and you can only rate a post once.
Depending on options chosen by the course coordinator, you may also find the following
available:
•
•
•
12
Allow Users to Reply with Quote. Allows users to include the text of the original
message in any replies to that message. This is enabled by default.
Enable forum members to rate individual posts.
Users can save posts as drafts, allowing them to work on a post over more than one
Blackboard session until the post is ready for publishing
© 2008 The University of Queensland
Reading discussion board posts
Clicking a message subject in the list of messages will display that message.
When you’ve finished reading the message, you can:
1. View any replies to the message in the
Thread Detail area n
2. Reply to the current message by clicking
Reply
3. Close the message and return to the
message list by clicking OK.
Collating discussion board posts
If you want to filter certain posts to a separate screen, you can select the appropriate check
boxes n and then click on Collect. o This will provide your chosen messages on one
screen. Whilst collected together, you have the option to print the selected group of posted
messages. Navigating away from this
screen will remove the selection.
Users can group posts into Collections.
Collections can also be sorted and filtered
for easy viewing and printing. You can
filter by Author, Status, Read Status, Date
or Order.
You can choose to Flag a message to
remind you to return to it at a later date.
You must select the check box at the left of
a message to set this option.
When you are finished with the flag
reminder, you then select the message
check box and click on Clear Flag
There are also the options of Mark
Read and Mark Unread.
© 2008 The University of Queensland
13
Writing a new message
You may be able to start a completely new thread (if this has been enabled by your academic
staff).
14
•
To post a new message, click the Thread button (right) at the top of
the list of messages.
•
This will display the Add Thread screen:
•
You will see 2 main fields: Subject and Message. Complete both of these fields and click
Submit n at the bottom to post the message.
© 2008 The University of Queensland
Attachments
You may also be able to attach a file to your message before submitting it (if this has been
enabled by your course co-ordinator).
•
If so, there will be an Attachment field below the message.
•
To attach a file, click Attach a file link. You will be presented with further options
•
Click the Browse… button to locate your file.
•
Click Open. The file will be listed in the Attachment field.
•
When you click Submit, the file will be transmitted to Blackboard with the message, and
others will be able to download the file when they view your message.
Note: Only one file can be attached to discussion board messages.
Tips for writing messages
1. Do not use any form of electronic communication, including email or discussion
boards, to attack members of staff or fellow students.
Remember that you may not be able to delete message you send.
Use of the University network is subject to a code of practice. You can read the
University’s Internet Code of Practice at http://www.uq.edu.au/hupp/index.html
(click on number 6 Information Technology and then 6.10.1 Internet Code of Practice)
2. Make subject headings specific to the contents so that readers of the discussion board
can establish whether the message is relevant to them prior to opening it. Visiting a
discussion board full of messages with subjects such as “Hi” and “Help me!” can be
very frustrating.
3. Messages should be pertinent and relevant to the subject matter of the specific
discussion board. Your colleagues will appreciate your ability to keep to the point of
discussion.
4. The Message field contains lots of controls designed to format your text, similar to a
word processing application. This can help emphasise certain parts of your messages by
expressing yourself in bold or italics.
Make sure that your text is easy to read. Don’t use a lot of unusual colours or font sizes –
use these features to enhance the meaning of your message.
5. Click on Save to keep a draft of the message. You can return to it and complete it before
submitting at a later date.
6. Click Cancel to return to the list of messages without sending the message.
© 2008 The University of Queensland
15
Replying to threads and posts
You can reply to a thread by clicking the Reply button alongside the Thread topic Headingn
or…
You can reply to a post in a thread by clicking the reply button in the message headero
You can then compose a response to the message. Compose your message as outlined in
(Writing a new message on page 14). The only difference here is that the Subject field is already
completed for you (but can still be edited if required).
You are able to bring the original post you are replying to into view by clicking the Show
Original Post link.
16
© 2008 The University of Queensland
Message list management
Busy discussion boards can be complicated to keep track of, and it’s useful to be able to filter
out messages that are of lesser interest. Use the following to filter your messages:
•
Displaying Messages
You can select to display messages using the options below. Show All will display all posts
including those that have been locked, or hidden (archived). This will also display your own
draft messages.
•
Read/Unread Messages & Total Posts
At the far right of the discussion board, you’ll see that posts are marked as
read or unread. When you view a message, the post will be automatically
marked as read and the counter will revert to zero.
The number of replies to a thread is displayed under the column marked
Total Posts. It indicates how many replies have been posted to a thread.
•
View many messages simultaneously
The Collect
button will allow you to view any selected messages in the same
window. All messages viewed in this window can be replied to individually. You can also
print these messages and sort their display by Author, Date, Subject or Thread.
© 2008 The University of Queensland
17
Email
You can send email to any course instructor or fellow participant from within Blackboard.
Email is sent from Blackboard directly to participants’ UQ email addresses. To read email sent
from Blackboard you must access your student email in the usual way, such as via my.UQ at
http://my.uq.edu.au/.
Sending email
•
To send an email from within Blackboard, use the Communication link on the left-side
menu, and click Send Email.
•
The resulting screen (above) will display a variety of options for emailing individuals or
groups. Options such as All Users, All Teaching Assistants or All Instructors will allow
you to contact every member of those groups, while Select Users will allow you to select
specific individuals to receive your email.
•
Note that options which have been disabled by your course co-ordinator will display as
text only, rather than as a link.
•
If you click Select Users, the screen on the next page will be displayed.
(continued following page)
18
© 2008 The University of Queensland
•
n This section allows you to
select Recipients from the full
list of course participants by
ticking each required
username.
•
You then complete the
message, including Subject o
and Message p. (See Tips for
writing messages on page 15
for more information on how to
write effective messages.)
•
q It is then possible to Add
Attachments. See Attaching
files (below) for more
information on this.
•
Click Submit r and the email
will be sent directly to the UQ
student email address of each
of the individuals selected at
the beginning of this process.
Attaching files
Attaching files to an email is slightly different to attaching files to a discussion board post. It is
possible, for example, to attach more than one file to an email.
1. Click the Attach a File button. This will open up a new screen that allows you to
browse for the files you wish to attach.
2. Click Browse and select the file you want to attach. Click OK.
3. Click Submit to add the attachment.
4. Repeat steps 1 to 3 for further attachments, then continue composing and sending the
email.
© 2008 The University of Queensland
19
Assessments
Your course co-ordinator may require you to submit to online assessment via Blackboard.
•
Click the Assessment option on the left-side menu to view any assessments.
Assignments and assessments may be displayed here, and you can click the View/Complete
Assignment link under any of them to complete them. Assignments may require you to attach
one or more files. There are two steps to this process: upload and submission.
Uploading assignments
The following screen will be displayed after clicking View/Complete Assignment:
1. Click Browse n and select the file you wish to upload. Click Open.
2. The file location will now be displayed in the File to Attach field. Upload the file by
clicking Add Another File.
3. The file will now be displayed next to Currently Attached Files o. (This file can now be
downloaded at any time by clicking the filename link or removed by clicking the
Remove button that appears next to the file.)
4. Repeat steps 1-3 for each file you need to upload.
5. When you are finished, click the Save button p to save the added files in their current
states.
Important: Clicking Save will NOT submit your assignment to your course co-ordinator!
See Submitting Your Work(following page).
20
© 2008 The University of Queensland
Submitting your work
When you are ready to submit your work for assessment, make sure you remove any
unnecessary files from the Currently Attached Files list by clicking the Remove button beside
each one. When only the relevant files are listed, click Submit.
Important:
1. You must click Submit to send your work for assessment. Academic staff will not see
the files if you have merely saved them.
2. Files that are submitted cannot be retrieved for edit and re-submission. Once
submitted they are delivered to the course co-ordinator.
Turnitin
Turnitin is a Blackboard component which enables a course co-ordinator to
set an assignment for which all submissions are compared to external
resource databases to confirm its originality.
From summer semester 2005, students may be required to submit their
assignments via Turnitin in their Blackboard course. It is therefore very important that all
students are aware of how to do this.
View the list of assignments
To view the list of assignments in your course, click the Assessments link in the left-side menu.
A screen similar to the one below will be shown:
Turnitin assignments are displayed with the Turnitin logo (as shown above), and clicking
View/Complete will open a page on the Turnitin website within Blackboard. (Note: As Turnitin
is an external, off-net website, using Turnitin to submit assignments will count against your
student dialup download quota—even though it is being viewed within a Blackboard frame.)
When View/Complete is clicked, and the Turnitin page loads, a page will be displayed
providing the option to upload a file for checking.
© 2008 The University of Queensland
21
Submit an assignment
There are two ways to submit assignments: File Upload and Cut & Paste, which can be selected
from the Submit a paper by: list box.
File Upload
This is the recommended method and will probably be selected by default. If another method is
presented, change the option in the Submit a paper by: field to file upload before starting.
1. Type the name of your submission in the submission title field (as shown below n)
2. Click Browse… o to open a window which will allow you to locate your desired file.
Note that Turnitin can only accept these file types:
•
Word
•
WordPerfect
•
PostScript
•
PDF
•
HTML
•
RTF
•
plain text
•
Select the file and click Open. The window will close, and the full file name and
path will be displayed in the main window
3. Click submit p to send the file to Turnitin for checking and to your course co-ordinator
for assessment.
Cut & Paste
This method is not recommended as the submission will not include formatting. Without
formatting your submission may be difficult to read.
1. Create your submission in an separate application such as Microsoft Word
2. Highlight all of the text that forms your submission and copy. (In most applications,
including Word, this can be performed using the keyboard shortcut Ctrl-C)
3. Open your browser and access the
Turnitin assignment
4. In the Submit a paper by: field n,
select cut & paste
5. As with the File Upload method,
type the name of your submission
in the submission title field o
6. Click in the large
Cut & paste your paper: field pand
paste the submission (Ctrl-V or, from the browser's menu, Edit » Paste)
7. Click submit q to send the file to Turnitin for checking and to your course co-ordinator
for assessment.
22
© 2008 The University of Queensland
Check the Turnitin report
At the end of this process Turnitin will display the Assignment Inbox screen, displaying the
assignment and your submission. If your course co-ordinator has activated this feature, a
percentage value will be displayed heren indicating the proportion of the report that appears
to be sourced from elsewhere once Turnitin has checked this submission for originality (allow
24 hours). The lower this percentage score, the better.
Click this percentage icon (as indicated above) for a more detailed originality report, including
possible original sources for submission content. The assignment can be read from the title
linkn The percentage figure shown indicate how much of the file is unoriginalo. Every
submission will have its own unique identity numberp. Your lecturer may indicate how many
Turnitin submissions you can attempt.
Quizzes
There are many different kinds of potential online quizzes that are available in Blackboard.
Here are some of the most common:
•
Multiple Choice
Provides a multitude of choices. In multiple-choice questions, you indicate the correct
answer by selecting a radio button.
•
True/False
Choose either true or false.
•
Fill in the Blank
Enter the answer in the text fields provided. Those answers are evaluated based on an
exact text match.
•
Multiple Answer
Multiple answer questions allow you to choose more than one answer.
•
Matching Questions
Pair questions to answers.
•
Essay Questions
Instructors provide you with a question or statement. You are given the opportunity to
type or cut and paste an answer into a text field.
•
Calculated
Contains a formula with a number of variables. The correct answer can be a specific
value or a range of values.
© 2008 The University of Queensland
23
•
Calculated Numeric Response
Resembles a fill-in-the-blank question except a number is entered to complete the
statement. The correct answer can be a specific number or within a range of numbers.
•
File Response
Uploaded files are used to respond to the question.
•
Hot Spot
A specific point on an image is used to indicate the answer.
•
Fill in Multiple Blanks
Multiple responses are inserted into a sentence or paragraph.
•
Jumbled Sentence
A sentence with a number of variables within it.
•
Opinion Scale/Likert
A rating scale used to measure attitudes or reactions.
•
Short Answer
Similar to Essay questions; answer length is limited.
•
Either/Or
A statement with a pre-defined choice of two answers.
•
Quiz Bowl
An answer appears; the users uses a who, what, or where question to respond.
Note: Some of these assessments have a set time limit in which to complete them. Always check
if your quiz has a time limit prior to commencement. Internet Explorer users will see the
elapsed time in the bar at the bottom of the browser window.
Check your progress in the quiz
When you are undertaking a quiz it is recommended that you save your responses n as you
progress through the questions. You can view which questions you have saved at any time by
clicking on the arrow to open the Question Completion Status o.
Any question numbers listed on the Question Completion Status list with a floppy disk icon
have been saved, while the others have not. Click a question number on this list to view, answer
and save that question.
When you have completed all questions of a quiz, ensure that you click the Submit button to
submit your work for assessment.
24
© 2008 The University of Queensland
Viewing grades
You will find grades and results of assessment items under the left-side menu item Student
Tools.
•
Click Student Tools, then View Grades.
This screen will display the assessment item along with the grade, the maximum points
possible, the class average and the weighting given to that item, as well as a weighted total.
Clicking the Grade for an item will display (if available) more details on your attempt at that
assessment.
© 2008 The University of Queensland
25
Lecture Theatre Recording (also known as Lectopia)
Lecture Theatre Recording is a system that facilitates the recording of lectures and events for
delivery via the Internet. UQ is currently in the first stage of implementing the system. There
are currently 11 large lecture theatres fitted out across the campuses and one more to be
operational by Semester 2 2008 (see the table below for a current list). Lecture Recording will
enable students to review and revise lectures by accessing the sound and screen content just as
it was presented. It can be accessed through Blackboard (when enabled) by using the Lectopia
button (see image above) from the menu on the left of the screen.
With Lecture Theatre Recording, students can access lecture recordings over the Internet 24
hours a day, 7 days a week at their own convenience.
The links to audio and visuals from recordings will be accessible from unit pages on
Blackboard. Recordings are made available in a variety of formats (streaming, download,
podcasting) and no special software is required to view recordings.
Students should be aware that there is an expectation that students attend lectures, tutorials and
seminars for all classes in which they are enrolled. In cases where lecturers do provide recordings of
lectures and other teaching materials on-line, this is intended to supplement rather than substitute for
regular class attendance.
Venues fitted out with Lecture Theatre Recording capabilities
Campus
Building Name
St Lucia
St Lucia
St Lucia
St Lucia
(available
semester 2,
2008)
St Lucia
St Lucia
St Lucia
St Lucia
St Lucia
St Lucia
Ipswich
Gatton
Herston
26
Room
UQ Centre
Hawken Engineering
Schonell Theatre
Abel Smith Lecture Theatre
Building
No.
27a
50
22
23
Steele Building
Physiology Lecture Theatres
Physiology Lecture Theatres
Prentice Building
Goddard Building
Forgan Smith Building
Building Number 12
Building Number 8178
3
63
63
42
8
1
12
8178
206
348
360
216
139
E109
116
1
201
220
T203
201
1
© 2008 The University of Queensland
Wiki
Wikis are often used to create collaborative websites and to power community websites. A wiki
is a collection of web pages designed to enable anyone who accesses it to contribute or modify
content, using a simplified mark-up language. For example, the collaborative encyclopaedia
Wikipedia is one of the best known wikis. Today some companies use wikis as their only
collaborative software and as a replacement for static intranets.
Wiki’s for student use are available through blackboard as an option
on each course. The course administrator will need to activate the
wiki tool. Once activated the students can access the Wiki by clicking
on the Wiki Tool at the base of the menu on the left hand side of the
page.
1
2
3
To make a change to a page you must first click on the Edit option on the right hand side of the
page. 1 The history link, also in 1, will show who has made changes and when.
Anyone who makes a change to a page will be listed as a contributor on the right.
2
To see the privacy options go to the bottom of the page on the right. In the privacy section you
can see who can look at any changes you make. This will most likely be everyone on your
course. 3
© 2008 The University of Queensland
27
Blogs
A blog (an abridgment of the term web log) is a website, usually maintained by an individual,
with regular entries of commentary, descriptions of events, or other material such as graphics or
video. Entries are commonly displayed in reverse chronological order. "Blog" can also be used
as a verb, meaning to maintain or add content to a blog.
Many blogs provide commentary or news on a particular subject; others function as more
personal online diaries. A typical blog combines text, images, and links to other blogs, web
pages, and other media related to its topic. The ability for readers to leave comments in an
interactive format is an important part of many blogs.
Student blogs are available through Blackboard under each course.
The course administrator needs to activate the blog tool. Once
activated the blog can be accessed through the menu commands on the
left (either the Student Tools or Communication button).
Click on the Blog Tool choice to go into the blog for the
course.
1
2
3
To add a new entry to the blog you just click New Entry at the top right. 1 Once you create
the entry and click save the entry will appear at the top of the blog page 2 . If anyone
comments on your entry then the comment will appear below the blog entry.
3
28
© 2008 The University of Queensland
Wimba Voice, Classroom and Podcaster
The Wimba Collaboration Suite offers a wide array of
collaborative tools that allow faculty and students to retain
the highly personal nature of traditional classroom
instruction when working remotely from different sites.
From voice to video to podcasting, the Wimba
Collaboration Suite works seamlessly within blackboard
courses so students never have to leave their familiar
online course environments.
Wimba Voice
Wimba Voice is used to facilitate and promote vocal
instruction, collaboration and assessment. It does this
through its ability to allow online speaking and listening and online discussions. It is a method
of providing ongoing vocal debate and interaction between faculty and students, even when
they are operating from different sites.
Wimba voice can enable participation in
Threaded Voice boards. These are just like a
normal discussion board but with a voice
component that allows listening and speaking
comparisons as well as ongoing discussions
about topics.
Voice email is another capability of Wimba Voice. Voice
email is just like normal email but with a voice
capability so that a student or staff member can record a
message for listening purposes.
© 2008 The University of Queensland
29
Wimba Classroom
Wimba Classroom is a fully featured live virtual classroom that supports audio, video,
application sharing, and content display. This enables faculty to add vitally important elements
of interaction that simply cannot be provided in a text-based course.
To access Wimba click on the
button from the menu on the left.
Before you access Wimba Classroom it is advisable that you run the Setup Wizard. This enables
you to check that your machine is set up to run Wimba Classroom effectively.
1
2
3
4
5
1 , 2 and 3
The wizard will run through options
quickly. For option 4 it is very important to allow the applet
to be run on your machine. Depending on your browser you
will need to choose either Always, Run or Trust. Option 5
tests your machines ability to play sound. Once you hear the
greeting click on next. At step 6 you are testing your
microphone. When you hear your voice repeated back to you
click on next and the congratulations screen will be displayed.
6
After the setup wizard has run
and your machine has passed
you will be taken to the front
screen of your chosen room.
The Dial-in numbers are for use if
you are having connection issues
and need to connect using your
phone.
Click the Enter Room button.
The main content window will display. This will take several seconds to load up the various
sections.
30
© 2008 The University of Queensland
Other options within the content window are…
Netstats: The Faculty use this to identify internet connection strength
for all participants. The Faculty will see everyone’s connection,
students see their own connection speed in the upper left hand corner
in media center (near the number 2 above). If, as a student, you are
experiencing audio problems, check your netstats and, if weak, dial in.
NOTE: Weak is yellow or red colour for the Netstats
Volume control for the application. Once selected a slider will appear
above the controls. Just click and drag with the mouse to increase or
decrease the volume.
Question and answer buttons. Tick = Yes, Cross = No, Hand = Ask
question
Participate in class by using the emoticons that are available through
the smiley face button. Starting from the top left and working across
the rows they are…Clear, Away, Approve, Disapprove, Surprised,
Confused, Clap, Laugh, Faster or Slower
Get a feel for the how the class is dealing with the information by
using the room pulse to how many people are attending, confused,
agreeing etc.
© 2008 The University of Queensland
31
Wimba Podcaster
2
1
3
Another feature of
Wimba Voice is the
ability to create
Podcasts using the
Podcaster feature.
Note: The word
Podcast is a
portmanteau (or
blend) of the words
"iPod" and "broadcast"
since it was for iPod’s
that the first scripts for
podcasting were
developed.
It is easy to create a
podcast by clicking on
the New
1 button
and then recording
your message.
If the message was previously recorded you can always use the import feature to upload an
mp3 or wav file. 2
By using the 1-click or RSS feed button
podcasts as they become available. 3
it is easy to subscribe to iTunes to get the latest
You can then download the podcasts into your iPod for listening at a later time. Note: No other
brand of mp3 player will work with iTunes so if you don’t own an Apple iPod you will need to
listen from within iTunes itself.
32
© 2008 The University of Queensland
Practise using Blackboard
All UQ students have access to a Blackboard course under My Courses called Blackboard
Student Training from Ask I.T. This is designed to allow you to experiment and play with the
various features of Blackboard.
Access this course and get aced with the many features of Blackboard!
More help with Blackboard
For more help with Blackboard and its features, contact Ask I.T., The University of Queensland
Library’s computing help and training service for students.
Phone:
07 3365 6000 or Australia wide 1300 738 082
Email:
[email protected]
Web:
http://askit.uq.edu.au/
Desks:
Gatton
Ipswich
St Lucia (two locations)
Level 1,
UQ Gatton Library,
Building 102
Level 2,
UQ Ipswich
Library,
Building 8
Level 2,
Duhig Building,
Building 2
Hours:
Level 2,
Biological
Sciences
Library,
Building 94
Opening hours vary by location, service and time of year.
See http://askit.uq.edu.au/contact_us/ for current hours of operation.
© 2008 The University of Queensland
33
Other useful links and contacts
For more information
http://www.elearning.uq.edu.au/
First check your Browser setup
http://www.its.uq.edu.au/helpdesk/support/blackboard/
Accessing Blackboard
Either via:
my.UQ Student Portal:
http://my.uq.edu.au/
Or via:
UQ eLearning site:
http://www.elearning.uq.edu.au/
Blackboard Student support and training
•
Ask I.T.
Phone: (07) 33656000
Australia wide: 1300 738 082
Email: [email protected]
Website: http://askit.uq.edu.au
•
Ask I.T. Locations:
Level 2, Duhig Building, Building 2
Level 2, Biological Sciences Library, Building 94
Ask I.T. Ipswich
Level 2, UQ Ipswich Library, Building 8
•
Ask I.T. Gatton
Level 1, UQ Gatton Library, Building 102
Blackboard UQ staff support
•
TEDI (07) 33811271
[email protected]
The University of Queensland’s Internet Code of Practice
All UQ students should read and understand this policy:
http://www.uq.edu.au/hupp/internetcode/
Created by Ask I.T. and The University of Queensland Library
34
© 2008 The University of Queensland