1
ShadowProtect
TM
User Guide
ShadowProtect User Guide
Version 4.x
Copyright (c) 2006 - 2011 StorageCraft Technology Corporation
All rights reserved. This product and/or its use may be covered by one or more patents pending.
Visit www.storagecraft.com/legal for more information about StorageCraft Technology Corporation
(STC) intellectual property, trademarks, copyrights and any patents pending.
ShadowProtect is provided by STC to licensee on an "as is" basis and "with all faults." STC
specifically calls the licensee's attention to provisions of the End-User License Agreement
("License") that are intended to leave full responsibility and risk for the use or the results of use of
ShadowProtect Server Edition entirely with the licensee. These provisions include, but are not
limited to, LIMITED WARRANTY, DISCLAIMER OF WARRANTIES and LIMITATION OF
LIABILITY.
No part of this document may be reproduced in any means, electronic or mechanical, for any
purpose, except as expressed in the accompanying License Agreement.
StorageCraft Technology Corporation
11850 S. Election Road, Suite 120
Draper, UT 84020
U.S.A.
Contents
3
Table of Contents
Chapter 1: About the User Guide
Chapter 2: ShadowProtect Overview
5
7
2.1 Features...................................................................................................................................
and Components
8
2.2 Usage ...................................................................................................................................
Scenarios
10
Chapter 3: How ShadowProtect Works
13
3.1 Create ...................................................................................................................................
a Backup Image
14
3.2 Restore...................................................................................................................................
a Backup Image
15
3.3 Backup...................................................................................................................................
Image Files
15
Chapter 4: Installing ShadowProtect
18
4.1 Requirements
................................................................................................................................... 18
4.2 License...................................................................................................................................
and Install Options
21
4.3 Starting...................................................................................................................................
ShadowProtect
21
4.4 Activating
...................................................................................................................................
ShadowProtect
22
4.5 Uninstalling
...................................................................................................................................
ShadowProtect
24
Chapter 5: Understanding ShadowProtect Console
25
5.1 Menu Bar
................................................................................................................................... 25
5.2 Navigation
...................................................................................................................................
Panel
28
5.3 Tabs ................................................................................................................................... 30
5.4 Management
...................................................................................................................................
View
36
5.5 Network
...................................................................................................................................
View
37
Chapter 6: Creating Backup Image Files
39
6.1 Backup...................................................................................................................................
Image File Storage Locations
41
6.2 Destinations
................................................................................................................................... 42
6.3 Options................................................................................................................................... 44
6.4 Deleting
...................................................................................................................................
Backup Image Files
49
Chapter 7: Mounting Backup Image Files
50
7.1 Mounting
...................................................................................................................................
Backup Image Files in Windows
52
© 2010 StorageCraft Technology Corporation
3
4
ShadowProtect User Guide
7.2 Backup...................................................................................................................................
Image Mount Options
52
7.3 Dismounting
...................................................................................................................................
Backup Image Files
53
Chapter 8: Restoring a Volume
Chapter 9: Image Conversion Tool
Chapter 10: Remote Management
55
58
61
10.1 Remote...................................................................................................................................
Management with the Management Console
61
10.2 Remote...................................................................................................................................
Management with the Network View
65
10.3 Creating
...................................................................................................................................
an Install Setup Package
67
Chapter 11: Using VirtualBoot
69
11.1 VirtualBoot
...................................................................................................................................
Requirements
69
11.2 Limitations
................................................................................................................................... 70
11.3 Creating
...................................................................................................................................
a VM
71
11.4 Configuring
...................................................................................................................................
a VM
75
Chapter 12: Other Operations
79
12.1 Verifying
...................................................................................................................................
Backup Image Files
79
12.2 Configuring
...................................................................................................................................
Email Notifications
81
12.3 Log Files
................................................................................................................................... 82
12.4 Creating
...................................................................................................................................
Key Files
82
12.5 Changing
...................................................................................................................................
Partition Creation Policy
84
12.6 Creating
...................................................................................................................................
a Recovery CD
85
Chapter 13: Best Practices
Chapter 14: Retention Policy Configurations
Chapter 15: Product Support
Chapter 16: Glossary
Chapter 17: End User License Agreement
86
87
88
89
93
© 2010 StorageCraft Technology Corporation
About the User Guide
5
Chapter 1: About the User Guide
Welcome to the ShadowProtect User Guide. This Guide describes the ShadowProtect technology,
how to use the product, and how to derive maximum benefit from ShadowProtect. ShadowProtect
comes in three editions. While most differences between the various editions of ShadowProtect relate
to the associated user license, this Guide specifically identifies information that applies to a specific
edition.
Table 1: Shadow Protect editions
Edition
Description
ShadowProtect
Desktop Edition
Provides volume backup and restore options for a single desktop system. This
edition is most suitable for home use.
ShadowProtect
Server Edition
Provides backup and restore options for server operating systems. A separate
license is required for each installed Windows OS.
ShadowProtect
Provides backup and restore options for Microsoft Small Business Server (SBS). A
SBS Edition
separate license is required for each installed Windows OS.
(Small Business)
This Guide includes the following general sections:
Chapter 2: ShadowProtect Overview
7
Chapter 3: How ShadowProtect Works
Chapter 4: Installing ShadowProtect
13
18
Chapter 5: Understanding ShadowProtect Console
Chapter 6: Creating Backup Image Files
Chapter 7: Mounting Backup Image Files
Chapter 8: Restoring a Volume
55
Chapter 9: Backup Image Tool
58
Chapter 10: Remote Management
Chapter 11: Using VirtualBoot
69
Chapter 12: Other Operations
79
Chapter 13: Best Practices
25
39
50
61
86
Additionally, this Guide includes the following general information sections.
Chapter 14: Common Retention Policy Configurations
Chapter 15: Product Support
Chapter 16: Glossary
88
89
Chapter 17: Technician License Agreement
© 2010 StorageCraft Technology Corporation
93
87
6
ShadowProtect User Guide
Additional Information
For emerging issues and other resources, see the following:
The readme.txt file included on the ShadowProtect CD.
The StorageCraft technical support Web site at www.storagecraft.com/support.html
This User Guide is also available in the ShadowProtect user interface from the Help menu.
For a glossary of ShadowProtect terms and definitions, see Chapter 16: Glossary
89
.
Documentation Conventions
This symbol designates Note or Warning text that provides important information about the
configuration and/or use of ShadowProtect.
© 2010 StorageCraft Technology Corporation
ShadowProtect Overview
7
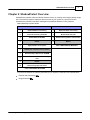
Chapter 2: ShadowProtect Overview
ShadowProtect provides robust and flexible disaster recovery by creating and managing backup image
files. Each backup image file represents the exact state of your system at a given point-in-time.
ShadowProtect provides tremendous advantages over traditional disaster recovery methods.
Table 2: Restoring a system volum e
Other Methods
ShadowProtect
1
Repair hardware if necessary
1
Repair hardware if necessary
2
Collect all necessary OS media
2
Boot from Recovery CD
3
Reload OS from CD-ROM
3
Restore entire system or selected files
4
Reboot
4
Reboot
5
Apply multiple service packs
6
Reboot (this could take several reboots)
7
Reload backup software from CD-ROM
8
Patch backup software to the latest support
level
9
Reboot
10
Load recovery tape and restore
FULLY RESTORED IN MINUTES
FULLY RESTORED IN HOURS
You should be aware of the following information as you prepare to install and use ShadowProtect:
Features and Components
Usage Scenarios
10
© 2010 StorageCraft Technology Corporation
8
8
2.1
ShadowProtect User Guide
Features and Components
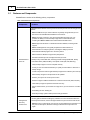
ShadowProtect consists of the following primary components:
Table 3: Shadow Protect com ponents
Component
Features
A Windows-based disaster recovery environment that provides the following primary
features:
New! VirtualBoot lets you create a VM from any backup image file that you can
then boot in the VirtualBox Virtual Machine environment.
New! The Image Conversion Tool, formerly the Backup Image Tool, now
provides the ability to convert backup image files into virtual file formats,
including the VMWare VMDK format and the Microsoft VHD format.
New! Support for Windows 7 and Windows Server 2008 R2, including 64-bit
support.
New! The Management View greatly simplifies the administration of
ShadowProtect on multiple systems, including the ability to push the
ShadowProtect Backup agent out to remote systems.
Microsoft Volume Shadow Copy Service (VSS) aware.
Schedule live backups in the background while you work.
ShadowProtect
Console
Backup to any accessible drive, including network storage (SAN, NAS, iSCSI),
removable drives (USB, FireWire), and optical media (CD, DVD, Blu-Ray).
Verify backup images to ensure complete recovery.
An easy-to-use user interface that lets you quickly recover folders or files from a
backup image.
Create compressed and encrypted backup image files for efficiency and security.
Mount backup images for simple folder or file updates.
Restore your system to an exact point-in-time.
Restore images to different hardware or to virtual environments (P2P,P2V,V2P).
View backup images for quick file and folder recovery.
Shrink Volume allows you to shrink an image file so you can restore to a smaller
drive.
I/O throttling for each backup job.
Remotely manage system backup and recovery operations.
StorageCraft
Recovery
Environment
The ShadowProtect CD contains a bootable Windows environment for disaster
recovery options without installing any software. For more information about the
Recovery Environment, see the StorageCraft Recovery Environment User Guide.
New! Resume on Interrupt lets you resume an interrupted restore operation from
the point of interruption, rather than having to start the restore process over
again.
© 2010 StorageCraft Technology Corporation
ShadowProtect Overview
9
New! An improved Boot Configuration Tool with support for Windows 7.
New! HeadStart Restore lets you restore a volume while ShadowProtect
continues to add Incremental backup images to the same backup image chain.
This can reduce restore time from days or weeks to minutes or hours, even for
very large volumes.
Access all the features of the ShadowProtect Console from a standalone
disaster recovery environment.
Loads from the bootable ShadowProtect CD.
Create ExactState™ backup images without installing any software.
If the system is unable to boot, ShadowProtect lets you back up the system
before a destructive restore potentially destroys valuable data
Use Hardware Independent Restore (HIR) to rrestore backup image files to a
different environment, either physical or virtual.
Network configuration tool to manage TCP/IP properties, domains and network
resources.
Remotely recover your system and data
Perform a quick and simple bare metal system recovery.
ShadowProtect
Backup Agent
The engine that creates and manages a system's point-in-time backup images.
The Backup Agent also handles mounting of backup image files. You can manage
the operation of the Backup Agent from the ShadowProtect Console.
To access the ShadowProtect Backup Agent, you must be a user with local
administration rights.
ImageManager provides unprecedented control over your backup image files. It
provides policy-driven services for managing backup image files, including:
Consolidation of Incremental backup image files into daily, weekly, and monthly
consolidated image files that greatly reduce the number of files in an image
chain.
Verification and re-verification of backup image files, including consolidated
files.
Replication of backup image files to a local drive.
ImageManager
New! For an additional fee you can extend replication support to off-site storage
through LAN/WAN and FTP.
New! For an additional fee, Head Start Restore (HSR) provides the ability to
restore a backup image while ShadowProtect continues to add Incremental
backup images to the same backup image chain. In a world of multi-Terabyte
storage HSR lets you short-circuit the restore process, greatly limiting the downtime associated with hardware failure or migration tasks.
For more information about ImageManager features, see the ShadowProtect
ImageManager User Guide.
© 2010 StorageCraft Technology Corporation
10
2.2
ShadowProtect User Guide
Usage Scenarios
ShadowProtect offers a variety of backup and recovery solutions, depending on your needs. This
section includes several usage scenarios that help describe ShadowProtect features and benefits.
ShadowProtect usage scenarios are organized into the following types:
ShadowProtect Console Scenarios
VirtualBoot Scenarios
10
11
ShadowProtect Console Scenarios
The following scenarios introduce several common use cases for ShadowProtect:
Live Backup
Problem: When taking system backups, I cannot take the time to shutdown a system each
time I want to create a backup image.
ShadowProtect Solution: By leveraging disk imaging with existing Windows snapshot
technology, ShadowProtect lets you create live system backups without any system downtime.
ShadowProtect creates live backup images that include a system's operating system, critical
data and configuration settings.
ExactState Backup Images
Problem: I need to create the most reliable and recoverable backup images possible.
ShadowProtect Solution: ShadowProtect includes ExactState backup image technology that
lets you create an image from the StorageCraft Recovery Environment, thereby ensuring that all
system files and resources are closed and in a state where ShadowProtect can create a
complete backup image. ExactState image technology supports all Windows server and
desktop operating systems.
Create Full and Incremental Backup Images
Problem: Making a full backup image every time I backup a system is very time consuming. I
need to be able to make incremental backup images to save time and space.
ShadowProtect Solution: ShadowProtect uses a sector-based backup strategy that lets it
backup just the changes to a file in an Incremental backup image file. Sector-based incremental
backup is the quickest and most efficient way to take an incremental backup. Once you have an
initial Full backup, you can create regular Incremental backup images from that point forward.
Individual Folder and File Restore
Problem: Restoring individual files and folders traditional backup systems, such as a tape drive,
can be very difficult and time-consuming...assuming I can even find the necessary data in the
first place. I need a quick and easy method to recover lost files or folders.
ShadowProtect Solution: Use the ShadowProtect Backup Explore Wizard to mount a backup
image file as a volume using a Drive letter or mount point. Once mounted, you can explore and
recover individual files and folders from the backup image. Disk-based backup images provide
fast file access, and you can even share backup images so Since the backups are disk-based,
the process is very fast and easy and uses Windows Explorer. The IT administrator can mount a
backup image and share this with end users who can select the files and folders they need to
© 2010 StorageCraft Technology Corporation
ShadowProtect Overview
11
restore.
Update an Existing Backup Image
Problem: I have an existing backup image, but need to update a driver in that image, or clean a
virus or other malware from the backup image before restoring files. I don't want to have to clean
the system, then re-create the backup image before using it to restore a system.
ShadowProtect Solution: Because you can mount ShadowProtect backup image files as
read/write volumes, you can modify and repair backup images as needed. ShadowProtect saves
backup image changes as a separate Incremental image file.
VirtualBoot Scenarios
The following scenarios introduce several possible use cases for VirtualBoot:
Historical Data Access
Problem: After transitioning to a new financial management system, you are audited. To satisfy the
audit, you need access to historical tax records stored in the proprietary format of the old financial
software. Unfortunately, you no longer have the old software, so you cannot access your historical
tax records.
VirtualBoot Solution: Rather than trying to restore a complete backup image that contains the old
financial software, use VirtualBoot to boot the backup image, which gives you access to both the
application and the data from your system at the time of the backup. By preserving the applications
with the data, you can greatly extend the lifespan of your data.
Software Testing
Problem: You need to find out how some new software performs on your production system, but
you don't want to risk having any problems.
VirtualBoot Solution: VirtualBoot the latest backup of your production system, then install the
software in the virtual machine. You can evaluate the software performance using your system's
actual production environment without any risk to your production system.
Backup Image Testing
Problem: You need to confirm that your backup images restore properly and that they provide
access to all your mission critical applications and data.
VirtualBoot Solution: VirtualBoot a recent backup image and you can verify that the restored
applications and data perform as expected..
Hardware Failure
Problem: You have a database server and the 20TB disk array crashes. You need to get the
system back on-line and replace the disk subsystem.
VirtualBoot Solution: This solution is a three-step process:
1.
VirtualBoot the latest backup image of your database server so users can continue using the
database server. The interim VM solution performs well because there is no file conversion
required. StorageCraft provides native support for its backup image files in the VirtualBox
© 2010 StorageCraft Technology Corporation
12
ShadowProtect User Guide
environment.
As part of this process, configure ShadowProtect to continue creating Incremental backups in
the VM, preferably every 15 minutes. These Incremental backups are part of the original
backup image chain. ShadowProtect has VirtualBox store the VM-generated Incremental
backups in native VDI files. While these files are relatively tolerant of VM host crashes, or
VirtualBox.exe or VBoxSvc.exe process crashes, they might become corrupt and
prevent the VM from restarting. If this happens, create a new VirtualBoot VM, using as the VM
source the latest Incremental backup created in the prior VM.
Warning: To continue uninterrupted Incremental backups in a VirtualBoot VM, the
ShadowProtect backup job that creates the backup image files must use a
ShadowProtect Destination Object of type Network (see Destinations 42 ).
2.
Start a HeadStart Restore (HSR) on the database server's new disk subsystem (For
information about HSR, see the ShadowProtect ImageManager User Guide).
3.
Once the HSR catches up to the most current Incremental, created in the VM, take the VM
offline and finalize the HSR installation on the new disk subsystem (a quick operation), then
bring the database server hardware back on-line.
Note: Once the replacement VM is on-line and continuing the Incremental backup image
chain, you can recover from a hardware failure in several different ways, including:
Restore to the original hardware, once repaired.
Restore to new hardware (using StorageCraft Recovery Environment's Hardware
Independent Restore (HIR)).
Restore permanently to a VM environment by using HSR to restore to a .VHD or .
VMDK virtual machine hard disk file.
© 2010 StorageCraft Technology Corporation
How ShadowProtect Works
13
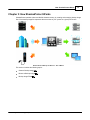
Chapter 3: How ShadowProtect Works
ShadowProtect provides robust and flexible disaster recovery by creating and managing backup image
files. Each backup image file represents the exact state of your system at a given point-in-time.
Shadow Protect Backup and Restore - How it Works
This section includes the following topics:
Create a Backup Image
14
Restore a Backup Image
Backup Image Files
15
© 2010 StorageCraft Technology Corporation
.
15
14
3.1
ShadowProtect User Guide
Create a Backup Image
Creating a ShadowProtect backup image involves two key processes:
Create a Virtual Volume
Using Microsoft VolSnap and VSS (with Windows Server 2003, Windows XP, or later), ShadowProtect
creates a point-in-time snapshot of the volume you want to backup. The entire process of taking a
snapshot of a volume and creating a virtual volume takes only seconds and does not interfere with
system operation.
Table 4: Snapshot m ethods supported by Shadow Protect
Snapshot
Supported OS
Image
Speed
Quality
Comments
VSS aware applications are managed to
achieve best backups.
StorageCraft
VSM with VSS
Windows XP / 2003
and later
Fast
Best
Can use script files to manage
applications that are not VSS aware to
improve backups.
VSS aware applications are managed
automatically to achieve best backups.
Microsoft
VolSnap with
VSS
Windows XP / 2003
and later
Slow
Best
Use script files (before and after the
snapshot) to manage non-VSS-aware
applications and improve backups.
Cannot create Incremental Image File
(see Chapter 16: Glossary 89 ).
StorageCraft
VSM direct
Windows 2000
Fast
Good
Use script files (before and after the
snapshot) to manage applications (both
VSS and non-VSS) and improve
backups.
Additionally, ShadowProtect provides a Backup Scheduler that lets you configure automated backup
jobs for protected volumes. You can schedule Full Image, Incremental Images (as often as every 15
minutes), and manage the retention of Backup Image Sets. The ShadowProtect Image Conversion
Tool simplifies image management by letting you manage existing image files, including consolidating
files in an Image Set, modifying password encryption and compression, and merging or splitting image
files.
Capture the Virtual Volume
To backup the volume, ShadowProtect replicates the virtual volume to create a backup image file. A
back up image file is a sector-by-sector representation of the volume at the time the volume snapshot
was taken. For more information about backup image files, see Backup Image Files 15 .
ShadowProtect writes the backup image file to the designated storage media. Options include network
storage (SAN, iSCSI, NAS, etc.), removable storage (USB / FireWire), and optical storage (CD, DVD,
Blu-ray). The amount of time it takes to write the backup image file depends upon the system
hardware and the size of the image file. For information about configuring and creating backup image
files, see Chapter 6: Creating Backup Image Files 39 .
© 2010 StorageCraft Technology Corporation
How ShadowProtect Works
3.2
15
Restore a Backup Image
Once you have created a backup image, you can use a ShadowProtect backup image to restore data
in two different ways:
Recover individual files and folders
Use the ShadowProtect Mount utility to mount the backup image file as a volume using either a drive
letter or a mount point. The Mount utility can efficiently mount hundreds of backup images
simultaneously, if desired. Furthermore, since the mounted backup image files preserve the Windows
volume properties, users can share and access the backup image file for emergency access to
backup image file data, including modifying and saving changes to the backup image file as an
incremental backup file.
For more information about mounting backup image files to recover data, see Chapter 7: Mounting
Backup Image Files 50 .
Restore an entire volume
Use the ShadowProtect Restore Wizard to restore an entire volume from a backup image file. You can
restore system volumes (that contains the system's operating system) using the StorageCraft
Recovery Environment, or restore non-system volumes using either Recovery Environment or while
running ShadowProtect Console in Windows. For more information about recovering volumes, see
Chapter 8: Restoring Backup Image Files 55 .
3.3
Backup Image Files
A ShadowProtect backup image file is a point-in-time representation of a computer volume. It is not a
standard file copy of the volume, but rather a sector-by-sector duplicate of the volume. Because of
this, you can mount a backup image file (using the ShadowProtect Mount utility) and view its contents
as if it were a regular volume. In the event that you need to recover data, you can recover specific files
and folders from the image or you may recover the entire volume to the exact point-in-time that the
backup image was taken.
ShadowProtect uses the following types of backup image files to provide a complete disaster recovery
solution.
Table 5: Types of backup im age files
Backup Images
Full (.spf)
Incremental (.spi)
© 2010 StorageCraft Technology Corporation
Description
A stand-alone image file that represents a disk volume at a specific
point-in-time. Full backup image files do not rely and does not rely on
any other files.
An image file that contains volume changes relative to another backup
image file. You can create Incremental backup image files relative to
Full backup images or other Incremental backup images.
ShadowProtect also creates an Incremental image file when an
existing image file is mounted as a read/write volume and modified.
16
ShadowProtect User Guide
Incremental backup image files let ShadowProtect offer multiple
volume backup strategies, including Differential and Incremental
backup options. See Chapter 16: Glossary 89 for information about
these backup strategies.
Spanned (.sp#)
Image files that belong to a spanned Image Set. Spanned Image Sets
are made by breaking a backup image file into pieces for increased
portability (for example, to save the image file on multiple CDs).
The actual Spanned image file name replaces the pound sign (#) with
a number that indicates the position of the file within the spanned
Image Set.
ImageManager
(-cd.spi, -cw.spi, -cm.
spi)
Image files that have been automatically collapsed by ShadowProtect
ImageManager. The suffix before the file extension indicates if the file is
a daily, weekly or monthly collapsed backup files.
.spk
A password key file used to encrypt backup image files.
File Naming Conventions
ShadowProtect backup image files use the following naming convention to help you identify the file and
its relationship to, and dependencies on, other backup image files.
<Volume Identifier>-b<base-seq>-d<diff-seq>-i<inc-seq>.<extension>
volume identifier: Identifies the volume that the backup image file represents.
base-seq: The Base Image File sequence number. This either identifies the sequence number of
this file, or identifies the Base Image File upon which this file is dependent.
diff-seq: The Differential backup sequence number. This either identifies the sequence number of
this file, or identifies the Differential Image File upon which this file is dependent.
inc-seq: The Incremental backup sequence number. This either identifies the sequence number of
this file, or identifies the Incremental Image File upon which this file is dependent.
extension: The file extension, which identifies if the file is a Full, Incremental, or Spanned backup
image file.
Table 6: Exam ples of backup im age file nam es
File Type Extension
Description
C_Vol-b001.spf
Full image of the C:\ volume.
C_Vol-b001-d001-i000.spi
Differential image of the C:\ volume with a dependency on
the full backup image file C_Vol-b001.spf
*
or
C_Vol-b001.d001.spi
© 2010 StorageCraft Technology Corporation
How ShadowProtect Works
C_Vol-b001-d000-i001.spi
*
17
Incremental image of the C:\ volume with a dependency on
the full backup image file C_Vol-b001.spf
or
C_Vol-b001-i001.spi
C_Vol-b001-d001.i001.spi
Incremental backup image file of the C:\ volume with a
dependency on the differential backup image file C_Volb001-d001.i000 which in turn has a dependency on
C_Vol-b001.spi.
Note: Backup image file names that have a “-d000” or “-i000” segment use these name
segments only as place holders, and indicate that a differential backup image or an
incremental backup image are not part of the image and the backup image file has no
dependency on a previous differential or incremental backup image file.
File Dependencies
By examining the name of a backup image file, ShadowProtect users can identify the files on which it
depends. However, it is not possible to determine if other backup image files are dependent on this
file. Because of this, it is very important to use the Image Conversion Tool (see Chapter 9: Image
Conversion Tool 58 ) to review dependencies prior to moving, modifying or deleting backup images.
Warning: Deleting a backup image file on which other files depend renders the dependent
backup image files useless. You cannot browse or restore files contained by these
dependent backup image files.
Note: Deleting a full image file from an active backup image job causes ShadowProtect to create
a new Full image during the next scheduled backup and start a new backup Image Set.
© 2010 StorageCraft Technology Corporation
18
ShadowProtect User Guide
Chapter 4: Installing ShadowProtect
Before installing ShadowProtect, review the Requirements
18
and the License and Install Options
21
.
To Install ShadowProtect
1.
Insert the ShadowProtect CD into the system's CD drive.
If the installation does not start automatically, browse the ShadowProtect CD and run
AUTORUN from the root of the CD.
2.
On the Product Installation CD home page, select the product version to install (Desktop,
Server, Small Business Server).
The appropriate install Wizard loads to walk you through the installation process.
3.
On the Welcome page, click Next.
4.
On the License Agreement page, select I accept the terms of the license agreement, then
click Next.
You must accept the license agreement to install ShadowProtect. Click Print to print out the
License Agreement.
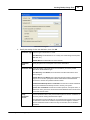
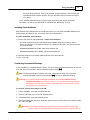
5.
On the Choose Components page, select the ShadowProtect components to install, then click
Next.
Agent: Installs the ShadowProtect Backup agent, which lets you remotely manage
ShadowProtect operations on this system.
Console: Installs the ShadowProtect Management View, which lets you manage
ShadowProtect operations for the system, and remote systems if desired..
Mount: Installs the ShadowProtect mount driver and adds the ability to mount and dismount a
backup image file using the right-click menu in Windows Explorer.
6.
In the Ready to Install the Program page, click Install.
7.
In the InstallShield Wizard Complete page, select Yes, I want to restart my computer now,
then click Finish.
If you cannot restart the computer immediately, select No, I will restart my computer later.
However, you must restart the computer before attempting to use ShadowProtect.
8.
4.1
Remove the ShadowProtect CD from the system's CD drive.
Requirements
ShadowProtect has the following hardware and software requirements:
Hardware Requirements
19
Supported Operating Systems
Supported File Systems
19
20
Supported Storage Media
20
© 2010 StorageCraft Technology Corporation
Installing ShadowProtect
19
Hardware Requirements
Table 7: Shadow Protect hardw are requirem ents
Hardware
ShadowProtect
300 MHz or higher Pentium-compatible
CPU.
CPU
Recovery Environment (RE)
Windows 2008 RE: 1 GHz or faster.
Windows 2008 RE (Japan only): 1.4 GHz
(x64 processor) or 1.3GHz (Dual Core).
Windows 2003 RE: 550 MHz or faster.
Supports up to four processors per
system.
The greater of 256 MB or the Operating
System minimum.
Windows 2008 RE: 512 MB minimum.
Hard Drive space
50 MB free disk space.
N/A
CD-ROM or DVD
drive
Required.
Required.
Monitor
VGA or higher resolution.
VGA or higher resolution.
Memory
Windows 2003 RE: 256 MB minimum.
Supported Operating Systems
Specific Operating System support is dependent upon the edition of ShadowProtect that you have
purchased. However, ShadowProtect supports both 32-bit and 64-bit versions of the operating system,
where applicable.
Table 8: Shadow Protect operating system requirem ents
Edition
Description
Windows XP Family, including:
XP Home
XP Professional
Windows Vista Family, including:
ShadowProtect
Desktop Edition
Vista Home Basic
Vista Home Premium
Vista Business
Vista Ultimate
Windows 7
Windows 2000 Workstation SP4 (Support for Hot Backup of the booted OS and
Cold Backup from Recovery Environment.)
ShadowProtect
Server Edition
Windows Server 2000 SP4 (Support for Hot Backup of the booted OS and Cold
Backup from Recovery Environment.)
© 2010 StorageCraft Technology Corporation
20
ShadowProtect User Guide
Windows Server 2003 Family, including:
Server 2003 Standard Edition
Server 2003 Standard Edition R2
Server 2003 Advanced Edition
Server 2003 Advanced Edition R2
Server 2003 Enterprise Edition
Server 2003 Enterprise Edition R2
Server 2003 Datacenter Edition
Server 2003 Datacenter Edition R2
Server 2003 Web Edition
Small Business Server 2003
Windows Server 2008 (including R2)
ShadowProtect
SBS Edition
(Small Business)
Small Business Server 2003
Small Business Server 2008
Supported File Systems
ShadowProtect supports the following File Systems:
FAT16
FAT16X
FAT32
FAT32X
NTFS
Dynamic Disks
Supported Storage Media
ShadowProtect supports the following storage media:
Locally-connected hard drives
Removeable hard drives (USB or FireWire)
Network drives (SAN, NAS, iSCSI)
Optical media (CD, DVD, Blu-Ray)
Multi-Boot Environments
If your system has multiple boot partitions, install ShadowProtect on each of the bootable Windows
partitions to guarantee that ShadowProtect recognizes changes to ShadowProtect-managed volumes
from these secondary Windows environments. You do not need to activate ShadowProtect, but the
snapshot driver (stcvsm.sys) must be available in each Windows partition.
The snapshot driver manages the fast incremental tracking in ShadowProtect. If you boot to an
© 2010 StorageCraft Technology Corporation
Installing ShadowProtect
21
alternate OS environment where the snapshot driver is not loaded, ShadowProtect cannot track
volume updates from that OS boot session. This means that your next Incremental backup misses
any changes made from the alternate OS.
If one or more of non-Windows operating systems, such as Linux, can write to a ShadowProtectmanaged volume, you can make sure ShadowProtect recognizes those changes by doing the
following:
Create a script, that executes during the startup/logon phase of the non-Windows OS, to delete
all VSM000.IDX (case-sensitive) files from the root directory of each ShadowProtect-managed
volume. Removing these files forces stcvsm.sys, when your primary Windows volume boots, to
use a Full Differential/Comparison backup, which captures any changes made to the volume from
the non-Windows OS.
4.2
License and Install Options
Use of ShadowProtect is governed by the ShadowProtect End User License Agreement (see Chapter
17: End User License Agreement 93 ). However, StorageCraft provides the following ShadowProtect
license options to help you in your decision-making process:
Purchased License: StorageCraft licenses ShadowProtect on a per system basis (based on the
number of systems for which you are making backups. For example, using ShadowProtect to
backup 100 computers requires 100 licenses. Before using the Software, review the complete End
User License Agreement .
Evaluation Version License: StorageCraft provides an Evaluation version of the ShadowProtect
Software as a CD or ISO image file. With the Evaluation version, you can create backup image files
of system and data volumes. You can also restore system and data volumes or specific files and
folders. The Evaluation version includes the StorageCraft Recovery Environment, so you can restore
system volumes with the Evaluation version. The Evaluation version expires and ceases to operate
when the Evaluation period ends. Images created during the Evaluation period are fully compatible
with the registered (purchased) version of the Software.
Trial Version License: StorageCraft provides a Trial version of the ShadowProtect software as a
free download. With the Trial version, you can create backup image files of system and data
volumes. You can also restore system and data volumes or specific files and folders. However, the
Trial version expires and ceases to operate when the trial period ends. Images created during the
trial period are fully compatible with the registered (purchased) version of ShadowProtect. However,
you cannot restore the system volumes because StorageCraft Recovery Environment is not included
with the Trial version.
4.3
Starting ShadowProtect
You can access ShadowProtect in two ways:
From Windows: Select Start > All Programs > ShadowProtect > ShadowProtect.
From Recovery Environment: Put the ShadowProtect CD in the system's CD-ROM drive, then
boot the system. Make sure your system boot sequence is set to boot from the CD before the hard
drive. For more information about loading and using Recovery Environment, see the Recovery
Environment User Guide.
© 2010 StorageCraft Technology Corporation
22
4.4
ShadowProtect User Guide
Activating ShadowProtect
When you purchase ShadowProtect, StorageCraft provides you with a product serial number and an
Evaluation version of the purchased product. The Evaluation version provides 30 days of product
access, during which you must activate the product. If you do not activate the product within 30 days
of installation, the product times out and stops functioning.
You can activate ShadowProtect in the following ways:
Automatic Activation
Manual Activation
22
23
You can also deactivate a previously activated ShadowProtect installation to free a product license for
use by another system (see Deactivating ShadowProtect 24 ).
Automatic Activation
StorageCraft provides an activation server that you can use to quickly and easily activate your
ShadowProtect installation.
To activate ShadowProtect automatically
1.
Start ShadowProtect.
For more information, see Starting ShadowProtect
21
.
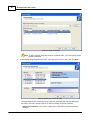
2.
From the Menu Bar select Help > Product Activation.
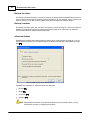
3.
In the Product Activation dialog box, provide the requested information, then click OK.
Customer Name: (Optional) Specify the name of the product purchaser, either person or
organization.
Product Serial Number: Enter the serial number that you received when purchasing
© 2010 StorageCraft Technology Corporation
Installing ShadowProtect
23
ShadowProtect.
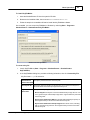
4.
ShadowProtect notifies you if the activation process was successful.
a. If the activation is successful, click Close.
b. If the activation was not successful, review the message to determine why the activation
was unsuccessful. To correct the problem, do one of the following:
i.
Review the information in the Product Activation dialog box for accuracy. Correct
any errors, then OK to resubmit the activation request.
ii.
If your computer cannot successfully communicate to the activation server or the
Internet, wait for a while and try the activation process again.. You can also try
using a manual activation option.
iii. If the number of allowed activations for the serial number has been exceeded, you
must purchase additional licenses. If you feel you received this message in error,
contact StorageCraft Support (see Chapter 15: Product Support 88 .)
iv. For all other activation issues, contact StorageCraft Support (see Chapter 15:
Product Support 88 .)
Manual Activation
If for some reason you are unable to use the automated activation method, StorageCraft provide the
following manual options for activating your ShadowProtect installation. These manual options require
you to receive the activation key and manually apply it to your ShadowProtect installation.
To get an activation key
1.
Use one of the following methods to contact StorageCraft and request an activation key.
Online: Open a Web browser to http://www.storagecraft.com/product_activation.php.
Email: Request an activation key from StorageCraft Support ([email protected]).
Phone: Call StorageCraft Support (see Chapter 15: Product Support
2.
88
).
Provide the information required to generate an activation key.
Product Serial Number: Enter the serial number that you received when purchasing
ShadowProtect.
Machine ID: ShadowProtect generates the Machine ID during the installation process. You
can view the Machine ID in the ShadowProtect Activation dialog box (select Help > Product
Activation).
Version: The ShadowProtect version you installed. You can view this by selecting Help >
About.
Language: The product language you are using (English, Japanese, French, or German).
3.
When you receive the activation key, continue with To activate ShadowProtect manually.
Depending on the method used to request the activation key, StorageCraft will deliver it to you
either in a Web form or via an Email where you can copy and paste it into your ShadowProtect
installation.
To activate ShadowProtect manually
© 2010 StorageCraft Technology Corporation
24
ShadowProtect User Guide
1.
Start ShadowProtect.
For more information, see Starting ShadowProtect
21
.
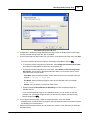
2.
From the Menu Bar select Tools > Product Activation.
3.
In the Activation dialog box, select Manual activation.
4.
In the Activation Key field, type or copy the activation key, then click Activate.
Deactivating ShadowProtect
When retiring a system, you can deactivate the ShadowProtect license to make the license available
for use on another system.
To deactivate a ShadowProtect license
1.
Start ShadowProtect.
For more information, see Starting ShadowProtect
21
2.
From the Menu Bar select Help > Product Activation.
3.
Click Deactivate.
.
ShadowProtect displays a message stating you can no longer use this product key on this
machine
4.
4.5
Click OK.
Uninstalling ShadowProtect
Use the standard Windows application removal tool to uninstall ShadowProtect.
To uninstall ShadowProtect
1. In Windows, select Start > Settings > Control Panel > Add or Remove Programs.
2. Select ShadowProtect 4.x, then click Remove.
3. Click Yes to complete the uninstall.
After uninstalling ShadowProtect, you must reboot the computer for the changes to take
effect.
© 2010 StorageCraft Technology Corporation
Understanding ShadowProtect Console
25
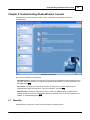
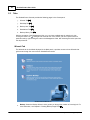
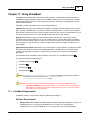
Chapter 5: Understanding ShadowProtect Console
ShadowProtect Console provides access to most configuration and operation controls for
ShadowProtect:
Shadow Protect Console
The console is divided into three panels:
Navigation Panel: Located on the left side of the console, the Navigation panel provides access to
the tasks and tools necessary to configure and operate ShadowProtect. For more information, see
Navigation Panel 28 .
Main Panel: Located in the center of the console, the Main panel contains tabbed views of
ShadowProtect tasks and information. For more information, see Tabs 30 .
Network Panel: Located on the right side of the console, the Network panel, or Network View,
provides access to the remote management features in ShadowProtect. For more information, see
Chapter 10: Remote Management 61 .
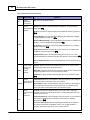
5.1
Menu Bar
ShadowProtect Console has a menu bar that includes the following menus:
© 2010 StorageCraft Technology Corporation
26
ShadowProtect User Guide
Table 9: Shadow Protect console m enus
Menu
File
Description
Access
applicationlevel options.
Options
Exit: Close the ShadowProtect UI.
Access
Backup: Launches the Backup Wizard (see Chapter 6: Creating Backup
ShadowProtect Image Files 39 ).
Wizards.
Restore: Launches the Restore Wizard (see Chapter 8: Restoring a Volume
55 ).
Explore Backup: Launches the Explore Backup Image Wizard (see Chapter
7: Mounting Backup Image Files 50 ).
Dismount Backup Image: Launches the Backup Image Dismount Wizard (see
Section 7.3: Dismounting Backup Image Files 53 ).
Tasks
Verify Image: Launches the Verify Image Wizard (see Section 13.1: Verifying
Backup Image Files 79 ).
Image Conversion Tool: Launches the Image Conversion Tool Wizard (see
Chapter 9: Image Conversion Tool 58 ).
Add Destination: Opens the Destination dialog box where you can create
named destinations for backup image files (see Section 6.2: Destinations
).
42
Refresh Volume Info: Refreshes the ShadowProtect volume list for the current
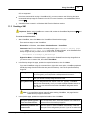
system.
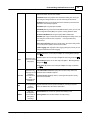
View
Create custom
toolbars and
manage
toolbar
visibility.
Toolbars: Opens the Customize Tool Bar dialog box, where you can create
customized tool bars for the ShadowProtect UI.
Status Bar: Toggles a status bar at the bottom of ShadowProtect Console that
provides application and environment status information.
Task Panel: Toggles visibility of the Navigation Panel (see Navigation Panel
28 ).
Access
Client Options: Opens the Client Options dialog box where you can configure
ShadowProtect visual notifications for backup job success or failure.
Options Agent options. Agent Options: Opens the Agent Options dialog box where you can configure
Email notification settings for the current system. You can choose to send
Email notifications for both failed and successful backup jobs.
Help
Access
Contents: Launches the ShadowProtect on-line help system. The help is
ShadowProtect available only when running ShadowProtect Console in Windows (not in the
help
Recovery Environment).
resources.
Product Activation: Opens the Activation dialog box, where you can activate (or
deactivate) the ShadowProtect installation (see Section 4.4: Activating
ShadowProtect 22 ).
Check for Latest Version: Queries the StorageCraft Web site for updates to
the current ShadowProtect installation. If there is an update available, a
message displays the URL where you can get the update.
© 2010 StorageCraft Technology Corporation
Understanding ShadowProtect Console
27
Register: Opens a browser to https://register.storagecraft.com/register/
regstart.jsp where you can manually request an product activation key (see
Section 4.2.2: Manual Activation 23 ).
About: Displays the ShadowProtect version and copyright information. Click
System Info to open the Microsoft System Information dialog box, which
contains detailed information about the computer.
© 2010 StorageCraft Technology Corporation
28
5.2
ShadowProtect User Guide
Navigation Panel
The left-side Navigation panel provides quick access to ShadowProtect tasks and tools. You can
toggle the Navigation panel on or off by selecting View > Task Panel. The Navigation panel is
organized into the following categories. You can collapse and expand each category, as desired.
Table 10: Shadow Protect task panel options
Category
View
Description
Display or hide
the Network
View.
Options
Network View: Displays the nodes running the ShadowProtect Backup
Agent (see Chapter 10: Remote Management 61 ).
Management View: Displays the Management View in the Main panel
(see Management View Tab 36 ).
Backup: Launches the Backup Wizard (see Chapter 6: Creating Backup
Image Files 39 ).
Restore: Launches the Restore Wizard (see Chapter 8: Restoring a
Volume 55 ).
Explore Backup: Launches the Explore Backup Image Wizard (see
Chapter 7: Mounting Backup Image Files 50 ).
Tasks
Access
ShadowProtect
Wizards.
Dismount Backup Image: Launches the Backup Image Dismount Wizard
(see Section 7.3: Dismounting Backup Image Files 53 ).
Verify Image: Launches the Verify Image Wizard (see Section 13.1:
Verifying Backup Image Files 79 ).
Image Conversion Tool: Launches the Backup Image Tool Wizard (see
Chapter 9: Image Conversion Tool 58 ).
Add Destination: Opens the Destination dialog box where you can create
named destinations for backup image files (see Section 6.2:
Destinations 42 ).
Refresh Volume Info: Refreshes the ShadowProtect volume list for the
current system.
Note: Several tools are available only in the Recovery Environment
(RE). For more information about these tools, see the
StorageCraft Recovery Environment User Guide.
Verify Image: Launches the Verify Image Wizard (see Section 12.1:
Verifying Backup Image Files 79 ).
Tools
Access
ShadowProtect
tools.
Image Conversion Tool: Launches the Image Conversion Tool Wizard
(see Chapter 9: Image Conversion Tool 58 ).
Refresh Volume Info: Refreshes the ShadowProtect volume list for the
current system.
Network Configuration: (RE only) Launches the Network Configuration
utility, where you can configure a computer's network access settings.
HIR Configuration: (RE only) Launches the Hardware Independent
Restore (HIR) utility, where you can restore a backup image to a different
© 2010 StorageCraft Technology Corporation
Understanding ShadowProtect Console
29
environment from which it was created.
Load Drivers: (RE only) Opens the Load Drivers dialog box, where you
can configure storage drivers for use in the Recovery Environment.
File Browser: (RE only) A simple file browser that lets you browse files
and folders of a backup image file.
Text Editor: (RE only) A simple text editor.
Vista BCD: (RE only) Launches the Vista BCD editor, where you can edit
Boot Configuration Data (BCD) on systems running Windows Vista.
Partition Table Editor: (RE only) A simple partition table editor.
UltraVNC: (RE only) Launches the Remote Management utility, where you
can configure remote access to systems running the Recovery
Environment.
Select Your Time Zone: (RE only) Launches the Time Zone utility, where
you can adjust the system's time zone information.
Enable Logging: (RE only) Opens the Logging dialog box, where you can
configure ShadowProtect event logging.
Backup: Opens the on-line help to Chapter 6: Creating Backup Image
Files 39 .
Help
(Windows only) Restore: Opens the on-line help to Chapter 8: Restoring a Volume 55 .
Access to on-line
Browse Image: Opens the on-line help to Chapter 7: Mounting Backup
help topics.
Image Files 50 .
Image Tools: Opens the on-line help to Chapter 9: Image Conversion
Tool 58 .
License
(Windows only)
Displays current
licensing
information for
this
ShadowProtect
installation.
Info
(RE only) Display A quick reference to basic system information, including Computer
system
Name, IP Address and Time Zone information.
information.
Status
(RE only)
Displays the
current state of
the system,
including:
© 2010 StorageCraft Technology Corporation
Trial or Evaluation version: Displays the number of days before the
ShadowProtect installation expires.
Licensed version: Displays "Active", meaning that the product is fully
licensed and activated.
Queued Tasks: The number of queued tasks waiting to run.
Running Tasks: The number of tasks currently running.
30
5.3
ShadowProtect User Guide
Tabs
The ShadowProtect Console provides the following pages in the Center panel:
Wizards Tab
30
Disk Map Tab
31
Backup Jobs Tab
Destinations Tab
32
34
Backup History Tab
35
With the exception of the Management View, you can close a tabbed page by selecting it, then
clicking the Close icon to the right side of the tab list. Once closed, you can re-open a tab for a
particular node by right-clicking the node in the Management View, then selecting the tab to open from
the drop-down list.
Wizards Tab
The Wizards tab is the default displayed in the Main panel. It provides access to three Wizards that
guide users through the most common ShadowProtect tasks.
Shadow Protect Wizards tab
Backup: Starts the Backup Wizard, which guides you through the creation of a backup job. For
more information, see Chapter 6: Creating Backup Image Files 39 .
© 2010 StorageCraft Technology Corporation
Understanding ShadowProtect Console
31
Restore: Starts the Restore Wizard, which guides you through the process of restoring a
volume from a backup image file. For more information, see Chapter 8: Restoring a Volume
for additional information.
55
Explore Backup: Starts the Explore Backup Wizard, which guides you through mounting a
backup image file as a volume so you can restore individual files and folders. For more
information, see Chapter 7: Mounting Backup Image Files 50 .
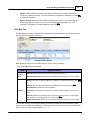
Disk Map Tab
The Disk Map tab provides a graphical view of system drives. Disk Map lists each physical disk drive
with the partitions available on that drive.
Shadow Protect Disk Map tab
Right-clicking an entry in the Disk Map opens an actions menu for that entry.
Table 11: Disk Map action m enu options
Entry
Physical
Drive
Right-click Actions
Edit Policy: Opens the Partition Creation Policy Editor dialog box.
Refresh Volumes Info: Refreshes the ShadowProtect volume list for the current system.
Backup: Launches the Backup Wizard (see Chapter 6: Creating Backup Image Files
).
Restore: Launches the Restore Wizard (see Chapter 8: Restoring a Volume
55
39
).
Delete Partition: Deletes the selected partition.
Partition
Set Active: Sets the selected partition as the active (bootable) partition on the physical
drive.
Edit Policy: Opens the Partition Creation Policy Editor dialog box. For more information,
see Section 12.5: Changing Partition Creation Policy 84 .
Refresh Volumes Info: Refreshes the ShadowProtect volume list for the current system.
The Disk Map tab lets you access the Backup and Restore Wizards, and change partition creation
policies for the selected drive. Additionally, in the Recovery Environment you can also run Check Disk,
format a drive and edit the selected disk's boot.ini.
© 2010 StorageCraft Technology Corporation
32
ShadowProtect User Guide
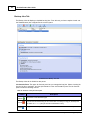
Backup Jobs Tab
The Backup Jobs tab displays scheduled backup jobs. From this tab, you have complete control over
the ShadowProtect jobs configured for the current system.
Shadow Protect Backup Jobs tab
The Backup Jobs tab is divided into two panes:
Job Controls Pane: The upper Job Controls pane lets you manage backup jobs. Select a backup job
from the job list to manage it, and view job information in the Job Information pane. The Job Controls
pane includes the following controls:
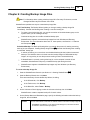
Table 12: Controls in the job control pane
Control
Description
Execute
Executes the selected backup job.
Cancel
Cancels the selected backup job. This terminates a currently running job, but keeps the
job status as enabled (the job executes at its Next Run Time).
Pause
Toggles the selected job status between enabled and disabled. A disabled job is
© 2010 StorageCraft Technology Corporation
Understanding ShadowProtect Console
33
suspended and will not run until re-enabled.
New
Launches the Backup Wizard (see Chapter 6: Creating Backup Image Files
Delete
Deletes the selected job from the Job Scheduler.
Edit
Launches the Backup Wizard, where you can edit the selected job's configuration (see
Chapter 6: Creating Backup Image Files 39 ).
Details
Opens the Volume Backup tab in the Job Information pane so you can see details about
the currently selected backup job.
Refresh
Refreshes the volume information in the Backup Job Information pane.
39
).
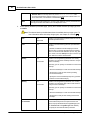
Job Information: Displayed in the lower pane, the Job Information pane includes two tabs that
provide information about the currently selected backup job.
Table 13: Tabs in the job inform ation pane
Component
Description
Displays information about the currently selected backup job in three panes:
Job Status: Displays information about the current backup job, including the
destination backup image file, and status (queued, running, completed), and the
time remaining (running job) or total time (completed job). Click View Details to view
the Volume Backup tab.
Basic Properties
Backup Job: Displays information about the backup job configuration, including
Compression, Encryption, and the backup job options.
Schedule: If the selected backup job is a recurring job, the Basic Properties tab
displays the job schedule for both Full backup images, and Incremental backup
images, where applicable.
Volume Backup
Displays detailed information about the currently running backup job, including time
remaining, throughput, and an Event log. If no backup job is running, the Volume
Backup tab displays details from the most recent backup job.
© 2010 StorageCraft Technology Corporation
34
ShadowProtect User Guide
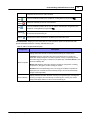
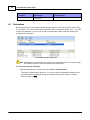
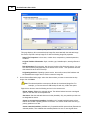
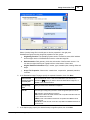
Destinations Tab
The Destinations tab displays information about the system's named destinations, which are predefined storage locations for backup image files. From this tab, you have complete control over the
Destinations defined on the current system. For more information see Section 6.2: Destinations 42 .
Shadow Protect Destinations tab
The Destinations tab includes the following panes:
Destinations List: The upper pane displays a list of currently defined Destinations for the system.
To delete or edit a destination location, highlight the destination location in the list and then select
the operation to perform. Information about backup Image Sets stored at the destination location is
presented for the highlighted entry in the Destination Information.
Destination Usage: The lower pane displays information about the backup Image Sets stored in the
currently selected Destination, including Base Name, First Image Creation Time, Last Image
Creation Time and number of "point-in-time" image files in the backup Image Set.
Additionally, the Destinations tab includes the following icons for working with Destinations:
Add: Opens the Destination dialog box (see Section 6.2: Destinations
42
for additional information).
Delete: Deletes the currently selected Destination.
Edit: Opens the Destinations dialog box so you can modify an existing Destination configuration
(see Section 6.2.1: Editing Destinations 44 ).
Refresh: Updates the Destination Objects List and the Destination Objects Information List.
© 2010 StorageCraft Technology Corporation
Understanding ShadowProtect Console
35
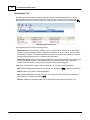
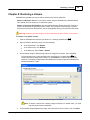
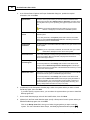
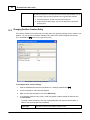
Backup History Tab
The Backup History tab displays log information for completed backup jobs. The Backup History lets
you analyze ShadowProtect backup activity over time, including failed jobs, if any.
The Backup History tab
The Backup History tab includes the following panes:
Job History: The upper pane displays a list of completed backup jobs. Select a job to view job
details in the Job Log.
Job Log: The lower pane displays the log entries for the selected job. This is the same information
available in the Volume Backup tab (see Backup Jobs Tab 32 .)
You can sort the backup history lists by clicking on the column headers. You can also adjust the
column width by dragging the column header borders.
Additionally, the Backup History tab includes the following icons:
Delete All: Clears the Job List.
Details: Displays or hides the Job Log pane.
© 2010 StorageCraft Technology Corporation
36
5.4
ShadowProtect User Guide
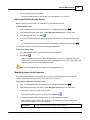
Management View
The Management View is one way to access the remote management capabilities of ShadowProtect.
It is the preferred management view for users of ShadowProtect Server and ShadowProtect SBS
because it lets you easily manage many nodes from a single location.
The Management View tab is divided into two panes:
Node Controls Pane: The upper Node Controls pane lets you manage connected nodes. Select a
node from the Node Information pane to manage it. The Node Controls pane includes the following
controls:
Table 14: Controls in the job control pane
Control
Connect
Disconnect
Description
Connects a previously added managed remote node to the ShadowProtect user
interface.
Disconnects a managed remote node from the ShadowProtect user interface.
Add
Adds a system that has the ShadowProtect Backup Agent installed to the node list.
Delete
Deletes a remote node from the managed node list.
Edit
Opens the Server Details dialog box of the currently selected node (see Modifying
Remote Node Properties 66 ).
Manage
Opens the ShadowProtect tabs (Disk Map, Backup Jobs, Destinations, Backup
History) for the currently selected node.
Install
Opens the ShadowProtect Push Wizard, which lets you push the ShadowProtect agent
out to other systems that you want to manage from this Management View. For more
information, see Installing the Backup Agent Remotely 61 .
Node Information List: The Node Information pane displays a list of nodes currently managed by this
management console.
Table 15: Tabs in the job inform ation pane
Component
Description
Displays information about the currently selected backup job in three panes:
Basic Properties
Job Status: Displays information about the current backup job, including the
destination backup image file, and status (queued, running, completed), and the
© 2010 StorageCraft Technology Corporation
Understanding ShadowProtect Console
37
time remaining (running job) or total time (completed job). Click View Details to view
the Volume Backup tab.
Backup Job: Displays information about the backup job configuration, including
Compression, Encryption, and the backup job options.
Schedule: If the selected backup job is a recurring job, the Basic Properties tab
displays the job schedule for both Full backup images, and Incremental backup
images, where applicable.
Volume Backup
5.5
Displays detailed information about the currently running backup job, including time
remaining, throughput, and an Event log. If no backup job is running, the Volume
Backup tab displays details from the most recent backup job.
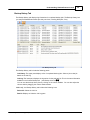
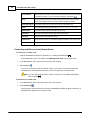
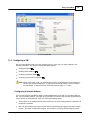
Network View
The Network view displays information for managing ShadowProtect on remote systems (see Chapter
10: Remote Management 61 ).
The Netw ork View panel
The Network View includes the following controls:
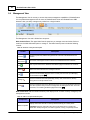
Table 15: Controls in the job control pane
Control
Connect
Disconnect
Description
Connects a previously added managed remote node to the ShadowProtect user
interface.
Disconnects a managed remote node from the ShadowProtect user interface.
© 2010 StorageCraft Technology Corporation
38
ShadowProtect User Guide
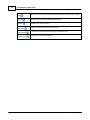
Add
Adds a system that has the ShadowProtect Backup Agent installed to the node list.
Delete
Deletes a remote node from the managed node list.
Refresh
Refreshes the remote node list.
Properties
Import Nodes
Export Nodes
Toggles the Server Properties table on and off.
Imports a previously exported node list into your Network View.
Exports your node list into an XML file.
© 2010 StorageCraft Technology Corporation
Creating Backup Image Files
39
Chapter 6: Creating Backup Image Files
Note: For information about creating a backup image file in Recovery Environment, see the
StorageCraft Recovery Environment User Guide.
ShadowProtect provides two ways to create backup image files:
One-Time Backup: The Backup Wizard guides you through creating a backup image file
immediately. Consider the following when creating a one-time backup job:
To create a one-time backup job, you must be a member of the Administrator group on the
system where you are creating a backup.
One-time backup jobs do not affect scheduled backup jobs.
ShadowProtect supports one-time backup images from both Windows and Recovery
Environment. For more information about each of these options, see Section 2.1: Features
and Components 8 .
Scheduled Backup: The Backup Wizard guides you through the process of creating a recurring
backup job (see Chapter 6: Creating Backup Image Files 49 ). Consider the following when creating
a scheduled backup job:
A volume can belong to no more than one scheduled backup job that includes Incremental
backups. This limitation does not include one-time backup images or Differential backup
images, as long as they do not disrupt sector tracking for the Incremental backup.
If ShadowProtect is currently running a backup job, or the computer is turned off and
unavailable, ShadowProtect skips any scheduled backup jobs during that time.
ShadowProtect supports scheduled backup images only from Windows (not Recovery
Environment).
To create a backup image file
1.
Start the ShadowProtect Console (see Section 4.3: Starting ShadowProtect
2.
Start the Backup Wizard, then click Next.
21
).
There are several ways to start the Backup Wizard, including:
In the Wizards tab, click Backup.
In the Tasks menu, click Backup.
In the Menu Bar, select Tasks > Backup.
3.
On the Volumes to Back Up page, select the volumes to backup, then click Next.
ShadowProtect creates a separate backup file for each volume.
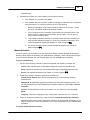
4.
On the Backup Name and Destination page, specify the following information about the backup
image file, then click Next.
Location
You can select either a local drive or network location to store the backup image file:
Local Drive: Click Browse. In the Open Folder dialog box, select the local drive
and folder to store the backup image file.
© 2010 StorageCraft Technology Corporation
40
ShadowProtect User Guide
Network Share: In the drop-down list, select <Network Locations>. This
opens the Destinations dialog box where you can define the network share. For
more information, see Section 6.2: Destinations 42 .
Name
5.
The File Name table displays the volumes (with default file names) selected for the
backup job. Double-click a table row to modify the file name.
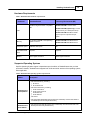
On the Specify the Backup Schedule page, specify the schedule and backup image type, then
click Next.
Note: The selected backup schedule determines the available backup image types. For
more information about the backup image types, see Chapter 16: Glossary 89 .
Now
Full
Differential
Later
Full
Creates a one-time backup job that starts as soon as
the Backup Wizard closes.
Creates a one-time backup job at the specified date
and time.
By default, the Start Time fields display the current
date and time. To change the date and time settings,
click on an element of the date/time (month, day, year,
hour minute, second, AM/PM), then type or use the up/
down buttons to set the desired value.
Weekly
Full
Incremental
Creates a recurring backup job based on a weekly
schedule. You select the weekdays and time of day to
start a Full backup.
Optionally, you can specify a schedule for Incremental
backups.
a. Select the weekdays to create Incremental backups.
b. Specify times of day to start and stop creating
Incremental backups.
c. Specify the Incremental backup frequency (minutes
between Incremental backups).
Monthly
Full
Incremental
Creates a recurring backup job based on a monthly
schedule. You select the days of the month and time
of day to start a Full backup.
Optionally, you can specify a schedule for Incremental
backups.
a. Select the weekdays to create Incremental backups.
b. Specify times of day to start creating Incremental
backups.
Continuous
Incrementals
Incremental
Creates a single Full backup, then creates recurring
Incremental backups from that point forward. This
option requires ShadowProtect ImageManager (see
the ShadowProtect ImageManager User Guide.).
To specify the Incremental backup schedule:
© 2010 StorageCraft Technology Corporation
Creating Backup Image Files
41
a. Select the weekdays to create Incremental backups.
b. Specify times of day to start and stop creating
Incremental backups.
c. Specify the Incremental backup frequency (minutes
between Incremental backups).
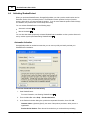
6.
(Conditional) On the Previous Backup Image page, select the existing backup image file to use
as a basis for creating the Differential backup image, then click Next.
This page displays only when you specified a Differential backup in the Backup Schedule
page.
7.
On the Options page, select the desired backup image file options, then click Next.
The Options page lets you set both basic and advanced backup image options. For more
information about each of the available options, see Backup Image File Options 44 .
8.
On the Wizard Summary page, review the backup job configuration, then click Finish.
Select Execute Now to run the backup job immediately in addition to the schedule defined in
the job.
You can monitor the progress of the backup in the Backup Jobs tab (see Section 5.3.3: Backup Jobs
Tab 32 ).
6.1
Backup Image File Storage Locations
ShadowProtect lets you store backup image files on any disk device, including hard drives,
removeable USB/FireWire drives, network drives and NAS (Network Attached Storage) devices. You
can also store backup images to optical media such as CDs, DVDs, or Blu-Ray discs.
Note: If you select a destination that does not have enough disk space to save the backup
image, the backup job fails due to lack of destination storage space. ShadowProtect
notes the reason for the failure in its log file.
Table 14: Advantages and disadvantages for various storage locations
Location
Advantages
Disadvantages
Local Hard Drive
Fast backup and restore.
Inexpensive.
Consumes local disk space.
Vulnerable to loss if the drive fails.
Local USB/FireWire
Drive
Fast backup and restore.
Preserves disk space on local
drives.
Inexpensive.
Easy off-site storage.
More expensive than local hard drives.
Vulnerable to loss if the drive fails.
Network Hard Drive
Fast backup and restore.
Protection from local hard
drive failure.
Off-site storage.
Must have network interface card drivers
supported by Recovery Environment.
Complexity. Users must have network
rights to save and access backup images.
CD/DVD/Blu-Ray
Good media for archiving.
Protection from local hard
Slower backups due to media speeds.
File restrictions due to limited size.
© 2010 StorageCraft Technology Corporation
42
ShadowProtect User Guide
Location
Advantages
Disadvantages
drive failure.
6.2
Destinations
Backup destinations let you create pre-defined storage locations for backup image files, either locally
or on a network. You can then select these destinations when creating backup jobs. Then, if you need
to modify the destination, you can do so by editing the destination object rather than deleting and
recreating new backup jobs.
The Shadow Protect Destinations tab
Note: ShadowProtect requires that every system has a unique Destination for its backup image
files. Multiple systems should not save files to the same folder.
To create a backup job destination
1.
Open the ShadowProtect Console, then select Tasks > Add Destination.
This opens the Destinations dialog box. You can also open the Destinations dialog box from
the Backup Name and Destination page of the Backup Wizard (see Chapter 6: Creating
Backup Image Files 39 ).
© 2010 StorageCraft Technology Corporation
Creating Backup Image Files
43
Destinations dialog box
2.
Specify the settings for the new destination, then click OK.
Destination Type Select the type of destination to create:
Local Directory: The destination is on a locally connected storage device (HDD,
USB drive, etc.)
Network Share: The destination is on the network.
Destination
Name
Specify the path to the a descriptive name for this destination.
Destination Path Specify the details of the destination. The information you need to provide
depends on the Destination Type.
Local Directory: Click Browse, then select the local drive and folder to store
backup images.
Network Share: Click Browse, then select the network location to store backup
images. You must also specify the network credentials that ShadowProtect
should use to access the specified network location:
ShadowProtect Backup Service credentials: Use the same stored credentials
used by the ShadowProtect backup service to access your system.
Specific User credentials: Provide the Container (Domain, Computer name, or
NAS device name), Username and Password that ShadowProtect should use to
access this network share.
Verify
Destination
Access
Instructs ShadowProtect to verify the destination path and access credentials, if
necessary, before creating the Destination object.
If the destination access verification is not successful the program alerts you that
the destination could not be created as requested. If this happens, check the
path and credentials used to make sure they are accurate, then re-create the
destination.
© 2010 StorageCraft Technology Corporation
44
ShadowProtect User Guide
Editing Destinations
To edit a backup job destination
1.
Start the ShadowProtect Console (see Section 4.3: Starting ShadowProtect
2.
Select the Destinations tab.
3.
Select the destination to edit, then click Edit.
21
).
This open the Destination dialog box, which displays the current destination configuration.
From this dialog box, you can edit all Destination properties except the Destination Type
(Network Share or Local Directory).
Deleting Destinations
To delete a backup job destination
1.
Start the ShadowProtect Console (see Section 4.3: Starting ShadowProtect
2.
Select the Destinations tab.
3.
Select the destination to delete, then click Delete.
21
).
Note: Before deleting a Destination, make sure to modify or delete any backup jobs that use the
Destination or the jobs will fail. For information about editing backup jobs, see Section
5.3.3: Backup Jobs Tab 32 .
6.3
Options
When creating a backup job, ShadowProtect provides the following backup image file options. The
Backup Wizard provides access to these options when you are creating a backup job (see Chapter 6:
Creating Backup Image Files 39 ).
Compression Method
Encryption
44
45
Split Image File
45
Backup Comment
46
Compression Method
ShadowProtect provides the following file compression options when creating a backup image file:
None: No data compression. This option uses the fewest CPU resources but uses the most disk
space.
Standard: Typically compresses data by about 40%. Standard compression provides an optimal
balance between CPU usage and disk space usage.
High: Typically compresses data by about 50%. This option requires the most CPU resources, but
is useful when disk space is limited.
© 2010 StorageCraft Technology Corporation
Creating Backup Image Files
45
File Protection
ShadowProtect provides the following file protection mechanisms when creating a backup image file.
This is particularly useful when storing backup image files on a network, or off-site, to help prevent
unauthorized access and use of your backup image files. If you select to protect the backup image
file, you must specify the correct password in order to mount or restore the backup image.
Password Protection: Assigning a password requires you to enter the correct password before
using the backup image file (for example, to restore a volume or create a Differential backup image
based on the password-protected file. ShadowProtect supports passwords comprised of
alphanumeric characters. Use the following guidelines when creating a password for the greatest
security with password encrypted backup image files.
Use at least eight characters.
Use a random mixture of characters, upper and lower case and numbers.
Don’t use a word found in the dictionary.
Change your password regularly or if you suspect your password has been compromised.
Warning: If you forget the password, you cannot access the backup image file. StorageCraft
cannot access an encrypted backup image file.
File Encryption: ShadowProtect uses the password as an encryption key when encrypting the
backup image file. You can select one of three encryption methods in the Advanced Options dialog
box. For more information, see "Encryption" in Section 6.3.5: Advanced Options 46 .
Use Password File: You can use password file, also known as a Key File, to encrypt a backup
image. This is helpful if you are not managing your own backups and you don’t want other users to
have access to the password used to protect the backup image files. For information about creating
a Key File, see Section 12.4: Creating Key Files 82 .
Split Image File
ShadowProtect lets you split a backup image file into multiple smaller files, creating a Spanned Image
Set. This is useful when you need to move a backup image file onto fixed length media such as CDs
or DVDs.
You can split a backup image file when you create it by selecting Split Image File in the Backup
Wizard's Options page. Once selected, specify the desired file size, in MB, in the Split Image File
field. For more information about the Backup Wizard, see Creating Backup Image Files 39 .
You can also split an existing backup image file using the Image Conversion Tool (see Chapter 9:
Image Conversion Tool 58 ).
Note: If a backup image file is divided into multiple files, the filename suffix will change to .sp1,
.sp2, ..., .spN, where N represents the file's sequence within the Spanned Image Set.
© 2010 StorageCraft Technology Corporation
46
ShadowProtect User Guide
Backup Job Name
The Backup Job Name field lets you specify a name for the backup job that ShadowProtect uses as a
prefix for each backup image file created as part of this backup job. For example, specify a backup job
name of "Server1" to be able to quickly identify those backup image files related to Server1.
Backup Comment
The Backup Comment option lets you attach a comment to a backup image file. These comments are
available for review when mounting or restoring the backup image file at a later date. By default the
time and date stamp are added to the backup image.
Advanced Options
ShadowProtect supports the following advanced options when creating a backup image job. You can
access advanced options from the Options page of the Backup Wizard (see Creating Backup Image
Files 39 ).
Advanced Options page in the Backup Wizard
ShadowProtect organizes its advanced options into four tabs:
Backup
Image
47
47
Commands
Retention
48
49
Note: StorageCraft recommends using the default advanced option settings unless you fully
understand the impact of changing these features.
© 2010 StorageCraft Technology Corporation
Creating Backup Image Files
47
Backup
The Backup tab includes the following advanced options:
Include free space: (Default = Off) Backs up all sectors on the volume, including those sectors
marked as free space. This can result in a much larger image file, but can help preserve previously
deleted files.
Performance throttling: (Default = On, 100% I/O usage) Specifies how much I/O bandwidth that
ShadowProtect can use when creating a backup image file. Use the slider bar to adjust this setting.
Reducing (throttling) ShadowProtect I/O usage increases the time it takes to create a backup image
file, but can reserve I/O bandwidth for other processes.
2nd and subsequent full backups are differentials: (Default = Off) Instructs ShadowProtect to
create Differential images rather than Full images for second and subsequent scheduled backup
jobs. For example, if you have a weekly backup schedule that creates a new Full image each
Monday, selecting this option instructs ShadowProtect to create Differential images each Monday
that are based on the initial Full image created when the backup job ran for the first time. This
reduces storage needs for the backup image files over time.
Generate MD5 file when creating an image file: (Default = On) Instructs ShadowProtect to
create an MD5 (Message Digest 5) checksum file when creating a backup image file. The checksum
lets you confirm the file integrity of backup image files.
Ignore read failures and continue backup: (Default = Off) Instructs ShadowProtect to ignore disk
read errors that occur during the creation of backup image files.
Image
The Image tab includes the following advanced options:
Enable write caching: (Default = Off) Enables or disables using file caching when writing the
backup image file. Turning this option on might slow down the imaging process.
Enable concurrent task execution: (Default = Off) Enables or disables creating backup images
simultaneously for multiple volumes rather than creating only one backup images at a time. When
using this option, you should have hardware capable of supporting a high disk load.
Enable self-healing incremental recovery: (Default = On) Determines how ShadowProtect reacts
to a system error that interrupts the ShadowProtect incremental tracking feature. When Off,
ShadowProtect recovers by generating a new Full image and starting a new Image Set. When On,
ShadowProtect recovers by creating an Incremental image as planned, along with a Differential
image based on the most recent Incremental image and the current volume. This prevents disruption
of the Incremental backup schedule, but can result in increased CPU and network bandwidth when
compared to creating a new backup Image Set.
Auto-execution of unexecuted task: (Default = On) Enables or disables executing the last
scheduled backup job if it was missed (for example, because the system was powered off). This
option executes only the last unexecuted backup job if ShadowProtect misses more than one
scheduled backup job.
© 2010 StorageCraft Technology Corporation
48
ShadowProtect User Guide
Commands
The Commands tab lets you specify command files (.exe, .cmd, .bat) to execute at key points in
the backup image file creation process. The command files cannot rely on any user interaction, so you
should test each command file before using them with ShadowProtect. ShadowProtect allows 5
minutes at each stage (Pre-snapshot, Post-snapshot, and Post-backup) for command files to
complete. If the command files do not complete in 5 minutes, ShadowProtect proceeds while the
command files continue executing.
To use a command file, enter the full file name, including path, into the appropriate field:
Pre-Snapshot: Executes the specified command file before taking the image snapshot (see
"Snapshot" in Chapter 16: Glossary 89 ). For example, you might execute a pre-snapshot command
file that places non-VSS aware applications or databases into a backup state.
Note: It takes only a few seconds to create a snapshot, so non-VSS databases or
applications are out of production only briefly before they can be returned to normal
operating mode with a post-snapshot command.
Post-Snapshot: Executes the specified command file after taking the image snapshot (see
"Snapshot" in Chapter 16: Glossary 89 ). For example, you might execute a post-snapshot
command file to return non-VSS aware applications or databases to normal operating mode.
Post-Backup: Executes the specified command file after creating the backup image file. For
example, you might execute a post-backup command file to automatically copy the backup image
file to an off-site location or FTP server.
Note: To avoid the 5 minute execution limit for post-backup command files, you can call a
command file that simply executes another command file and then finishes. This lets
you complete the ShadowProtect-associated command file in the 5 minute allotment
while the secondary command file performs tasks that take longer to complete
(synchronizing or copying the backup image files to an alternate location, scanning
the backup image file for viruses, etc.
Encryption
The Encryption tab lets you select the algorithm used to encrypt the backup image file. The
Encryption tab is displayed only when you have selected Enter Password on the Options page of the
Backup Wizard (see Section 6.3.2: File Protection 45 ).
RC4 128-bit: This encryption option is the fastest, but least secure of the algorithms.
AES 128-bit: This encryption option strikes a balance between speed and security.
AES 256-bit: This encryption option is the most secure, but slowest, of the algorithms.
© 2010 StorageCraft Technology Corporation
Creating Backup Image Files
49
Retention
The Retention tab lets you specify a policy for automatically managing the retention of backup Image
Sets (see "Image Set" in Chapter 16: Glossary 89 ). The Retention tab is not available if you are using
the Continuous Incremental backup schedule, which leverages ShadowProtect ImageManager to
manage backup Image Sets. For more information, see the ShadowProtect ImageManager User Guide
.
The Retention tab includes the following advanced options:
Enable a retention policy: (Default = Off) Enables or disables an automatic Image Set retention
policy.
Number of backup Image Sets to retain: (Default = 3) Specifies the maximum number of Image
Sets to retain. When the specified maximum (M) is reached, ShadowProtect deletes the oldest
Image Set. By default, ShadowProtect enforces the retention policy after creating an Image Set,
meaning that ShadowProtect creates the M+1 Image Set, then deletes the oldest Image Set,
thereby retaining M Image Sets.
Delete both Full and Incremental backup images in the set: (Default = Off) Instructs
ShadowProtect to delete the all files, both Full and Incremental, when removing an old Image Set.
Delete only Incremental backup images (retain Full backup images): (Default = On) Instructs
ShadowProtect to delete only Incremental backup images when removing an old Image Set.
Enforce policy before starting the next Full backup: (Default = Off) Instructs ShadowProtect to
"make room" for a new Image Set by deleting the oldest Image Set before creating the new Image
Set that will replace it. This reduces the amount of disk space needed to adhere to the specified
retention policy.
For more information about the benefits of retention policies, see Chapter 14: Common Retention
Policy Configurations 87 .
6.4
Deleting Backup Image Files
You can delete backup image files using any process you normally use to delete a file in Windows.
However, before deleting a backup image file, be certain of the following:
The backup image file is not required for any active backup job. If you delete the Full image to
an active backup image job, ShadowProtect creates a new Full image at the next scheduled
backup and starts a new Image Set.
Other backup image files do not depend on this backup image file. If you delete a backup image
file that other point-in-time backup image files depend on, all dependent backup image files
become useless. You cannot browse and restore files from these dependent backup image files.
Use the Image Conversion Tool to check for any file dependencies (see Chapter 9: Image
Conversion Tool 58 ).
© 2010 StorageCraft Technology Corporation
50
ShadowProtect User Guide
Chapter 7: Mounting Backup Image Files
The ShadowProtect Explore Backup Wizard guides you through the process of mounting a backup
image file. ShadowProtect automatically associates the files required to browse and restore a specific
backup image file. You need only select the backup image you want to explore. Once mounted, you
can treat the backup image file as you would any other Windows volume:
Browse the backup image file.
Share the backup image file.
Copy individual files and folders from the backup image file.
Modify the backup image file (if the volume is configured as writeable).
Use standard Windows security and file properties.
While the process is the same, whether you can restore files and folders in Windows, or need to use
the StorageCraft Recovery Environment, depends specifically on the state of your system and what
you need to restore:
Restore in Windows: Windows loads, but you have lost data or had undesirable changes to
applications or hardware files on a volume (excluding the operating system files).
Restore in Recovery Environment: Windows does not load and you have lost data or operating
system files, or had undesirable changes to applications or hardware files on a volume. For more
information, see the StorageCraft Recovery Environment User Guide.
Note: To restore data from an Incremental image, you must have all previous incremental
backup image files and the initial full backup image. If any of these files is missing or
corrupt, mounting the backup image to that point in time is not possible. ShadowProtect
does not let you modify Full images prevent corrupting an entire Image Set.
For information about mount options, see Backup Image Mount Options
52
.
To mount a backup image file
1. Start the ShadowProtect Console (see Section 4.3: Starting ShadowProtect
21
).
2. Open the Explore Backup Wizard by doing one of the following:
In the Wizards tab, click Explore Backup.
In the Tasks menu, click Explore Backup.
In the Menu bar, select Tasks > Explore Backup.
3. On the Backup Image File Name page, browse to the backup image file you want to mount,
then click Next.
For information about backup image file naming conventions, see Section 3.3.1: File Naming
Conventions 16 .
Note: If the backup image is encrypted you must provide the appropriate password.
The Explore Backup Image Wizard displays a categorized list of information about the backup
image file.
© 2010 StorageCraft Technology Corporation
Mounting Backup Image Files
51
Select Backup Im age File to Brow se
4. (Conditional) In the Backup Image Dependencies page, select the desired point-in-time image
from the selected backup Image Set, then click Next.
5. On the Explore Options page, select how you want to mount the backup image, then click Next
.
For more information about mount options, see Backup Image Mount Options
52
.
a. To mount the backup image file as a drive letter, select Assign the following drive letter,
then select the appropriate drive letter from the drop-down list.
b. To mount the backup image file as a mount point, select Mount in the following empty
NTFS folder, then browse to the appropriate NTFS folder. You must also specify how to
name the mount point sub-folder:
Time/Date: Uses the backup image's creation date and time as the sub-folder name (for
example, 7-12-2008 10.19.24 AM).
File Name: Uses the backup image file name as the sub-folder name (for example,
E_VOL b001).
Custom: Lets you specify a custom sub-folder name.
c. (Optional) Deselect Mount Backup as Read-Only to mount the backup image as a
writeable volume.
If you mount the backup image file as a writeable volume, you can choose to save the
changes to an Incremental image file when you dismount the volume (see Dismounting
Backup Image Files 53 ).
6. On the Wizard Summary page, review the mount information, then click Finish.
ShadowProtect mounts the backup image file, then automatically launches Windows Explorer
and displays the mounted volume.
7. With the backup image mounted, you can browse the contents of the volume as you would any
Windows volume.
© 2010 StorageCraft Technology Corporation
52
ShadowProtect User Guide
To restore individual files or folders, simply copy them from the backup image file volume to
your production volume.
Note: Once mounted, select Refresh Volumes Info to get an accurate view of the mounted
system volumes from the Disk Map tab.
7.1
Mounting Backup Image Files in Windows
ShadowProtect adds two options to the Context menu (the right-click menu) of backup image files:
Mount: Launches the Image File Mount Wizard to guide you through the process of mounting the
selected backup image file. For information about the various options in the Image File Mount
Wizard, see Mounting Backup Image Files 50 , starting in Step 3. You can simultaneously mount
multiple backup image files, but you must mount each backup image file individually with the Image
File Mount Wizard.
Quick Mount: Mounts the backup image file as read-only using the next available drive letter. You
can select multiple backup image files, then quick mount them simultaneously, with each backup
image file receiving the next available drive letter.
For information about dismounting a backup image file, see Dismounting Backup Image Files
7.2
53
.
Backup Image Mount Options
When mounting a backup image file, consider the following:
Whether to mount the backup image as a drive letter or at a mount point location.
Whether to mount the backup image as read-only or writeable.
Mounting a Backup Image as a Drive Letter
The ShadowProtect Mount Utility lets you mount a backup image file as a drive letter on your
computer with all the properties of the original volume.
After mounting a backup image as a drive letter, you may perform a variety of tasks, such as
running ScanDisk (or CHKDSK), performing a virus check, defragmenting the drive, copying
folders or files to an alternate location or simply viewing disk information about the drive such as
used space and free space.
When a drive is mounted, you may set it up as a shared drive. Users on a network can connect
to the shared drive and restore files and folders from within the backup image if you want end
users to recover their own files. You also may mount one or more backup images at a time. The
drives will remain mounted until you dismount them or restart the machine. If an NTFS volume
uses EFS (Encrypted File System), the security remains intact on the volume when it is
mounted.
Mounting a Backup Image as a Mount Point
The ShadowProtect Mount Utility lets you mount a backup image file as a mount point (a
directory on an NTFS file system). Mount points overcome the available drive letter limitation and
support more logical organization of files and folders.
© 2010 StorageCraft Technology Corporation
Mounting Backup Image Files
53
Mounting a Read-Only Backup Image
By default, ShadowProtect mounts backup image files as read-only. This lets users access the
backup image to do the following:
Recover files from an existing backup image.
View the contents of a backup image.
Run other applications that need to access the backup image, such as a storage resource
manager or data mining application.
Note: Windows 2000 does not support read-only NTFS volumes.
Mounting a Writeable Backup Image
ShadowProtect can mount a backup image as writeable volume. This lets users access the
backup image to do the following:
Remove files from the backup image (viruses, malware, etc.)
Add files to the backup image.
Update the backup image security.
Restore a backup image to a smaller volume (see Dismounting Backup Image Files
53
).
Note: ShadowProtect prevents you from modifying a Full image file to prevent corruption of
an entire Image Set.
7.3
Dismounting Backup Image Files
Once mounted, a backup image file remains mounted until explicitly dismounted, or the system
reboots. The ShadowProtect Backup Image Dismount Wizard guides you through the process of
dismounting a previously mounted backup image file (see Mounting Backup Image Files 50 ). As part
of the dismount process, you can do the following:
Save changes to writeable backup images.
Shrink the volume so you can restore the image to a smaller drive.
Note: The Shrink Volume feature truncates mounted backup image files so that the file
system ends at the last currently-allocated cluster. To reduce the backup image
size as much as possible, use a disk defragmentation tool on the mounted image
to consolidate file distribution within the volume and free up space at the end of the
volume.
To dismount a backup image
1. Start the ShadowProtect Console (see Section 4.3: Starting ShadowProtect
2. Open the Backup Image Dismount Wizard by doing one of the following:
In the Tasks menu, click Dismount Backup Image.
In the Menu bar, select Tasks > Dismount Backup Image.
© 2010 StorageCraft Technology Corporation
21
).
54
ShadowProtect User Guide
3. In the Mounted Backup Images page, select the backup image volume to dismount, then click
Next.
When selecting a mounted backup image, this page also displays the volume properties.
4. (Conditional) In the Backup Image Dismount Options page, select if you want to Save volume
changes, or Shrink the backup Image, then click Next.
These options are available only if the backup image volume is writeable (see Backup Image
Mount Options 52 ).
Save changes to incremental file: Saves changes made to the mounted volume. Rightclick the Incremental File to save the modified backup image file using a different name.
Shrink Volume: Lets you shrink the volume so you can restore this image to a smaller hard
drive. This option is available only in the following situations:
Dismounting a writeable backup image of an NTFS volume in Windows Vista or
Windows Server 2008 (or later).
Running StorageCraft Recovery Environment using boot option 1 (Recommended),
which boots using Windows PE (based on Windows 7).
5. In the Backup Image Dismount Summary page, review the dismount details, then click Finish.
Note: Once dismounted, select Refresh Volumes Info to get an accurate view of the mounted
system volumes from the Disk Map tab.
Dismounting Backup Images in Windows
ShadowProtect adds two options to the Context menu (the right-click menu) of mounted backup image
files. For information about mounting backup image files, see Mounting Backup Image Files 50 .
Dismount: Launches the Backup Image Dismount Wizard to guide you through the process of
dismounting the selected backup image file. For information about the various options in the Backup
image Dismount Wizard, see Dismounting Backup Image Files 53 , starting in Step 3.
Quick Dismount: Dismounts the backup image file without any further user interaction.
ShadowProtect dismounts the backup image file without saving changes made to a writeable
mounted image file, if applicable.
© 2010 StorageCraft Technology Corporation
Restoring a Volume
55
Chapter 8: Restoring a Volume
ShadowProtect provides two ways to restore volumes from backup image files:
Restore in Windows: Restore a non-system volume using the ShadowProtect Restore Wizard.
This method does not require you to reboot the system.
Restore in Recovery Environment: Use the bootable Recovery Environment when restoring a
system volume where the operating system resides. For information about restoring a system
volume from the Recovery Environment, see the StorageCraft Recovery Environment User Guide.
Warning: Restoring a backup image to a volume overwrites all data currently on the volume.
To restore a non-system volume
1.
Start the ShadowProtect Console (see Section 4.3: Starting ShadowProtect
2.
Open the Restore Wizard by doing one of the following:
21
).
In the Wizards tab, click Restore.
In the Tasks menu, click Restore.
In the Menu bar, select Tasks > Restore.
3.
On the Backup Image to Restore page, select the Image Set to restore, then click Next.
In the drop-down menu, select the Destination (see Section 6.2: Destinations 42 ) that
contains the backup Image Set to restore, or click Browse to locate the desired backup
image set. The Specify Image Names field displays the backup Image sets available at the
selected destination or path.
Select the backup im age set to restore
Note: To restore a volume from a backup image set stored on a network share, you must
have the proper network credentials.
4.
On the Backup Image Dependencies page, select the point-in-time to restore, then click Next.
© 2010 StorageCraft Technology Corporation
56
ShadowProtect User Guide
Select specific point-in-tim e to restore
This page displays all Incremental backup image files associated with the selected Image
Set. Select a specific backup image file to view the following image file properties:
Image File Properties: Volume size, creation time, compression, password protection,
comment.
Original Partition Information: Style, number, type, bootable option, starting offset and
length.
Disk Information: Disk geometry, disk size and number of the first track sectors. You can
also view the disk layout graphically at the bottom of the screen. This represents what the
disk looked like at the time of backup.
Originating machine: Operating system version, the machine name, MAC address and
the ShadowProtect engine version used to create the image file.
5.
On the Restore Destination page, select the volume where you want to restore the backup
image, then click Next.
Note: The selected partition must space sufficient for the selected Image Set. For
example, you cannot restore a 4GB backup file with only 1GB of free space.
Right-click a volume to see the following actions in the context menu:
Delete Volume: Deletes the selected volume. The deleted volume becomes unassigned
space on the disk that can be repartitioned.
Set Active: Sets the selected volume as Active (bootable). Only one partition per drive can
be designated as Active.
Create an exact primary partition: (Available only if unpartitioned disk space exists)
Defines and creates a primary partition on the disk. You cannot create more than four (4)
primary partitions on a disk.
Create extended partition: (Available only if unpartitioned disk space exists) Extends the
selected partition, then subdivide the extended partition into one or more logical drives.
© 2010 StorageCraft Technology Corporation
Restoring a Volume
57
Edit Policy: Launches the Partition Creation Policy Editor.
6.
On the Specify the Restoration Options page, select the appropriate volume restore options,
then click Next.
Set Partition Active: Configures the restored volume as the active partition in the system
(the drive the machine boots from).
Restore MBR: Restore the master boot record (MBR) as part of the volume restore job. The
master boot record is stored in the first sector of the first physical hard drive, and contains the
master boot program and partition table. The master boot program uses the partition table to
determine the active partition, then starts the boot program from the boot sector of the active
partition. When selected, you have the following MBR restore options:
Restore MBR from the image file: Restores the MBR from the backup image file.
Restore original Windows XP MBR: Restores the default MBR that ships with Windows
XP.
Restore disk signature: Restores the original hard drive physical disk signature. Windows
Server 2003, Windows 2000 Advanced Server, and Windows NT Server 4.0 Enterprise
Edition (SP3 and later) require disk signatures to use the hard drive.
Restore Disk Hidden Track: Restores the first 63 sectors of a drive. Some boot loader
applications require this for the system to boot.
7.
On the Wizard Summary page, review the details of the volume restore operation, then click
Finish.
You can view the progress of restore volume operation in the Backup Jobs tab.
© 2010 StorageCraft Technology Corporation
58
ShadowProtect User Guide
Chapter 9: Image Conversion Tool
ShadowProtect provides the Image Conversion Tool so you can manage existing backup image files,
and provides the following primary features:
Consolidate a point-in-time backup image (Full + Incremental images) into a new Full image.
Change the compression setting on an existing image.
Change the encryption setting on an existing image.
Split an backup image file into a Spanned Set where each file has a maximum file size. This is
useful for moving backup image files to CD or DVD.
Convert a backup image into a virtual machine format (VMDK or VHD).
You can access the Image Conversion Tool from either Windows or the StorageCraft Recovery
Environment.
To use the Image Conversion Tool
1. Start the ShadowProtect Console (see Section 4.3: Starting ShadowProtect
21
).
2. In the Tools menu, click Image Conversion Tool.
3. On the Source Image File page, browse to the location of the backup image files you want to
modify.
ShadowProtect displays the Full images stored in the specified location.
Specify Source Im age File
4. Select the Base Image File to work with, then click Next.
Note: If the backup image is encrypted you must provide the appropriate password.
5. In the Backup Image Dependencies page, select the Incremental image that represents the
point-in-time to consolidate with the Full image, then click Next.
© 2010 StorageCraft Technology Corporation
Image Conversion Tool
59
Select a point-in-tim e to consolidate into a new Full im age
Select a backup image file in the left pane to view its properties in the right pane.
ShadowProtect groups backup image file properties into four groups:
Originating machine: The operating system version, the machine name, MAC address
and the engine version of ShadowProtect used to create the image file.
Disk Information: Disk geometry, disk size and number of the first track sectors. You
can view the original disk layout in graphical form at the bottom of the screen.
Original Partition Information: Style, number, type, bootable option, starting offset and
length.
Image File Properties: Volume size, creation time, compression, password protection,
comment.
6. In the Destination Image File page, specify the required information, then click Next.
Select network
From the drop-down menu, select the Destination (see Section 6.2:
location or browse Destinations 42 ) where you want to store the destination image file, or
to a local path
Browse to the desired location.
Specify image
name
Specify a name for the destination image file.
Save As
Select the type of image file you want to create. Supported options include:
SPF: Create a new Full (Base) image file.
VHD: Create a Microsoft Virtual Hard Disk file compatible with Microsoft and
Hyper-V virtual environments.
VMDK: Create a Virtual Machine Disk file compatible with VMWare virtual
environments.
ESX Server: Create an ESX server file compatible with VMWare ESX virtual
environments.
7. In the Options page, specify the desired backup image file options, then click Next.
© 2010 StorageCraft Technology Corporation
60
ShadowProtect User Guide
For information about each of these options, including the Advanced options, see Section
6.3: Options 44 .
8. In the Wizard Summary page, review the Image Conversion Tool job summary, then click Finish
.
Monitor the progress of the Backup job in the Backup Jobs tab (select the job, then click Details).
Review the results of previously executed jobs in the Backup History tab.
© 2010 StorageCraft Technology Corporation
Remote Management
61
Chapter 10: Remote Management
ShadowProtect provides two ways to remotely manage ShadowProtect Backup Agents installed on
remote servers and desktops (known as remote nodes), as long as these systems are accessible
through the local area network or a virtual private network (VPN). By connecting to a remote node
through one of these tools, you have full access to ShadowProtect features and functionality on the
remote node.
Remote Management with the Management View
Remote Management with the Network View
61
65
Note: You must have administrative rights to the remote node in order to manage it. However,
with the proper administrative rights, you can remotely manage both ShadowProtect Server
Edition and ShadowProtect Desktop Edition nodes using either the Management View or
the Network View.
10.1 Remote Management with the Management Console
The Management View tab is designed specifically for ShadowProtect Server and ShadowProtect SBS
users that need to manage a larger number of remote ShadowProtect installations from a central
location.
Although the functionality is very similar to the Network View, the Management View organizes it in a
way to make it more friendly to administrators with many remote nodes to manage. You can open and
close the Management View by selecting Management View in the View menu (see Section 5.4:
Management View 36 ).
You can do the following from the Management View:
Installing the Backup Agent Remotely
Adding and Deleting Remote Nodes
Modifying Remote Node Properties
61
65
66
Connecting and Disconnecting Remote Nodes
66
Installing the Backup Agent Remotely
Using the Push Agent, Management View lets you remotely install the ShadowProtect Backup agent
so you can configure ShadowProtect operations on the remote system.
To remotely install the backup agent
1.
Start the ShadowProtect Console (see Section 4.3: Starting ShadowProtect
2.
In the View menu, click Management View to open the Management View.
3.
In the Management View, click Install.
21
).
The Push Install Wizard so you can configure the remote installation.
4.
On the Specify Installer Package page, browse to the ShadowProtect Installer Package that you
want to use for the remote installation, then click Next.
There must be an associated installation setup file (.iss) with the selected installer package.
For more information, see Section 10.3: Creating an Install Setup Package 67 .
© 2010 StorageCraft Technology Corporation
62
ShadowProtect User Guide
5.
In the Choose Search Options and Proper Credentials dialog box, provide the required
information, then click Next.
System Name
The name of the system where you want to install the ShadowProtect
Backup agent. Select either Domain name or Host name according to the
type of system name you are providing, then type the system name in the
field.
Note: If you leave the field blank, Push Install uses your current
domain or workgroup to locate a list of available systems.
Use Active Directory
Search
Instructs ShadowProtect to search Microsoft Active Directory for the
desired system.
To use this parameter, click options (at the bottom of the Push Install
dialog box when Use Active Directory search is selected) to refine the
Active Directory search characteristics.
Use Specified
Credentials
The authentication credentials that Push Install uses to gain access to the
remote system.
Note: If you do not provide credentials, Push Install uses your current
credentials to attempt to access the remote system.
Discover Services
Push Install attempts to identify existing ShadowProtect services running
on remote systems. When successful, it displays the information it
gathers about agent version.
Automatically activate Push Install automatically activates the Backup agent it installs.
installed agents
To use this parameter, click settings (at the bottom of the Push Install
dialog box when Automatically activate installed agents is selected) to
specify the Username and Serial # of the ShadowProtect license you want
to use on the remote system.
Reboot after install
Following a successful Backup agent install, ShadowProtect automatically
re-boots the remote system so the Backup agent is active.
To use this parameter, click settings (at the bottom of the Push Install
dialog box when Reboot after install is selected) to specify the details of
the reboot operation. You can instruct the remote system to reboot at a
specific date/time; specify a message to display before rebooting; and
specify a delay before the reboot occurs (in seconds).
6.
(Conditional) On the Computers Overview page, select the systems where you want to install
the Backup agent, then click Next.
If you didn't specify a system name, you can select the systems where you want to install the
Backup agent here.
7.
On the Install Overview page, wait until the install finishes, then click Next.
8.
(Optional) On the Post Install Overview page, specify a Group name for each system where you
installed the Backup agent, then click Next.
Click in the Group name field, then type of select the group where you want to add this
system. For more information about Groups, see Modifying Remote Node Properties 63 .
© 2010 StorageCraft Technology Corporation
Remote Management
9.
63
On the Summary page, click Finish.
The newly installed remote nodes appear in the Management View node list.
Adding and Deleting Remote Nodes
Before managing a remote node, you must add it to your Management View.
To add a remote node
1.
Start the ShadowProtect Console (see Section 4.3: Starting ShadowProtect
2.
If the Management View is not visible, select Management View from the View menu.
3.
In the Management View, click Add
4.
In the Server Details dialog box, specify the appropriate connection information for the remote
node.
21
).
.
For information about remote node properties, see Modifying Remote Node Properties
66
.
You can now connect to the remote node to manage ShadowProtect.
To delete a remote node
1.
In the Management View, select the remote node in the node list.
2.
Click Delete
.
Deleting a remote node does not delete ShadowProtect or any of its configurations from the
remote node, or remove the remote node from the Management View of any other system that
might be configured to remotely manage that node.
Note: You cannot delete the local node from the Management View.
Modifying Remote Node Properties
The properties table displays the properties of the currently selected remote node. You can edit
remote node properties as long as the remote node is not connected.
To modify the properties of a remote node
1.
Start the ShadowProtect Console (see Section 4.3: Starting ShadowProtect
2.
If the Management View is not visible, select Management View from the View menu.
3.
In the node list, select a remote node to modify.
If the Server Properties pane is not visible, click Properties
4.
21
).
.
In the Server properties pane, modify the remote node properties as needed.
Select a field to make it active. You can also use the Tab key to move from field to field.
Remote Node properties include the following:
Server Name
© 2010 StorageCraft Technology Corporation
A remote node name used to identify it in the node list.
64
ShadowProtect User Guide
Server Address
The IP address or machine name of the remote node. To browse the network
for a particular system so you can find the IP address, click Browse
.
Group
The group that you want to associate with the remote node. You can create
groups help organize remote nodes and make management easier.
Server Description A description of the remote node. This is for your information only.
Status
(Informational) The remote node status (Connected or Disconnected).
Domain Name
The domain name used to access the remote node.
User Name
A user name with Administrator rights to the remote node.
Password
The user name's associated password.
Agent Version
(Informational) The version of the Backup Agent installed on the remote node.
Last Connected
(Informational) The date and time you last connected to the remote node.
Connecting and Disconnecting Remote Nodes
To connect to a remote node
1.
Start the ShadowProtect Console (see Section 4.3: Starting ShadowProtect
21
).
If the Management View is not visible, select Management View from the View menu.
2.
In the Management View, select the remote node in the node list.
3.
Click Connect
.
You can be connected to only one node at a time. If you connect to another remote node,
ShadowProtect automatically disconnects you from the previously connected node.
Note: You must add a remote node in order to connect to it (see Adding and Deleting
Remote Nodes 65 ).
To disconnect a remote node
1.
In the Management View, select the remote node in the node list.
2.
Click Disconnect
.
Disconnecting a remote node does not stop the ShadowProtect Backup Agent or affect any of
ShadowProtect operations on the remote node.
© 2010 StorageCraft Technology Corporation
Remote Management
65
10.2 Remote Management with the Network View
When open, the Network View appears as a right panel in the ShadowProtect Console. You can open
and close the Network View by selecting Network View in the View menu (see Section 5.4: Network
View 37 ).
You can do the following from the Network View:
Adding and Deleting Remote Nodes
Modifying Remote Node Properties
65
66
Connecting and Disconnecting Remote Nodes
Exporting and Importing Node Settings
66
67
Adding and Deleting Remote Nodes
Before managing a remote node, you must add it to your Network View.
To add a remote node
1.
Start the ShadowProtect Console (see Section 4.3: Starting ShadowProtect
21
).
If the Network View is not visible, select Network View from the View menu.
2.
In the Network View, click Add
.
This creates a new node in the Network View named New Node 1 and opens a Server
Properties pane where you can configure the remote node.
3.
In the Server Properties pane, specify the appropriate connection information for the remote
node.
For information about remote node properties, see Modifying Remote Node Properties
66
.
You can now connect to the remote node and manage ShadowProtect.
To delete a remote node
1.
In the Network View, select the remote node in the node list.
2.
Click Delete
.
Deleting a remote node does not delete ShadowProtect or any of its configurations from the
remote node, or remove the remote node from the Network View of any other system that
might be configured to remotely manage that node.
Note: You cannot delete the local node from the Network View.
© 2010 StorageCraft Technology Corporation
66
ShadowProtect User Guide
Modifying Remote Node Properties
The properties table displays the properties of the currently selected remote node. You can edit
remote node properties as long as the remote node is not connected.
To modify the properties of a remote node
1.
Start the ShadowProtect Console (see Section 4.3: Starting ShadowProtect
21
).
If the Network View is not visible, select Network View from the View menu.
2.
In the node list, select a remote node to modify.
If the Server Properties pane is not visible, click Properties
3.
.
In the Server properties pane, modify the remote node properties as needed.
Select a field to make it active. You can also use the Tab key to move from field to field.
Remote Node properties include the following:
Server Name
A remote node name used to identify it in the node list.
Server Address
The IP address or machine name of the remote node. To browse the network
for a particular system so you can find the IP address, click Browse
.
Group
The group that you want to associate with the remote node. You can create
groups help organize remote nodes and make management easier.
Server Description A description of the remote node. This is for your information only.
Status
(Informational) The remote node status (Connected or Disconnected).
Domain Name
The domain name used to access the remote node.
User Name
A user name with Administrator rights to the remote node.
Password
The user name's associated password.
Agent Version
(Informational) The version of the Backup Agent installed on the remote node.
Last Connected
(Informational) The date and time you last connected to the remote node.
Connecting and Disconnecting Remote Nodes
To connect to a remote node
1.
Start the ShadowProtect Console (see Section 4.3: Starting ShadowProtect
21
).
If the Network View is not visible, select Network View from the View menu.
2.
In the Network View, select the remote node in the node list.
3.
Click Connect
.
You can only be connected to a single node at a time, so if you connect to another remote
node, ShadowProtect automatically disconnects you from the previously connected remote
node.
© 2010 StorageCraft Technology Corporation
Remote Management
67
Note: You must add a remote node in order to connect to it (see Adding and Deleting Remote
Nodes 65 ).
To disconnect a remote node
1.
In the Network View, select the remote node in the node list.
2.
Click Disconnect
.
Disconnecting a remote node does not stop the ShadowProtect Backup Agent or affect any of
ShadowProtect operations on the remote node.
Exporting and Importing Node Settings
ShadowProtect lets you transfer remote node configurations from one ShadowProtect Console to
another.
To export remote node configurations
1.
Start the ShadowProtect Console (see Section 4.3: Starting ShadowProtect
21
).
If the Network View is not visible, select Network View from the View menu.
2.
In the Network View, click Export nodes
.
3.
Specify the name for the XML file that contains the exported remote node configurations, then
click Save.
To import remote node configurations
1.
In the Network View, click Import nodes
.
2.
Browse to the XML file that contains the previously exported remote node configurations, then
click Open.
10.3 Creating an Install Setup Package
The ShadowProtect Install Setup Package contains the recorded selections and settings associated
with a ShadowProtect installation. You can use the install setup package to automate a
ShadowProtect install in a in remote installation scenario.
Note: An Install Setup package file must have the same name as the Installer package with a .
iss extension.
To create a ShadowProtect Install Package
1. Open a Windows command prompt.
Click Start > Run. Enter cmd in the Open field, then click OK.
2. Browse (using the cd command) to the directory that contains the ShadowProtect installer that
you want to install remotely.
3. Execute the ShadowProtect installer, using the following command-line parameters:
© 2010 StorageCraft Technology Corporation
68
ShadowProtect User Guide
/r
Instructs the ShadowProtect installer to record the session.
/f1
Specifies where to create the write the install package. Do not put a space between
the parameter and the path information.
For example: ENU_Desktop_Setup_4.0.1.exe /r /f1c:
\storagecraft\ENU_Desktop_Setup_4.0.1.iss.
© 2010 StorageCraft Technology Corporation
Using VirtualBoot
69
Chapter 11: Using VirtualBoot
VirtualBoot lets ShadowProtect users boot a backup image in a Virtual Machine (VM) environment.
VirtualBoot leverages the open source Oracle VirtualBox software so you can quickly boot a backup
image without performing a time-consuming restore operation, and without converting backup image
files to a different format.
VirtualBoot provides tremendous value in the following situations:
System Fail-over: When you're dealing with Terabytes of storage, restoring a failed system can take
days. However, VirtualBoot lets you quickly recreate your failed system in a VM while you rebuild the
failed system. Users have full access to the system during this time, with only a brief downtime to cutover to the new system once it is ready. Downtime drops from days to just minutes.
Backup Test: Disaster recovery is all about having system data stored in a way that is readily
accessible should it be needed. But can you be confident that your stored data is valid? VirtualBoot
lets you mount any backup image in a VM so you can test it to make sure a restored system would
function properly. In just minutes you can feel confident that your backup images are ready for use
when needed.
Application-specific Data: While backing up system data is a critical operation, sometimes the data
files alone aren't useful without their associated applications. VirtualBoot lets you mount an entire
system, both applications and data, in a VM where you have access to data from its associated
application.
For information about VirtualBoot usage scenarios, see Section 3.3: VirtualBoot Scenarios
11
.
This section includes the following topics:
VirtualBoot Requirements
Limitations
69
70
Creating a VM
71
Configuring a VM
75
Note: DeveloperNotes_VirtualBoot.txt contains developer-level information related to
VirtualBoot. You can find this file in the <install_folder>
\StorageCraft\ShadowProtect\ folder.
Warning: If you power off a VM created with VirtualBoot, do not select Restore current
snapshot VirtualBoot as a shutdown option, or you will lose all Incremental backup
data written in the VM since its creation. Select this option only if you want to revert
the VM back to its original state.
11.1 VirtualBoot Requirements
VirtualBoot requires you to install the following software before using it:
Software Requirements
ShadowProtect 4.x or later: VirtualBoot supports backup image files created by any version of
ShadowProtect, but you must have ShadowProtect 4.x or later to run the application.
ShadowProtect 4.x includes VirtualBoot as a core component of the console installation.
© 2010 StorageCraft Technology Corporation
70
ShadowProtect User Guide
Note: Although VirtualBoot can generate a VM from backup image files created with any
version of ShadowProtect, StorageCraft recommends using VirtualBoot with backup
image files created by ShadowProtect 3.3 and later to get full access to the benefits
of VirtualBoot.
VirtualBox 3.1.x: VirtualBox is an open source VM environment. VirtualBoot provides native
support for ShadowProtect files in a VirtualBox VM. For information about VirtualBox, and to
download the software, visit www.virtualbox.org. VirtualBox is free for personal, education, and
evaluation use.
Hardware Requirements
VirtualBoot hardware requirements are driven primarily by the hardware requirements necessary to run
VirtualBox (see VirtualBox End-User Documentation).
Processor: Reasonably powerful x86 processor (either Intel or AMD), including AMD/Intel x64
processors. VirtualBoot does not support Itanium (IA64).
Note: When using VirtualBoot to boot an image of an x64 operating system, make sure
that your host hardware supports AMD-V or VT-x, and that AMD-V, or VT-x, is
enabled in the host machine's hardware BIOS settings.
Memory: At least 1GB.
Hard Drive: At least 10 GB. This is dependent upon the Operating System you want to load in the
VM.
Guest OS: VirtualBoot supports backup image files that contain backups of the following operating
systems (This is the OS that runs in the VM):
Windows 2000
Windows XP (32- and 64-bit)
Windows 2003 (32- and 64-bit)
Windows Vista (32- and 64-bit)
Windows 2008 (32- and 64-bit)
Windows 2008 R2 (32- and 64-bit)
Windows 7 (32- and 64-bit)
Host OS: VirtualBoot supports the same Host operating systems as VirtualBox 1.6; namely
Windows XP or later. Windows 2000 is not supported.
11.2 Limitations
This release of VirtualBoot has the following limitations:
Supports boot volumes up to 2TB. However, VirtualBoot supports data volumes (non-bootable) of
any size.
Does not support LBD hard disk volumes, which report 4096-byte sector size to the OS. However,
Advanced Format hard disks, which have 4096-byte sectors but report 512-byte sectors to the
© 2010 StorageCraft Technology Corporation
Using VirtualBoot
71
OS, are supported.
If the host crashes while running a VirtualBoot VM, you must create a new VM using the latest
Incremental backup image file created in the VM. For more information, see theHardware Failure
scenario 11 .
VirtualBoot does not work in a Windows 2000 Terminal Services session.
11.3 Creating a VM
Important: Before using VirtualBoot to create a VM, review the VirtualBoot Requirements
Limitations 70 .
69
and
To create a virtual machine
1.
Start VirtualBoot, then click Next on the VirtualBoot Wizard welcome page.
There are three ways to start VirtualBoot:
Executable: In Windows, select Start > ShadowProtect > VirtualBoot.
Command Line: From a Windows command prompt, type VirtualBoot <backup image
file>, where <backup image file> is the name, including full path, of the ShadowProtect
backup image file that you want to use to create a VM. For example:
VirtualBoot e:\backups\C_VOL-b005.spi
Right-Click Menu: In Windows Explorer, right-click the ShadowProtect backup image file that
you want to use to create a VM, then select VirtualBoot.
2.
In the Backup Image List page, provide the required information, then click Next.
If you start VirtualBoot using the command line or right-click menu option, VirtualBoot populates
the Backup Image list with all files that are part of the backup chain for the specified backup
image file.
Add Image File
Lets you add a backup image file to the VM. If the selected backup image
file is encrypted, you must provide a valid password to access it.
Remove Image File
Lets you remove a backup image file from the VM.
Specify Boot Volume Lets you designate the boot volume in the VM. Typically, VirtualBoot
detects this automatically, but if you include multiple bootable volumes in
the VM, you can select the volume that VirtualBoot designates as the
boot volume.
Note: If you specified a backup image file when starting VirtualBoot, this page lists the
related backup image file information.
3.
In the Options page, provide the required information, then click Next.
Specify the operating system
for the new virtual machine
From the dropdown menu, select the Windows OS contained in
the boot volume of the backup image file.
Automatically create the new
virtual machine
Select this option to have VirtualBoot automatically create the
VM as part of the configuration process. If you do not select this
© 2010 StorageCraft Technology Corporation
72
ShadowProtect User Guide
option, you must manually configure the VM in VirtualBox.
In either case, VirtualBoot creates the XSP files that VirtualBox
uses to define the virtual disk drives in the VM.
Note: VirtualBoot ALWAYS places the boot volume in the
Disk_0 XSP file.
For more information, see Manually Configuring a VM
73
.
Automatically start the new
virtual machine
Select this option to launch VirtualBox automatically after the
VM is complete and load it for use.
Specify the name of the new
virtual machine
Specify a name for the VM. By default, VirtualBoot creates a
name based on the machine name.
Specify the amount of memory Specify the amount of memory, in MB, that VirtualBox should
to allocate to the new virtual allocate for use by the VM when it loads.
machine
Specify the VM network
adapter type
Select whether to include a network adapter in the VM.
Supported options include:
NAT PRO/1000 MT Desktop: Adds a generic network
adapter to the VM that uses Network Address Translation
(NAT).
No Network Adapter: Excludes a network adapter from the
VM.
4.
(Optional) On the Options page, click Advanced to open the Advanced Options dialog box.
The Advanced Options dialog box provides the following options:
Import only one volume per
hard disk drive within the
virtual machine
Instructs VirtualBoot to include only one volume per VirtualBox
XSP file. By default, VirtualBoot assigns four volumes per XSP
file.
Note: VirtualBoot ALWAYS places the boot volume in the
Disk_0 XSP file.
Deactivate Windows within the Deactivates Windows on the VM's system volume. Because
virtual machine
Microsoft licensing limits the number of reactivations, this
options lets you use the activation grace period to accomplish
your purposes with the VM.
Note: If the host hardware where you start the VM is
sufficiently different, Windows might deactivate
automatically.
Store write buffers in a
different directory than the
image files
Lets you specify a location to store the write buffers used when
creating the VM. By default, VirtualBoot stores write buffers in
the same location as the backup image files used to create the
VM.
Override personality used to
For use only by StorageCraft technical support.
© 2010 StorageCraft Technology Corporation
Using VirtualBoot
73
configure the virtual machine
OS volume
5.
On the Wizard Summary page, click Finish.
VirtualBoot generates the files necessary to support the new VM and, if specified in the VM
configuration, creates the VM and launches it for use.
Note: For information about manually creating a VM in VirtualBox, see Creating a VM
Manually 73 .
6.
(Conditional) If you do not start the VM as part of the VirtualBoot creation process, you must start
the VM manually from VirtualBox.
a. Launch VirtualBox.
b. In the left-side VM list, select the VM, then click Start..
7.
Continue with Configuring a VM
75
.
Creating a VM Manually
If you elected not to have VirtualBoot create the VM for you (see Step 4 in Creating a VM
manually create the VM in VirtualBox.
71
), you can
Note: The following task is based on VirtualBox v 3.1.4. Task details might vary slightly with
different versions of VirtualBox.
The VirtualBox UI
© 2010 StorageCraft Technology Corporation
74
ShadowProtect User Guide
To manually create a virtual machine
1.
Launch VirtualBox, then click New.
2.
In VirtualBox, select File > Virtual Media Manager., then select the Hard Disks tab.
3.
Click Add, then browse to and select any XSP files previously created by VirtualBoot.
VirtualBoot virtual hard disk files have a .xsp extension. This adds the selected XSP files as
managed hard disks that you can assign to any VirtualBox VM. The XSP files contain lists of
the backup image files that constitute the virtual hard drive used by the VM.
Note: Make sure you select the _Disk_0 XSP file as the VM's first disk, as this disk
always contains the boot volume.
4.
On the Create New Virtual Machine Wizard page, click Next.
5.
On the VM Name and OS Type page, specify the required information, then click Next.
6.
Name
The name of the virtual machine. You should make the name descriptive of
the OS and environment used in the VM.
Operating System
The model of operating system used in the VM. VirtualBoot supports only
Microsoft Windows.
Version
The specific Windows operating system used in the VM.
On the Memory page, specify the amount of system memory (RAM) to allocate for use by the
VM.
More memory makes the VM faster and more efficient. StorageCraft recommends at least
512MB.
7.
On the Virtual Hard Disk page, select Use existing hard disk, then select the bootable virtual
disk created by VirtualBoot.
8.
On the Summary page, click Finish.
VirtualBox creates the VM.
9.
Once created, you can start the VM manually from VirtualBox.
a. Select the VM In the left-side list.
b. Click Start..
10. Continue with Configuring a VM
75
.
© 2010 StorageCraft Technology Corporation
Using VirtualBoot
75
A new VirtualBox VM
11.4 Configuring a VM
Once you have started a VM, you must configure it for use, much like you might configure a new
Windows installation. This process involves the following tasks:
Configuring Drivers
76
Installing Guest Additions
77
Configuring a Network Driver
75
Continuing Continuous Incrementals
77
Note: When working with a VM, you must be able to switch keyboard/mouse focus between the
VM and your system environment. To switch focus to the VM, simply click the mouse in
the VM window. To switch focus out of the VM, press the right Ctrl button.
Configuring a Network Adapter
If you choose not have VirtualBoot create a network adapter (NIC) in the VM, you can add it after the
fact. For the following reasons, this might be a good idea if you want to boot a backup image while the
source system is still operational, which can cause the following issues:
Two systems on the network with the same network ID can cause routing problems, particularly at
the Domain controllers.
Both the VM and the source system might save Incremental backup images to the same network
location. This does not affect data integrity, but can lead to confusing backup image file names,
© 2010 StorageCraft Technology Corporation
76
ShadowProtect User Guide
with Incremental backup image files from both branches of the chain intermixed.
Keeping the VM off the network lets you resolve these types of issues before they cause any
problems. For example, once the VM loads you can pause ShadowProtect backup operations in the
VM.
To add network support to the VM
1.
Launch VirtualBox.
2.
On the VirtualBox main page, select the VM where you want to add a NIC, then click Settings.
The VM must be powered off to modify the VM settings.
3.
On the Settings page, select Network in the left-side navigation.
4.
Select the Adapter 1 tab, then select Enable Network Adapter.
5.
In the Attached To field, select how you want the virtual NIC to communicate with your host.
By default, VirtualBox uses Network Address Translation (NAT), but it supports other
connection options. For more information, see the VirtualBox documentation. A Bridged Adapter
is necessary if you want VM services to be visible to other network hosts. For example, during a
failover scenario for an Microsoft Exchange server.
6.
Click Advanced, then select the virtual adapter type to use in the VM.
In testing, the "Intel Pro/1000 MT Desktop" appears to be a good generic driver for the
VirtualBoot environment.
7.
Click OK to modify the network adapter settings.
Configuring Drivers
After starting a VM for the first time, you must allow Windows to detect and configure drivers for the
VM environment.
To configure a virtual machine for use
1.
In the VM window, click Machine > Insert Ctrl-Alt-Delete to launch the Windows login, then log
in to the VM.
Click in the VM window to transfer mouse and keyboard control to the VM.
2.
Allow Windows to identify hardware and install drivers in the VM.
Windows goes through it's initial boot sequence, identifying hardware and attempting to load
drivers for those devices. This process is similar to performing a Hardware Independent Restore
(HIR) in ShadowProtect. Follow the on-screen prompts and allow Windows to reboot as needed
to load the necessary drivers.
3.
After rebooting, log in to the VM.
Note: Because of hardware changes detected by Windows as part of the transition to the VM
environment, you will likely be prompted to reactivate Windows when you log in to the VM.
However, you typically have a three-day grace period for doing this. Because Microsoft
restricts the number of hardware reactivations for each Windows license, you might want
to leave Windows deactivated if you can get the production system ready to restore within
© 2010 StorageCraft Technology Corporation
Using VirtualBoot
77
the three day grace period. If this is not possible, activate Windows in the VM using the
standard Microsoft activation process, and your Windows VM is licensed for as long as
you need it.
If your Windows installation does not grant a login grace period and requires immediate
reactivation, try booting into Safe Mode, or Safe Mode with Networking, to log in.
Installing Guest Additions
After Windows has installed drivers for the VM environment, you can install VirtualBox additions that
provide enhanced interaction with, and control over, the VM environment.
To install VirtualBox guest additions
1. From the VM menu bar, select Devices > Install Guest Additions.
This loads a virtual CD into the VM that has extra software designed to make the VM run
quickly and smoothly. If the CD does not auto-run, browse the CD drive in the VM and execute
one of the following:
VBoxWindowsAdditions-x86.exe: 32-bit Windows VM.
VBoxWindowsAdditions-amd64.exe: 64-bit Windows VM.
2. Follow the directions in the Guest Additions Wizard, then reboot the VM.
3. Log in to the VM.
Continuing Incremental Backups
To use VirtualBoot in a hardware failure scenario, you must configure Incremental backups to continue
in the VM. For more information, see the Hardware Failure scenario 11 .
Note: To prevent performance problems in the VM, use backup jobs that use Incremental
backups (preferably Continuous Incrementals 40 ). Do not use Differential imaging.
Warning: If you power off a VM created with VirtualBoot, do not select Restore current
snapshot VirtualBoot as a shutdown option, or you will lose all Incremental backup
data written in the VM since its creation. Select this option only if you want to revert
the VM back to its original state.
To continue incremental backups in the VM
1.
Launch VirtualBox, then start the appropriate VM.
2.
Once the VM loads, log in, then start ShadowProtect.
3.
In ShadowProtect, select the Destinations tab.
4.
In the Destinations tab, select the destination object used to store the VM's source backup image
files, then click Edit.
Warning: Do not delete the destination object or you will break the backup image chain.
Rather, modify the destination object as needed to point to the current location of
© 2010 StorageCraft Technology Corporation
78
ShadowProtect User Guide
the backup image files used to create the VM.
5.
In the Destination dialog box, modify the Destination Path to point to the location of the backup
image files used to create the VM, then click OK.
You might need to modify the network credentials (Domain, User, Password) in the destination
object to access the backup image files in their new location. If you have problems with name
resolution in the VM environment, try using the IP address of the host machine rather than its
Host name.
When editing the Destination Object path, use only real SMB/CIFS network share paths. Do not
use share paths provided in the VM-to-Host file sharing facility of the VirtualBox “Guest
Additions”.
6.
In the ShadowProtect main page, select the Backups tab.
7.
Select the appropriate backup job, then click Execute.
ShadowProtect starts an incremental backup job. The naming of incremental backup files in the
VM starts where the last Incremental image file used to create the VirtualBoot VM left off. The new
incremental image file depends on the Incremental image file chain used to create the VM. This
maintains a single backup image chain and makes it possible to provide Head Start Restore
(HSR) capabilities.
Warning: When continuing Incremental backups in the VM and using VirtualBox's Virtual Media
Manager to Remove managed XSP files, make sure to specify that you want to keep
the storage unit of the XSP disks for the VM where you continued creating Incremental
backups. Otherwise, VirtualBox deletes the XSP file and all other associated files,
including the Incremental backup image file created by VirtualBoot (You can identify
this file because the file name includes a GUID value). Any Incremental backups
created in the VM are dependent upon the VirtualBoot Incremental backup image file.
By deleting it, VirtualBox renders all Incrementals created in the VM unusable.
© 2010 StorageCraft Technology Corporation
Other Operations
79
Chapter 12: Other Operations
ShadowProtect provides the following features to help you manage and maintain your backup
environment:
Verifying Backup Image Files
Email Notification
Log Files
79
81
82
12.1 Verifying Backup Image Files
It is important to verify the quality and integrity of backup images on a routine basis to ensure that a
backup image is ready should you need it.
One way to do this is to mount a backup image and browse the files and folders. If you can do this
successfully, you know the backup image is healthy. However, you can also use the Verify Image tool
to test the integrity of a specific backup image.
To test a backup image with the Verify Image tool
1.
Start the ShadowProtect Console (see Section 4.3: Starting ShadowProtect
2.
Open the Verify Image Wizard by doing one of the following:
21
).
In the Tools menu, click Verify Image.
In the Menu bar, select Tasks > Verify Image.
3.
On the Source Image File page, select the Image Set to verify, then click Next.
In the drop-down menu, select the Destination (see Section 6.2: Destinations 42 ) that
contains the backup Image Set to restore, or click Browse to locate the desired backup
Image Set. The Specify Image Names field displays the Image Sets available at the selected
Destination or path.
© 2010 StorageCraft Technology Corporation
80
ShadowProtect User Guide
Select an im age set to verify
Note: To verify a backup Image Set stored on a network share, you must have the proper
network credentials.
4.
On the Backup Image Dependencies page, select the point-in-time to verify, then click Next.
Select a specific point-in-tim e to verify
This page displays all Incremental backup image files associated with the selected Image
Set. Select a specific backup image file to view the following image file properties:
Image File Properties: Volume size, creation time, compression, password protection,
comment.
© 2010 StorageCraft Technology Corporation
Other Operations
81
Original Partition Information: Style, number, type, bootable option, starting offset and
length.
Disk Information: Disk geometry, disk size and number of the first track sectors. You can
also view the disk layout graphically at the bottom of the screen. This represents what the
disk looked like at the time of backup.
Originating machine: Operating system version, the machine name, MAC address and
the ShadowProtect engine version used to create the image file.
5.
On the Specify the Verify Options page, select what you want to verify, then click Next.
Verify only selected image: The Verify Image tool checks only the selected backup image
file.
Verify selected image and all dependent files: Verifies the selected backup image file
and all files that it depends on. This verifies the integrity of the full point-in-time backup. If you
select this option, specify the order to verify the files (Newest to Oldest or Oldest to
Newest).
6.
On the Wizard Summary page, review the details of the verify operation, then click Finish.
You can view the progress of verify operation in the Backup Jobs tab.
12.2 Configuring Email Notifications
ShadowProtect can be configured to send Email notifications on the success or failure of a backup
job. The Email notification includes the following information:
Email Subject: Indicates that this notification is for a successful or unsuccessful back up job.
Email Body: Contains the following information about the backup job.
Start time
Finish time
Source volume
Destination path
To configure email notifications
1.
Start the ShadowProtect Console (see Section 4.3: Starting ShadowProtect
2.
In the Menu bar, select Options > Agent Options.
3.
On the Agent Options page, provide the details of the Email configuration, then click OK.
21
).
SMTP Server Name or The host name or IP address of the outgoing SMTP server to use when
IP Address
sending Email notifications (for example [email protected]).
SMTP Port
(default: 25) The port used by the SMTP service.
SMTP Login User
Name
The username ShadowProtect uses to access the SMTP server.
SMTP Login Password The password associated with the SMTP user name.
SMTP Authentication
Method
The authentication method used by the SMTP server. Select the
appropriate authentication method from the drop-down list.
Use SSL
(Default: Off) Indicates if you want to use a secure connection to
communicate with the SMTP server.
© 2010 StorageCraft Technology Corporation
82
ShadowProtect User Guide
Email From Address
The Email address that appears in Email message's From field.
Email To Addresses
A semi-colon separated list of Email addresses that you want to receive
the notification. For example, [email protected];[email protected].
Character Encoding
The character-encoding to use with the Email subject and body. Select the
appropriate value from the drop-down list.
Custom Subject Suffix (Optional) A text string that appears the Email Subject field. Use /r for
carriage return, /n for new line, and /t for tab characters.
4.
Custom Body Prefix
(Optional) A text string that appears in the Email Message field. Use /r for
carriage return, /n for new line, and /t for tab characters.
Send Email on
Success
(Default: Off) Set to On to send Emails upon the successful completion of
a ShadowProtect job.
Send Email on Failure
(Default: Off) Set to On to send Emails upon the failure of a
ShadowProtect job.
(Optional) Click Test Email to send a test message and confirm that the Email configuration is
working properly.
12.3 Log Files
ShadowProtect creates a log file for each backup job. This log file provides information about the
backup job results, including the reason for failure, if any. You can view the log for any backup job in
the Backup History tab (see Section 5.3.5: Backup History Tab 35 ).
Each log entry provides information about the related backup job: Start Time, End Time, Type (Full or
Incremental), Source, Destination and Status. Backup jobs that finished successfully have a status of
“Completed.” ShadowProtect marks jobs that do not complete successfully with a Warning icon
.
These jobs have a status other than “Completed,” such as “Execution Failed” or “Aborted.” It is
important to review these entries and determine why the job failed.
The Job Log provides information about the events that occurred during that job: Timing (when the
event occurred), Module, Code, and Message. Backup jobs that finished successfully have a status of
“Completed.” ShadowProtect marks events that do not complete successfully with Failed icon
.
12.4 Creating Key Files
Key Files provide an alternative mechanism for protecting backup images. Key Files let you delegate
the creation and storage of backup image files without losing control of the passwords used to protect
your backup image files.
ShadowProtect includes the KeyFileMaker tool for generating Key Files. KeyFileMaker is provided on
the ShadowProtect CD, but is not installed by default.
Note: When using a Continuous Incrementals schedule (see Step 5 in Chapter 6: Creating
Backup Image Files 39 ), ShadowProtect automatically creates a new Key File each time
it generates a new Full image. ImageManager uses the Key File when collapsing
Incremental images. For more information about ImageManager, see the ShadowProtect
ImageManager User Guide.
© 2010 StorageCraft Technology Corporation
Other Operations
83
To install KeyFileMaker
1.
Insert the ShadowProtect CD into the system's CD drive.
2.
Browse to the \Installers folder, then execute KEYFILEMAKERSETUP.exe.
3.
Follow the steps in the Installation Wizard to install the KeyFileMaker software.
Once installed, you can access KeyFileMaker in Windows by selecting Start > Programs >
ShadowProtect > ShadowProtect KeyFileMaker.
Shadow Protect KeyFileMaker
To create a key file
1.
Launch KeyFileMaker (Start > Programs > ShadowProtect > ShadowProtect
KeyFileMaker).
2.
In the KeyFileMaker dialog box, provide the following information, then click Create Key File.
Key files have a .spk file extension.
Set Password /
Specify the password to store in the Key File.
Confirm Password
Save Key File As
Specify the name and location for the Key File. You must save the Key File in
the same folder as the backup image files that rely on it.
Key File
Association
Specify the backup Image Set that you want to associate with the Key File.
Generic Key File: The key file is not associated with any Image Set. You can
use a generic key file if all backup image files in a given folder are part of the
same Image Set.
Key File associated with a GUID: The File Set GUID (Globally Unique ID) of
the Image Set that you want to associate with this Key File.
Key File associated with a backup image file: The full file name, including
path, to a backup image file from the Image Set that you want to associate
with this Key File.
© 2010 StorageCraft Technology Corporation
84
ShadowProtect User Guide
All backup image files in an Image Set share the same File Set GUID. You can
view a backup image file's File Set GUID in the Image File Mount Wizard:
a. In Windows Explorer, double-click the backup image file.
b. On the Image File Name page, open the File Dependency Properties
property group.
12.5 Changing Partition Creation Policy
The Partition Creation Policy Editor lets you modify basic disk geometry settings used to create a new
partition. You can access the Partition Creation Policy Editor from the Disk Map tab (see Section
5.3.2: Disk Map Tab 31 ) action menu (right-click menu).
The Partition Creation Policy dialog box
To modify partition creation settings
1.
Start the ShadowProtect Console (see Section 4.3: Starting ShadowProtect
2.
On the Center panel, select the Disk Map tab.
3.
Right-click the desired partition, then select Edit Policy.
4.
In the Partition Creation Policy Editor, modify the partition creation settings as desired, then
click Set Active.
21
).
To modify a particular setting, click in the appropriate field, then type the desired value, or
select it from the drop-down list (if available).
Layout Type
Specifies a name for the partition creation policy.
© 2010 StorageCraft Technology Corporation
Other Operations
85
Partition Start
Alignment
(Default: Track) Identifies the partition starting point, which typically
occurs at a specific disk boundary. Supported options include:
Cylinder, Track, and Sector.
Partition End
Alignment
(Default: Sector) Identifies the partition end point. Supported options
include: Cylinder, Track, and Sector.
Offset from Disk Start Specifies an offset from the start of the disk where you want the
partition to begin. This should be a Whole number.
Disk Start Offset
Units
(Default: Sector) Specifies the units to use with the specified offset.
Supported options include: Cylinder, Track, Sector, Byte.
12.6 Creating a Recovery CD
StorageCraft provides an ISO image file that you can use to create a bootable Recovery Environment
disk. For more information about using the StorageCraft Recovery Environment, see the StorageCraft
Recovery Environment User Guide.
To create a Recovery Environment disk
1.
If necessary, download the Recovery Environment ISO image file.
a. Open a Web browser to the StorageCraft ISO Download Web page.
b. In the Serial Number field, specify the product serial number you received when you
purchased ShadowProtect, then click Submit.
c. Save the Recovery Environment ISO image (ShadowProtect_RE_4.0.0.iso) to a local
drive.
2.
Insert a blank CD/DVD/Blu-Ray in your system's optical drive.
3.
From Windows, select Start > ShadowProtect > ISO Tool.
4.
Browse to and select the ShadowProtect ISO file, then click Burn the Disk.
Select Overwrite any existing data... if you want to replace existing data on the disk.
5.
When ISO Tool finishes transferring the ISO image, click Close.
The ISO transfer can take several minutes to complete.
© 2010 StorageCraft Technology Corporation
86
ShadowProtect User Guide
Chapter 13: Best Practices
Turn off disk defrag software if using incremental backups. When you take an incremental
backup, you are writing a file of only the sectors which have changed since the last full or
incremental backup image was taken. If you run disk defrag software, you will be changing the
sectors on the disk and cause the time and size of the incremental backup image to greatly
increase. If you want to run disk defrag software, it is recommended that you do it before you run
a Full backup image and then do not run or schedule the disk defrag software to run while
ShadowProtect is scheduled to take Incremental backup images.
Test the StorageCraft Recovery Environment. Make sure the ShadowProtect CD lets you boot
your system and gain access to both any local drives and network devices that you might need.
Monitor disk space usage where images are stored. Make sure your backup image file storage
location has sufficient disk space for new backup image files, or backup jobs will fail.
Monitor the ShadowProtect log files. Routinely examine the ShadowProtect log files. The log files
will provide status of backup jobs, letting you know the backup jobs were completed successfully
or if the backup jobs failed. If the backup job failed, the log files will provide details of the failure
allowing you to take action to correct the situation.
Use password encryption to protect backup image files. Since ShadowProtect backup images
include all the contents of the disk drive, use password encryption to help protect data security.
Include multiple volumes in your backup job. If you have databases or applications that span
volumes, include all relevant volumes in the backup image. ShadowProtect snapshots can operate
simultaneously on multiple volumes, thereby ensuring cross-volume consistency.
Periodically save backup image files on a removable hard drive. CD, DVD, and Blue-Ray
storage lets you easily store backup image files at an off-site location. This helps ensure available
backup images in the case of a disaster.
Use the Image Conversion Tool to manage backup images. You can consolidate backup
images, split backup images for CD or DVD storage, and apply new password encryption to
existing backup image files in the event passwords are compromised (see Chapter 9: Image
Conversion Tool 58 ).
Use Email notification. Automatic Emails keep you informed of the operation of your ShadowProtect
backup jobs so you can quickly identify and resolve problems that might arise (see Configuring
Email Notifications 81 ).
Use a retention policy that maximizes point-in-time histories. Review the options available in the
ShadowProtect for retaining point-in-time histories, including using Differential images for second
and subsequent Full images (see "Retention" in Section 6.3.5: Advanced Options 46 ).
© 2010 StorageCraft Technology Corporation
Retention Policy Configurations
87
Chapter 14: Retention Policy Configurations
ShadowProtect employs a unique method for maximizing point-in-time backup images while
minimizing storage consumption that results in the ability to store more point-in-time histories in
substantially less storage space. The following two tables present four common retention policies for a
scheduled backup job, and the resulting performance of each. For more information about creating
scheduled backup jobs and retention policies, see Chapter 6: Creating Backup Image Files 39 .
Com parison of various retention policies
© 2010 StorageCraft Technology Corporation
88
ShadowProtect User Guide
Chapter 15: Product Support
Technical support for StorageCraft products is available beginning with the release of the product and
ending six months after the release of the next major version of the product or after StorageCraft
discontinues the product line.
Complimentary Technical Support
StorageCraft complimentary technical support consists of self-help support tools that are available
at http://forum.storagecraft.com/Community/ (in English only), and an easy-to-use, powerful
knowledge base that helps you find answers to the most frequently asked product questions, as well
as “how-to” procedures and technical information about all StorageCraft products.
E-Mail Support
Requests for e-mail support in North America are processed 8:00 am to 5:00 pm MST, Monday
through Friday. To obtain e-mail technical support for specific technical questions or issues, fill out
the form at http://forum.storagecraft.com/Community/. Please provide as much detail as possible to
help the technical support engineers understand and diagnose the issue.
In order to ensure efficient service, please provide at a minimum the following information:
Product name and version number
Detailed problem description, error code, log file description, etc.
Hardware and software configuration, operating system version, service pack number, etc.
Telephone Support
StorageCraft support engineers are available Monday through Friday 9:00 A.M. to 5:30 P.M. (MST),
except for business holidays. To reach the StorageCraft technical support team, please call: (801)
545-4710. Telephone support is available to all customers with a current maintenance plan or
customers who have purchased product maintenance from the StorageCraft Web store. If you are
not immediately connected to a support engineer, leave a message and the next available support
engineer will return your call.
© 2010 StorageCraft Technology Corporation
Glossary
89
Chapter 16: Glossary
Backup: The activity of copying files, volumes, and databases to preserve them in case of equipment
failure or other catastrophe. An important part of a disaster recovery strategy, backup is often
neglected, particularly for personal computer users.
Backup Image File: Files that contain the contents of a backup activity, Backup Image Files let you
restore the contents of a computer system to a specific point-in-time.
Backup Image Set: The Base Image File, plus any Incremental Image Files, that comprise all
Backup Image Files for a specific computer system.
Bare Metal Recovery: The complete restoration of computer data after a catastrophic failure,
including the operating system, file system, partitions, volumes and data, from a complete backup
image.
Base Image File: Backup files that contain a copy of all used sectors on a disk drive. This image file
contains all data on the computer, including the operating system, applications, and data.
Basic Disk: A physical disk drive that can be accessed by MS-DOS* and all Windows* operating
systems. Basic disks can contain up to four primary partitions, or three primary partitions and an
extended partition with multiple logical drives.
Cold Backup: A backup taken from the Recovery Environment, rather than when the computer's
operating system is loaded.
Continuous Incrementals: A backup scheduling model for ShadowProtect that lets you create a
base backup file, then create additional incremental backup files that include only changes that
occurred since the last backup.
Compression: A technology that reduces the size of a file. Compression lets you save time,
bandwidth and storage space.
Differential Image File: Backup files containing the hard drive sectors that have changed since the
Base Image File was created. Differential image files take about the same time to create as Base
Image Files, but they are smaller. When restoring a drive (or files and folders), you must use the Base
Image File with the appropriate Differential Image File to restore the computer to a specific point-intime.
Disaster Recovery: The ability to recover from the complete loss of a computer, whether due to
natural disaster or malicious intent. Typical disaster recovery strategies include replication and
backup/restore.
Disk Device: A locally accessible disk drive, including locally attached USB or FireWire disk drives,
and network drives such as SAN, NAS, iSCSI, SCSI, USB or FireWire.
Driver: A program that interacts with a particular device or software. The driver provides a common
interface to the device, or software, that makes it accessible to other computer systems and the user.
Drive Letter: See Mount as Drive Letter.
Dynamic Disk: A physical disk that provides features that basic disks do not (see Basic Disk), such
as support for volumes spanning multiple disks. Dynamic disks use a hidden database to track
information about dynamic volumes on the disk and other dynamic disks in the computer.
Encryption: A procedure that renders the contents of a file unintelligible to anyone that cannot present
the appropriate decryption key.
ExactState™ Imaging: The ability to create a backup image at a point where the computer is in the
© 2010 StorageCraft Technology Corporation
90
ShadowProtect User Guide
best state for creating a backup (for example, no open files).
Full Image File – See Base Image File.
Hard Drive: An electromagnetic storage device, also referred to as a “disk drive,” “hard drive,” or “hard
disk drive” that stores and provides access to data on a computer.
Head Start Restore (HSR): The ability to begin the restoration of a large backup image chain while
ShadowProtect continues to add Incremental backup image files to the same image chain. This
reduces the time necessary to restore a large volume from days or weeks, to minutes or just a few
hours.
Hot Backup: A backup image taken when ShadowProtect is loaded on the computer's standard
operating system. A hot backup requires the use of a snapshot filter driver (see Snapshot).
Hot Restore: The restoration of a backup image while the computer or server remains up and running.
You cannot perform a hot restore of a system volume.
Image or Image File: See Back up Image File.
Image Set: The combination of a Full image and all additional Incremental images necessary to
restore a computer to a given point-in-time.
Incremental Image File: Backup files containing the sectors that have changed since the last
Incremental backup was taken. Incremental Images are fast to create and smaller than either Base
Image Files or Differential Image Files. When restoring a drive (or files and folders), you must use the
Base Image File and the appropriate Incremental Image Files necessary to restore the computer to a
specific point-in-time.
Lock Volume: A software request to gain exclusive access to a particular drive. Locking the volume
prevents other software programs from changing the file system or opening files during the process of
writing the image file.
Microsoft VolSnap: The proprietary Microsoft snapshot technology.
Microsoft Volume Shadow Copy Service (VSS): The backup infrastructure for Microsoft Windows
XP and Microsoft Windows Server 2003 operating systems, as well as a mechanism for creating
consistent point-in-time copies of data. The Volume Shadow Copy Service produces consistent
snapshots by coordinating with business applications, file-system services, backup applications, fastrecovery solutions, and storage hardware.
Mount as Drive Letter: The process of assigning volumes (active primary partitions and logical
partitions) to specific letter designators in the root namespace of a Microsoft operating system. Unlike
mount points (see Mount Point), drive letter assignment permits only letters in the namespace, and
they solely represent volumes. In other words, it is a process of naming the roots of the "forest" that
represents the file-system (with each volume being an independent tree therein).
Mount Point: A directory on a volume that an application can use to "mount" (set up for use) a
different volume. Mount points overcome the limitation of drive letters (see Mount as Drive Letter) and
allow for more logical organization of files and folders.
Mounted Volume: The ability to see and use a backup image that is physically located somewhere
else on the network. When mounted, the backup image appears as a volume and behaves as if it is a
part of the local computer system. Mounted volumes are read/write capable so users can update
existing image files, scan for viruses or other malware, and repair the image file.
Operating System: Software that, after being loaded into the computer by a boot program, manages
all other programs on a computer. Other programs are called applications or application programs.
© 2010 StorageCraft Technology Corporation
Glossary
91
Partition: The portion of a physical disk that functions as though it were a physically separate disk.
Once created, a partition must be formatted and assigned a drive letter before data can be stored on it.
On basic disks, partitions can contain basic volumes, which include primary partitions and logical
drives. On dynamic disks, partitions are known as dynamic volumes and come in the following types:
simple, striped, spanned, mirrored, and RAID–5 (striped with parity) volumes.
Restoring: The activity of retrieving computer data from a previously saved backup image file.
Snapshot: A type of backup that provides a point-in-time view of a volume. When you perform a
backup or scheduled backup, ShadowProtect uses either StorageCraft Volume Snapshot Manager
(VSM) or Microsoft Volume Shadow Copy Service (VSS) to take a snapshot of the volume. Any
changes that occur to the volume after the snapshot is taken are not included in the backup.
.spf: A file extension representing a ShadowProtect full or base image file.
.spi: A file extension representing a ShadowProtect incremental or differential image file.
.sp(number): A file extension representing a ShadowProtect image file that spans multiple files. The
number following .sp is the sequence of the file in the spanned image file group.
Point-In-Time Backup: A backup routine that lets you restore a file, folder, or the entire system to a
specific point-in-time. Point-in-time backups are often used to roll-back a computer to a point prior to a
computer problem.
Protected Volumes: Volumes that users have selected for backup by ShadowProtect.
RAID: Redundant Array of Independent Disks. A collection of disk drives that offers increased
performance and fault tolerance. There are a number of different RAID levels. The three most
commonly used are 0, 1, and 5:
Level 0: striping without parity (spreading out blocks of each file across multiple disks).
Level 1: disk mirroring or duplexing.
Level 5: block-level striping with distributed parity.
Real-Time: A level of computer responsiveness that a user perceives as essentially immediate, or
that enables the computer to keep up with some external process such as backing up.
Recovery Environment: See StorageCraft Recovery Environment.
Remote Computer (Node): A computer that is physically located somewhere else on a network but
is accessible from a local computer.
Service: A program, routine, or process that performs a specific system function to support other
programs, particularly at a low (close to the hardware) level.
Scheduled Job: A job created in the ShadowProtect interface. Scheduled jobs let ShadowProtect
backup events to occur automatically.
Spanned Image Set: A Backup Image File that has been divided into multiple smaller files for easier
management or storage. This lets you save the Backup Image File to removable media such as a CD
or DVD.
StorageCraft Recovery Environment: A secondary boot environment (or operating system) that
gives a user the functionality necessary to access and restore Backup Image Files on a network. This
environment is typically used when a drive cannot be restored from within Windows or when the
computer has suffered a catastrophic failure and the entire hard drive must be restored.
System downtime: The amount of time a server or PC is offline and inaccessible to users. This is
commonly known as having the system out of production.
© 2010 StorageCraft Technology Corporation
92
ShadowProtect User Guide
System Volume: The volume that stores the boot files necessary to load an operating system.
Typically, this is the C:\ volume.
Tray Icon: A graphical representation of a computer program or application. For example,
ShadowProtect uses a tray icon for the user to gain information about the program. Tray icons reside
in the system tray.
UNC (Universal Naming Convention): A method used to identify folders, files and programs on a
network computer. A UNC path begins with two backslashes \\ followed by the server name, share
name, directory and filename. For example, \\server_name\share_name\backup_name.spi.
Unprotected Volumes: Volumes not protected by ShadowProtect.
User Interface (UI): The portions of a computer system with which a user interacts (display,
keyboard, mouse, etc.) and the portion of a software program that accepts and responds to user
interaction.
Virtual Private Network (VPN): A private data network that makes use of the public
telecommunication infrastructure. VPNs maintain privacy through the use of tunneling protocols,
encryption, and other security procedures.
VirtualBoot: The ability to create a Virtual Machine based on an existing backup image chain. Once
started, the VM provides complete access to data, applications, and services provided by the original
system, in a state corresponding with the last Incremental image included in the VM.
Virtual Volume: A locally referenced volume that does not physically exist on the system.
ShadowProtect uses virtual volumes for the benefit of protecting computer systems.
Volume: An area of storage on a hard disk. A volume is formatted by using a file system, such as file
allocation table (FAT) or NTFS, and typically has a drive letter assigned to it. A single hard disk can
have multiple volumes, and volumes can also span multiple disks.
VSS Aware: An application designed to work with Microsoft Volume Shadow Copy Services (VSS)
framework to ensure consistent data backup.
© 2010 StorageCraft Technology Corporation
End User License Agreement
93
Chapter 17: End User License Agreement
END-USER LICENSE AGREEMENT FOR SELECT SHADOWPROTECT TM SOFTWARE PRODUCTS
END-USER LICENSE AGREEMENT FOR SELECT SHADOWPROTECT TM SOFTWARE PRODUCTS
Please carefully read the terms and conditions of this license agreement (the “Agreement”), which applies to use of the following
versions of StorageCraft Technology Corporation™ software: ShadowProtect Server 4.0, ShadowProtect Small Business Server
4.0, ShadowProtect Desktop 4.0, ShadowProtect ImageManager™ 4.0, and ShadowProtect ImageManager Enterprise™ 4.0
(collectively the "ShadowProtect Products" and individually a "ShadowProtect Product"). This Agreement specifies the terms and
conditions of your use of any of the foregoing ShadowProtect Products. StorageCraft Technology Corporation (“StorageCraft”), is
willing to license a ShadowProtect Product to you as the individual, company or legal entity that will be using the ShadowProtect
Product (“you” or “Licensee”), but only on the condition that you accept all terms of this Agreement. This Agreement is a legal
and enforceable contract between StorageCraft and you. You accept this Agreement and agree to its terms if you open a
package containing a ShadowProtect Product, break the seal on a ShadowProtect Product, click the “I Agree” button, or
otherwise indicate assent to the terms of this Agreement by using the ShadowProtect Product (e.g., installing, loading, retaining,
or copying the Product). If you do not agree to these terms and conditions, do not open the packaging, break the seal, click the “I
Agree” button, or otherwise use the ShadowProtect Product. You may contact StorageCraft’s customer service department for
information on both obtaining a refund of any License Fee you paid and instructions on returning the ShadowProtect Product and
Documentation. If you install or otherwise use the ShadowProtect Product under any trial, evaluation, or purchase transaction,
your conduct constitutes acceptance of this Agreement and you will be bound by all of its terms and conditions. You and
StorageCraft are sometimes collectively referred to in this Agreement as “the Parties” and individually as a “Party.” You may
access StorageCraft’s website at www.storagecraft.com/legal/ to download and print a copy of this Agreement.
Section 1 Definitions. Capitalized terms will have the meaning given in this Section 1.
1.1.
“Archival Use” means the creation and confidential storage by Licensee of a single copy of the Software for use by
Licensee only in the event that the Original Copy fails to function properly. Archival Use does not include simultaneous use of the
Original Copy and the archival copy, which simultaneous use is prohibited by this Agreement.
1.2.
“Desktop Operating System” means any broadly released Microsoft operating system intended for desktop computers
including but not limited to: Windows 2000 Professional, Windows XP Home Edition, Windows XP Professional, Windows Vista,
and Windows 7.
1.3.
“Documentation” means all on-line help files or written instruction manuals and user guides addressing the use of the
Software.
1.4.
“Effective Date” means the date on which Licensee has both paid the License Fee and accepted this Agreement.
1.5.
"ImageManager " means ShadowProtect ImageManager Version 4.0, which is an executable program used for the
scheduled verification, retention, and consolidation of ShadowProtect image files and includes the ImageManager Service and
ImageManager Client, but excludes ImageManager Enterprise and the additional features and functionality included with
ImageManager Enterprise. ImageManager is included with the purchase of ShadowProtect Server, ShadowProtect SBS, or
ShadowProtect Desktop.
1.6.
"ImageManager Enterprise" means ShadowProtect Image Manager Enterprise Version 4.0, which is an executable
program used for the scheduled verification, retention, consolidation, monitoring, and management of ShadowProtect image
files. ImageManager Enterprise includes the advanced license features of image file replication and HeadStart Restore™, which
are licensed on a per-job basis. One job permits ImageManager Enterprise to perform: (a) one replication to a destination
computer (either a Physical or Virtual System) on which ShadowProtect Server, ShadowProtect Desktop, or ShadowProtect SBS is
installed and (b) one HeadStart Restore to a destination computer (either a Physical or Virtual System) on which ShadowProtect
Server, ShadowProtect Desktop, or ShadowProtect SBS is installed. Additional jobs must be purchased separately.
1.7.
“Intellectual Property Rights” means all of StorageCraft’s ownership rights associated with intellectual property and
the Software, including but not limited to patents, copyrights, trademarks, and trade secrets, and any and all rights to exclude
existing from time to time in a specified jurisdiction under patent law, copyright law, moral rights law, trade-secret law,
trademark law, unfair competition law, or other similar rights.
1.8.
“License Fee” means the price paid by Licensee to StorageCraft or its reseller, distributor, or authorized
representative in exchange for a license to use the Software in accordance with the limitations established in this Agreement.
1.9.
"Maintenance" means, for the specific ShadowProtect Product to which you are licensed in accordance with this
Agreement and in exchange for which you paid a License Fee, a time-limited right to (i) all Updates and Upgrades to the
ShadowProtect Product that StorageCraft releases during the period that Maintenance is in effect and, (ii) in addition to the
support specified elsewhere in this Agreement, telephone support during StorageCraft business hours. Maintenance is provided
© 2010 StorageCraft Technology Corporation
94
ShadowProtect User Guide
on a per-serial-number or per-seat basis and expressly excludes any other ShadowProtect Products, Updates to other
ShadowProtect Products, separately licensed add-on modules, or features included in other ShadowProtect Products. Updates,
Upgrades, and additional features of ShadowProtect Products will be released, added, or created at StorageCraft's sole and
complete discretion, and StorageCraft makes no warranty, promise, or commitment to make any such offering.
1.10.
“Object Code” means the output of a compiler after it processes StorageCraft’s source code in the form of an
executable, dll, or library file.
1.11.
“Original Copy” means the single copy of the Software provided to Licensee in conjunction with this Agreement.
1.12.
“Physical System” means a computer hardware device supported by an installed operating system.
1.13.
“Server Operating System” means any broadly released Microsoft operating system intended for server computers
including but not limited to: Windows Server 2003 and Windows Server 2008.
1.14.
"ShadowProtect Desktop" means ShadowProtect Desktop Version 4.0 and includes two components: the executable
program installed on the computer and the StorageCraft Recovery Environment. ShadowProtect Desktop does not include
separately licensed, fee-bearing products or add-on modules, including without limitation ImageManager Enterprise.
ShadowProtect Desktop is licensed for use on either a Physical System or a Virtual Machine, but not both. ShadowProtect
Desktop includes three proprietary StorageCraft applications: (a) VirtualBoot™, (b) ImageManager, and (c) ShadowProtect
KeyFileMaker™ and other KeyFile Tools (collectively "KeyFileMaker").
1.15.
ShadowProtect SBS" means ShadowProtect Small Business Server Version 4.0 and includes two components: the
executable program installed on the computer and the StorageCraft Recovery Environment. ShadowProtect SBS does not include
separately licensed, fee-bearing products or add-on modules, including without limitation ImageManager Enterprise.
ShadowProtect SBS is licensed for use on either a Physical System or a Virtual Machine, but not both. ShadowProtect SBS
includes three proprietary StorageCraft applications: (a) VirtualBoot, (b) ImageManager, and (c) KeyFileMaker.
1.16.
ShadowProtect Server" means ShadowProtect Server Version 4.0 and includes two components: the executable
program installed on the computer and the StorageCraft Recovery Environment. ShadowProtect Server does not include
separately licensed, fee-bearing products or add-on modules, including without limitation ImageManager Enterprise.
ShadowProtect Server is licensed for use on either a Physical System or a Virtual Machine, but not both. ShadowProtect Server
includes three proprietary StorageCraft applications: (a) VirtualBoot, (b) ImageManager, and (c) KeyFileMaker.
1.17.
“Small Business Server Operating System” means Microsoft Small Business Server 2000, Microsoft Small Business
Server 2003, and Microsoft Small Business Server 2008.
1.18.
"Software" means: (a) the specific ShadowProtect Product to which you are licensed in accordance with this
Agreement and in exchange for which you paid a License Fee to StorageCraft or its authorized reseller, and/or (b) the specific
ShadowProtect Product to which you have been granted an Evaluation License, a Trial License, or an NFR License.
1.19.
“StorageCraft Recovery Environment” means the bootable CD component of the Software or the ISO file that permits
you to create the bootable CD component of the Software (and the all functionality included therein) that includes WinPE under
license granted to StorageCraft by Microsoft Licensing, GP and which provides a bootable operating system environment that
runs a version of the Software.
1.20.
"Update" means the process in which StorageCraft makes available to existing users of the Software patches, issue
corrections, and bug fixes. StorageCraft makes no warranty, promise, or commitment to create or release any Updates.
1.21.
"Upgrade" means StorageCraft's release to the public of a version of the Software that replaces the prior version of the
Software on StorageCraft's price list pursuant to StorageCraft's then-current Upgrade policies. StorageCraft makes no warranty,
promise, or commitment to create or release any Upgrades.
1.22.
“Use” means the ability to run, execute, and display the Software in its Object Code form as it was provided to you by
StorageCraft or its authorized reseller, but only in accordance with the terms of this Agreement.
1.23.
“Virtual Machine” means a software emulation of a computer hardware device with operating system. VMware® and
Virtual PC are examples of software that create virtual machines. “Desktop Virtual Machine” means a Virtual Machine
employing a Desktop Operating System (e.g., VMware running the Windows 7 operating system). “Server Virtual Machine”
means a Virtual Machine employing a Server Operating System (e.g., VMware running the Windows Server 2008 operating
system). “Small Business Server Virtual Machine” means a Virtual Machine employing a Small Business Server operating system
(e.g., VMware running the Windows Small Business Server 2008 operating system).
1.24.
“Volume License Certificate” means a license certificate issued by StorageCraft authorizing the Licensee to install and
use multiple copies of the Software in such numbers as are authorized by the certificate.
© 2010 StorageCraft Technology Corporation
End User License Agreement
95
Section 2 Proprietary Rights. This is a license and not a sale. The Software and Documentation are proprietary products of
StorageCraft or its licensors and are protected under United States copyright laws and international treaty provisions. Nothing
in this License constitutes a waiver of StorageCraft’s rights under U.S. or international copyright law or any other law. Ownership
of the Software and all copies, modifications, translations, components, features, and merged portions of the Software shall at
all times remain with StorageCraft, including all copyrights, patent rights, trade secret rights, trademarks and other intellectual
property rights in the Software and Documentation. Licensee’s rights to use the Software are limited solely to those rights
identified in this Agreement. StorageCraft retains all rights not expressly granted to Licensee in this Agreement. This Agreement
governs any Updates, Upgrades, releases, revisions, or enhancements to the Software that StorageCraft may furnish to the
Licensee. This Agreement does not include a grant to Licensee of any: (a) ownership right, title, interest, security interest, or
other interest in the source code or Object Code of the Software or in StorageCraft’s Intellectual Property Rights; (b) Intellectual
Property Rights relating to the Software, any copy of any part of the Software or the Documentation; (c) right or authority to
modify the Software; (d) right to use the Software to develop derivatives or derivative works of the Software; (e) right to reverse
engineer, decompile, recompile the Software or otherwise attempt to discover source code or trade secrets related to the
Software; (f) right to copy the Software except as expressly permitted in this Agreement; (g) right to copy, sublicense, sell, lend,
rent, lease, give, transfer, assign, or otherwise dispose of all or any portion of the Software or any interest in the Software
without StorageCraft’s prior written consent (any such disposition made without such consent shall be null and void); and/or (h)
right to remove, obscure or alter any notice of patent, copyright, trade secret, trademark, or other proprietary right of
StorageCraft.
Section 3 Grant of License. Licensee is granted a fully paid, worldwide, perpetual, revocable, non-exclusive, non-transferable,
non-sublicenseable, license-fee bearing, Object Code license, subject to timely payment to StorageCraft of any applicable
License Fee, to do the following: (a) use the Software and Documentation in its "as is" and unmodified form as provided to you by
StorageCraft; (b) use the Software strictly in accordance with the terms of this Agreement and with the specific conditions and
limitations applicable to the specific ShadowProtect Product licensed by Licensee, as specified in Section 3.1 below; (c) copy the
Software for Archival Use only, provided that all titles, trademark symbols, copyright symbols and legends, and other proprietary
markings are reproduced on such archival copy, and provided further that the archival copy is not used unless the original copy of
the Software becomes inoperable or fails to function properly; and (d) use the Software on only one computer, unless Licensee
has acquired a Volume License Certificate, in which case the Licensee is authorized to install and operate the Software on as
many computers as are authorized by the Volume License Certificate. LICENSEE UNDERSTANDS AND AGREES THAT WITH RESPECT TO
CERTAIN LICENSES COVERED BY THIS AGREEMENT ALL FUNCTIONALITY OF THE SOFTWARE WILL TIME OUT AND CEASE TO OPERATE AS
GOVERNED BY THE AGREEMENT AND SOFTWARE. IN THE EVENT THAT THE SOFTWARE TIMES OUT AND CEASES TO OPERATE,
STORAGECRAFT SHALL HAVE NO RESPONSIBILITY TO PROVIDE SERVICE OR SUPPORT FOR THE SOFTWARE.
3.1.
Additional Terms, Conditions, and Limitations Applicable to Specific Versions of the Software.
3.1.1.
Desktop License – A Desktop License to the Software permits use only on a Desktop Operating System. This version of
the Software may be acquired by the Licensee either by purchase of a packaged boxed version or by download from the webstore
of StorageCraft or one of its reseller partners. It includes a license to use ImageManager.
3.1.2.
Desktop Virtual Machine License – A Desktop Virtual Machine License to the Software permits use only on a Virtual
Machine running a Desktop Operating System. This license does not authorize the Licensee to install and use the Software on a
Physical System. With the exception that the use of the Software granted under this License is limited to a Desktop Virtual
Machine, all other rights granted and limitations imposed under the Desktop License apply. This version of the Software may be
acquired by the Licensee either by purchase of a packaged boxed version or by download from the webstore of StorageCraft or
one of its reseller partners. It includes a license to use ImageManager.
3.1.3.
Evaluation License – An Evaluation License is a license to the Software that permits Licensee to use all features of the
corresponding ShadowProtect Product and includes the StorageCraft Recovery Environment. This license is provided to the
Licensee for evaluation purposes for the specific evaluation period allowed by the Software. The Software will provide Licensee
with advance notice of the expiration of the Software before that event occurs. This License may not be copied, distributed or
resold. This version of the Software may be acquired by the Licensee based on a pre-qualified transaction of a packaged boxed
version or by download from the website of StorageCraft or one of its reseller partners. It includes a license to use
ImageManager.
3.1.4.
ImageManager Enterprise License – An ImageManager Enterprise License to the Software permits use of the advanced
licensed features of ImageManager Enterprise on a per-job basis. One job permits ImageManager Enterprise to perform: (a) one
replication to a destination computer (either a Physical or Virtual System) on which ShadowProtect Server, ShadowProtect
Desktop, or ShadowProtect SBS is installed and (b) one HeadStart Restore to a destination computer (either a Physical or Virtual
System) on which ShadowProtect Server, ShadowProtect Desktop, or ShadowProtect SBS is installed. Additional jobs must be
purchased separately.
3.1.5.
Not for Resale (“NFR”) Software License – An NFR Software License permits the Licensee to use a ShadowProtect
Product for promotional purposes at no or reduced cost to Licensee. This license may not be copied, distributed or resold. The
electronic delivery, packaging or media on which the NFR Software is provided is marked “NFR” or “Not For Resale.” This version
of the Software may be acquired by the Licensee either as a packaged boxed version provided by StorageCraft or by download
from the webstore of StorageCraft or one of its reseller partners. It includes a license to use ImageManager but excludes
© 2010 StorageCraft Technology Corporation
96
ShadowProtect User Guide
Maintenance.
3.1.6.
Server License – A Server License to the Software permits use only on a Server Operating System. This version of the
Software may be acquired by the Licensee either by purchase of a packaged boxed version or by download from StorageCraft’s
webstore or one of StorageCraft’s reseller partners. It includes a license to use ImageManager.
3.1.7.
Server Virtual Machine License – A Server Virtual Machine License to the Software permits use only on a Virtual
Machine running a Server Operating System. This license does not authorize the Licensee to install and use the Software on a
Physical System. With the exception that the use of the Software granted under this License is limited to a Server Virtual
Machine, all other rights granted and limitations imposed under the Server License apply. This version of the Software may be
acquired by the Licensee either by purchase of a packaged boxed version or by download from the webstore of StorageCraft or
one of its reseller partners. It includes a license to use ImageManager.
3.1.8.
Small Business Server License – A Small Business Server License to the Software permits use only on a Small Business
Server Operating System. This version of the Software may be acquired by the Licensee either by purchase of a packaged boxed
version or by download from the webstore of StorageCraft or one of its reseller partners. It includes a license to use
ImageManager.
3.1.9.
Small Business Server Virtual Machine License – A Small Business Server Virtual Machine License to the Software
permits use only on a Virtual Machine running a Small Business Server Operating System. This license does not authorize the
Licensee to install and use the Software on a Physical System. With the exception that the use of the Software granted under
this License is limited to a Small Business Server Virtual Machine, all other rights granted and limitations imposed under the
Small Business Server License apply. This version of the Software may be acquired by the Licensee either by purchase of a
packaged boxed version or by download from the webstore of StorageCraft or one of its reseller partners. It includes a license to
use ImageManager.
3.1.10. Trial License – A Trial License is a license to the Software that permits Licensee to use all features of the corresponding
ShadowProtect Product, but does not include the StorageCraft Recovery Environment. This version of the Software may be
acquired by the Licensee by download from StorageCraft’s website or a download provider authorized by StorageCraft. It
includes a license to use ImageManager but excludes Maintenance.
SECTION 4 LICENSE RESTRICTIONS. Licensee agrees that, unless it has obtained StorageCraft's prior written consent, it will not
directly or through any parent, subsidiary, affiliate, agent, or third party do any of the following with respect to the Software and
Documentation:
4.1.
Use the Software or Documentation in violation of the terms of this Agreement;
4.2.
Copy the Software or Documentation except as specifically authorized by this Agreement;
4.3.
Permit concurrent use of any copy of the Software except as authorized by a Volume License Certificate;
4.4.
Sell, lease, license, sublicense or otherwise deal with any portion of the Software or Documentation;
4.5.
Provide, lend, disclose, divulge, make available to, or permit use of the Software or Documentation by persons other
than the Licensee without StorageCraft’s prior written consent;
4.6.
Rent, lease, grant a security interest in, or otherwise transfer rights to, or possession of, the Software or any copy
thereof;
4.7.
Use the Software in any service bureau, facility management, or time sharing arrangement;
4.8.
Use the StorageCraft Recovery Environment except in conjunction with the licensed copy of the ShadowProtect
Product with which the StorageCraft Recovery Environment was provided to you;
4.9.
Remove or alter any proprietary notices, labels, or legends on any copy of the Software or Documentation;
4.10.
Ship or transmit (directly or indirectly) any copies of the Software or Documentation to any country or destination
prohibited by the United States Government;
4.11.
Reverse engineer, decompile, disassemble, modify, translate, make any attempt to discover the source code of the
Software, or create derivative works from, employ, or manipulate the Software;
4.12.
Use a Virtual Machine license on a Physical System;
4.13.
Use KeyFileMaker, or VirtualBoot in conjunction with image files created by software other than the specific seat of
licensed Software with which KeyFileMaker or VirtualBoot were provided to Licensee; and
© 2010 StorageCraft Technology Corporation
End User License Agreement
97
4.14.
Assign or transfer the rights granted to Licensee under this Agreement on a permanent basis unless: (a) Licensee
retains no copies of the Software, (b) prior to such assignment or transfer, the assignee or transferee agrees in writing to the
terms and conditions of this Agreement, and (c) StorageCraft consents to such assignment or transfer.
Section 5 License Fee.
5.1.
License Fee. With the exception of an Evaluation License, Trial License, and NFR License, Licensee is required to pay
the License Fee established by StorageCraft or its authorized reseller.
5.2.
Maintenance and Support Fee. Maintenance or additional support beyond the support granted in this Agreement is
available by a separate maintenance or support agreement with StorageCraft.
Section 6 Support, Updates and Upgrades.
6.1.
Licensee is entitled to receive Updates and participate in StorageCraft’s support program in consideration for its
payment of the License Fee. StorageCraft’s support program includes StorageCraft’s on-line support system, the StorageCraftmoderated user forum, and StorageCraft’s knowledge base, which is a question and answer resource that includes frequently
asked questions.
6.2.
StorageCraft reserves the right to require that any Upgrades of the Software that you have obtained pursuant to a
Volume License Certificate may only be obtained in a quantity equal to the number of seats licensed pursuant to the Volume
License Certificate. Any Upgrade is provided under StorageCraft's policies in effect at the time of order. This Agreement does not
separately license you for licenses in addition to those which you have purchased and which have been authorized by
StorageCraft.
Section 7 Termination. This Agreement is effective until terminated as permitted in this Section. Either Party may terminate this
License for convenience at any time, but in the event of StorageCraft’s termination for convenience, it shall refund to Licensee
the License Fee paid by Licensee. StorageCraft may terminate this License effective immediately by providing a notice to
Licensee of its breach of any provision in Sections 3, 4 and 5 of this Agreement. StorageCraft may terminate this Agreement on
twenty (20) days written notice to Licensee if Licensee breaches any other provision of this Agreement and fails to cure such
breach within twenty (20) days after receiving StorageCraft's written notice of the breach. Upon termination of this License,
Licensee must cease all use of the Software and Documentation and destroy all copies of the Software and Documentation.
Section 8 Limited Warranty, Exclusive Remedy. StorageCraft warrants that, for sixty (60) days after the date Licensee first
purchased the Software from StorageCraft or its reseller, distributor, or authorized representative, the media on which the
Software is provided will be free from defects in materials and workmanship under normal use. This warranty gives Licensee
specific rights and Licensee may also have other rights that vary from state to state. In the event of any breach of this limited
warranty, Licensee’s sole and exclusive remedy against StorageCraft and its agents, employees, representatives, officers,
directors, contractors, dealers, and distributors is, at StorageCraft’s option, either: (a) return of the license fee paid for the
license or (b) replacement of the defective media on which the Software is contained, provided that Licensee notifies
StorageCraft of the nonconformance within the sixty (60) day warranty period. Licensee must return the defective media to
StorageCraft or its dealer, distributor, or authorized representative at Licensee’s expense, together with a copy of Licensee’s
proof of payment of the License Fee within the sixty (60) day warranty period. This limited warranty is void if the defect is the
result of alteration, abuse, damage, or misapplication. Any replacement media will be warranted for the remainder of the
original warranty period, or thirty (30) days, whichever is longer.
Section 9 Disclaimer of Warranties. STORAGECRAFT DOES NOT WARRANT THAT THE SOFTWARE WILL MEET LICENSEE’S
REQUIREMENTS OR THAT ITS OPERATION WILL BE UNINTERRUPTED OR ERROR-FREE. EXCEPT AS EXPRESSLY STATED IN THIS AGREEMENT,
THE SOFTWARE IS PROVIDED AND LICENSED "AS IS" AND WITH ALL FAULTS. THERE ARE NO WARRANTIES, REPRESENTATIONS, OR
CONDITIONS, EXPRESS OR IMPLIED, WRITTEN OR ORAL, ARISING BY STATUTE, OPERATION OF LAW, OR OTHERWISE, REGARDING THE
SOFTWARE OR ANY OTHER PRODUCT OR SERVICE PROVIDED UNDER OR IN CONNECTION WITH THIS AGREEMENT. TO THE MAXIMUM
EXTENT PERMITTED BY APPLICABLE LAW, STORAGECRAFT AND ITS DEALERS, DISTRIBUTORS AND AUTHORIZED REPRESENTATIVES
DISCLAIM ALL WARRANTIES AND CONDITIONS, WHETHER EXPRESS, IMPLIED, OR STATUTORY, INCLUDING WITHOUT LIMITATION ANY (IF
ANY) WARRANTIES OR CONDITIONS OF OR RELATED TO: MERCHANTABILITY, DURABILITY, FITNESS FOR A PARTICULAR PURPOSE, LACK OF
VIRUSES, NONINFRINGEMENT, ACCURACY OR COMPLETENESS OF RESPONSES, RESULTS, WORKMANLIKE EFFORT, AND LACK OF
NEGLIGENCE. ALSO, TO THE MAXIMUM EXTENT PERMITTED BY LAW, THERE IS NO WARRANTY, DUTY, OR CONDITION OF TITLE, QUIET
ENJOYMENT, QUIET POSSESSION, CORRESPONDENCE TO DESCRIPTION, OR NONINFRINGEMENT. THE ENTIRE RISK ARISING OUT OF USE
OR PERFORMANCE OF THE SOFTWARE REMAINS WITH LICENSEE. IF ANY IMPLIED WARRANTY IS NOT DISCLAIMED UNDER APPLICABLE
LAW, THEN SUCH IMPLIED WARRANTY IS LIMITED TO THIRTY (30) DAYS FROM THE DATE LICENSEE ACQUIRED THE SOFTWARE FROM
STORAGECRAFT OR ITS DEALERS, DISTRIBUTORS OR AUTHORIZED REPRESENTATIVES AND IS SUBJECT TO THE EXCLUSIVE REMEDY
PROVISION SET FORTH IN SECTION 8. SOME JURISDICTIONS DO NOT PERMIT LIMITATIONS ON IMPLIED WARRANTIES, SO THE
FOREGOING THIRTY (30) DAY TIME LIMITATION ON IMPLIED WARRANTIES MAY NOT APPLY TO LICENSEE. THE LIMITED WARRANTY
HEREIN GIVES LICENSEE SPECIFIC LEGAL RIGHTS AND LICENSEE MAY ALSO HAVE OTHER LEGAL RIGHTS WHICH VARY BY JURISDICTION.
WARRANTY INQUIRIES MAY BE SENT TO STORAGECRAFT AT: [email protected] OR TO LEGAL DEPARTMENT, 121 WEST
ELECTION ROAD, SUITE 110, DRAPER, UTAH 84020, U.S.A. NO AGREEMENTS VARYING OR EXTENDING THE FOREGOING WARRANTIES OR
LIMITATIONS WILL BE BINDING ON EITHER PARTY UNLESS IN WRITING AND SIGNED BY AN AUTHORIZED REPRESENTATIVE OF BOTH
© 2010 StorageCraft Technology Corporation
98
ShadowProtect User Guide
PARTIES.
Section 10 Limitation of Liability. THE LIABILITY TO LICENSEE OF STORAGECRAFT AND THAT OF ITS DEALERS, DISTRIBUTORS AND
AUTHORIZED REPRESENTATIVES FOR ANY LOSSES SHALL BE LIMITED TO DIRECT DAMAGES AND SHALL NOT EXCEED THE AMOUNT
LICENSEE ORIGINALLY PAID FOR THE SOFTWARE. IN NO EVENT SHALL STORAGECRAFT OR ITS DEALERS, DISTRIBUTORS OR AUTHORIZED
REPRESENTATIVES BE LIABLE FOR ANY INCIDENTAL, INDIRECT, SPECIAL, PUNITIVE, OR CONSEQUENTIAL DAMAGES (INCLUDING WITHOUT
LIMITATION PROCUREMENT OF SUBSTITUTE GOODS OR SERVICES; LOSS OF PROFITS, USE, OR DATA; OR BUSINESS INTERRUPTION), EVEN
IF STORAGECRAFT OR ITS AGENTS OR REPRESENTATIVES HAVE BEEN ADVISED OF THE POSSIBILITY OF SUCH DAMAGES. These limitations
apply even in the event of fault, tort, negligence, misrepresentation, or strict or product liability. In no event shall any person
who has contributed to any part of the Software be liable for any damages whatsoever, however caused, and on any theory of
liability, whether in contract, strict liability, or tort (including negligence or otherwise) arising in any way out of the use of the
Software, even if advised of the possibility of such damage. Some jurisdictions do not allow the exclusion or limitation of
incidental or consequential damages, so the above limitation or exclusion may not apply to Licensee. Licensee releases
StorageCraft from all liability in excess of the liabilities that are limited by this Section, including without limitation any claim for
indemnification or contribution whether arising under statutory or common law or otherwise. End users in certain countries
(such as Malaysia, New Zealand, and Australia) may be subject to certain consumer protection laws unique to their locale and
which limit the ability to modify or exclude liability. If Licensee acquired the Software for the purposes of a business, Licensee
confirms that any applicable consumer protection laws do not apply. If StorageCraft breaches a condition or warranty implied by
applicable law and which cannot lawfully be modified or excluded by this Agreement then, to the extent permitted by law,
StorageCraft’s liability to Licensee is limited, at StorageCraft’s option, to: (a) replacement or repair of the Software and/or resupply of customer support; or (b) the cost of replacing or repairing the Software and/or the cost of re-supplying customer
support.
Section 11 United States Government Restricted Rights. RESTRICTED RIGHTS LEGEND. All StorageCraft products and
documentation are commercial in nature. The Software and Software Documentation are "Commercial Items", as that term is
defined in 48 C.F.R. § 2.101, consisting of "Commercial Computer Software" and "Commercial Computer Software
Documentation", as such terms are defined in 48 C.F.R. § 252.227-7014(a)(5) and 48 C.F.R. § 252.227-7014(a)(1), and used in 48 C.
F.R. § 12.212 and 48 C.F.R. § 227.7202, as applicable. Consistent with 48 C.F.R. §§ 12.212, 252.227-7015, 227.7202 – 227.7202-4,
and 52.227-14, and other relevant sections of the Code of Federal Regulations, as applicable, StorageCraft's Software and
Documentation are licensed to United States Government end users with only those rights as granted to all other end users,
according to the terms and conditions contained in this Agreement.
Section 12 Compliance with Export Law. The Software is subject to export controls by the U.S. Department of Commerce (DOC),
under the Export Administration Regulations (“EAR”) (see http://www.access.gpo.gov/bis/index.html). Violation of U.S. law is
strictly prohibited. Licensee agrees to comply with the requirements of the EAR and all applicable international, national, state,
regional and local laws and regulations, including any applicable import and use restrictions. StorageCraft products are
currently prohibited for export or re-export to certain countries subject to U.S. trade sanctions. Licensee agrees not to export, or
re-export, directly or indirectly, any product to any country outlined in the EAR, nor to any person or entity on the DOC Denied
Persons, Entities and Unverified Lists, the U.S. Department of State’s Debarred List, or on the U.S. Department of Treasury's lists
of Specially Designated Nationals, Specially Designated Narcotics Traffickers, or Specially Designated Terrorists. Furthermore,
Licensee agrees not to export or re-export StorageCraft products to any military entity not approved under the EAR, or to any
other person or entity for any military purpose, nor will Licensee sell any StorageCraft product for use in connection with
chemical, biological, or nuclear weapons or missiles capable of delivering such weapons.
Section 13 Notices. All notices between the Parties shall be in writing and shall be deemed to have been given if personally
delivered or sent by certified or registered mail (return receipt requested) or electronic facsimile to the addresses set forth as
follows, and shall be deemed effective upon receipt:
If to StorageCraft to:
Legal Department
StorageCraft Technology Corporation
11850 South Election Road, Suite 120
Draper, UT 84020
With a Copy to:
StorageCraft Technology Corporation
P.O. Box 1149
Riverton, UT 84065
If to Licensee to:
To the last known address that Licensee provided to StorageCraft
Section 14 Microsoft® Windows® Preinstallation Environment License (“WinPE”). StorageCraft is a licensee under a license
granted by Microsoft with respect to Microsoft Windows Preinstallation Environment software, including versions 2005 and 2.0.
Licensee accepts the following terms and conditions concerning WinPE:
© 2010 StorageCraft Technology Corporation
End User License Agreement
99
14.1.
The Software is limited to use as a boot, diagnostic, disaster recovery, set up, restoration, emergency services,
installation, test/or configuration utilities program, and is not for use as a general purpose operating system or as a substitute
for a fully functional version of any operating system products.
14.2.
THE SOFTWARE CONTAINS WINPE, WHICH INCLUDES A SECURITY FEATURE THAT WILL CAUSE THE COMPUTER SYSTEM TO
REBOOT WITHOUT PRIOR NOTIFICATION TO THE LICENSEE AFTER TWENTY-FOUR (24) HOURS OF CONTINUOUS USE. THIS TIME-OUT
FEATURE WILL RESET EACH TIME THE COMPONENT CONTAINING WINPE IS RELAUNCHED.
14.3.
Any and all Microsoft and Microsoft affiliate’s liability related to the Software are disclaimed in full and without
condition.
14.4.
All customer support issues will be handled solely by StorageCraft.
14.5.
Licensee is specifically prohibited from reverse engineering, decompiling, or disassembling WinPE, except to the
extent expressly permitted by applicable law.
14.6.
Licensee is specifically informed that the Software is subject to U.S. export jurisdiction.
14.7.
In the event that Licensee’s breach of this Agreement places StorageCraft in breach of its license agreement with
Microsoft, Licensee agrees to indemnify and hold StorageCraft harmless from any such breach, notwithstanding the limitations
on liability imposed elsewhere in this Agreement.
Section 15 Passwords. If you invoke any password-protection or encryption functionality of the Software, you understand that
loss of your password may result in the loss of access to your data and/or access to image files created by the Software. You
understand and acknowledge that StorageCraft does not keep, maintain, or monitor any password you create, and StorageCraft
has neither liability associated with loss of your password nor obligation to assist in its recovery. By creating a password or
encrypting your data, you assume all risk associated with loss of that password.
Section 16 Miscellaneous.
16.1.
Activation. The Documentation describes the process of activating the Software, which involves recognition of each
seat of licensed Software by StorageCraft’s activation server. The records of StorageCraft’s activation server are determinative
in any question concerning whether a seat of licensed Software has been activated by Licensee.
16.2.
Severability. If any provision of this Agreement is unenforceable or invalid pursuant to any applicable law, such
unenforceability or invalidity will not render this Agreement unenforceable or invalid as a whole, and such unenforceable or
invalid provision will be changed and interpreted so as to best accomplish the objectives of such provision within the limits of
applicable law.
16.3.
Entire Agreement. Unless Licensee has entered into a separate, written and signed agreement with StorageCraft or
one of its dealers, distributors, resellers, or authorized representatives for the supply of the Software (including without
limitation a managed service provider agreement), this Agreement is the complete and exclusive statement of the agreement
between StorageCraft and Licensee concerning the Software and supersedes all previous communications, representations,
understandings and agreements, either oral or written, between the Parties.
16.4.
No Waiver or Modification. This Agreement may not be modified except by a written and express addendum issued by
a duly authorized representative of StorageCraft. No delay or failure to take action represents a waiver of the rights inherent to
or granted to StorageCraft under this Agreement.
16.5.
No Third Party Beneficiary. No third party is or shall be a beneficiary of this Agreement and no third party shall have
the right to enforce this Agreement.
16.6.
Assignment. This Agreement is personal to Licensee and may not be assigned or assumed (including by operation of
law) without StorageCraft’s prior written consent. A change of control of Licensee shall constitute an assignment.
16.7.
Compliance. For Software licensed for business or commercial purposes, during the period this Agreement remains in
effect, and for three years thereafter, StorageCraft may verify Licensee’s compliance with this Agreement on its premises during
its normal business hours and in a manner that minimizes disruption to Licensee’s business. StorageCraft may use an
independent auditor for this purpose with Licensee’s prior approval, which Licensee will not unreasonably withhold.
16.8.
Headings and Captions. The headings and captions used in this Agreement are for convenience or reference only and
shall not modify, expand, limit, or describe the scope or intent of this Agreement or in any other way affect the terms or
conditions of this Agreement.
16.9.
Force Majeure. No delay, failure or default in performance of any obligation of StorageCraft hereunder shall constitute
a breach of the Agreement to the extent caused by a force majeure.
© 2010 StorageCraft Technology Corporation
100
ShadowProtect User Guide
16.10.
Applicable Law. This Agreement shall be governed and construed in accordance with the laws of the State of Utah, U.S.
A., without application of any choice-of-law or conflict-of-law principles, rules, or provision that would result in the application of
the laws of any jurisdiction other than Utah. Any action for provisional relief concerning this Agreement or the Parties’
relationship hereunder, including but not limited to a temporary restraining order, preliminary injunction, attachment in aid of
arbitration, or order for any interim or conservatory measure, shall be brought in Salt Lake County, State of Utah, U.S.A. The
Parties consent and submit to the exclusive jurisdiction of the state or federal courts in Salt Lake County, State of Utah, U.S.A., for
purposes of any action for such provisional remedy or interim or conservatory measure.
16.11.
Dispute Resolution. At the election of either Party to this Agreement, any dispute, controversy, or claim arising out of,
relating to, or in connection with the following shall be submitted for final resolution by arbitration administered by the
American Arbitration Association (the “AAA”): Licensee's purchase or use of the Software; the Software's performance, including
without limitation any alleged deficiency or defect; the existence or breach of a contractual, statutory, or common-law warranty;
the terms and obligations of this Agreement; the performance, termination, rescission, or alleged breach of this Agreement; and
the Agreement's validity or enforceability, including without limitation any claim that all or any part of this Agreement is void,
voidable, unconscionable, or unenforceable (collectively, "Arbitratable Dispute"). Notwithstanding the foregoing, any claim for
infringement or violation of copyright, trademark, or other intellectual property rights is not an Arbitratable Dispute, but shall be
brought before a court of competent jurisdiction in Salt Lake County, State of Utah, U.S.A. In the event of an Arbitratable Dispute
the election to arbitrate must be made in writing by a Party on or before the last day to answer and/or respond to a summons
and/or complaint brought by the other Party. If Licensee is a U.S. resident or maintains a place of business in the U.S., the
arbitration shall be conducted in accordance with the AAA Commercial Arbitration Rules in effect at the time of the arbitration,
excepting any rules pertaining to class arbitrations. If Licensee is not a U.S. resident or does not maintain a place of business in
the U.S., the arbitration shall be conducted in accordance with the AAA International Arbitration Rules in effect at the time of the
arbitration, excepting any rules pertaining to class arbitrations. (The Commercial Arbitration Rules and International
Arbitration Rules are collectively referred to as the "Rules".) The Parties intend that any arbitration between them shall involve
only the dispute between the Parties and no other, even identical, dispute between a Party and a third party. Class arbitration
shall not be permitted.
If the Arbitratable Dispute involves a claim for damages of $20,000 U.S.D. or less, the arbitration shall be conducted by a single
arbitrator selected in accordance with the Rules. All other Arbitratable Disputes shall be conducted by three arbitrators
selected as follows: Each Party shall select one arbitrator and deliver written notice of such selection to the other Party and to
the AAA within twenty (20) calendar days after the deadline for serving a statement of defense. In the event a Party fails to select
an arbitrator or deliver notice of such selection to the other Party and to the AAA within such time period, upon request of either
Party, such arbitrator shall instead be appointed by the AAA (as provided in the Rules) within fifteen (15) calendar days of
receiving such request. The two arbitrators so appointed shall nominate a third arbitrator, notifying the Parties and the AAA of
the nomination within fifteen (15) calendar days of their appointment. If the first two appointed arbitrators fail to nominate a
third arbitrator within that time period, then, upon request of either Party, the third arbitrator shall be appointed by the AAA (as
provided in the Rules). The third arbitrator shall serve as chairman of the arbitral tribunal. In the event that an arbitrator is no
longer able or willing to serve as arbitrator, the method of selection used to select such arbitrator shall be used to select the
replacement arbitrator. Any arbitrator must be fluent in the English language and a licensed attorney with experience in
software licensing transactions. In the event of an arbitration conducted under the International Arbitration Rules, the
arbitrator(s) must also have experience in international software licensing transactions.
The place of arbitration shall be Salt Lake County, State of Utah, U.S.A., unless the Parties agree otherwise in writing. The
arbitration shall be conducted in the English language. Any award rendered by the arbitrators must be a reasoned award that:
fully sets forth findings of fact from the evidence presented; applies the findings of fact to the law of the case; fully sets forth
conclusions of law based upon the Parties' respective legal theories; explains which legal theories were followed and why; and,
if damages, costs, and/or fees are awarded, specifies the calculations of the types of damages, costs, and/or fees awarded as to
each Party. Any award is final and binding on the Parties and may be challenged in a court of competent jurisdiction only upon
those grounds allowed under the Utah Uniform Arbitration Act, Utah Code Ann. section 78B-11-101 et seq. In the absence of
challenge, judgment on the award may be entered in any court of competent jurisdiction. Without limiting the authority
conferred on the arbitral tribunal by this Agreement and the Rules, the tribunal shall have the authority to exercise equitable
principles and award equitable remedies. By agreeing to Arbitration, the Parties do not intend to deprive any court of
competent jurisdiction in Salt Lake County, State of Utah, U.S.A., of its ability to issue any form of provisional remedy, including
but not limited to a temporary restraining order, preliminary injunction, attachment in aid of arbitration, or order for any interim
or conservatory measure. A request for such provisional remedy or interim or conservatory measure by a Party to a court shall
not be deemed a waiver of an agreement to arbitrate.
16.12.
CDDL. The Software’s executable, VBoxHDDXSP.dll, includes unmodified files containing VirtualBox Open Source
Edition source code, which is licensed under the Common Development and Distribution License Version 1.0 (“CDDL”).
StorageCraft made no “modifications” to the CDDL-licensed files and StorageCraft is not a “contributor” as those terms are
defined in the CDDL. Irrespective of the CDDL, the Software is licensed and distributed solely in accordance with the terms and
conditions of this Agreement and the CDDL gives Licensee no right, title or interest in or to the Software. The CDDL and all
referenced CDDL-licensed source code are available at http://download.virtualbox.org/virtualbox/3.1.2/VirtualBox-3.1.2-OSE.
tar.bz2; http://download.virtualbox.org/ virtualbox/3.1.8/VirtualBox-3.1.8-OSE.tar.bz2; and http://download.virtualbox.org/
virtualbox/3.2.0_BETA3 /VirtualBox-3.2.0_BETA3-OSE.tar.bz2..
© 2010 StorageCraft Technology Corporation
End User License Agreement
101
16.13.
Customer Contact. If Licensee has any questions concerning this Agreement, Licensee may contact StorageCraft as
follows: website - www.storagecraft.com; telephone – 801-545-4700; fax - 801-545-4705; mail – StorageCraft Technology
Corporation, 11850 S. Election Road, Suite 120, Draper, Utah 84020, U.S.A.
Vers. May 18, 2010
© Copyright 2006-2010 StorageCraft Technology Corporation. All Rights Reserved. This Software and Documentation are the
copyrighted property of StorageCraft Technology Corporation and all rights in and to ShadowProtect Server, ShadowProtect Small
Business Server, ShadowProtect Desktop, VirtualBoot, ImageManager, ImageManager Enterprise and ShadowProtect
KeyFileMaker are exclusively reserved to and owned by StorageCraft Technology Corporation. StorageCraft, StorageCraft
Recovery Environment, ShadowProtect Server, ShadowProtect Small Business Server, ShadowProtect Desktop, VirtualBoot,
HeadstartRestore, ImageManager, ImageManager Enterprise, KeyFileMaker, and ExactState and their respective logos and
trademarks are owned exclusively by StorageCraft Technology Corporation in the United States and elsewhere. Microsoft and
Windows are registered trademarks of Microsoft Corporation. Windows Preinstallation Environment and WinPE are or may be
trademarks of Microsoft Corporation. VMware is or may be a registered trademark of VMware Inc. The Software includes the
Network Configuration Utility based on a derivative created by StorageCraft under a license granted by Pierre Mounir (a/k/a The
Truth), a proprietary software product that is or may be copyrighted by that licensor © 2003-2010 with all rights reserved. All
other brands and product names referenced in this Agreement are or may be the trademarks or registered trademarks of their
respective owners.
© 2010 StorageCraft Technology Corporation