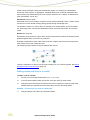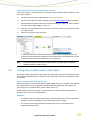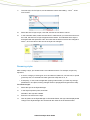
1
www.ewater.com.au
User Guide
Based on Urban Developer 1.0.0
29 June 2011
Document History
Date
Revision Description of Change
15 February 2011
0.4.0
First draft, delivered with Urban Developer beta 0.4.0
29 June 2011
1.0.0
Added statistics & water balance calculation information for all node types,
updated node model information, updated descriptions of subnetwork &
style behaviour, added link lag routing, added glossary of terms, updated
user interface information, updated technical requirements, updated file
formats section. Applies to Urban Developer 1.0.0.
Copyright Notice
© eWater CRC, 2011
Legal Information
All rights reserved. No parts of this work may be reproduced in any form or by any means - graphic, electronic, or mechanical, including
photocopying, recording, taping, or information storage and retrieval systems - without the written permission of the publisher.
Products that are referred to in this document may be either trademarks and/or registered trademarks of the respective owners. The
publisher and the author make no claim to these trademarks.
While every precaution has been taken in the preparation of this document, the publisher and the author assume no responsibility for errors
or omissions, or for damages resulting from the use of information contained in this document or from the use of programs and source code
that may accompany it. In no event shall the publisher and the author be liable for any loss of profit or any other commercial damage caused
or alleged to have been caused directly or indirectly by this document
Citing this document
You can cite this document as:
eWater Cooperative Research Centre 2011, Urban Developer User Guide, eWater Cooperative Research Centre, Canberra.
ISBN 978-1-921543-40-1
Acknowledgements
eWater CRC acknowledges and thanks all partners to the CRC and individuals who have contributed to the research and development of
this software product.
Contents
1
Introduction ................................................................. 1
1.1
Target audience .................................................................................................................... 1
1.2
What is Urban Developer? .................................................................................................... 1
Urban Developer features ..................................................................................................... 2
Appropriate applications ....................................................................................................... 2
Urban Developer Limitations................................................................................................. 3
2
References and training .............................................. 5
3
About this user guide .................................................. 6
3.1
Software and documentation feedback................................................................................. 6
3.2
Using the Adobe Acrobat commenting tools ......................................................................... 6
3.3
Acrobat commenting Q & A .................................................................................................. 8
4
Installation ................................................................... 9
4.1
Technical specifications ........................................................................................................ 9
4.2
Installing Urban Developer.................................................................................................. 10
4.3
Starting Urban Developer ................................................................................................... 12
4.4
Quitting Urban Developer ................................................................................................... 16
4.5
Uninstalling Urban Developer ............................................................................................. 16
4.6
Updating Urban Developer ................................................................................................. 16
4.7
Version numbering .............................................................................................................. 17
4.8
Version compatibility ........................................................................................................... 18
5
User Interface............................................................ 19
5.1
Dockable windows .............................................................................................................. 20
5.2
Undocking and moving windows......................................................................................... 21
5.3
Re-display hidden or "lost" windows ................................................................................... 22
5.4
Resizing windows in Urban Developer ............................................................................... 22
5.5
Menus ................................................................................................................................. 23
File Menu ............................................................................................................................ 23
View Menu .......................................................................................................................... 24
Configure Menu .................................................................................................................. 24
Tools Menu ......................................................................................................................... 25
Run Menu ........................................................................................................................... 27
Urban Developer User Guide
i
5.6
Node Palette ....................................................................................................................... 27
5.7
Style Manager ..................................................................................................................... 28
5.8
Project Explorer .................................................................................................................. 28
Project Hierarchy ................................................................................................................ 29
5.9
Properties Panel ................................................................................................................. 30
Property Styles within node and link models ...................................................................... 33
5.10
Statistics Panel ................................................................................................................... 33
5.11
Log Reporter ....................................................................................................................... 34
5.12
Layer Manager .................................................................................................................... 34
5.13
Recording Manager ............................................................................................................ 35
5.14
Urban Developer Toolbars .................................................................................................. 35
Climate toolbar .................................................................................................................... 35
File toolbar .......................................................................................................................... 35
Recording Manager toolbar ................................................................................................ 36
Schematic Editor Toolbar.................................................................................................... 37
Charting Tool toolbar .......................................................................................................... 37
View Toolbar ....................................................................................................................... 38
6
Climate simulation ..................................................... 39
6.1
Design Rainfall .................................................................................................................... 39
6.2
Observed Analysis .............................................................................................................. 40
7
Demand and end-use simulation .............................. 43
7.1
Average daily model ........................................................................................................... 43
7.2
Behavioural model .............................................................................................................. 44
7.3
Behavioural model configuration......................................................................................... 45
Behavioural model with fixed appliances and occupancy ................................................... 45
Behavioural model with sampled appliances and occupancy ............................................. 46
Sampled appliances and occupancy configuration ............................................................. 47
8
8.1
Building models using Urban Developer ................... 51
How to build a model of an urban water network ................................................................ 51
Suggestions for documenting models ................................................................................. 53
8.2
Projects & scenarios ........................................................................................................... 54
Scenarios ............................................................................................................................ 55
8.3
Input Data ........................................................................................................................... 57
8.4
Creating a model using nodes and links ............................................................................. 58
Node models in Urban Developer ....................................................................................... 58
Link models in Urban Developer ......................................................................................... 59
Link types and colours ........................................................................................................ 59
Adding nodes and links to a model ..................................................................................... 60
ii
Urban Developer User Guide
Deleting nodes and links ..................................................................................................... 62
Default node names ............................................................................................................ 62
Editing node properties ....................................................................................................... 63
Renaming nodes and links.................................................................................................. 64
8.5
Configuring multiple nodes using styles.............................................................................. 65
Create a style ...................................................................................................................... 66
Edit a node style ................................................................................................................. 66
Create a node (or multiple nodes) from a style ................................................................... 67
Apply a style to a node........................................................................................................ 67
Remove a style from a node ............................................................................................... 68
Style example 1 .................................................................................................................. 68
Renaming styles ................................................................................................................. 69
9
Grouping nodes and common elements using
subnetworks .............................................................. 71
9.1
Introduction to subnetworks ................................................................................................ 71
9.2
Subnetwork operations: adding & deleting, editing, closing ............................................... 72
9.3
Subnetwork basic concepts ................................................................................................ 73
9.4
Subnetworks and node styles ............................................................................................. 74
10
Running scenarios in Urban Developer .................... 77
10.1
Running a scenario ............................................................................................................. 77
10.2
Recording model outputs .................................................................................................... 77
10.3
Viewing results from the Recording Manager ..................................................................... 78
10.4
Examining Urban Developer model run results using the Charting Tool ............................ 80
Charting Tool - graph tab .................................................................................................... 81
Viewing multiple (overlaid) graphs ...................................................................................... 83
Exporting and Saving Data ................................................................................................. 86
Editing graph properties ...................................................................................................... 86
11
Urban Developer's node types .................................. 93
11.1
Urban Developer's node types ............................................................................................ 93
11.2
Node connection rules ........................................................................................................ 94
11.3
Catchment nodes ................................................................................................................ 97
Impervious Area .................................................................................................................. 97
Pervious area ...................................................................................................................... 99
Roof .................................................................................................................................. 103
11.4
Aggregation nodes ............................................................................................................ 105
Alternative supply.............................................................................................................. 105
Junction............................................................................................................................. 106
Urban Developer User Guide
iii
Mains water supply ........................................................................................................... 106
Wastewater connection..................................................................................................... 107
11.5
Subnetwork nodes ............................................................................................................ 108
Subnetwork ....................................................................................................................... 108
11.6
Functional nodes............................................................................................................... 111
Tank .................................................................................................................................. 111
Water Use ......................................................................................................................... 117
11.7
Receiving nodes ............................................................................................................... 121
Receiving node ................................................................................................................. 121
12
File Formats ............................................................ 123
12.1
Overview ........................................................................................................................... 123
12.2
Audience ........................................................................................................................... 124
12.3
Limitations ......................................................................................................................... 124
12.4
Time Series Formats......................................................................................................... 124
.bts Binary Time Series................................................................................................... 124
.cdt Comma Delimited Column Time Series ................................................................... 124
.csv Comma Separated Value ........................................................................................ 125
.sdt Space Delimited Column Time Series ..................................................................... 126
12.5
Other data formats ............................................................................................................ 126
Water Data Transfer Format ............................................................................................. 126
.pat Urban Developer Daily Diurnal Pattern ...................................................................... 127
.wup Urban Developer Water Use Parameters................................................................. 127
12.6
Zero-padding data in Excel ............................................................................................... 128
12.7
Times and Dates in Data Files .......................................................................................... 130
Formats for CDT and CSV files ........................................................................................ 130
The ISO8601 standard for representing dates and times ................................................. 133
13
Additional reading ................................................... 137
14
Glossary of Terms ................................................... 139
15
Acknowledgements ................................................. 141
16
Index ....................................................................... 143
iv
Urban Developer User Guide
1
Introduction
In This Chapter
Target audience ........................................................................................................................ 1
What is Urban Developer? ........................................................................................................ 1
1.1
Target audience
Urban Developer is targetted at researchers, modellers, planners, decision-makers and
consultants who construct tailored models to better understand particular urban water
management problems.
Prospective users of Urban Developer should have a good working knowledge of urban water
systems, urban water modelling, and integrated urban water management. This User Guide
assumes you are familiar with the user interface conventions of the Microsoft Windows
operating environment.
Information produced by Urban Developer may also be considered and used by a much
broader audience who are not strictly users of the model, such as managers, planners,
environmental groups, or others with an interest in water science and engineering.
The Urban Developer Glossary (on page 139) lists terms used in this User Guide that may not
be familiar. You should also consult the eWater CRC Glossary if necessary.
1.2
What is Urban Developer?
Urban Developer is an integrated urban water cycle modelling (IUWM) tool designed to meet
the needs of water professionals facing the challenges of integrated water cycle service
planning and assessment arising from the ever-increasing pressures on Australia’s water
resources.
Urban Developer allows simulation of urban water systems in a level of detail and with a
degree of flexibility not offered by existing integrated models.
Urban Developer provides the ability to simulate all three urban water cycle service networks
(water supply, stormwater, wastewater), ranging in scale from a single allotment up to large
clusters or small subdivisions.
Allotment Scale
The allotment scale represents household-level water supply, water use and water disposal
services, and allows you to evaluate the cumulative effects of individual water use actions
(Mitchell, 2001). For example, with Urban Developer's Water Use model, you can examine the
cumulative effect of installing water-saving showerheads or dual-flush toilets in individual
households.
Urban Developer User Guide
1
Cluster Scale
There is no single, simple, definition of what the cluster scale represents. Urban Developer
assumes a cluster is a small grouping of 2 - 30 allotments, businesses and/or commercial
premises.
The cluster scale is particularly useful for exploring decentralised supply, treatment, reuse,
and disposal options, as it enables potential for some economies of scale in infrastructure
delivery, and ameliorates some of the need for expensive centralised distribution and
collection infrastructure.
Note
Urban Developer v1.0 is targetted at urban network models up to, and including,
cluster scale. Future releases of Urban Developer will extend its simulation capability
beyond cluster scale to subdivision and suburb scale.
Subdivision and Suburb Scale
Beyond the cluster scale are the subdivision and suburb scales. Again, there is no clear
delineation between these terms as there can be crossovers between them.
For example the term subdivision can be applied to the creation of two or more allotments but
is typically used to describe developments in the 10s or 100s of houses.
Beyond the subdivision scale lies the broader suburb / catchment scale. This scale presents a
number of key challenges for modellers as the number of houses and service system
components becomes computationally prohibitive for individual process modelling. A key
application of Urban Developer is as a platform to explore the representation of urban water
systems at this scale and understand the impacts of decentralised management practices at
the suburb and city scale.
Urban Developer features
The key features of Urban Developer are:
• an easy-to-understand, node-link representation of all three urban water cycle service
networks: water supply, stormwater, and wastewater;
• simulation of sub-daily demand and end-use, to more accurately model interactions
between water service systems;
• the ability to simulate at temporal and spatial scales commensurate with state and local
government planning approval metrics;
• the ability to group service network elements into subnetworks, reducing the visual
complexity of models and allowing the Urban Developer software to be more easily
applied at a range of scales; and
• reduced network and computational complexity by using styles: "packages" of
configuration parameters that can be re-used and applied to multiple node models.
Appropriate applications
Urban Developer facilitates improved and consistent evaluation of Integrated Urban Water
Management (IUWM) strategies.
2
Urban Developer User Guide
Urban Developer scales from simulating a single lot (allotment) to modelling large clusters,
with commensurate process-appropriate timescales. You can apply Urban Developer to urban
water management in both brownfield (ie existing) and greenfield (ie new) developments.
To use Urban Developer effectively, you should be familiar with the following modelling
concepts:
• detail/resolution requirements and capabilities;
• choice and application of suitable rainfall-runoff models;
• implications of joining component models;
• implications of modelling time step for continuous simulation modelling; and
• uncertainty in data, and the propagation of uncertainty due to application of an
integrated model.
It is strongly recommended that you attend an Urban Developer training course, to become
familiar with both the concepts and operation of Urban Developer.
Urban Developer is a lumped model
Urban Developer models water networks as a series of nodes and links (page 60). Urban
Developer's approach "lumps" the characteristics of each individual node model. This means
that while some node models may have a spatial component, all activity at these nodes is
assumed to occur at a single point.
For modelling applications that require spatial variation, you should use the catchment
modelling capability of Source, available from:
http://www.ewater.com.au/products/ewater-source/for-catchments/
Urban Developer Limitations
Urban Developer embodies a new, integrated approach to urban water cycle modelling that
requires not only a new way of thinking about model construction, but also a new way of
thinking about urban water management problems and solutions.
As with all models, however, there are limitations to the Urban Developer approach. These
limitations are as follows:
• Urban Developer imposes a particular conceptual structure upon integrated catchment
models. This structure may not be the most appropriate for all types of problems.
• The predictive power of Urban Developer is a function of the available component
models, so if the available models are not appropriate to the problem or available data,
predictive performance will be compromised.
Urban Developer User Guide
3
4
Urban Developer User Guide
2
References and training
Additional training for Urban Developer will be provided on either a demand basis or as part of
other water industry events.
Upcoming training is posted on the eWater training web site, at:
http://training.ewater.com.au/
Note
Training is provided for released eWater products only; unannounced or
in-development products have no formal training or support.
Urban Developer User Guide
5
3
About this user guide
This User Guide provides:
• information on installing and operating Urban Developer, including running simulations
and viewing results;
• information on the different node and link models supported by Urban Developer; and
• information on data formats compatible with Urban Developer.
Add your own notes
You can make this User Guide more useful to yourself and other people in your organisation
by adding your own notes, hints, settings, and so on, as you become more familiar with Urban
Developer.
The next section describes how to use Adobe Acrobat's commenting tools to add information
to the User Guide. You can also send these notes back to eWater in order to share your
experience and insight.
3.1
Software and documentation feedback
eWater encourages you to give feedback on the Urban Developer software, context-sensitive
help, User Guide, and other reference materials. Any feedback you are able to provide, and
any suggestions, will be considered for future versions of the software and supporting
materials.
• To give feedback on the Urban Developer software, please forward any comments to
[email protected].
• To give feedback on the context-sensitive help, use the feedback form at the bottom of
every topic screen.
• To give feedback on the User Guide, we encourage you to use the Adobe Acrobat
commenting tools, then export the comments to a file, called a form-data file, and email
the file to [email protected]. The next section explains how to do this.
3.2
Using the Adobe Acrobat commenting tools
Adobe Acrobat and Adobe Acrobat reader (versions 9 and above) have a feature where you
can add comments, notes and draw onto a PDF, then email those changes back to the
documentation team. We then put all these comments together in a "master" list of comments.
To add comments:
1
6
Open the commenting toolbar in Acrobat/Acrobat Reader: Tools > Comment & Markup >
Show Comments & Markup Toolbar.
Urban Developer User Guide
2
Select the text you wish to comment on.
3
Click a tool from the Comments & Markup Toolbar
4
Enter the comment.
5
Save the document.
How to send the comment back to the documentation team
You can provide your feedback to the editors in either of the following ways:
• By sending a copy of your marked-up PDF user guide; or
• By exporting your comments to a separate feedback file and sending the comments file
– this is preferable.
The primary difference is that the separate feedback file will always be substantially smaller
than a copy of the marked-up user guide. To export your comments to a separate feedback
file:
1
In Acrobat Reader, select Document > Comments > Export Comments to Data File…
If you have Acrobat (the full version), select Comments > Export Comments to Data File…
2
Navigate to an appropriate location on your computer (eg, your Desktop).
3
Enter an appropriate filename. Please try to include your name, the date, and the Urban
Developer version number in the filename, as this will help the editors identify the
correct version of the user guide. The default extension is “.fdf” (Forms Data Format).
4
Click Save.
5
Email the comments file to [email protected].
The editors can then open the same version of the user guide and import your comments file,
after which their copy of the user guide will be the same as your marked-up copy.
Urban Developer User Guide
7
3.3
Acrobat commenting Q & A
How do I send the comments back to the documentation team?
The feedback email address is [email protected]. You can either send the entire PDF,
or from the Acrobat/Acrobat Reader menu, select Forms > Manage Form Data > Export data. Save
the data as an FDF (form-data file) and email the FDF file. FDF files are much smaller than the
corresponding PDF.
What happens after I send the comments back to the documentation team?
The team consolidates all the different comments by merging the emailed PDFs or FDFs
together. We then create a master list of comments, and work through them.
Acrobat produces a consolidated marked-up copy, complete with annotations, for archival and
traceability purposes by merging all user comments into a single document.
What are the advantages of this method?
It is similar to printing a copy of the manual, writing on it, and faxing it back to eWater, but it:
• is more legible;
• allows us to consolidate feedback from multiple users doing the same thing;
• allows the documentation team to better collect feedback;
• allows the documentation team to record everything for traceability; and
• allows you to help us put the information you need, into the documentation.
8
Urban Developer User Guide
4
Installation
In This Chapter
Technical specifications ............................................................................................................ 9
Installing Urban Developer ...................................................................................................... 10
Starting Urban Developer ....................................................................................................... 12
Quitting Urban Developer ....................................................................................................... 16
Uninstalling Urban Developer ................................................................................................. 16
Updating Urban Developer ..................................................................................................... 16
Version numbering .................................................................................................................. 17
Version compatibility ............................................................................................................... 18
This section provides information on the hardware and software requirements of Urban
Developer, how to install it, how to activate the licence, and how to update the software.
4.1
Technical specifications
The hardware and software requirements of Urban Developer are:
Type of machine
Intel-based PC
Minimum CPU
Pentium 4 or i-series CPU
Minimum memory
32-bit systems: 4 GB for reasonable system performance.
64-bit systems: 6GB or more
Minimum available disk space
At least 1 GB of free hard drive space
Screen size and resolution
1024 x 768, 16-bit colour - a second monitor is recommended, but is not
compulsory
Internet access (optional)
Urban Developer's software licence can be activated via the Internet
(preferably) or by phone. Internet access is required if you want to be
notified of updates to the Urban Developer software.
Operating system
32-bit systems: Windows XP + Service Pack 3 or later, Windows 7. 32-bit
systems support only the 32-bit version of Urban Developer.
64-bit systems: Windows 7 x64. 64-bit systems support only the 64-bit
versions of Urban Developer. For large networks, the 64-bit version of
Urban Developer is recommended.
Urban Developer is not supported on the following operating systems:
Windows XP 64, Windows Vista, Windows Server 2003, Windows
Server 2008.
Urban Developer will not run on Windows NT, Windows 95, Windows 98,
Windows ME or Windows 2000.
Other supporting software
Urban Developer requires the following software to be installed:
•
Microsoft Dot Net 4 redistributable library (or later). Note that
Urban Developer requires the full version of the .NET 4 library.
You may already have the "client" version of the .NET 4 library
on your computer, but you will still need to download and install
Urban Developer User Guide
9
Type of machine
Intel-based PC
the full version from this link. Once you have installed the .NET
framework, you should see the following entries in the control
panel Programs and Features (Windows 7) or Add/Remove Programs
(Windows XP) windows:
Microsoft .NET Framework 4 Client Profile
Microsoft .NET Framework 4 Extended
•
Adobe Acrobat reader 9.1 or later for reading documentation
You must have local administrator access to the computer in order to install Urban Developer.
You must also have permissions to install and uninstall software.
You do not require administrator access in order to run Urban Developer.
Note
If you are using a networked computer, then inform your system administrator
BEFORE applying any service packs or updates, as there may be other applications
on your computer that could be affected by these updates.
Data folders
Urban Developer creates several data folders under the Windows My Documents folder. See the
Options (page 25) screen (Tools > Options) for more information.
Technical specifications information
Urban Developer does not currently use multiple threads for model processing; using
multi-core CPUs such as the Intel Core2 or i-series CPUs will not increase model processing
performance. Urban Developer does, however, use multiple threads for its user interface.
4.2
Installing Urban Developer
You can download the most recent version of Urban Developer from the eWater web site:
http://www.ewater.com.au/products/ewater-toolkit/urban-tools/urban-developer/
Urban Developer is distributed as a Windows Installer Package (.MSI) file - the file name will
be similar to Urban Developer_XXXX_YY.msi, where YY is the platform indicator and XXXX
is the version number (page 17).
The platform indicator is either x86 for 32-bit versions of Windows, or x64, for 64-bit versions
of Windows.
Before installing Urban Developer:
• Ensure that the Microsoft .NET 4 framework is installed on your computer (Urban
Developer works with either version). You will see an error message if the .NET 4
framework is not installed.
• Uninstall (page 16) any previous versions of Urban Developer from your computer.
To install Urban Developer:
1
Double-click the Urban Developer_YY_XXXX.msi file from the installation media (CD)
or from the Urban Developer_YY_XXXX.msi file downloaded from the eWater web
site.
The name of the Windows Installer Package (.MSI) file might be slightly different, and
may include the version number of Urban Developer.
10
Urban Developer User Guide
2
At the Licence Agreement screen, you must acknowledge that you have read,
understood and agreed to be bound by the conditions of the software licence agreement
to be able to proceed with the installation.
Click I Agree to agree to the terms of the eWater licence agreement.
If you click Install, Urban Developer is installed automatically. This is the
recommended option.
If you click Advanced, you can choose the folder Urban Developer installs into, and
which optional features (if any) are installed. At the current time there are no optional
features.
3
If you are installing on Windows 7, you will see the User Account Control window appear,
asking your permission to continue installation:
Urban Developer User Guide
11
Click Yes to continue. Urban Developer will continue installing, copying files to your
computer
4
Once the installer has finished copying files, click Finish to close the installer.
You can now start Urban Developer.
Note
4.3
You cannot run more than one copy of Urban Developer simultaneously.
Starting Urban Developer
To start Urban Developer:
• In Windows XP, select Start > Programs > eWater > Urban Developer > Urban Developer.
• In Windows 7, select Start > All Programs > eWater > Urban Developer > Urban Developer.
Alternatively, using Windows Explorer, you can also double-click any Urban Developer project
file (any file with a .UDPROJ extension) to start Urban Developer and load the project.
Urban Developer may take a few seconds to load.
12
Urban Developer User Guide
If you run Urban Developer frequently, in Windows 7 you can right-click the Urban Developer
shortcut in the Start menu, and select Pin to Startup Menu. Urban Developer will then be available
from Start > Urban Developer.
Urban Developer startup screen
When you start Urban Developer, you see the startup screen.
To close the startup screen, click the close button, in the top-right corner.
The startup screen:
• lists any recent Urban Developer projects you have been using;
• allows you to create a new project (page 54) or load a project file from disk (page 54);
• allows you to report a bug in Urban Developer or make a suggestion for improvement;
and
• (if you have an active Internet connection) displays the most recent eWater and eWater
Toolkit news, and details of upcoming training courses.
When you start Urban Developer for the first time, there are several steps necessary for
activating the licence.
Note
For security reasons, parts of the licence and other numbers have been obscured in
the example screens below.
Urban Developer User Guide
13
1
The Registration window appears.
2
Choose either Instant Web Activation (you need an Internet connection) or Phone Activation,
and enter the licence code you were given
If you do not yet have a licence code, click Need a licence code? This opens your web
browser and takes you to the eWater online shop.
14
3
Click Next. If you chose Instant Web Activation, you are asked to enter your eWater Toolkit
username and password.
4
Once you enter your username and password, click Register, and the Urban Developer
software is activated and ready to use.
Urban Developer User Guide
5
If you chose Phone Activation, click Next; make sure you have your licence number, and
eWater Toolkit username and password ready. Call the phone number listed on the
following screen:
6
Click Next. This screen shows identifying information from your computer. When asked,
read the information to the eWater representative.
The eWater representative will then give you an access code, which you enter into the
Access Code area at the bottom of the screen.
7
Once you have entered the access code, click Register, and the Urban Developer
software is activated and ready to use.
Urban Developer User Guide
15
Licence troubleshooting
No licence code
If you do not yet have a licence code, click Need a licence code (at the bottom of the initial
registration screen). This opens your web browser and takes you to the eWater online shop.
You can also go directly to the address www.licensing.ewater.com.au.
Error: This licence key no longer exists, you will need to re-activate with a new licence
key on next use
Contact [email protected] for more information.
Error: Disabled licence, contact support
If you check for an update to Urban Developer, and the Check for Updates screen (page 16)
displays this error, it is likely that the licence has been disabled due to a security issue. Contact
[email protected] for more information.
4.4
Quitting Urban Developer
To quit Urban Developer, select File > Exit, or click the Close button at the top-right of the Urban
Developer window.
Note
4.5
If you have made any changes to a project, Urban Developer will prompt you to save
the project file.
Uninstalling Urban Developer
Urban Developer can be uninstalled using the Control Panel Add or Remove Programs options in
Windows XP, or Programs and Features in Windows 7.
You do not need to uninstall previous versions of Urban Developer before updating to a newer
version.
Note
4.6
If you installed any Windows updates or service packs, do not uninstall them when
you uninstall Urban Developer.
Updating Urban Developer
Urban Developer cannot automatically update itself.
You can check manually for updates by either
• Visiting the Urban Developer home page at
http://www.ewater.com.au/products/ewater-toolkit/urban-tools/urban-developer/
16
Urban Developer User Guide
• Selecting Check Version... from the Help menu. The Check For New Version window appears.
You can check your software version against the most recent version available from the
eWater web site.
The line beginning Software Status indicates whether or not the software (and your licence) is
up to date, and if you have a current software support agreement.
Click Don't remind me again for this release to stop Urban Developer reminding you of new
versions.
If you do decide to update, click Download.
To see what has changed in the new version, click View Release Notes.
Installing a new version of Urban Developer
Before installing any newer version of Urban Developer, uninstall (page 16) the previous
version of Urban Developer.
Note
4.7
If you have created Urban Developer project files, be sure to store them outside of
the Urban Developer folder, or they may be removed when uninstalling Urban
Developer.
Version numbering
The version number will have three or four digits; for example: 0_3_1_558.
Major version number
The "0" is the major version number, and increases when major features or new capabilities
are added to the software. The major version number is "0" before the software is formally
released, then increases to "1".
Minor version number
The "3" is the minor version number, and usually increases when minor revisions are made.
Urban Developer User Guide
17
Bugfix version number
The third number, "1", increases each time a number of bug fixes have been made.
Build number
The final number, "558", is the build number. Each day, eWater's automated processes rebuild
the Urban Developer software. The build number is used for tracking bugs and other eWater
administrative purposes.
4.8
Version compatibility
All official releases of Urban Developer made through official eWater distributions will be
backward-compatible. This means that projects saved in an older version of Urban Developer
can be opened in newer versions of Urban Developer.
Should any compatibility issues arise with official releases please contact the eWater support
team immediately via email, [email protected], including a copy of the project file and
information on the version in which the model was last built and/or successfully saved and run.
The full product version number can be found in the About window (Help > About Urban Developer).
Backwards compatibility is not guaranteed for any interim releases made for testing or trialling
purposes. This includes all nightly automated builds, and all beta versions.
If you build projects using any version of Urban Developer, you should archive a copy of the
Urban Developer software along with the project file and data files.
18
Urban Developer User Guide
5
User Interface
In This Chapter
Dockable windows .................................................................................................................. 20
Undocking and moving windows ............................................................................................. 21
Re-display hidden or "lost" windows ....................................................................................... 22
Resizing windows in Urban Developer ................................................................................... 22
Menus ..................................................................................................................................... 23
Node Palette ........................................................................................................................... 27
Style Manager ......................................................................................................................... 28
Project Explorer....................................................................................................................... 28
Properties Panel...................................................................................................................... 30
Statistics Panel........................................................................................................................ 33
Log Reporter ........................................................................................................................... 34
Layer Manager ........................................................................................................................ 34
Recording Manager................................................................................................................. 35
Urban Developer Toolbars ...................................................................................................... 35
Urban Developer operates similarly to most Microsoft Windows applications. The diagram
below shows the Urban Developer main interface.
Urban Developer User Guide
19
Getting help
Wherever you see the help icon, or a help button, you can get
help on the current window. You can also right-click nodes and
select Help from the pop-up menu.
When you click the icon or help button, the Urban Developer
online help system opens, giving you information about the
current window or node. At the bottom of the help window is a
button that opens a feedback form, so you can provide feedback
about the current help topic.
Projects and Scenarios
Urban Developer uses a project and scenario approach to managing model development.
Urban Developer scenarios comprise a collection of node and link models, and their settings,
parameters and data files, all corresponding to one particular management approach within
the overall model.
A project is a collection (or container) of Urban Developer scenarios. Urban Developer stores
one or more scenarios in a project file. Only one project file can be open at a time.
Urban Developer models appear in the Schematic Editor, in the middle of the screen.
Different scenarios (ie different models or different approaches to management) appear in
"tabs" at the top of the Urban Developer window.
Project details (including each of the scenarios within the project) appear in the Project
Explorer (page 28), which (by default) appears on the left of the screen.
Note
5.1
The Project Explorer does not appear when you first run Urban Developer. From the
Urban Developer main menu, select View > Project Explorer to display it.
Dockable windows
Many of Urban Developer's windows can be "docked" or anchored within the main window, or
arranged independently. The dockable windows include:
•
Project Explorer
•
Style Manager
•
Layer Manager
•
Node Property Editor
•
Node Palette
•
Log Reporter
•
Recording Manager
•
Statistics Panel
If you have two monitors, you can put all the docked windows onto the second monitor, giving
you more space for the Schematic Editor on your main monitor.
20
Urban Developer User Guide
By default, Urban Developer displays the Node Palette and Layer Manager windows on the
screen. You can switch between them by either undocking them, or clicking the relevant tab at
the bottom of the window.
It is a good idea to display the Project Explorer - select View > Project Explorer, or click the Project
Explorer button on the View toolbar (on page 38). The window now appears as follows:
5.2
Undocking and moving windows
The default position of the dockable windows is docked. To undock a window, simply
double-click its title bar.
To move the window to other dockable points:
1
Activate the window by clicking it once. The title bar will be highlighted.
2
Click and drag the title bar of the window into another docking position within Urban
Developer, or to a position outside the main window.
3
Docking positions, or targets, are indicated using docking targets (small boxes around
the edges of the window). Release the mouse button when the mouse pointer is over a
docking target to dock the window.
Urban Developer User Guide
21
The picture below shows the Project Explorer (page 28) window being dragged (the small
boxes around the edge of the window are docking targets).
5.3
Re-display hidden or "lost" windows
To re-display a window that you have hidden or "lost":
1
From the Urban Developer main screen, select the View menu.
2
Select Reset All Windows.
This will reset the windows to their default position.
You can also use the View menu to hide or show various windows, including the Log Reporter
(page 34).
5.4
Resizing windows in Urban Developer
The overall size of the main window, and the dockable windows within it, can be adjusted as
follows.
• Use the full-screen toggle (Maximize) and Minimize buttons to hide or show the main
window.
• Use the resize controls around the edge of the main window, and the split controls between
the windows inside the main window, to arrange the Urban Developer interface.
Each resize or split control has a "resize zone", which is the border area between the individual
windows.
The image below shows the main window and an example of how the mouse cursor appears
as you move over each resize zone. The mouse cursor examples are enlarged for clarity.
22
Urban Developer User Guide
To resize, click the resize zone, then drag the mouse. The window will resize, and the other
windows will adjust themselves to fit the main window.
5.5
Menus
This section describes the functions available on Urban Developer menus.
File Menu
The File menu contains the standard commands for opening and saving Urban Developer
projects, and exiting the application.
Menu item
Notes
New
Create a new project or new scenario.
A project can contain one or more scenarios. From the File menu, you can create either a
project or a scenario, but if you create a project first, you must then create a scenario to
develop the model (ie the particular management approach) in. If you create a scenario,
Urban Developer will automatically create a project, and ask you to enter a name for the
project file.
Open
Open a previously-saved project or scenario.
Save
Save the current project. Urban Developer will ask for a name for the project file if you
have not saved the project before.
Urban Developer saves all open scenarios into the project file.
Save As...
Allows you to save the current project with another name.
(recent files)
This section display recently-loaded projects.
To load one of these projects, click the project's name.
Urban Developer User Guide
23
Menu item
Notes
Exit
Exits the Urban Developer application.
View Menu
The View menu allows you to hide and display various Urban Developer windows.
Menu Item
Notes
Project Explorer
Hides or displays the Project Explorer (page 28).
Recording Manager
Hides or displays the Recording Manager (page 78).
Log Reporter
Hides or displays the Log Reporter (page 34).
Layer Manager
Hides or displays the Layer Manager.
Node Palette
Hides or displays the Node Palette (page 27).
Style Manager
Hides or displays the Style Manager (page 28).
Statistics panel
Hides or displays the Statistics Panel (page 33).
Properties Panel
Hides or displays the Properties Panel (page 30).
Reset All Windows
Resets the main windows so that the Node Palette (page 27) and Schematic
Editor are visible.
Connect to node
centres
Makes the links appear to connect to a point at the centre of each node.
Select scenario
background
image...
Allows you to select a background image for each scenario in a project. Aerial
imagery helps to put node locations into their real-world context.
Remove scenario
background image
Removes the background image from the current scenario.
Zoom Settings
Allows you to change the zoom settings of the Schematic Editor.
Configure Menu
The Configure menu allows you to set the scenario analysis type, and water use characteristics
for the active, or current (page 54), scenario in the urban model.
You can also set the analysis type parameters using the Climate Toolbar (page 35).
Analysis Type
The Analysis Type submenu allows you to specify either an Observed Analysis simulation using
either observed or synthetic climate data, or Design Rainfall simulation using Australian
Rainfall and Runoff (ARR) design events.
See Observed Analysis (page 40) for instructions on setting up a simulation using observed
data, or Design Rainfall (page 39) for design storm generation.
Note
The Configure menu sets the analysis type and water use characteristics only for
the active scenario. If you have two or more scenarios you wish to run
simultaneously, you must independently set the properties for each scenario.
After running each scenario, you can compare scenario results using different
24
Urban Developer User Guide
configuration settings for climate and water use. Each scenario can run with different
climate input. If you wish to run scenarios with the same climate input, you need to
specify the same input data files for each scenario.
Water Use
The Water Use submenu provides options for configuring the Behavioural End use Stochastic
Simulation (BESS) model (Thyer et al, 2011).
Note
Only Water Use nodes in your scenario using the BESS model will be affected by the
choices made on this menu.
Menu item
Notes
Fixed appliances
and occupancy
This option produces a repeatable, probabilistic simulation of water use, using fixed
(ie user-specified) appliances and occupancy rates for each water use node.
Sampled
appliances and
occupancy
This option produces a repeatable (if configured in Random Seed Settings, see
below), probabilistic simulation of water use, using sampled appliances and
occupancy from user-defined probability distributions.
Random Seed
Settings
This option allows you to set the random seed used by the BESS model for water
use simulation - this enables production of repeatable random series. See Water
Use node (page 117) for more information.
These options are described in more detail in Configure climate data and water use behaviour
(page 39).
Tools Menu
The Tools menu contains commands for customising the behaviour of Urban Developer.
Options
The Tools menu contains commands for customising the behaviour of Urban Developer.
There are three categories of options. To select each category, click its name in the list on the
left of the Options window.
If you want to abandon any change you have made, click Cancel. Urban Developer will then
operate as it did before you changed any of the options.
To save the options, click Save.
To reset all options to their default values (as in a completely new installation of Urban
Developer), click Default.
General options
This screen controls the user interface behaviour of Urban Developer.
Option
Purpose
Show startup screen on
start up
If enabled, this option makes Urban Developer display the startup screen (on
page 12) the next time Urban Developer starts. Enabled by default.
Load last project when
application starts
If enabled, Load last project when application starts, makes Urban Developer load the
last Urban Developer project automatically. Note that large projects may take a
long time to load. If you start Urban Developer by double-clicking a .UDPROJ
file, Urban Developer will load the double-clicked project instead - so keep an
Urban Developer User Guide
25
Option
Purpose
empty project file available in case you enable Load last project when application
starts with a huge project loaded.
Show warning when
editing a style
If enabled, this option makes Urban Developer display a warning if you edit a
style (on page 66). Accidentally changing a style usually has adverse
consequences on a model, so the warning is enabled by default as a
safeguard.
Tab colour for each
schematic editor level
This editor allows you to assign a different tab colour to different "levels (on
page 71)" within the schematic editor.
Network checks
This screen enables or disables various model checks and warnings used by Urban
Developer. These checks will not prevent you from running an urban model, but they may
indicate when an urban model or node model configuration could lead to inaccurate results.
Option
Purpose
Show warning when a
water use node is used
with a Design Rainfall
configuration.
Design Rainfall should only be used for simulating stormwater runoff.
Show warning when a
behavioural water use
node has 30 houses or
less.
A sample size of less than 30 houses is likely to introduce statistical inaccuracy
to the behavioural water use model.
File Locations
This screen controls the default folders used by Urban Developer.
Option
Purpose
Default project folder
Default value: My Documents\My Urban Developer\Sample Projects
Default location for storing new scenarios.
Default data folder
Default value: My Documents\My Urban Developer\Sample Data
Default folder for input data
Water balance output
folder
Default value: My Documents\My Urban Developer\Water Balance
This folder contains a file listing the water balance for each node type in a
scenario.
Units
This screen allows you to set units displayed for various purposes.
Option
Purpose
Units for node statistics
Default value: m3/s
Sets the default units for displaying node statistics, on the Statistics panel
(page 33).
Diagnostics
If enabled, Calculate water balance during run creates text files containing sub-daily time series of
the water balance for all key node models in the scenario.
26
Urban Developer User Guide
The time-series files are stored in the Water balance output folder, on the File Locations page of
the Options screen.
See the description of each node type in Urban Developer's node types (page 93) for
information on what is recorded for each node.
Run Menu
To run the Urban Developer model, select Run, from the main menu, or click the Run button, at
the upper-right in the main interface (page 19).
Urban Developer displays the Running Scenario dialog.
If an error occurs, you will see a small
icon near the Stop button.
Once the run is complete, you can select the results to view, in the Recording Manager (page
78).
5.6
Node Palette
The Node Palette (View > Node Palette) displays the node models available within Urban
Developer.
For information on building models and adding nodes (and links) to Urban Developer models,
see Adding nodes and links to a model (page 60).
At the top of Node Palette is a drop-down menu; this drop-down menu filters the nodes
displayed into different categories.
Urban Developer User Guide
27
5.7
Style Manager
The Style Manager (View > Style Manger) allows you to save and re-use information describing
the physical entity or process represented by a node or link model component (ie a set of
parameters or configuration for a node or link model).
For example, a roof style (shown below) contains information on the roof area, time of
concentration and percentage of roof connected to a rainwater tank.
The Style Manager is essentially a library for both storing, and applying, user-defined node
model configurations.
For more information on creating and using styles, see Configuring multiple nodes using styles
(page 65).
Using styles also affects the operation of the Properties Panel (page 30).
5.8
Project Explorer
The Project Explorer (View > Project Explorer) contains:
• the Project Hierarchy (page 29) displays a hierarchical view of the project and scenario
structure. You can manage various aspects of the model components using the Project
Explorer, Project Hierarchy, Model Parameters, and pop-up menus.
28
Urban Developer User Guide
• the Project Parameters displays the parameters associated with scenario elements
(links, nodes, and so on).
Using the Project Explorer toolbar, you can create a new scenario (page 55), copy a scenario
(page 56), delete a scenario (page 57), choose which model outputs to record, and sort the
project structure by category, or alphabetically.
Project Hierarchy
The project hierarchy displays a structural breakdown of each scenario in a project. The
hierarchy shows different types of nodes and links, and can be sorted by the node and link
type (or category) and alphabetically by the name of each node and link.
The next two images show an alphabetically-sorted network (on the left) and a network sorted
by category (on the right).
Urban Developer User Guide
29
Recording node and link model outputs
To choose which node and link model parameters are recorded, and subsequently displayed
in the Recording Manager (page 78), right-click the required parameter and select the
appropriate option. The choice will be applied to the selected element and all elements below
it in the hierarchy. In the picture below, all Roof parameters will be recorded when you select
Record All.
5.9
Properties Panel
The properties panel (View > Properties Panel) is used to access and set component model
parameters.
You can rename nodes by editing the node name field and pressing Enter, or clicking
anywhere else within the Urban Developer window.
30
Urban Developer User Guide
Note
You cannot have duplicate node or link names in Urban Developer.
Some node property panels have more than one section. In the screen above, the Pervious
Area node has a Routing Data section (which is "open", or "expanded"), and a Soil Properties
section (which is "closed" or "contracted").
You can expand and contract the sections by either:
• double-clicking the section heading, or
• clicking the expand/contract icons (the triangle-in-circle icons)
Recommended ranges for certain parameters
Some Urban Developer nodes have recommended ranges for certain parameters. See the
surface area property of the Impervious Area (page 97) node for an example.
If you enter a value outside the recommended range, Urban Developer will display a warning
icon next to the edit field.
The property panel and styles
For an introduction to styles, see Configuring multiple nodes using styles (page 65).
When you select (ie left-click) a styled node, the Properties Panel displays the properties of the
style, not the node applied.
The following screen shows a styled roof node, with the node selected (in the Schematic
Editor, on the left). The Properties Panel shows the style name (Roof 1 Style 1), and the name
of the currently-selected styled node (Roof 1). Note that the Properties Panel is greyed-out, or
disabled, so you cannot accidentally change any of the style's properties.
Here, you can edit the style name, and also the node name, as the editing fields are not
disabled.
Urban Developer User Guide
31
You can also edit the style properties by clicking Edit.
The following screen shows the same node, but this time the style itself is selected (you can
see the style highlighted in the Style Manager). The Properties Panel now shows the style
name (Roof 1 Style 1), and the type of node (page 93) the style is applied to (Roof).
You can edit the style properties using the Edit button.
32
Urban Developer User Guide
Most nodes have the ability to add annotations describing their configuration and use. Click
the Notes Editor button in the node's property editor to display a small "notepad" area where
you can enter descriptive text:
You can also use the notepad area to describe styles (page 65).
Click Save Notes to save and store the note.
Click Discard to cancel any changes you make to the note.
Currently, Urban Developer has no ability to create a report of separate annotations in different
nodes.
Note
The maximum practical length of a note is approximately 10000 characters.
Property Styles within node and link models
Some of the sections within the property panel allow you to create styles for specific
properties. For nodes having this capability, there are Create, Edit and Delete buttons in the
relevant section heading. The screen below shows the Pervious Area node, which supports
styles (ie sets of parameters) for different soil types. See Pervious Area node (page 99) for
more information on the procedure.
Only one style property (Porosity) is shown for brevity; there are several others.
5.10
Statistics Panel
The Statistics Panel (View > Statistics Panel) displays statistical information about node outputs
after a simulation run.
Urban Developer User Guide
33
To view statistics for each node (total, minimum and maximum flows), right-click the node and
select Statistics from the pop-up menu.
You can select the text in the statistics panel by clicking and dragging the mouse cursor over
the text. Use Control-C to copy the text, and Control-V to paste the text into Microsoft Excel, or
other software application.
5.11
Log Reporter
The Log Reporter (View > Log Reporter) displays any errors, warnings or information messages
resulting from user actions, or events that have occurred in a scenario run.
You can hide or show different types of events by clicking the Errors, Warnings, or Info tabs at
the bottom of the Log Reporter.
In the picture above, the blue Errors and Warnings tabs mean that the Log Reporter displays
only the errors and warnings, not information messages.
• To clear the log, right-click the Log Reporter window and select Clear Log from the pop-up
menu.
• To copy the log contents to the Windows clipboard, right-click the Log Reporter window
and select Copy Log from the pop-up menu.
5.12
Layer Manager
The Layer Manager (View > Layer Manager) allows you to hide or show different types of
connections/links between nodes. Nodes are always displayed, regardless of the settings in
the Layer Manager.
Urban Developer displays different link types in different colours. See Link types and colours
(page 59) for more information.
To display all available layers, click All Layers.
34
Urban Developer User Guide
5.13
Recording Manager
The Recording Manager is hidden by default, and displays automatically after running a
scenario. The Recording Manager displays the chosen outputs of the nodes and allows you to
view the scenario results in graphical and tabular formats. See Recording Manager (page 78)
for more information.
5.14
Urban Developer Toolbars
This section describes the toolbars in Urban Developer.
Climate toolbar
The Climate toolbar allows you to set the input data type (Design Rainfall or Observed [rainfall]
Analysis).
Click Set Parameters to specify one or more input data files.
You can also set these parameters from the Configure menu.
File toolbar
The File toolbar allows you to create a new project, open an existing project, and save the
current project. See Projects & scenarios overview (page 54) for more information.
The Project Explorer toolbar contains four buttons:
Urban Developer User Guide
35
• New Scenario – creates a new Urban Developer scenario. When you create a new
scenario, the icon changes to the default Urban Developer icon.
• Copy Scenario – makes a copy of the highlighted scenario, and then asks you for a
name for the copied scenario.
• Delete Scenario – deletes the highlighted scenario
• Recording Options – allows quick selection to record all or none of the parameters
under the selected level of the scenario in the Project Hierarchy (page 29) when the
model is run. See Recording model outputs (page 77) for more information.
• Sort categorised - sorts the project hierarchy by category (link, type of link, then node,
type of node).
• Sort alphabetical - sorts the project hierarchy alphabetically by node or link name.
Recording Manager toolbar
The Recording Manager toolbar gives quick access to common functions.
Save Run Results - saves the entire result of a scenario run (all models, all nodes, and all
links) to a comma- or tab-delimited file.
Open Run Results - allows you to load the results from a previous scenario run.
Delete Run Results - deletes the run results for the current scenario. You cannot undelete run
results, so ensure you save the results first.
Sort Run Results - sorts the results based on the network run order. This means the elements
are sorted in the order of calculation in the flow, or distribution phase, from upper leaf nodes (ie
the uppermost nodes in the network) to the outlet node.
This command sorts the results in all tabs (ie for all scenarios) in the Recording Manager, so
that the results are comparable when you swap between tabs.
36
Urban Developer User Guide
Schematic Editor Toolbar
The Schematic Editor toolbar has options for moving and selecting model elements (ie nodes and
links) within the Schematic Editor.
To use these tools, click the icon in the toolbar, then click the Schematic Editor background, or
node or link.
Select - allows you to select a node or link. You can also click and drag around more than one
node to select them.
Zoom in - allows you to enlarge the model display by repeatedly clicking on the Schematic
Editor.
Zoom out - allows you to decrease the model display by repeatedly clicking on the Schematic
Editor.
Pan - allows you to move the model inside the Schematic Editor, from side to side, and up and
down. After selecting the Pan tool, click and drag the background of the Schematic Editor
(either the white background, or the background image if you have loaded a background
image.)
Show all - zooms the schematic out so you can see the entire model.
Grid settings - displays a window where you can set the grid size.
Exit subnetwork - moves you up one level in a network hierarchy if you are currently inside a
subnetwork node (page 108).
Charting Tool toolbar
The Charting Tool toolbar provides functions for viewing graphical and statistical data resulting
from running model simulations.
Urban Developer User Guide
37
There are a large number of functions available via this toolbar; see User Chart - graph tab
(page 81) for more information.
View Toolbar
The View toolbar shows and hides various windows and tools within the Urban Developer
main interface. With most of these tools, you must have a scenario open before the various
tools will appear.
Node Palette - Hides or displays the Node Palette (page 27).
Style Manager - Hides or displays the Style Manager (page 28).
Properties Panel - Hides or displays the Properties Panel (page 30).
Layer Manager - Hides or displays the Layer Manager.
Project Explorer - Hides or displays the Project Explorer (page 28). To choose the model
outputs to record, open the Project Explorer.
Recording Manager - Hides or displays the Recording Manager (page 78).
Statistics Panel - Hides or displays the Statistics Panel (page 33).
Log Reporter- Hides or displays the Log Reporter (page 34). Hides or displays the Layer
Manager. .
Reset All Windows - Resets the main windows so that the Node Palette (page 27),
Schematic Editor and Properties Panel are visible.
38
Urban Developer User Guide
6
Climate simulation
In This Chapter
Design Rainfall ........................................................................................................................ 39
Observed Analysis .................................................................................................................. 40
Each Urban Developer model requires a rainfall time series (at least) in order to run.
The behavioural end-use model also requires temperature data in order for the scenario to
run.
The rainfall-runoff model should be calibrated to local conditions whenever possible, using any
available data from within or near the catchment.
6.1
Design Rainfall
Design Rainfall uses the Australian Rainfall and Runoff (ARR) storm generation methodology.
ARR is a document produced by Engineers Australia, as a guideline for the estimation of flood
flows throughout the varied climatic regions of Australia. Urban Developer uses the 1987/1999
Edition of ARR for storm estimation.
For more information on ARR, see http://www.ncwe.org.au/arr/index.html.
To select the Design Rainfall tool:
1
There are two methods for specifying Design Rainfall.
a)
Select Design Rainfall from the Climate drop-down menu.
Urban Developer User Guide
39
2
6.2
b)
Click Set parameters. The Design Rainfall window appears.
c)
You can also select Configure > Analysis Type > Observed Analysis from the main menu.
The Observed Analysis window will then appear.
Configure the properties relevant to your project location, and choose an array of storm
durations appropriate to the critical times of concentration pertinent to your model.
Observed Analysis
Observed Analysis uses imported time series data files of observed rainfall, temperature and
evaporation. Urban Developer then uses this data to run a continuous simulation for the
duration of the imported climate files.
In an observed analysis, Urban Developer uses recorded time series data for rainfall,
evaporation and temperature.
To specify time-series data files:
1
There are two methods for specifying Observed Analysis climate data:
a)
40
Select Observed Analysis from the Climate drop-down menu.
Urban Developer User Guide
b)
Click Set parameters. The Observed Analysis window appears.
You can also select Configure > Analysis Type > Observed Analysis from the main menu. The
Observed Analysis window appears.
2
For each time series (rainfall, evaporation and temperature), click Open to select a data
file. You can also click Preview to display the file data at the bottom of the dialog.
3
To delete a data file from the Observed Analysis dialog, click Delete. This removes the
data file from the dialog, but does not delete the file from disk.
Urban Developer User Guide
41
42
Urban Developer User Guide
7
Demand and end-use simulation
In This Chapter
Average daily model................................................................................................................ 43
Behavioural model .................................................................................................................. 44
Behavioural model configuration............................................................................................. 45
Urban Developer represents demand is represented by simulating individual end-uses at the
household level. The end-use categories included in Urban Developer are:
• outdoor;
• shower;
• washing machine;
• toilets and
• indoor hand taps.
These five end-uses typically comprise 93-98% of household water use (Thyer et al, 2008).
End-uses such as baths and leaks are excluded. By separating demand into its individual
users this provides the user with the flexibility to use different sources for each of the different
types of end-use. The urban demand is represented by a Water Use node. Urban Developer
offers two methods for simulating the water use at a water use node, either:
• Average daily model, or
• Behavioural model , with two different configurations:
a)
Fixed appliances and occupancy specified for each water use node in the model
b)
Randomly sampled values for appliances and occupancy across the water use
nodes in the model
Refer to the Water Use (page 117) node for details on how to select between the two different
methods for a particular water use node.
7.1
Average daily model
In this model, the water use node uses monthly varying, average daily consumptions for indoor
and outdoor use. It disaggregates the daily demand data to a sub-daily time-step using a
non-dimensionalised diurnal pattern. A sample pattern is provided, however, you can specify
your own. See the Water Use (page 117) node section and the diurnal pattern (page 127) file
format specification for details on how to do this.
The disaggregated demand is then further portioned into different end-uses for both indoor
and outdoor consumption. This enables supply sources to be selected for different end uses.
You can also model demand management options by applying a demand reduction
percentage to individual end-uses, to represent things such as water-efficient appliances, and
Urban Developer User Guide
43
water saving practices. The discharge from consumption activities can also be apportioned to
various water streams in the water use node.
7.2
Behavioural model
The behavioural model provides simulation of water use using the Behavioural End-use
Stochastic simulator (BESS) of Thyer et al. (2011). BESS stochastically simulating individual
end-uses (outdoor, shower, washing machine, toilet, tap etc) at the household scale at
sub-daily time steps using algorithms which probabilistically simulate an individual
household’s use of common household water-using appliances. The conceptual framework for
BESS is provided as follows:
For indoor water uses the water use simulations for each household are based on the type of
water-using appliance and the household occupancy of that household. The difference from
the average daily model is that instead of specifying an average daily volume and percentages
for each end use the user specifies the water-using appliance and household occupancy and
BESS simulates the water for each individual end-use using the in-built parameters for the
water use event dynamics. The types of water-using appliances for each end-use currently
supported are listed in options for indoor water use appliance types. This enables users to
simulate the effects of changes in the uptake of water efficient appliances.
The appliances and occupancy for each household can be specified in two different ways:
• Fixed occupancy and appliances – where the type of appliances and occupancy for
each house are fixed by the user and
• Sampled appliances and occupancy – where the users inputs probability distributions
for the occupancy and water-using appliance. At the start of Urban Developer run the
occupancy and appliance type is randomly sampled for each house in the water use
nodes that are set to Behavioural. Further details on these two different configurations
are given in Behavioural model configuration (on page 45).
The statistical distributions used by BESS to generate the sub-daily indoor water use are
based on the end-use study of Roberts et al. (2005). Users are encouraged to check that the
predicted water use statistics provided by BESS match their expectations.
44
Urban Developer User Guide
BESS uses a diurnal variation based on Roberts et al. (2005) to vary the probability of water
use events occurring throughout the day. Future versions of Urban Developer will enable
users to input their own diurnal pattern, similar to the average daily model
For outdoor water, the behavioural model uses monthly varying, average daily values, which
can be input by the user - similar to the average daily model. For the sub-daily outdoor water
use, the daily values are evenly distributed throughout the day. Future versions of the
behavioural model will incorporate the behavioural impact daily weather has on outdoor water
use variability (Micevski et al, 2011).
7.3
Behavioural model configuration
For Water Use nodes set to behavioural mode, there are two options for specifying their
configuration.
From the Urban Developer main menu, select Configure > Water Use. The following table explains
the menu options.
Menu item
Notes
Fixed appliances
and occupancy
This option produces a repeatable, probabilistic simulation of water use, using fixed
(ie user-specified) appliances and occupancy rates for each water use node.
Sampled
appliances and
occupancy
This option produces a repeatable (if configured in Random Seed Settings, see
below), probabilistic simulation of water use, using sampled appliances and
occupancy from user-defined probability distributions.
Random Seed
Settings
This option allows you to set the random seed used by the BESS model for water
use simulation - this enables production of repeatable random series. See Water
Use node (page 117) for more information.
These water use configuration options act only on Water Use nodes within the scenario that
are set to the behavioural model. These options have no effect on any Water Use nodes in the
same scenario that use an Average Daily model.
You can have water use nodes with both Average Daily and Behavioural models active in the
same scenario, but the settings specified on the Configure menu only affect those water use
nodes in the scenario which use the Behavioural model.
Behavioural model with fixed appliances and occupancy
The behavioural water use model configuration with fixed appliances and occupancy allows
you to set appliance types for each end use (showers, washing machines, and toilets),
household occupancy and outdoor use for each water use node.
Using the behavioural model with fixed appliances and occupancy is the recommended
approach when you are simulating a smaller number of houses (< 400), and you want to
specify exactly the type of appliances and occupancy for each house.
Similarly to the average daily model, you select the supply source preference for each
individual end use.
For this behavioural model configuration (fixed appliances and occupancy) you set the indoor
end-use appliance types and occupancy for each water use node. Refer to the Water Use
node description (page 117) for instructions.
Urban Developer User Guide
45
Behavioural model with sampled appliances and occupancy
The behavioural water use model configuration with sampled appliances and occupancy
allows you to specify random sampling of occupancy and appliance types, for each household,
from statistical distributions.
Using the behavioural model with sampled appliances and occupancy is only recommended
when you are simulating a larger number of households (> 400) and you do not want to set the
appliance types /occupancy for each house.
Sample size requirements
If you specify sampled appliances and occupancy, you must specify a minimum number of
houses in order to provide a statistically-reliable sample of the household occupancy and
appliance type.
Due to random sampling in any particular Urban Developer run, the percentage of houses
actually sampled for each household occupancy and appliance type (the sampled percentage)
will not be exactly the same as what you specify (the true percentage).
For example - if you specify only 10 houses, with a true probability of 0.2 for 3-Star showers
and 0.8 for 1-Star showers, the chance of the sampled percentage being very different (eg: 0.5
3-Star and 0.5 2-Star) is much greater than with a large sample size.
The recommended minimum number of 400 houses ensures that for true percentages greater
than 10%, the sampled percentage of houses is within 30% of the true percentage for 90% of
the time.
You can specify a number of houses smaller than 400, but should be aware that the sampled
percentage of household occupancy and appliances types may be different than the
percentage you originally specified.
Random Seed Settings
Random seeding provides a way to control randomisation of simulation outcomes. Random
seeding applies to both sampled, and fixed, appliances configurations. The seed applies to
both allocation of appliance types (eg Shower 0-Star or Shower 3-Star) to a house, and the
actual water use, given the specified appliances. You can obtain repeatable results, or varied
results, or repeatably-varied results with the random seed settings.
When using probabilistic simulations in models such as BESS, it can be difficult to reproduce
results due to the random generation of water use. Urban Developer therefore allows you to
use any random seed, but to also specify whether to generate the same, or different, datasets
for each run.
Set the random seed using the Random Seed Settings window (Configure > Water Use > Random
Seed Settings).
For any random seed:
46
Urban Developer User Guide
• Always get the same dataset configures Urban Developer to produce a random dataset
based on the seed, however the dataset will be identical for each simulation run as long
as the seed remains the same.
If you want to get a different dataset, but still want it to be the same for every node every
time you run the project, change the seed.
• Get a different dataset each run configures Urban Developer to produce a random
dataset based on the seed, however the dataset is different for each simulation run.
This option produces a deterministic series of datasets: each time you open the project,
you will still get the same dataset on the first run as any other time you open the project
and run for the first time. Similarly, you will also always get the same 2nd dataset on the
second simulation run, and so on.
If you then want to get a different series of datasets, change the random seed.
Sampled appliances and occupancy configuration
This section describes how to configure the Water Use node for sampled appliances and
occupancy.
1
Select Configure > Water Use > Sampled Appliances and Occupancy from the Urban Developer
main menu. The Sampled Appliances and Occupancy window opens:
At the left of the window are several headings (Occupancy, Shower, etc) displaying the
probabilities for occupants per dwelling and water use efficiency. Click the heading to
expand or contract each section.
Urban Developer User Guide
47
2
Set the probability distribution (percentage) of houses for each occupancy (1-7 people).
In the example window, above, 11.3% of houses have one occupant, 22.7% of houses
have two occupants, etc.
3
Set the probability distribution (percentage) for each type and efficiency of water use (ie
shower, washing machine, etc). BESS randomly assigns the appliance type and
occupancy to each house based on these percentages. In the example above, 35% of
households have 0-Star showers, 45% have 1-Star showers, etc. As you enter the
numbers, the graph also dynamically re-draws itself, showing you the relative
probabilities.
Note
The probabilities in each appliance section should sum to 1 and cannot sum to
greater than 1.
If the probabilities do not sum to 1, the numbers, and the graph, will be coloured red,
but the model will still run.
If the probabilities sum to greater than one, a warning message appears, and the
model will not run.
Occupancy
To set the distribution of occupants, enter the relative proportion of occupants into the
right-hand side of the table. For example:
Occupants Probability
1
0.5
2
0.5
or
Occupants Probability
1
0.2
2
0.3
3
0.4
4
0.1
Water use appliance types for each end use (Shower, Washing machine, etc)
To set the distributions of appliance types, enter the relative proportions for each appliance
type into the text boxes on the right-hand side. The probabilities must sum to 1. For example:
Washing machine
Front-loading 0.75
Top-loading
0.25
The different water use elements available are as follows:
48
Water use
Notes
Shower
0, 1, 2 or 3-Star shower head
Washing
machine
Top loader, front loader
Urban Developer User Guide
Water use
Notes
Hand tap
Standard
Toilet
Dual flush 6/3 litre (3-Star)
Dual flush 9/4.5 litre (1-Star)
Dual flush 11/6 litre (0-Star)
Single flush 10 litre (0-Star)
Outdoor
This section enables you to specify the average monthly demand for outdoor water use,
including garden watering/irrigation, swimming pools, car washing, ornamental ponds etc
Water efficiency star ratings are based on WELS scheme (AS/NZS6400:2005, Water Efficient
Products - Rating and Labelling)
Viewing distribution graphs
To display a graph of the distribution for water use element efficiencies, click the header for
each section, or select the water use from the drop-down menu above the graph.
Creating and saving parameter sets
You can save parameter sets and re-use them in different scenarios and projects.
Select Parameters > New (the menu inside this window) or click New, to create a new parameter
set. The new parameter set will overwrite the currently-selected parameter set, so Urban
Developer will ask if you want to save the current parameter set.
The Parameters > Save, or Save command will save any changes to the parameter set currently
selected in the drop-down menu.
If you make changes to a parameter set, you can save them to a new parameter set using the
Parameters > Save As... or Save As... command.
Removing parameter sets
To remove a parameter set from the drop-down menu, and from the scenario, select the
parameter set and choose Parameters > Remove, or click Remove.
Importing and exporting parameter sets
The File menu has additional commands for importing previously-saved parameter sets, and
exporting parameter sets in CSV and Urban Developer "native" format (.WUP, for Water Use
Parameters).
Use the .WUP format for exporting parameter sets so that you can use them in different
scenarios and projects, ie select Parameters > Export..., then enter a name for the parameters,
then (in another project) use Parameters > Import... to import the parameters. Note that importing
a parameter set will overwrite any parameters you are currently using.
Use Parameters > Export to CSV... to export parameters to Microsoft Excel, or other applications
capable of reading the .CSV format.
Urban Developer User Guide
49
50
Urban Developer User Guide
8
Building models using Urban
Developer
In This Chapter
How to build a model of an urban water network .................................................................... 51
Projects & scenarios ............................................................................................................... 54
Input Data ................................................................................................................................ 57
Creating a model using nodes and links ................................................................................. 58
Configuring multiple nodes using styles.................................................................................. 65
This section describes the process of building an Urban Developer model. Subsequent
sections show how to run scenarios (page 77), and how to view scenario run results.
8.1
How to build a model of an urban water network
Urban Developer represents urban water networks and water cycle services models using a
node/link model structure. See Adding nodes and links to a model (page 60) for the procedure
for creating an Urban Developer model, and the node types (page 93) section for details on the
different node models.
In this User Guide, the following definitions apply:
• Nodes represent point or diffuse processes such as surface runoff generation, storage
routing and domestic water demand and use: at a node water can be added, extracted,
stored, or diverted. For example, a roof catchment, rainwater tank or a water use are all
represented by nodes.
• A node model refers to the algorithm underlying each different node type. For example,
the Urban Developer tank node (page 111) incorporates a generalised representation
(ie model) of the processes occurring in a physical tank. The tank node model can
therefore represent different uses of a tank: a rainwater tank, an irrigation water tank, or
other kind of tank, depending on your particular modelling scenario.
• Links represent the flow paths and conduits used to transport water and waste water
around urban environments. In Urban Developer, links are depicted as lines with
arrowheads indicating the direction of flow. Links are used to route water passing
between nodes.
• A link model refers to the algorithm underlying each link type.
• An Urban Developer model refers to a model of an urban water system; in other
words, the current scenario, the entirety of the processes you wish to model.
Urban Developer User Guide
51
Often, the word "model" is used to mean either i) a node model (tank, storage, catchment etc)
or ii) a particular scenario or particular management approach. This User Guide uses the full
name (node model, link model, or Urban Developer model) to avoid any ambiguity.
General approach
An Urban Developer model must always begin and end with a node, and nodes must be
connected by links.
The general approach is as follows:
1
Draw a node/link schematic diagram corresponding to the system under study.
2
Collect as much input and infrastructure data as possible, see which node or link
models can represent the infrastructure, and try to determine what information is
missing.
3
a)
Collect information relevant to each node (page 93).
b)
Test smaller models before combining into larger models, ie try an allotment-level
model to begin with, and ensure it conceptually makes sense and that the model
predictions are realistic.
Set the parameters for each node and link. This means specifying the physical
characteristics of the node to represent as closely as possible the situation in reality.
You can also apply a style (page 65) (a pre-defined set of parameters) to each node or
link to speed up the configuration process.
4
Choose the model outputs to record, using the Project Hierarchy (page 29). Most Urban
Developer models have a number of inputs and outputs that can be recorded and then
displayed, analysed, or exported in different formats.
5
Specify input climatic data (page 39) as either observed data, or as a design rainfall
input.
6
Run the model.
7
Expand the model (adding nodes and links) as necessary.
Note
In observed analysis mode (ie you are not using Design Rainfall) Urban Developer
applies the input time series data across the entire modelled system within the
currently-selected scenario. This means that if you specify an input rainfall file, that
rainfall is applied to all "catchment" nodes in the model: impervious/pervious areas,
roofs, etc. Downstream nodes receive the runoff from these catchment nodes; the
runoff then undergoes routing, distribution and use processes. Different scenarios
within the same project can have different climate inputs. For spatially distributed
modelling across larger areas, use Source Catchments, available from:
http://www.ewater.com.au/products/ewater-source/for-catchments/
52
8
Calibrate the model until it approximates the observed behaviour of the real-world
system.
9
Investigate real-world and proposed scenarios, changing the schematic and/or models
to represent the case that needs to be investigated.
10
Generate a report of modelling results and communicate this to your clients.
Urban Developer User Guide
11
Once the model is deemed sufficiently robust for real-world application, archive a copy
of the model's Urban Developer project files, input data files and a copy of Urban
Developer.
As with constructing the model, calibration is also an iterative process, and may involve
obtaining more data and/or adjusting the physical model to support operational calibration. A
baseline is established once operational parameters have been calibrated.
Simulations can be run for as long as users of the results keep asking questions. When an
initial water resource plan is being developed, routine simulation runs may continue for several
years. Thereafter, the model may be run on an as-needed basis.
Verification after calibration
Ideally verification would be carried out after calibration, however limits to available data at
present make this difficult to achieve.
Suggestions for documenting models
Whilst model integrity, model development governance and model and data provenance are
outside the scope of this User Guide, the following practices may be helpful:
• Establish a change control procedure for updating models, changing style parameters,
sources of data, etc.
• After a model is deemed to be suitable for real-world application, create an archive of
the model (Urban Developer project file), all input data files, and a copy of the Urban
Developer software used to develop the model.
• Establish conventions for naming links, nodes and styles.
Annotating node models
Most nodes have the ability to add annotations describing their configuration and use. Click
the Notes Editor button in the node's property editor to display a small "notepad" area where
you can enter descriptive text:
You can also use the notepad area to describe styles (page 65).
Click Save Notes to save and store the note.
Click Discard to cancel any changes you make to the note.
Currently, Urban Developer has no ability to create a report of separate annotations in different
nodes.
Note
The maximum practical length of a note is approximately 10000 characters.
Urban Developer User Guide
53
8.2
Projects & scenarios
Urban Developer uses a project and scenario approach to managing model development.
Urban Developer scenarios comprise a collection of node and link models, and their settings,
parameters and data files, all corresponding to one particular management approach within
the overall model.
A project is a collection (or container) of Urban Developer scenarios. Urban Developer stores
one or more scenarios in a project file. Only one project file can be open at a time.
A project can contain one or more scenarios. From the File menu, you can create either a
project or a scenario, but if you create a project first, you must then create a scenario to
develop the model (ie the particular management approach) in. If you create a scenario, Urban
Developer will automatically create a project, and ask you to enter a name for the project file.
Create a new project
Urban Developer stores one (or more) scenarios in a project file.
To create a new project:
1
From the main menu, select File > New > Project...
2
Enter a name for the project.
3
Enter a description for the project.
You can view the project description at any time by right-clicking the project name in the
Project Hierarchy (located within the Project Explorer (page 28)), and selecting Details...
from the pop-up menu.
4
Wait a few seconds for Urban Developer to prepare the project. The project name will
then appear in the Project Hierarchy.
As you build the project, its scenarios, nodes and links will be listed in the Project
Hierarchy under the project name.
Open a Project File
To load (or open) a project file:
1
From the main menu, select File > Open.
2
Find the folder where the project file was previously saved.
3
Either double-click the file, or select it and press Enter, to open it.
Note
Urban Developer project files use the extension .UDPROJ.
Save a project
To save a project file, either:
• Click Save Project in the File toolbar, or
• Use the Save or Save As options within the File menu to save your project.
54
Urban Developer User Guide
Saving a project automatically saves all the scenarios stored within the project.
Note that saving a project does not save the results of a scenario (simulation) run. Use the
save or export functions in the Recording Manager (page 78) to store or export scenario run
results.
Urban Developer project files use the extension .UDPROJ.
Note
Windows 7 will usually display the User Access Control permissions dialog if you try
to write new data to C:\Program Files\eWater\Urban Developer\Data (or anywhere
else under C:\Program Files). You should save new projects and scenarios in
another location.
Scenarios
Create a new scenario
In Urban Developer you initially create a blank scenario, that is, a scenario with no
pre-determined elements (models, links, or anything else).
To create a new scenario:
1
Click the New Scenario drop-down menu in the Project Explorer toolbar (page 35), or click File
> New > Scenario...
2
Enter a name for the scenario, or leave the default name.
A new scenario will automatically be made active, or current. The active scenario is displayed
in a highlighted tab, as shown below: Scenario #1 is the active scenario. Note that tabs are
colour-coded according to level; Subnetwork 1 (part of Scenario #1) is displayed in blue. See
Introduction to subnetworks (on page 71) for more information.
To rename a scenario:
To change the scenario name from the default (Scenario #n):
1
Select the scenario in the Project Hierarchy.
2
Once the scenario name is selected, pause then click again.
3
When it is highlighted in blue with a white margin, you can enter a new name. The
following pictures show the sequence.
Note Scenario names must be unique within an Urban Developer project.
Urban Developer User Guide
55
Copy a scenario
Copying a scenario creates a new scenario within the current project.
All scenario elements (nodes, links and styles) and settings are copied, except the outputs
selected for recording in the Project Hierarchy (page 29).
To copy a scenario:
1
In the Project Hierarchy, double-click the scenario you want to copy. This makes the
scenario active, and its name appears in bold.
2
Click Copy Scenario, in the Project Explorer toolbar (page 35).
3
Enter a new name for the copied scenario.
4
The new (ie the copy) scenario appears in the Project Hierarchy (page 29).
Rename a scenario
To rename a scenario:
To change the scenario name from the default (Scenario #n):
1
Select the scenario in the Project Hierarchy.
2
Once the scenario name is selected, pause then click again.
3
When it is highlighted in blue with a white margin, you can enter a new name. The
following pictures show the sequence.
Note
Scenario names must be unique within an Urban Developer project.
Making a scenario active
You can make a scenario active (or current) by either:
• double-clicking its name in the Project Hierarchy, or
• selecting the scenario's tab - click once on the tab to select it.
The active scenario is displayed in a highlighted tab, as shown below: Scenario #1 is the active
scenario. Note that tabs are colour-coded according to level; Subnetwork 1 (part of Scenario
#1) is displayed in blue. See Introduction to subnetworks (on page 71) for more information.
56
Urban Developer User Guide
Delete a scenario
Note
Once you delete a scenario, you cannot undelete it.
To delete a scenario:
1
In the Project Hierarchy (page 29), double-click the scenario you want to delete. This
makes the scenario active, and its name appears in bold.
2
Click Delete Scenario, in the Project Explorer toolbar (page 35).
Running a scenario
To run a scenario/run a model:
1
Construct the scenario with the required nodes, links, data files, etc.
2
Set the Climate inputs to either Observed Analysis (page 40) or Design Rainfall (page
39), then configure the climate data input (ie specify the data files to use, or set the
design rainfall parameters).
3
Select the outputs you want to record. See Project Hierarchy (page 29).
4
Click Run to start the simulation.
5
The simulation results appear in the Recording Manager (page 78).
Viewing scenario run results
Scenario run results are displayed in the Recording Manager (page 78) in a list arranged
under 4 column headings.
• Type – Urban Developer generic name for node or link, eg Inflow;
• Name – your name for that component;
• Attribute – name of output parameter as listed in Parameters, eg Additional Inflow; and
• Values – the actual results for that output parameter can be viewed by clicking on the
item in this column. The results appear in the Charting Tool (page 80), where you can
combine graphical outputs from more than one result, view statistical information on the
outputs, and view results in tabular format.
8.3
Input Data
Urban Developer uses standard data file formats (page 123) for its input data.
Note
In observed analysis mode (ie you are not using Design Rainfall) Urban Developer
applies the input time series data across the entire modelled system within the
currently-selected scenario. This means that if you specify an input rainfall file, that
rainfall is applied to all "catchment" nodes in the model: impervious/pervious areas,
roofs, etc. Downstream nodes receive the runoff from these catchment nodes; the
runoff then undergoes routing, distribution and use processes. Different scenarios
within the same project can have different climate inputs. For spatially distributed
modelling across larger areas, use Source Catchments, available from:
Urban Developer User Guide
57
http://www.ewater.com.au/products/ewater-source/for-catchments/
8.4
Creating a model using nodes and links
This section describes how to add nodes and links to create a representation of a physical
system. To configure more than one node or link at a time, or to create a set of parameters you
can apply to multiple nodes or links, see the section on styles (page 65).
Node models in Urban Developer
Urban Developer uses nodes to represent point or diffuse processes such as surface runoff
generation, storage routing and domestic water demand and use: at a node water can be
added, extracted, stored, or diverted. For example, a roof catchment, rainwater tank or a water
use are all represented by nodes.
The following table lists the node models currently available within Urban Developer. Each
node is represented by a specific icon. The table outlines the function of each node model;
other sections of this User Guide contain a more comprehensive description of the node
model.
Node icon
58
Node name
Purpose
Alternative supply
(page 105)
An alternative supply node represents decentralised and/or
non-traditional potable supply networks such as third-pipe
reticulation systems.
Impervious area
(page 97)
An impervious area node is used to model catchment areas of
zero infiltration, such as roads, driveways, parking lots, and
other concreted or paved surfaces.
Junction
(page 106)
A junction node represents aggregation of inflows of surface or
piped stormwater networks, and also assists in the schematic
representation of a network.
Mains water supply
(page 106)
A mains water supply node represents a potable supply from a
traditional centralised water supply network and/or treatment
plant.
Pervious area
(page 99)
A pervious area node models areas within the catchment that
allow infiltration and seepage to groundwater.
Receiving node
(page 121)
A receiving node represents the most downstream node in a
surface or piped stormwater network and is used for tracking
purposes.
Roof
(page 103)
A roof node represents a physical roof catchment surface, and
is similar to an impervious area node.
Subnetwork
(page 108)
A subnetwork is a characterisation of a group or cluster of
dwellings, water uses or general water demands, as a discrete
unit.
Urban Developer User Guide
Node icon
Node name
Purpose
Tank
(page 111)
A tank is a type of storage used in domestic, commercial and/or
industrial settings to store water collected from surface runoff or
sources such as greywater or blackwater waste streams. Once
stored the water can be released in a controlled manner, and/or
used to supply water demands.
Wastewater connection
(page 107)
A wastewater connection node represents a waste collection
network for blackwater and greywater waste streams.
Water use
(page 117)
A water use node represents urban water demand and water
consumption behaviour.
Link models in Urban Developer
Urban Developer uses links to connect nodes and represent the flow paths and conduits used
to transport water and waste water around urban environments. In Urban Developer, links are
depicted as lines with arrowheads indicating the direction of flow. Links are used to route water
passing between nodes.
Stormwater pipes, channels and sewer mains are all examples of entities represented by links.
You can only connect nodes using links. You cannot connect two links to each other without an
intervening node - use a junction node (page 106) if necessary.
Urban Developer displays different link types in different colours. See Link types and colours
(page 59) for more information.
Urban Developer attempts to simplify the model setup process and prevents conceptual
mistakes such as connecting a node input to a node input, or an output to an output. There are
restrictions on which node inputs and outputs you can connect together. See Urban Developer
node connection rules (page 94).
Link types and colours
Urban Developer uses colours to differentiate different types of links.
Demand links are blue.
A demand link supplies a requirement for water to be met from the sources in the urban water
system. Demands may be consumptive or non-consumptive and may, for example, include
town water supplies, irrigation, hydro, industrial, minimum flows, environmental and
recreational requirements, and inter-basin transfers, but need not be limited to these.
Some Urban Developer nodes have demand link outputs, as they supply a requirement (eg
mains supply), and other nodes have demand link inputs (eg Water Use).
Wastewater links are black.
A wastewater link conveys water which has been used at least once and hence is regarded as
unsuitable for immediate reuse for that purpose without treatment; water collected from
domestic and industrial sources to be treated prior to discharge to the environment or for
recycling for other uses.
Urban Developer User Guide
59
Certain Urban Developer nodes have wastewater outputs. For example, the Wastewater
Connection node collects, or aggregates, individual flows into a combined wastewater flow.
Other nodes have wastewater inputs. The Junction node acts as a collector of different flow
types (wastewater, runoff, etc).
Stormwater links are green.
Stormwater links convey sudden, excessive run-off of water following a storm. Surface runoff
results from excess rainfall, usually passing quickly through a drainage area.
The detention outflow of a Tank node is an example of an output feeding in to a stormwater
link. Stormwater links can feed into Wastewater nodes, Pervious Area nodes, and Junction
nodes.
Runoff links are green.
Runoff links convey flow from a given area; the flow results from the effects of rainwater and/or
applied irrigation water in excess of any demand.
Examples include Roof nodes, which have runoff link outputs, and Pervious and Impervious
Area nodes, which have runoff link inputs.
The following simple network shows the different link colours.
There are restrictions on which node inputs and outputs you can connect together. See Urban
Developer node connection rules (page 94).
Adding nodes and links to a model
To add a node to a model:
1
Ensure you can see the Node Palette (View > Node Palette).
2
From the Node Palette, select (ie left-click once) the node you want to add.
3
Drag (hold down the left mouse button and move the mouse) the node from the Node
Palette and drop it (release the left mouse button) onto the Schematic Editor.
Example - connecting a roof node to a tank node
1
60
Drag and drop a roof node to the Schematic Editor.
Urban Developer User Guide
Once the roof node is in the Schematic Editor, you can move it around: as you move the
mouse pointer over the node, the pointer changes to a 4-pointed arrow; you can move
the node around by clicking it and dragging the mouse.
2
Drag and drop a Tank node onto the editor.
To see the connection points (ie the places where you can connect inputs and outputs)
move the mouse pointer over a node.
.
The small triangles represent the connection points.
3
To connect the roof to the tank, move the mouse pointer over the Roof's Runoff to Tank
output. The mouse pointer changes to a small square:
4
Click and drag the mouse, and highlight the Tank node's inflow input.
5
Release the mouse. Urban Developer creates a link between the nodes. The pictures
below show how the link appears (left) with the option View > Connect to node centres set off,
and (right) View > Connect to node centres set on.
Urban Developer displays different link types in different colours. See Link types and
colours (page 59) for more information.
Urban Developer User Guide
61
Note
You cannot currently copy and paste nodes and links. This capability is planned for a
future version of Urban Developer. You can, however, copy an entire scenario (page
56).
Deleting nodes and links
To delete a node, either:
• Select the node you wish to delete by left-clicking it once (the node will be highlighted)
then press the Delete key on the keyboard, or
• Right-click the node, then select Delete from the pop-up menu.
To delete a link, either:
• Select the link you wish to delete by left-clicking it once (the link will be highlighted by
turning bold or will change to a dashed line) then press the Delete key on the keyboard,
or
• Right-click the link (it is easiest to right-click the link arrow), then select Delete from the
pop-up menu.
Deleting a node also deletes any attached links. Deleting a link only deletes the link.
Note
A delete operation cannot be undone. You must re-create the deleted link or node.
Default node names
Whenever a node, link or style (page 65) is created, it is given a default name in the pattern:
Type #
Where type is the type of node (roof, water use, etc), and # is a number that increases
monotonically for each node of the same type within the same scenario; ie the number resets
back to 1 in a new scenario. For example:
• Pervious Area 1
• Roof 1
• Roof 2
You should develop a consistent naming convention for nodes, links and styles to make them
easier to find.
62
Urban Developer User Guide
Note that in the Project Explorer, you can sort the nodes alphabetically and by category (ie the
type of node) using the Project Explorer toolbar.
The example below shows a simple network sorted alphabetically.
Editing node properties
Each node has various properties (model parameters, descriptive text, etc) associated with it.
For a description of each property, see Urban Developer's node types (page 93).
The process for editing style properties is similar. See Properties Panel (page 30) for more
information.
To edit node properties:
1
Ensure you can see the Properties Panel (View > Properties Panel).
2
In the Schematic Editor, select the node you wish to edit.
You can also right-click any node, and select Properties from the pop-up menu.
Urban Developer User Guide
63
3
In the Properties Panel, Urban Developer displays a list of properties relevant to the
node. The example below shows the Property Panel for a tank.
4
To edit any of the properties, enter the appropriate value and press Enter.
Note
Some property fields have built-in validation, to prevent entry of incorrect values, eg
negative numbers for area, or percentages over 100.
Renaming nodes and links
There are several ways of renaming nodes and links. To rename a style, see Renaming styles
(page 69).
To rename a node:
1
Ensure you can see the Properties Panel (View > Properties Panel).
2
Select the node you wish to rename (ie left-click the node once).
3
In the Properties Panel, enter the new name into the Node Name field.
To rename a link:
64
1
Ensure you can see the Properties Panel (View > Properties Panel).
2
Select the link you wish to rename (ie left-click the link arrow once). The arrowhead will
have a yellow selection box around it.
3
In the Properties Panel, enter the new name into the Link Name field.
Urban Developer User Guide
Using the Project Explorer to rename nodes and links
If you have a large, or complex network, the easiest way to rename nodes and links is to use
the Project Explorer:
1
Ensure you can see the Project Explorer (View > Project Explorer).
2
Sort the list of nodes and links by category, using the Sort Categorised (page 35) button.
3
Expand the list of nodes or links until you find the node type, or link, you wish to rename
(Junction, Mains Water Supply, and so on)
4
Click the node or link name once to select it, then click it once more. This puts the name
into editing mode.
5
Enter the new name, and press Enter.
In the picture above, the link between the roof and the tank is selected, and is in the
process of being renamed to Downpipe. The link name has not yet updated in the Link
Properties panel, but will be updated once you press Enter.
Note
8.5
Each node and link name must be unique. Urban Developer does not support
duplicate names for nodes or links.
Configuring multiple nodes using styles
Constructing Urban Developer models can be time-consuming. Apart from selecting the nodes
and creating links between them, you also have to enter data and model parameters for each
node model.
Styles - reducing data entry requirements
Urban Developer has an innovative feature called a style. A style is a reusable, user-defined
set of parameters that can be applied to multiple node model elements of the same type
(where type is roof, rainwater tank, pervious area, and so on).
Styles exploit the inherent similarity of model elements: in the one street or subdivision, for
example, many of the roofs will be identical.
Examples
• A rainwater tank style contains information on the tank dimensions, outlet configuration,
detention volume configuration and its connectivity to top-up supply.
• An impervious area style specifies the surface area, time of concentration and
depression storage depth.
Urban Developer User Guide
65
Create a style
Ensure you can see the Style Manager (View > Style Manager).
To create a node style, use any of these three methods:
• Right-click a node in the Node Palette, and drag and drop the node into the Style
Manager.
In this case, the style will contain the default settings for the node.
• Right-click a node in the Schematic Editor, and drag and drop the node into the Style
Manager.
In this case, the style will contain any changes to the parameters that you have set. This
is a good way of duplicating a heavily-customised node model.
• Right-click an existing style in the Style Manager, and drag and drop the node
elsewhere in the Style Manager.
In this case, the duplicated style is identical to the original style. This is a good way of
making minor changes to a node model, but having those changes applied quickly to all
models associated with the style.
Note 1
You cannot base a style on another style.
Note 2
You cannot create a subnetwork style in this version of Urban Developer
To check the settings for a particular style, click a node that has the style applied. The
Properties Panel then shows the settings.
Edit a node style
Note
Editing a style will change the properties for all nodes that use the style. When
making changes to large networks, save the Urban Developer project to a new file
(File > Save As...), so that you can reload the original file if the style change causes
unexpected results.
To edit a node style:
1
In the Style Manager, select the style, and then click Edit. The style's property fields,
including the style name, are unlocked so you can edit them - by default the editing
fields are locked so that you cannot accidentally change them.
By default, Urban Developer will warn you about changing styles; you can turn off this
warning if you wish, and re-enable it in the Options (page 25) screen.
66
Urban Developer User Guide
2
Once you have changed one or more properties, click in the Style Manager window and
the style's property fields with automatically lock again, as shown above.
Create a node (or multiple nodes) from a style
You can use a style to create a single node, or as many identical nodes as you need.
1
Left-click a style in the Style Manager.
2
Drag the style to the Schematic Editor, and drop the style onto a blank area of the
Schematic Editor.
Apply a style to a node
To apply a style to a node, or change a node's style, use either of these methods:
• Right-click a Style in the Style Manager, and then right-drag and drop the style onto a
node in the Schematic Editor. The node now has the style applied.
Using the right mouse button like this is also called "right-dragging".
• Left-click a node in the Schematic Editor. Use the drop-down menu in the Properties
Panel to select a style - only styles compatible with the currently-selected node are
shown. In the example below, the properties for the Roof 1 node show only
roof-node-compatible styles.
Urban Developer User Guide
67
Remove a style from a node
Note
You cannot remove a style from an individual node in Urban Developer v1.0. This will
be fixed in a subsequent release.
If you have created a styled node, and now wish to make the node "unique" (because it has
some characteristic that is different from other nodes of the same type), you must delete the
node, and then add a new node to the schematic.
Style example 1
This example illustrates the basic features of styles.
68
1
Create a new scenario.
2
Right-click the Roof node in the node palette, and drag and drop the node into the Style
Manager. A new style called Blank Roof Style 1 appears. New style names follow the
node naming rules (page 62).
3
Left-click (ie, select) the new style. Note that the roof area is 150 m 2.
4
Drag a roof node onto the schematic editor. This node is named Roof 2. By default, the
roof area is 150 m2.
5
Set the area of the Roof 2 node to 133 m2.
6
Right-click this roof node (on the schematic) and drag and drop it into the Style
Manager. A new style called Roof 2 Style 2 appears. (The name implies that this is style
1 that has been created from the node Roof 2.)
Urban Developer User Guide
7
The new style, Roof 2 Style 2, has inherited the custom area setting - 133 m2 - of the
Roof 2 node.
8
Select the Roof 2 Style 2 style, click Edit, and set the roof area to 400 m2.
9
In the schematic editor, select the node Roof 2. Note that as you move the mouse over
the node, the text Roof 2 Style 2 appears at the bottom. This indicates which style is
associated with that particular node. Also note that the area for Roof 2 has changed to
400 m2, since the value of the area in the style was changed.
Renaming styles
After creating a style, you should rename it to indicate its intent. For example, a style may
represent:
• a class or category of node types, such as metal roof, tiled roof, concrete roof, or paved
(pervious) area, un-mulched bare earth (pervious area) and so on, or
• a temporary, or test, node configuration (styling nodes means you need only change
parameters in one place, making changes easier to propagate throughout the model).
To rename a style:
1
Select the style in the Style Manager.
2
In the Style Properties panel, click Edit.
All fields in the style are enabled.
3
Enter the new name for the style.
4
Click anywhere in the Style Manager or Schematic Editor; the style name displayed will
change in the Style Manager and underneath the nodes in the Schematic Editor.
Urban Developer User Guide
69
70
Urban Developer User Guide
9
Grouping nodes and common
elements using subnetworks
In This Chapter
Introduction to subnetworks .................................................................................................... 71
Subnetwork operations: adding & deleting, editing, closing ...................................................72
Subnetwork basic concepts .................................................................................................... 73
Subnetworks and node styles ................................................................................................. 74
Urban Developer can operate at different scales, either allotment, street or suburb, or can be
used to group a number of dwellings into an allotment cluster (eg a block of flats, or several
streets in a new suburb).
In order to make the model easier to navigate and understand, you can group nodes together
into a subnetwork.
Examples
• You develop a comprehensive allotment model that gives good results. You then
re-create the model in a subnetwork, then create copies of the subnetwork to model an
entire cluster.
• A group of houses on one side of a street are grouped together in one subnetwork,
supplied by a particular mains supply; another group of houses on the other side of the
street are grouped together as they are supplied by a different mains supply.
Note
As of Urban Developer 1.0, subnetworks, and the way they behave, are a work in
progress. Later versions of Urban Developer are planned to have more advanced
subnetwork editing features. This User Guide will point out where editing a
subnetwork can make changes you may not expect.
eWater would appreciate any comments or suggestions you have about the
subnetworks feature. Please send all comments to [email protected].
Using subnetworks take some practice. Experiment with smaller projects before
using subnetworks in real models.
9.1
Introduction to subnetworks
A subnetwork is a specific node type, available from the Urban Developer Node Palette (page
27). Subnetworks have several inputs and outputs corresponding to different water sources
and demands, respectively.
Urban Developer User Guide
71
Conceptually, a subnetwork node acts as a "doorway" into the subnetwork proper. A
subnetwork itself is very similar to a scenario: you can add and delete nodes, make
connections between nodes, and so on. The differences between a subnetwork and a
scenario are that:
• A subnetwork must have a scenario, or another subnetwork, "above" it; and
• A subnetwork must have connections to its inputs and outputs, in order to be useful.
You enter the subnetwork by editing, or opening, the subnetwork node (see below). Once
opened, subnetworks are displayed as tabs inside the Schematic Editor. Tabs for different
levels are displayed in different colours (see the Options (page 25) screen for more
information) to make it easy to see which level you are currently editing.
You can place a subnetwork inside another subnetwork. Urban Developer limits the number of
levels of network to three: level 1 is the scenario, level 2 is a subnetwork inside the scenario,
and level 3 is a subnetwork inside the first subnetwork.
Note
When talking about scenarios and subnetworks, we use the term level: the scenario
level is the top level, a subnetwork in the scenario is the next level down, and a
subnetwork inside that subnetwork is at the bottom level.
Layers, on the other hand, represent categories of information (labels, links/link types,
other features, etc) that can be made visible or hidden on each level.
9.2
Subnetwork operations: adding & deleting, editing, closing
To add a subnetwork to an urban model:
To add a subnetwork, drag and drop a subnetwork node into the Schematic Editor.
To connect water inputs and outputs to a subnetwork:
To connect water inputs to a subnetwork, drag links from catchment or aggregation nodes and
link them to the appropriate subnetwork input. The process is the same for outputs from the
subnetwork. See Adding nodes and links to a model (page 60) for more information.
The example below shows a Tank node, with its Demand output being connected to the Tank
Supply input of a subnetwork. Initially, the subnetwork shows only the valid connection points
(left-hand picture). When you move the cursor over one of the connection points, all the other
connection points disappear so it is clearer which connection point you are choosing
(right-hand picture)..
To edit the contents of a subnetwork:
To "open" a subnetwork, right-click the subnetwork node and select Edit from the pop-up menu.
The subnetwork opens in a new tab in the Schematic Editor. You can switch between the
subnetwork tab and the scenario tab as necessary by clicking the relevant tab.
72
Urban Developer User Guide
To close a subnetwork:
If you have finished editing a subnetwork, click the red close button on the subnetwork tab.
This hides the subnetwork tab - the subnetwork node remains in the parent scenario or
subnetwork.
You will see a prompt asking "Delete subnetwork subnetwork name?". As mentioned,
subnetworks are very similar to scenarios, hence the similar wording.
To delete a subnetwork:
To delete a subnetwork, follow this procedure carefully:
1
Save the project using the existing name, but with "and subnetwork XXX" at the end of
the project name, where XXX is the subnetwork name. This step is not mandatory, but is
recommended in case you change your mind - subnetworks can be as complex as a
scenario, and Urban Developer does not yet provide an "undelete" function.
2
Close the subnetwork tab, if it is open.
3
In the scenario (or in the subnetwork above the subnetwork you wish to delete),
right-click the subnetwork node, then select Delete from the pop-up menu. Alternatively,
left-click the subnetwork node and press the Delete key.
Note
9.3
You must close the subnetwork tab before deleting the subnetwork.
Subnetwork basic concepts
This example will show you how to create and edit subnetworks.
This example shows only the mechanics of setting up and using subnetworks: the
subnetworks you create will not function as models; you will not connect anything to the
subnetwork inputs or outputs.
In later examples, you will use subnetworks as building blocks to create a more complex urban
model.
1
Create a new project and scenario. Save the project as Subnetworks and styles
01.udproj. By default, the project will be saved in \My Documents\My Urban
Developer\Sample Projects.
2
Add the following nodes to the scenario, Scenario 1. You don't need to connect the
nodes.
Node
Setting
Tank 1
Initial water depth (IWD) = 0.1
Tank 2
IWD = 0.2
Roof 1
Area = 1
Roof 2
Area = 2
To make it easier to remember the node settings, the node number (eg 2 in Tank 2), is
part of the node settings, eg for Tank 2, the initial water level (IWL) is 0.2.
Similarly, Roof 2 has an area of 2.
1
Add a subnetwork: Subnetwork 1.
Urban Developer User Guide
73
2
Edit Subnetwork 1 (Right-click Subnetwork 1, then select Edit Subnetwork), Note that a
new tab appears at the top of the Schematic Editor.
3
Add the following nodes to the subnetwork. As before, you don't need to connect the
nodes.
Node
Setting
Tank 3 (rename from tank 1; in a new
scenario or subnetwork you always start
from Tank 1, Roof 1, etc)
Initial water depth (IWD) = 0.3
Tank 4 (rename from Tank 2)
IWD = 0.4
Roof 3 (rename from Roof 1)
Area = 3
Roof 4 (rename from Roof 2)
Area = 4
Save the project as Subnetworks and styles 02.udproj.
Note
You cannot remove a style from an individual node in Urban Developer v1.0. This will
be fixed in a subsequent release.
1
Click the Scenario #1 tab.
2
Right-click Subnetwork 1 and select Delete. Note that you are warned that you have to
close the subnetwork tab first.
The next step is to examine how node styles operate within subnetworks.
9.4
Subnetworks and node styles
In this example, to make it easy to remember which nodes are styled and which are not:
• Even-numbered nodes are styled; odd-numbered nodes are not styled.
• As before, the node number, eg the "2" in Tank 2, is part of the settings, eg Tank 2 initial
water level is 0.2.
1
Click the Scenario #1 tab.
2
Create a style for Roof 2 by right-clicking Roof 2, and dragging and dropping into the
Style Manager. This creates a style called (by default) Roof 2 style 1. You can edit the style
name, but this example uses the default names.
3
Create a style for Tank 2 (Tank 2 style 1).
4
Edit Subnetwork 1, or click the Subnetwork 1 tab.
5
In Subnetwork 1:
6
a)
Create a style for Roof 4 (Roof 4 Style 1).
b)
Create a style for Tank 4 (Tank 4 Style 1).
Save the project as Subnetworks and styles 03.udproj.
Now there are styled and unstyled nodes within the scenario, and in the subnetwork.
Create styled nodes directly from styles
1
74
Select the scenario tab.
Urban Developer User Guide
2
From the Style Manager, left-click, and drag Roof 2 Style1 into the Schematic Editor.
This will create a node Roof 3/Roof 2 style 1 (denoted: node name/node style name).
Note that the area is 2.
3
Drag Tank 2 style 1 into the Schematic Editor, creating Tank 3/Tank 2 Style 1. Note the
IWD is 0.2.
You can create styled nodes directly from the styles in the Style Manager - this is much faster
than adding nodes individually, then configuring their parameters.
Delete a style from an individual node
Note
You cannot remove a style from an individual node in Urban Developer v1.0. This will
be fixed in a subsequent release.
Delete a style
You cannot delete a style while it is being used by one or more nodes.
To delete a style, first find and delete all nodes that have the style. Then, right-click the style in
the Style Manager and select Delete.
1
Try to delete the style Tank 2 Style 1, from the Style Manager. You cannot, as the style
is being used.
2
In the Schematic Editor, delete the node Tank 3/Tank 2 Style 1.
3
Try to delete the style Tank 2 Style 1, again. Deleting now works since no nodes are
using the style.
Urban Developer User Guide
75
76
Urban Developer User Guide
10
Running scenarios in Urban
Developer
In This Chapter
Running a scenario ................................................................................................................. 77
Recording model outputs ........................................................................................................ 77
Viewing results from the Recording Manager ......................................................................... 78
Examining Urban Developer model run results using the Charting Tool ................................80
This section describes how to select the node model outputs to record, how to run scenarios,
and how to view the results.
10.1
Running a scenario
Running a scenario is the Urban Developer process of applying observed time series inputs or
drivers to the currently selected scenario.
After a scenario run, you can see the results in the Recording Manager (page 78) at the bottom
of the Urban Developer main window.
Before running a scenario, you must:
• Construct a model in the Urban Developer schematic editor using an appropriate
configuration of nodes and links, and adjust node properties as required
• Configure the appropriate climate data, including rainfall.
• Use the Project Explorer to select the outputs to record.
The model can then be run through ‘Run’ button on the main Urban Developer toolbar.
10.2
Recording model outputs
After setting up a scenario, you then select the model outputs of interest.
When you run the models in a scenario, every node and link produces results in the form of
predicted water flows, volumes and other data outputs specific to each node and link.
Some node or link types can produce many data outputs. You can change the outputs that
Urban Developer records by default.
Note 1
Urban Developer does not automatically record all possible outputs of all nodes and
links. You must use the Project Explorer to check that the output you want will be
recorded (see below).
Urban Developer User Guide
77
Note 2
In general, the more outputs you record, the longer the simulation will take, though
this depends on exactly what you record: recording mass-balance is more
computationally intensive than recording inflow, for example.
Note 3
Urban Developer automatically saves the list of model outputs selected for recording
into the project file, however Urban Developer does not automatically save the
model run results themselves. You must save or export the model run results using
the options in the Recording Manager (page 78) toolbar.
Using the Project Hierarchy to select and record the model outputs of interest
1
Ensure you can see the Project Explorer (View > Project Explorer)
2
Right-click a node, link or other element in the Project Hierarchy (page 29) or Model
Parameters list.
3
To record all model parameters at this level and below, select Record All
pop-up menu.
4
To de-select all parameters, right-click a node, link, etc and select Record None
the pop-up menu.
5
If you select some (but not all) parameters at a lower level, the indicator will appear as
(partially filled).
from the
from
In the picture below some of the parameters in the node Roof 1 are recorded-, but
Depression Storage Volume is not recorded at all.
Using the Schematic Editor to select and record the model outputs of interest
10.3
1
Select a model element in the Schematic Editor (eg a catchment, node or link). The
chosen model element is highlighted in the Project Hierarchy.
2
Right-click the element's name in the Project Hierarchy and select the recording status
from the pop-up menu, or click the Record icon in the Project Explorer toolbar.
Viewing results from the Recording Manager
The Recording Manager (View > Recording Manager) is located at the bottom of the Urban
Developer main window, and lists the recorded outputs of scenarios after they are run.
The outputs displayed are set using the Project Explorer; see Recording Model Outputs (page
77).
78
Urban Developer User Guide
For multiple scenario runs a new results tab is created for each scenario. The tab name
contains the name of the scenario and the finish time of the scenario run.
The Type column displays the node type (Mains Water Supply, Wastewater Connection, or
other scenario element).
The Name column displays either an automatically-generated name (eg the default name for a
node or link) or a name you manually entered.
The Attribute column displays the selected and recorded outputs of a scenario element; Tank
elements have detention outflow and spill attributes, and others.
The Values column lists the outputs associated with the scenario element. To view the output
or outputs for a particular node or parameter, click the underlined link in the Values column.
The Charting Tool will display the data.
Urban Developer displays daily and subdaily time series
To highlight and group all outputs according to the node or link to which they belong, click once
on any of the node or link icons in the Schematic Editor.
Sorting scenario results
The Type, Name, and Attributes columns can be sorted alphabetically: click the column
header (ie click the word Type, Name or Attribute). To reverse the sort order, click the header a
second time.
You can also sort and select results according to the, node or link to which they belong. Click
once on any of the node or link elements in the Schematic Editor. This will display and select
the results relevant to that element.
You can also select results by node or link element by selecting them in the project hierarchy.
The Recording Manager toolbar gives quick access to common functions.
Save Run Results - saves the entire result of a scenario run (all models, all nodes, and all
links) to a comma- or tab-delimited file.
Open Run Results - allows you to load the results from a previous scenario run.
Delete Run Results - deletes the run results for the current scenario. You cannot undelete run
results, so ensure you save the results first.
Urban Developer User Guide
79
Sort Run Results - sorts the results based on the network run order. This means the elements
are sorted in the order of calculation in the flow, or distribution phase, from upper leaf nodes (ie
the uppermost nodes in the network) to the outlet node.
This command sorts the results in all tabs (ie for all scenarios) in the Recording Manager, so
that the results are comparable when you swap between tabs.
Errors and warnings
If the scenario run caused any errors, the error icon
appears on the tab.
If the scenario run had any associated warnings (usually, missing configuration data), the
warning icon
warning.
10.4
appears on the tab. See the Log Reporter (page 34) for details on the error or
Examining Urban Developer model run results using the
Charting Tool
After running a scenario, you can display the results listed in the Recording Manager (page
78).
To view the output (or outputs) for a particular node or parameter, click the underlined link in
the Values column. The Charting Tool then displays the data.
To view statistics for each node (total, minimum and maximum flows), right-click the node and
select Statistics from the pop-up menu.
To identify the outputs of a particular node, select the node in either the Schematic Editor, or
the Project Hierarchy, and the node outputs will be highlighted in the Recording Manager, as
shown below.
80
Urban Developer User Guide
If you cannot find the results you wanted in the Recording Manager, check that the parameter
is set to be recorded. See Recording model outputs (page 77).
Charting Tool - graph tab
The Graph toolbar
The Graph toolbar controls how the graph is displayed. It contains the following control
buttons:
The Charting Tool toolbar provides functions for viewing graphical and statistical data resulting
from running model simulations.
There are a large number of functions available via this toolbar; see User Chart - graph tab
(page 81) for more information.
You can also right-click any part of the graph to display a contextual menu containing some of
these functions.
Draggable (Drag to overlay)
The draggable tool (overlaying graphs) allows you to superimpose one graph over another
(baseline) graph for analysing and comparing results. If the data range for the baseline graph
is smaller than the comparison graph, the baseline graph will rescale to accept the incoming
data. Once overlaid, the graph will function in the same way as any individual graph.
The next section contains an example of overlaying several graphs onto another graph.
Reset
The reset button cancels all zoom commands and returns the graph to 100% magnification.
Log Y axis
The Log Y axis setting sets the Y axis to a log 10 scale.
Zoom
Use the Zoom command to zoom in on an area of the graph.
1
Ensure the draggable tool is not selected.
Urban Developer User Guide
81
2
Click the zoom tool, then click and drag within the graph's data area. The zoomed area
is previewed with a shaded area, as follows:
3
To reset the zoom back to 100%, so you can see the entire graph, click Reset Zoom.
After zooming in, the X and Y axes display scroll bars, so you can examine parts of the graph
outside the zoomed area. There are also two reset buttons at the top and left of each axis to
reset the zoom factor for each axis individually.
Hint - hide/show details
The hint tool displays the X and Y data values at the point under the mouse cursor. It also
displays two date range selector windows at the top right corner of the graph.
These can be used to manually enter a date range to display.
Unit selector
The units selector will change the display of graphed units as required and will only display
units appropriate for the selected graph.
Statistics display
This option is enabled only when you overlay one graph with another. It creates a difference or
scatter plot of the overlaid graphs. You can create difference plots with 2 or more graphs, but
scatter plots work only with 2 graphs.
Graph type
The data series can be displayed as either cumulative, exceedance or line graphs.
82
Urban Developer User Guide
Hide/Show legend
This command hides or shows the graph legend. The legend properties (colours, fonts, etc)
can be edited using the Graph properties and settings tool.
Graph properties and settings
Allows you to customise the graph appearance. See Editing graph properties (page 86).
Save options
See Saving and Exporting Data (page 86).
Viewing multiple (overlaid) graphs
Method 1 - Using the draggable tool:
1
Open two (or more) graphs from the Values column in the Recording Manager.
2
Decide which graph will be the baseline graph, and which graph(s) will be used for
comparison.
3
Click the Draggable button on the comparison graph.
4
Click-and-hold inside the graphed area of the comparison graph and drag it over the
baseline graph.
5
Drop the comparison onto the baseline by releasing the mouse button once over the
baseline graph.
6
The comparison graph will now display both data sets simultaneously.
Note
This function is most effective when the baseline graph is taken from the Recording
Manager. When the target graph is within a node tab the resultant graphic is usually
small and difficult to work with.
Displaying observed data (for comparison with modelled data)
You may wish to compare modelled with observed data. Urban Developer can display any
data file in the supported file formats (page 123).
To display observed data in the Urban Developer Charting Tool:
1
Locate the data file in Windows Explorer.
2
In Urban Developer, open the Recording Manager.
3
Left-drag the data file and drop it anywhere on the Urban Developer Recording
Manager's toolbar area.
4
The data file then opens in the Urban Developer Charting Tool.
When comparing observed and modelled results, use the observed results as the baseline
and the modelled results as the comparison. You can then overlay the observed results with 1
or more modelled results.
Urban Developer User Guide
83
Overlaying graphs - Example
This example shows the results of overlaying several graphs. The small network shown below
has 3 roofs and 3 tanks. Roof 1 has 100% of its runoff flowing to the tank; roofs 2 and 3 have
64% and 24% of their runoff, respectively, flowing to their tanks.
After supplying climatic data and running the model, open the graph for Complete Time Series
for Tank 1 - Water depth in tank.
The graph should appear as shown below. This will be the baseline graph (Tank 1, 100%
runoff from Roof 1). To make it easier to remember which graph is the baseline, move this
graph to the left-most side of the screen.
Open the Complete Time Series, water depth in tank for tanks 2 and 3. These will be the
comparison graphs. To make it easier to remember that these graphs are for comparison,
move them to the right-most side of the screen.
84
Urban Developer User Guide
Click the draggable tool for the water depth in tank 2 graph, and click-and-drag the graph over
the baseline graph. The result should appear as follows
After overlaying the graph for Tank 3 onto the baseline graph, the baseline graph appears as
follows:
You can overlay as many graphs as you want. Each overlaid graph receives a colour and is
represented in the legend when displayed.
If a colour is difficult to see, click Edit Graph Options, and select the Series tab (page 87).
Select the relevant series and edit its visual properties.
Method 2 - Multiple overlay by selection:
This method is easier if you have a large number of graphs to overlay.
Urban Developer User Guide
85
1
In the Recording Manager, select more than one output (eg via control-clicking the
desired outputs). In the example below, it is the water depth in the tank for all three
tanks.
2
Right-click one of the selected lines and choose View Selected from the pop-up menu.
Exporting and Saving Data
You can save the displayed data as an image, or export it for use in other analysis tools.
Saving graphs as images
Click Save Options > Save as Image. You can save the graph as an image in a variety of possible
image formats, including .PNG, .GIF, .JPG and .TIF.
Saving graph settings
This option allows you to save the graph settings (appearance, colours, axis settings, and so
on).
Exporting data
You can export the currently-graphed data for use in other analysis tools.
1
Click Save Options > Save Series Data. The following dialog appears (in this example, 3 time
series have been overlaid on the one graph):
2
Select the time series to save, then click Save As...
3
A standard Windows File-Save dialog appears. Choose the appropriate data format
(page 123), and click OK.
Editing graph properties
The graph property editor is available on all charts and can be accessed by clicking Edit Graph
Properties. You can edit different graph properties, as follows:
86
Urban Developer User Guide
• Series - controls the appearance of time series data.
• 3D Chart - sets the graph to display in 3D.
• Background - controls the appearance of the graph background and graph borders.
• Legend - controls the appearance of the legend font, colour and legend borders.
• Titles - controls the appearance of the primary and secondary title font, colour and title
borders.
• Export - controls for importing and exporting graph settings.
• Axis - controls the appearance and scaling for the X and Y axes.
At the bottom of the Graph Settings dialog, the Reset to User Graph Settings button resets all graph
settings to default values.
Graph properties - Series tab
The Series settings allow to you add/remove data series from the graph, and change how the
data is displayed. You can specify marker style and colour, and also display a secondary axis,
if you are displaying more than one time series.
If you have more than one data series displayed (see Viewing multiple (overlaid) graphs (page
83)), select the series from the list, then you can edit the series appearance.
You can add and remove data series using the Add and Remove buttons (ie you can graph data
independently of having to use the Recording Manager). You can add data series files in any
of the supported data formats (page 123).
You can alter which data series appears "on top" of the others using the Up and Down buttons.
By default, the last data series added will be "on top" of the others.
Urban Developer User Guide
87
Graph properties - 3D chart tab
The 3D chart tab allows you to view the time series in a pseudo-3D fashion; on some
occasions, viewing multiple time series can be easier to see this way.
Graph properties - Axis tab
The Axis tab allows you to specify grid settings, colours and intervals for the graph axes.
88
Urban Developer User Guide
Graph properties - Background tab
The Background tab allows you to specify colours and gradient fills for chart backgrounds.
This may help with chart readability when using a data projector.
Graph properties - Export tab
The Export tab allows you to export, or save, and import, chart settings.
Once you have a preferred style for charts, background, colours, etc, you can save all the
graph settings, and then re-use them in different Urban Developer projects. This can be useful
if your organisation has a preferred corporate style, branding and colour scheme.
Urban Developer User Guide
89
Graph properties - Titles tab
The Titles tab allows you to specify the text, font and colours for the graph titles. Darker colours
are best when projecting graphs using a data projector. The borders settings here apply only
to the border of the titles area.
Graph properties - Legend tab
The Legend tab allows you to specify the location and properties of the chart legend. The
borders settings here apply only to the border of the legend area.
90
Urban Developer User Guide
Urban Developer User Guide
91
11
Urban Developer's node types
In This Chapter
Urban Developer's node types ................................................................................................ 93
Node connection rules ............................................................................................................ 94
Catchment nodes .................................................................................................................... 97
Aggregation nodes ................................................................................................................ 105
Subnetwork nodes ................................................................................................................ 108
Functional nodes ................................................................................................................... 111
Receiving nodes.................................................................................................................... 121
11.1
Urban Developer's node types
This section lists all the Urban Developer node types, their characteristics and how their
models operate.
This section also describes the node connection rules ie the inputs and outputs that are
allowed to be connected.
Node icon
Node name
Purpose
Alternative supply
(page 105)
An alternative supply node represents decentralised and/or
non-traditional potable supply networks such as third-pipe
reticulation systems.
Impervious area
(page 97)
An impervious area node is used to model catchment areas of
zero infiltration, such as roads, driveways, parking lots, and
other concreted or paved surfaces.
Junction
(page 106)
A junction node represents aggregation of inflows of surface or
piped stormwater networks, and also assists in the schematic
representation of a network.
Mains water supply
(page 106)
A mains water supply node represents a potable supply from a
traditional centralised water supply network and/or treatment
plant.
Pervious area
(page 99)
A pervious area node models areas within the catchment that
allow infiltration and seepage to groundwater.
Receiving node
(page 121)
A receiving node represents the most downstream node in a
surface or piped stormwater network and is used for tracking
purposes.
Roof
(page 103)
A roof node represents a physical roof catchment surface, and
is similar to an impervious area node.
Urban Developer User Guide
93
Node icon
11.2
Node name
Purpose
Subnetwork
(page 108)
A subnetwork is a characterisation of a group or cluster of
dwellings, water uses or general water demands, as a discrete
unit.
Tank
(page 111)
A tank is a type of storage used in domestic, commercial and/or
industrial settings to store water collected from surface runoff or
sources such as greywater or blackwater waste streams. Once
stored the water can be released in a controlled manner, and/or
used to supply water demands.
Wastewater connection
(page 107)
A wastewater connection node represents a waste collection
network for blackwater and greywater waste streams.
Water use
(page 117)
A water use node represents urban water demand and water
consumption behaviour.
Node connection rules
The node connection rules are based on the link type (page 59) allowed between each node
output and input. When you draw links between outputs and inputs, Urban Developer prevents
you from connecting incompatible inputs and outputs together.
In the node model section (page 93), each node model input and output has a link type listed.
The table below summarises these connection rules in one place.
To use this table, look up the originating node in the left-most column, then the output you want
to connect (the destination node) in columns 2..29.
Example: from a Roof node, you can connect the Runoff Bypassing Tank output to an Impervious
Node Inflow input, but not the Runoff to Tank input.
This table shows the allowed connections between a source node, and a destination node.
The Destination node column specifies which output of the Source node can connect to the
nodes below it. For example, the Impervious Area node's Runoff output can connect to
another Impervious Area node's Inflow input, or a Junction node's Inflow input.
When you create a link between an upstream node and downstream node, Urban Developer
automatically shows only the compatible connection points on the downstream node. For
example, when connecting a Tank node to a Subnetwork node, only the compatible
Subnetwork inputs appear:
94
Urban Developer User Guide
Node icon
Source node name
Source node output
Destination node - destination input type
Alternative supply
(page 105)
Outflow
Impervious area
(page 97)
Runoff
Junction
(page 106)
Outflow
Mains water supply
(page 106)
Outflow
Pervious area
(page 99)
Runoff
Receiving node
(page 121)
Receiving nodes can accept only stormwater and runoff
outflows from other nodes.
Roof
(page 103)
Runoff to tank
Alternative Supply - Inflow
Subnetwork - Alternative Supply 1 & 2
Water Use - Alternative Supply 1 & 2
Impervious Area - Inflow
Junction - Inflow
Pervious Area - Inflow
Receiving Node - Inflow
Subnetwork - Surface Inflow
Tank - Rainwater/Stormwater
Impervious Area - Inflow
Junction - Inflow
Pervious Area - Inflow
Receiving Node - Inflow
Subnetwork - Surface inflow, piped inflow
Tank - Rainwater/Stormwater
Mains Water Supply - Inflow
Subnetwork - Mains supply
Water Use - Mains supply
Impervious Area - Inflow
Junction - Inflow
Pervious Area - Inflow
Receiving Node - Inflow
Subnetwork - Surface Inflow
Tank - Rainwater/Stormwater
Junction - Inflow
Receiving Node - Inflow
Subnetwork - Piped inflow
Tank - Rainwater/Stormwater
Runoff bypassing tank
Impervious Area - Inflow
Junction - Inflow
Pervious Area - Inflow
Receiving Node - Inflow
Subnetwork - Surface inflow, Piped inflow
Tank - Rainwater/Stormwater
Urban Developer User Guide
95
Node icon
Source node name
Source node output
Destination node - destination input type
Subnetwork
(page 108)
Surface runoff
Impervious Area - Inflow
Junction - Inflow
Pervious Area - Inflow
Receiving Node - Inflow
Subnetwork - Surface inflow
Piped discharge 1, Piped discharge 2
Impervious Area - Inflow
Junction - Inflow
Pervious Area - Inflow
Receiving Node - Inflow
Subnetwork - Piped inflow
Tank - Rainwater/Stormwater
Greywater, Blackwater
Subnetwork - Piped inflow
Tank - Recycled
Wastewater Connection - Inflow
Irrigation/Other
Pervious Area - Inflow
Subnetwork - Surface inflow, piped inflow
Wastewater Connection - Inflow
Spill
Tank
(page 111)
Impervious Area - Inflow
Junction - Inflow
Pervious Area - Inflow
Receiving Node - Inflow
Subnetwork - Surface inflow
Detention Outflow
Impervious Area - Inflow
Junction - Inflow
Pervious Area - Inflow
Receiving Node - Inflow
Subnetwork - Surface inflow, piped inflow
Tank - Rainwater/Stormwater
Demand
Alternative Supply - Inflow
Mains Water Supply - Inflow
Subnetwork - Mains supply, Tank supply, Alternative supply 1
&2
Wastewater Connection - Inflow
Water Use - Mains supply, Tank supply, Alternative supply 1 &
2
96
Wastewater connection
(page 107)
Outflow
Water use
(page 117)
Greywater
Tank - Recycled
Wastewater Connection - Inflow
Subnetwork - Piped inflow
Tank - Recycled
Wastewater Connection - Inflow
Urban Developer User Guide
Node icon
Source node name
Source node output
Destination node - destination input type
Blackwater
Subnetwork - Piped inflow
Tank - Recycled
Wastewater Connection - Inflow
Irrigation/Other
Pervious Area - Inflow
Subnetwork - Surface inflow, piped inflow
Tank - Recycled
Wastewater Connection - Inflow
11.3
Catchment nodes
Impervious Area
Usage
An impervious area node is used to model catchment areas of zero infiltration, such as roads,
driveways, parking lots, and other concreted or paved surfaces.
Rainfall and surface inflow, from adjacent upstream surfaces, supply water to the impervious
surface and fill the available depression storage. Evaporation draws down this store through
the conversion of liquid water to vapour before its subsequent atmospheric transfer away from
the surface. Surface runoff occurs when the available surface depression storage is
exceeded.
You must enter a time of concentration for the catchment calculated to represent the
catchment surface characteristics as accurately as possible.
Restrictions
The surface area of the impervious area node must be > 0 m 2.
There are restrictions on which node inputs and outputs you can connect together. See Urban
Developer node connection rules (page 94).
Node inputs
• Inflow: The impervious area receives inflow from other nodes. The inflow into the node,
and the rainfall falling on to the catchment area of the node, is then routed over the
surface.
Link type (page 59): Runoff
Node outputs
• Runoff: The flow leaving the impervious area.
Link type (page 59): Runoff
Urban Developer User Guide
97
Other node properties
Node property
Notes
Node name
Node name.
Surface area (m2)
Defines the total surface area of the impervious area
represented by the node.
Urban Developer does not enforce a maximum area for this
node type, however the algorithms used to determine the
hydrologic response (particularly peak flow) are not accurate
for areas greater than 1000 m2 or flow path lengths longer
than around 50 m.
Default: 100 m2
Recommended minimum: 1 m2
Recommended maximum: 1000 m2
Constraint(s): > 0 m2
Time of concentration (min)
The time of concentration represents the time taken for
surface runoff to travel from the most hydraulically-remote
point in the catchment to the catchment outlet.
Default: 2 min
Recommended minimum: > 1 m
Recommended maximum: Constraint(s): > 0 min
Average depression storage depth (mm)
Represents the depth of the impervious area’s depression
storage, which is filled in a rainfall event, before surface
runoff occurs.
Default: 1 mm
Recommended minimum: Recommended maximum: Constraint(s): ≥ 0 mm, < 100 mm
Model statistics recorded during a simulation
To select/deselect statistics recording during a simulation, use the Project Hierarchy (page
77). Urban Developer records the following statistics for this node (entries in bold are recorded
by default).
• Depression Storage Volume at the end of a run (Total m 3) Relevant only to the last
timestep, and records the volume of water left in the depression storage that has not yet
been lost to either evaporation or runoff.
• Inflow (Total m3, Minimum L/s, Maximum, L/s)
• Rainfall (Total m3, Total m)
• Runoff (Total m3, Minimum L/s, Maximum L/s)
• Surface Evaporation Rate (Total m3, Minimum L/s, Maximum L/s)
Water quality
No water quality parameters are supported in this version of Urban Developer.
Water balance
This node can record water balance parameters for each time step. To enable water balance
recording, select Tools > Options. Water balance recording is on the Diagnostics screen in the
Options (page 25) window. The following parameters are recorded:
Date, Time, Inflow (L), Rainfall (mm), Outflow (L), Av depression depth (mm), Surface total
evaporation (mm).
98
Urban Developer User Guide
Pervious area
Usage
A pervious area node models areas within the catchment that allow infiltration and seepage to
groundwater.
The node is similar to the impervious area with the addition of underlying soil moisture stores.
The dynamic surface and sub-soil infiltration rate is calculated with a two-zone soil-moisture
storage water balance model based on the Holtan methodology (Holtan, 1961). Surface water
infiltrates from the depression storage into the underlying root zone soil moisture store at an
infiltration rate governed by the available supply and the moisture content of the root zone soil
itself. Surface runoff occurs when the available surface depression storage is exceeded and
the rate of rainfall is greater than the surface infiltration rate.
You can specify a fixed Time of Concentration (Tc) or use Urban Developer to estimate a Tc for
each event as a function of average storm intensity, through the kinematic wave
approximation.
Restrictions
There are restrictions on which node inputs and outputs you can connect together. See Urban
Developer node connection rules (page 94).
Node inputs
• Inflow: The inflow to the pervious area node can be used to model the implications of
irrigation. In this way it can be linked to a water use node where garden irrigation has
been set.
Link type (page 59): Runoff
Node outputs
• Runoff: Runoff from the pervious area
Link type (page 59): Runoff
• Root zone infiltration
Link type (page 59): Runoff
Other node properties
Node property
Notes
Node name
Node name.
Routing data
Surface area (m2)
Total surface area over which runoff occurs.
Urban Developer does not enforce a maximum area for this
node type, however the algorithms used to determine the
hydrologic response (particularly peak flow) are not accurate
for areas greater than 1000 m2 or flow path lengths longer
than around 50 m.
Default: 150 m2
Recommended minimum: 1 m2
Recommended maximum: 1000 m2
Constraint(s): > 0 m2
Urban Developer User Guide
99
Node property
Notes
Average depression storage depth (mm)
Average depression storage for the catchment surface that
must be satisfied before runoff occurs.
Default: 5 mm
Recommended minimum: Recommended maximum: Constraint(s): ≥ 0 mm, < 100 mm
Time of concentration
For pervious surfaces you can specify Tc can be specified as
a fixed value or calculated for each rainfall event as a function
of the rainfall intensity using the kinematic wave
approximation.
Use a Fixed Time of Concentration
(min)
Fixed time of concentration for all rainfall events.
Default: 2 min
Recommended minimum: > 1 m
Recommended maximum: Constraint(s): > 0 min
Use the Kinematic Wave Time of
Concentration Equation
Length (m)
Length of longest overland sheet flow path.
Default: 10 min
Recommended minimum: Recommended maximum: Constraint(s): > 0 m
Slope (m/m)
Slope of the overland sheet flow path.
Default: 0.01 m/m
Recommended minimum: Recommended maximum: Constraint(s): > 0 m/m, < 1 m/m
Manning's n
Manning’s n for pervious surfaces (see the link below for a
table of Manning's n values)
Default: 0.03
Recommended minimum: > 0.02
Recommended maximum: < 0.15
Constraint(s): < 1
Soil properties
Soil style
Select the desired soil type from the drop-down menu.
Model statistics recorded during a simulation
To select/deselect statistics recording during a simulation, use the Project Hierarchy (page
77). Urban Developer records the following statistics for this node (entries in bold are recorded
by default).
• Depression Storage Volume at the end of a run (Total m 3). Relevant only to the last
timestep, and records the volume of water left in the depression storage that has not yet
been lost to either evaporation or runoff.
• Inflow (Total m3, Minimum L/s, Maximum L/s)
• Rainfall (Total m3, Total m)
• Runoff (Total m3, Minimum L/s, Maximum L/s, Number of Runoff Days)
• Subsurface Soil Storage Volume (Total m3) Relevant only to the last timestep, and
records the volume of water left in the soil storage that has not yet been lost to either
evaporation or subsoil infiltration.
100
Urban Developer User Guide
• Surface Evaporation (Total m3, Minimum L/s, Maximum L/s, Number of Runoff Days)
• Total Subsurface Infiltration (Total m3)
Soil style editor
Urban Developer allows you to define styles for different soil types. The available soil types are
displayed in the drop-down menu below the Soil Properties bar.
By default, when you select a soil type style, all the property fields are displayed as disabled, to
prevent you from accidentally changing them.
To edit the current soil type style
1
Click Edit, in the Soil Properties bar. The property fields will be enabled.
2
Change the properties as necessary.
3
To save your changes, click once in the Style name field. The property fields will change
back to a disabled state.
To add a new soil style
1
Click New, in the Soil Properties bar. The property fields will be enabled.
2
Change the properties as necessary. The previous soil style's property values remain in
each field.
3
To save your changes, click once in the Style name field. The property fields will change
back to a disabled state.
To delete a soil style
1
Click Delete, in the Soil Properties bar. The style will be removed.
2
Note that you cannot undo a style deletion.
Soil properties
Soil property
Notes
Style name
Soil style name. Names must be unique.
Porosity (m3/m3)
The ratio of the soil void space to the total soil volume.
Default: 0.35
Recommended minimum: Recommended maximum: Constraint(s): > 0, ≤ 1
Wilting point (m3/m3)
The soil moisture content below which evapotranspiration
ceases. Volumetric soil moisture content at wilting point
typically ranges between 0.05 for sandy soils and 0.25 - 0.3
for clays.
Default: 0.15
Recommended minimum: 0.05 m3/m3
Recommended maximum: 0.25 m3/m3
Constraint(s): > 0, ≤ 1
Field capacity (m3/m3)
The soil moisture content at which further gravitational
drainage is negligible. Typical volumetric soil moisture
content at field capacities can be as low as 0.1 for sands and
in excess of 0.3 for clay soils.
Default: 0.35
Recommended minimum: Recommended maximum: Constraint(s): > 0, ≤ 1
Urban Developer User Guide
101
Soil property
Notes
Initial degree of saturation (%)
The antecedent soil moisture volume-to-void ratio at the
beginning of the simulation.
Default: 85%
Recommended minimum: Recommended maximum: Constraint(s): ≥ 0, ≤ 1
Holtan vegetation factor
A factor representing the amount of vegetation. Usually 0.8
for most wooded areas and 1.0 for permanent pasture.
Default: 1
Recommended minimum: > 0.1
Recommended maximum: < 1
Constraint(s): > 0, ≤ 1
Holtan growth index
A factor between 0.1 and 1.0 dependant on the maturity of
plants in the catchment, where 1.0 is for mature plants,
Default: 1
Recommended minimum: > 0.8
Recommended maximum: < 1
Constraint(s): > 0, ≤ 1
Root zone depth (mm)
The depth of the root zone below the surface.
Default: 100 mm
Recommended minimum: Recommended maximum: < 5000 mm
Constraint(s): > 0 mm
Saturation root zone hydraulic
conductivity (mm/h)
The saturated infiltration rate of the root zone.
Default: 5 mm/h
Recommended minimum: Recommended maximum: < 1000 mm/h
Constraint(s): > 0 mm/h
Sub-surface percolation rate (mm/h)
The final infiltration rate deeper below the surface layer once
the root zone is saturated.
Default: 25 mm/h
Recommended minimum: Recommended minimum: < 100 mm/h
Constraint(s): > 0 mm/h
Manning's n values
For a table of common Manning's n values, see
http://www.hec.usace.army.mil/software/hec-ras/documents/hydref/chap03.pdf.
Water balance
This node can record water balance parameters for each time step. To enable water balance
recording, select Tools > Options. Water balance recording is on the Diagnostics screen in the
Options (page 25) window. The following parameters are recorded:
Date, Time, Inflow (L), Rainfall (mm), Outflow (L), Root zone infiltration (L), Root zone soil
moisture (L), Sub-surface infiltration (L), Surface total evaporation (mm), Root zone
evaporation (L), Depression storage volume (L).
Holtan index
The Holtan method assumes proportionality between the (subsurface) infiltration rate and the
available water storage (ie depression storage) in the surface layer of the soil.
102
Urban Developer User Guide
As water infiltrates below the surface, these water storages are filled up, the available storage
decreases and the infiltration rate decreases accordingly. Some of the water that fills the
"surface layer" storages is assumed to infiltrate deeper below the surface layer at the
saturated root zone infiltration rate. The soil water balance continues to be calculated
throughout the simulation, in periods of no rain, and soil water storages are emptied due to
infiltration and evaporative losses at this time. This methodology allows the realistic
representation throughout the simulation, of the effects of the antecedent catchment condition
on runoff.
The Holtan method was originally developed to model agricultural runoff, but can be applied to
any vegetated ground, whether it be heavily wooded areas or grasslands, or vegetated areas
in the urban landscape. Note that it is a simplified, two-zone soil-profile model, and uses the
term "subsurface infiltration rate" to refer to infiltration into soil depression storage.
The Growth Index is a measure of plant maturity. It ranges from 0.1 to 1.0, with G = 1.0 being
applicable for mature plants.
The Vegetative Factor represents the amount of vegetation cover, with a value of 0.8
recommended for heavily-wooded areas and a value of 1.0 for permanent pasture.
Roof
Usage
A roof node represents a physical roof catchment surface, and is similar to an impervious area
node. The roof model has no infiltration, and quickly produces surface runoff during a rainfall
event. You must specify a catchment area, time of concentration for the roof catchment,
maximum depression storage, and what percentage of the roof area is connected to a
rainwater harvesting tank.
Restrictions
The roof node surface area must be > 0.
There are restrictions on which node inputs and outputs you can connect together. See Urban
Developer node connection rules (page 94).
Node inputs
There are no node inputs (ie nothing is "upstream" of a roof); however climate inputs, such as
rainfall and evapotranspiration, and design rainfall settings, are applied to the node.
Node outputs
• Runoff to tank: Runoff quantity is proportional to the % of roof connected to tank.
Link type (page 59): Runoff
• Runoff bypassing tank: Other runoff; not connected to a tank.
Link type (page 59): Runoff
Other node properties
Input
Notes
Node name
Identifying name for the roof. The name must be unique.
Urban Developer User Guide
103
Input
Notes
Roof area (m2)
Total area of the roof.
Urban Developer does not enforce a maximum area for this
node type, however the algorithms used to determine the
hydrologic response (particularly peak flow) are not accurate
for areas greater than 1000 m2 or flow path lengths longer
than around 50 m.
It is unlikely that you will have one roof node of 1000 m2 or
greater flowing to a single downpipe. You can use styles to
duplicate roof nodes if necessary.
Default: 150 m2
Recommended minimum: 1 m2
Recommended maximum: 1000 m2
Constraint(s): > 0 m2
Time of concentration (min)
The time of concentration represents the time taken for
surface runoff to travel from the most hydraulically--remote
point on the roof to the roof outlet.
Default: 2 min
Recommended minimum: > 1 m
Recommended maximum: Constraint(s): > 0 min
Average depression storage depth (mm)
Represents the depth of the roof area’s depression storage
(in millimetres) satisfied in a rainfall event, before surface
runoff occurs. In practical terms, maximum depression
storage in the roof node represents the small amount of loss
that occurs due to surface irregularities, water absorbed by
debris in the gutters or in rust holes in the roof. It is a way of
modelling the reality that you never see 100% of rainfall from
a roof surface ending up as runoff, although runoff will usually
be close to 100%.
Default: 1 mm
Recommended minimum: Recommended maximum: Constraint(s): ≥ 0 mm, < 100 mm
% of roof connected to tank (%)
Some roofs may have only a proportion of runoff directed to a
tank, with the remainder being directed to stormwater or
domestic garden use.
Model statistics recorded during a simulation
To select/deselect statistics recording during a simulation, use the Project Hierarchy (page
77). Urban Developer records the following statistics for this node (entries in bold are recorded
by default).
• Depression Storage Volume at the end of a run (Total m 3) Relevant only to the last
timestep, and records the volume of water left in the depression storage that has not yet
been lost to either evaporation or runoff.
• Inflow (Total m3, Minimum L/s, Maximum L/s)
• Runoff to Tank (Total m3, Minimum L/s, Maximum L/s)
• Runoff bypassing Tank (Total m3, Minimum L/s, Maximum L/s)
• Surface Evaporation (Total m3, Minimum L/s, Maximum L/s)
104
Urban Developer User Guide
Water balance
This node can record water balance parameters for each time step. To enable water balance
recording, select Tools > Options. Water balance recording is on the Diagnostics screen in the
Options (page 25) window. The following parameters are recorded:
Date, Time, Inflow (L), Rainfall (mm), Outflow (L), Av depression depth (mm), Surface total
evaporation (mm)
11.4
Aggregation nodes
Alternative supply
Usage
An alternative supply node represents decentralised and/or non-traditional potable supply
networks such as third-pipe reticulation systems.
Restrictions
There are restrictions on which node inputs and outputs you can connect together. See Urban
Developer node connection rules (page 94).
Node Inputs
• Inflow: The flow coming into the node. There can be only one link connected to the
Inflow input. In this version of Urban Developer, the alternative supply node releases all
water demanded of it without limit, as is the case for the mains supply (page 106) node.
Link type (page 59): Demand
Node Outputs
• Outflow: The flow leaving the node. The Outflow output can have multiple outflow links.
Link type (page 59): Outflow
Other node properties
There are no configurable parameters apart from the node name.
Model statistics recorded during a simulation
To select/deselect statistics recording during a simulation, use the Project Hierarchy (page
77). Urban Developer records the following statistics for this node (entries in bold are recorded
by default).
• Inflow (Total m3, Minimum L/s, Maximum L/s)
• Outflow (Total m3, Minimum L/s, Maximum L/s)
Urban Developer User Guide
105
Junction
Usage
A junction node represents aggregation of inflows of surface or piped stormwater networks,
and also assists in the schematic representation of a network. The junction node should be
used only to track stormwater streams and should be re-named so that the project schematic
mimics the physical system as closely as possible.
Note
Junctions should be used only for stormwater networks due to the technical
implementation of Urban Developer's time-stepping functions.
Restrictions
There are restrictions on which node inputs and outputs you can connect together. See Urban
Developer node connection rules (page 94).
Node inputs
• Inflow: Flow into the junction. A junction can have multiple inputs.
Link type (page 59): Stormwater and runoff only.
Node outputs
• Outflow: Flow out of the junction. A junction can have only one output.
Link type (page 59): Stormwater and runoff only.
Other node properties
There are no configurable parameters apart from the node name.
Model statistics recorded during a simulation
To select/deselect statistics recording during a simulation, use the Project Hierarchy (page
77). Urban Developer records the following statistics for this node (entries in bold are recorded
by default).
• Inflow (Total m3, Minimum m3, Maximum m3)
• Outflow (Total m3, Minimum m3, Maximum m3)
Mains water supply
Usage
A mains water supply node represents a potable supply from a traditional centralised water
supply network and/or treatment plant.
Mains water supply nodes supply the demands of all downstream nodes without limit.
Restrictions
There are restrictions on which node inputs and outputs you can connect together. See Urban
Developer node connection rules (page 94).
106
Urban Developer User Guide
Node inputs
• Inflow: A mains supply node can have only one inflow, and can only be supplied by
another mains supply node. This is useful for tracking mains supply contributions at
different points in the supply network.
Link type (page 59): Demand
Node outputs
• Outflow: The outflow from a mains supply node can have multiple links flowing from the
node, supplying water use nodes or linking to other mains supply nodes.
Link type (page 59): Demand
Other node properties
There are no configurable parameters apart from the node name.
You do not need to connect anything to the mains supply node's input. The mains supply node
supplies as much water as is necessary to satisfy the demands of the system.
Model statistics recorded during a simulation
To select/deselect statistics recording during a simulation, use the Project Hierarchy (page
77). Urban Developer records the following statistics for this node (entries in bold are recorded
by default).
• Inflow (Total m3, Minimum L/s, Maximum L/s)
• Outflow (Total m3, Minimum L/s, Maximum L/s)
Note
If the model contains a water use node that draws water from a tank with external
top-up enabled, you must add the external top-up total and rate to the total mains
water usage in the water use node in order to determine the water use node's
combined total mains usage. Exporting the simulation run results to Excel is the
easiest way to do this.
Wastewater connection
Usage
A wastewater connection node represents a waste collection network for blackwater and
greywater waste streams.
A wastewater connection node can be used to represent and track any wastewater stream.
The wastewater connection node has no configurable properties but acts to aggregate inflows
coming to the node. A wastewater connection node can have multiple inflow links, and can
receive inflow from another wastewater connection node as well as outflow from particular
other nodes (see connection rules for details). There can be only one outflow from the node.
For reporting purposes, you could use one node per greywater and blackwater outputs of an
allotment, then connect the outputs of these nodes into a single "street-level" node to obtain
street-level output of greywater and blackwater: in the Recording Manager (page 78), you
could then view individual wastewater outputs, as well as an aggregate output.
Urban Developer User Guide
107
Restrictions
There are restrictions on which node inputs and outputs you can connect together. See Urban
Developer node connection rules (page 94).
Node inputs
• Inflow: one or more wastewater outputs from:
• a water user node
• outflows of other wastewater connection nodes
• runoff from an impervious/pervious area, etc.
Link type (page 59): Wastewater
Node Outputs
• Outflow: Wastewater outflow from the node.
Link type (page 59): Wastewater
Other node properties
There are no configurable parameters apart from the node name.
Model statistics recorded during a simulation
To select/deselect statistics recording during a simulation, use the Project Hierarchy (page
77). Urban Developer records the following statistics for this node (entries in bold are recorded
by default).
• Inflow (Total m3, Minimum L/s, Maximum L/s)
• Outflow (Total m3, Minimum L/s, Maximum L/s)
11.5
Subnetwork nodes
Subnetwork
Usage
A subnetwork is a characterisation of a group or cluster of dwellings, water uses or general
water demands, as a discrete unit.
Urban Developer can operate at different scales, allotment, street or suburb, or can be used to
group a number of dwellings (eg a block of flats or group of townhouses).
In order to make the model easier to navigate and understand, you can group nodes together
into a subnetwork.
Examples
• A group of nodes are created inside a subnetwork to represent a single allotment; the
style from this subnetwork can then be re-used to model similar allotments across a
sub-division.
108
Urban Developer User Guide
• A group of allotments (perhaps in subnetworks of their own) on one side of a street are
grouped together in a subnetwork, supplied by a particular mains supply; another group
of houses on the other side of the street are grouped together as they are supplied by a
different mains supply.
A subnetwork could represent a collection of allotment-level dwellings that are identical or
substantially similar, once the allotment-level model has been developed.
A subnetwork could also represent a more heterogeneous system modelled with "average"
behaviours applied.
Create a subnetwork
To create a subnetwork, drag and drop a subnetwork icon from the Node Palette into the
Schematic Editor.
Subnetwork and scenario limits
You can create only 3 levels of network:
1
a scenario - the "top" level;
2
a subnetwork within the scenario (level 1); and
3
a subnetwork within a subnetwork (level 2).
Scenarios and subnetworks appear in different-coloured tabs in order to give you visual
feedback as to where in the overall model you are working. You can change the colours in the
Options window (Tools > Options > General).
Edit a subnetwork
To edit a subnetwork, right-click the subnetwork node in the schematic, and select Edit
Subnetwork from the pop-up menu.
A new tab appears in the Schematic Editor to indicate that you are in the subnetwork - the
subnetwork name appears in the tab, and at the bottom of the Schematic Editor window.
The following screen shows a scenario, Scenario 1, with a subnetwork, Subnetwork 1. Note
that the Project Explorer (page 28) is open, and shows the nodes within the scenario, and also
within the subnetwork.
Exit the subnetwork & return to the scenario/subnetwork above
To exit the subnetwork, either
Urban Developer User Guide
109
• right-click anywhere on the subnetwork (not a node or link) and select Exit Subnetwork
from the pop-up menu.
• click the red Close button on the subnetwork tab.
Restrictions
There are restrictions on which node inputs and outputs you can connect together. See Urban
Developer node connection rules (page 94).
Node inputs
Input
Notes - applies to all inputs
Surface inflow
Link type (page 59): Runoff
All subnetwork inputs arise from node outflows from the
scenario or subnetwork a level above. If nothing is connected
to the subnetwork inputs, no flow occurs between the
scenario or subnetwork above, and the current subnetwork.
Mains and tank supply, and alternate supplies 1 and 2 are
demands, like a water use (page 117).
Piped inflow
Link type: Stormwater
Mains supply
Link type: Demand
Tank supply
Link type: Demand
Alternate supply 1
Link type: Demand
Alternate supply 2
Link type: Demand
Node outputs
Output
Notes - applies to all outputs
Surface runoff
Link type: Runoff
All subnetwork outputs (to another subnetwork or scenario a
level above) arise from node outflows within the subnetwork.
If nothing is connected to the subnetwork outputs, no flow
occurs between the subnetwork, and the subnetwork or
scenario at the level above.
Piped discharge 1
Link type: Stormwater
Piped discharge 2
Link type: Stormwater
Blackwater
Link type: Wastewater
Greywater
Link type: Wastewater
Irrigation/Other waste water
Link type: Wastewater
Other node properties
A subnetwork node has no configurable properties of its own, however all configurable nodes
within the subnetwork are able to be configured and styled.
110
Urban Developer User Guide
Model statistics recorded during a simulation
To select/deselect statistics recording during a simulation, use the Project Hierarchy (page
77). Urban Developer records the following statistics for this node (entries in bold are recorded
by default).
• Alternative Supply 1 (Total m3, Minimum L/s, Maximum L/s)
• Alternative Supply 2 (Total m3, Minimum L/s, Maximum L/s)
• Blackwater (Total m3, Minimum L/s, Maximum L/s)
• Greywater (Total m3, Minimum L/s, Maximum L/s)
• Irrigation / Other (Total m3, Minimum L/s, Maximum L/s)
• Mains Supply (Total m3, Minimum L/s, Maximum L/s)
• Piped Discharge 1 (Total m3, Minimum L/s, Maximum L/s)
• Piped Discharge 2 (Total m3, Minimum L/s, Maximum L/s)
• Piped Inflow (Total m3, Minimum L/s, Maximum L/s)
• Surface Inflow (Total m3, Minimum L/s, Maximum L/s)
• Surface Runoff (Total m3, Minimum L/s, Maximum L/s)
• Tank Supply (Total m3, Minimum L/s, Maximum L/s)
11.6
Functional nodes
Tank
Usage
A tank is a type of storage used in domestic, commercial and/or industrial settings to store
water collected from surface runoff or sources such as greywater or blackwater waste
streams. Once stored the water can be released in a controlled manner, and/or used to supply
water demands.
There is a trend towards installing domestic rainwater tanks in urban areas to capture roof
runoff and supply non-potable water demands. The benefits of using water sourced from a
rainwater tank include:
• reduced reliance on potable water supply, thus deferring potable water system upgrade
or expansion and increasing the security of supply from existing water sources;
• stormwater retention/detention;
• urban water quality improvement via retention and diversion of stormwater to the sewer
and garden areas, thus reducing the volume of stormwater pollutants discharging to the
catchment watercourses; and
• protection of urban streams, through reducing the duration of elevated flows.
Urban Developer User Guide
111
Rainwater tanks are most efficient when the retained water supplies multiple water demands
within a household, eg toilet flushing, garden irrigation, filling or topping-up swimming pools,
clothes washing and other appropriate non-potable uses.
Tank construction
Rainwater tanks are usually constructed from plastic, or galvanised steel, and are located
above-ground adjacent to the sides of a dwelling or building. Where space is limited, tanks can
also be installed below-ground, under-floor and in-slab - in these situations, tanks are often
constructed from concrete or impermeable plastic membranes.
Restrictions
In many areas health departments do not expressly prohibit rainwater tanks supplying drinking
water, however, guidelines typically recommend avoiding drinking rainwater where a
reticulated potable supply is available.
There are restrictions on which node inputs and outputs you can connect together. See Urban
Developer node connection rules (page 94).
Multiple tanks
In the current version of Urban Developer, you can connect more than one tank to a supply
point; however this model type is not currently supported and may give inaccurate results. If
you need to model a multiple-tank installation, the best workaround is to regard the entire
installation as a single tank, and adjust initial levels, first-flush volumes etc, accordingly.
Tank (Urban Developer type)
Conceptually, the operation of a rainwater tank is identical to the operation of any tank-based
storage infrastructure. The simulation scheme developed for Urban Developer is generic in its
applicability to all forms of tank-based storage.
The tank allows for the inflow of rainwater as well as the provision of trickle top-up, triggered to
start and stop at a user-specified tank level.
Inputs
• Inflow: Tank inflow is usually from a roof node (page 103) or other impervious area
(page 97).There is no direct input capability for "topping-up" the tank; topup is controlled
by a parameter in the tank property editor (see below).
The top-up function takes water from the mains supply, however in this version, the
mains supply usage due to trickle top-up is not tracked in the mains supply aggregation.
This functionality will be added in future versions of Urban Developer
Outputs
• Supply out: The tank volume extracted from a Water Use (page 117) node per unit
time.
Link type (page 59): Demand
• Spill: The volume flowing out of the tank when the detention volume is exceeded.
Link type (page 59): Runoff
• Detention outflow: The flow from the overflow pipe at the invert of the detention
volume, during a flood event.
112
Urban Developer User Guide
Restrictions
There are restrictions on which node inputs and outputs you can connect together. See Urban
Developer node connection rules (page 94).
Other properties
Property
Notes
Node name
Node name.
Tank dimensions
Cross-sectional area (m2)
Defines the cross-sectional or area of the tank base.
Height (m)
Defines the total height of the tank in m. Includes detention
and dead zone height.
Height of off-take (m)
Defines the height of the offtake pipe on the tank; the offtake
pipe supplies demands from the tank.
The invert level of the offtake is the height of the lowest point
of the pipe above the tank base. Once the tank is filled above
the offtake invert level, the water depth in the tank will never
fall below this level.
Demand off-take occurs from the base of the tank just above
the anaerobic or "dead" zone; a tank should therefore have a
minimum "dead zone" depth of 0.1m to allow for
accumulation of sediment and other material. Water will
never be drawn from the "dead zone".
Default: 0.1 m
Minimum: 0.0 m
Maximum: 2.0 m
Initial water depth (m)
Defines the initial depth of water in the tank at the start of the
model run.
Default: 0.1 m
Minimum: 0.0 m
Maximum: 1000.0 m
Overflow outlet and detention
storage
Detention volume depth (m)
Defines the detention (storage) volume depth of the tank. The
detention volume depth is the depth from above the overflow
outlet invert to below the tank spill/top of the tank; hdet in the
diagram.
Detention volumes are used as buffers to decrease output
flow rates in situations of high input flow. If the tank has no
detention storage, set the detention volume depth equal to
the overflow outlet diameter.
Default: 0.1 m
Constraints: ≥ 0 m, ≤ 2.0 m
Overflow outlet diameter (mm)
Defines the diameter of the overflow orifice, located at the
base of the detention storage.
Default: 100 mm
Recommended minimum: 10 mm
Recommended maximum: 320 mm
Constraints: ≥ 1 mm, ≤ 1000 mm
Overflow outlet discharge coefficient
Discharge coefficient used in the evaluation of the orifice flow
equation.
External top up
Enable external top-up
If enabled, allows for the tank to be topped-up with mains
Urban Developer User Guide
113
Property
Notes
water so that the tank always maintains a user-specified
water level. You do not need to connect a mains water supply
node to a tank node to provide inflow for topup; when you
enable external top-up, Urban Developer handles the mains
connection internally.
Top-up rate (L/s)
Defines the rate of mains water top-up in litres per second.
Top-up triggered on (m)
Defines the depth above the tank base at which the tank will
start to top up.
This depth must be greater than the height of the off-take.
Top-up triggered off (m)
Defines the depth above the tank base at which the tank will
stop automatically topping up.
This depth must be greater than the Top-up triggered-on
depth.
First Flush System
Enable first flush system
If enabled, changes the tank inflow behaviour so that a
user-specified volume of water will bypass the tank before
inflow to the tank occurs.
Volume (m3)
Specifies the volume of water the first-flush device diverts.
Default: 0.0 m3
Recommended maximum: 100 m3
Constraints: ≥ 0.0 m3
Outlet flow rate (m3/s)
Specifies the outflow rate to the selected discharge outlet.
Discharges to
Specifies the tank outlet that first-flush outflow is discharged
through.
Detention outflow specifies that the first flush volume
discharges via a connection to the detention outflow pipe.
Spill specifies that the first flush volume discharges via
spilling from the tank.
Other
Tank bypass
If enabled, all inflows flow directly to the detention outflow.
This allows you to temporarily disconnect a tank without
removing it from the model. A bypassed tank still has a small
impact on model run-time performance, due to the direct
routing of flow from the inflow connection to the detention
outflow connection. In testing, simulation time for a
disconnected tank is approximately 10% greater than for no
tank at all (ie having link with no routing in place of the tank).
Model statistics recorded during a simulation
To select/deselect statistics recording during a simulation, use the Project Hierarchy (page
77). Urban Developer records the following statistics for this node (entries in bold are recorded
by default).
• Detention Outflow (Total m3, Minimum L/s, Maximum L/s)
• External Top-up Volume (Total m3)
• Outflow (Total m3, Minimum L/s, Maximum L/s)
• Rainwater / Stormwater (Total m3, Minimum L/s, Maximum L/s)
114
Urban Developer User Guide
• Recycled (Total m3, Minimum L/s, Maximum L/s)
• Spill (Total m3, Minimum L/s, Maximum L/s)
• Demand (Total m3, Minimum L/s, Maximum L/s)
• Water Depth in Tank (Total m3, Minimum m, Maximum m, Average m)
Water balance
This node can record water balance parameters for each time step. To enable water balance
recording, select Tools > Options. Water balance recording is on the Diagnostics screen in the
Options (page 25) window. The following parameters are recorded:
Date, Time, Inflow (L), Outflow (L), Depth (m), Spillage (L), Demand (L)
Water quality
No water quality parameters are supported in this version of Urban Developer.
Tank model operation
Tank storage zones
The rainwater tank model used by Urban Developer is illustrated below. The storage volume
comprises three distinct storage zones.
where:
VDetention
is the Detention Storage Volume (m3)
VRetention
is the Retention Storage Volume (m3)
VDead
is the Dead Storage Volume (m3)
hoff-take
is the height of the supply off-take obvert from the base of the tank (m)
hretention
is the height of the retention storage volume (m)
hdetention
is the height of the detention storage volume (m)
htank
is the height of the storage tank (m)
hTT On
is the height of the trickle top-up on trigger (m)
hTT Off
is the height of the trickle top-up off trigger (m)
Tank routing
The Urban Developer storage tank allows for the inflow of water, Qin, as well as providing for
an optional trickle top-up volume, Qtopup, that is triggered on and off at user-specified tank
Urban Developer User Guide
115
heights. Supply to meet consumptive demand, Qsupply is drawn from the base of the tank just
above the "dead" storage zone.
Inflows in excess of the retention storage volume are routed through the detention outflow,
which is controlled according to the capacity and configuration of the outlet. During periods of
very large and rapid inflows the detention storage capacity of the tank may be exceeded
resulting in spillages, Qspill, from the top of the tank. This spillage volume represents the
volume of water that is unable to enter the storage tank.
The routing algorithm adopted by the tank applies the generic first order Ordinary Differential
Equation (ODE) solution scheme, to solve the governing water balance present in Eqn 1:
Vt = Vt −1 + Qtin + Qttopup − QtSupply − Qtspill (ht ) − qtdetention (ht −1 )∆t
where:
116
Vt
is the volume at the end of time t (m3)
Vt −1
is the volume at the end of time t-1 (m3)
Qtin
is the inflow volume for time interval t-(t-1) (m3)
Qttopup
is trickle top-up volume for time interval t-(t-1) (m3)
Qtsupply
is the demand volume extracted for time interval t-(t-1) (m3)
ht
is the depth of water at the end of time t (m)
ht −1
is the depth of water at the end of time t-1 (m)
Qtspill (ht )
is the overtopping volume as a function of depth at time t (m3)
Urban Developer User Guide
(Eqn 1)
qtdetention (ht −1 )∆t
is the discharge rate from the detention storage for time interval t-(t-1) (m3/s)
Outflow from the detention volume is calculated as a function of depth, above the detention
outflow orifice obvert, Outflow using the minimum discharge of the broad crested weir and
orifice flow (Eqn 2) to account for the transition that occurs as the outflow orifice is drowned.
where:
hmax
is the maximum height of the detention storage (m)
h
is the depth of water above the outlet obvert (m)
qdetention outflow
is the detention storage outflow rate (m3/s)
φdetention outflow
is diameter of the outflow orifice (m)
(Eqn 2)
where:
Cd
is the coefficient of discharge
g
is gravity (m/s2)
Water Use
Usage
A water use node represents urban water demand and water consumption behaviour. Urban
Developer offers two methods for simulating water use behaviour:
• Average daily model
• Behavioural model with two different configurations:
• Fixed appliances and occupancy specified for each Water Use node in the
model, and
• Randomly-sampled values for appliances and occupancy across the Water Use
nodes in the model.
See Demand and end-use simulation (on page 43) for more information on each configuration.
Urban Developer User Guide
117
You can also choose None for a water use model which deactivates the water use node in your
project, without having to delete the node from the model.
Selecting water use model configuration
To choose from the Average Daily and Behavioural model (or to choose none ) select from the
Model Type drop down list in the Properties panel of the water use node.
Switching configurations (fixed to/from randomly-sampled)
When using a behavioural model, to switch from fixed to the randomly sampled behavioural
model:
1
Select Configure > Water Use > Sampled appliances and occupancy. The Behavioural Demand Probabilistic File Configuration window appears.
2
Here, you can configure and save a file containing the probabilistic settings, and load
files containing other probabilistic settings. You can also configure certain aspects of
the water use node or style, such as supply source priorities and end use apportioning,
through the properties panel.
Restrictions
There are restrictions on which node inputs and outputs you can connect together. See Urban
Developer node connection rules (page 94).
Node inputs
118
Node input
Notes
Mains supply
Connect to a mains supply node (if available)
Tank supply
Connect to a tank node (if available)
Alternative supply 1
Connect to an Alternative supply node (if available)
Urban Developer User Guide
Node input
Notes
Alternative supply 2
Connect to an Alternative supply node (if available)
Node outputs
Node output
Notes
Blackwater
Connect to a blackwater stream (if necessary)
Greywater
Connect to a greywater stream (if necessary)
Irrigation/Other
Connect to any other end-use stream. For example, you can
track your garden irrigation through this end-use, and link it
back to a pervious area node in your model to capture the
effects of run-off of irrigating your pervious area.
Other node properties - Average Daily model type
Node property
Notes
Diurnal pattern
This allows you to set the diurnal water usage pattern. Click
Import to load a .CSV file containing diurnal data. The diurnal
pattern should contain non-dimensionalised values at a 6 min
time step.
See the description of the .pat file format (page 127) for more
information, or if you want to create your own pattern file.
Average daily demand table
For each month, enter the average indoor and outdoor
demands in litres/day/household. This is used to characterise
the seasonal variation in water usage.
The percentages in each column must sum to 100%.
End-use properties (indoor/outdoor)
For each end use, enter the percentage of total demand. To
add a new end-use type, click
. The end-use properties
table can also be used to capture the proposed effects of
demand management strategies.
Percentages must sum to 100.
Indoor supply source priorities
(indoor/outdoor)
For each indoor/outdoor source, use the drop-down menu to
enter an order of preference for supply; eg for the end use
"Toilet":
•
Enter 1 in the Rainwater column to specify that
rainwater is the first preference for toilet flushing.
•
Enter 2 in the Mains column to specify that, if no
rainwater is available, then use Mains water as the
second preference for flushing.
The option Don't Supply specifies that mains water, rainwater,
etc will not supply that particular end use.
Discharge breakdown (indoor/outdoor)
For each end-use, specify the percentage of water
discharged as blackwater, greywater, or other wastewater.
The percentages in each column must sum to 100%.
Other node properties - Behavioural model type
Node property
Notes
Number of houses
Specify the number of houses the node represents.
The following three properties (Occupants per household, Indoor end-use appliance types and Outdoor
average daily demand) apply only when the behavioural model configuration is set to fixed appliances
and occupancy. When the behavioural model configuration is set to sampled appliances and occupancy,
these properties are not used. Refer to Behavioural model with fixed appliances and occupancy (on page
Urban Developer User Guide
119
Node property
45).
Notes
Occupants per household
Specify the number of occupants per household.
Indoor end-use appliance types
For each appliance type, enter the type of shower, washing
machine or toilet. See indoor water use appliance types in
Behavioural model with fixed appliances and occupancy (on
page 45).
Outdoor average daily demand
For each month, specify the average daily demand.
Indoor supply source priorities
(indoor/outdoor)
For each indoor/outdoor source, enter an order of preference
for supply; eg for the end use "Toilet":
Discharge breakdown (indoor/outdoor)
•
Enter 1 in the Rainwater column to specify that
rainwater is the first preference for toilet flushing.
•
Enter 2 in the Mains column to specify that, if no
rainwater is available, then use Mains water as the
second preference for flushing.
For each end-use, specify the percentage of water
discharged as blackwater, greywater, or other wastewater.
The percentages in each column must sum to 100%.
Model statistics recorded during a simulation
To select/deselect statistics recording during a simulation, use the Project Hierarchy (page
77). Urban Developer records the following statistics for this node (entries in bold are recorded
by default).
• Alternative Supply 1 (Total m3, Minimum L/s, Maximum L/s)
• Alternative Supply 2 (Total m3, Minimum L/s, Maximum L/s)
• Blackwater (Total m3, Minimum L/s, Maximum L/s)
• End use breakdown for each end use (Total m3)
• Greywater (Total m3, Minimum L/s, Maximum L/s)
• Irrigation / Other (Total m3, Minimum L/s, Maximum L/s)
• Mains Supply (Total m3, Minimum L/s, Maximum L/s)
• Tank Supply (Total m3, Minimum L/s, Maximum L/s)
• Total Demand (Total m3, Minimum L/s, Maximum L/s)
• Total Supply (Total m3, Minimum L/s, Maximum L/s)
Water balance
This node can record water balance parameters for each time step. To enable water balance
recording, select Tools > Options. Water balance recording is on the Diagnostics screen in the
Options (page 25) window. The following parameters are recorded:
Date, Time, inflow (m3/s), weir_out (m3/s), pond_water_depth (m), pond-media_infiltration
(m3/s), pond-soil_infiltration (m3), soil_moisture, moisture_for_quality, media_infiltration (m 3/s),
soil_ET (m3/s), qhc (m3/s), SZ_water_depth (m), SZ+pond-soil_infiltration (m3/s), pipe_out
(m3/s), WaterBalanceError (m3).
120
Urban Developer User Guide
11.7
Receiving nodes
Receiving node
Usage
A receiving node represents the most downstream node in a surface or piped stormwater
network and is used for tracking purposes.
As the input of a receiving node is displayed in the Recording Manager, you can use a
receiving node to track total outflow at the bottom of a network, or use multiple receiving nodes
to track total stormwater or runoff.
You can also use receiving nodes higher up in a network if you want to track stormwater or
runoff outflows from other node models.
Restrictions
There are restrictions on which node inputs and outputs you can connect together. See Urban
Developer node connection rules (page 94).
Node inputs
Inflow - Receiving nodes can aggregate multiple stormwater or runoff inputs. For example,
you can connect the surface runoff outputs of two or more Subnetwork nodes to a Receiving
node to track the combined runoff output from two allotments/two subdivisions, etc.
Link type (page 59): Stormwater or runoff.
Node outputs
Outflow
Not applicable. Receiving nodes act as an infinite sink for all stormwater or runoff inflows.
Other node properties
There are no configurable parameters apart from the node name.
Model statistics recorded during a simulation
To select/deselect statistics recording during a simulation, use the Project Hierarchy (page
77). Urban Developer records the following statistics for this node (entries in bold are recorded
by default).
• Inflow (Total m3, Minimum L/s, Maximum L/s, Number of Runoff Days)
Urban Developer User Guide
121
122
Urban Developer User Guide
12
File Formats
In This Chapter
Overview ............................................................................................................................... 123
Audience ............................................................................................................................... 124
Limitations ............................................................................................................................. 124
Time Series Formats ............................................................................................................. 124
Other data formats ................................................................................................................ 126
Zero-padding data in Excel ................................................................................................... 128
Times and Dates in Data Files .............................................................................................. 130
This User Guide provides an overview of file formats commonly used in the TIME modelling
framework and relevant eWater CRC software products, with associated file extensions. Small
examples of data files for relevant text formats are also provided.
Note
12.1
Not all file formats listed can be read/written; new file formats are added on an
as-needed basis. If you have problems importing or exporting a particular file format,
please contact [email protected].
Overview
Using standard file formats makes it easier to prepare files, transfer files between applications,
and to interpret modelling results in output files.
Note that not all of these file types are relevant to each eWater product.
The file formats included in this User Guide are:
Text-based time series formats
.cdt
Comma Delimited Column Time Series
.sdt
Space Delimited Column Time Series
.pat
Space Delimited Diurnal Pattern
.csv
Comma Separated Value
Other supported formats
There are several GIS, Graphics and other formats recognised by eWater CRC software
products but not included in this User Guide. Note that not all of these file types are relevant to
each product. The supported file types are:
.flt
ESRI Binary Raster Interchange format
.mif
MapInfo Interchange
.shp ESRI Shape files (SHP) (see the ESRI shape file format guide for format details)
Urban Developer User Guide
123
.jpg
GEO JPG Image
.jpeg GEO JPEG Image
12.2
.tif
GEOTif Image
.tiff
GEOTiff Image
Audience
This User Guide is intended for use by software developers and users, as well as those
preparing documentation for eWater CRC and Catchment Modelling Toolkit products.
12.3
Limitations
This User Guide does not provide specifications for common external file formats, such as
.shp. For the .shp file format, see the ESRI shape file format guide.
For larger and more complex standard formats, such as Water Data Transfer Format (page
126), links are given to the relevant organisations.
12.4
Time Series Formats
.bts
Binary Time Series
For support with binary time series data formats, please email [email protected].
.cdt
Comma Delimited Column Time Series
A comma delimited column time series format file is an ASCII text file that contains regular
(periodic) time series data. The file commonly has no header line, but can support a single line
header specifying "Date, Time series 1" if required.
There are two columns of data, with the first column being a date string, followed by the time
series value. The date string may be specified in two formats: the ISO date-time string (eg
2000-01-24, 1998-12), or the local culture settings of the machine (e.g. 24/01/2000 for
Australia), ie typically what Microsoft Excel will produce by default. Both can be recognised
unambiguously on a given machine, but the latter will not necessarily be transferable to
another machine. You are thus encouraged to use the ISO format (see The ISO8601 standard
for representing dates and times (page 133)).
The Times and Dates in Data Files (page 130) section gives more information. All time-series
data readings assume that the reading is at time 00:00 at the beginning of the day/month/year
"date" field.
The columns are separated by a comma. Annual data can be entered using month number as
01 (eg 01/1995; 01/1996).
Note
124
We strongly recommend using zero padding, eg use "01/1996" for January 1996, not
1/1996.
Urban Developer User Guide
See Zero-padding data in Excel (page 128) for instructions on how to zero-pad files
in Microsoft Excel 2003 (the instructions will be similar for other versions.)
CDT example: Daily time series
01/2000,2600
02/2000,2454
03/2000,2270
04/2000,2224
05/2000,2201
06/2000,2061
07/2000,1963
08/2000,1985
09/2000,71
10/2000,24
11/2000,23
12/2000,45
01/2001,43
CDT example: Six minute time series
2000-01-01,00:00,0
2000-01-01,00:06,1
2000-01-01,00:12,2
2000-01-01,00:18,3
2000-01-01,00:24,4
CDT example: Annual time series
2000,0
2001,1
2002,2
CDT example: Daily time series in ISO format
2000-01-01,0.9,0.9
2000-02-01,0.7,0.9
2000-03-01,0.9,0.9
2000-04-01,0.4,0.9
.csv Comma Separated Value
A comma separated value file is an ASCII text file that contains regular (periodic) time series
data.
There may be many different CSV formats; where the number and content of columns differs
depending on the type of data being stored.
A common type of CSV format used in eWater products contains two columns of data:
Column 1 contains a date string (eg 01/01/2003; 01/1995)
Column 2 contains the time series value.
The two values are separated by a comma.
To enter annual data, zero-pad the month number 01 (eg 01/1995; 01/1996).
Optionally, the file may have a single header line with a title for each column. Each column is
separated by a comma.
The first column header is usually "Date" followed by a relevant data column header (eg flow,
velocity, natural, historic).
CSV example
Date,flow
1/01/1974,336.9
Urban Developer User Guide
125
2/01/1974,771.2
3/01/1974,837.7
4/01/1974,940.2
5/01/1974,1249.3
6/01/1974,1445.4
7/01/1974,974.7
8/01/1974,797.0
9/01/1974,849.8
10/01/1974,168.4
.sdt
Space Delimited Column Time Series
A space delimited column time series format file is an ASCII text file that contains time series
data. There is no header line in the file. There are four columns of data, being:
• Year (yyyy)
• Month (mm)
• Day (dd), and
• Value (integral or decimal)
separated by a space or tab character. Monthly and annual data can be entered using month
and/or day number as 01. These files can be created in a spreadsheet application by saving
correctly formatted columns to a text (.txt) format.
SDT example
2000
2000
2000
2000
2000
2000
2000
2000
2000
2000
12.5
1
1
1
1
1
1
1
1
1
1
1 14.000
2 2.000
3 16.000
4 9.000
5 13.000
6 15.000
7 1.000
8 19.000
9 45.000
10 0.000
Other data formats
The following sections provide information on other data formats either fully or partially
supported by eWater products.
Water Data Transfer Format
The Water Data Transfer format is a standard data format intended to streamline the
exchange of water data between and within organisations. WDTF was developed by a
consortium of organisations, including the Bureau of Meteorology (BoM), CSIRO, Greenspan,
Kisters, Rubion and SRA Information Technology.
WDTF is an XML-based format. More information is available from the Water Data Transfer
Format (WDTF) pages on the Bureau of Meteorology's web site.
This information includes:
• A rationale for development of the WDTF
• A list of IT/data management companies who have expertise in implementing WDTF
and enabling transfer of water data to the BoM.
126
Urban Developer User Guide
• Descriptions of ongoing work to harmonise WDTF with existing national and
international standards.
.pat Urban Developer Daily Diurnal Pattern
A daily diurnal pattern file is an ASCII text file that contains regular (periodic) time series data,
and is used in the eWater Urban Developer product to disaggregate daily demand into
sub-daily values. The time series provided must be equi-spaced. There is a 3-line header
followed by space-delimited data.
Header
Urban Developer Diurnal Demand Distribution
String literal, must be present
Version 1.010
Version specifier, must be present
240
Number of data points in the file ie lines of data
following the header; must be present
There is no delimiting line or character between the header and the data.
Data
Column 1 contains the cumulative decimal fraction of the daily pattern.
1 day = 1440 = 24 x 10 x 6 minute intervals; so:
• the first decimal fraction/first interval is 6/1440 = 0.00416
• the second decimal fraction/second interval is 12/1440 = 0.00833, etc
Column 2 contains the fraction of water use assigned to this interval (the total of column 2 must
sum to 1.0)
The two values are separated by a space.
PAT example
Urban Developer Diurnal Demand Distribution
Version 1.010
7
0.004166670 0.000000000
0.008333330 0.000000000
0.012500000 0.600000000
0.016666670 0.200000000
0.020833330 0.100000000
0.025000000 0.000000000
0.029166670 0.000000000
.wup Urban Developer Water Use Parameters
A .wup file is an exported set of water use parameters from Urban Developer. It contains
sections for each domestic water use, and probabilities distributions describing different water
uses and water efficiency ratings.
The format is complex; however, an exported .wup file contains comments describing each
entry. A .wup file can be used across different scenarios within the same project, but cannot be
used in other Urban Developer projects.
Urban Developer User Guide
127
12.6
Zero-padding data in Excel
Certain file formats require data to be zero-padded. In the table below, the first column
represents months, and is not zero-padded. Some applications, including eWater CRC
software products, will sort this data as is shown in the 2nd column - clearly this is not correct.
The third column is zero-padded and will sort correctly.
Non zero-padded
What happens after sorting Zero-padded data (will sort
(some applications)
correctly)
1
2
3
4
5
6
7
8
9
10
11
12
1
10
11
12
2
3
4
5
6
7
8
9
01
02
03
04
05
06
07
08
09
10
11
12
How to zero-pad data in Excel
This procedure works in Excel version 2003, 2007 and 2010.
In this example, we will pad numbers representing the months, for example in the CDT format
(page 124).
1
128
Select the column representing the data
Urban Developer User Guide
2
Right-click the selection and select Format Cells...
3
Click the Number tab, then in the Categories list, click Custom, then select General in
the Type list.
Urban Developer User Guide
129
4
Type in as many zeroes as there are digits in the data field. For example, "months" has
two digits, so type two zeroes:
In the Sample area at the top, you can see what the padded number looks like.
If you wanted to pad Julian days (which have 3 digits), you would type three zeroes into
the Type field.
5
12.7
Click OK, and Excel pads the data:
Times and Dates in Data Files
Formats for CDT and CSV files
Line format
The format of each line in a CDT, SDT or CSV file is
Date,value1,value2,value3,value4
130
Urban Developer User Guide
Missing Entries
Missing entries must be specified as -9999. Empty strings or whitespace between commas
are also read as missing values.
Decimal separators
Always use a dot as a decimal separator for numerical values, irrespective of the local
culture/language/locale settings for Windows.
Headers
There may be a header on the first line specifying the names of the time series in the columns.
Each element in the header must also be separated by commas e.g.
Date,rainfall,evaporation,temperature
Dates
Dates must comply with the ISO 8601 standard. The full date-time format used is:
yyyy-MM-dd HH:mm:ss
A subset of this format may be used for the sake of compactness if there is no ambiguity or
loss of precision, for example:
yyyy-MM-dd
ie at most, seconds, minutes and hours can be omitted
The TIME framework (used for most Toolkit products) will always write the following:
yyyy-MM-dd
though more compact formats will be read if unambiguous.
The smallest time step that CSV files can currently handle is a second. See The ISO8601
standard for representing dates and times (page 133) for more details on the ISO date-time
format.
Note
Microsoft Excel seems to recognise the ISO 8601 date format with at least the
precision yyyy-MM-dd. This correct detection seems to be independent of the
computer regional and language settings.
Dates read when loading a CSV file do not necessarily have to follow the ISO 8601 standard,
but end-users should be encouraged to use it when generating CSV data files from
another software tool. Local date-time culture settings are supported for the benefit of users for
two main practical reasons: the default behaviour of Microsoft Excel and backward
compatibility.
How the TIME framework determines date/time formats
When reading a file, the TIME framework (on which most eWater CRC software products are
built) examines the first few lines to detect the date-time format and the time step of the time
series:
• If the format is recognised as being ISO 8601 compliant, this format will be used to read
all subsequent dates.
Urban Developer User Guide
131
• Failing that, an attempt is made to detect the dates and time step with English-Australia
("en-AU") settings, for backward-compatibility reasons.
• Last, an attempt is made to use the computer configuration for regional and language
settings.
An exception, LoadDataFileIOException, occurs if all methods fail. If you see this exception
you will need to check your input data.
Note
The date-time format must be consistent throughout the file.
Possible problems with time steps
The only known case where a time step may be incorrectly detected when reading a file is on
a computer with U.S. settings, due to the mm/dd/yyyy date format. This may happen if the
whole of a daily time series covers less than 13 days, or less than 12 months for a monthly
time series. Users working on such computers should use the recommended ISO 8601 format
in order to prevent any ambiguity.
Examples
A CSV file with one daily time series, where the time of record is 00:00:00 every day will be
written as:
2000-01-01,0.9
2000-01-02,0.7
2000-01-03,0.9
2000-01-04,0.4
An example of a daily time series with missing values at the second and fourth day:
2000-01-01,0.9
2000-01-02,-9999
2000-01-03,0.9
2000-01-04,
2000-01-05,1.1
Parsing the following file would throw an exception: missing entries are not allowed since their
interpretation is likely ambiguous (missing data, or zero record?)
2000-01-01,0.9
2000-01-02,2.2
2000-01-05,1.1
2000-01-06,1.1
A time series with a six minutes time step:
2000-01-01
2000-01-01
2000-01-01
2000-01-01
2000-01-01
00:00,0
00:06,1
00:12,2
00:18,3
00:24,4
The following time series will be read as one monthly time series, with records on the first day
of every month at time 00:00:00.
2000-01,0
2000-02,1
2000-03,2
2000-04,3
2000-05,4
The following time series will be read as one annual time series, with records on January the
first, at time 00:00:00
2000,0
2001,1
2002,2
132
Urban Developer User Guide
Any even time step is supported, e.g. a weekly time series would be written as:
2004-01-02,0
2004-01-09,1.2
2004-01-16,2.3
2004-01-23,3
2004-01-30,4
2004-02-06,4
A header may be specified:
Date,rainfall,evaporation
2000-01-01,0.9,0.9
2000-02-01,0.7,0.9
2000-03-01,0.9,0.9
2000-04-01,0.4,0.9
The following file, generated for instance with Excel, will be recognised as a monthly time
series on a computer with U.S. culture (locale) settings, but loading it on a computer with
different culture settings will likely fail:
01/01/2000,0.1
02/01/2000,0.8
03/01/2000,0.6
04/01/2000,0.9
05/01/2000,0.6
06/01/2000,0.4
07/01/2000,0.6
08/01/2000,0.2
09/01/2000,0.8
10/01/2000,0.6
11/01/2000,0.3
12/01/2000,0.1
01/01/2001,0.389
02/01/2001,0.389
The following file, irrespective of the computer's culture settings, will be read as a daily time
series from the first of January to the fifth:
01/01/2000,0.1
02/01/2000,0.8
03/01/2000,0.6
04/01/2000,0.9
05/01/2000,0.6
The ISO8601 standard for representing dates and times
The TIME framework uses a subset of the ISO8601 standard. The central part of this subset is
the use of the format string:
yyyy-MM-ddTHH:mm:ss
It appears that de facto 'standards' such as Microsoft Excel do not detect dates with the T
symbol between the date and time parts of the date-time. However if the T symbol is replaced
with a space, the date-time is recognised by Excel, irrespective of the regional settings of the
computer. Houston (undated) reports that according to the ISO standard the T symbol "may be
omitted by those interchanging data, if ambiguity can be avoided". The T symbol will thus be
replaced by a space to ensure compatibility with de facto Microsoft 'standards'. The members
of this class are qualified as 'compatible' if the T symbol is replaced by a whitespace, otherwise
the term 'strict compliance' will be used.
Urban Developer User Guide
133
References
Kuhn M., "A Summary of the International Standard Date and Time Notation",
http://www.cl.cam.ac.uk/~mgk25/iso-time.html
(http://www.cl.cam.ac.uk/~mgk25/iso-time.html)
Houston G., "ISO 8601:1988 Date/Time Representations", (Unknown date; please search on
the title for further information)
Note
134
The official ISO document is copyrighted and not freely available.
Urban Developer User Guide
Introduction
Mitchell, V.G., Mein, R.G., McMahon, T.A. 2001. "Modelling the urban water cycle"
Environmental Modelling and Software 16(7), 615-629.
Demand and end-use simulation
Thyer, M.A., Duncan, H., Coombes, P., Kuczera, G. and Micevski, T. (2009). A Probabilistic
Behavioural Approach for the Dynamic Modelling of Indoor Household Water
Use. 32nd Hydrology and Water Resources Symposium, 30 November – 3
December 2009, Newcastle, Australia.
Roberts, P. (2005). 2004 Residential End Use Measurement Study, Final Report: Yarra Valley
Water, Victoria.
Micevski, T., Thyer, M., Kuczera, G. (2011). A Behavioural Approach for Household Outdoor
Water Use Modelling. Paper submitted to Water Resources Research (April
2011).
Pervious Area node
Holtan, H.N. 1961. A Concept for Infiltration Estimates in Watershed Engineering. USDA-ARS
41-51.
Water User node
Thyer, M., Micevski, T., Kuczera, G., and Coombes, P. (2011).A Behavioural Approach to
Stochastic End Use Modelling. Paper presented at Oz Water, 9-11 May 2011,
Adelaide.
Urban Developer User Guide
135
136
Urban Developer User Guide
13
Additional reading
The following references provide background material on urban water cycle modelling.
Cui, L., Thyer, M., Coombes, P. and Kuczera, G. (2008). ‘A Stochastic Model for Identifying the
Long Term Dynamics of Indoor Household Water Uses.’ Water Down Under,
14-17 April 2008, Adelaide, Australia.
Hardy, M. J., Jefferson, C., Coombes, P. J., & Kuczera, G. (2003). ‘Integrated Urban Water
Cycle Management: Redefining the Boundaries.’ Paper presented at the 28th
International Hydrology and Water Resources Symposium, Wollongong, NSW.
Hardy, M. J., Coombes, P. J., & Kuczera, G. (2004). ‘An investigation of estate level impacts of
spatially distributed rainwater tanks.’ Paper presented at the International
Conference on Water Sensitive Design, Cities as Catchments, Adelaide,
Australia.
Hardy, M. J., Kuczera, G., & Coombes, P. J. (2005). Integrated urban water cycle
management: the UrbanCycle model. Water Science & Technology, 52(9), 1-9.
Hardy, M. J., Kuczera, G., & Coombes, P. J. (2006). ‘Embedded Hierarchical Network
Modelling: A Means to Integrate Across Scales and Systems.’ Paper presented
at the 7th International Conference on Urban Drainage and 4th International
Conference on Water Sensitive Design, Melbourne, Australia.
Hardy, M.J. (2009). ‘Integrated Urban Water Management and the urbanCycle Modelling
Framework.’ PhD Thesis, University of Newcastle.
Hardy, M. J., Kuczera, G., Coombes, P. J., Barbour, E., & Jurd, K. (2007). ‘An Evaluation of the
Performance of the application of the urbanCycle Model to a Gauged Urban
Catchment.’ Paper presented at the 2007 Conference on Rainwater and Urban
Design, Sydney, Australia.
Micevski, T., Thyer, M., and Coombes, P. (2009). ‘Evaluation of a behavioural approach and a
regression approach for the modelling of household-scale outdoor water use.’
32nd Hydrology and Water Resources Symposium, 30 November – 3 December
2009, Newcastle, Australia.
Micevski, T., Thyer, M., Kuczera, G. (2011). ‘A Behavioural Approach for Household Outdoor
Water Use Modelling.’ Paper submitted to Water Resources Research (April
2011).
Thyer, M.A., Duncan, H., Coombes, P., Kuczera, G. and Micevski, T. (2009). ‘A Probabilistic
Behavioural Approach for the Dynamic Modelling of Indoor Household Water
Use.’ 32nd Hydrology and Water Resources Symposium, 30 November – 3
December 2009, Newcastle, Australia.
Thyer, M., Hardy, M. J., Coombes, P. J., & Patterson, C. (2007). The Impact Of End-Use
Dynamics On Urban Water System Design Criteria. Australian Journal of Water
Resources, 12(12).
Urban Developer User Guide
137
Thyer, M., Micevski, T., Kuczera, G., and Coombes, P. (2011). ‘A Behavioural Approach to
Stochastic End Use Modelling.’ Paper presented at Oz Water, 9-11 May 2011,
Adelaide.
138
Urban Developer User Guide
14
industrial, minimum flows,
environmental and recreational
requirements, and inter-basin
transfers, but need not be limited to
these.
Glossary of
Terms
A
Some Urban Developer nodes have
demand link outputs, as they supply
a requirement (eg mains supply),
and other nodes have demand link
inputs (eg Water Use).
L
Allotment
Layer
A unit representing a household,
building or small group of buildings
and their surrounds, up to
approximately 1000 m2.
In Urban Developer, a layer is a
category of information, or feature,
that can be made visible, or hidden,
within the Schematic Editor. Urban
Developer layers are analogous to
layers in a GIS tool, however Urban
Developer layers contain no spatial
information.
C
Cluster
A small grouping of allotments,
businesses and/or commercial
premises of between approximately
2 and 30 in number.
Level
In Urban Developer, a level
corresponds to either:
For example, a cluster could
represent the number of houses in a
small suburban street, or a block of
apartments. It is a particularly useful
scale for exploring decentralised
options as it affords potential for
some economies of scale in
infrastructure delivery and
ameliorates some of the need for
expensive centralised distribution
and collection infrastructure.
i) a view of the urban model inside
the schematic editor where the user
can see the scenario (highest level),
a subnetwork within the scenario
(middle level) or a subnetwork within
another subnetwork (bottom level).
ii) the scope of the model itself, for
example a suburb-level model
means that the model applies to a
suburb, a street-level model means
that the model applies at street
level, and so on.
D
R
Demand link
A demand link supplies a
requirement for water to be met from
the sources in the urban water
system. Demands may be
consumptive or non-consumptive
and may, for example, include town
water supplies, irrigation, hydro,
Runoff link
Runoff links convey flow from a
given area; the flow results from the
effects of rainwater and/or applied
Urban Developer User Guide
139
irrigation water in excess of any
demand.
Examples include Roof nodes,
which have runoff link outputs, and
Pervious and Impervious Area
nodes, which have runoff link inputs.
S
Stormwater link
Stormwater links convey sudden,
excessive run-off of water following
a storm. Surface runoff results from
excess rainfall, usually passing
quickly through a drainage area.
The detention outflow of a Tank
node is an example of an output
feeding in to a stormwater link.
Stormwater links can feed into
Wastewater nodes, Pervious Area
nodes, and Junction nodes.
Subdivision
eWater glossary, see the eWater
Glossary.
W
Wastewater link
A wastewater link conveys water
which has been used at least once
and hence is regarded as unsuitable
for immediate reuse for that purpose
without treatment; water collected
from domestic and industrial
sources to be treated prior to
discharge to the environment or for
recycling for other uses.
Certain Urban Developer nodes
have wastewater outputs. For
example, the Wastewater
Connection node collects, or
aggregates, individual flows into a
combined wastewater flow. Other
nodes have wastewater inputs. The
Junction node acts as a collector of
different flow types (wastewater,
runoff, etc).
A grouping of (allotment) clusters.
For example, a sub-division could
represent a new residential housing
development consisting of 5 streets,
with approximately 20 houses in
each cluster – roughly 100
allotments in total.
Suburb
A grouping of subdivisions.
For example, a suburb could
represent 10 subdivisions, with
approximately 100 houses in each–
roughly 1000 allotments in total.
U
Urban Developer Glossary
This glossary defines terms used in
Urban Developer. For the full
140
Urban Developer User Guide
15
Acknowledgements
The Urban Developer team gratefully acknowledge contributions from the following
organisations (in alphabetical order):
• Australian Capital Territory Department of the Environment, Climate Change, Energy
and Water
• Australian Capital Territory Department of Planning (ACTPLA)
• ActewAGL
• BMT WBM
• Brisbane City Council
• Bureau of Meteorology
• Commonwealth Department of Environment, Water, Heritage and the Arts
• CSIRO Land and Water
• CSS (Catchment Simulation Solutions)
• Discover Me
• eWater Innovations
• Melbourne Water
• Monash University
• Murray-Darling Basin Authority (including MSM-Bigmod material)
• National Water Commission
• New South Wales Department of Water and Energy (IQQM material)
• Queensland Department of Environment and Resource Management (IQQM material)
• Sinclair Knight Merz
• South Australian Department of Water, Land and Biodiversity Conservation
• University of Adelaide
• University of Canberra
• University of Melbourne Department of Civil and Environmental Engineering (including
NGenIRR crop modelling work)
• University of Newcastle
• Victoria University (including REALM material)
• Victorian Department of Sustainability and Environment (including REALM material)
• Water for a Healthy Country Flagship, CSIRO
• Western Australian Department of Water
Urban Developer User Guide
141
The Urban Developer team also gratefully acknowledge contributions from the following
people (in alphabetical order):
• Andrew Grant
• Luke McPhail
• Bill Pascoe
• Mark Thyer
• Catherine Plant
• Mathew J Hardy
• Chris Ryan
• Matthew Hardy
• Dave Penton
• Matthew Sant
• Dominic
Snowdon
• Michael Barry
• Dominic Wong
• Frank Yan
• Geoff Davis
• George Kuczera
• Grace Hamilton
• Grace Mitchell
• Guy Burkitt
• Hangdong Xue
• Hugh Duncan
• Jakin Ravalico
• James Robinson
• Jane Blackmore
• Jane McArthur
• Jesse Barrett
• Nick Murray
• Peter Coombes
• Ralph Ogden
• Shannon Li
• Susan Daly
• Thoosje (user at
deviantart.com, for the help
icon)
• Tim Blackman
• Tom Micevski
• Tony Ladson
• Tony McAlister
• Tony Weber
• Tory Grice
• Vic Hughes
• Jin Park
• Joel Rahman
142
Urban Developer User Guide
C
Catchment nodes • 97
Charting Tool - graph tab • 38, 81
16
Index
Charting Tool toolbar • 37
Climate simulation • 25, 39, 52
.
Climate toolbar • 24, 35
.bts Binary Time Series • 124
Cluster • 139
.cdt Comma Delimited Column Time Series •
124, 128
Configure Menu • 24
.csv Comma Separated Value • 125
Configuring multiple nodes using styles • 28,
31, 33, 52, 53, 58, 62, 65
.pat Urban Developer Daily Diurnal Pattern • 43,
119, 127
Copy a scenario • 29, 56, 62
Create a new project • 13, 24, 54
.sdt Space Delimited Column Time Series •
126
Create a new scenario • 29, 55
Create a node (or multiple nodes) from a style •
67
.wup Urban Developer Water Use Parameters •
127
Create a style • 66
A
Creating a model using nodes and links • 58
About this user guide • 6
D
Acknowledgements • 141
Acrobat commenting Q & A • 8
Default node names • 62, 68
Adding nodes and links to a model • 3, 27, 51,
60, 72
Delete a scenario • 29, 57
Additional reading • 137
Demand and end-use simulation • 43, 118
Aggregation nodes • 105
Demand link • 139
Allotment • 1, 139
Design Rainfall • 24, 39, 57
Alternative supply • 58, 93, 95, 105
Dockable windows • 20
Apply a style to a node • 67
Deleting nodes and links • 62
E
Appropriate applications • 2
Edit a node style • 26, 66
Audience • 124
Editing graph properties • 83, 87
Average daily model • 43
Editing node properties • 63
B
Behavioural model • 44
Examining Urban Developer model run results
using the Charting Tool • 57, 80
Behavioural model configuration • 44, 45
Exporting and Saving Data • 83, 86
Behavioural model with fixed appliances and
occupancy • 45, 120
Behavioural model with sampled appliances
and occupancy • 46
F
File Formats • 123
File Menu • 23
File toolbar • 35
Building models using Urban Developer • 51
Urban Developer User Guide
143
Formats for CDT and CSV files • 130
Making a scenario active • 56
Functional nodes • 111
Menus • 23
G
N
Graph properties - 3D chart tab • 89
Node connection rules • 59, 60, 94, 97, 99, 103,
105, 106, 108, 110, 112, 113, 118, 121
Graph properties - Axis tab • 89
Node models in Urban Developer • 58
Graph properties - Background tab • 90
Node Palette • 24, 27, 38, 71
Graph properties - Export tab • 90
Node types
Graph properties - Legend tab • 91
Alternative Supply • 105
Graph properties - Series tab • 86, 88
Impervious Area • 97
Graph properties - Titles tab • 91
Junction • 106
Grouping nodes and common elements using
subnetworks • 26, 71
Mains Water Supply • 106
H
Pervious Area • 99
Holtan index • 103
Receiving • 121
How to build a model of an urban water network
• 51
Roof • 103
Subnetwork • 108
I
Tank (Urban Developer type) • 112
Impervious Area • 31, 58, 93, 95, 97, 112
Waste Water Connection • 107
Input Data • 57
Water Use • 117
Installation • 9
O
Installing Urban Developer • 10
Observed Analysis • 24, 40, 57
Introduction • 1
Open a Project File • 13, 54
Introduction to subnetworks • 55, 56, 71
Options • 10, 25, 66, 72, 98, 102, 105, 115, 120
J
Other data formats • 126
Junction • 58, 59, 93, 95, 106
Overview • 57, 83, 87, 88, 123
L
P
Layer • 139
Pervious area • 33, 58, 93, 95, 99
Layer Manager • 34
Project Explorer • 20, 22, 24, 28, 38, 54, 109
Level • 139
Project Hierarchy • 28, 29, 36, 52, 56, 57, 78
Limitations • 124
Projects & scenarios • 35, 54
Link models in Urban Developer • 59
Properties Panel • 24, 28, 30, 38, 63
Link types and colours • 34, 59, 61, 94, 97, 99,
103, 105, 106, 107, 108, 110, 112, 121
Log Reporter • 22, 24, 34, 38, 80
Property Styles within node and link models •
33
Q
M
Quitting Urban Developer • 16
Mains water supply • 58, 93, 95, 105, 106
144
Urban Developer User Guide
R
Subnetwork operations
Receiving node • 58, 93, 95, 121
adding & deleting, editing, closing • 72
Receiving nodes • 121
Subnetworks and node styles • 74
Recording Manager • 35
Suburb • 140
Recording Manager toolbar • 36
Suggestions for documenting models • 53
Recording model outputs • 36, 77, 78, 81, 98,
100, 104, 105, 106, 107, 108, 111, 114, 120,
121
T
Tank • 51, 59, 94, 96, 111
Tank (Urban Developer type) • 112
Re-display hidden or • 22
Tank model operation • 115
References and training • 5
Target audience • 1
Remove a style from a node • 68
Technical specifications • 9
Rename a scenario • 56
The ISO8601 standard for representing dates
and times • 124, 131, 133
Renaming nodes and links • 64
Renaming styles • 64, 69
Time Series Formats • 124
Resizing windows in Urban Developer • 22
Times and Dates in Data Files • 124, 130
Roof • 58, 93, 95, 103, 112
Tools Menu • 25
Run Menu • 27
U
Running a scenario • 57, 77
Undocking and moving windows • 21
Running scenarios in Urban Developer • 51, 77
Uninstalling Urban Developer • 10, 16, 17
Runoff link • 139
Updating Urban Developer • 16
S
Urban Developer features • 2
Sampled appliances and occupancy
configuration • 47
Urban Developer Glossary • 140
Urban Developer Limitations • 3
Save a project • 54
Urban Developer Toolbars • 35
Scenarios • 55
Urban Developer's node types • 27, 32, 51, 52,
63, 93, 94
Schematic Editor Toolbar • 37
Software and documentation feedback • 6
User Interface • 19, 27
Starting Urban Developer • 12, 25
Statistics Panel • 24, 26, 33, 38
Stormwater link • 140
Style example 1 • 68
Style Manager • 24, 28, 38
Subdivision • 140
Subnetwork • 37, 58, 94, 96, 108
Subnetwork basic concepts • 73
Subnetwork nodes • 108
Using the Adobe Acrobat commenting tools • 6
V
Version compatibility • 18
Version numbering • 10, 17
View Menu • 24
View Toolbar • 21, 38
Viewing multiple (overlaid) graphs • 83, 88
Viewing results from the Recording Manager •
24, 27, 30, 35, 38, 55, 57, 77, 78, 80, 107
Urban Developer User Guide
145
Viewing scenario run results • 57
W
Wastewater connection • 59, 94, 96, 107
Wastewater link • 140
Water Data Transfer Format • 124, 126
Water Use • 25, 43, 45, 59, 94, 96, 110, 112,
117
What is Urban Developer? • 1
Z
Zero-padding data in Excel • 125, 128
146
Urban Developer User Guide
eWater Cooperative Research Centre
eWater Limited ABN 47 115 422 903
Innovation Centre
University of Canberra ACT 2601
Phone: +61 2 6201 5168
[email protected]
www.ewater.com.au
eWater © 2011