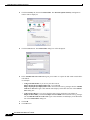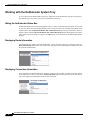
1
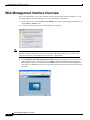
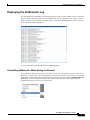
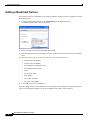
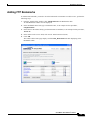
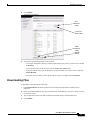
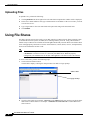
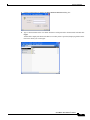
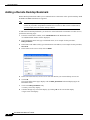
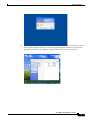
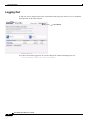
COMPREHENSIVE INTERNET SECURITY ™
SSSSSonicWALL Security Appliances
SonicWALL SSL-VPN
User's Guide
Table of Contents
Using This Guide . . . . . . . . . . . . . . . . . . . . . . . . . . . . . . . . . . . . . . . . . . . . . . . . . . . . . . . . . . . . 3
Virtual Office Overview . . . . . . . . . . . . . . . . . . . . . . . . . . . . . . . . . . . 8
Accessing Virtual Office Resources . . . . . . . . . . . . . . . . . . . . . . . . . . . . . . . . 8
Browser Requirements . . . . . . . . . . . . . . . . . . . . . . . . . . . . . . . . . . . . 9
Web Management Interface Overview . . . . . . . . . . . . . . . . . . . . . . . 10
Virtual Office Overview . . . . . . . . . . . . . . . . . . . . . . . . . . . . . . . . . . . . . . . . 11
Making Virtual Office a Trusted Site . . . . . . . . . . . . . . . . . . . . . . . . . . . . . . 13
Using Virtual Office Features . . . . . . . . . . . . . . . . . . . . . . . . . . . . . . . . 16
Installing NetExtender on Windows . . . . . . . . . . . . . . . . . . . . . . . . . 16
Connecting NetExtender to the Security Appliance . . . . . . . . . . . . . . . . . . . 16
Disconnecting NetExtender . . . . . . . . . . . . . . . . . . . . . . . . . . . . . . . . . . . . . . 17
Working with the NetExtender System Tray . . . . . . . . . . . . . . . . . . . . . . . . . 18
Hiding the NetExtender Status Box . . . . . . . . . . . . . . . . . . . . . . . . . . . . . 18
Displaying Route Information . . . . . . . . . . . . . . . . . . . . . . . . . . . . . . . . . 18
Displaying Connection Information . . . . . . . . . . . . . . . . . . . . . . . . . . . . 18
Displaying the NetExtender Log . . . . . . . . . . . . . . . . . . . . . . . . . . . . . . . . . . 19
Uninstalling NetExtender When Exiting the Browser . . . . . . . . . . . . . . . 19
Bookmarks Overview . . . . . . . . . . . . . . . . . . . . . . . . . . . . . . . . . . . . 20
Adding Bookmarks . . . . . . . . . . . . . . . . . . . . . . . . . . . . . . . . . . . . . . . . . . . . 20
Editing Bookmarks . . . . . . . . . . . . . . . . . . . . . . . . . . . . . . . . . . . . . . . . . . . . 21
Removing Bookmarks . . . . . . . . . . . . . . . . . . . . . . . . . . . . . . . . . . . . . . . . . . 21
Adding a Bookmark Service . . . . . . . . . . . . . . . . . . . . . . . . . . . . . . . . . . . . . 22
Adding FTP Bookmarks . . . . . . . . . . . . . . . . . . . . . . . . . . . . . . . . . . . . . . . . 23
Downloading Files . . . . . . . . . . . . . . . . . . . . . . . . . . . . . . . . . . . . . . . . . . . . . 25
Uploading Files . . . . . . . . . . . . . . . . . . . . . . . . . . . . . . . . . . . . . . . . . . . . . . . 26
Using File Shares . . . . . . . . . . . . . . . . . . . . . . . . . . . . . . . . . . . . . . . . 26
Adding a Remote Desktop Bookmark . . . . . . . . . . . . . . . . . . . . . . . . . . . . . . 28
Logging Out . . . . . . . . . . . . . . . . . . . . . . . . . . . . . . . . . . . . . . . . . . . . . . . . . . 30
SonicWALL SSL-VPN User’s Guide
1
SonicWALL SSL-VPN User’s Guide
2
Chapter :
Using This Guide
About this Guide
Welcome to the SonicWALL SSL-VPN User’s Guide. This manual is a user's guide. It provides
information on using the SonicWALL SSL-VPN user portal called Virtual Office that allows you to
create bookmarks and run services over the SonicWALL SSL-VPN security appliance.
Note: Always check <http//:www.sonicwall.com/support/documentation.html> for the latest
version of this manual as well as other SonicWALL products and services documentation.
Organization of this Guide
The SonicWALL SSL-VPN User’s Guide organization is structured into the following parts that follow
the SonicWALL Web Management Interface structure. Within these parts, individual chapters
correspond to SonicWALL security appliance management interface layout.
Chapter 1 Virtual Office Overview
This chapter provides an overview of new SonicWALL SSL-VPN security appliance user features,
NetExtender, File Shares, services, sessions, bookmarks, and service tray menu options.
Chapter 2 Using Virtual Office
This chapter provides procedures on how to install NetExtender, working with the NetExtender system
tray, displaying the NetExtender log, configuring bookmarks, and using file shares.
SonicWALL SSL-VPN User’s Guide
3
Guide Conventions
The following Conventions used in this guide are as follows:
Convention
Use
Bold
Highlights dialog box, window, and screen names. Also
highlights buttons. Also used for filenames and text or
values you are being instructed to type into the interface.
Italic
Indicates the name of a technical manual. Also indicates emphasis on certain words in a sentence. Also,
sometimes indicates the first instance of a significant
term or concept.
Icons Used in this Manual
These special messages refer to noteworthy information, and include a symbol for quick identification:
S
9
Â
Alert: Important information that cautions about features affecting firewall performance, security
features, or causing potential problems with your SonicWALL.
Tip: Useful information about security features and configurations on your SonicWALL.
Note: Important information on a feature that requires callout for special attention.
Cross Reference: Provides a pointer to related information in the Administrator’s Guide or other
resources.
SonicWALL SSL-VPN User’s Guide
4
SonicWALL Technical Support
For timely resolution of technical support questions, visit SonicWALL on the Internet at
<http://www.sonicwall.com/support/support.html>. Web-based resources are available to help you
resolve most technical issues or contact SonicWALL Technical Support.
To contact SonicWALL telephone support, see the telephone numbers listed below:
North America Telephone Support
U.S./Canada - 888.777.1476 or +1 408.752.7819
International Telephone Support
Australia - + 1800.35.1642
Austria - + 43(0)820.400.105
EMEA - +31(0)411.617.810
France - + 33(0)1.4933.7414
Germany - + 49(0)1805.0800.22
Hong Kong - + 1.800.93.0997
India - + 8026556828
Italy - +39.02.7541.9803
Japan - + 81(0)3.5460.5356
New Zealand - + 0800.446489
Singapore - + 800.110.1441
Spain - + 34(0)9137.53035
Switzerland - +41.1.308.3.977
UK - +44(0)1344.668.484
Note: Please visit <http://www.sonicwall.com/support/contact.html> for the latest technical support
telephone numbers.
More Information on SonicWALL Products
Contact SonicWALL, Inc. for information about SonicWALL products and services at:
Web:
E-mail:
Phone:
Fax:
http://www.sonicwall.com
[email protected]
(408) 745-9600
(408)745-9300
SonicWALL SSL-VPN User’s Guide
5
Quick Access Work Sheet
This section should be completed by your network administrator to allow remote users SSL-VPN access.
Important Information You Need
IP Address:
___________________________________________________
User Name: ___________________________________________________
Password:
Domain:
___________________________________________________
_____________________________________________________
SonicWALL SSL-VPN User’s Guide
6
Virtual Office Overview
This chapter provides an overview of the SonicWALL SSL-VPN user portal. It also includes an
introduction to the SSL-VPN and its features and applications. This chapter contains the following
sections:
•
“Virtual Office Overview” section on page 8
•
“Browser Requirements” section on page 9
•
“Web Management Interface Overview” section on page 10
•
“Virtual Office Overview” section on page 11
•
“Making Virtual Office a Trusted Site” section on page 13
SonicWALL SSL-VPN User’s Guide
7
Virtual Office Overview
Virtual Office Overview
SonicWALL SSL-VPN Virtual Office provides secure remote access to network resources, such as
applications, files, Intranet web sites, and email through web access interface such as OWA. The
underlying protocol used for these sessions is SSL.
With SSL-VPN, mobile workers, telecommuters, partners, and customers can access information and
applications on your Intranet or Extranet. What information should be accessible to the user is
determined by access policies configured by the SonicWALL SSL-VPN administrator.
Accessing Virtual Office Resources
Remote network resources can be accessed in the following ways:
•
Using a standard web browser - To access network resources, you must log into the SSL-VPN portal.
Once authenticated, you may access Intranet HTTP and HTTPS sites, web-based applications, and
web-based email. In addition, you may upload and download files using FTP or Windows Network
File Sharing. All access is performed through a standard web browser and does not require any client
applications to be downloaded to remote users’ machines.
•
Java thin-client access to corporate desktops and applications – The SonicWALL SSL-VPN security
appliance includes several Java or ActiveX thin-client programs that can be launched from within
the SonicWALL SSL-VPN security appliance. Terminal Services and VNC Java clients allow
remote users to access corporate servers and desktops, open files, edit and store data as if they were
at the office. In addition, Terminal Services provides the unique ability to open individual
applications and support remote sound and print services. In addition, users may access Telnet and
SSH servers from the SSL-VPN portal.
•
Using the NetExtender SSL-VPN client – The SonicWALL SSL-VPN security appliance includes
an ActiveX-based SSL-VPN client for Window users. To connect using the SSL-VPN client, log
into the portal, download the installer application and then launch the NetExtender connector to
establish the SSL-VPN tunnel. Once you have set up a VPN connection, you can access network
resources as if you were on the local network.
For SSL-VPN to work as described in this guide, the SonicWALL SSL-VPN security appliance must be
installed and configured according to the directions provided in the SonicWALL SSL-VPN 2000 Getting
Started Guide.
SonicWALL SSL-VPN User’s Guide
8
Browser Requirements
Browser Requirements
The following web browsers are supported for the web management interface and the SSL-VPN portal.
Note that Java is only required for the SSL-VPN portal, not the web management interface.
Table 1
Attribute
Browser
Java
Apple MacOS X
Unix, Linux, or BSD
Microsoft Windows Settings
Setting
•
Internet Explorer 5.0.1 or higher, Mozilla 1.x, or Netscape 7.0
or higher
•
Opera 7.0 or higher
•
FireFox 1.0 or higher
•
Sun JRE 1.3.1 or higher
•
Microsoft JVM 5 or higher
•
Browser: Safari 1.2 or higher
•
Java: Sun JRE 1.1 or higher
Browser: Mozilla 1.x or Netscape 7.0 or higher
Safari 1.2 or higher
•
Java: Sun JRE 1.1 or higher
To configure SonicWALL SSL-VPN software, an administrator must use a web browser with JavaScript,
cookies, and SSL enabled.
SonicWALL SSL-VPN User’s Guide
9
Web Management Interface Overview
Web Management Interface Overview
From your workstation at your remote location, launch an approved web-browser and browse to your
SSL-VPN appliance at the URL provided to you by your network administrator.
Note
1.
Open a Web browser and enter https://192.168.200.1 (the default LAN management IP address) in
the Location or Address field.
2.
A security warning may appear. Click the Yes button to continue.
While these browsers are acceptable for use in configuring your SonicWALL SSL-VPN security
appliance, end users will need to use IE 5.0.1 or higher, supporting JavaScript, Java, cookies, SSL
and ActiveX in order to take advantage of the full suite of applications.
3.
The SonicWALL SSL-VPN Management Interface displays and prompts you to enter your user
name and password. As a default value, enter admin in the User Name field, password in the
Password field, and select a domain from the Domain drop-down list and click the Login button.
Note that your administrator may have set up another login and password for you that has only user
privileges.
SonicWALL SSL-VPN User’s Guide
10
Web Management Interface Overview
The default page displayed is the Virtual Office home page. The default version of this page shows a
SonicWALL logo, although your company’s system administrator may have customized this page to
contain a logo and look and feel of your company. Go to the Virtual Office Overview, page 8 to learn
more about the Virtual Office home page.
Note
Note that from the Virtual Office portal home page, you cannot navigate to the administrator’s
environment. If you have administrator’s privileges and want to enter the administrator environment,
you need to go back to the login page and enter a username and password that have administrator
privileges set up for them and log in again. Note that the domain is independent of the privileges set
up for the user.
Virtual Office Overview
Logging in as a user takes you directly to Virtual Office. The Virtual Office Home page displays as
shown here.
NetExtender
File Shares
Bookmarks
Region
Note
The Virtual Office pages and content will vary based on the configuration of your network
administrator. So some pages described in the SonicWALL SSL-VPN User’s Guide may not be
displayed when you log into the SonicWALL SSL-VPN security appliance.
SonicWALL SSL-VPN User’s Guide
11
Web Management Interface Overview
The Virtual Office consists of the nodes described in the following table.
Note
Node
Description
File Shares
Provides access to the FileShares utility which provide remote users
with a secure Web interface to Microsoft File Shares using the CIFS
(Common Internet File System) or SMB (Server Message Block)
protocols. Using a Web interface similar in style to Microsoft’s
familiar Network Neighborhood or My Network Places, File Shares
allow users with appropriate permissions to browse network shares,
rename, delete, retrieve, and upload files, and to create bookmarks
for later recall.
NetExtender
Provides access to the NetExtender utility, a transparent SSL-VPN
client for Windows users that allows you to run any application
securely on the remote network. It acts as an IP-level mechanism
provided by the virtual interface that negotiates the ActiveX
component, using a Point-to-Point Protocol (PPP) adapter instance.
Bookmarks
Provides a list of available bookmarks which are objects that enable
you to connect to a location or application conveniently and quickly.
Online Help
Launches online help for Virtual Office.
Logout
Logs you out of the Virtual Office environment.
Not all Virtual Office pages may be displayed when you log into the SSL-VPN portal. The
administrator may hide certain pages if they are not needed.
The Home page provides customized content and links to network resources. The Home Page may
contain support contact information, VPN instructions, company news, or technical updates.
Only a web browser is required to access Intranet web sites and FTP sites. VNC, Telnet and SSH require
Java. And Terminal Services requires either Java or ActiveX on the client machine.
As examples of tasks you can perform and environments you can reach through Virtual Office, you can
connect to:
•
Intranet web or HTTPS sites – If your organization supports web-based email, such as Outlook Web
Access, you can also access web-based email
•
The entire network by launching the NetExtender client
•
FTP servers for uploading and downloading files
•
The corporate network neighborhood for file sharing
•
Telnet and SSH servers
•
Desktops and desktop applications using Terminal Services or VNC.
•
Email servers via the NetExtender client.
The administrator determines what resources are available to users from the SonicWALL SSL-VPN
Virtual Office. The administrator can create user, group, and global policies that disable access to certain
machines or applications on the corporate network.
The administrator may also define bookmarks, or preconfigured links, to web sites or computers on the
Intranet. Additional bookmarks may be defined by the end user.
SonicWALL SSL-VPN User’s Guide
12
Web Management Interface Overview
SonicWALL NetExtender is a software application othat enables remote users to securely connect to the
remote network. With NetExtender, remote users can virtually join the remote network. Users can mount
network drives, upload and download files, and access resources in the same way as if they were on the
local network.
Note
If the SSL-VPN gateway uses a self-signed SSL certificate for HTTPS authentication, then it is
necessary to install the certificate before establishing a NetExtender connection. If you are unsure
whether the certificate is self-signed or generated by a trusted root Certificate Authority, SonicWALL
recommends that you import the certificate. The easiest way to import the certificate is to click the
Import Certificate button at the bottom of the Virtual Office home page.
Making Virtual Office a Trusted Site
If your Internet Explorer security settings are set to High or prevent the ActiveX or Java applications
from running properly, you may need to add the SSL-VPN portal to your browser's list of Trusted Sites.
To ensure that your machine is protected against malicious code and spyware files, it is not
recommended to change your web browser’s security settings in order to use the Java and ActiveX files
included in the SonicWALL SSL-VPN security appliance Virtual Office. Instead, add the appliance
address to your web browser’s list of Trusted sites.
Most web browsers today support multiple security zones with different permission levels. Trusted sites
have lower security settings that will, by default, allow the Java and ActiveX content to function
properly.
Note
ActiveX content is only supported in Internet Explorer.
To add the SonicWALL SSL-VPN security appliance Virtual Office as a trusted site:
1.
Go to the login page.
2.
Press ALT+D to select the SSL-VPN portal address, and press CTRL+C to copy it to the Windows
Clipboard.
3.
On the Internet Explorer Tools menu, click Internet Options.
SonicWALL SSL-VPN User’s Guide
13
Web Management Interface Overview
4.
Click the Security tab, then click Trusted Sites. The Internet Options Security configuration
window will be displayed.
5.
Click the Sites button. The Trusted Sites dialog box will be displayed.
6.
In the Add this Web site to the zone region, press CTRL+V to paste the SSL-VPN Virtual Office
web address.
As examples:
– Using a Domain Name: If you access your SSL-VPN at
https://mysslvpn.mycompanyname.com, you would add
https://mysslvpn.mycompanyname.com to the trusted site list by pasting it into the Add this
Web site to the zone region. This domain name displays in the Web Sites list of the Trusted
Sites dialog box.
– Using an IP Address: If you access the SSL-VPN security appliance by IP address at
https://67.115.118.80, you would add https://67.115.118.80 to the trusted site list by pasting it
into the Add this Web site to the zone region. This IP address would display in the Web Sites
list of the Trusted Sites dialog box.
7.
Click Add.
8.
Click OK twice.
SonicWALL SSL-VPN User’s Guide
14
Using Virtual Office Features
This chapter provides details on how to use the features in the SonicWALL SSL-VPN user portal,
including installing NetExtender, configuring bookmarks, accessing services, and using file shares. This
chapter contains the following sections:
•
“Installing NetExtender on Windows” section on page 16
•
“Disconnecting NetExtender” section on page 17
•
“Bookmarks Overview” section on page 20
•
“Using File Shares” section on page 26
SonicWALL SSL-VPN User’s Guide
15
Installing NetExtender on Windows
Installing NetExtender on Windows
The following are NetExtender requirements for Windows clients:
•
Windows 2000 Professional, Windows XP Home or Professional, Windows 2000 Server or
Windows 2003 Server
•
Internet Explorer 5.0.1 and greater
•
To initially install the NetExtender driver, the user must be logged in with administrative privileges.
•
Downloading and running scripted ActiveX files must be enabled on Internet Explorer.
Connecting NetExtender to the Security Appliance
To connect NetExtender to the SSL-VPN security appliance, perform the following:
1.
To begin installing the NetExtender utility, click the NetExtender option.
2.
Note that a message box appears indicating that NetExtender is initializing.
3.
When NetExtender completes installing, the NetExtender Status window displays, indicating
whether you have established a successful NetExtender connection.
Closing the windows (clicking on the x icon in the upper right corner of the window) will not close the
NetExtender session, but will minimize it to the system tray for continued operation.
4.
Review the following table to understand the fields in the NetExtender Status window.
Field
Description
Status
Indicates what operating state the NetExtender client is in, either
Connected or Disconnected.
Server
Indicates the name of the server to which the NetExtender client is
connected.
Client IP
Indicates the IP address assigned to the NetExtender client.
Sent
Indicates the amount of traffic the NetExtender client has
transmitted since initial connection.
SonicWALL SSL-VPN User’s Guide
16
Installing NetExtender on Windows
Field
Description
Received
Indicates the amount of traffic the NetExtender client has received
since initial connection.
Duration
The amount of time the NetExtender has been connected, expressed
as days, hours, minutes, and seconds.
5.
Additionally, a balloon icon in the system tray appears, indicating NetExtender has successfully
installed.
6.
Finally, note in the system tray, the NetExtender icon that appears there.
Disconnecting NetExtender
To disconnect NetExtender, perform the following steps:
1.
Right click on the NetExtender icon in the system tray to display the NetExtender icon menu.
2.
Click the Disconnect option.
3.
Wait several seconds.
The NetExtender session disconnects.
SonicWALL SSL-VPN User’s Guide
17
Installing NetExtender on Windows
Working with the NetExtender System Tray
To view options in the NetExtender system tray, right click on the NetExtender icon in the system tray.
The following are some tasks you can perform with the system tray.
Hiding the NetExtender Status Box
NetExtender displays the status box during the course of your session while using the utility. If you want
to move the status box to the background so it does not interfere with your working environment in the
Virtual Office, click the Hide SonicWALL SSL-VPN NetExtender option in the system tray menu. To
display it again, click the Show SonicWALL SSL-VPN NetExtender option which appears in the same
place in the system tray menu as a toggle to the Hide option. You can also close the NetExtender window
to hide it.
Displaying Route Information
You can display the default route that NetExtender is using from the system tray. To do this, click the
Route Information option in the system tray menu. The system tray menu displays the default route and
the associated subnet mask.
Displaying Connection Information
You can display connection information from the system tray menu which is similar to the data shown
in the status box. To do this, click on the Connection Status option in the system tray menu. The system
tray menu displays an information box about the connection.
SonicWALL SSL-VPN User’s Guide
18
Installing NetExtender on Windows
Displaying the NetExtender Log
You can display the NetExtender log from the system tray menu. The log contains a list of events that
have occurred in NetExtender since it was installed. Each log entry includes a date, a time, a severity
number, and an event description. To display the log, click on the View Log option in the system tray
menu. The NetExtender log displays.
To remove all entries from the log, click the Clear Log option.
Uninstalling NetExtender When Exiting the Browser
The NetExtender utility remains active even when you exit your Virtual Office session. If you do not
deactivate it, NetExtender will be running when you reenter Virtual Office after leaving it. If you want
NetExtender to deactivate automatically each time you exit the browser, click the Uninstall on Browser
Exit option. A sub-menu appears with a choice of Yes or No. Click Yes to direct NetExtender to
automatically deactive when you exit the browser.
SonicWALL SSL-VPN User’s Guide
19
Bookmarks Overview
Bookmarks Overview
Bookmarks are objects that enable you to connect to a location or application conveniently and quickly.
The Virtual Office Bookmark system allows bookmarks to be created at the group and user levels. The
administrator can create both group and user bookmarks which will apply to applicable users while
individual users can create only personal (user-level) bookmarks.
Since bookmarks are stored within the security appliance’s local configuration files, it is necessary for
group and user bookmarks to be correlated to defined group and user entities. When working with local
groups and users (LocalDomain), this is automated since the administrator must manually define the
groups and users on the device. Similarly, when working with external groups (not LocalDomain), the
correlation is automated since creating an external domain creates a corresponding local group.
However, when working with external users, a local user entity must exist so that any user-created
(personal) bookmarks can be stored within the SSL-VPN’s configuration files. The need to store
bookmarks on the SSL-VPN itself is because LDAP, RADIUS, and NT authentication external domains
do not provide a direct facility to store such information as bookmarks.
Rather than requiring administrators to manually create local users for external domain users wishing to
use personal bookmarks, SonicWALL SSL-VPN automatically creates a corresponding local user entity
when an external domain user creates a personal bookmark so that it may store the bookmark
information.
Adding Bookmarks
Bookmarks provide a convenient way for you to access web, FTP, or other services on the remote
network that you will connect to frequently. To define bookmarks, perform the following:
1.
From the Virtual Office window, click Add Bookmark in the Bookmarks table. An Add Bookmark
window will be displayed.
2.
Enter a descriptive name in the Bookmark Name field.
3.
Enter the domain name or the IP address of a host machine on the LAN in the Name or IP Address
field.
4.
Select the service type in the Service menu.
5.
Click Add to update the configuration.
Once the configuration has been updated, the new bookmark will be displayed in the Bookmarks table.
Click on a bookmark description to go to the bookmark location that you have defined.
SonicWALL SSL-VPN User’s Guide
20
Bookmarks Overview
Editing Bookmarks
You can change the IP address or domain name associated with an existing bookmark.
Note
Only user created Bookmarks can be edited or deleted by the user. Bookmarks pre-defined
by the administrator can not be edited or deleted.
To edit a bookmark to change its name or associated IP address, perform the following steps:
1.
Identify a bookmark in the Bookmarks list for which you want to change an IP address or domain
name.
2.
In the Bookmarks list, click on the Configure icon for an existing bookmark.
The Edit Bookmark dialog box displays.
Note the bookmark name and associated service is in a read-only form.
3.
To change the domain name or IP address of the bookmark, delete the entry in the Name or IP
Address field and type a new one.
4.
Click Apply.
The Virtual Office home page displays with the new IP address or domain name.
Removing Bookmarks
To remove a bookmark, perform the following steps:
1.
Identify a bookmark in the Bookmarks list that you want to remove.
2.
In the Bookmarks list, click on the Trashcan icon for the bookmark you want to remove.
The bookmark disappears from the Bookmarks list.
SonicWALL SSL-VPN User’s Guide
21
Bookmarks Overview
Adding a Bookmark Service
You can add a service to a bookmark by recreating a bookmark. To add a service to a bookmark, perform
the following steps:
1.
From the Virtual Office window, click Add Bookmark in the Bookmarks table.
An Add Bookmark window will be displayed.
2.
Enter a descriptive name in the Bookmark Name field.
3.
Enter the domain name or the IP address of a host machine on the LAN in the Name or IP Address
field.
4.
Select the service type in the Service menu. The services you can select are:
– Terminal Services (RDP5)
– Terminal Services (RDP4)
– Virtual Network Computing (VNC)
– File Transfer Protocol (FTP)
– Telnet
– Secure Shell (SSH)
– Web (HTTP)
– Secure Web (HTTPS)
– File Share (CIFS/SMB)
5.
Click Add to update the configuration.
Once the configuration has been updated, the new bookmark will be displayed in the Bookmarks table.
Click on a bookmark description to go to the bookmark location that you have defined.
SonicWALL SSL-VPN User’s Guide
22
Bookmarks Overview
Adding FTP Bookmarks
To add an FTP bookmark, you need to be in the bookmarks environment. To add a service, perform the
following steps:
1.
From the Virtual Office window, click Add Bookmark in the Bookmarks table.
An Add Bookmark window will be displayed.
2.
In the Bookmark Name field, type a bookmark name, as an example for this procedure,
FTP_Bookmark.
3.
In the Name or IP Address field, type a domain name or IP address, as an example for this procedure,
10.0.71.55.
4.
In the listbox in the service field, click on File Transfer Protocol (FTP).
5.
Click Add.
The Virtual Office home page displays with the FTP_Bookmark bookmark displaying in the
Bookmarks Table.
SonicWALL SSL-VPN User’s Guide
23
Bookmarks Overview
6.
Click the FTP_Bookmark.
The FTP Session dialog box displays.
7.
Type a username, for example, anonymous, in the User name field. A password is automatically
filled in. If you want to use your Virtual Office username and password, simply leave the fields
blank.
SonicWALL SSL-VPN User’s Guide
24
Bookmarks Overview
8.
Click Submit.
An FTP session displays.
Go to
directory
Utility
Create new
folder Utility
Delete
Marked
Utility
Rename
Utility
9.
You can use the following utilities in the FTP site:
– To navigate through the directory structure under the directory where you arrived, use the Go
to directory
– To create new folders in the directory, use the Create new folder fields.
– To delete multiple files, click in checkboxes of files or folders you want to remove and click
Delete Marked.
– To rename a file or folder, click in the checkbox of a file or a folder and click Rename.
Downloading Files
To download a file, perform the following:
1.
Click Download Files in the navigation bar. The FTP Session upload files window will be
displayed.
2.
In the Server Name/Address field, type a domain name or IP address of the server where you want
to create the service.
3.
Type a login name in the User name field and a password string in the Password field.
4.
Click Submit.
SonicWALL SSL-VPN User’s Guide
25
Using File Shares
Uploading Files
To upload a file, perform the following:
1.
Click Upload Files in the navigation bar. The FTP Session upload files window will be displayed.
2.
In the Server Name/Address field, type a domain name or IP address of the server where you want
to create the service.
3.
Type a login name in the User name field and a password string in the Password field.
4.
Click Submit.
Using File Shares
File shares provide remote users with a secure Web interface to Microsoft File Shares using the CIFS
(Common Internet File System) or SMB (Server Message Block) protocols. Using a Web interface
similar in style to Microsoft’s familiar Network Neighborhood or My Network Places, File Shares allow
users with appropriate permissions to browse network shares, rename, delete, retrieve, and upload files,
and to create bookmarks for later recall.
Note
The server can be specified either by name or by IP address, for example, \\moosedc or
\\10.50.165.2. For names to work, it is necessary that DNS and or WINS be properly
configured by the administrator on the SSL-VPN appliance to be able to resolve host names.
To create a file share, perform the following steps:
1.
Click on the File Shares button.
Virtual Office displays a dialog box that provides a hot link to a login prompt.
Address Field
Login Prompt
2.
Specify a share path (as an example, \\moosedc) in the Address field. You need to precede the share
name with two back slashes. For example: \\svl0fs04.sv.us.sonicwall.com is a SonicWALL file
share location.
SonicWALL SSL-VPN User’s Guide
26
Using File Shares
3.
Click the login prompt to display the Enter Network Password dialog box.
4.
Type a valid username in the User Name field and a valid password in the Password field and click
Login.
Virtual Office displays the home File Share screen that you have specified, displaying folders on the
network to which you can navigate.
SonicWALL SSL-VPN User’s Guide
27
Using File Shares
Adding a Remote Desktop Bookmark
Remote Desktop bookmarks enable you to establish remote connections with a specified desktop. Both
the RDP5 and RDP4 standards are supported.
Note
To terminate your remote desktop session, be sure to log off from the Terminal Server
session. If you wish to suspend the Terminal Server session (so that it can be resumed later)
you may simply close the remote desktop window.
To add a Remote Desktop bookmark, you need to be in the bookmarks environment. To add a service,
perform the following steps:
1.
From the Virtual Office window, click Add Bookmark in the Bookmarks table.
An Add Bookmark window will be displayed.
2.
In the Bookmark Name field, type a bookmark name, as an example for this procedure,
RDP_Bookmark.
3.
In the Name or IP Address field, type a domain name or IP address, as an example for this procedure,
10.0.61.40.
4.
In the listbox in the service field, click on RDP5.
5.
In the Screen Size list box, select a screen size that matches your current desktop screen size.
6.
Click Add.
The Virtual Office home page displays with the RDP_Bookmark bookmark displaying in the
Bookmarks Table.
7.
Click on the RDP_Bookmark entry.
A security screen may display.
8.
Continue through any screens that display by clicking Ok on the screens that display.
A login screen will display.
SonicWALL SSL-VPN User’s Guide
28
Using File Shares
9.
Type a valid username and password for the host machine of the desktop you are trying to reach in
the User Name and Password fields. Select the proper domain name from the Log on to listbox.
The desktop you want to reach displays A sample remote desktop screen is shown here.
SonicWALL SSL-VPN User’s Guide
29
Using File Shares
Logging Out
To end your session, simply return to the Virtual Office home page from wherever you are within the
portal and click on the Logout button.
Logout Button
If you have successfully logged out, the system collapses the window and displays the text:
User successfully logged out. Close this window.
SonicWALL SSL-VPN User’s Guide
30
Using File Shares
Trademarks
SonicWALL is a registered trademark of SonicWALL, Inc.
Microsoft Windows 98, Windows NT, Windows 2000, Windows XP, Windows Server 2003,
Internet Explorer, and Active Directory are trademarks or registered trademarks of Microsoft
Corporation.
Netscape is a registered trademark of Netscape Communications Corporation in the U.S. and
other countries. Netscape Navigator and Netscape Communicator are also trademarks of
Netscape Communications Corporation and may be registered outside the U.S.
Adobe, Acrobat, and Acrobat Reader are either registered trademarks or trademarks of Adobe
Systems Incorporated in the U.S. and/or other countries.
Other product and company names mentioned herein may be trademarks and/or registered
trademarks of their respective companies and are the sole property of their respective
manufacturers.
Limited Warranty
SonicWALL, Inc. warrants that commencing from the delivery date to Customer (but in any case
commencing not more than ninety (90) days after the original shipment by SonicWALL), and
continuing for a period of twelve (12) months, that the product will be free from defects in materials
and workmanship under normal use. This Limited Warranty is not transferable and applies only to
the original end user of the product. SonicWALL and its suppliers' entire liability and Customer's
sole and exclusive remedy under this limited warranty will be shipment of a replacement product.
At SonicWALL's discretion the replacement product may be of equal or greater functionality and
may be of either new or like-new quality. SonicWALL's obligations under this warranty are
contingent upon the return of the defective product according to the terms of SonicWALL's
then-current Support Services policies.
This warranty does not apply if the product has been subjected to abnormal electrical stress,
damaged by accident, abuse, misuse or misapplication, or has been modified without the written
permission of SonicWALL.
SonicWALL SSL-VPN User’s Guide
31
Using File Shares
DISCLAIMER OF WARRANTY. EXCEPT AS SPECIFIED IN THIS WARRANTY, ALL EXPRESS
OR IMPLIED CONDITIONS, REPRESENTATIONS, AND WARRANTIES INCLUDING, WITHOUT
LIMITATION, ANY IMPLIED WARRANTY OR CONDITION OF MERCHANTABILITY, FITNESS
FOR A PARTICULAR PURPOSE, NONINFRINGEMENT, SATISFACTORY QUALITY OR
ARISING FROM A COURSE OF DEALING, LAW, USAGE, OR TRADE PRACTICE, ARE HEREBY
EXCLUDED TO THE MAXIMUM EXTENT ALLOWED BY APPLICABLE LAW. TO THE EXTENT
AN IMPLIED WARRANTY CANNOT BE EXCLUDED, SUCH WARRANTY IS LIMITED IN
DURATION TO THE WARRANTY PERIOD. BECAUSE SOME STATES OR JURISDICTIONS DO
NOT ALLOW LIMITATIONS ON HOW LONG AN IMPLIED WARRANTY LASTS, THE ABOVE
LIMITATION MAY NOT APPLY TO YOU. THIS WARRANTY GIVES YOU SPECIFIC LEGAL
RIGHTS, AND YOU MAY ALSO HAVE OTHER RIGHTS WHICH VARY FROM JURISDICTION TO
JURISDICTION. This disclaimer and exclusion shall apply even if the express warranty set forth
above fails of its essential purpose.
SonicWALL SSL-VPN User’s Guide
32
Index
A
Active X 13
B
bookmarks 11, 20, 22
adding 20
FTP 23
description 12
overview 20
RDP 28
remote desktop 28, 29
removing 21
services 20
bookmarks list 21
D
disconnect option 17
domains 20
downloading files
FTP 25, 26
F
file shares 11, 26, 27
desciption 12
using 26
FTP
bookmarks 23
session 25
password 24
session dialog box 24
H
home page
Virtual Office 11, 12
J
Java applications 13
L
local groups 20
local users 20
logging in 10, 11
logging out 30
login page 10, 11
N
NetExtender 8, 11, 13, 15, 16, 17
clearing log 19
connection status 18
description 12
exting the browser 19
hiding 18
installing 16
log 19
route information 18
showing 18
status fields 16
status window 16
system tray 17, 18
uninstalling 19
uninstalling on browser exit 19
viewing log 19
P
portal 15, 30
R
RDP bookmarks 28
remote desktop 28
bookmarks 29
S
services 22
SonicWALL technical support 5
SSL 8, 10, 13
SSL-VPN 3, 6, 7, 8, 9, 10, 12, 13, 14, 15, 16, 18, 20,
26
SSL-VPN access features 12
T
Terminal Server 28
U
uploading files 26
FTP 25, 26
V
Virtual Office 8, 11, 12
environments supported 12
features 15
home page 11, 12
logging out 30
making a trusted site 13
SonicWALL SSL-VPN User’s Guide
1
SonicWALL SSL-VPN User’s Guide
2
SonicWALL,Inc.
1143 Borregas Avenue
Sunnyvale,CA 94089-1306
T: 408.745.9600
F: 408.745.9300
www.sonicwall.com
© 2005 SonicWALL, Inc. SonicWALL is a registered trademark of SonicWALL, Inc. Other product and company names mentioned herein may be
trademarks and/ or registered trademarks of their respective companies. Specifications and descriptions subject to change with out notice.
P/N 232-000844-00
Rev A 09/05